JEEP COMMANDER 2008 1.G Owners Manual
COMMANDER 2008 1.G
JEEP
JEEP
https://www.carmanualsonline.info/img/16/7064/w960_7064-0.png
JEEP COMMANDER 2008 1.G Owners Manual
Trending: octane, clock reset, cooling, automatic transmission fluid, oil temperature, fog light bulb, Fuses
Page 421 of 478
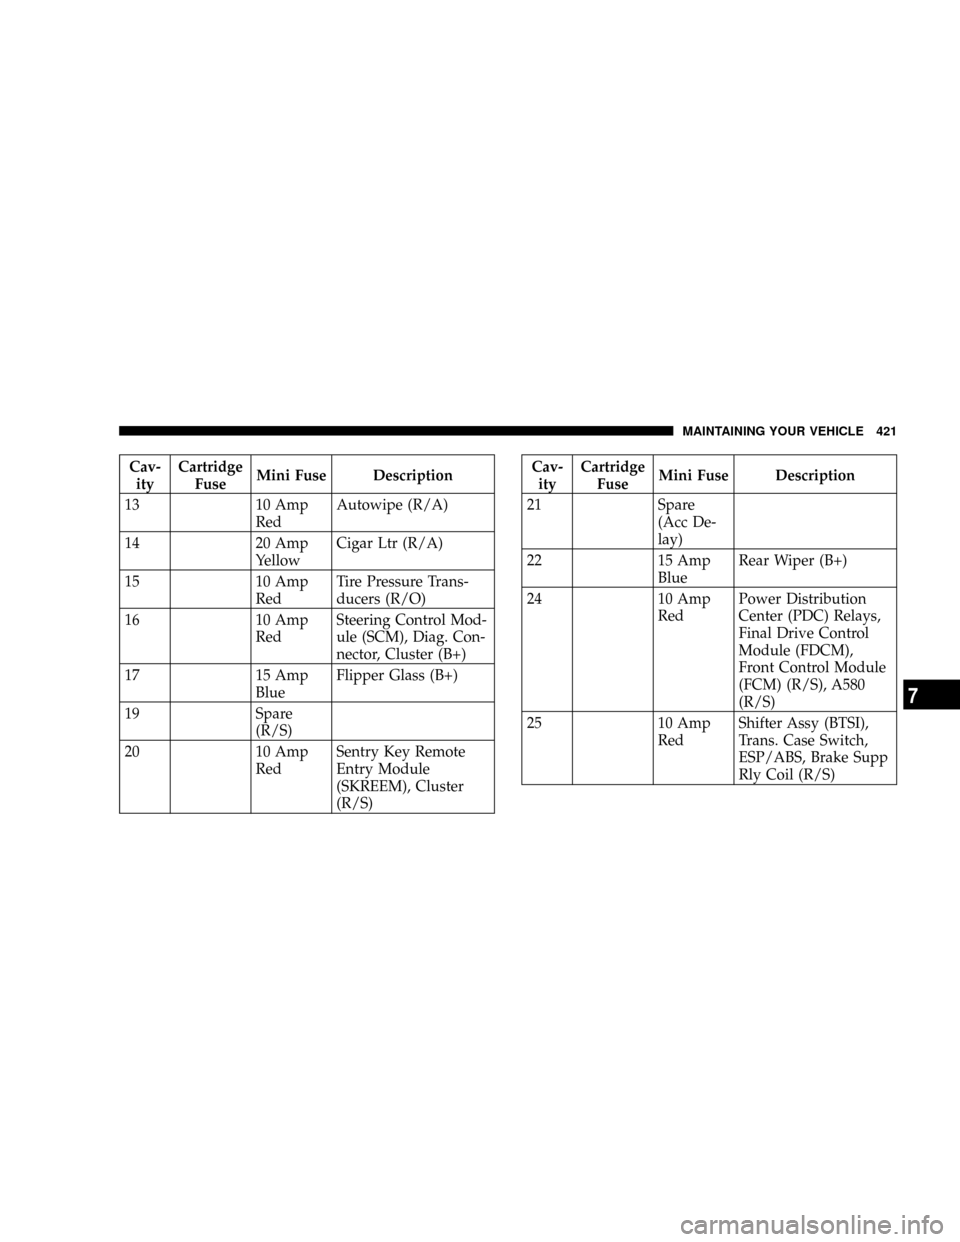
Cav-
ityCartridge
FuseMini Fuse Description
13 10 Amp
RedAutowipe (R/A)
14 20 Amp
YellowCigar Ltr (R/A)
15 10 Amp
RedTire Pressure Trans-
ducers (R/O)
16 10 Amp
RedSteering Control Mod-
ule (SCM), Diag. Con-
nector, Cluster (B+)
17 15 Amp
BlueFlipper Glass (B+)
19 Spare
(R/S)
20 10 Amp
RedSentry Key Remote
Entry Module
(SKREEM), Cluster
(R/S)Cav-
ityCartridge
FuseMini Fuse Description
21 Spare
(Acc De-
lay)
22 15 Amp
BlueRear Wiper (B+)
24 10 Amp
RedPower Distribution
Center (PDC) Relays,
Final Drive Control
Module (FDCM),
Front Control Module
(FCM) (R/S), A580
(R/S)
25 10 Amp
RedShifter Assy (BTSI),
Trans. Case Switch,
ESP/ABS, Brake Supp
Rly Coil (R/S)
MAINTAINING YOUR VEHICLE 421
7
Page 422 of 478
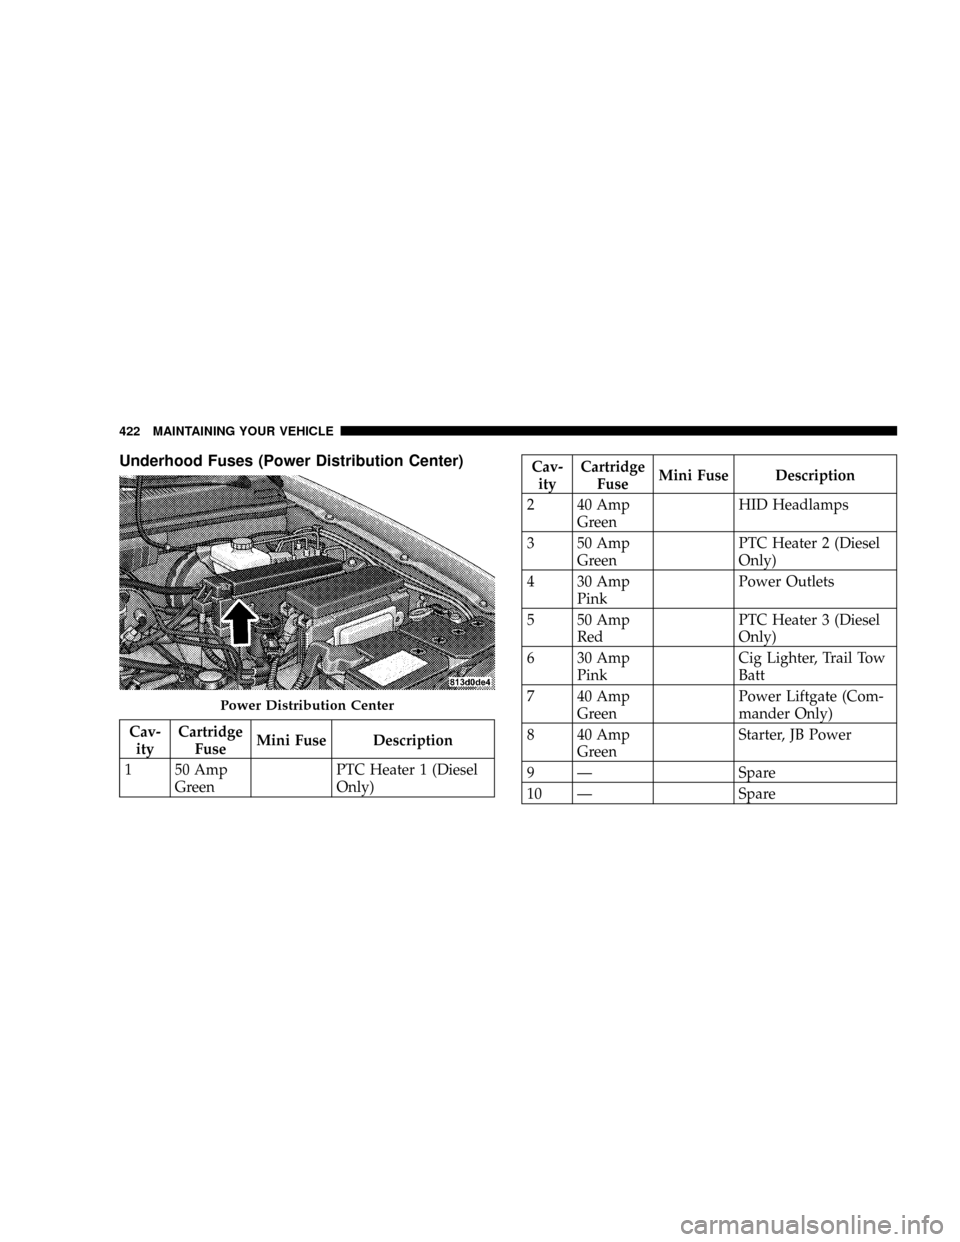
Underhood Fuses (Power Distribution Center)
Cav-
ityCartridge
FuseMini Fuse Description
1 50 Amp
GreenPTC Heater 1 (Diesel
Only)
Cav-
ityCartridge
FuseMini Fuse Description
2 40 Amp
GreenHID Headlamps
3 50 Amp
GreenPTC Heater 2 (Diesel
Only)
4 30 Amp
PinkPower Outlets
5 50 Amp
RedPTC Heater 3 (Diesel
Only)
6 30 Amp
PinkCig Lighter, Trail Tow
Batt
7 40 Amp
GreenPower Liftgate (Com-
mander Only)
8 40 Amp
GreenStarter, JB Power
9 Ð Spare
10 Ð Spare
Power Distribution Center
422 MAINTAINING YOUR VEHICLE
Page 423 of 478
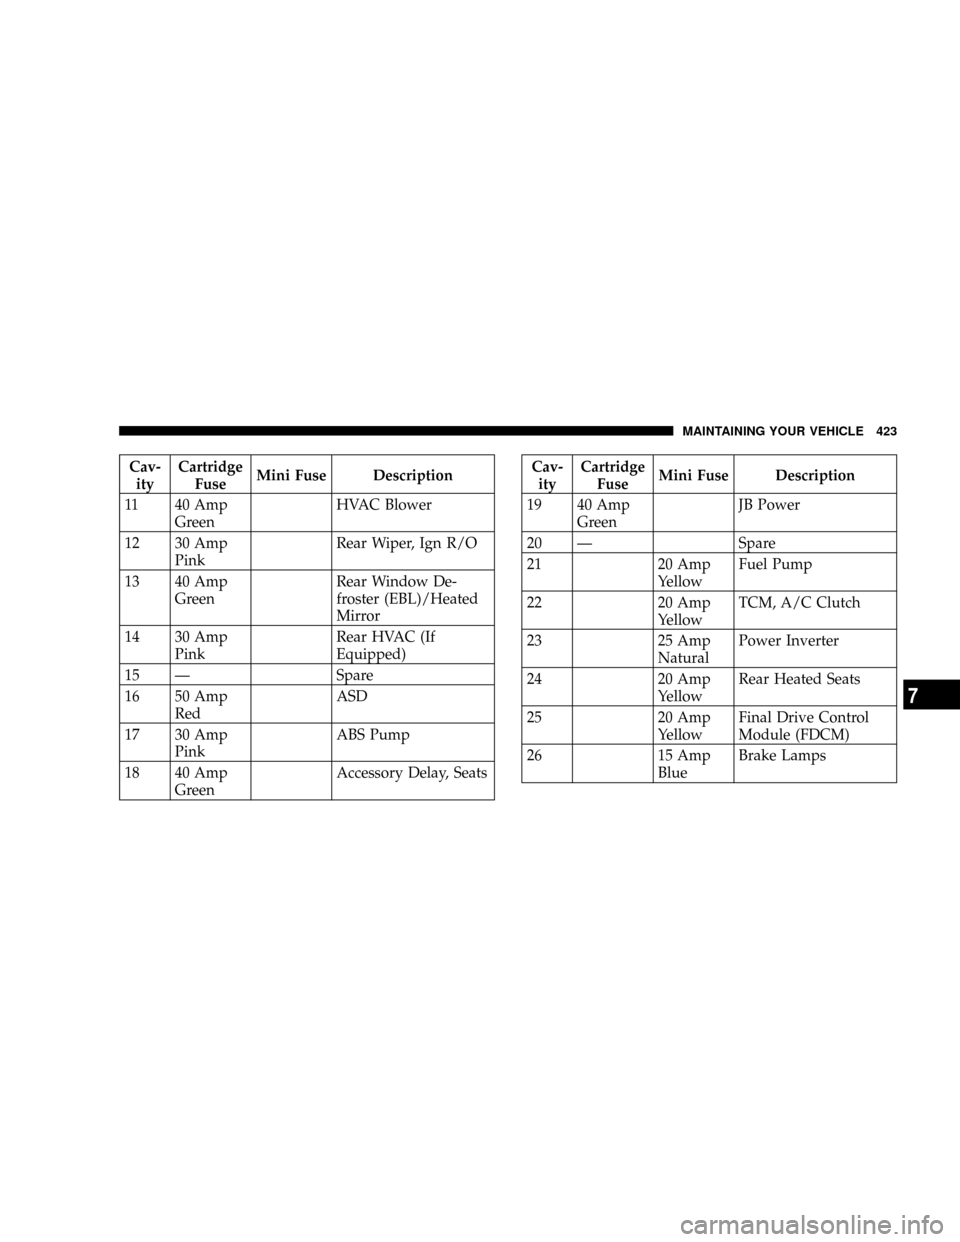
Cav-
ityCartridge
FuseMini Fuse Description
11 40 Amp
GreenHVAC Blower
12 30 Amp
PinkRear Wiper, Ign R/O
13 40 Amp
GreenRear Window De-
froster (EBL)/Heated
Mirror
14 30 Amp
PinkRear HVAC (If
Equipped)
15 Ð Spare
16 50 Amp
RedASD
17 30 Amp
PinkABS Pump
18 40 Amp
GreenAccessory Delay, SeatsCav-
ityCartridge
FuseMini Fuse Description
19 40 Amp
GreenJB Power
20 Ð Spare
21 20 Amp
YellowFuel Pump
22 20 Amp
YellowTCM, A/C Clutch
23 25 Amp
NaturalPower Inverter
24 20 Amp
YellowRear Heated Seats
25 20 Amp
YellowFinal Drive Control
Module (FDCM)
26 15 Amp
BlueBrake Lamps
MAINTAINING YOUR VEHICLE 423
7
Page 424 of 478
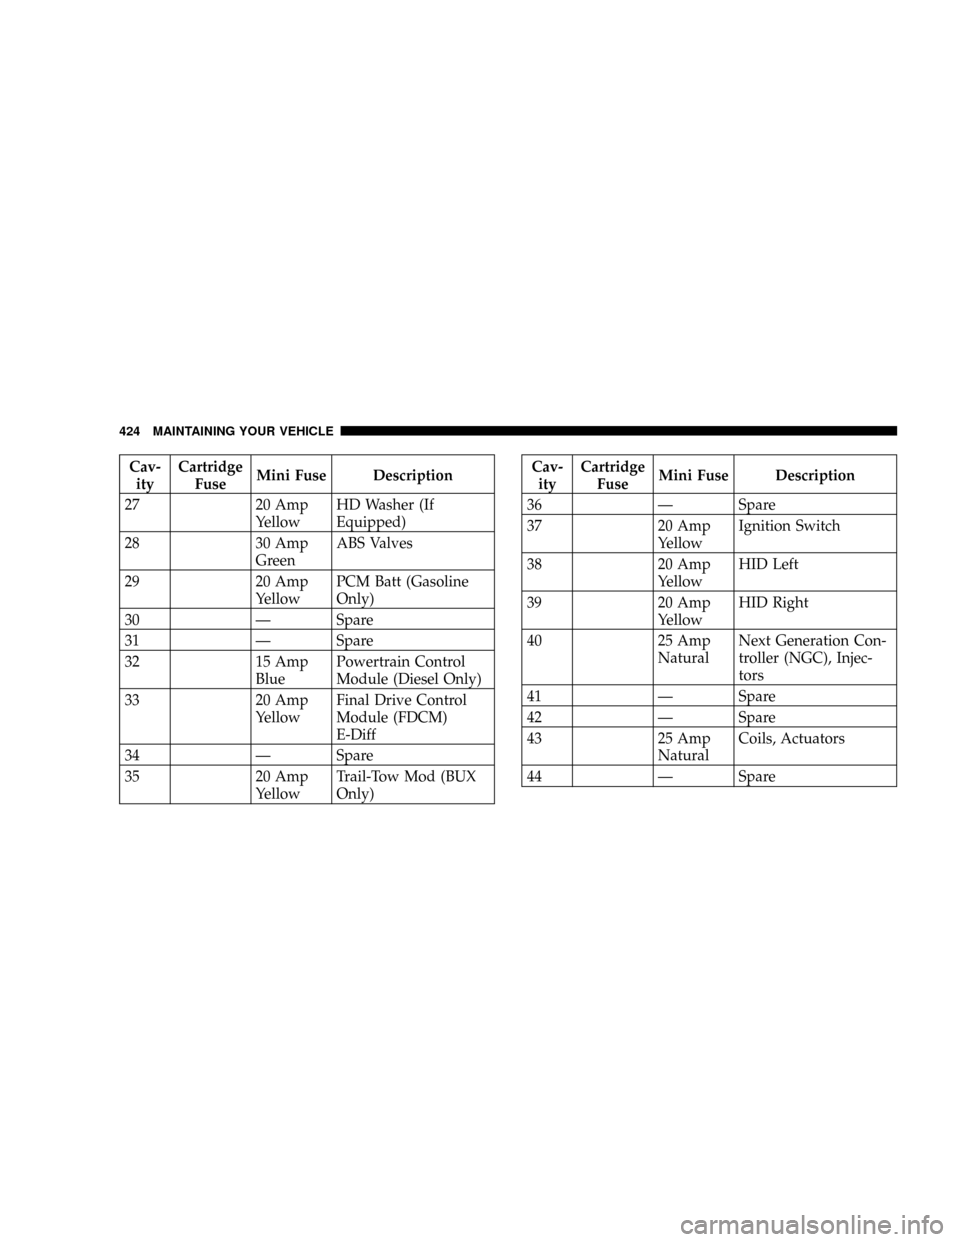
Cav-
ityCartridge
FuseMini Fuse Description
27 20 Amp
YellowHD Washer (If
Equipped)
28 30 Amp
GreenABS Valves
29 20 Amp
YellowPCM Batt (Gasoline
Only)
30 Ð Spare
31 Ð Spare
32 15 Amp
BluePowertrain Control
Module (Diesel Only)
33 20 Amp
YellowFinal Drive Control
Module (FDCM)
E-Diff
34 Ð Spare
35 20 Amp
YellowTrail-Tow Mod (BUX
Only)Cav-
ityCartridge
FuseMini Fuse Description
36 Ð Spare
37 20 Amp
YellowIgnition Switch
38 20 Amp
YellowHID Left
39 20 Amp
YellowHID Right
40 25 Amp
NaturalNext Generation Con-
troller (NGC), Injec-
tors
41 Ð Spare
42 Ð Spare
43 25 Amp
NaturalCoils, Actuators
44 Ð Spare
424 MAINTAINING YOUR VEHICLE
Page 425 of 478
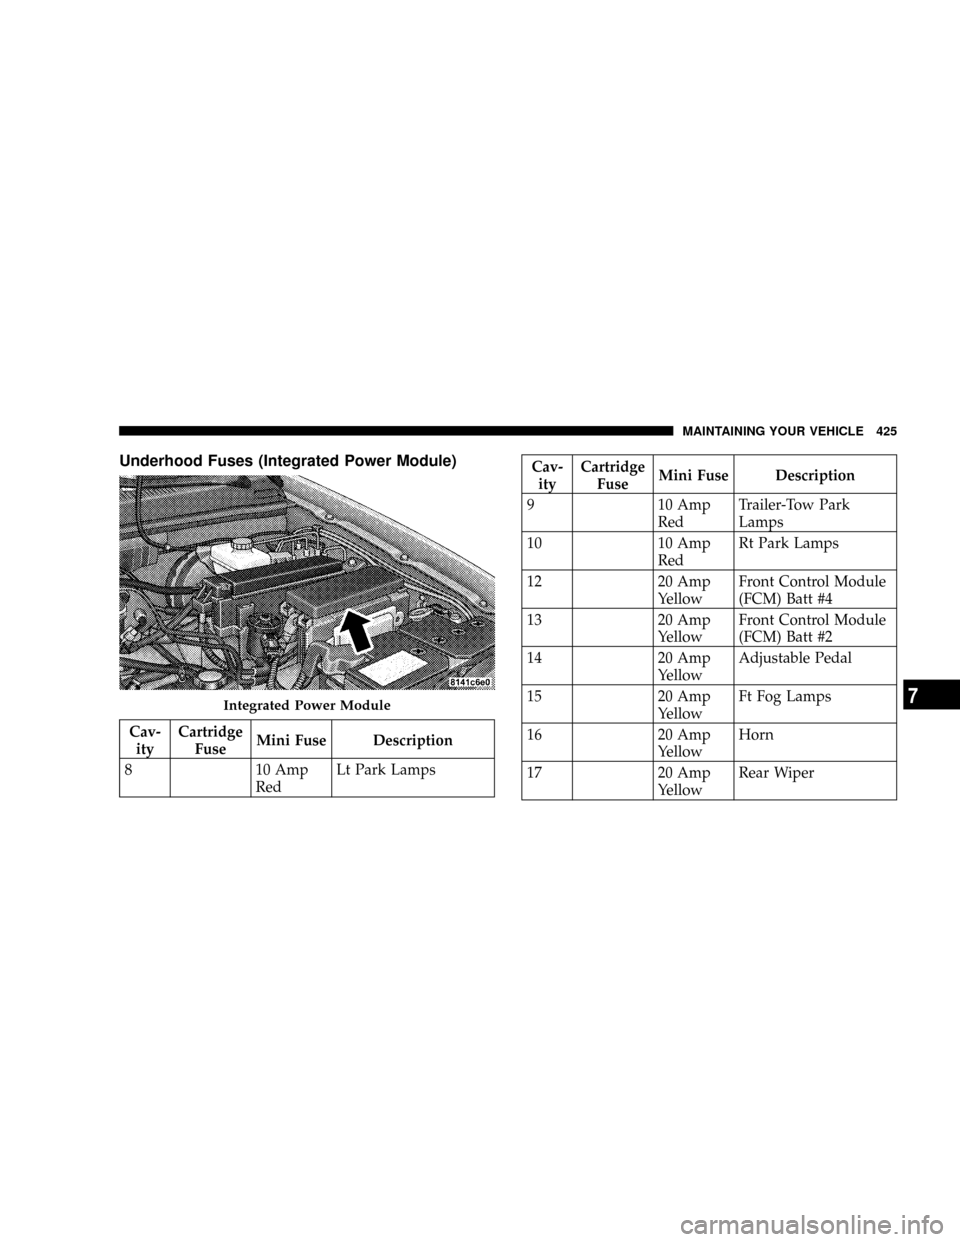
Underhood Fuses (Integrated Power Module)
Cav-
ityCartridge
FuseMini Fuse Description
8 10 Amp
RedLt Park Lamps
Cav-
ityCartridge
FuseMini Fuse Description
9 10 Amp
RedTrailer-Tow Park
Lamps
10 10 Amp
RedRt Park Lamps
12 20 Amp
YellowFront Control Module
(FCM) Batt #4
13 20 Amp
YellowFront Control Module
(FCM) Batt #2
14 20 Amp
YellowAdjustable Pedal
15 20 Amp
YellowFt Fog Lamps
16 20 Amp
YellowHorn
17 20 Amp
YellowRear Wiper
Integrated Power Module
MAINTAINING YOUR VEHICLE 425
7
Page 426 of 478
Cav-
ityCartridge
FuseMini Fuse Description
18 20 Amp
YellowFront Control Module
(FCM) Batt #1
19 20 Amp
YellowLt Trailer-Tow Stop/
Turn
20 20 Amp
YellowFront Control Module
(FCM) Batt #3
21 20 Amp
YellowRt Trailer-Tow Stop/
Turn
22 30 Amp
PinkFinal Drive Control
Module (FDCM)
MOD
23 50 Amp
RedRadiator Fan
27 15 Amp
BlueIgnition Off Draw
(IOD) #1
28 20 Amp
YellowIgnition Off Draw
(IOD) #2Cav-
ityCartridge
FuseMini Fuse Description
29 10 Amp
RedOccupant Restraint
Controller (ORC) R/S
30 10 Amp
RedOccupant Restraint
Controller (ORC) R/O
VEHICLE STORAGE
If you are leaving your vehicle dormant for more than 21
days you may want to take steps to protect your battery.
You may:
²Remove fuse #27 in the Intelligent Power Module
labeled Ignition-Off Draw (IOD#1).
²Or, disconnect the negative cable from the battery.
426 MAINTAINING YOUR VEHICLE
Page 427 of 478

²Anytime you store your vehicle, or keep it out of
service (i.e. vacation) for two weeks or more, run the
air conditioning system at idle for about five minutes
in the fresh air and high blower setting. This will
insure adequate system lubrication to minimize the
possibility of compressor damage when the system is
started again.
REPLACEMENT BULBS
Interior Lights Bulb Type
Glove Box Light......................... 194
Grab Handle Light................L002825W5W
Overhead Console Reading Lights..........VT4976
Rear Cargo Light.......................214±2
Visor Vanity Light.....................V26377
Underpanel Courtesy Lights................. 906
Instrument Cluster (General Illumination)....... 103
Telltale/Hazard Light...................... 74
* Available only from authorized dealers.Exterior Lights Bulb Type
Backup Lights.........................3057K
Front Fog Lights........................9145
Front Park/Turn Light...................3157A
Front Side Marker...................... W5W
Headlights (Low Beam)...................9006
Headlights (High Beam)...................9005
Rear Turn/Stop/Tail Lights...............3057K
NOTE:Numbers refer to commercial bulb types that
can be purchased from your authorized dealer.
If a bulb needs to be replaced, visit your authorized
dealer or refer to the applicable Service Manual.
MAINTAINING YOUR VEHICLE 427
7
Page 428 of 478
BULB REPLACEMENT
Head Light
1. Open the hood.
2. Remove the headlamp cover.
Insert a finger into each hole of the headlamp cover, and
pull upward to unsnap the rear edge of the cover from
the two upper lamp mounting brackets. Slide the cover
rearward to disengage the front edge from beneath the
tab on the top near the front of the lamp housing.
3. Disconnect the electrical connector.
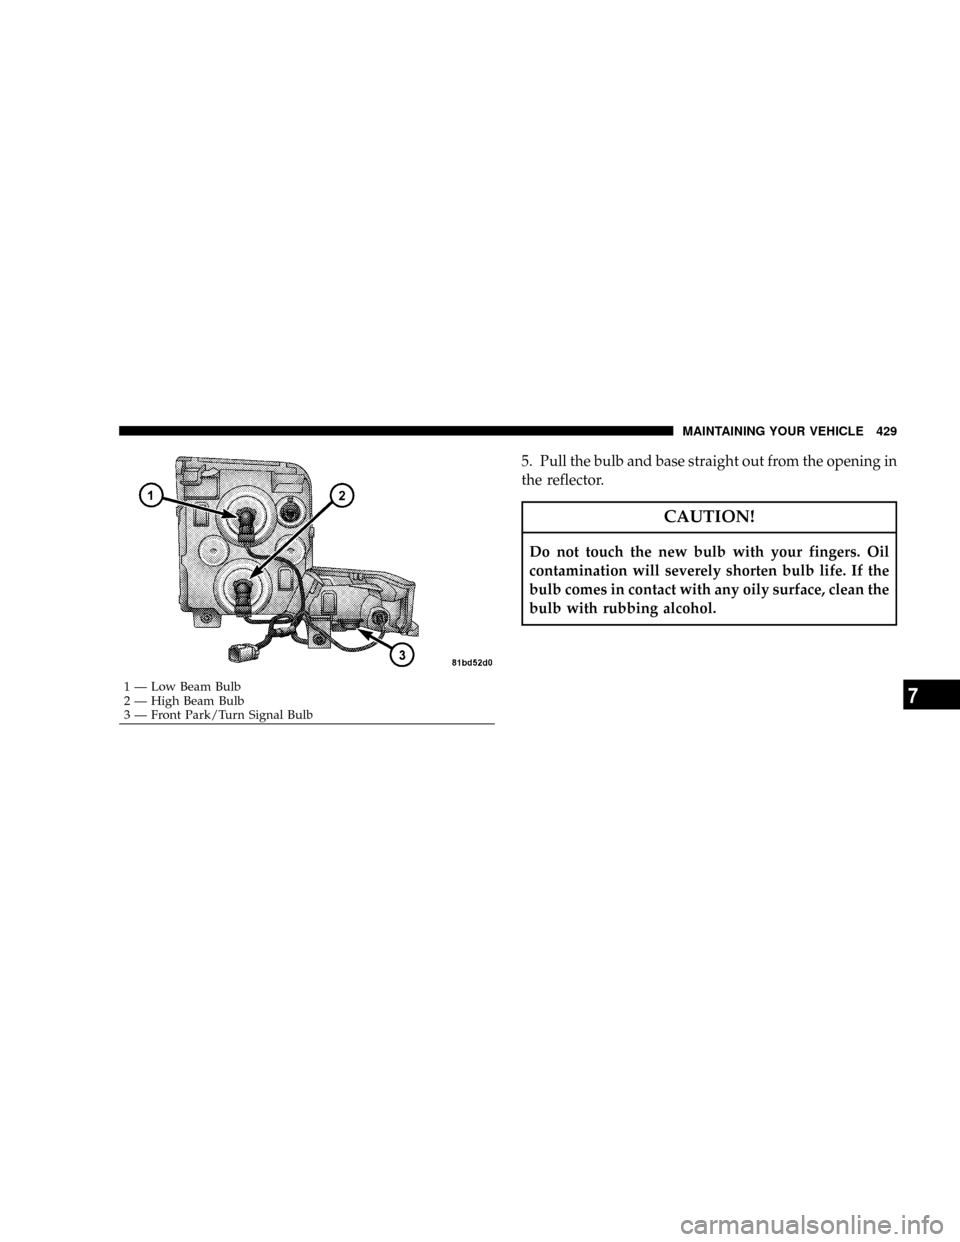
4. Turn the low or high beam bulb 1/4 turn counter
clockwise to unlock it from the housing.
428 MAINTAINING YOUR VEHICLE
Page 429 of 478
5. Pull the bulb and base straight out from the opening in
the reflector.
CAUTION!
Do not touch the new bulb with your fingers. Oil
contamination will severely shorten bulb life. If the
bulb comes in contact with any oily surface, clean the
bulb with rubbing alcohol.
1 Ð Low Beam Bulb
2 Ð High Beam Bulb
3 Ð Front Park/Turn Signal BulbMAINTAINING YOUR VEHICLE 4297
Page 430 of 478
Front Turn Signal
1. Turn the steering wheel all the way to the left or right.
2. Reach into the front wheel house ahead of the front
wheel to unsnap and lift the cover over the access hole in
the front of the wheel house splash shield. Access to the
bulb can be gained through the wheel liner hole.3. Reach through the access hole to access the park/turn
signal bulb socket on the bottom of the front lamp unit
housing.
1 Ð Low Beam Bulb
2 Ð High Beam Bulb
3 Ð Front Park/Turn Signal Bulb 430 MAINTAINING YOUR VEHICLE
Trending: radio, remove seats, rear entertainment, fuse box, RAIN SENSOR, fuel cap release, reset sun roof
