instrument cluster JEEP COMMANDER 2010 1.G User Guide
[x] Cancel search | Manufacturer: JEEP, Model Year: 2010, Model line: COMMANDER, Model: JEEP COMMANDER 2010 1.GPages: 78, PDF Size: 7.31 MB
Page 3 of 78
INTRODUCTION/WELCOME
WELCOME FROM
CHRYSLER GROUP LLC.......... 2
CONTROLS AT A GLANCE
DRIVER COCKPIT.............. 4
INSTRUMENT CLUSTER .......... 6
GETTING STARTED
KEYFOB .................. 8
THEFT ALARM............... 9
SEAT BELT ................. 9
FRONT SEATS ...............10
REAR SEATS ................13
TILT/TELESCOPING STEERING
COLUMN ..................15
ADJUSTABLE PEDALS ...........16
PROGRAMMABLE FEATURES .......16
OPERATING YOUR VEHICLE
TURN SIGNAL/LIGHTS LEVER .......17
WIPER/WASHER LEVER ..........18
SPEED CONTROL LEVER .........19
ELECTRONIC RANGE SELECT (ERS) . . . 20
MANUAL CLIMATE CONTROLS ......20
AUTOMATIC TEMPERATURE CONTROLS
(ATC) ....................21
PARKSENSE
®REAR PARK ASSIST ....22
PARKVIEW®REAR BACK-UP CAMERA . . 22
POWER LIFTGATE .............23
LIFTGATE FLIPPER GLASS ........23
POWER SUNROOF .............23
WIND BUFFETING .............24
ELECTRONICS
NON-TOUCH-SCREEN RADIOS ......25
TOUCH-SCREEN RADIOS .........27
REMOTE AUDIO CONTROLS ........31
VIDEO ENTERTAINMENT SYSTEM
(VES)™ ...................31
ELECTRONIC VEHICLE INFORMATION
CENTER (EVIC) ...............33
UNIVERSAL GARAGE DOOR OPENER . . . 33
POWER INVERTER .............34
POWER OUTLET ..............35
uconnect™ phone .............35
VOICE RECOGNITION ............37
OFF-ROAD CAPABILITIES
FOUR-WHEEL DRIVE OPERATION .....38
UTILITY
INTERIOR STORAGE COMPARTMENTS . . 40
TRAILER TOWING WEIGHTS (MAXIMUM
TRAILER WEIGHT RATINGS)........41
RECREATIONAL TOWING (BEHIND
MOTORHOME, ETC.) ............42
BRAKE/TRANSMISSION INTERLOCK
MANUAL OVERRIDE ............43
WHAT TO DO IN EMERGENCIES
24 HOUR TOWING ASSISTANCE ......44
INSTRUMENT CLUSTER WARNING
LIGHTS ...................44
IF YOUR ENGINE OVERHEATS .......47
JACKING AND TIRE CHANGING ......48
JUMP-STARTING ..............51
EMERGENCY TOW HOOKS .........53
TOWING A DISABLED VEHICLE ......54
EVENT DATA RECORDER (EDR) ......55
MAINTAINING YOUR VEHICLE
OPENING THE HOOD............56
ENGINE COMPARTMENT .........57
FLUIDS AND CAPACITIES .........59
MAINTENANCE CHART ..........60
FUSES ...................62
TIRE PRESSURES .............67
WHEEL AND WHEEL TRIM CARE .....68
EXTERIOR BULBS .............68
CONSUMER ASSISTANCE
CHRYSLER GROUP LLC CUSTOMER
CENTER...................69
CHRYSLER CANADA INC. CUSTOMER
CENTER ...................69
ASSISTANCE FOR THE HEARING
IMPAIRED ..................69
PUBLICATIONS ORDERING ........69
REPORTING SAFETY DEFECTS IN
THE 50 UNITED STATES AND
WASHINGTON, D.C. ............70
TIRE WARRANTY ..............70
MOPAR ACCESSORIES
MOPAR®ACCESSORIES..........73
TABLE OF CONTENTS
Page 8 of 78
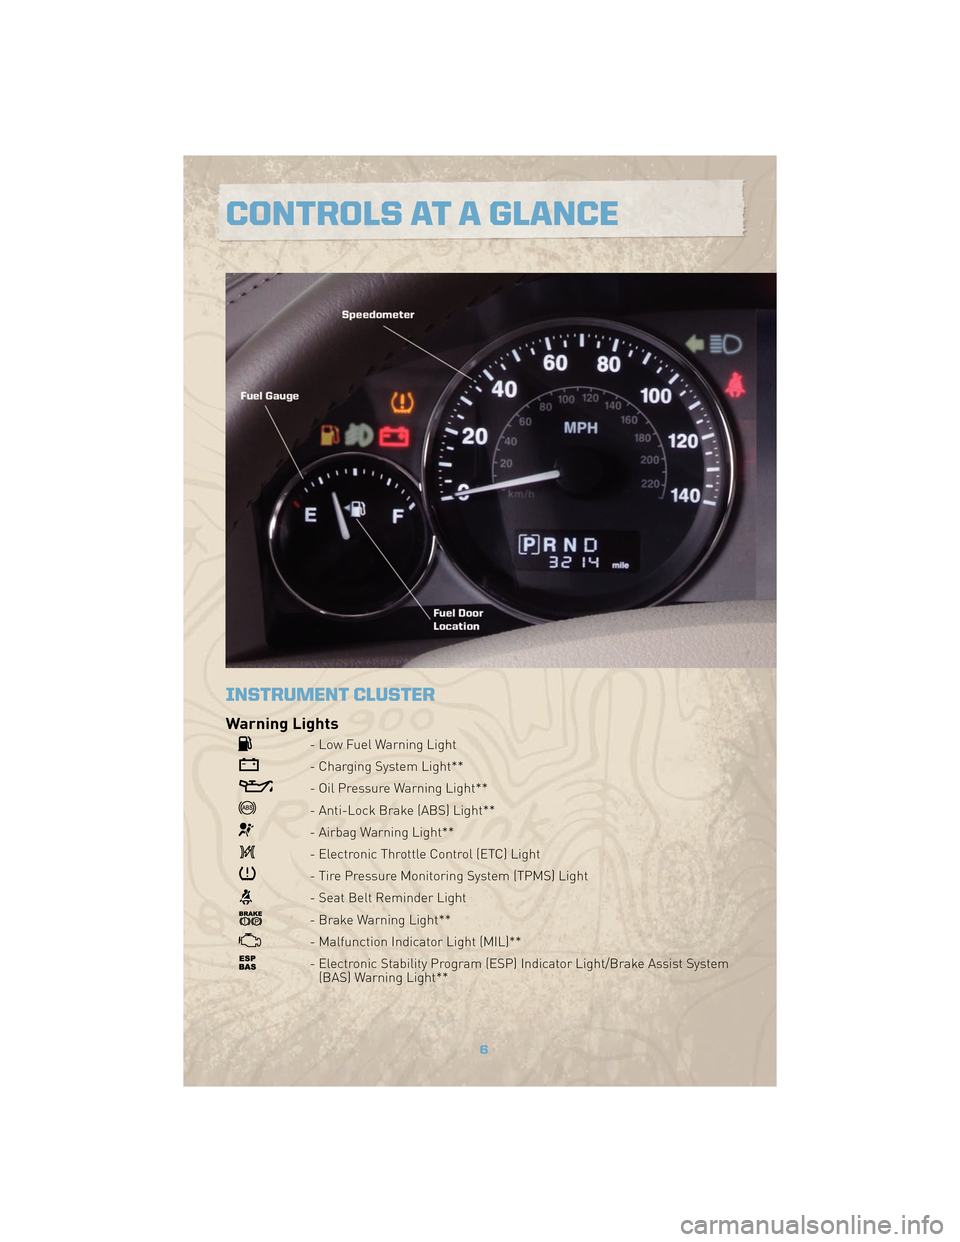
INSTRUMENT CLUSTER
Warning Lights
- Low Fuel Warning Light
- Charging System Light**
- Oil Pressure Warning Light**
- Anti-Lock Brake (ABS) Light**
- Airbag Warning Light**
- Electronic Throttle Control (ETC) Light
- Tire Pressure Monitoring System (TPMS) Light
- Seat Belt Reminder Light
- Brake Warning Light**
- Malfunction Indicator Light (MIL)**
- Electronic Stability Program (ESP) Indicator Light/Brake Assist System(BAS) Warning Light**
6
CONTROLS AT A GLANCE
Page 21 of 78
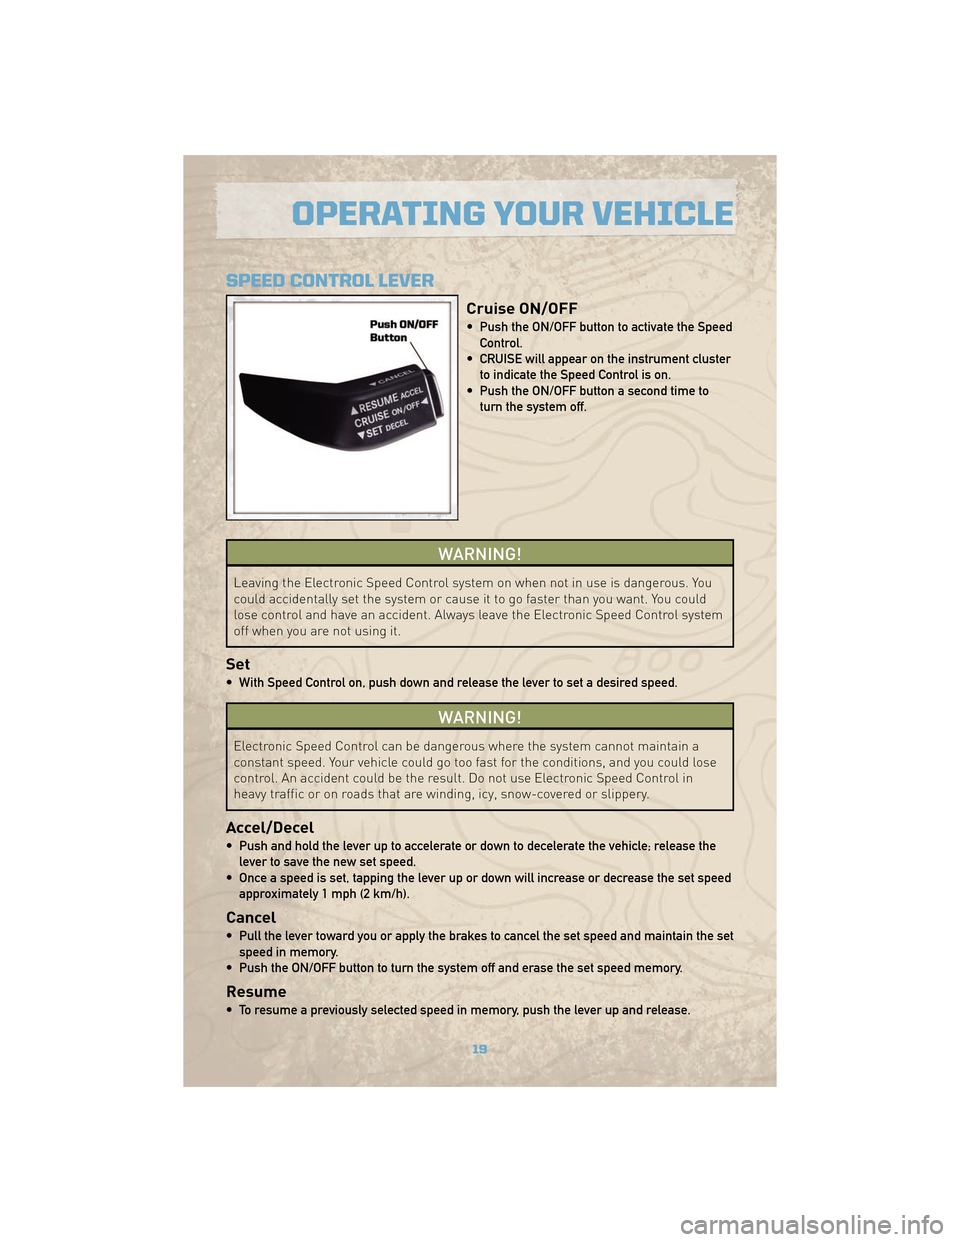
SPEED CONTROL LEVER
Cruise ON/OFF
• Push the ON/OFF button to activate the SpeedControl.
• CRUISE will appear on the instrument cluster to indicate the Speed Control is on.
• Push the ON/OFF button a second time to turn the system off.
WARNING!
Leaving the Electronic Speed Control system on when not in use is dangerous. You
could accidentally set the system or cause it to go faster than you want. You could
lose control and have an accident. Always leave the Electronic Speed Control system
off when you are not using it.
Set
• With Speed Control on, push down and release the lever to set a desired speed.
WARNING!
Electronic Speed Control can be dangerous where the system cannot maintain a
constant speed. Your vehicle could go too fast for the conditions, and you could lose
control. An accident could be the result. Do not use Electronic Speed Control in
heavy traffic or on roads that are winding, icy, snow-covered or slippery.
Accel/Decel
• Push and hold the lever up to accelerate or down to decelerate the vehicle; release thelever to save the new set speed.
• Once a speed is set, tapping the lever up or down will increase or decrease the set speed approximately 1 mph (2 km/h).
Cancel
• Pull the lever toward you or apply the brakes to cancel the set speed and maintain the setspeed in memory.
• Push the ON/OFF button to turn the system off and erase the set speed memory.
Resume
• To resume a previously selected speed in memory, push the lever up and release.
19
OPERATING YOUR VEHICLE
Page 22 of 78
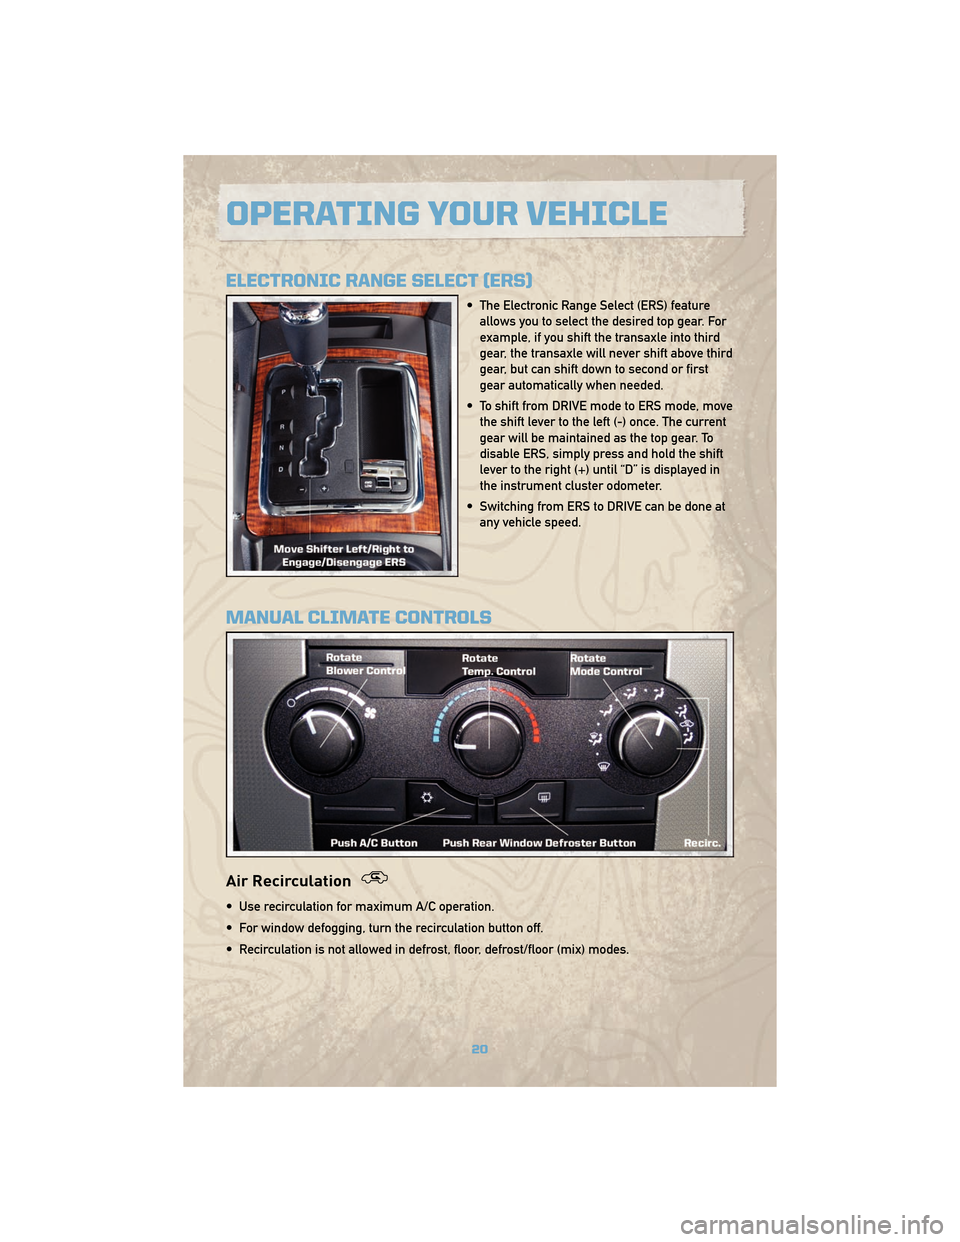
ELECTRONIC RANGE SELECT (ERS)
• The Electronic Range Select (ERS) featureallows you to select the desired top gear. For
example, if you shift the transaxle into third
gear, the transaxle will never shift above third
gear, but can shift down to second or first
gear automatically when needed.
• To shift from DRIVE mode to ERS mode, move the shift lever to the left (-) once. The current
gear will be maintained as the top gear. To
disable ERS, simply press and hold the shift
lever to the right (+) until “D” is displayed in
the instrument cluster odometer.
• Switching from ERS to DRIVE can be done at any vehicle speed.
MANUAL CLIMATE CONTROLS
Air Recirculation
• Use recirculation for maximum A/C operation.
• For window defogging, turn the recirculation button off.
• Recirculation is not allowed in defrost, floor, defrost/floor (mix) modes.
OPERATING YOUR VEHICLE
20
Page 35 of 78
ELECTRONIC VEHICLE INFORMATION CENTER (EVIC)
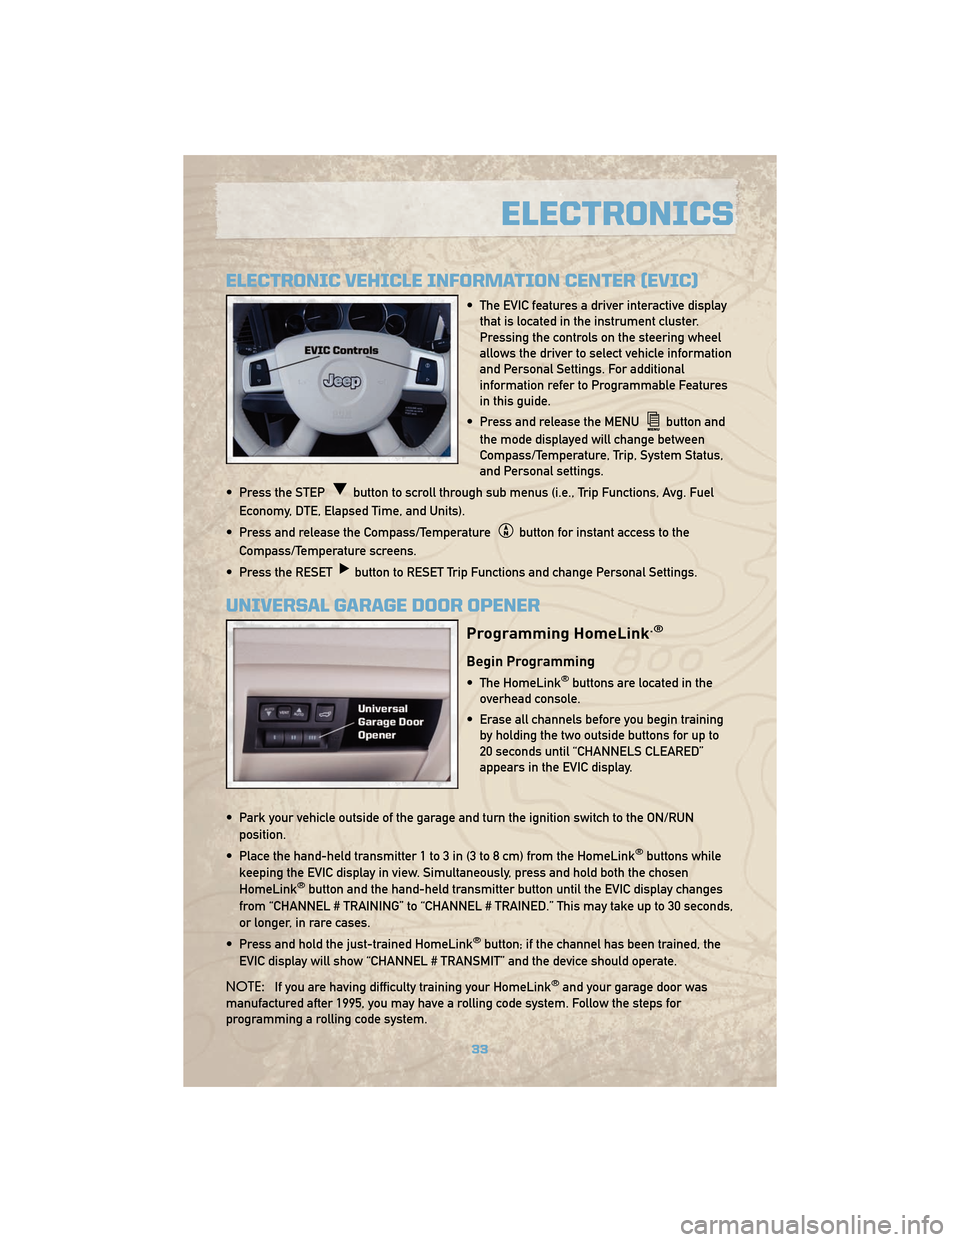
• The EVIC features a driver interactive displaythat is located in the instrument cluster.
Pressing the controls on the steering wheel
allows the driver to select vehicle information
and Personal Settings. For additional
information refer to Programmable Features
in this guide.
• Press and release the MENU
button and
the mode displayed will change between
Compass/Temperature, Trip, System Status,
and Personal settings.
• Press the STEP
button to scroll through sub menus (i.e., Trip Functions, Avg. Fuel
Economy, DTE, Elapsed Time, and Units).
• Press and release the Compass/Temperature
button for instant access to the
Compass/Temperature screens.
• Press the RESET
button to RESET Trip Functions and change Personal Settings.
UNIVERSAL GARAGE DOOR OPENER
Programming HomeLink.®
Begin Programming
• The HomeLink®buttons are located in the
overhead console.
• Erase all channels before you begin training by holding the two outside buttons for up to
20 seconds until “CHANNELS CLEARED”
appears in the EVIC display.
• Park your vehicle outside of the garage and turn the ignition switch to the ON/RUN position.
• Place the hand-held transmitter 1 to 3 in (3 to 8 cm) from the HomeLink
®buttons while
keeping the EVIC display in view. Simultaneously, press and hold both the chosen
HomeLink
®button and the hand-held transmitter button until the EVIC display changes
from “CHANNEL # TRAINING” to “CHANNEL # TRAINED.” This may take up to 30 seconds,
or longer, in rare cases.
• Press and hold the just-trained HomeLink
®button; if the channel has been trained, the
EVIC display will show “CHANNEL # TRANSMIT” and the device should operate.
NOTE: If you are having difficulty training your HomeLink
®and your garage door was
manufactured after 1995, you may have a rolling code system. Follow the steps for
programming a rolling code system.
33
ELECTRONICS
Page 41 of 78
Shifting Procedures
4WD HI To 4WD LOW
• With the vehicle at speeds of 0 to 3 mph(0 to 5 km/h), key ON or engine
running, shift the transmission into
NEUTRAL, and raise the transfer case
T-handle. The “4WD LOW” indicator
light in the instrument cluster will
begin to flash and remain on solid
when the shift is complete. Release the
T-handle.
• Shifting into or out of 4WD LOW is possible with the vehicle completely
stopped; however, difficulty may occur
due to the mating clutch teeth not being
properly aligned. Several attempts may
be required for clutch teeth alignment
and shift completion to occur. The
preferred method is with the vehicle
rolling 0 to 3 mph (0 to 5 km/h). If the
vehicle is moving faster than 3 mph
(5 km/h), the transfer case will not
allow the shift.
4WD LOW To 4WD HI
• With the vehicle at speeds of 0 to 3 mph(0 to 5 km/h), key ON or engine
running, shift the transmission into
NEUTRAL, and raise the transfer case
T-handle. The “4WD LOW” indicator
light in the instrument cluster will flash
and go out when the shift is complete.
Release the T-handle.
NEUTRAL Shift Procedure
• Key ON, engine off.
• Vehicle stopped, with foot on brake.
• Place the transmission into NEUTRAL.
• Hold down the NEUTRAL “pin” switch
(with a pen, etc.) for four seconds until
the LED light by the switch starts to
blink indicating shift in progress. The
light will stop blinking (stay on solid)
when the NEUTRAL shift is complete. A
“4WD SYSTEM IN NEUTRAL” message
will display on the Electronic Vehicle
Information Center (EVIC).
• Repeat these Steps to shift out of NEUTRAL.
39
OFF-ROAD CAPABILITIES
Page 46 of 78
24 HOUR TOWING ASSISTANCE
• Dial toll-free 1-800-521-2779.
• Provide your name, vehicle identification number and license plate number.
• Provide your location, including telephone number, from which you are calling.
• Briefly describe the nature of the problem and answer a few simple questions.
• You will be given the name of the service provider and an estimated time of arrival. If youfeel you are in an “unsafe situation”, please let us know. With your consent, we will
contact local police or safety authorities.
INSTRUMENT CLUSTER WARNING LIGHTS
- Electronic Stability Program (ESP) Indicator Light
• If this indicator light flashes during acceleration, apply as little throttle as possible. Whiledriving, ease up on the accelerator. Adapt your speed and driving to the prevailing road
conditions. To improve the vehicles traction when starting off in deep snow, sand or
gravel, it may be desirable to switch the ESP system off.
- Tire Pressure Monitoring System (TPMS) Light
• A Tire Pressure Monitoring Light and a “low tire” message will display in your instrumentcluster along with an audible chime if one or more of your vehicle’s four road tires are
significantly under-inflated.
• Check the inflation pressure of each tire and inflate to the recommended pressure for your vehicle. The tire pressures recommended for your vehicle are found on the “Tire and
Loading Information” label located on the driver’s side door opening. The TPMS light
should not be used as a tire pressure gauge when adjusting your tire pressure.
• It is recommended that you check the tire pressure in the morning when tires are cool; inflate each tire to the recommended pressure for your vehicle. The light will turn off
after your vehicle’s tire pressures are properly inflated and the pressure has been
recognized. The vehicle may need to be driven for up to 20 minutes above 15 mph
(25 km/h) before the light will turn off.
• Temperature changes can affect tire pressure, causing the TPMS light to turn on. Tire pressures will also increase as the vehicle is driven – this is normal and you should not
adjust for this increased pressure.
• Driving on under-inflated tires reduces your vehicle’s fuel efficiency and tire tread life. If a spare tire is in use on the vehicle, the TPMS light may turn on.
- Brake Warning Light
• The Brake Warning light illuminates when there is either a system malfunction or theparking brake is applied. If the light is on and the parking brake is not applied, it
indicates a possible brake hydraulic malfunction, brake booster problem or an Anti-Lock
Brake System problem.
• We recommend you drive to the nearest Service Center and have the vehicle serviced immediately.
WHAT TO DO IN EMERGENCIES
44
Page 68 of 78
Interior Fuses
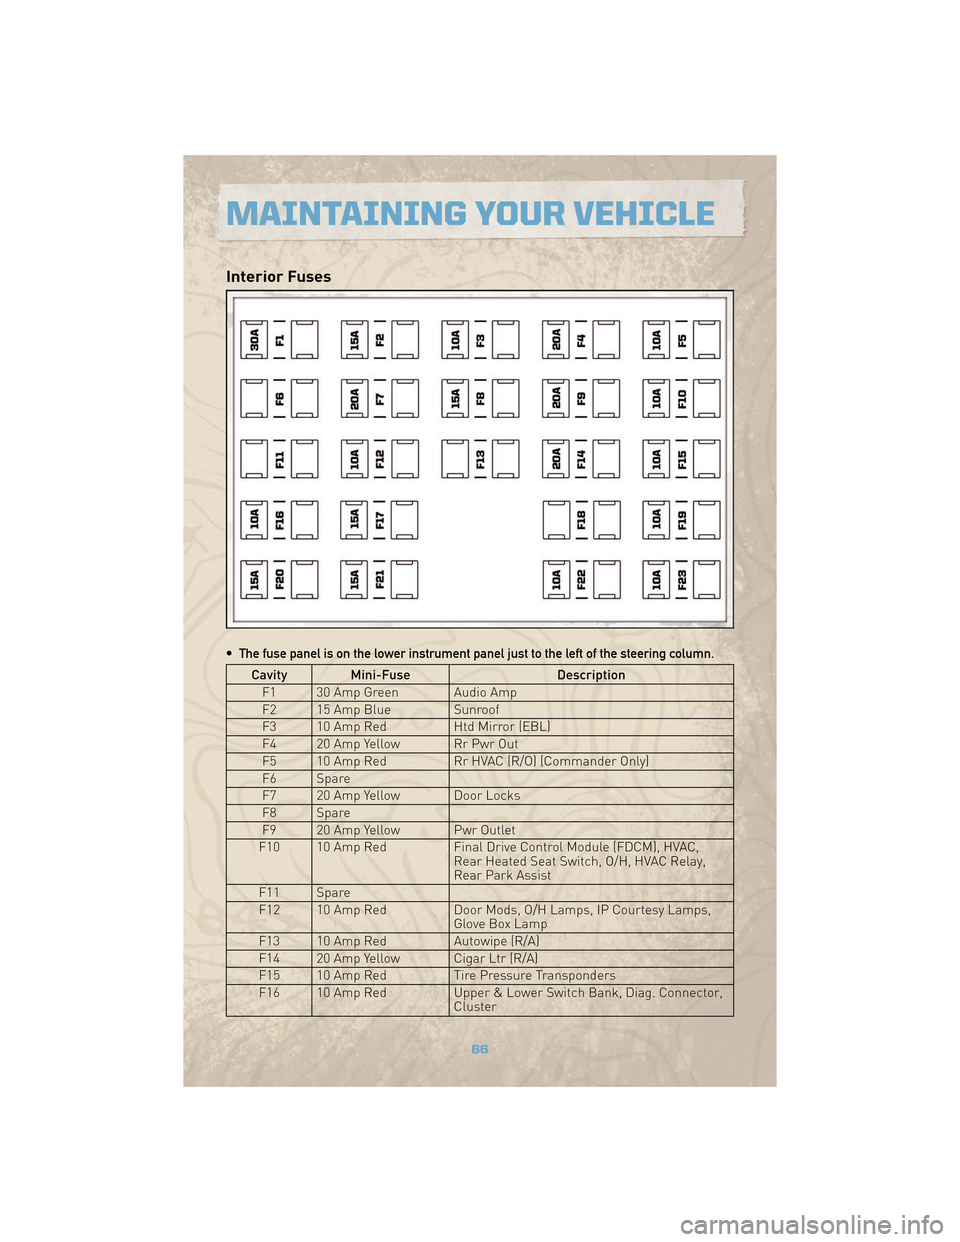
• The fuse panel is on the lower instrument panel just to the left of the steering column.
Cavity Mini-FuseDescription
F1 30 Amp Green Audio Amp
F2 15 Amp Blue Sunroof
F3 10 Amp Red Htd Mirror (EBL)
F4 20 Amp Yellow Rr Pwr Out
F5 10 Amp Red Rr HVAC (R/O) (Commander Only)
F6 Spare
F7 20 Amp Yellow Door Locks
F8 Spare
F9 20 Amp Yellow Pwr Outlet
F10 10 Amp Red Final Drive Control Module (FDCM), HVAC,
Rear Heated Seat Switch, O/H, HVAC Relay,
Rear Park Assist
F11 Spare
F12 10 Amp Red Door Mods, O/H Lamps, IP Courtesy Lamps,
Glove Box Lamp
F13 10 Amp Red Autowipe (R/A)
F14 20 Amp Yellow Cigar Ltr (R/A)
F15 10 Amp Red Tire Pressure Transponders
F16 10 Amp Red Upper & Lower Switch Bank, Diag. Connector,
Cluster
MAINTAINING YOUR VEHICLE
66