ad blue JEEP COMPASS 2011 1.G User Guide
[x] Cancel search | Manufacturer: JEEP, Model Year: 2011, Model line: COMPASS, Model: JEEP COMPASS 2011 1.GPages: 80, PDF Size: 3.09 MB
Page 35 of 80
•Sports Scores
• View scores and upcoming events for all major sports.
• Your favorite location, theater and sports teams can be stored for quick access.
• Refer to your Media Center 430/430N (RBZ/RHB) User's Manual for more details.
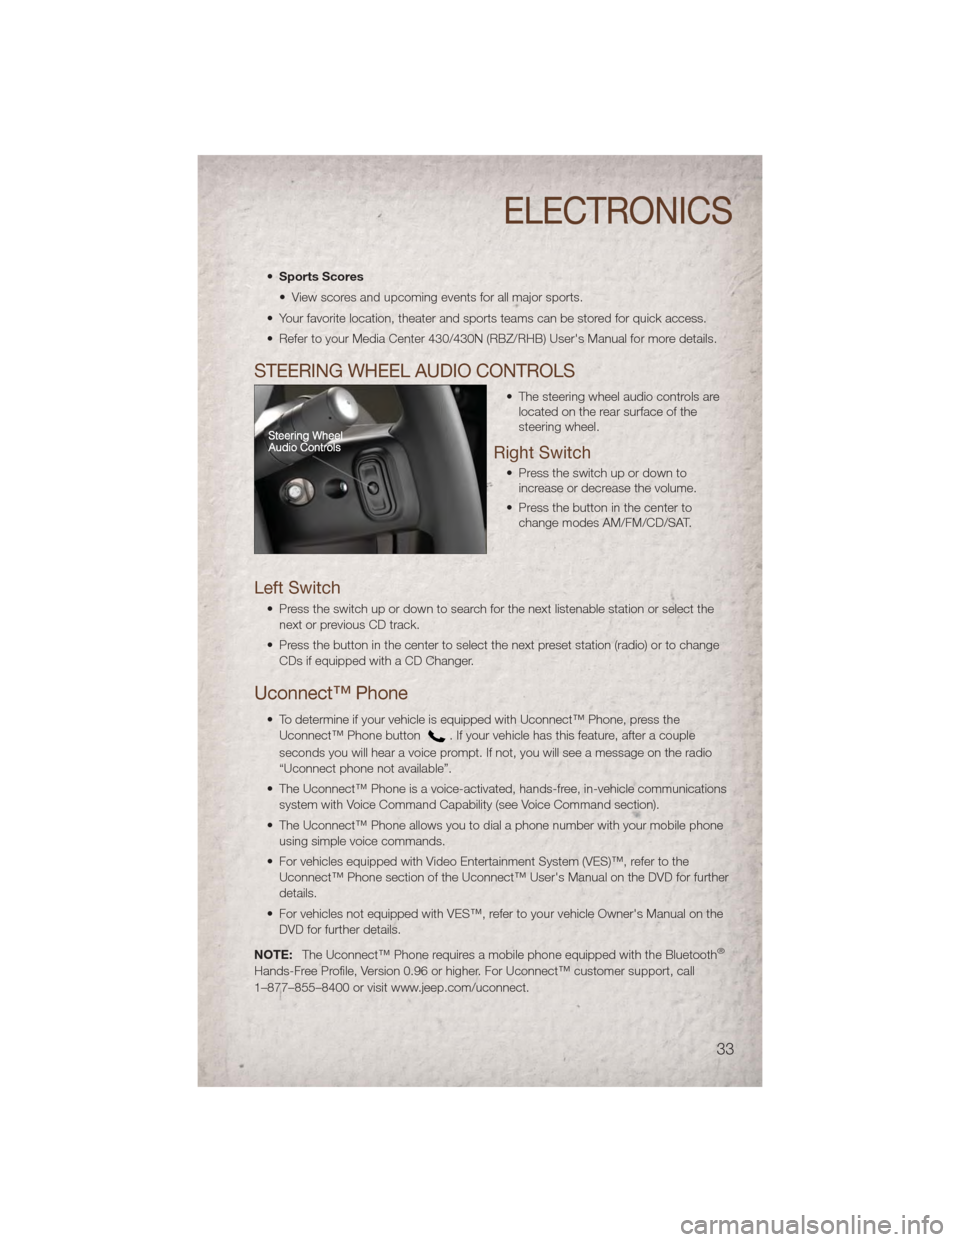
STEERING WHEEL AUDIO CONTROLS
• The steering wheel audio controls are located on the rear surface of the
steering wheel.
Right Switch
• Press the switch up or down toincrease or decrease the volume.
• Press the button in the center to change modes AM/FM/CD/SAT.
Left Switch
• Press the switch up or down to search for the next listenable station or select the
next or previous CD track.
• Press the button in the center to select the next preset station (radio) or to change CDs if equipped with a CD Changer.
Uconnect™ Phone
• To determine if your vehicle is equipped with Uconnect™ Phone, press theUconnect™ Phone button
. If your vehicle has this feature, after a couple
seconds you will hear a voice prompt. If not, you will see a message on the radio
“Uconnect phone not available”.
• The Uconnect™ Phone is a voice-activated, hands-free, in-vehicle communications system with Voice Command Capability (see Voice Command section).
• The Uconnect™ Phone allows you to dial a phone number with your mobile phone using simple voice commands.
• For vehicles equipped with Video Entertainment System (VES)™, refer to the Uconnect™ Phone section of the Uconnect™ User's Manual on the DVD for further
details.
• For vehicles not equipped with VES™, refer to your vehicle Owner's Manual on the DVD for further details.
NOTE: The Uconnect™ Phone requires a mobile phone equipped with the Bluetooth
®
Hands-Free Profile, Version 0.96 or higher. For Uconnect™ customer support, call
1–877–855–8400 or visit www.jeep.com/uconnect.
ELECTRONICS
33
Page 36 of 80
Phone Pairing
NOTE:Pairing is a one-time initial setup before using the phone. You will also need to
follow the Bluetooth®instructions in your cell phone user guide to complete the phone
pairing setup.
• Press the Phone button
to begin.
• Wait for the “ready” prompt and BEEP.
• (After the BEEP), say “Uconnect setup”.
• (After the BEEP), say “phone pairing”.
• (After the BEEP), say “pair a phone”.
• Follow the audible prompts.
• You will be asked to enter a four-digit Personal Identification Number (PIN), which you will later need to enter into your mobile phone. You can enter any four-digit PIN.
You will not need to remember this PIN after the initial pairing process.
• You will then be prompted to give the phone pairing a name (each phone paired should have a unique name).
• Next you will be asked to give this new pairing a priority of 1 thru 7 (up to seven phones may be paired); 1 is the highest and 7 is the lowest priority. The system will
only connect to the highest priority phone that exists within the proximity of the
vehicle.
Making A Phone Call
• Press the Phone button.
• (After the BEEP), say “dial” (or “call” a name).
• (After the BEEP), say number (or name).
Phonebook Edit
• Press the Phone button.
• (After the BEEP), say “phonebook”.
• (After the BEEP), say “new entry” or “list names” or “delete”.
• Follow the prompts.
Receiving A Call – Accept (And End)
• When an incoming call rings/is announced on Uconnect™, press the Phone button.
• To end a call, press the Phone button
.
Mute (Or Unmute) Microphone During Call
• During a call, press the Voice Command button.
• (After the BEEP), say “mute” (or “mute off”).
Transfer Ongoing Call Between Handset And Vehicle
• During a call, press the Voice Command button.
• (After the BEEP), say “transfer call”.
ELECTRONICS
34
Page 37 of 80
Changing The Volume
• Start a dialogue by pressing the Phone button, then adjust the volume during a
normal call.
• Use the radio ON/OFF VOLUME rotary knob to adjust the volume to a comfortable level while the Uconnect™ system is speaking. Please note the volume setting for
Uconnect™ is different than the audio system.
NOTE: To access the tutorial, press the Uconnect™ hard-key. After the BEEP, say
“tutorial”. Press any hard-key/button or touch the display (Touch-Screen radio) to cancel
the tutorial.
WARNING!
• Any voice commanded system should be used only in safe driving conditions following local laws and phone use. All attention should be kept on the
roadway ahead. Failure to do so may result in a collision causing you and
others to be severely injured or killed.
• In an emergency, to use Uconnect™ Phone, your mobile phone must be: • turned on,
• paired to Uconnect™ Phone,
• and have network coverage.
Uconnect™ VOICE COMMAND
• The Uconnect™ Voice Command system allows you to control your AM, FM radio,satellite radio, disc player, Uconnect™ Phone, a memo recorder, and supported
portable media devices.
• When you press the Voice Command button
located on the radio faceplate
or steering wheel, you will hear a beep. The beep is your signal to give a command.
If you do not say a command within a few seconds, the system will present you with
a list of options. If you ever wish to interrupt the system while it lists options, press
the Voice Command button
, listen for the BEEP, and say your command.
Voice Command for Text Messaging
• If equipped with Uconnect™ Voice Command, your Media Center 430N radio may be able to play incoming SMS messages through the vehicle sound system.
• It also allows you to respond by selecting from various pre-defined phrases.
• Not all phones are compatible with this feature. Refer to the phone compatibility list at www.jeep.com/uconnect. Connected mobile phones must be bluetooth-
compatible, and paired with your radio.
ELECTRONICS
35
Page 39 of 80
• Compatible iPod®devices may also be controllable using voice commands
(Media Center 430/430N with Uconnect™ Phone required). Refer to the Owner's
Manual on the DVD for details.
NOTE:
• The USB port supports certain Mini, Classic, Nano, Touch, and iPhone
®devices. The
USB port also supports playing music from compatible external USB Mass Storage
Class memory devices. For supported audio file formats, refer to the USB Port section
in the Owner's Manual on the DVD. Refer to www.jeep.com/uconnect website for a list
of tested iPod
®s. Some iPod®software versions may not fully support the USB port
features. Please visit Apple’s website for iPod®software updates.
Bluetooth®Streaming Audio
• If equipped with Uconnect™ Voice Command, your Bluetooth-equipped iPod®
devices, cell phones or other media players, may also be able to stream music to
your vehicle's speakers. Your connected device must be Bluetooth-compatible, and
paired with your Media Center radio (see Uconnect™ Phone for pairing instructions).
Press the AUX button on the radio faceplate until "BT" is displayed on the radio
screen. This feature allows you to control your Bluetooth device through the radio,
steering wheel audio controls or voice commands. Your Bluetooth device must
support A2DP and AVCRP 1.3 protocol or higher.
WARNING!
Do not plug in or remove the iPod®or external device while driving. Failure to
follow this warning could result in a collision.
ELECTRONIC VEHICLE INFORMATION CENTER (EVIC)
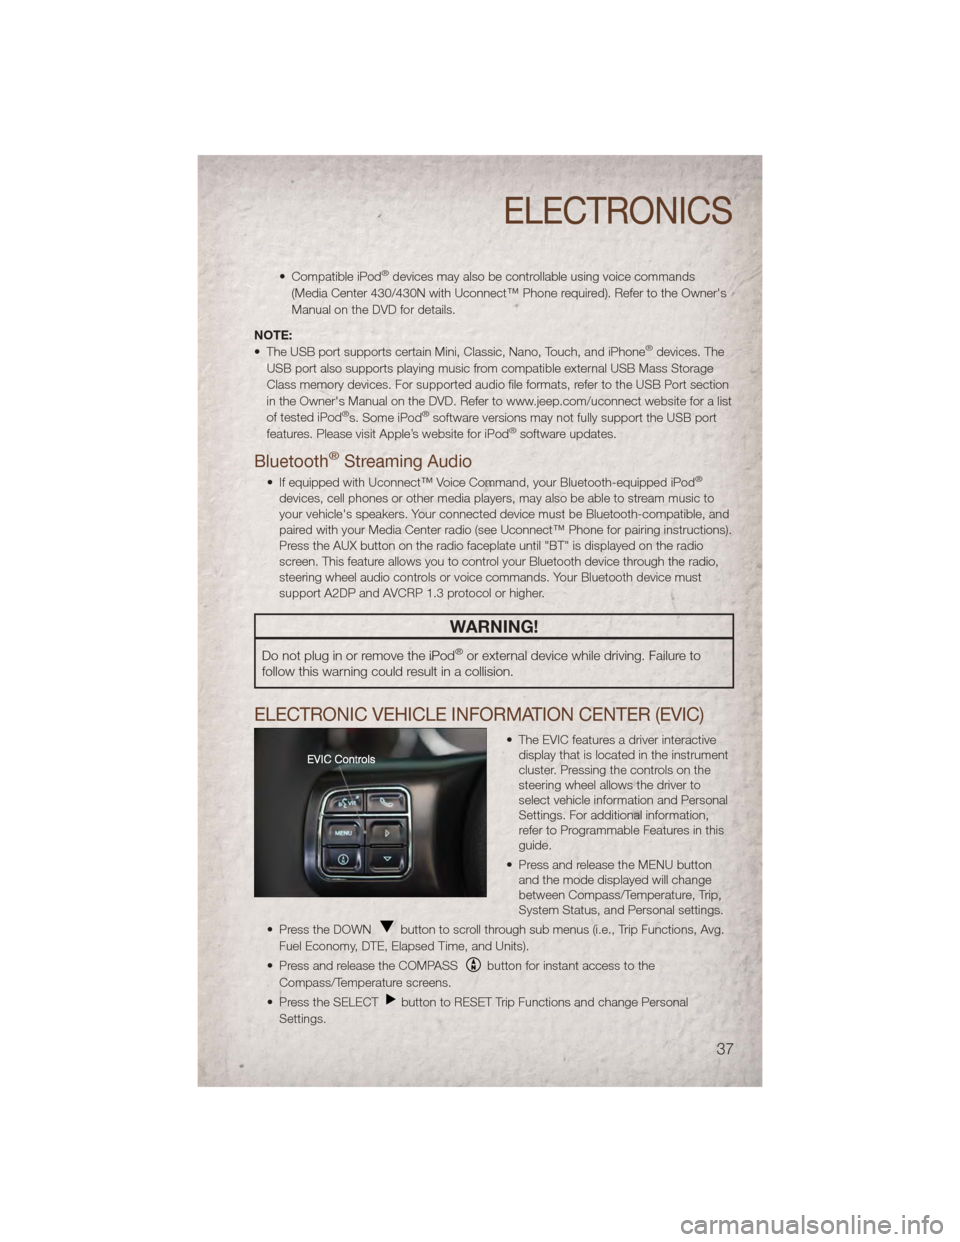
• The EVIC features a driver interactive display that is located in the instrument
cluster. Pressing the controls on the
steering wheel allows the driver to
select vehicle information and Personal
Settings. For additional information,
refer to Programmable Features in this
guide.
• Press and release the MENU button and the mode displayed will change
between Compass/Temperature, Trip,
System Status, and Personal settings.
• Press the DOWN
button to scroll through sub menus (i.e., Trip Functions, Avg.
Fuel Economy, DTE, Elapsed Time, and Units).
• Press and release the COMPASS
button for instant access to the
Compass/Temperature screens.
• Press the SELECT
button to RESET Trip Functions and change Personal
Settings.
ELECTRONICS
37
Page 69 of 80
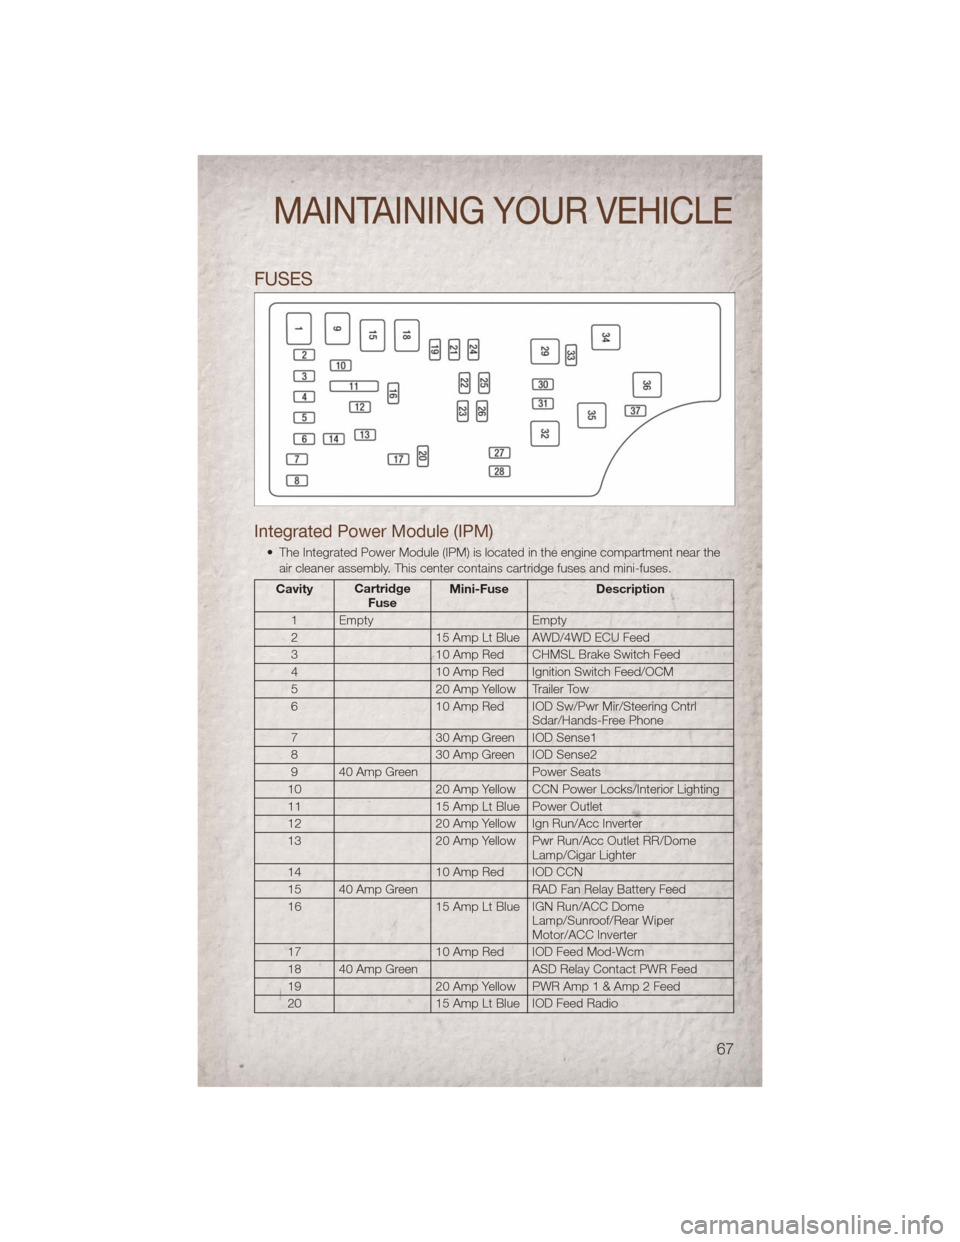
FUSES
Integrated Power Module (IPM)
• The Integrated Power Module (IPM) is located in the engine compartment near theair cleaner assembly. This center contains cartridge fuses and mini-fuses.
Cavity Cartridge
Fuse Mini-Fuse
Description
1 Empty Empty
2 15 Amp Lt Blue AWD/4WD ECU Feed
3 10 Amp Red CHMSL Brake Switch Feed
4 10 Amp Red Ignition Switch Feed/OCM
5 20 Amp Yellow Trailer Tow
6 10 Amp Red IOD Sw/Pwr Mir/Steering Cntrl
Sdar/Hands-Free Phone
7 30 Amp Green IOD Sense1
8 30 Amp Green IOD Sense2
9 40 Amp Green Power Seats
10 20 Amp Yellow CCN Power Locks/Interior Lighting
11 15 Amp Lt Blue Power Outlet
12 20 Amp Yellow Ign Run/Acc Inverter
13 20 Amp Yellow Pwr Run/Acc Outlet RR/Dome
Lamp/Cigar Lighter
14 10 Amp Red IOD CCN
15 40 Amp Green RAD Fan Relay Battery Feed
16 15 Amp Lt Blue IGN Run/ACC Dome
Lamp/Sunroof/Rear Wiper
Motor/ACC Inverter
17 10 Amp Red IOD Feed Mod-Wcm
18 40 Amp Green ASD Relay Contact PWR Feed
19 20 Amp Yellow PWR Amp 1 & Amp 2 Feed
20 15 Amp Lt Blue IOD Feed Radio
MAINTAINING YOUR VEHICLE
67
Page 70 of 80
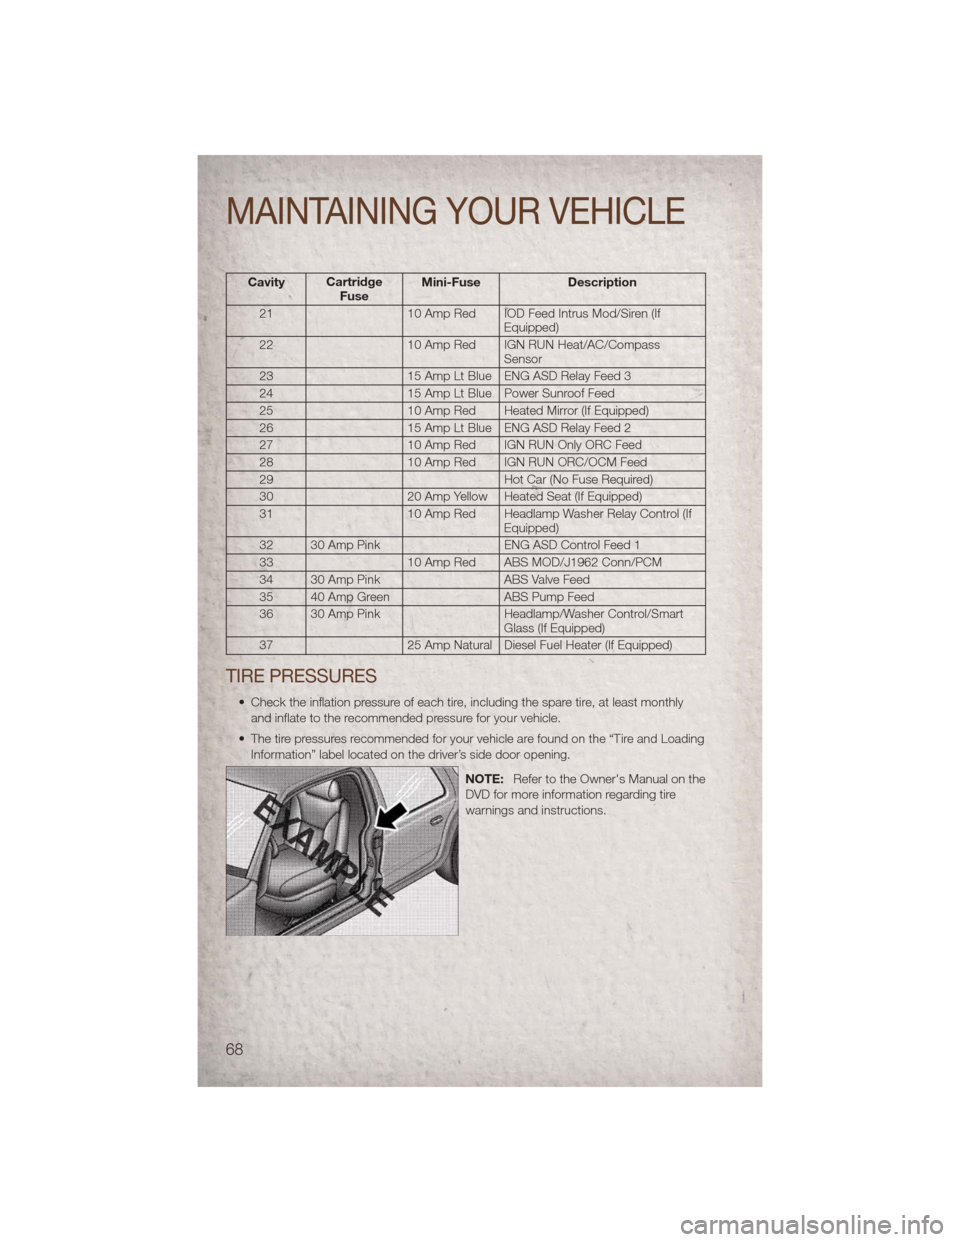
CavityCartridge
Fuse Mini-Fuse Description
21 10 Amp Red IOD Feed Intrus Mod/Siren (If Equipped)
22 10 Amp Red IGN RUN Heat/AC/Compass Sensor
23 15 Amp Lt Blue ENG ASD Relay Feed 3
24 15 Amp Lt Blue Power Sunroof Feed
25 10 Amp Red Heated Mirror (If Equipped)
26 15 Amp Lt Blue ENG ASD Relay Feed 2
27 10 Amp Red IGN RUN Only ORC Feed
28 10 Amp Red IGN RUN ORC/OCM Feed
29 Hot Car (No Fuse Required)
30 20 Amp Yellow Heated Seat (If Equipped)
31 10 Amp Red Headlamp Washer Relay Control (If Equipped)
32 30 Amp Pink ENG ASD Control Feed 1
33 10 Amp Red ABS MOD/J1962 Conn/PCM
34 30 Amp Pink ABS Valve Feed
35 40 Amp Green ABS Pump Feed
36 30 Amp Pink Headlamp/Washer Control/Smart Glass (If Equipped)
37 25 Amp Natural Diesel Fuel Heater (If Equipped)
TIRE PRESSURES
• Check the inflation pressure of each tire, including the spare tire, at least monthly and inflate to the recommended pressure for your vehicle.
• The tire pressures recommended for your vehicle are found on the “Tire and Loading Information” label located on the driver’s side door opening.
NOTE:Refer to the Owner's Manual on the
DVD for more information regarding tire
warnings and instructions.
MAINTAINING YOUR VEHICLE
68
Page 75 of 80
Airbag ..................10
Alarm,Panic ...............8
Arming Theft System (Security
Alarm) ...................9
Audio Jack...............29
Audio Settings ............27,28
Automatic Temperature Control
(ATC) ...................21
Automatic Transmission FluidType ...............62
Overheating ..............50
AxleFluid ................62
Belts, Seat ................9
BrakeFluid ...............62
Bulb Replacement ...........69
Calibration, Compass ..........38
Change Oil Indicator ..........49
Child Restraint ..............11
Child Restraint Tether Anchors ....11
Clock Setting ............28,30
Compass Calibration ..........38
Cooling System Coolant Capacity ...........62
Cruise Control (Speed Control) ....19
CruiseLight ...............19
Customer Assistance ..........70
Defects, Reporting ...........71
Dimmer Control .............17
Dimmer Switch, Headlight .......17
Disarming, Theft System .........9
Driver Cockpit ..............4
Electronic Speed Control (Cruise
Control) .................19
Electronic Vehicle Information Center
(EVIC) .................37,38
Electronics Your Vehicle's Sound System ....24
Emergency, In Case of Overheating ..............49
Engine Compartment .............60
OilSelection .............62
Overheating ..............49 Event Data Recorder
..........58
Exterior Lights ..............69
Flash-To-Pass ..............17
Fluid Capacities .............62
Fluids ...................62
FogLights ................17
Folding Front Passenger Seat .....14
Folding Rear Seat ............14
Four Wheel Drive Operation ......43
Freeing A Stuck Vehicle ........57
Front Heated Seats ...........15
Fuel Specifications .............62
Garage Door Opener (HomeLink®) . . 40
Hard Disk Drive .............30
Headlights ................17
Dimmer Switch ............17
High Beam ..............17
HeatedSeats ..............15
High Beam/Low Beam Select (Dimmer)
Switch ..................17
HomeLink® (Garage Door Opener)
Transmitter ................40
Hood Release ..............59
Instrument Cluster ............6
Indicators ................7
Instrument Cluster Warning Lights . 6,45
Intermittent Wipers (Delay Wipers) . . 18
Introduction ................2
Inverter Outlet (115V) ..........41
Inverter
, Power .............41
iPod®/USB/MP3 Control .......36
Bluetooth Streaming Audio .....37
Jack Location ..............50
Jump Starting ..............53
KeyFob ..................8
Key Fob Programmable Features . . . 38
Lane Change Assist ..........17
INDEX
73