engine JEEP COMPASS 2014 1.G Owners Manual
[x] Cancel search | Manufacturer: JEEP, Model Year: 2014, Model line: COMPASS, Model: JEEP COMPASS 2014 1.GPages: 572, PDF Size: 3.63 MB
Page 507 of 572
WARNING!(Continued)
•To avoid contamination from foreign matter or
moisture, use only new brake fluid or fluid that has
been in a tightly closed container. Keep the master
cylinder reservoir cap secured at all times. Brake
fluid in a open container absorbs moisture from the
air resulting in a lower boiling point. This may
cause it to boil unexpectedly during hard or pro-
longed braking, resulting in sudden brake failure.
This could result in a collision.
• Overfilling the brake fluid reservoir can result in
spilling brake fluid on hot engine parts, causing
the brake fluid to catch fire. Brake fluid can also
damage painted and vinyl surfaces, care should be
taken to avoid its contact with these surfaces.
(Continued)
WARNING! (Continued)
•Do not allow petroleum based fluid to contaminate
the brake fluid. Brake seal components could be
damaged, causing partial or complete brake failure.
This could result in a collision.
CAUTION!
Use of improper brake fluids will affect overall
clutch system performance. Improper brake fluids
may damage the clutch system resulting in loss of
clutch function and the ability to shift the transmis-
sion.
7
MAINTAINING YOUR VEHICLE 505
Page 508 of 572
Automatic Transmission (Six-Speed) — If
Equipped
Selection Of Lubricant (Six-Speed Transmission)
It is important to use the proper transmission fluid to
ensure optimum transmission performance and life. Use
only the manufacturer ’s recommended transmission
fluid. Refer to “Fluids, Lubricants, and Genuine Parts” in
this section for fluid specifications. It is important to
maintain the transmission fluid at the correct level using
the recommended fluid.
No chemical flushes should be used in any transmission;
only the approved lubricant should be used.
CAUTION!
Using a transmission fluid other than the manufac-
turer ’s recommended fluid may cause deterioration
(Continued)
CAUTION!(Continued)
in transmission shift quality, and will require more
frequent fluid and filter changes. Refer to “Fluids,
Lubricants, and Genuine Parts” in this section for
fluid specifications.
Special Additives
The manufacturer strongly recommends against using
any special additives in the transmission.
Automatic transmission fluid is an engineered product
and its performance may be impaired by supplemental
additives. Therefore, do not add any fluid additives to
the transmission. The only exception to this policy is the
use of special dyes for diagnosing fluid leaks. Avoid
using transmission sealers as they may adversely affect
seals.
506 MAINTAINING YOUR VEHICLE
Page 510 of 572
Automatic Transmission (CVT) — If Equipped
Selection Of Lubricant (CVT)
It is important to use the proper transmission fluid to
ensure optimum transmission performance and life. Use
only the manufacturer’s recommended transmission
fluid which has the special friction coefficient additives
necessary for proper steel belt traction on the drive and
driven pulleys. Refer to “Fluids, Lubricants, and Genuine
Parts” in this section for fluid specifications. It is impor-
tant to maintain the transmission fluid at the correct level
using the recommended fluid.
No chemical flushes should be used in any transmission;
only the approved lubricant should be used.
CAUTION!
•Do not use chemical flushes in your transmission
as the chemicals can damage your transmission
components. Such damage is not covered by the
New Vehicle Limited Warranty.
• Using a transmission fluid other than the manufac-
turer’s recommended fluid will cause belt slip and
result in a complete transmission failure! Refer to
“Fluids, Lubricants, and Genuine Parts” in “Main-
taining Your Vehicle” for fluid specifications.
Special Additives
The manufacturer strongly recommends against using
any special additives in the transmission.
Automatic transmission fluid is an engineered product
and its performance may be impaired by supplemental
additives. Therefore, do not add any fluid additives to
the transmission. The only exception to this policy is the
508 MAINTAINING YOUR VEHICLE
Page 520 of 572
FUSES
WARNING!
•When replacing a blown fuse, always use an ap-
propriate replacement fuse with the same amp
rating as the original fuse. Never replace a fuse
with another fuse of higher amp rating. Never
replace a blown fuse with metal wires or any other
material. Failure to use proper fuses may result in
serious personal injury, fire and/or property dam-
age.
• Before replacing a fuse, make sure that the ignition
is off and that all the other services are switched off
and/or disengaged.
• If the replaced fuse blows again, contact an autho-
rized dealer.
(Continued)
WARNING! (Continued)
•If a general protection fuse for safety systems (air
bag system, braking system), power unit systems
(engine system, gearbox system) or steering system
blows, contact an authorized dealer.
518 MAINTAINING YOUR VEHICLE
Page 521 of 572
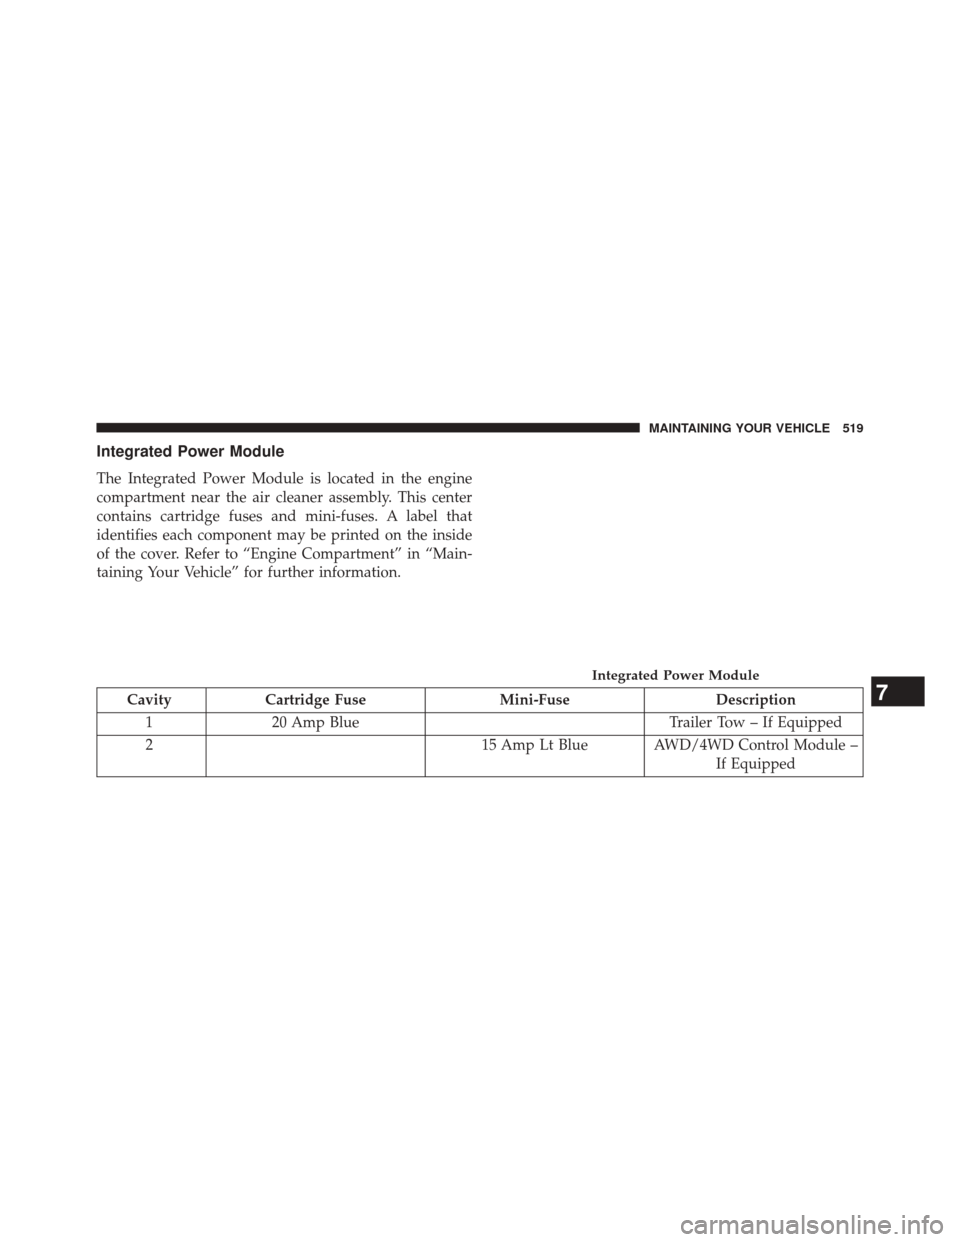
Integrated Power Module
The Integrated Power Module is located in the engine
compartment near the air cleaner assembly. This center
contains cartridge fuses and mini-fuses. A label that
identifies each component may be printed on the inside
of the cover. Refer to “Engine Compartment” in “Main-
taining Your Vehicle” for further information.
CavityCartridge Fuse Mini-FuseDescription
1 20 Amp Blue Trailer Tow – If Equipped
2 15 Amp Lt Blue AWD/4WD Control Module –
If Equipped
Integrated Power Module
7
MAINTAINING YOUR VEHICLE 519
Page 527 of 572
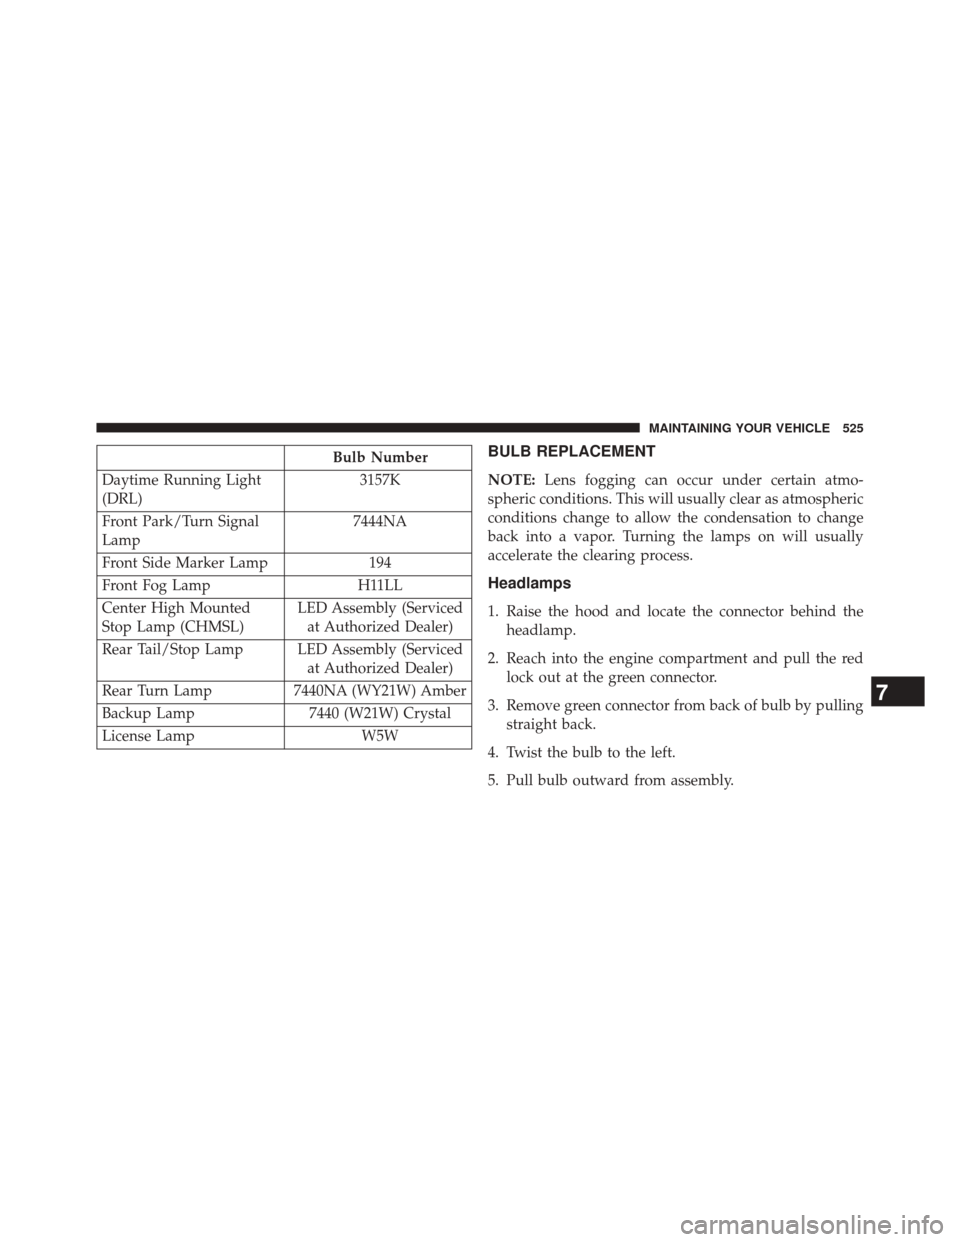
Bulb Number
Daytime Running Light
(DRL) 3157K
Front Park/Turn Signal
Lamp 7444NA
Front Side Marker Lamp 194
Front Fog Lamp H11LL
Center High Mounted
Stop Lamp (CHMSL) LED Assembly (Serviced
at Authorized Dealer)
Rear Tail/Stop Lamp LED Assembly (Serviced at Authorized Dealer)
Rear Turn Lamp 7440NA (WY21W) Amber
Backup Lamp 7440 (W21W) Crystal
License Lamp W5WBULB REPLACEMENT
NOTE:Lens fogging can occur under certain atmo-
spheric conditions. This will usually clear as atmospheric
conditions change to allow the condensation to change
back into a vapor. Turning the lamps on will usually
accelerate the clearing process.
Headlamps
1. Raise the hood and locate the connector behind the headlamp.
2. Reach into the engine compartment and pull the red lock out at the green connector.
3. Remove green connector from back of bulb by pulling straight back.
4. Twist the bulb to the left.
5. Pull bulb outward from assembly.
7
MAINTAINING YOUR VEHICLE 525
Page 529 of 572
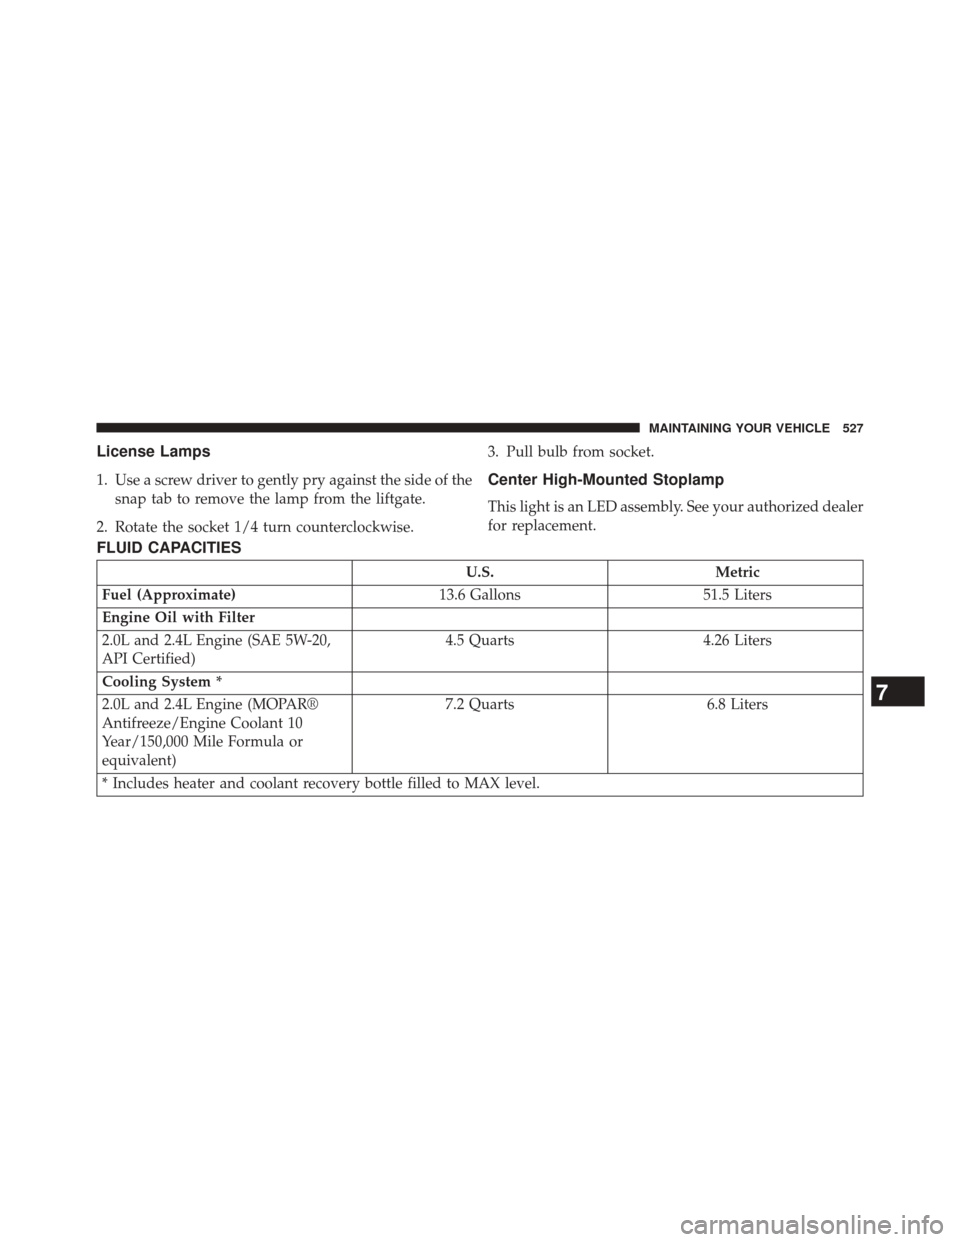
License Lamps
1. Use a screw driver to gently pry against the side of thesnap tab to remove the lamp from the liftgate.
2. Rotate the socket 1/4 turn counterclockwise. 3. Pull bulb from socket.Center High-Mounted Stoplamp
This light is an LED assembly. See your authorized dealer
for replacement.
FLUID CAPACITIES
U.S.
Metric
Fuel (Approximate) 13.6 Gallons51.5 Liters
Engine Oil with Filter
2.0L and 2.4L Engine (SAE 5W-20,
API Certified) 4.5 Quarts
4.26 Liters
Cooling System *
2.0L and 2.4L Engine (MOPAR®
Antifreeze/Engine Coolant 10
Year/150,000 Mile Formula or
equivalent) 7.2 Quarts
6.8 Liters
* Includes heater and coolant recovery bottle filled to MAX level.
7
MAINTAINING YOUR VEHICLE 527
Page 530 of 572
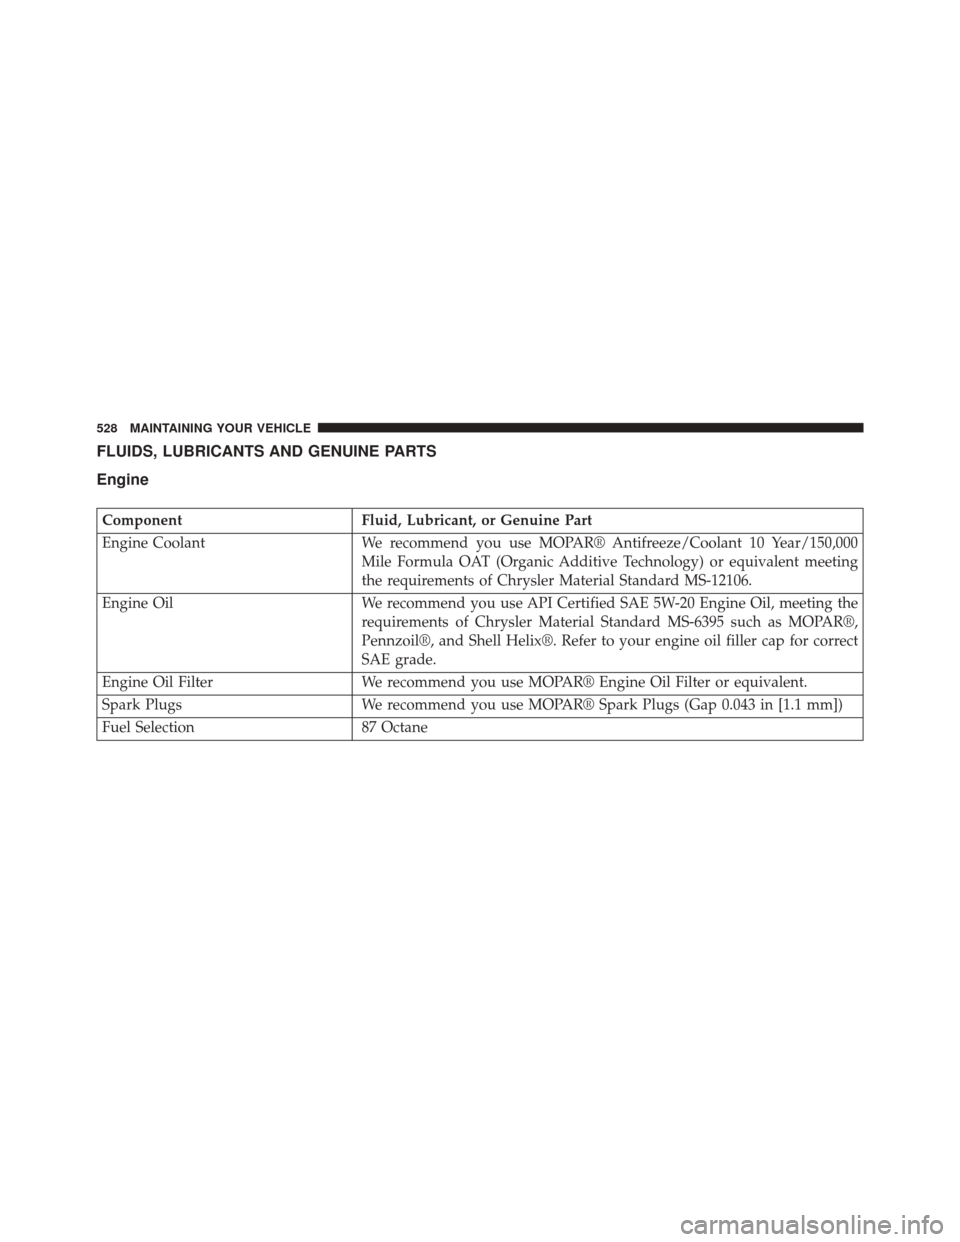
FLUIDS, LUBRICANTS AND GENUINE PARTS
Engine
ComponentFluid, Lubricant, or Genuine Part
Engine Coolant We recommend you use MOPAR® Antifreeze/Coolant 10 Year/150,000
Mile Formula OAT (Organic Additive Technology) or equivalent meeting
the requirements of Chrysler Material Standard MS-12106.
Engine Oil We recommend you use API Certified SAE 5W-20 Engine Oil, meeting the
requirements of Chrysler Material Standard MS-6395 such as MOPAR®,
Pennzoil®, and Shell Helix®. Refer to your engine oil filler cap for correct
SAE grade.
Engine Oil Filter We recommend you use MOPAR® Engine Oil Filter or equivalent.
Spark Plugs We recommend you use MOPAR® Spark Plugs (Gap 0.043 in [1.1 mm])
Fuel Selection 87 Octane
528 MAINTAINING YOUR VEHICLE
Page 534 of 572
MAINTENANCE SCHEDULE
Your vehicle is equipped with an automatic oil change
indicator system. The oil change indicator system will
remind you that it is time to take your vehicle in for
scheduled maintenance.
Based on engine operation conditions, the oil change
indicator message will illuminate. This means that ser-
vice is required for your vehicle. Operating conditions
such as frequent short-trips, trailer tow, extremely hot or
cold ambient temperatures will influence when the
“Change Oil” or “Oil Change Required” message is
displayed. Severe Operating Conditions can cause the
change oil message to illuminate as early as 3,500 miles
(5,600 km) since last reset. Have your vehicle serviced as
soon as possible, within the next 500 miles (805 km).On Electronic Vehicle Information Center (EVIC)
equipped vehicles, “Oil Change Required” will be dis-
played in the EVIC and a single chime will sound,
indicating that an oil change is necessary.
On Non-EVIC equipped vehicles, “Change Oil” will flash
in the instrument cluster odometer and a single chime
will sound, indicating that an oil change is necessary.
Your authorized dealer will reset the oil change indicator
message after completing the scheduled oil change. If a
scheduled oil change is performed by someone other
than your authorized dealer, the message can be reset by
referring to the steps described under “Instrument Clus-
ter Descriptions” or “Electronic Vehicle Information Cen-
ter (EVIC)” in “Understanding Your Instrument Panel”
for further information.
NOTE:
Under no circumstances should oil change inter-
vals exceed 10,000 miles (16,000 km) or twelve months,
whichever comes first.
8
M A I
N T
E
N
A
N
C E
S
C
H E
D
U L
E
S532 MAINTENANCE SCHEDULES
Page 535 of 572
Severe Duty All Models
Change Engine Oil at 4000 miles (6,500 km) if the vehicle
is operated in a dusty and off road environment. This
type of vehicle use is considered Severe Duty.
Once A Month Or Before A Long Trip:
•Check engine oil level
• Check windshield washer fluid level
• Check the tire inflation pressures and look for unusual
wear or damage
• Check the fluid levels of the coolant reservoir, brake
master cylinder, power steering and fill as needed
• Check function of all interior and exterior lights
Required Maintenance Intervals.
Refer to the maintenance schedules on the following
page for the required maintenance intervals.At Every Oil Change Interval As Indicated By Oil Change Indicator System:
•Change oil and filter.
• Rotate the tires. Rotate at the first sign of irregu-
lar wear, even if it occurs before the oil indicator
system turns on.
• Inspect battery and clean and tighten terminals as
required.
• Inspect brake pads, shoes, rotors, drums, hoses
and park brake.
• Inspect engine cooling system protection and
hoses.
• Inspect exhaust system.
• Inspect engine air cleaner if using in dusty or
off-road conditions.
8
M
A I
N T
E
N
A
N
C E
S
C
H E
D
U L
E
SMAINTENANCE SCHEDULES 533