radio JEEP COMPASS 2014 1.G Owner's Guide
[x] Cancel search | Manufacturer: JEEP, Model Year: 2014, Model line: COMPASS, Model: JEEP COMPASS 2014 1.GPages: 124, PDF Size: 2.64 MB
Page 70 of 124
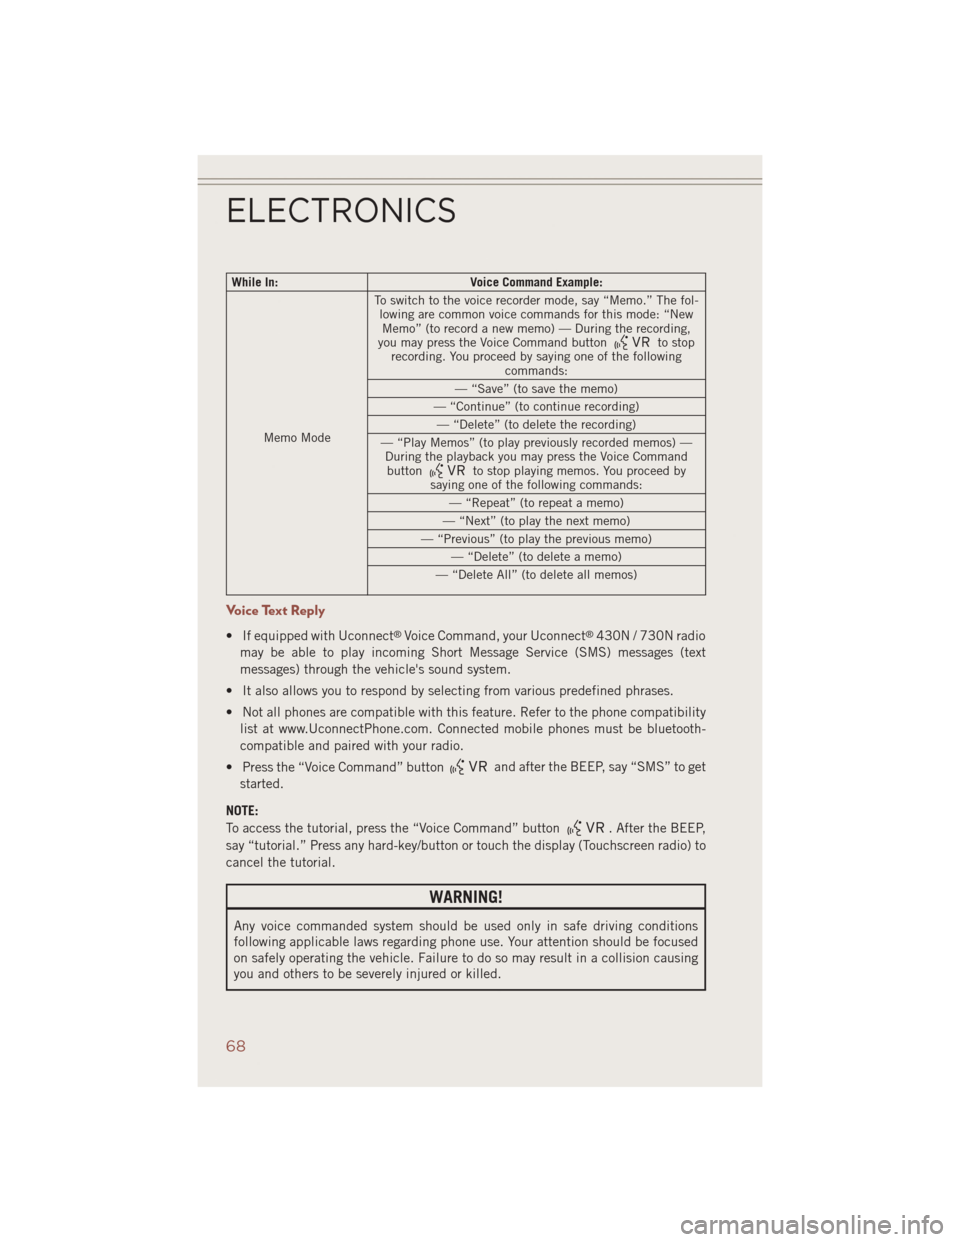
While In:Voice Command Example:
Memo Mode To switch to the voice recorder mode, say “Memo.” The fol-
lowing are common voice commands for this mode: “NewMemo” (to record a new memo) — During the recording,
you may press the Voice Command button
to stop
recording. You proceed by saying one of the following commands:
— “Save” (to save the memo)
— “Continue” (to continue recording) — “Delete” (to delete the recording)
— “Play Memos” (to play previously recorded memos) — During the playback you may press the Voice Commandbutton
to stop playing memos. You proceed by
saying one of the following commands:
— “Repeat” (to repeat a memo)
— “Next” (to play the next memo)
— “Previous” (to play the previous memo) — “Delete” (to delete a memo)
— “Delete All” (to delete all memos)
Voice Text Reply
• If equipped with Uconnect®Voice Command, your Uconnect®430N / 730N radio
may be able to play incoming Short Message Service (SMS) messages (text
messages) through the vehicle's sound system.
• It also allows you to respond by selecting from various predefined phrases.
• Not all phones are compatible with this feature. Refer to the phone compatibility list at www.UconnectPhone.com. Connected mobile phones must be bluetooth-
compatible and paired with your radio.
• Press the “Voice Command” button
and after the BEEP, say “SMS” to get
started.
NOTE:
To access the tutorial, press the “Voice Command” button
. After the BEEP,
say “tutorial.” Press any hard-key/button or touch the display (Touchscreen radio) to
cancel the tutorial.
WARNING!
Any voice commanded system should be used only in safe driving conditions
following applicable laws regarding phone use. Your attention should be focused
on safely operating the vehicle. Failure to do so may result in a collision causing
you and others to be severely injured or killed.
ELECTRONICS
68
Page 71 of 124
Bluetooth® STREAMING AUDIO
If equipped with Uconnect®Voice Command, your Bluetooth®-equipped iPod®
devices, cell phones or other media players, may also be able to stream music to your
vehicle's speakers. Your connected device must be Bluetooth®-compatible, and
paired with your radio (see Uconnect®Phone for pairing instructions).
• Non-Touchscreen Radios:
Press the
“AUX” button on the radio faceplate
until “BT” or “Audio Streaming” is dis-
played on the radio screen.
• Touchscreen-Radios: Press the RADIO/
MEDIA or MEDIA hard-key and then
touch the “AUX” soft-key tab.
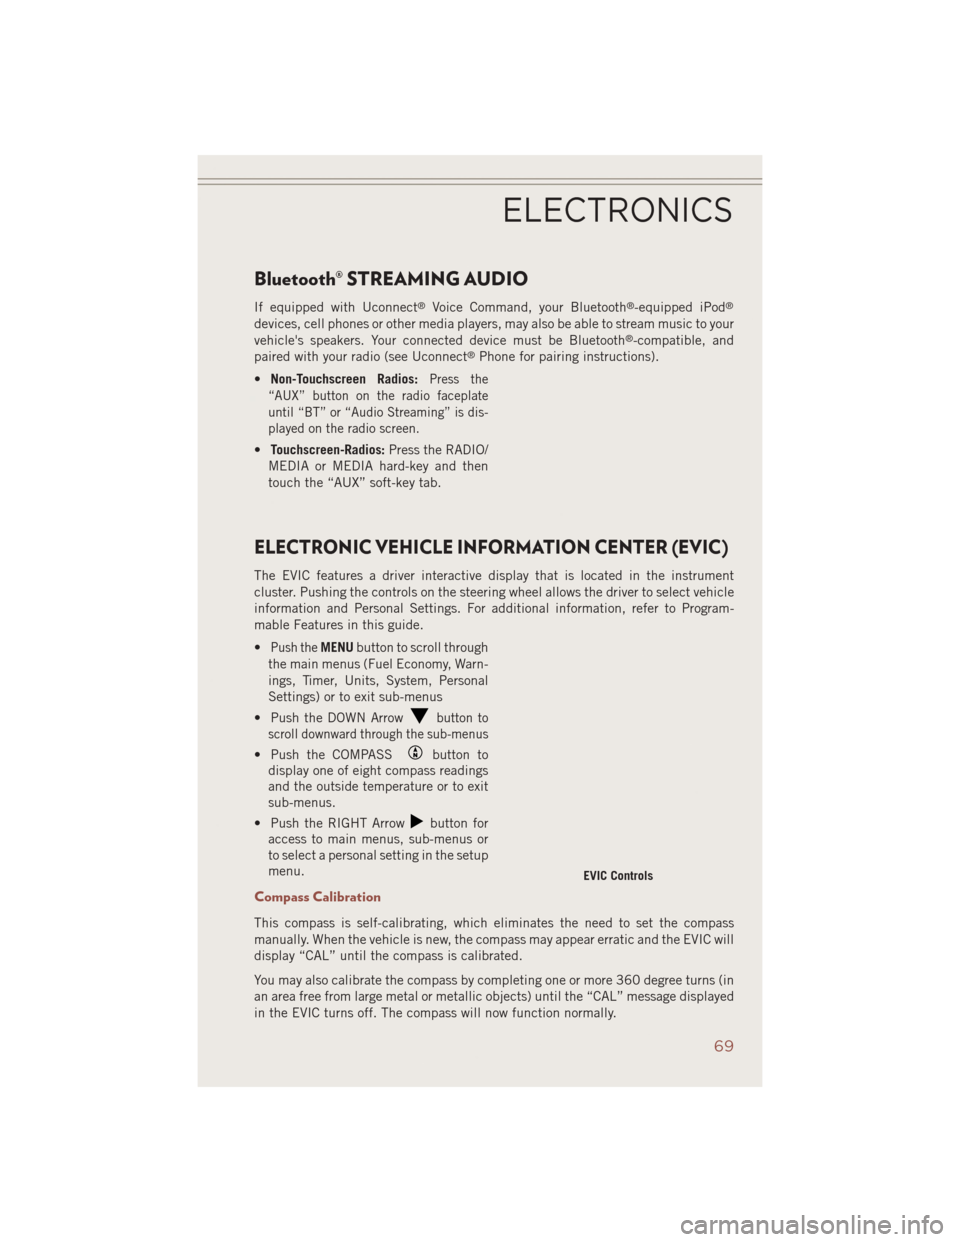
ELECTRONIC VEHICLE INFORMATION CENTER (EVIC)
The EVIC features a driver interactive display that is located in the instrument
cluster. Pushing the controls on the steering wheel allows the driver to select vehicle
information and Personal Settings. For additional information, refer to Program-
mable Features in this guide.
•
Push theMENU button to scroll through
the main menus (Fuel Economy, Warn-
ings, Timer, Units, System, Personal
Settings) or to exit sub-menus
• Push the DOWN Arrow
button to
scroll downward through the sub-menus
• Push the COMPASSbutton to
display one of eight compass readings
and the outside temperature or to exit
sub-menus.
• Push the RIGHT Arrow
button for
access to main menus, sub-menus or
to select a personal setting in the setup
menu.
Compass Calibration
This compass is self-calibrating, which eliminates the need to set the compass
manually. When the vehicle is new, the compass may appear erratic and the EVIC will
display “CAL” until the compass is calibrated.
You may also calibrate the compass by completing one or more 360 degree turns (in
an area free from large metal or metallic objects) until the “CAL” message displayed
in the EVIC turns off. The compass will now function normally.
EVIC Controls
ELECTRONICS
69
Page 74 of 124
Before You Begin Programming HomeLink®
Ensure that your vehicle is parked outside of the garage before you begin program-
ming.
For efficient programming and accurate transmission of the radio-frequency signal,
it is recommended that a new battery be placed in the hand-held transmitter of the
device that is being programmed to the HomeLink
®system.
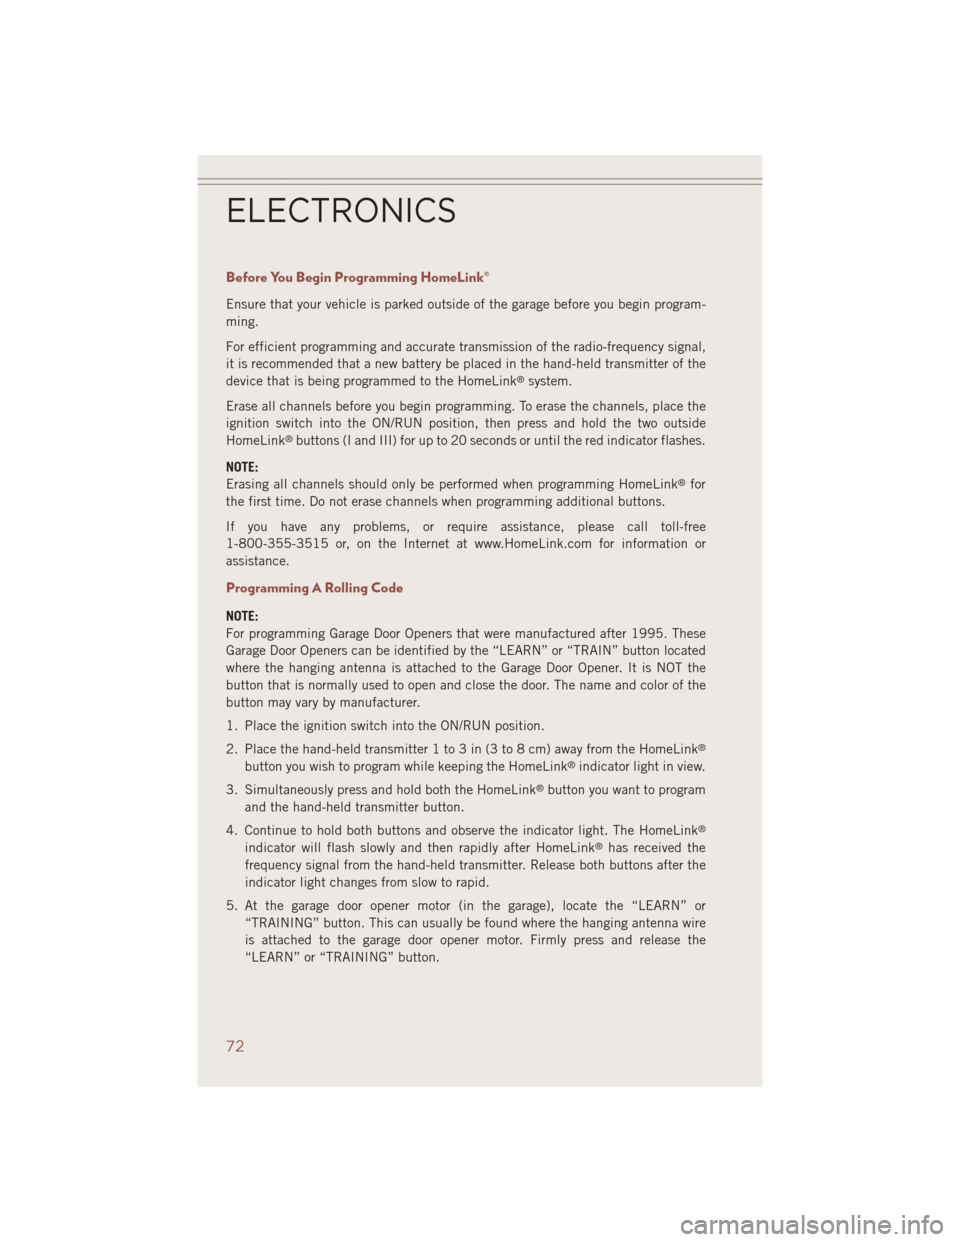
Erase all channels before you begin programming. To erase the channels, place the
ignition switch into the ON/RUN position, then press and hold the two outside
HomeLink
®buttons (I and III) for up to 20 seconds or until the red indicator flashes.
NOTE:
Erasing all channels should only be performed when programming HomeLink
®for
the first time. Do not erase channels when programming additional buttons.
If you have any problems, or require assistance, please call toll-free
1-800-355-3515 or, on the Internet at www.HomeLink.com for information or
assistance.
Programming A Rolling Code
NOTE:
For programming Garage Door Openers that were manufactured after 1995. These
Garage Door Openers can be identified by the “LEARN” or “TRAIN” button located
where the hanging antenna is attached to the Garage Door Opener. It is NOT the
button that is normally used to open and close the door. The name and color of the
button may vary by manufacturer.
1. Place the ignition switch into the ON/RUN position.
2. Place the hand-held transmitter 1 to 3 in (3 to 8 cm) away from the HomeLink
®
button you wish to program while keeping the HomeLink®indicator light in view.
3. Simultaneously press and hold both the HomeLink
®button you want to program
and the hand-held transmitter button.
4. Continue to hold both buttons and observe the indicator light. The HomeLink
®
indicator will flash slowly and then rapidly after HomeLink®has received the
frequency signal from the hand-held transmitter. Release both buttons after the
indicator light changes from slow to rapid.
5. At the garage door opener motor (in the garage), locate the “LEARN” or “TRAINING” button. This can usually be found where the hanging antenna wire
is attached to the garage door opener motor. Firmly press and release the
“LEARN” or “TRAINING” button.
ELECTRONICS
72
Page 95 of 124
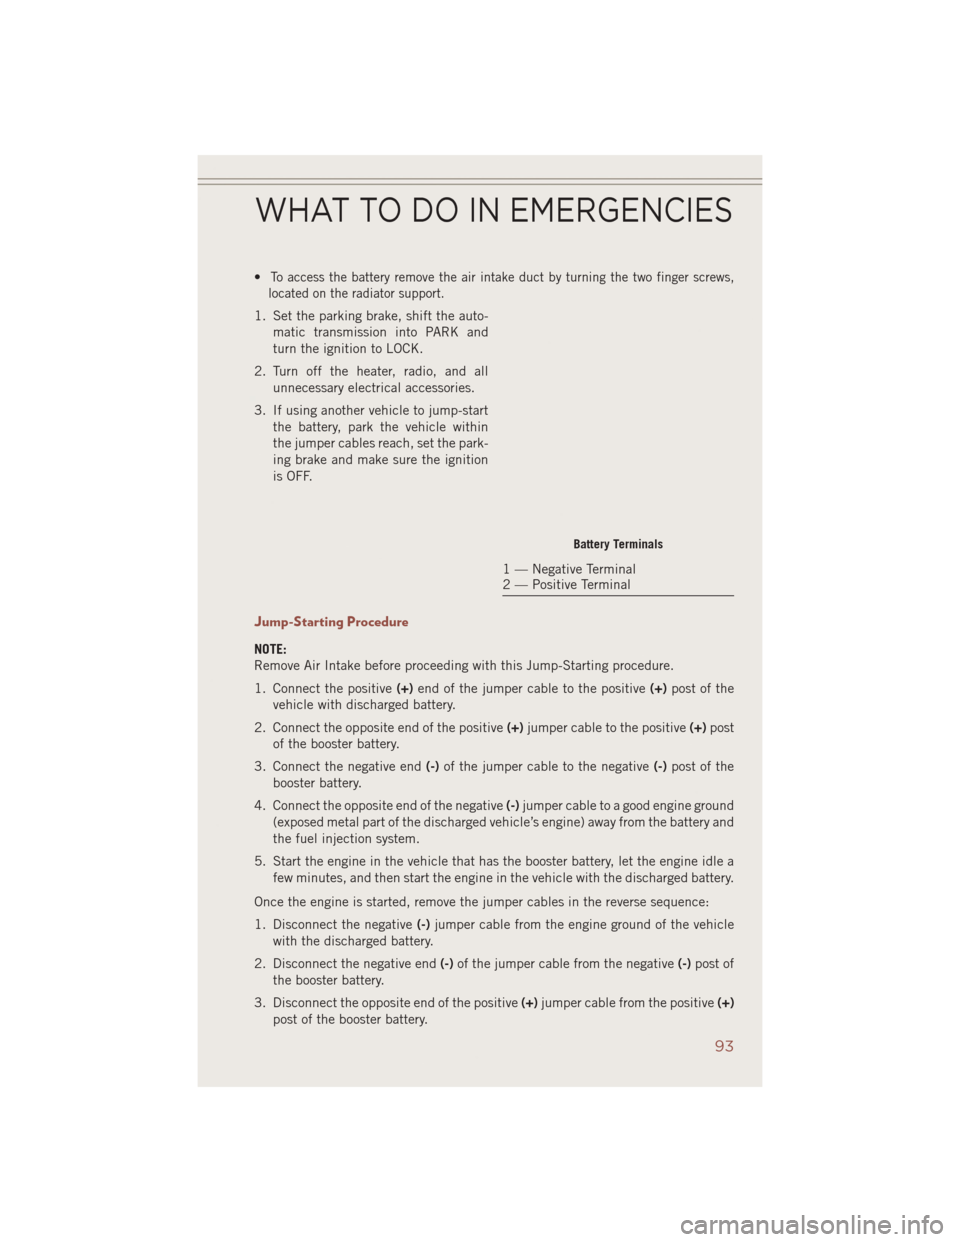
•To access the battery remove the air intake duct by turning the two finger screws,
located on the radiator support.
1. Set the parking brake, shift the auto-
matic transmission into PARK and
turn the ignition to LOCK.
2. Turn off the heater, radio, and all unnecessary electrical accessories.
3. If using another vehicle to jump-start the battery, park the vehicle within
the jumper cables reach, set the park-
ing brake and make sure the ignition
is OFF.
Jump-Starting Procedure
NOTE:
Remove Air Intake before proceeding with this Jump-Starting procedure.
1. Connect the positive (+)end of the jumper cable to the positive (+)post of the
vehicle with discharged battery.
2. Connect the opposite end of the positive (+)jumper cable to the positive (+)post
of the booster battery.
3. Connect the negative end (-)of the jumper cable to the negative (-)post of the
booster battery.
4. Connect the opposite end of the negative (-)jumper cable to a good engine ground
(exposed metal part of the discharged vehicle’s engine) away from the battery and
the fuel injection system.
5. Start the engine in the vehicle that has the booster battery, let the engine idle a few minutes, and then start the engine in the vehicle with the discharged battery.
Once the engine is started, remove the jumper cables in the reverse sequence:
1. Disconnect the negative (-)jumper cable from the engine ground of the vehicle
with the discharged battery.
2. Disconnect the negative end (-)of the jumper cable from the negative (-)post of
the booster battery.
3. Disconnect the opposite end of the positive (+)jumper cable from the positive (+)
post of the booster battery.
Battery Terminals
1 — Negative Terminal
2 — Positive Terminal
WHAT TO DO IN EMERGENCIES
93
Page 110 of 124
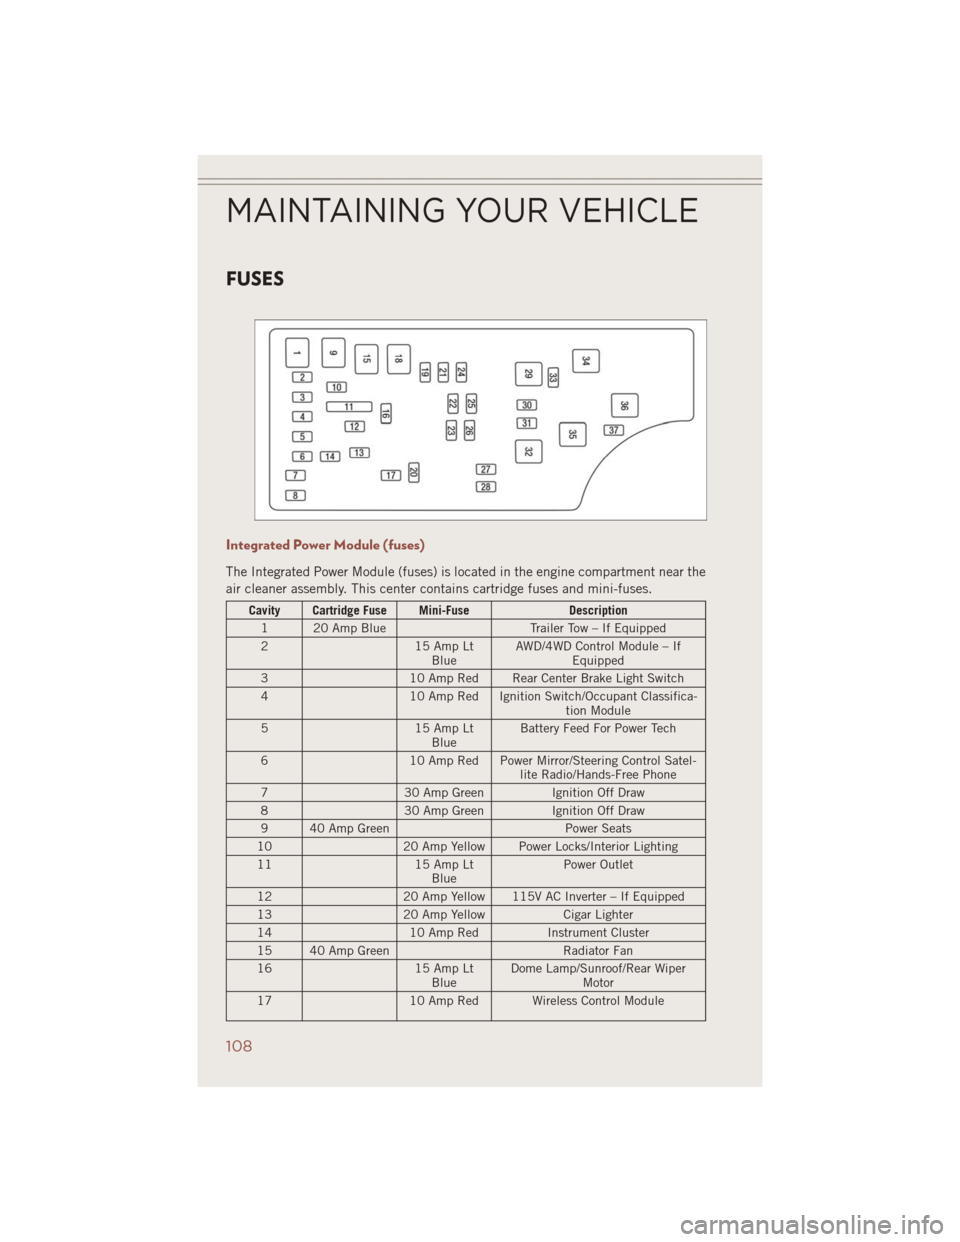
FUSES
Integrated Power Module (fuses)
The Integrated Power Module (fuses) is located in the engine compartment near the
air cleaner assembly. This center contains cartridge fuses and mini-fuses.
Cavity Cartridge Fuse Mini-FuseDescription
1 20 Amp Blue Trailer Tow – If Equipped
2 15 Amp Lt
Blue AWD/4WD Control Module – If
Equipped
3 10 Amp Red Rear Center Brake Light Switch
4 10 Amp Red Ignition Switch/Occupant Classifica-
tion Module
5 15 Amp Lt
Blue Battery Feed For Power Tech
6 10 Amp Red Power Mirror/Steering Control Satel-
lite Radio/Hands-Free Phone
7 30 Amp Green Ignition Off Draw
8 30 Amp Green Ignition Off Draw
9 40 Amp Green Power Seats
10 20 Amp Yellow Power Locks/Interior Lighting
11 15 Amp Lt
Blue Power Outlet
12 20 Amp Yellow 115V AC Inverter – If Equipped
13 20 Amp Yellow Cigar Lighter
14 10 Amp RedInstrument Cluster
15 40 Amp Green Radiator Fan
16 15 Amp Lt
Blue Dome Lamp/Sunroof/Rear Wiper
Motor
17 10 Amp Red Wireless Control Module
MAINTAINING YOUR VEHICLE
108
Page 111 of 124
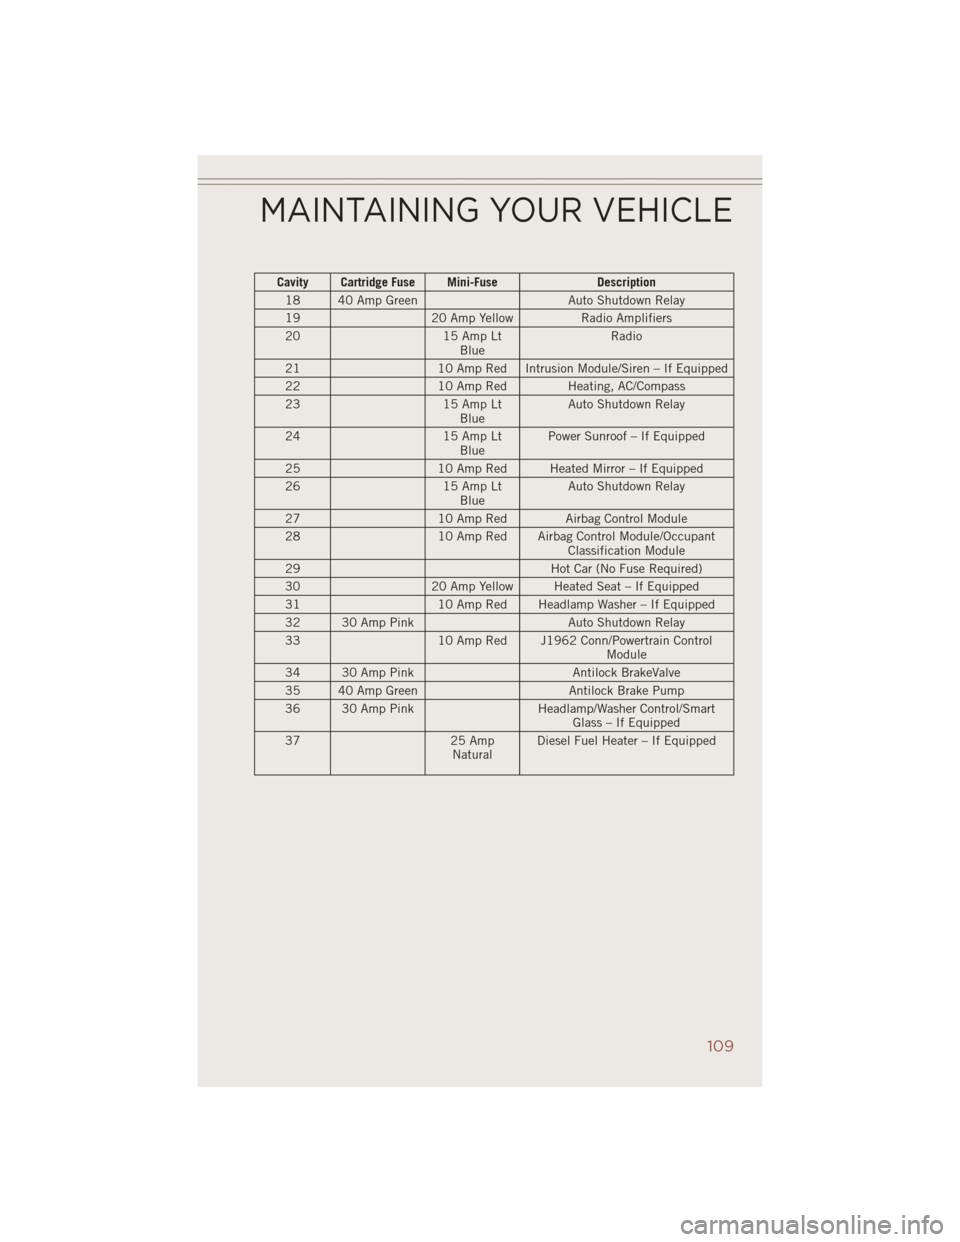
Cavity Cartridge Fuse Mini-FuseDescription
18 40 Amp Green Auto Shutdown Relay
19 20 Amp Yellow Radio Amplifiers
20 15 Amp Lt
Blue Radio
21 10 Amp Red Intrusion Module/Siren – If Equipped
22 10 Amp Red Heating, AC/Compass
23 15 Amp Lt
Blue Auto Shutdown Relay
24 15 Amp Lt
Blue Power Sunroof – If Equipped
25 10 Amp Red Heated Mirror – If Equipped
26 15 Amp Lt
Blue Auto Shutdown Relay
27 10 Amp Red Airbag Control Module
28 10 Amp Red Airbag Control Module/Occupant
Classification Module
29 Hot Car (No Fuse Required)
30 20 Amp Yellow Heated Seat – If Equipped
31 10 Amp Red Headlamp Washer – If Equipped
32 30 Amp Pink Auto Shutdown Relay
33 10 Amp Red J1962 Conn/Powertrain Control
Module
34 30 Amp Pink Antilock BrakeValve
35 40 Amp Green Antilock Brake Pump
36 30 Amp Pink Headlamp/Washer Control/Smart
Glass – If Equipped
37 25 Amp
Natural Diesel Fuel Heater – If Equipped
MAINTAINING YOUR VEHICLE
109
Page 114 of 124
CHRYSLER GROUP LLC CUSTOMER CENTER
P.O. Box 21–8004 Auburn Hills, MI 48321–8004 Phone: 1–877–426–5337
CHRYSLER CANADA INC. CUSTOMER CENTER
P.O. Box 1621 Windsor, Ontario N9A 4H6 Phone: 1–800–465–2001 (English)
Phone: 1–800–387–9983 (French)
ASSISTANCE FOR THE HEARING IMPAIRED
To assist customers who have hearing difficulties, the manufacturer has installed
special TDD (Telecommunication Devices for the Deaf) equipment at its customer
center. Any hearing or speech impaired customer, who has access to a TDD or a
conventional teletypewriter (TTY) in the United States, can communicate with the
manufacturer by dialing 1–800–380–CHRY. Canadian residents with hearing diffi-
culties that require assistance can use the special needs relay service offered by
Bell Canada. For TTY teletypewriter users, dial 711 and for Voice callers, dial
1–800–855–0511 to connect with a Bell Relay Service operator.
WARNING!
Engine exhaust, some of its constituents, and certain vehicle components con-
tain, or emit, chemicals known to the State of California to cause cancer and birth
defects, or other reproductive harm. In addition, certain fluids contained in
vehicles and certain products of component wear contain, or emit, chemicals
known to the State of California to cause cancer and birth defects, or other
reproductive harm.
PUBLICATIONS ORDERING
• If you are the first registered retail owner of your vehicle, you may obtain acomplimentary printed copy of the Owner's Manual, Navigation/Uconnect®Manu-
als or Warranty Booklet. United States customers may visit the Jeep Contact Us
page at www.jeep.com scroll to the bottom of the page and select the “Contact Us”
link, then select the “Owner’s Manual and Glove Box Material” from the left menu.
You may also obtain a complimentary copy by calling 1–877–426–5337 (U.S.) or
1–800–387–1143 (Canada).
• Replacement User Guide kits or DVDs or, if you prefer, additional printed copies of the Owner's Manual, Warranty Booklet or Radio Manuals may be purchased by
visiting www.techauthority.com or by calling 1–877–890–4038 (U.S.) or
1–800–387–1143 (Canada). Visa, Master Card, American Express and Discover
orders are accepted. If you prefer mailing your order, please call the above
numbers for an order form.
CUSTOMER ASSISTANCE
112
Page 117 of 124
FREQUENTLY ASKED QUESTIONS
GETTING STARTED
• How do I install my LATCH Equipped Child Seat? pg. 15
• How do my heated seats operate? pg. 23
ELECTRONICS
• Which radio is in my vehicle?• Uconnect
®130 pg. 38
• Uconnect
®130 with Satellite Radio pg. 41
• Uconnect
®230 pg. 44
• Uconnect
®430/430N pg. 47
• How do I activate the Audio Jack?
• Uconnect
®130 pg. 47
• Uconnect
®130 with Satellite Radio pg. 47
• Uconnect
®230 pg. 47
• Uconnect
®430/430N pg. 52
• How do I set the clock on my radio?
• Uconnect
®130 pg. 45
• Uconnect
®130 with Satellite Radio pg. 45
• Uconnect
®230 pg. 45
• Uconnect
®430/430N pg. 48
• How do I use the Navigation feature? pg. 55
• How do I pair my cell phone via Bluetooth
®with the Uconnect®Hands-Free Voice
Activation System? pg. 64
• How do I configure my Universal Garage Door Opener (HomeLink
®)? pg. 71
UTILITY
• How do I know how much I can tow with my Jeep Compass? pg. 78
WHAT TO DO IN EMERGENCIES
• What do I do if my TPMS warning light is blinking? pg. 80
• How do I change a flat tire? pg. 86
• How do I Jump-Start my vehicle? pg. 92
MAINTAINING YOUR VEHICLE
• Where is my Fuse Block located? pg. 108
• What type of oil do I use? pg. 102
• How often should I change my engine’s oil? pg. 103
• What should my tire pressure be set at? pg. 110
FAQ (How To?)
115
Page 118 of 124
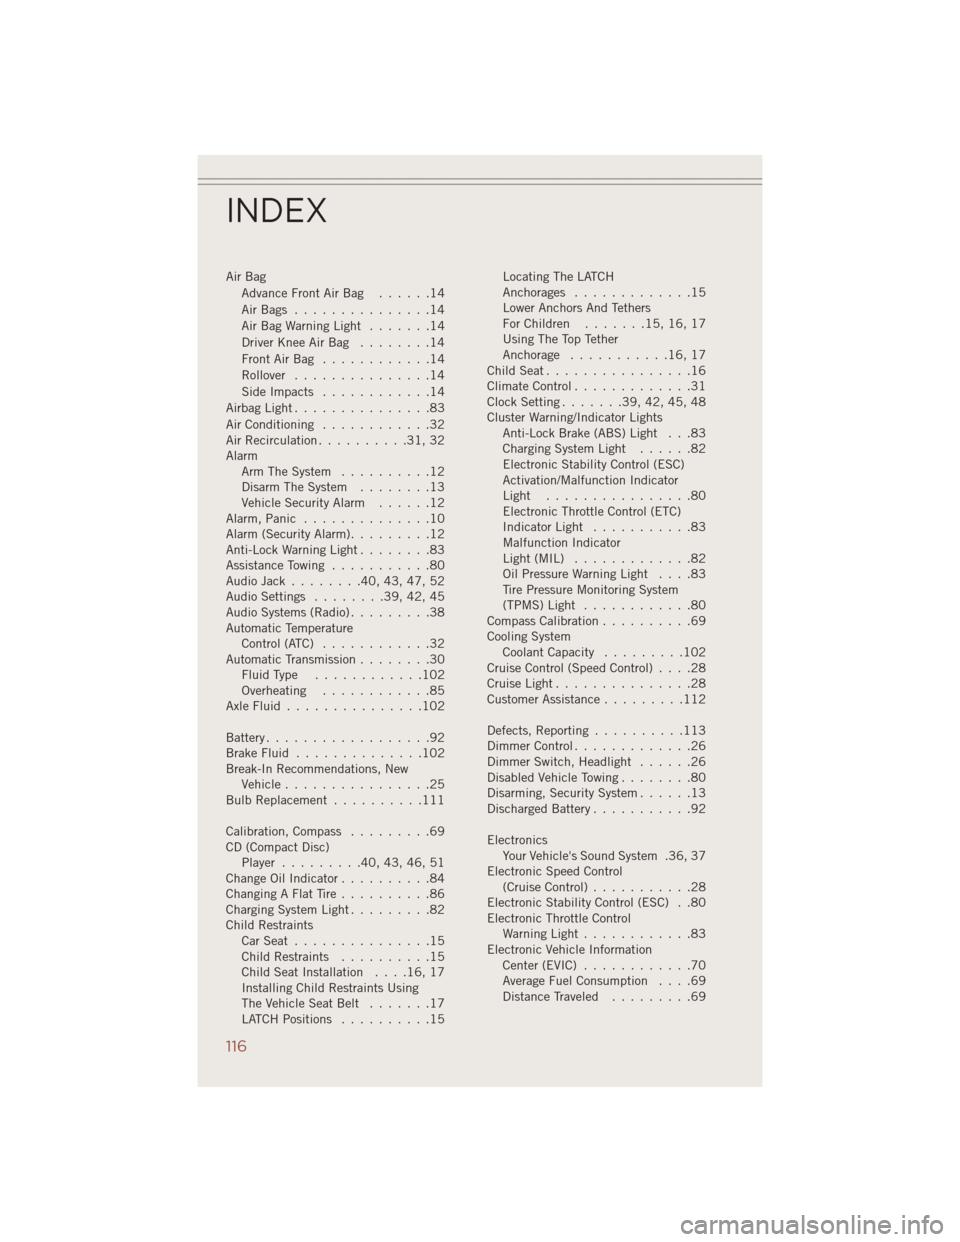
Air BagAdvanceFrontAirBag ......14
AirBags ...............14
AirBagWarningLight .......14
Driver Knee Air Bag ........14
FrontAirBag ............14
Rollover ...............14
SideImpacts ............14
AirbagLight...............83
Air Conditioning ............32
Air Recirculation ..........31,32
Alarm Arm The System ..........12
Disarm The System ........13
Vehicle Security Alarm ......12
Alarm, Panic ..............10
Alarm (Security Alarm) .........12
Anti-Lock Warning Light ........83
Assistance Towing ...........80
Audio Jack ........40,43,47,52
Audio Settings ........39,42,45
Audio Systems (Radio) .........38
Automatic Temperature Control (ATC) ............32
Automatic Transmission ........30
FluidType ............102
Overheating ............85
AxleFluid...............102
Battery ..................92
BrakeFluid ..............102
Break-In Recommendations, New Vehicle ................25
Bulb Replacement ..........111
Calibration, Compass .........69
CD (Compact Disc) Player .........40,43,46,51
Change Oil Indicator ..........84
Changing A Flat Tire ..........86
Charging System Light .........82
Child Restraints CarSeat ...............15
Child Restraints ..........15
Child Seat Installation ....16,17
Installing Child Restraints Using
The Vehicle Seat Belt .......17
LATCH Positions ..........15 Locating The LATCH
Anchorages
.............15
Lower Anchors And Tethers
ForChildren .......15,16,17
Using The Top Tether
Anchorage ...........16,17
ChildSeat................16
Climate Control .............31
Clock Setting .......39,42,45,48
Cluster Warning/Indicator Lights Anti-Lock Brake (ABS) Light . . .83
Charging System Light ......82
Electronic Stability Control (ESC)
Activation/Malfunction Indicator
Light ................80
Electronic Throttle Control (ETC)
Indicator Light ...........83
Malfunction Indicator
Light(MIL) .............82
Oil Pressure Warning Light ....83
Tire Pressure Monitoring System
(TPMS) Light ............80
Compass Calibration ..........69
Cooling System Coolant Capacity .........102
Cruise Control (Speed Control) ....28
CruiseLight...............28
Customer Assistance .........112
Defects, Reporting ..........113
Dimmer Control .............26
Dimmer Switch, Headlight ......26
Disabled Vehicle Towing ........80
Disarming, Security System ......
1
3
Discharged Battery ...........92
Electronics Your Vehicle's Sound System .36, 37
Electronic Speed Control (Cruise Control) ...........28
Electronic Stability Control (ESC) . .80
Electronic Throttle Control Warning Light ............83
Electronic Vehicle Information Center(EVIC) ............70
Average Fuel Consumption ....69
Distance Traveled .........69
INDEX
116
Page 120 of 124
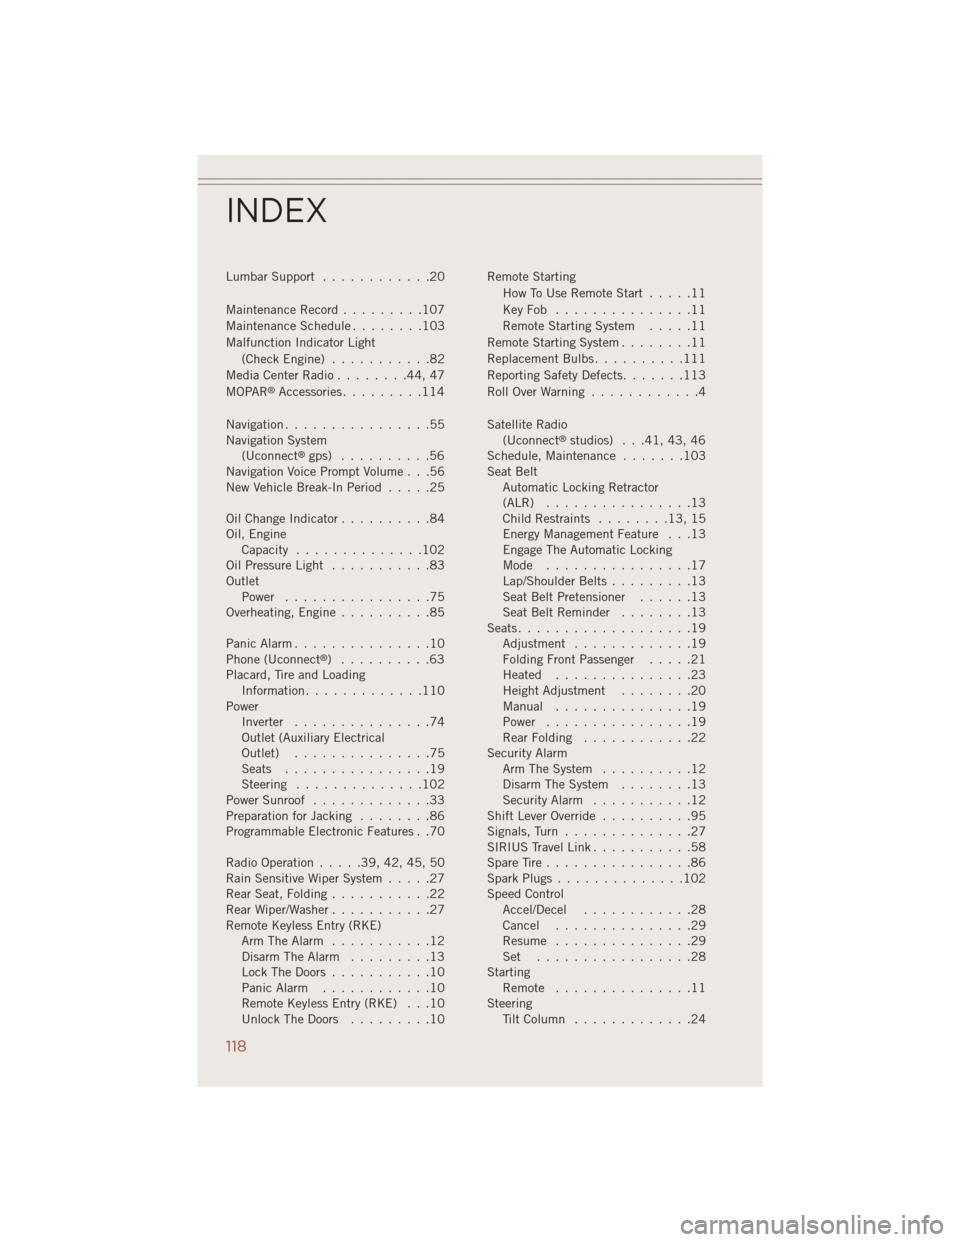
Lumbar Support............20
Maintenance Record .........107
MaintenanceSchedule........103
Malfunction Indicator Light (CheckEngine) ...........82
Media Center Radio ........44,47
MOPAR
®Accessories .........114
Navigation ................55
Navigation System (Uconnect
®gps) ..........56
Navigation Voice Prompt Volume . . .56
New Vehicle Break-In Period .....25
Oil Change Indicator ..........84
Oil, Engine Capacity ..............102
Oil Pressure Light ...........83
Outlet Power ................75
Overheating, Engine ..........85
Panic Alarm ...............10
Phone (Uconnect
®) ..........63
Placard, Tire and Loading Information .............110
Power Inverter ...............74
Outlet (Auxiliary Electrical
Outlet) ...............75
Seats ................19
Steering ..............102
Power Sunroof .............33
Preparation for Jacking ........86
Programmable Electronic Features . .70
Radio Operation .....39,42,45,50
Rain Sensitive Wiper System .....27
RearSeat,Folding...........22
RearWiper/Washer...........27
Remote Keyless Entry (RKE) Arm The Alarm ...........12
Disarm The Alarm .........13
Lock The Doors ...........10
Panic Alarm ............10
Remote Keyless Entry (RKE) . . .10
Unlock The Doors .........10 Remote Starting
HowToUseRemoteStart .....11
KeyFob ...............11
Remote Starting System .....11
Remote Starting System ........11
Replacement Bulbs ..........111
Reporting Safety Defects .......113
RollOverWarning ............4
Satellite Radio (Uconnect
®studios) . . .41, 43, 46
Schedule,Maintenance .......103
Seat Belt Automatic Locking Retractor
(ALR) ................13
Child Restraints ........13,15
Energy Management Feature . . .13
Engage The Automatic Locking
Mode ................17
Lap/Shoulder Belts .........13
Seat Belt Pretensioner ......13
SeatBeltReminder ........13
Seats ...................19
Adjustment .............19
Folding Front Passenger .....21
Heated ...............23
Height Adjustment ........20
Manual ...............19
Power ................19
RearFolding ............22
Security Alarm Arm The System ..........12
Disarm The System ........13
Security Alarm ...........12
Shift Lever Override ..........95
Signals, Turn ..............27
SIRIUS Travel Link ...........58
SpareTire................86
SparkPlugs..............102
Speed Control Accel/Decel ............28
Cancel ...............29
Resume ...............29
Set .................28
Starting Remote ...............11
Steering TiltColumn .............24
INDEX
118