radiator JEEP COMPASS 2014 1.G User Guide
[x] Cancel search | Manufacturer: JEEP, Model Year: 2014, Model line: COMPASS, Model: JEEP COMPASS 2014 1.GPages: 124, PDF Size: 2.64 MB
Page 87 of 124
IF YOUR ENGINE OVERHEATS
In any of the following situations, you can reduce the potential for overheating by
taking the appropriate action:
• On the highways — slow down.
• In city traffic — while stopped, shift the transmission to NEUTRAL, but do notincrease engine idle speed.
NOTE:
There are steps that you can take to slow down an impending overheat condition:
• If your air conditioner (A/C) is on, turn it off. The A/C system adds heat to the engine cooling system and turning the A/C off can help remove this heat.
• You can also turn the temperature control to maximum heat, the mode control to floor and the blower control to high. This allows the heater core to act as a
supplement to the radiator and aids in removing heat from the engine cooling
system.
CAUTION!
Driving with a hot cooling system could damage your vehicle. If the temperature
gauge reads HOT (H), pull over and stop the vehicle. Idle the vehicle with the air
conditioner turned off until the pointer drops back into the normal range. If the
pointer remains on HOT (H), and you hear continuous chimes, turn the engine off
immediately, and call for service.
WARNING!
You or others can be badly burned by hot engine coolant (antifreeze) or steam from
your radiator. If you see or hear steam coming from under the hood, do not open
the hood until the radiator has had time to cool. Never try to open a cooling system
pressure cap when the radiator or coolant bottle is hot.
AUTOMATIC TRANSMISSION OVERHEATING
During sustained high speed driving or trailer towing up long grades on hot days, the
automatic transmission oil may become too hot.
When the transmission overheat warning light
turns on, you will experience
reduced performance until the automatic transmission cools down. Once the trans-
mission has cooled down and the light turns off, you may continue to drive normally.
If the high speed is maintained, the overheating will continue to occur.
If the overheating continues, it may become necessary to stop the vehicle and run the
engine at idle with the transmission in NEUTRAL until the light turns off.
WHAT TO DO IN EMERGENCIES
85
Page 95 of 124
•To access the battery remove the air intake duct by turning the two finger screws,
located on the radiator support.
1. Set the parking brake, shift the auto-
matic transmission into PARK and
turn the ignition to LOCK.
2. Turn off the heater, radio, and all unnecessary electrical accessories.
3. If using another vehicle to jump-start the battery, park the vehicle within
the jumper cables reach, set the park-
ing brake and make sure the ignition
is OFF.
Jump-Starting Procedure
NOTE:
Remove Air Intake before proceeding with this Jump-Starting procedure.
1. Connect the positive (+)end of the jumper cable to the positive (+)post of the
vehicle with discharged battery.
2. Connect the opposite end of the positive (+)jumper cable to the positive (+)post
of the booster battery.
3. Connect the negative end (-)of the jumper cable to the negative (-)post of the
booster battery.
4. Connect the opposite end of the negative (-)jumper cable to a good engine ground
(exposed metal part of the discharged vehicle’s engine) away from the battery and
the fuel injection system.
5. Start the engine in the vehicle that has the booster battery, let the engine idle a few minutes, and then start the engine in the vehicle with the discharged battery.
Once the engine is started, remove the jumper cables in the reverse sequence:
1. Disconnect the negative (-)jumper cable from the engine ground of the vehicle
with the discharged battery.
2. Disconnect the negative end (-)of the jumper cable from the negative (-)post of
the booster battery.
3. Disconnect the opposite end of the positive (+)jumper cable from the positive (+)
post of the booster battery.
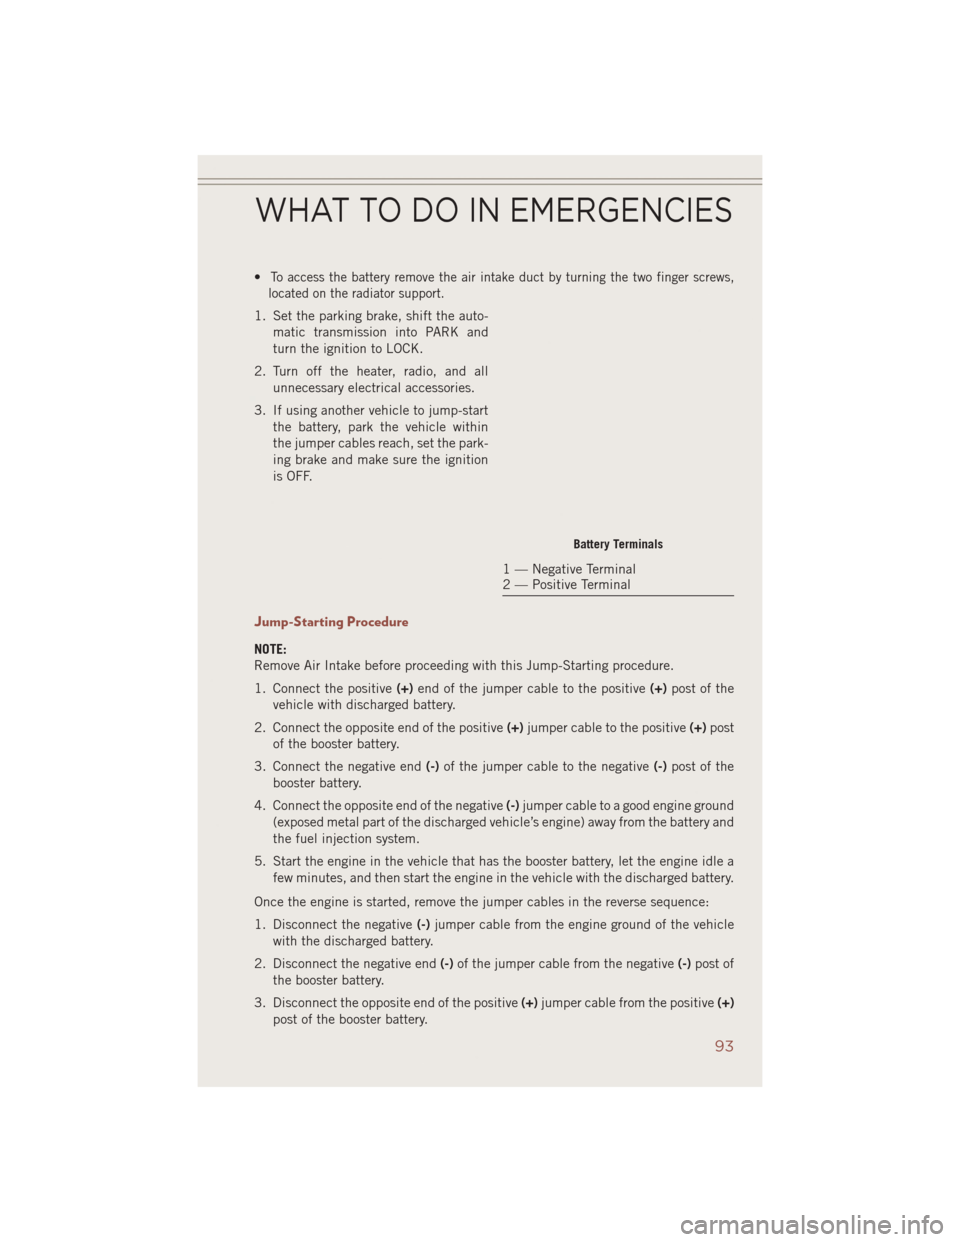
Battery Terminals
1 — Negative Terminal
2 — Positive Terminal
WHAT TO DO IN EMERGENCIES
93
Page 96 of 124
4. Disconnect the positive(+)end of the jumper cable from the positive (+)post of
the vehicle with discharged battery.
5. Reinstall the air intake duct.
If frequent jump-starting is required to start your vehicle you should have the battery
and charging system inspected at your authorized dealer.
CAUTION!
• Accessories that can be plugged into the vehicle power outlets draw power from the vehicle’s battery, even when not in use (i.e., cellular phones, etc.).
Eventually, if plugged in long enough, the vehicle’s battery will discharge
sufficiently to degrade battery life and/or prevent the engine from starting.
• Do not use a portable battery booster pack or any other booster source with a
system voltage greater than 12 Volts or damage to the battery, starter motor,
alternator or electrical system may occur.
• Failure to follow these procedures could result in damage to the charging
system of the booster vehicle or the discharged vehicle.
WARNING!
• Do not attempt jump-starting if the battery is frozen. It could rupture or explodeand cause personal injury.
• Take care to avoid the radiator cooling fan whenever the hood is raised. It can
start anytime the ignition switch is on. You can be injured by moving fan
blades.
• Remove any metal jewelry such as watch bands or bracelets that might make
an inadvertent electrical contact. You could be seriously injured.
• Batteries contain sulfuric acid that can burn your skin or eyes and generate
hydrogen gas which is flammable and explosive. Keep open flames or sparks
away from the battery.
• Do not allow vehicles to touch each other as this could establish a ground
connection and personal injury could result.
• Failure to follow this procedure could result in personal injury or property
damage due to battery explosion.
• Do not connect the cable to the negative post (-)of the discharged battery. The
resulting electrical spark could cause the battery to explode and could result in
personal injury.
WHAT TO DO IN EMERGENCIES
94
Page 105 of 124
ComponentFluid, Lubricant, or Genuine
Part Capacities
Brake Master Cylinder We recommend you use
MOPAR
®DOT 3, SAE
J1703. If DOT 3 is not
available, then DOT 4 is acceptable. —
Power Steering Reservoir We recommend you use
MOPAR
®Power Steering
Fluid +4 or MOPAR®
ATF+4®Automatic
Transmission Fluid. —
CAUTION!
• Mixing of engine coolant (antifreeze) other than specified Organic Additive
Technology (OAT) engine coolant (antifreeze), may result in engine damage and
may decrease corrosion protection. Organic Additive Technology (OAT) engine
coolant is different and should not be mixed with Hybrid Organic Additive
Technology (HOAT) engine coolant (antifreeze) or any “globally compatible”
coolant (antifreeze). If a non-OAT engine coolant (antifreeze) is introduced into
the cooling system in an emergency, the cooling system will need to be drained,
flushed, and refilled with fresh OAT coolant (conforming to MS-12106), by an
authorized dealer as soon as possible.
• Do not use water alone or alcohol-based engine coolant (antifreeze) products.
Do not use additional rust inhibitors or antirust products, as they may not be
compatible with the radiator engine coolant and may plug the radiator.
• This vehicle has not been designed for use with propylene glycol-based engine
coolant (antifreeze). Use of propylene glycol-based engine coolant (antifreeze)
is not recommended.
MAINTENANCE SCHEDULE
Your vehicle is equipped with an automatic oil change indicator system. The oil
change indicator system will remind you that it is time to take your vehicle in for
scheduled maintenance.
Based on engine operation conditions, the oil change indicator message will
illuminate. This means that service is required for your vehicle. Operating conditions
such as frequent short-trips, trailer tow, extremely hot or cold ambient temperatures
will influence when the “Change Oil” or “Oil Change Required” message is dis-
played. Severe Operating Conditions can cause the change oil message to illuminate
as early as 3,500 miles (5,600 km) since last reset. Have your vehicle serviced as
soon as possible, within the next 500 miles (805 km).
MAINTAINING YOUR VEHICLE
103
Page 110 of 124
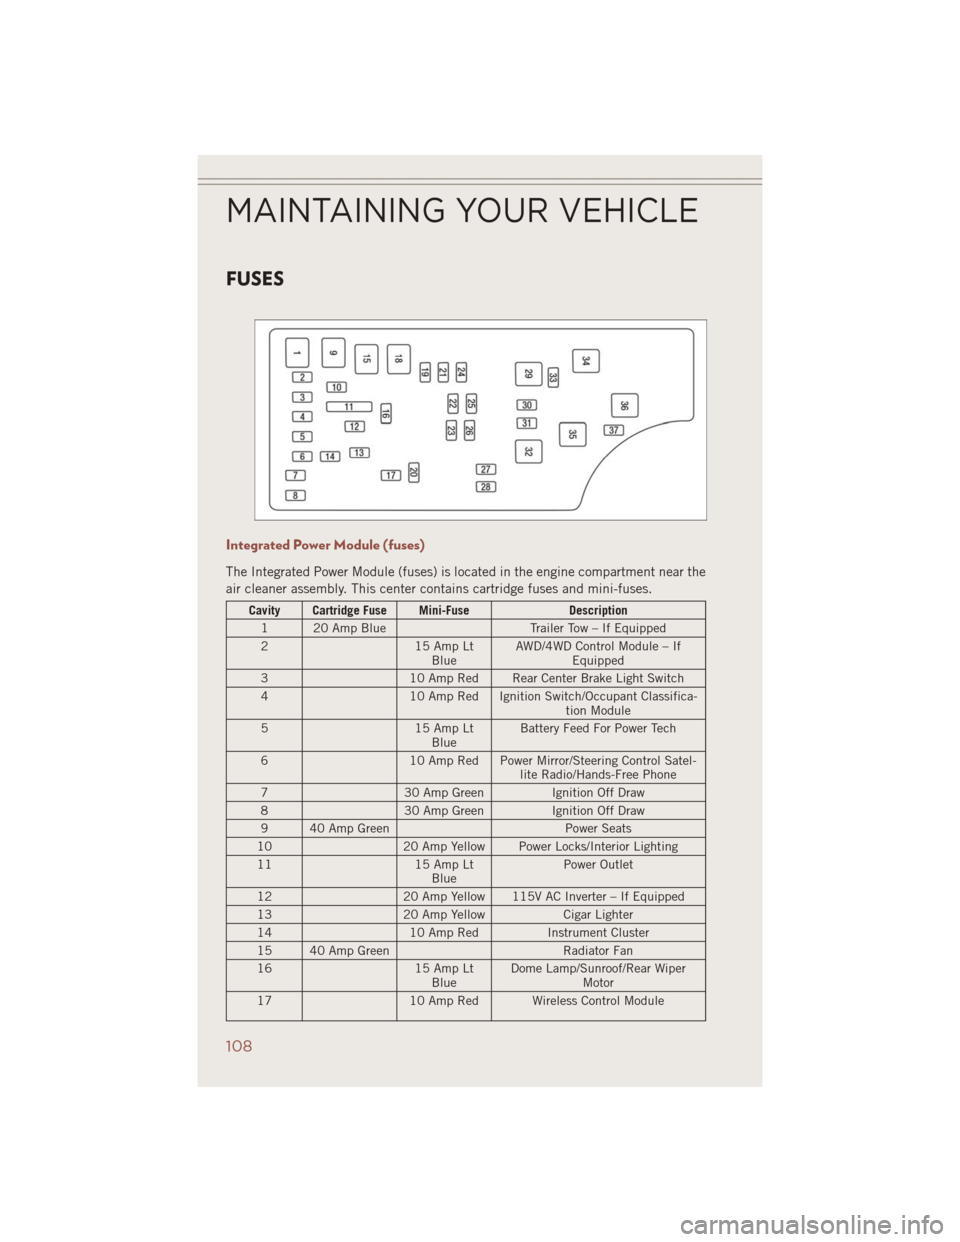
FUSES
Integrated Power Module (fuses)
The Integrated Power Module (fuses) is located in the engine compartment near the
air cleaner assembly. This center contains cartridge fuses and mini-fuses.
Cavity Cartridge Fuse Mini-FuseDescription
1 20 Amp Blue Trailer Tow – If Equipped
2 15 Amp Lt
Blue AWD/4WD Control Module – If
Equipped
3 10 Amp Red Rear Center Brake Light Switch
4 10 Amp Red Ignition Switch/Occupant Classifica-
tion Module
5 15 Amp Lt
Blue Battery Feed For Power Tech
6 10 Amp Red Power Mirror/Steering Control Satel-
lite Radio/Hands-Free Phone
7 30 Amp Green Ignition Off Draw
8 30 Amp Green Ignition Off Draw
9 40 Amp Green Power Seats
10 20 Amp Yellow Power Locks/Interior Lighting
11 15 Amp Lt
Blue Power Outlet
12 20 Amp Yellow 115V AC Inverter – If Equipped
13 20 Amp Yellow Cigar Lighter
14 10 Amp RedInstrument Cluster
15 40 Amp Green Radiator Fan
16 15 Amp Lt
Blue Dome Lamp/Sunroof/Rear Wiper
Motor
17 10 Amp Red Wireless Control Module
MAINTAINING YOUR VEHICLE
108