stop start JEEP COMPASS 2015 1.G Owners Manual
[x] Cancel search | Manufacturer: JEEP, Model Year: 2015, Model line: COMPASS, Model: JEEP COMPASS 2015 1.GPages: 560, PDF Size: 11.51 MB
Page 15 of 560
NOTE:If you try to remove the key before you place the
shift lever in PARK, the key may become trapped tem-
porarily in the ignition switch cylinder. If this occurs,
place the shift lever in PARK, rotate the key clockwise
slightly, then remove the key as described above. If a
malfunction occurs, the system will trap the key in the
ignition cylinder to warn you that this safety feature is
inoperable. The engine can be started and stopped but
the key cannot be removed until you obtain service.
WARNING!
•Before exiting a vehicle, always apply the parking
brake, shift the transmission into PARK and re-
move the Key Fob from the ignition. When leaving
the vehicle, always lock your vehicle.
•Never leave children alone in a vehicle, or with
access to an unlocked vehicle.
(Continued)
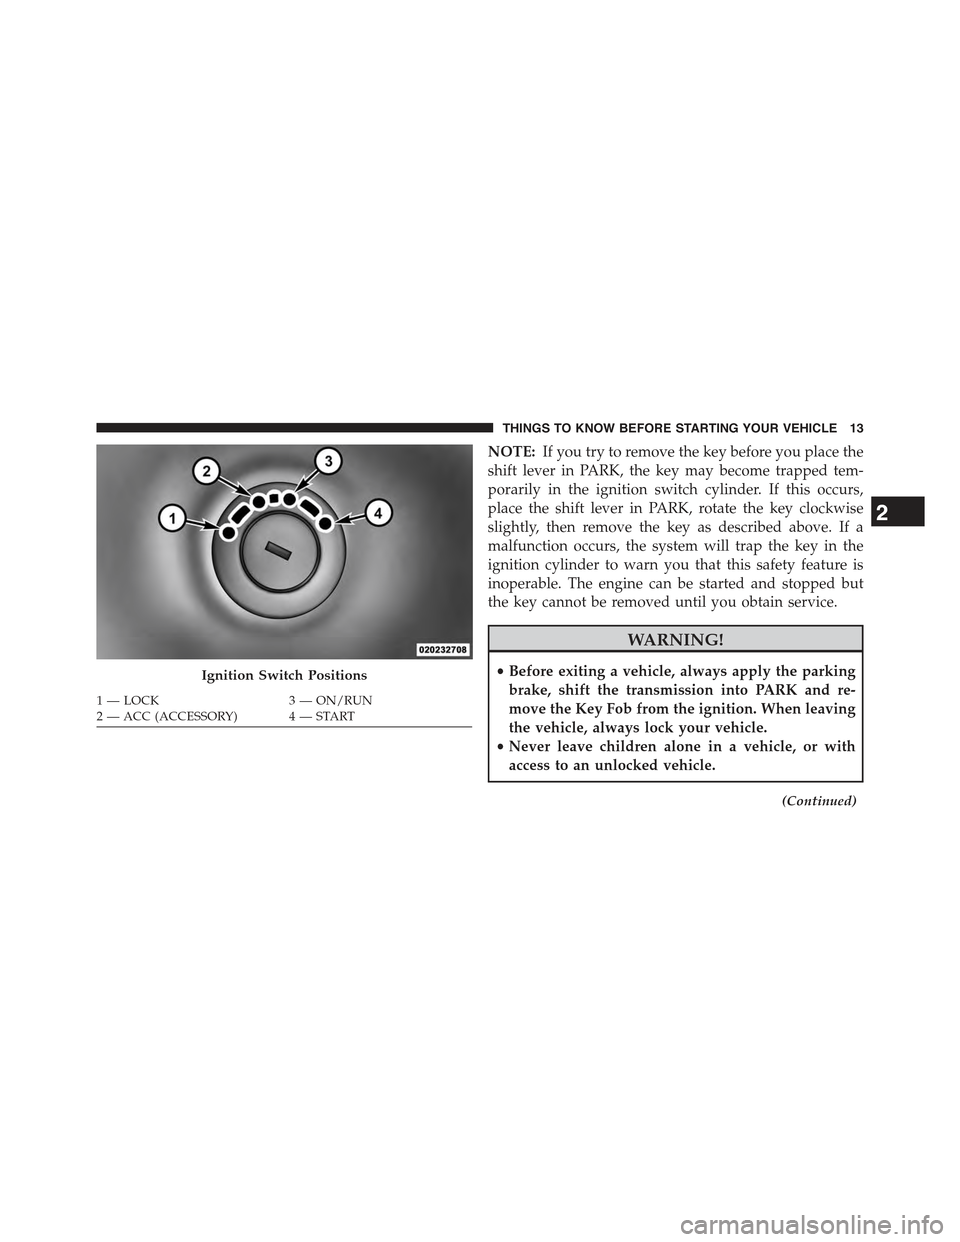
Ignition Switch Positions
1—LOCK3—ON/RUN2—ACC(ACCESSORY) 4—START
2
THINGS TO KNOW BEFORE STARTING YOUR VEHICLE 13
Page 19 of 560
Customer Key Programming
If you have two valid Sentry Keys®, you can program
new Sentry Keys® to the system by performing the
following procedure:
1. Cut the additional Sentry Key® Transponder blank(s)
to match the ignition switch lock cylinder key code.
2. Insert the first valid key into the ignition switch. Turn
the ignition switch to the ON/RUN position for at
least three seconds, but no longer than 15 seconds.
Then, turn the ignition switch to the LOCK position
and remove the first key.
3. Insert the second valid key into the ignition switch.
Turn the ignition switch to the ON/RUN position
within 15 seconds. After 10 seconds, a chime will
sound. In addition, the Vehicle Security Light will
begin to flash. Turn the ignition switch to the LOCK
position and remove the second key.
4. Insert a blank Sentry Key® into the ignition switch.
Turn the ignition switch to the ON/RUN position
within 60 seconds. After 10 seconds, a single chime
will sound. In addition, the Vehicle Security Light will
stop flashing. To indicate that programming is com-
plete, the Vehicle Security Light will turn on again for
three seconds and then turn off.
The new Sentry Key® is programmed.The Remote
Keyless Entry (RKE) transmitter will also be pro-
grammed during this procedure.
Repeat this procedure to program up to eight keys. If you
do not have a programmed Sentry Key®, contact your
authorized dealer for details.
NOTE:If a programmed key is lost, see your authorized
dealer to have all remaining keys erased from the
system’s memory. This will prevent the lost key from
2
THINGS TO KNOW BEFORE STARTING YOUR VEHICLE 17
Page 45 of 560
NOTE:If BeltAlert has been deactivated, the Seat Belt
Reminder Light will continue to illuminate while the
driver ’s or outboard front passenger ’s (if equipped with
BeltAlert) seat belt remains unbuckled.
Lap/Shoulder Belts
All seating positions in your vehicle are equipped with
lap/shoulder belts.
The seat belt webbing retractor will lock only during very
sudden stops or collisions. This feature allows the shoul-
der part of the seat belt to move freely with you under
normal conditions. However, in a collision the seat belt
will lock and reduce your risk of striking the inside of the
vehicle or being thrown out of the vehicle.
WARNING!
•Relying on the air bags alone could lead to more
severe injuries in a collision. The air bags work
with your seat belt to restrain you properly. In
some collisions, the air bags won’t deploy at all.
Always wear your seat belt even though you have
air bags.
•In a collision, you and your passengers can suffer
much greater injuries if you are not properly buck-
led up. You can strike the interior of your vehicle or
other passengers, or you can be thrown out of the
vehicle. Always be sure you and others in your
vehicle are buckled up properly.
•It is dangerous to ride in a cargo area, inside or
outside of a vehicle. In a collision, people riding in
these areas are more likely to be seriously injured
or killed.
(Continued)
2
THINGS TO KNOW BEFORE STARTING YOUR VEHICLE 43
Page 47 of 560
WARNING!(Continued)
•A seat belt that is too loose will not protect you
properly. In a sudden stop, you could move too far
forward, increasing the possibility of injury. Wear
your seat belt snugly.
•A seat belt that is worn under your arm is dangerous.
Your body could strike the inside surfaces of the
vehicle in a collision, increasing head and neck
injury. A seat belt worn under the arm can cause
internal injuries. Ribs aren’t as strong as shoulder
bones. Wear the seat belt over your shoulder so that
your strongest bones will take the force in a collision.
•A shoulder belt placed behind you will not protect
you from injury during a collision. You are more
likely to hit your head in a collision if you do not
wear your shoulder belt. The lap and shoulder belt
are meant to be used together.
(Continued)
WARNING!(Continued)
•A frayed or torn seat belt could rip apart in a
collision and leave you with no protection. Inspect
the seat belt system periodically, checking for
cuts, frays, or loose parts. Damaged parts must be
replaced immediately. Do not disassemble or
modify the seat belt system. Seat belt assemblies
must be replaced after a collision.
Lap/Shoulder Belt Operating Instructions
1. Enter the vehicle and close the door. Sit back and
adjust the seat.
2. The seat belt latch plate is above the back of the front
seat, and next to your arm in the rear seat (for vehicles
equipped with a rear seat). Grasp the latch plate and
pull out the seat belt. Slide the latch plate up the
webbing as far as necessary to allow the seat belt to go
around your lap.
2
THINGS TO KNOW BEFORE STARTING YOUR VEHICLE 45
Page 82 of 560
WARNING!
•Improper installation can lead to failure of an infant
or child restraint. It could come loose in a collision.
The child could be badly injured or killed. Follow
the child restraint manufacturer ’s directions exactly
when installing an infant or child restraint.
•After a child restraint is installed in the vehicle, do
not move the vehicle seat forward or rearward
because it can loosen the child restraint attach-
ments. Remove the child restraint before adjusting
the vehicle seat position. When the vehicle seat has
been adjusted, reinstall the child restraint.
•When your child restraint is not in use, secure it in
the vehicle with the seat belt or LATCH anchor-
ages, or remove it from the vehicle. Do not leave it
loose in the vehicle. In a sudden stop or accident, it
could strike the occupants or seatbacks and cause
serious personal injury.
Children Too Large For Booster Seats
Children who are large enough to wear the shoulder belt
comfortably, and whose legs are long enough to bend
over the front of the seat when their back is against the
seatback, should use the seat belt in a rear seat. Use this
simple 5-step test to decide whether the child can use the
vehicle’s seat belt alone:
1. Can the child sit all the way back against the back of
the vehicle seat?
2. Do the child’s knees bend comfortably over the front
of the vehicle seat – while they are still sitting all the
way back?
3. Does the shoulder belt cross the child’s shoulder
between their neck and arm?
80 THINGS TO KNOW BEFORE STARTING YOUR VEHICLE
Page 160 of 560
NOTE:
•The head restraints should only be removed by quali-
fied technicians, for service purposes only. If either of
the head restraints require removal, see your autho-
rized dealer.
•In the event of deployment of an Active Head Re-
straint, refer to “Occupant Restraints/Resetting Active
Head Restraints (AHR)” in “Things To Know Before
Starting Your Vehicle” for further information.
WARNING!
•Do not place items over the top of the Active Head
Restraint, such as coats, seat covers or portable
DVD players. These items may interfere with the
operation of the Active Head Restraint in the event
of a collision and could result in serious injury or
death.
(Continued)
WARNING!(Continued)
•Active Head Restraints may be deployed if they are
struck by an object such as a hand, foot or loose
cargo. To avoid accidental deployment of the Ac-
tive Head Restraint ensure that all cargo is secured,
as loose cargo could contact the Active Head Re-
straint during sudden stops. Failure to follow this
warning could cause personal injury if the Active
Head Restraint is deployed.
Rear Head Restraints
The head restraints in the rear are non adjustable. Refer to
“Occupant Restraints” in “Things To Know Before Start-
ing Your Vehicle” for information on Tether routing.
158 UNDERSTANDING THE FEATURES OF YOUR VEHICLE
Page 216 of 560
INSTRUMENT CLUSTER DESCRIPTIONS
1. Fuel Gauge /Fuel Door Reminder
When the ignition switch is in the ON/RUN
position, the pointer will show the level of fuel
remaining in the fuel tank. The fuel pump
symbol points to the side of the vehicle where
the fuel door is located.
2. Charging System Light
This light shows the status of the electrical charg-
ing system. The light should come on when the
ignition switch is first turned to ON/RUN and remain on
briefly as a bulb check. If the light stays on or comes on
while driving, turn off some of the vehicle’s non-essential
electrical devices or increase engine speed (if at idle).
If the charging system light remains on, it means that the
vehicle is experiencing a problem with the charging
system. Obtain SERVICE IMMEDIATELY. See an autho-
rized dealer.
If jump starting is required, refer to “Jump Starting
Procedures” in “What To Do In Emergencies”.
3. Electronic Throttle Control (ETC) Light
This light informs you of a problem with the
Electronic Throttle Control (ETC) system. If a
problem is detected, the light will come on
while the engine is running. Cycle the ignition
key when the vehicle has completely stopped and the
shift lever is placed in the PARK position. The light
should turn off. If the light remains lit with the engine
running, your vehicle will usually be drivable; however,
see an authorized dealer for service as soon as possible.
If the light is flashing when the engine is running,
immediate service is required and you may experience
reduced performance, an elevated/rough idle or engine
stall and your vehicle may require towing. The light will
come on when the ignition is first turned to ON/RUN
and remain
214 UNDERSTANDING YOUR INSTRUMENT PANEL
Page 217 of 560
on briefly as a bulb check. If the light does not come on
during starting, have the system checked by an autho-
rized dealer.
4. Oil Pressure Warning Light
This light indicates low engine oil pressure. The
light should turn on momentarily when the engine is
started. If the light turns on while driving, stop the
vehicle and shut off the engine as soon as possible. A
chime will sound when this light turns on.
Do not operate the vehicle until the cause is corrected.
This light does not indicate how much oil is in the engine.
The engine oil level must be checked under the hood.
5. Low Fuel Light
When the fuel level reaches approximately 2.0 gal
(7.8 L) this light will turn on, and remain on until
fuel is added.
6. Speedometer
The Speedometer shows the vehicle speed in miles per
hour (MPH) and kilometers per hour (km/h).
7. Air Bag Warning Light
This light will turn on for four to eight seconds
as a bulb check when the ignition switch is first
turned to ON/RUN. If the light is either not on
during starting, stays on, or turns on while
driving, have the system inspected at an authorized
dealer as soon as possible. Refer to “Occupant Restraints”
in “Things To Know Before Starting Your Vehicle” for
further information.
8. Turn Signal Indicators
The arrow will flash with the exterior turn
signal when the turn signal lever is operated.
4
UNDERSTANDING YOUR INSTRUMENT PANEL 215
Page 292 of 560
•Jump backward in the current track by pushing and
holding the <
track.
•Jump forward in the current track by pushing and
holding theFF>> button.
•A single push backward <
jump backward or forward respectively, for five sec-
onds.
•Use the <
previous or next track. Pushing theSEEK>> button
during play mode will jump to the next track in the
list, or push the VR button and say#Next or Previous
Track.#
•While a track is playing, push theINFObutton to see
the associated metadata (artist, track title, album, etc.)
for that track. Pushing theINFObutton again jumps to
the next screen of data for that track. Once all screens
have been viewed, the lastINFObutton push will go
back to the play mode screen on the radio.
•Pushing theREPEATbutton will change the audio
device mode to repeat the current playing track or
push the VR button and say#Repeat ON#or#Repeat
Off.#
•Push theSCANbutton to use iPod®/USB/MP3 de-
vice scan mode, which will play the first ten seconds of
each track in the current list and then forward to the
next song. To stop SCAN mode and start playing the
desired track, when it is playing the track, push the
SCANbutton again. During Scan mode, pushing the
<
and next tracks.
290 UNDERSTANDING YOUR INSTRUMENT PANEL
Page 323 of 560
Never shift into REVERSE until the vehicle has come to a
complete stop.
NOTE:During cold weather, until the transmission lubri-
cant is warm, you may experience slightly higher shift
efforts. This is normal and not harmful to the transmission.
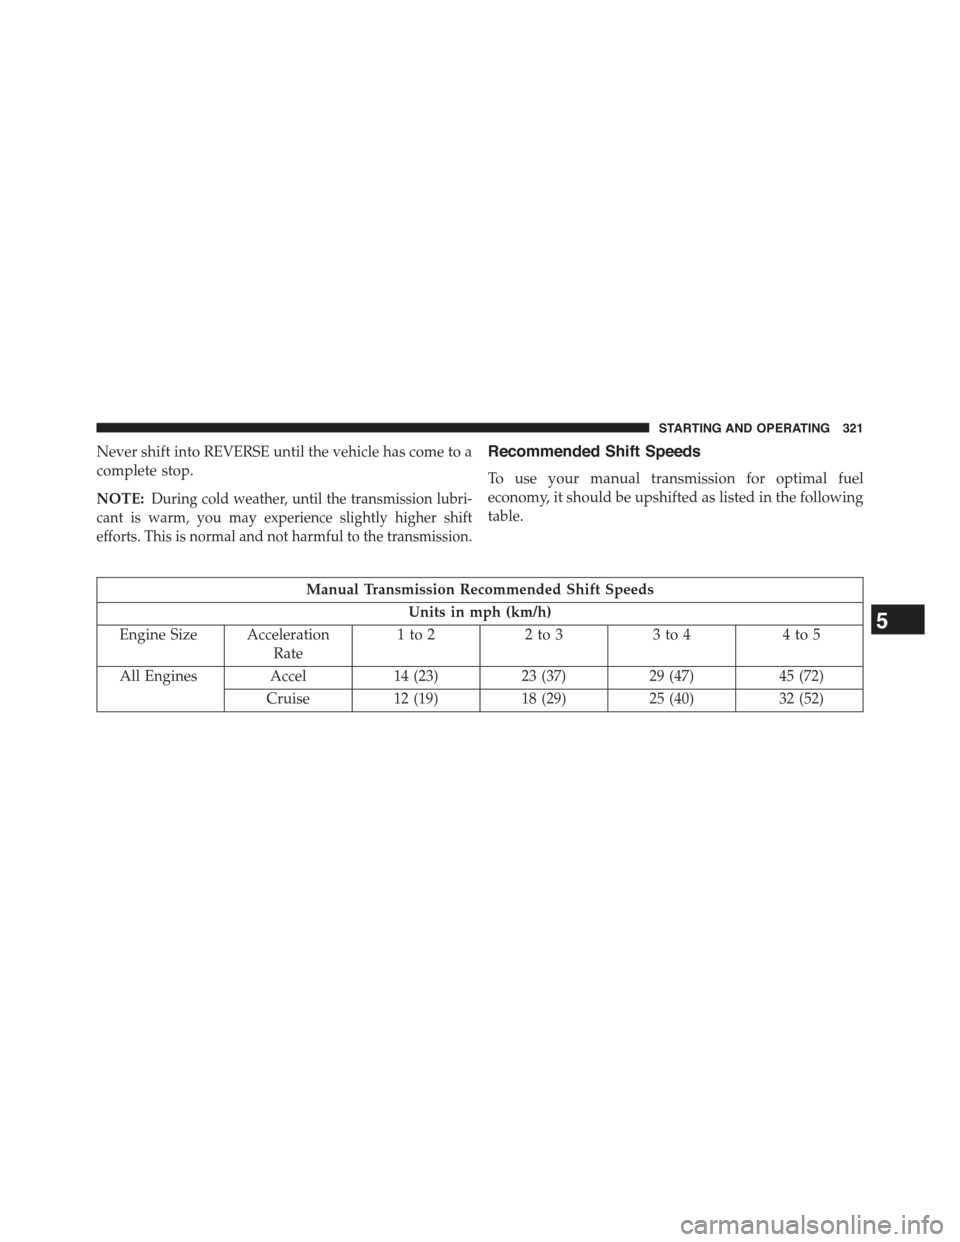
Recommended Shift Speeds
To use your manual transmission for optimal fuel
economy, it should be upshifted as listed in the following
table.
Manual Transmission Recommended Shift Speeds
Units in mph (km/h)
Engine Size Acceleration
Rate
1to22to33to44to5
All Engines Accel14 (23)23 (37)29 (47)45 (72)
Cruise12 (19)18 (29)25 (40)32 (52)
5
STARTING AND OPERATING 321