door lock JEEP COMPASS 2015 1.G User Guide
[x] Cancel search | Manufacturer: JEEP, Model Year: 2015, Model line: COMPASS, Model: JEEP COMPASS 2015 1.GPages: 132, PDF Size: 21.94 MB
Page 9 of 132
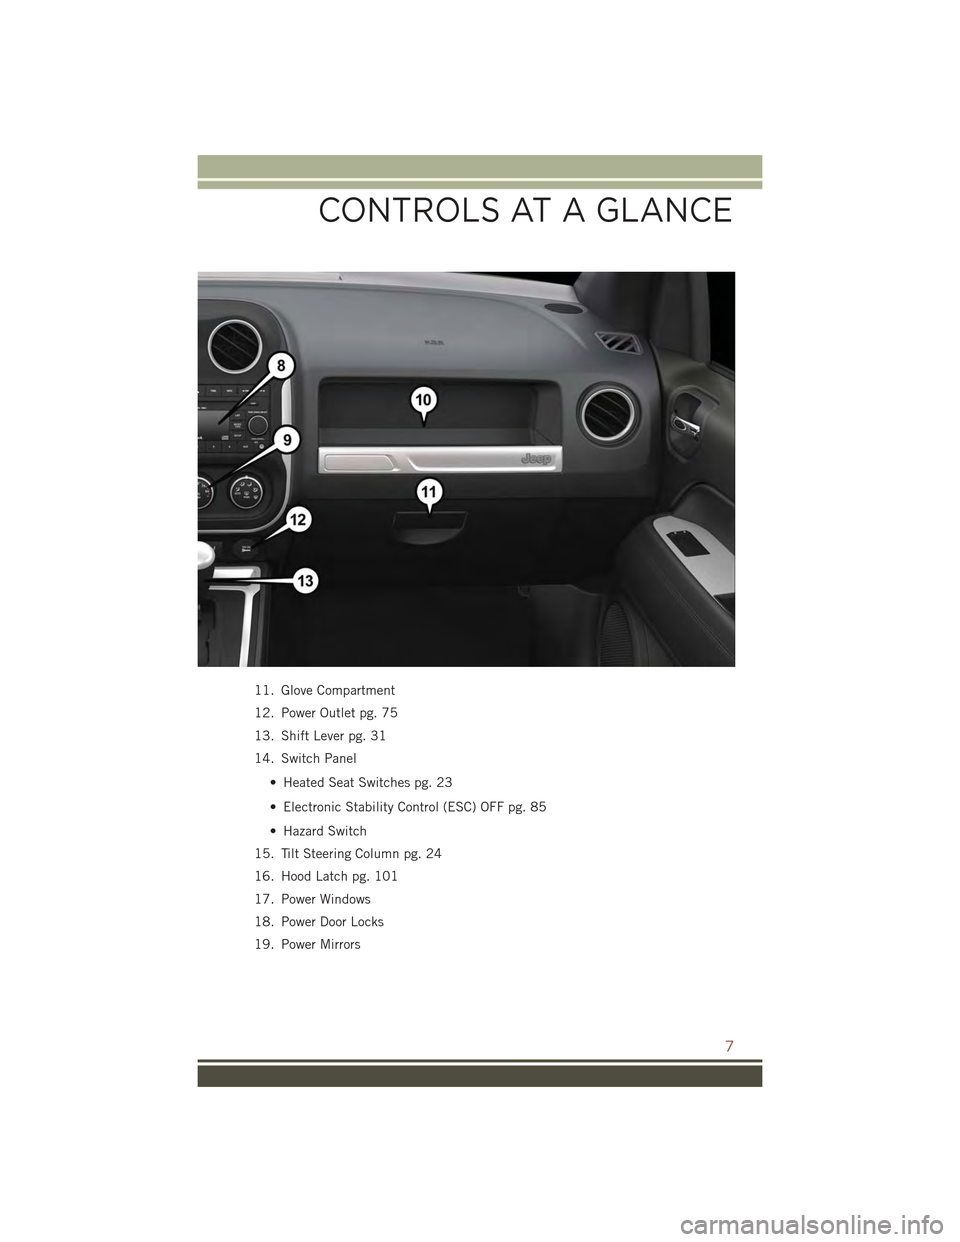
11. Glove Compartment
12. Power Outlet pg. 75
13. Shift Lever pg. 31
14. Switch Panel
• Heated Seat Switches pg. 23
• Electronic Stability Control (ESC) OFF pg. 85
• Hazard Switch
15. Tilt Steering Column pg. 24
16. Hood Latch pg. 101
17. Power Windows
18. Power Door Locks
19. Power Mirrors
CONTROLS AT A GLANCE
7
Page 12 of 132
KEY FOB
Locking And Unlocking The Doors
And Liftgate
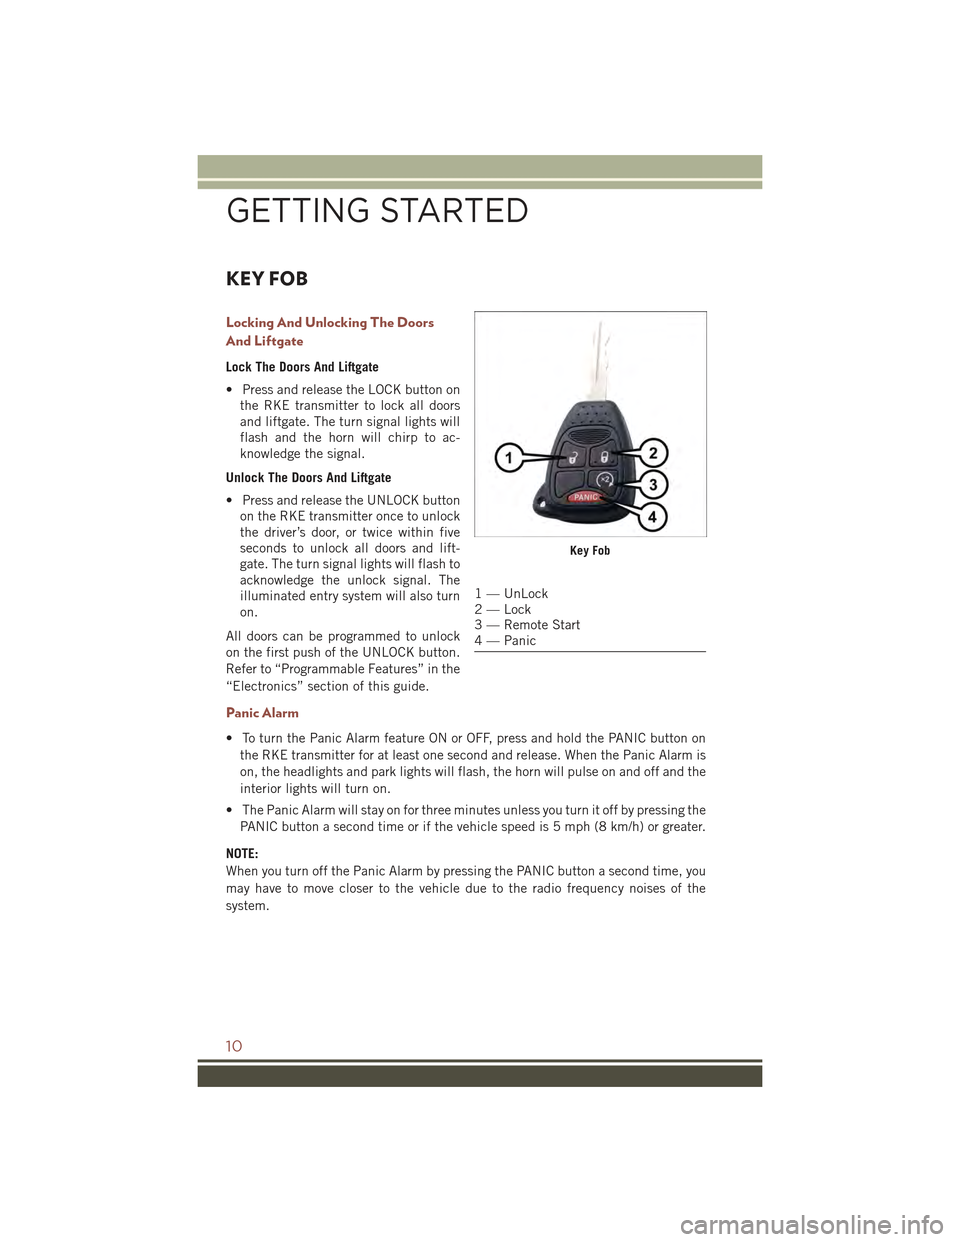
Lock The Doors And Liftgate
• Press and release the LOCK button on
the RKE transmitter to lock all doors
and liftgate. The turn signal lights will
flash and the horn will chirp to ac-
knowledge the signal.
Unlock The Doors And Liftgate
• Press and release the UNLOCK button
on the RKE transmitter once to unlock
the driver’s door, or twice within five
seconds to unlock all doors and lift-
gate. The turn signal lights will flash to
acknowledge the unlock signal. The
illuminated entry system will also turn
on.
All doors can be programmed to unlock
on the first push of the UNLOCK button.
Refer to “Programmable Features” in the
“Electronics” section of this guide.
Panic Alarm
• To turn the Panic Alarm feature ON or OFF, press and hold the PANIC button on
the RKE transmitter for at least one second and release. When the Panic Alarm is
on, the headlights and park lights will flash, the horn will pulse on and off and the
interior lights will turn on.
• The Panic Alarm will stay on for three minutes unless you turn it off by pressing the
PANIC button a second time or if the vehicle speed is 5 mph (8 km/h) or greater.
NOTE:
When you turn off the Panic Alarm by pressing the PANIC button a second time, you
may have to move closer to the vehicle due to the radio frequency noises of the
system.
Key Fob
1 — UnLock2 — Lock3 — Remote Start4 — Panic
GETTING STARTED
10
Page 13 of 132
WARNING!
• When leaving the vehicle, always make sure the ignition is in the OFF position,
remove the key fob from the vehicle, and lock your vehicle.
• Never leave children alone in a vehicle, or with access to an unlocked vehicle.
Allowing children to be in a vehicle unattended is dangerous for a number of
reasons. A child or others could be seriously or fatally injured. Children should
be warned not to touch the parking brake, brake pedal or the transmission gear
selector.
• Do not leave the Key Fob in or near the vehicle (or in a location accessible to
children). A child could operate power windows, other controls, or move the
vehicle.
REMOTE START
NOTE:
The vehicle must be equipped with an automatic transmission to be equipped with
Remote Start.
• Push the REMOTE START buttonx2on the Key Fob twice within five seconds.
Pushing the REMOTE START button a third time shuts the engine off.
• To drive the vehicle, push the UNLOCK button, insert the key in the ignition and
turn to the ON/RUN position.
With remote start, the engine will only run for 15 minutes (timeout) unless the
ignition key is placed in the ON/RUN position.
The vehicle must be started with the key after two consecutive timeouts.
All of the following conditions must be met before the engine will remote start:
• Gear selector in PARK
• Doors closed
• Hood closed
• Hazard switch off
• Brake switch inactive (brake pedal not pressed)
• Ignition key removed from ignition switch
• Battery at an acceptable charge level
• RKE PANIC button not pressed
• System not disabled from previous remote start event
• Vehicle theft alarm not active
GETTING STARTED
11
Page 14 of 132
WARNING!
• Do not start or run an engine in a closed garage or confined area. Exhaust gas
contains Carbon Monoxide (CO) which is odorless and colorless. Carbon
Monoxide is poisonous and can cause serious injury or death when inhaled.
• Keep Key Fob transmitters away from children. Operation of the Remote Start
System, windows, door locks or other controls could cause serious injury or
death.
VEHICLE SECURITY ALARM
This Vehicle Security Alarm monitors the doors, liftgate, and ignition switch for
unauthorized operation.
When the alarm is activated, the interior switches for door locks are disabled. The
Vehicle Security Alarm provides both audio and visual signals repeatedly for three
minutes. If the disturbance is still present (driver's door, passenger door, other doors,
ignition) after three minutes, the parking lights and tail lights will flash for an
additional 15 minutes.
To A r m :
• Lock the door using either the power door lock switch (one door must be open) or
the LOCK button on the Remote Keyless Entry (RKE) transmitter (doors can be
open or closed), and close all doors.
The Vehicle Security Light in the instrument cluster will flash for 16 seconds. This
shows that the Vehicle Security Alarm is arming. During this period, if a door is
opened, the ignition is cycled to ON/RUN, or the power door locks are unlocked in any
manner, the Vehicle Security Alarm will automatically disarm.
NOTE:
• The Vehicle Security Alarm will not arm if you lock the doors with the manual door
lock plungers.
• Once armed, the Vehicle Security Alarm disables the unlock switch on the driver
door trim panel and passenger door trim panel.
To D i s a r m T h e S y s t e m :
• Push the Key Fob UNLOCK button or cycle the ignition to the ON/RUN position.
The Vehicle Security Alarm is designed to protect your vehicle; however, you can
create conditions where the Vehicle Security Alarm will give you a false alarm. If one
of the previously described arming sequences has occurred, the Vehicle Security
Alarm will arm regardless of whether you are in the vehicle or not. If you remain in the
vehicle and open a door, the alarm will sound. If this occurs, disarm the Vehicle
Security Alarm.
GETTING STARTED
12
Page 71 of 132
PROGRAMMABLE FEATURES
Electronic Vehicle Information Center (EVIC)
The EVIC can be used to program the following Personal Settings. Push and release
theMENUbutton until Personal Settings displays, then push the DOWN Arrow button
to scroll through the settings. Push the RIGHT Arrow buttonto change the
setting.
• Language• Illuminated Approach
• Auto Unlock On Exit• Hill Start Assist (HSA)
• RKE Unlock Driver's Door 1st • Display Units In
• Flash Lamps With Lock• Confirmation of Voice Commands
• Sound Horn With Lock• Automatic Compass Calibration
• Headlamp Off Delay• Compass Variance
• Key Off Power Delay
Key Fob Programmable Features
The following features may also be programmed by using the Key Fob transmitter or
the ignition switch and driver's door lock switch.
NOTE:
Pushing the LOCK button while you are inside the vehicle will activate the Vehicle
Security Alarm. Opening a door with the Vehicle Security Alarm activated will cause
the alarm to sound. Push the UNLOCK button to deactivate the Vehicle Security
Alarm.
Unlock On First Push
To unlock either the driver's side, or all doors, on the first push of the UNLOCK
button:
• Push and hold the LOCK button for at least four seconds, but no longer than 10
seconds. Then, push and hold the UNLOCK button while still holding the LOCK
button.
• Release both buttons at the same time.
ELECTRONICS
69
Page 72 of 132
Auto Unlock Doors On Exit
To have all of the vehicle doors unlock when any door is opened:
• Enter your vehicle and close all the doors, and fasten your seat belt.
• Cycle the ignition switch between the LOCK and ON position four times, ending in
the LOCK position (do not start the engine).
• Push the power door UNLOCK switch to unlock the doors. A single chime will
indicate that programming is complete.
Auto Door Lock
To have the doors lock automatically when the vehicle’s speed exceeds 15 mph
(24 km/h):
• Enter your vehicle and close all the doors.
• Cycle the ignition switch between LOCK and ON and then back to LOCK four
times, ending up in the LOCK position (do not start the engine).
• Push the power door LOCK switch to lock the doors. A single chime will indicate
that programming is complete.
Sound Horn With Lock
To turn the horn chirp on or off when the doors are locked:
• Push the LOCK button and PANIC button at the same time for at least four
seconds, but no longer than 10 seconds.
• Release both buttons at the same time.
Flashing Lights With Lock
The turn signal lights flash when the doors are locked, which can be turned on or off.
To turn this feature on or off:
• Push and hold the UNLOCK button and the LOCK button at the same time for at
least four seconds, but no longer than 10 seconds.
• Release both buttons at the same time.
ELECTRONICS
70
Page 75 of 132
Programming A Non-Rolling Code
NOTE:
For programming Garage Door Openers manufactured before 1995.
1. Turn the ignition switch to the ON/RUN position.
2. Place the hand-held transmitter 1 to 3 inches (3 to 8 cm) away from the
HomeLink®button you wish to program while keeping the HomeLink®indicator
light in view.
3. Push and hold the HomeLink®button you want to program while you push and
hold the hand-held transmitter button.
4. Continue to hold both buttons and observe the indicator light. The HomeLink®
indicator will flash slowly and then rapidly after HomeLink®has received the
frequency signal from the hand-held transmitter. Release both buttons after the
indicator light changes from slow to rapid.
5. Push and hold the programmed HomeLink®button and observe the indicator
light. If the indicator light stays on constantly, programming is complete and the
garage door (or device) should activate when the HomeLink®button is pushed.
6. To program the two remaining HomeLink®buttons, repeat each step for each
remaining button. DO NOT erase the channels.
Using HomeLink®
• To operate, push and release the programmed HomeLink®button. Activation will
now occur for the programmed device (e.g., garage door opener, gate operator,
security system, entry door lock, home/office lighting, etc.,). The hand-held
transmitter of the device may also be used at any time.
WARNING!
• Your motorized door or gate will open and close while you are programming the
universal transceiver. Do not program the transceiver if people or pets are in the
path of the door or gate.
• Do not run your vehicle in a closed garage or confined area while programming
the transceiver. Exhaust gas from your vehicle contains Carbon Monoxide (CO)
which is odorless and colorless. Carbon Monoxide is poisonous when inhaled
and can cause you and others to be severely injured or killed.
ELECTRONICS
73
Page 103 of 132
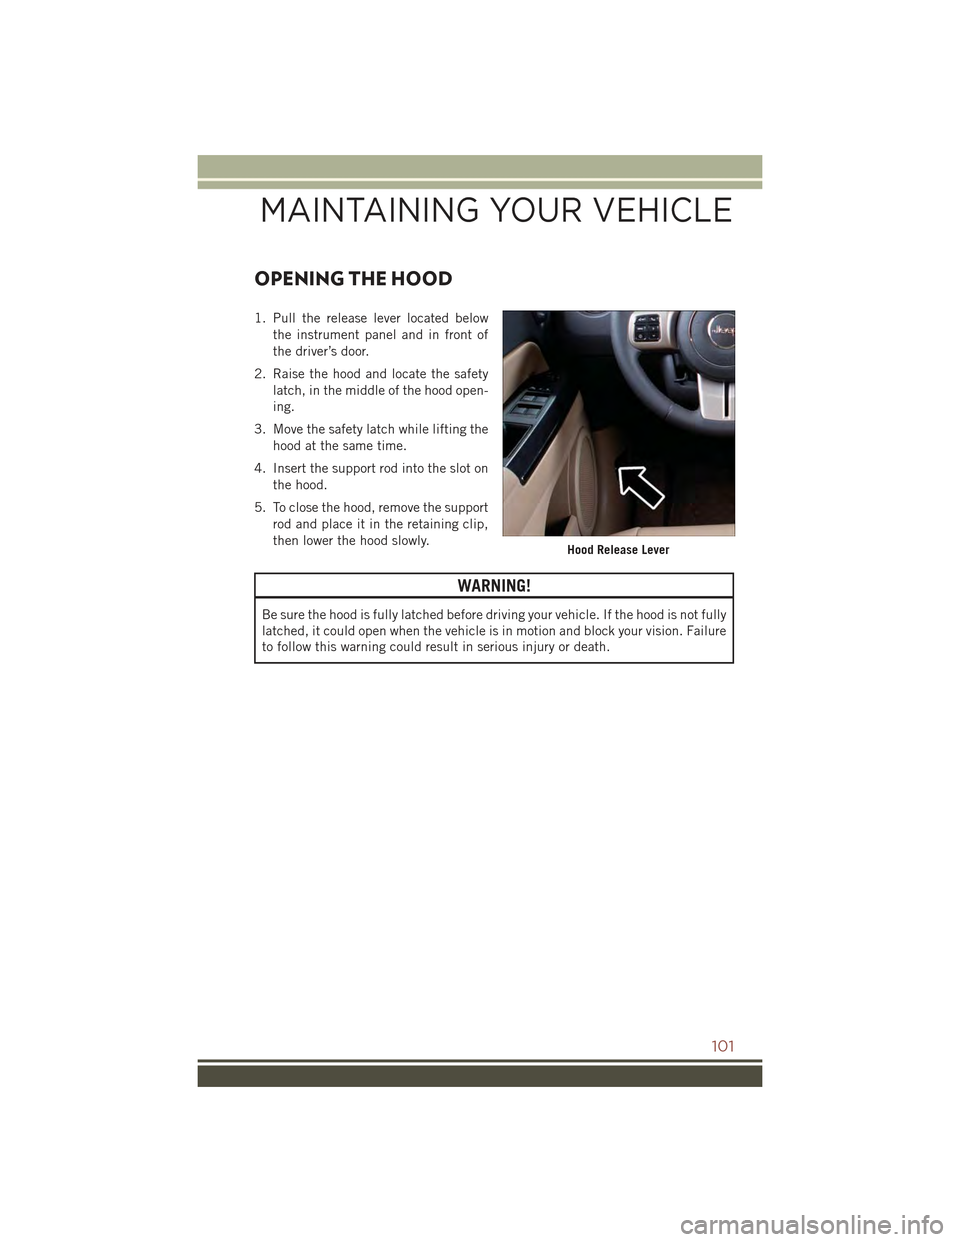
OPENING THE HOOD
1. Pull the release lever located below
the instrument panel and in front of
the driver’s door.
2. Raise the hood and locate the safety
latch, in the middle of the hood open-
ing.
3. Move the safety latch while lifting the
hood at the same time.
4. Insert the support rod into the slot on
the hood.
5. To close the hood, remove the support
rod and place it in the retaining clip,
then lower the hood slowly.
WARNING!
Be sure the hood is fully latched before driving your vehicle. If the hood is not fully
latched, it could open when the vehicle is in motion and block your vision. Failure
to follow this warning could result in serious injury or death.
Hood Release Lever
MAINTAINING YOUR VEHICLE
101
Page 124 of 132
FREQUENTLY ASKED QUESTIONS
GETTING STARTED
• How do I install my LATCH Equipped Child Seat? pg. 15
• How do my heated seats operate? pg. 23
ELECTRONICS
• Which radio is in my vehicle?
• Uconnect®130 pg. 38
• Uconnect®130 with Satellite Radio pg. 40
• Uconnect®230 pg. 43
• Uconnect®430/430N pg. 46
• How do I activate the Audio Jack?
• Uconnect®130 pg. 46
• Uconnect®130 with Satellite Radio pg. 46
• Uconnect®230 pg. 46
• Uconnect®430/430N pg. 51
• How do I set the clock on my radio?
• Uconnect®130 pg. 44
• Uconnect®130 with Satellite Radio pg. 44
• Uconnect®230 pg. 44
• Uconnect®430/430N pg. 47
• How do I use the Navigation feature? pg. 54
• How do I pair my cell phone via Bluetooth®with the Uconnect®Hands-Free Voice
Activation System? pg. 62
• How do I configure my Universal Garage Door Opener (HomeLink®)? pg. 71
UTILITY
• How do I know how much I can tow with my Jeep Compass? pg. 78
WHAT TO DO IN EMERGENCIES
• What do I do if my TPMS warning light is blinking? pg. 81
• How do I change a flat tire? pg. 87
• How do I Jump-Start my vehicle? pg. 94
MAINTAINING YOUR VEHICLE
• Where is my Fuse Block located? pg. 113
• What type of oil do I use? pg. 106
• How often should I change my engine’s oil? pg. 108
• What should my tire pressure be set at? pg. 115
FAQ (How To?)
122
Page 127 of 132
High Beam . . . . . . . . . . . . .26
Head Restraints............19
Heated Mirrors...........32,33
Heated Seats..............23
High Beam Indicator..........84
High Beam/Low Beam Select (Dimmer)
Switch................26
HomeLink®(Garage Door Opener) . .71
Hood Release.............101
Instrument Cluster............8Indicators..............9Instrument Cluster WarningLights . . . . . . . . . . . .8, 80, 84Instrument Panel Cover.......108Instrument Panel Lens Cleaning . .108Integrated Power Module (Fuses) . .113Interior and Instrument Lights . . .6, 7Interior Appearance Care.......108Intermittent Wipers (Delay Wipers) . .27Introduction...............2Inverter Outlet (115V).........74Inverter, Power.............74iPod®/USB/MP3 Control........61Bluetooth®Streaming Audio . . .67
Jacking Instructions..........88Jack Location..............87Jack Operation...........87,88Jump Starting..............94
Key Fob . . . . . . . . . . . . . . . . .10Arm The Alarm...........12Disarm The Alarm.........12Lock The Doors...........10Panic Alarm............10Remote Start . . . . . . . . . . . .11Unlock The Doors . . . . . . . . .10Key Fob Programmable Features . . .69
Lane Change and Turn Signals....27Lane Change Assist..........27LATCH (Lower Anchors and Tether forCHildren). . . . . . . . . . . . . . .15LightsCruise . . . . . . . . . . . . . . . .85Engine Temperature Warning . . .83Fog . . . . . . . . . . . . . . . . .85
Four-Wheel Drive Indicator....85
Headlights.............26
High Beam Indicator.......84
Hill Descent Control Indicator . .85
Low Fuel . . . . . . . . . . . . . .80
Park . . . . . . . . . . . . . . . . .26
Seat Belt Reminder........83
Security Alarm...........85
Tire Pressure Monitoring
(TPMS)...............81Transmission Warning.......83Tu r n S i g n a l . . . . . . . . . . 2 6 , 2 7LocksLiftgate, Tailgate..........10Lubrication, Body...........108Lumbar Support............21
Maintenance Free Battery......108Maintenance, General . . . . . . . .108Maintenance Procedures.......108Maintenance Record . . . . . . . . .112Maintenance Schedule . . . . . . . .108Malfunction Indicator Light (CheckEngine) . . . . . . . . . . . . . . . .84Manual TransmissionLubricant Selection.......107Master Cylinder (Brakes).......108Media Center Radio . . . . . . . .43, 46MOPAR®Accessories.........121
Navigation................54Navigation System (Uconnect®gps)..55Navigation Voice Prompt Volume . . .54New Vehicle Break-In Period.....25
Oil Change Indicator..........85Oil, Engine...........106, 108Capacity..............106Change Interval.........108Checking.............108Disposal..............108Filter............106, 108Filter Disposal..........108Materials Added to........108Recommendation.....106, 108Viscosity.............108Oil Filter, Selection..........108Oil Pressure Light...........80
INDEX
125