tow JEEP COMPASS 2015 1.G Owner's Manual
[x] Cancel search | Manufacturer: JEEP, Model Year: 2015, Model line: COMPASS, Model: JEEP COMPASS 2015 1.GPages: 132, PDF Size: 21.94 MB
Page 92 of 132
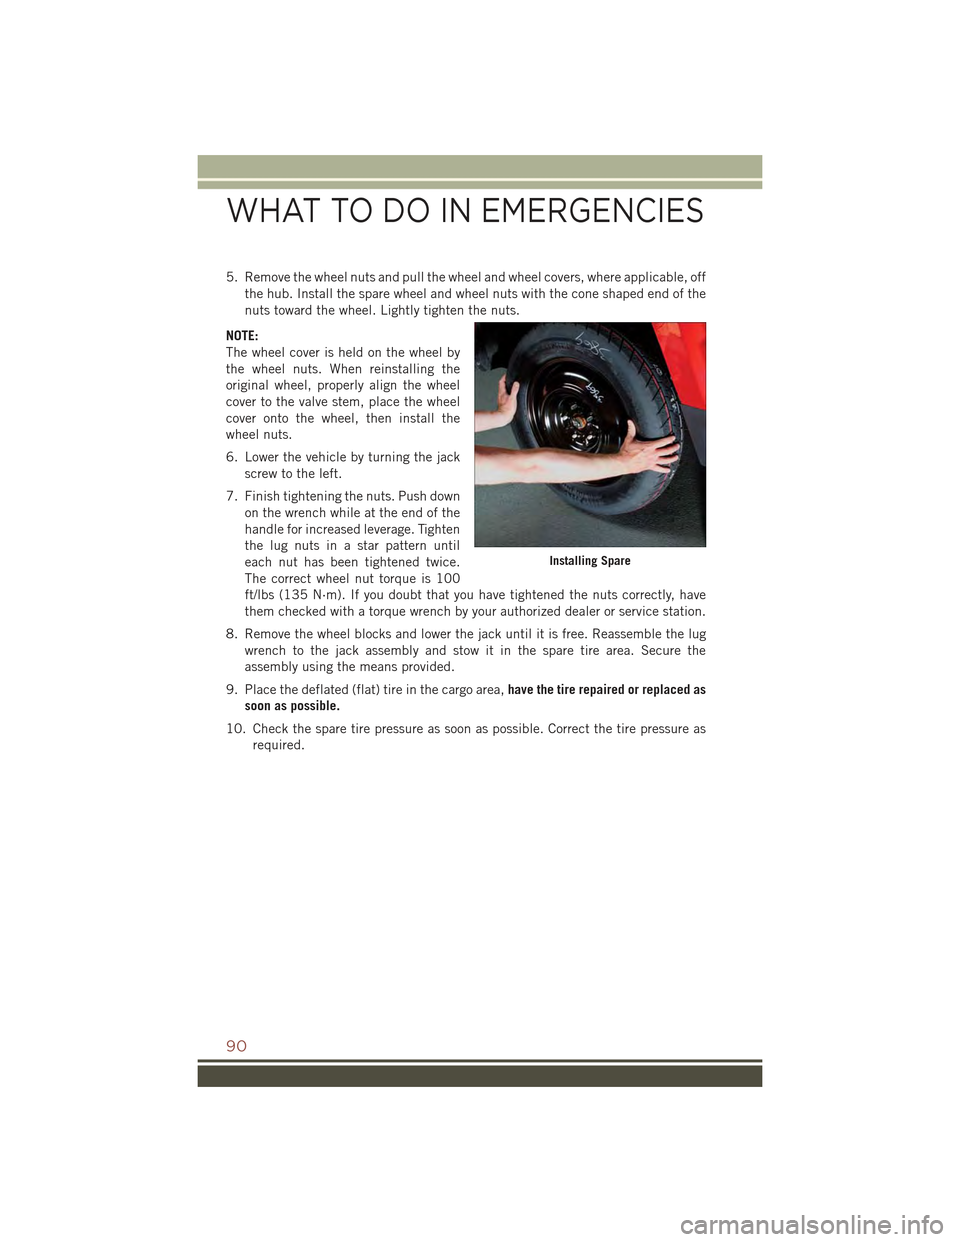
5. Remove the wheel nuts and pull the wheel and wheel covers, where applicable, off
the hub. Install the spare wheel and wheel nuts with the cone shaped end of the
nuts toward the wheel. Lightly tighten the nuts.
NOTE:
The wheel cover is held on the wheel by
the wheel nuts. When reinstalling the
original wheel, properly align the wheel
cover to the valve stem, place the wheel
cover onto the wheel, then install the
wheel nuts.
6. Lower the vehicle by turning the jack
screw to the left.
7. Finish tightening the nuts. Push down
on the wrench while at the end of the
handle for increased leverage. Tighten
the lug nuts in a star pattern until
each nut has been tightened twice.
The correct wheel nut torque is 100
ft/lbs (135 N·m). If you doubt that you have tightened the nuts correctly, have
them checked with a torque wrench by your authorized dealer or service station.
8. Remove the wheel blocks and lower the jack until it is free. Reassemble the lug
wrench to the jack assembly and stow it in the spare tire area. Secure the
assembly using the means provided.
9. Place the deflated (flat) tire in the cargo area,have the tire repaired or replaced as
soon as possible.
10. Check the spare tire pressure as soon as possible. Correct the tire pressure as
required.
Installing Spare
WHAT TO DO IN EMERGENCIES
90
Page 93 of 132
Road Tire Installation
Vehicles Equipped With Wheel Covers
1. Mount the road tire on the axle.
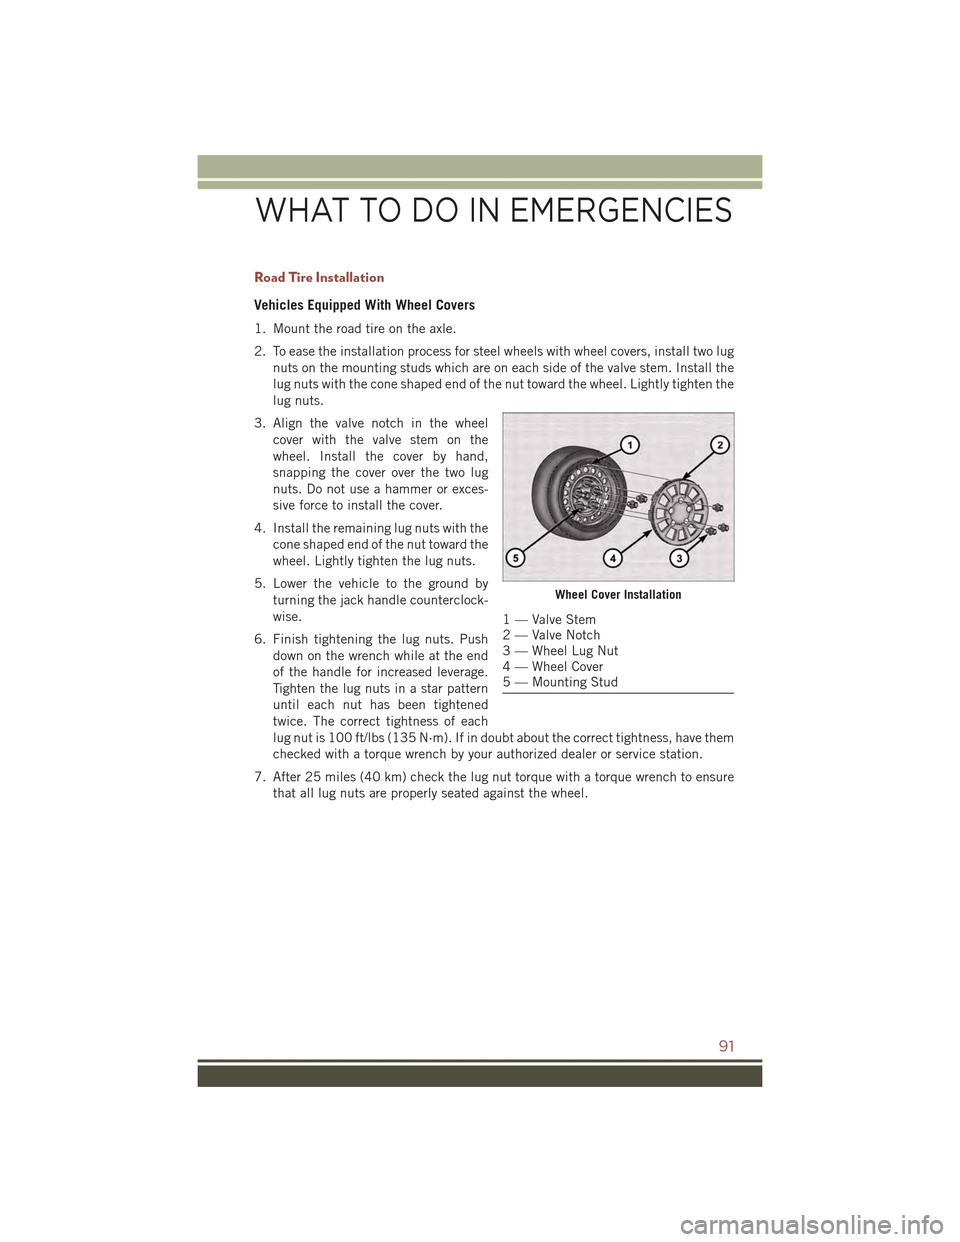
2. To ease the installation process for steel wheels with wheel covers, install two lug
nuts on the mounting studs which are on each side of the valve stem. Install the
lug nuts with the cone shaped end of the nut toward the wheel. Lightly tighten the
lug nuts.
3. Align the valve notch in the wheel
cover with the valve stem on the
wheel. Install the cover by hand,
snapping the cover over the two lug
nuts. Do not use a hammer or exces-
sive force to install the cover.
4. Install the remaining lug nuts with the
cone shaped end of the nut toward the
wheel. Lightly tighten the lug nuts.
5. Lower the vehicle to the ground by
turning the jack handle counterclock-
wise.
6. Finish tightening the lug nuts. Push
down on the wrench while at the end
of the handle for increased leverage.
Tighten the lug nuts in a star pattern
until each nut has been tightened
twice. The correct tightness of each
lug nut is 100 ft/lbs (135 N·m). If in doubt about the correct tightness, have them
checked with a torque wrench by your authorized dealer or service station.
7. After 25 miles (40 km) check the lug nut torque with a torque wrench to ensure
that all lug nuts are properly seated against the wheel.
Wheel Cover Installation
1 — Valve Stem2 — Valve Notch3 — Wheel Lug Nut4 — Wheel Cover5 — Mounting Stud
WHAT TO DO IN EMERGENCIES
91
Page 94 of 132
Vehicles Without Wheel Covers
1. Mount the road tire on the axle.
2. Install the remaining lug nuts with the cone shaped end of the nut toward the
wheel. Lightly tighten the lug nuts.
3. Lower the vehicle to the ground by turning the jack handle counterclockwise.
4. Finish tightening the lug nuts. Push down on the wrench while at the end of the
handle for increased leverage. Tighten the lug nuts in a star pattern until each nut
has been tightened twice. The correct tightness of each lug nut is 100 ft/lbs
(135 N·m). If in doubt about the correct tightness, have them checked with a
torque wrench by your authorized dealer or service station.
5. After 25 miles (40 km) check the lug nut torque with a torque wrench to ensure
that all lug nuts are properly seated against the wheel.
CAUTION!
• Do not attempt to raise the vehicle by jacking on locations other than those
indicated in the Jacking Instructions for this vehicle.
• Be sure to mount the spare tire with the valve stem facing outward. The vehicle
could be damaged if the spare tire is mounted incorrectly.
WHAT TO DO IN EMERGENCIES
92
Page 95 of 132
WARNING!
• Being under a jacked-up vehicle is dangerous. The vehicle could slip off the
jack and fall on you. You could be crushed. Never put any part of your body
under a vehicle that is on a jack. If you need to get under a raised vehicle, take
it to a service center where it can be raised on a lift.
• Never start or run the engine while the vehicle is on a jack.
• The jack is designed to be used as a tool for changing tires only. The jack
should not be used to lift the vehicle for service purposes. The vehicle should
be jacked on a firm level surface only. Avoid ice or slippery areas.
• Do not attempt to change a tire on the side of the vehicle close to moving
traffic, pull far enough off the road to avoid the danger of being hit when
operating the jack or changing the wheel.
• Carefully follow these tire changing warnings to help prevent personal injury or
damage to your vehicle:
• Always park on a firm, level surface as far from the edge of the roadway
as possible before raising the vehicle.
• Turn on the Hazard Warning flasher.
• Block the wheel diagonally opposite the wheel to be raised.
• Set the parking brake firmly and set an automatic transmission in PARK;
a manual transmission in REVERSE.
• Do not let anyone sit in the vehicle when it is on a jack.
• Do not get under the vehicle when it is on a jack.
• Only use the jack in the positions indicated and for lifting this vehicle during
a tire change.
• If working on or near a roadway, be extremely careful of motor traffic.
• To assure that spare tires, flat or inflated, are securely stowed, spares must be
stowed with the valve stem facing the ground.
• Raising the vehicle higher than necessary can make the vehicle less stable. It
could slip off the jack and hurt someone near it. Raise the vehicle only enough
to remove the tire.
• To avoid possible personal injury, handle the wheel covers with care to avoid
contact with any sharp edges.
• A loose tire or jack thrown forward in a collision or hard stop could injure the
occupants in the vehicle. Have the deflated (flat) tire repaired or replaced
immediately.
• To avoid the risk of forcing the vehicle off the jack, do not tighten the lug nuts
fully until the vehicle is lowered to the ground. Failure to follow this warning
may result in personal injury.
WHAT TO DO IN EMERGENCIES
93
Page 100 of 132
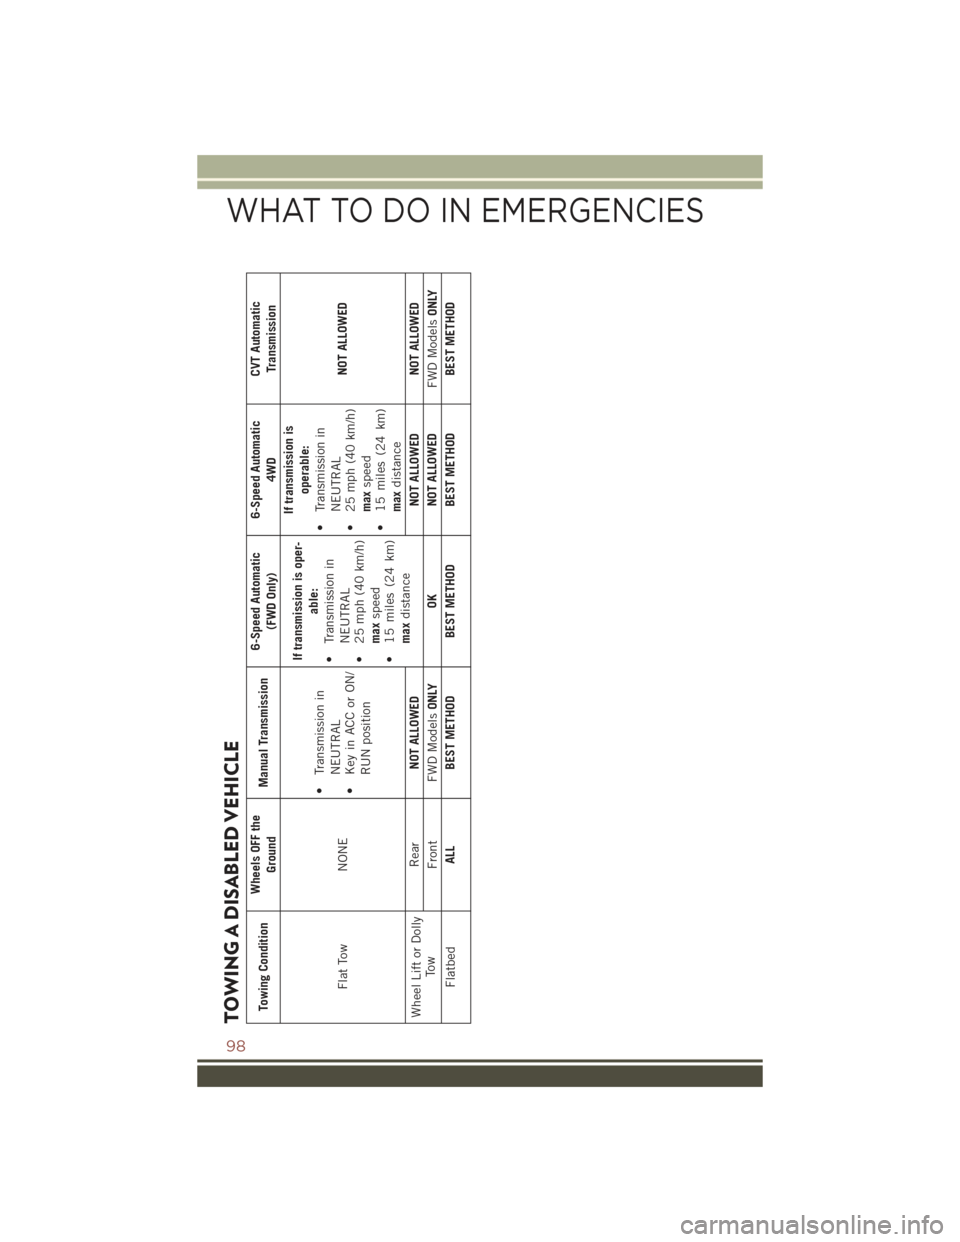
TOWING A DISABLED VEHICLETowing Condition
Wheels OFF the
Ground
Manual Transmission
6-Speed Automatic
(FWD Only)
6-Speed Automatic
4WD
CVT AutomaticTransmission
Flat Tow
NONE
• Transmission in
NEUTRAL
•KeyinACCorON/
RUN position
If transmission is oper-
able:
• Transmission in
NEUTRAL
•25mph(40km/h)
max
speed
• 15 miles (24 km)
max
distance
If transmission is
operable:
• Transmission in
NEUTRAL
•25mph(40km/h)
max
speed
• 15 miles (24 km)
max
distance
NOT ALLOWED
Wheel Lift or Dolly
Tow
Rear
NOT ALLOWED
NOT ALLOWED NOT ALLOWED
Front FWD Models
ONLY
OK
NOT ALLOWED
FWD Models
ONLY
Flatbed
ALL
BEST METHOD BEST METHOD BEST METHOD BEST METHOD
WHAT TO DO IN EMERGENCIES
98
Page 110 of 132
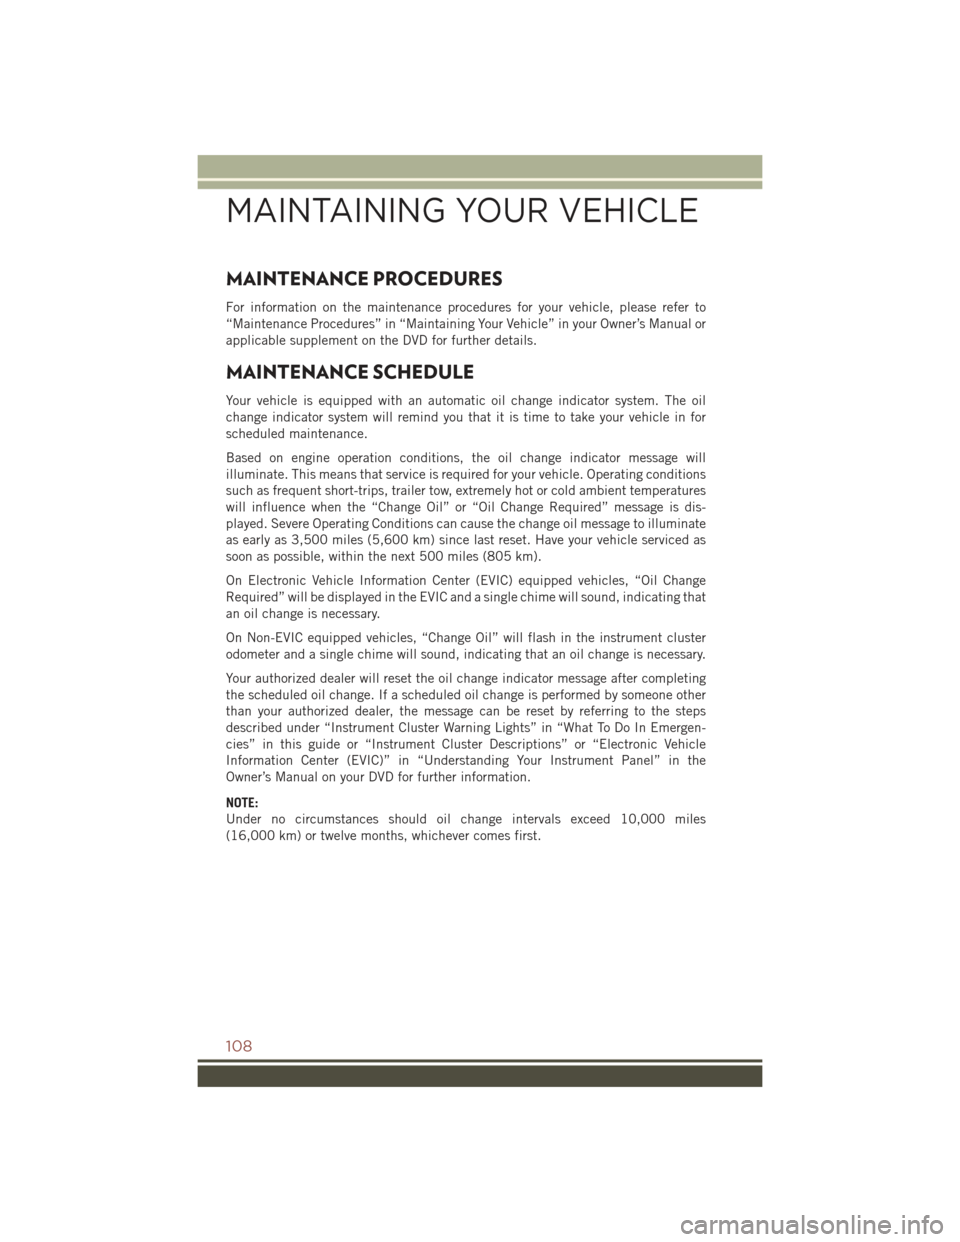
MAINTENANCE PROCEDURES
For information on the maintenance procedures for your vehicle, please refer to
“Maintenance Procedures” in “Maintaining Your Vehicle” in your Owner’s Manual or
applicable supplement on the DVD for further details.
MAINTENANCE SCHEDULE
Your vehicle is equipped with an automatic oil change indicator system. The oil
change indicator system will remind you that it is time to take your vehicle in for
scheduled maintenance.
Based on engine operation conditions, the oil change indicator message will
illuminate. This means that service is required for your vehicle. Operating conditions
such as frequent short-trips, trailer tow, extremely hot or cold ambient temperatures
will influence when the “Change Oil” or “Oil Change Required” message is dis-
played. Severe Operating Conditions can cause the change oil message to illuminate
as early as 3,500 miles (5,600 km) since last reset. Have your vehicle serviced as
soon as possible, within the next 500 miles (805 km).
On Electronic Vehicle Information Center (EVIC) equipped vehicles, “Oil Change
Required” will be displayed in the EVIC and a single chime will sound, indicating that
an oil change is necessary.
On Non-EVIC equipped vehicles, “Change Oil” will flash in the instrument cluster
odometer and a single chime will sound, indicating that an oil change is necessary.
Your authorized dealer will reset the oil change indicator message after completing
the scheduled oil change. If a scheduled oil change is performed by someone other
than your authorized dealer, the message can be reset by referring to the steps
described under “Instrument Cluster Warning Lights” in “What To Do In Emergen-
cies” in this guide or “Instrument Cluster Descriptions” or “Electronic Vehicle
Information Center (EVIC)” in “Understanding Your Instrument Panel” in the
Owner’s Manual on your DVD for further information.
NOTE:
Under no circumstances should oil change intervals exceed 10,000 miles
(16,000 km) or twelve months, whichever comes first.
MAINTAINING YOUR VEHICLE
108
Page 112 of 132
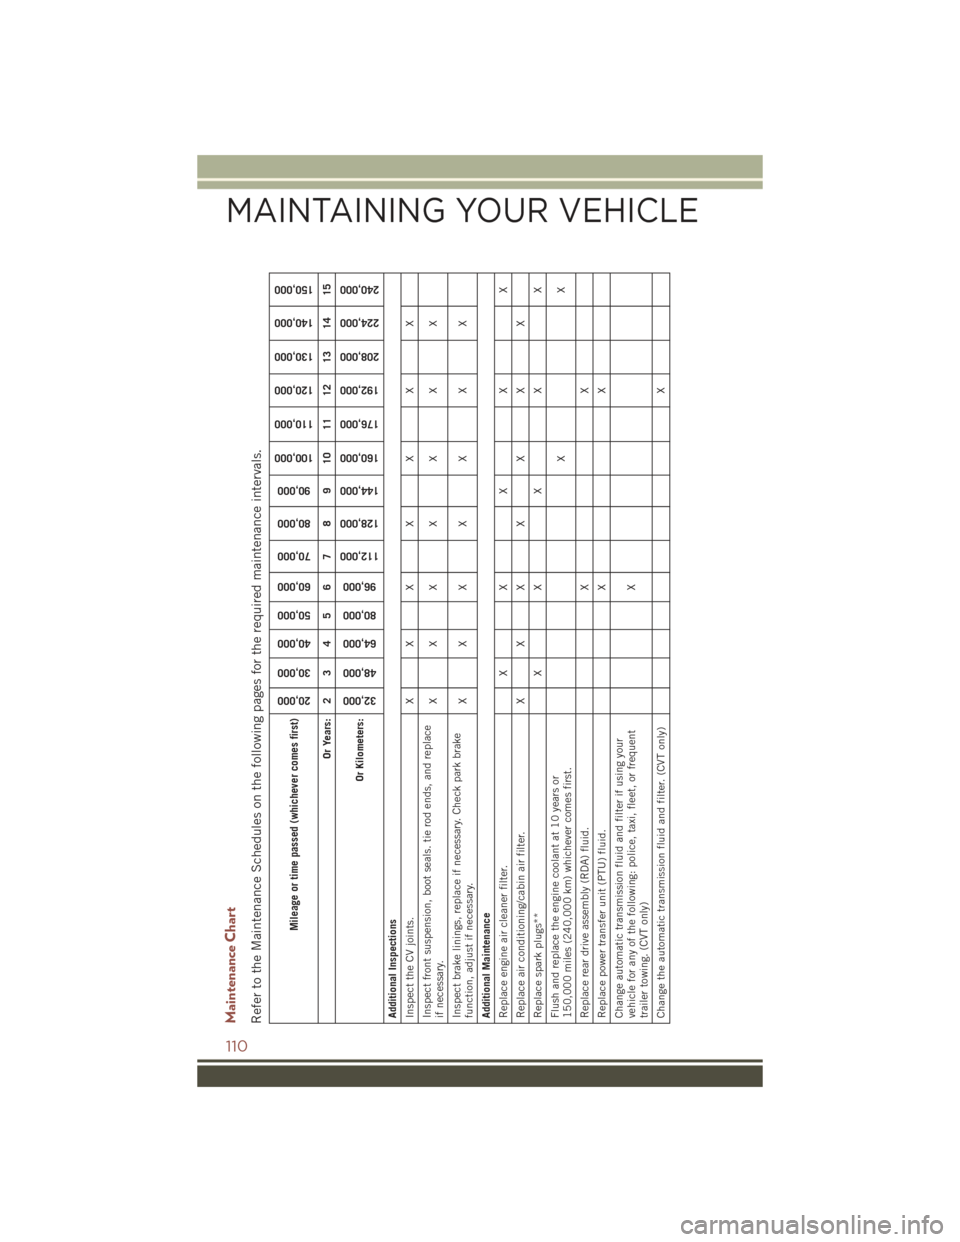
Maintenance ChartRefer to the Maintenance Schedules on the following pages for the required maintenance intervals.
Mileage or time passed (whichever comes first)
20,000
30,000
40,000
50,000
60,000
70,000
80,000
90,000
100,000
110,000
120,000
130,000
140,000
150,000
Or Years: 2 3 4 5 6 7 8 9 10 11 12 13 14 15
Or Kilometers:
32,000
48,000
64,000
80,000
96,000
112,000
128,000
144,000
160,000
176,000
192,000
208,000
224,000
240,000
Additional InspectionsInspect the CV joints. X X X X X X XInspect front suspension, boot seals. tie rod ends, and replaceif necessary.
XXX X X X X
Inspect brake linings, replace if necessary. Check park brakefunction, adjust if necessary.
XXX X X X X
Additional MaintenanceReplace engine air cleaner filter. X X X X XReplace air conditioning/cabin air filter. X X X X X X XReplace spark plugs** X X X X XFlush and replace the engine coolant at 10 years or150,000 miles (240,000 km) whichever comes first.
XX
Replace rear drive assembly (RDA) fluid. X XReplace power transfer unit (PTU) fluid. X XChange automatic transmission fluid and filter if using yourvehicle for any of the following: police, taxi, fleet, or frequenttrailer towing. (CVT only)
X
Change the automatic transmission fluid and filter. (CVT only) X
MAINTAINING YOUR VEHICLE
110
Page 113 of 132
Mileage or time passed (whichever comes first)
20,000
30,000
40,000
50,000
60,000
70,000
80,000
90,000
100,000
110,000
120,000
130,000
140,000
150,000
Or Years: 2 3 4 5 6 7 8 9 10 11 12 13 14 15
Or Kilometers:
32,000
48,000
64,000
80,000
96,000
112,000
128,000
144,000
160,000
176,000
192,000
208,000
224,000
240,000
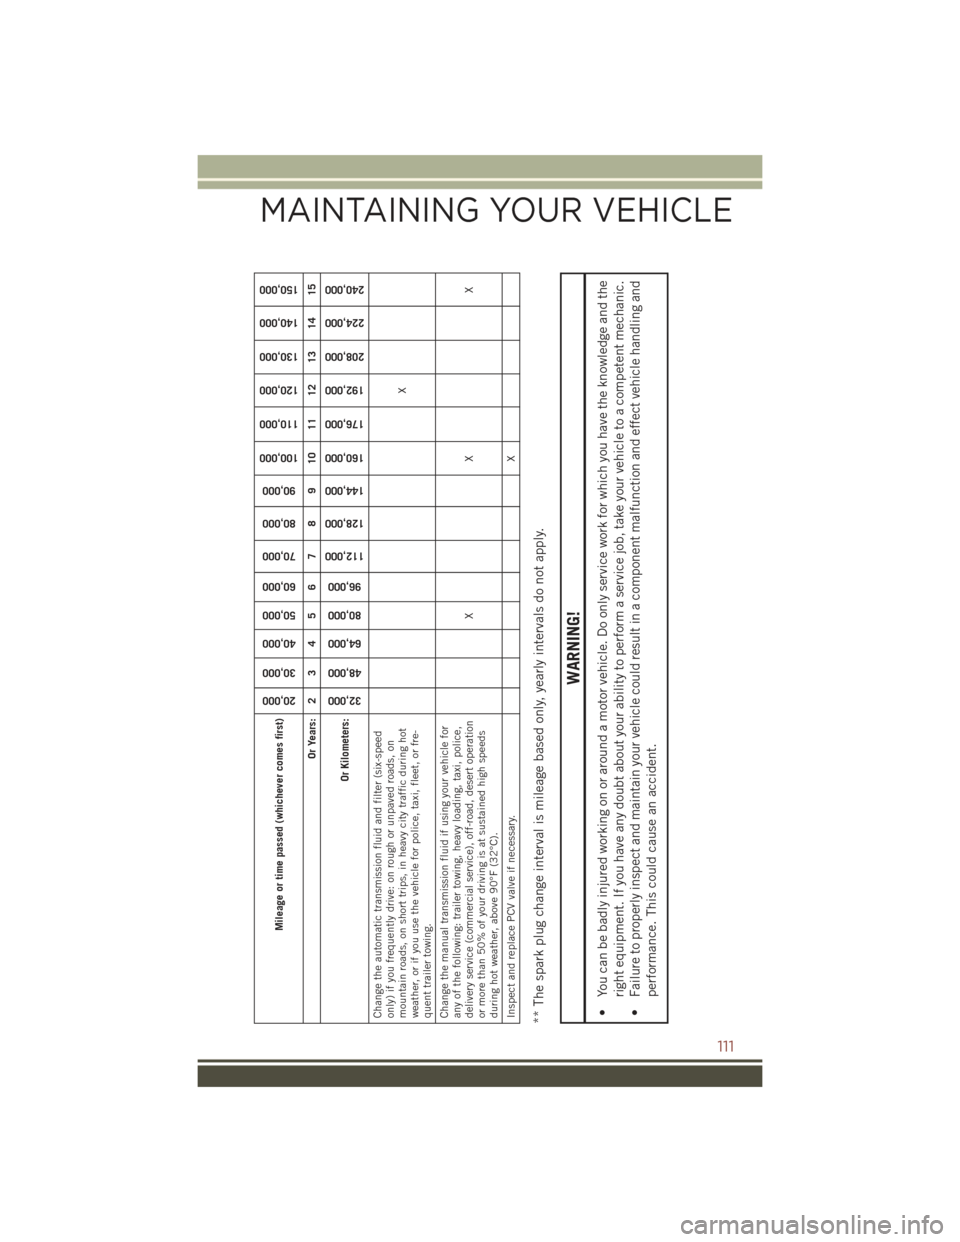
Change the automatic transmission fluid and filter (six-speedonly) if you frequently drive: on rough or unpaved roads, onmountain roads, on short trips, in heavy city traffic during hotweather, or if you use the vehicle for police, taxi, fleet, or fre-quent trailer towing.
X
Change the manual transmission fluid if using your vehicle forany of the following: trailer towing, heavy loading, taxi, police,delivery service (commercial service), off-road, desert operationor more than 50% of your driving is at sustained high speedsduring hot weather, above 90°F (32°C).
XX X
Inspect and replace PCV valve if necessary.
X
** The spark plug change interval is mileage based only, yearly intervals do not apply.
WARNING!
• You can be badly injured working on or around a motor vehicle. Do only service work for which you have the knowledge and the
right equipment. If you have any doubt about your ability to perform a service job, take your vehicle to a competent mechanic.
• Failure to properly inspect and maintain your vehicle could result in a component malfunction and effect vehicle handling and
performance. This could cause an accident.
MAINTAINING YOUR VEHICLE
111
Page 124 of 132
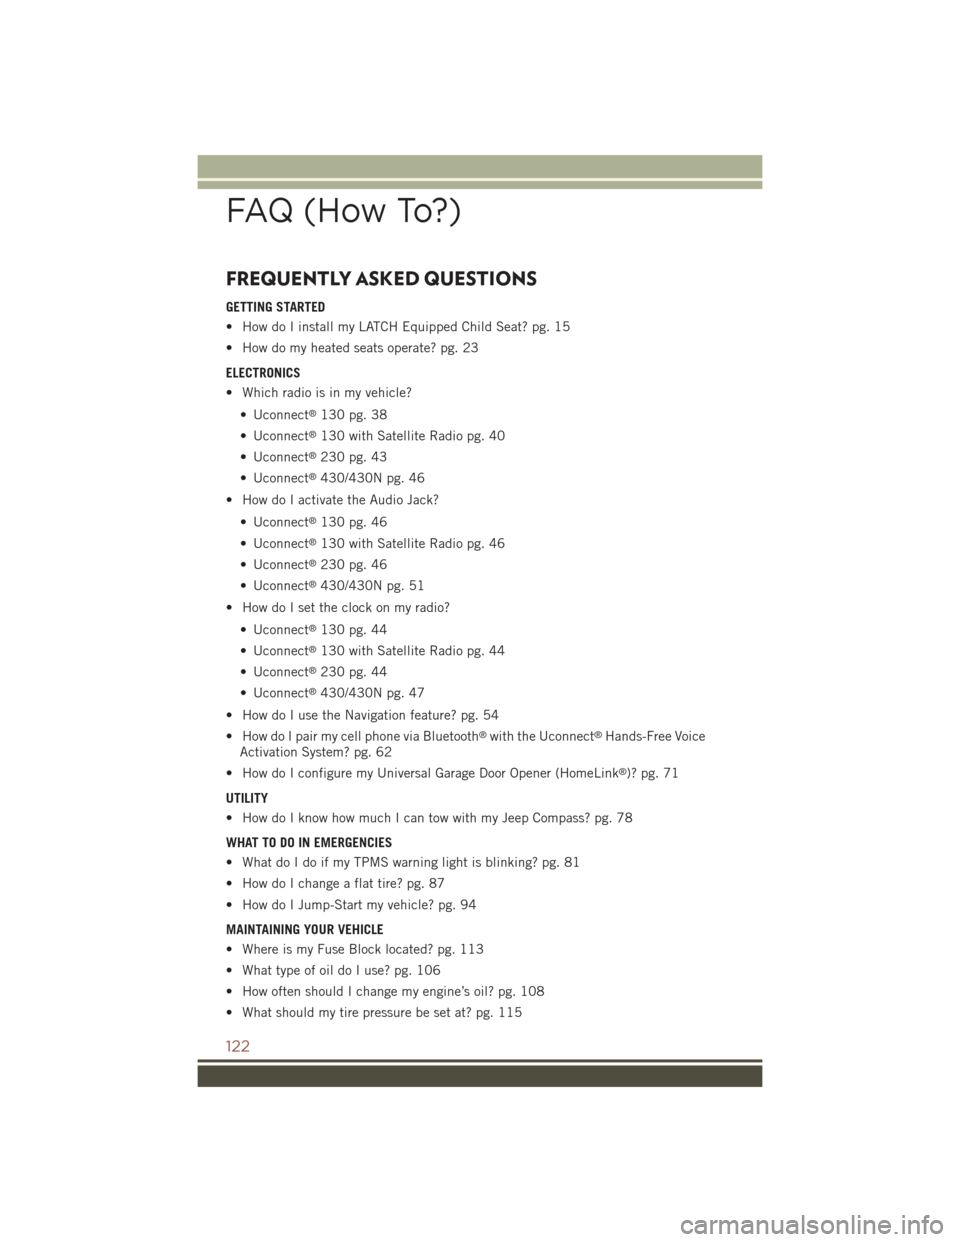
FREQUENTLY ASKED QUESTIONS
GETTING STARTED
• How do I install my LATCH Equipped Child Seat? pg. 15
• How do my heated seats operate? pg. 23
ELECTRONICS
• Which radio is in my vehicle?
• Uconnect®130 pg. 38
• Uconnect®130 with Satellite Radio pg. 40
• Uconnect®230 pg. 43
• Uconnect®430/430N pg. 46
• How do I activate the Audio Jack?
• Uconnect®130 pg. 46
• Uconnect®130 with Satellite Radio pg. 46
• Uconnect®230 pg. 46
• Uconnect®430/430N pg. 51
• How do I set the clock on my radio?
• Uconnect®130 pg. 44
• Uconnect®130 with Satellite Radio pg. 44
• Uconnect®230 pg. 44
• Uconnect®430/430N pg. 47
• How do I use the Navigation feature? pg. 54
• How do I pair my cell phone via Bluetooth®with the Uconnect®Hands-Free Voice
Activation System? pg. 62
• How do I configure my Universal Garage Door Opener (HomeLink®)? pg. 71
UTILITY
• How do I know how much I can tow with my Jeep Compass? pg. 78
WHAT TO DO IN EMERGENCIES
• What do I do if my TPMS warning light is blinking? pg. 81
• How do I change a flat tire? pg. 87
• How do I Jump-Start my vehicle? pg. 94
MAINTAINING YOUR VEHICLE
• Where is my Fuse Block located? pg. 113
• What type of oil do I use? pg. 106
• How often should I change my engine’s oil? pg. 108
• What should my tire pressure be set at? pg. 115
FAQ (How To?)
122
Page 125 of 132
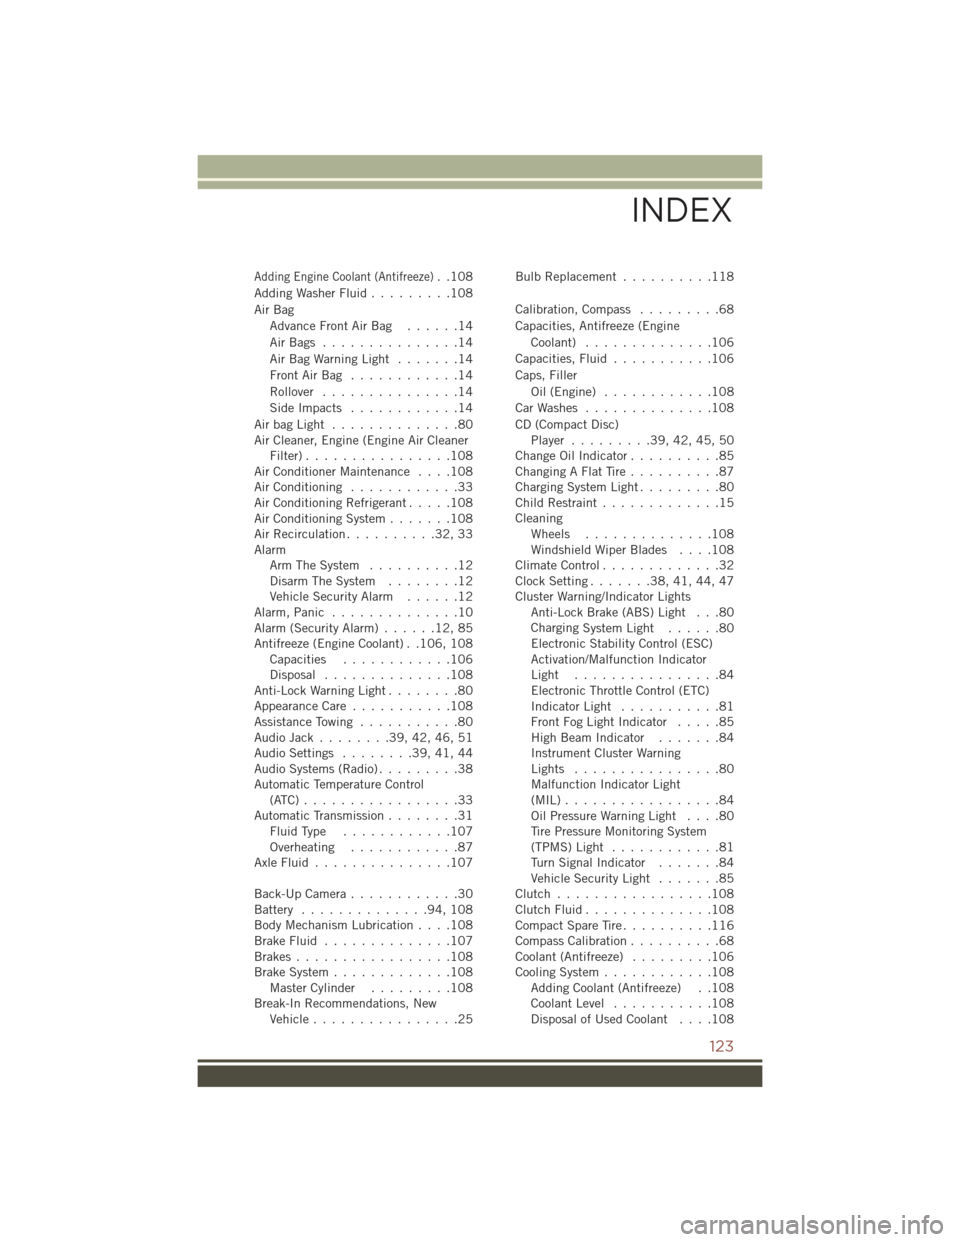
Adding Engine Coolant (Antifreeze)..108
Adding Washer Fluid.........108
Air Bag
Advance Front Air Bag . . . . . .14
Air Bags . . . . . . . . . . . . . . .14
Air Bag Warning Light . . . . . . .14
Front Air Bag . . . . . . . . . . . .14
Rollover...............14
Side Impacts . . . . . . . . . . . .14
Air bag Light . . . . . . . . . . . . . .80Air Cleaner, Engine (Engine Air CleanerFilter)................108Air Conditioner Maintenance....108Air Conditioning............33Air Conditioning Refrigerant.....108Air Conditioning System.......108Air Recirculation..........32,33AlarmArm The System..........12Disarm The System........12Vehicle Security Alarm......12Alarm, Panic . . . . . . . . . . . . . .10Alarm (Security Alarm)......12,85Antifreeze (Engine Coolant) . .106, 108Capacities............106Disposal..............108Anti-Lock Warning Light........80Appearance Care...........108Assistance Towing...........80Audio Jack........39,42,46,51Audio Settings........39,41,44Audio Systems (Radio).........38Automatic Temperature Control(ATC) . . . . . . . . . . . . . . . . .33Automatic Transmission........31Fluid Type . . . . . . . . . . . .107Overheating............87Axle Fluid . . . . . . . . . . . . . . .107
Back-Up Camera............30Battery..............94,108Body Mechanism Lubrication....108Brake Fluid..............107Brakes.................108Brake System.............108Master Cylinder.........108Break-In Recommendations, NewVehicle................25
Bulb Replacement..........118
Calibration, Compass.........68
Capacities, Antifreeze (Engine
Coolant)..............106
Capacities, Fluid...........106
Caps, Filler
Oil (Engine) . . . . . . . . . . . .108
Car Washes . . . . . . . . . . . . . .108
CD (Compact Disc)Player.........39,42,45,50Change Oil Indicator..........85Changing A Flat Tire . . . . . . . . . .87Charging System Light.........80Child Restraint.............15CleaningWheels..............108Windshield Wiper Blades....108Climate Control.............32Clock Setting.......38,41,44,47Cluster Warning/Indicator LightsAnti-Lock Brake (ABS) Light . . .80ChargingSystem Light......80Electronic Stability Control (ESC)Activation/Malfunction IndicatorLight . . . . . . . . . . . . . . . .84Electronic Throttle Control (ETC)Indicator Light...........81Front Fog Light Indicator.....85High Beam Indicator.......84Instrument Cluster WarningLights . . . . . . . . . . . . . . . .80Malfunction Indicator Light(MIL) . . . . . . . . . . . . . . . . .84Oil Pressure Warning Light....80Tire Pressure Monitoring System(TPMS) Light............81Turn Signal Indicator.......84Vehicle Security Light.......85Clutch . . . . . . . . . . . . . . . . .108Clutch Fluid . . . . . . . . . . . . . .108Compact Spare Tire . . . . . . . . . .116Compass Calibration..........68Coolant (Antifreeze).........106Cooling System............108Adding Coolant (Antifreeze) . .108Coolant Level...........108Disposal of Used Coolant....108
INDEX
123