replace JEEP COMPASS 2015 1.G User Guide
[x] Cancel search | Manufacturer: JEEP, Model Year: 2015, Model line: COMPASS, Model: JEEP COMPASS 2015 1.GPages: 132, PDF Size: 21.94 MB
Page 2 of 132
The driver’s primary responsibility is the safe operation of the vehicle. Driving while distracted can result in loss of vehicle control, resulting in a collision and personal injury. Chrysler Group LLC strongly recommends that the driver use extreme caution when using any device or feature that may take their attention o! the road. Use of any electrical devices, such as cellular telephones, computers, portable radios, vehicle navigation or other devices, by the driver while the vehicle is moving is dangerous and could lead to a serious collision. Texting while driving is also dangerous and should never be done while the vehicle is moving. If you find yourself unable to devote your full attention to vehicle operation, pull o! the road to a safe location and stop your vehicle. Some states or provinces prohibit the use of cellular telephones or texting while driving. It is always the driver’s responsibility to comply with all local laws.
If you are the first registered retail owner of
your vehicle, you may obtain a complimentary
printed copy of the Owner’s Manual, Navigation/
Uconnect® Manuals or Warranty Booklet by calling
1-877-426-5337 (U.S.) or 1-800-387-1143 (Canada)
or by contacting your dealer.
This guide has been prepared to help you get quickly
acquainted with your new Jeep and to provide a convenient
reference source for common questions. However, it is not
a substitute for your Owner’s Manual.
For complete operational instructions, maintenance
procedures and important safety messages, please consult
your Owner’s Manual, Navigation/Uconnect® Manuals and
other Warning Labels in your vehicle.
Not all features shown in this guide may apply to your
vehicle. For additional information on accessories to help
personalize your vehicle, visit www.mopar.com (U.S.),
www.mopar.ca (Canada) or your local Jeep dealer.
Impor tant:
This User Guide is intended to familiarize you with the important features of your vehicle. The DVD enclosed contains your Owner’s Manual, Navigation/Uconnect® Manuals, Warranty Booklets, Tire Warranty and Roadside Assistance (new vehicles purchased in the U.S.) or Roadside Assistance (new vehicles purchased in Canada) in electronic format. We hope you find it useful. Replacement DVD kits may be purchased by visiting www.techauthority.com. Jeep® is a registered trademark of Chrysler Group LLC. © 2014 Chrysler Group LLC.
Driving and Alcohol:
Drunken driving is one of the most frequent causes of collisions. Your driving ability can be seriously impaired with blood alcohol levels far below the legal minimum. If you are drinking, don’t drive. Ride with a designated non-drinking driver, call a cab, a friend, or use public transportation.
Driving after drinking can lead to a collision. Your perceptions are less sharp, your reflexes are slower, and your judgment is impaired when you have been drinking. Never drink and then drive.
WAR N I NG !
Page 15 of 132
If the Vehicle Security Alarm is armed and the battery becomes disconnected the
Vehicle Security Alarm will remain armed when the battery is reconnected. The
exterior lights will flash, and the horn will sound. If this occurs, disarm the Vehicle
Security Alarm.
SEAT BELT SYSTEMS
Lap/Shoulder Belts
• All seating positions in your vehicle are equipped with lap/shoulder belts.
• Be sure everyone in your vehicle is in a seat and using a seat belt properly.
• Position the lap belt so that it is snug and lies low across your hips, below your
abdomen. To remove slack in the lap belt portion, pull up on the shoulder belt. To
loosen the lap belt if it is too tight, tilt the latch plate and pull on the lap belt. A
snug seat belt reduces the risk of sliding under the seat belt in a collision
• Position the shoulder belt across the shoulder and chest with minimal, if any slack
so that it is comfortable and not resting on your neck. The retractor will withdraw
any slack in the shoulder belt.
Seat Belt Pretensioner
• The front seat belt system is equipped with pretensioning devices that are
designed to remove slack from the seat belt in the event of a collision.
• A deployed pretensioner or a deployed air bag must be replaced immediately.
WARNING!
• In a collision, you and your passengers can suffer much greater injuries if you
are not properly buckled up. You can strike the interior of your vehicle or other
passengers, or you can be thrown out of the vehicle. Always be sure you and
others in your vehicle are buckled up properly.
• A shoulder belt placed behind you will not protect you from injury during a
collision. You are more likely to hit your head in a collision if you do not wear
your shoulder belt. The lap and shoulder belt are meant to be used together.
• A seat belt that is too loose will not protect you properly. In a sudden stop, you
could move too far forward, increasing the possibility of injury. Wear your seat
belt snugly.
• A frayed or torn seat belt could rip apart in a collision and leave you with no
protection. Inspect the seat belt system periodically, checking for cuts, frays,
or loose parts. Damaged parts must be replaced immediately. Do not disas-
semble or modify the system. Seat belt assemblies must be replaced after a
collision.
GETTING STARTED
13
Page 73 of 132
UNIVERSAL GARAGE DOOR OPENER (HomeLink®)
• HomeLink®replaces up to three hand-held transmitters that operate devices such
as garage door openers, motorized gates, lighting or home security systems. The
HomeLink®unit is powered by your vehicles 12 Volt battery.
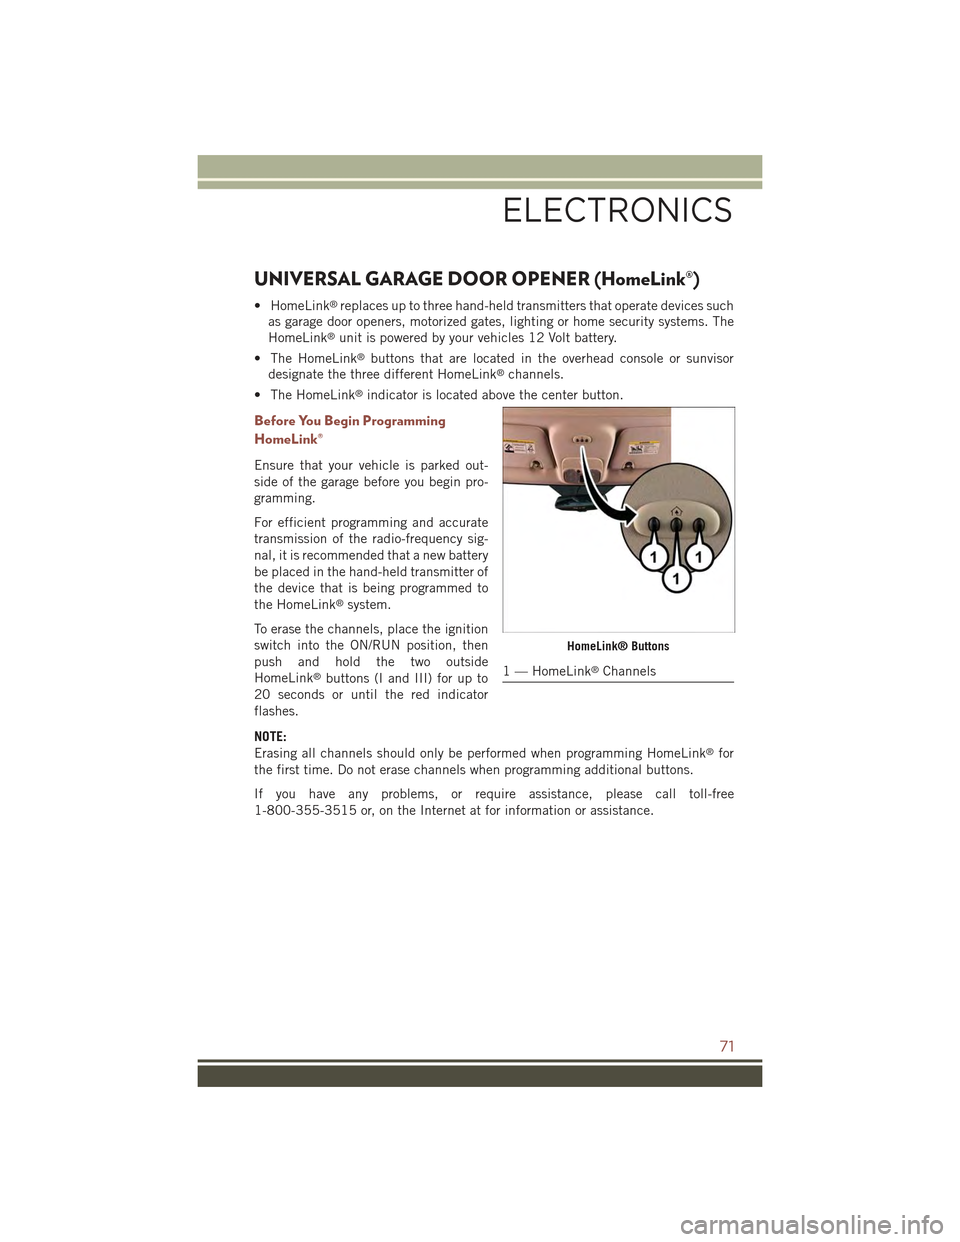
• The HomeLink®buttons that are located in the overhead console or sunvisor
designate the three different HomeLink®channels.
• The HomeLink®indicator is located above the center button.
Before You Begin Programming
HomeLink®
Ensure that your vehicle is parked out-
side of the garage before you begin pro-
gramming.
For efficient programming and accurate
transmission of the radio-frequency sig-
nal, it is recommended that a new battery
be placed in the hand-held transmitter of
the device that is being programmed to
the HomeLink®system.
To erase the channels, place the ignition
switch into the ON/RUN position, then
push and hold the two outside
HomeLink®buttons (I and III) for up to
20 seconds or until the red indicator
flashes.
NOTE:
Erasing all channels should only be performed when programming HomeLink®for
the first time. Do not erase channels when programming additional buttons.
If you have any problems, or require assistance, please call toll-free
1-800-355-3515 or, on the Internet at for information or assistance.
HomeLink® Buttons
1 — HomeLink®Channels
ELECTRONICS
71
Page 77 of 132
POWER OUTLET
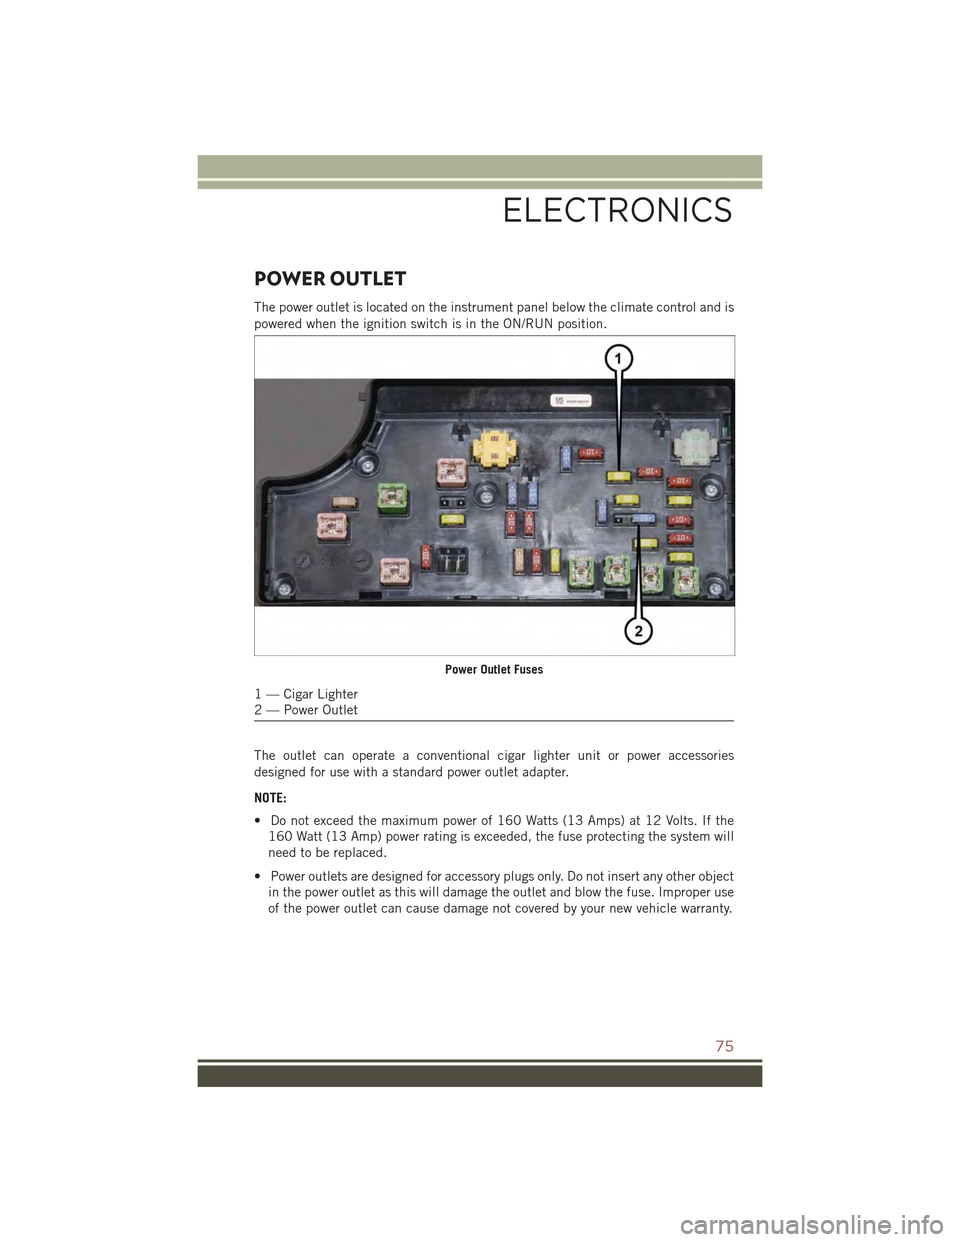
The power outlet is located on the instrument panel below the climate control and is
powered when the ignition switch is in the ON/RUN position.
The outlet can operate a conventional cigar lighter unit or power accessories
designed for use with a standard power outlet adapter.
NOTE:
• Do not exceed the maximum power of 160 Watts (13 Amps) at 12 Volts. If the
160 Watt (13 Amp) power rating is exceeded, the fuse protecting the system will
need to be replaced.
• Power outlets are designed for accessory plugs only. Do not insert any other object
in the power outlet as this will damage the outlet and blow the fuse. Improper use
of the power outlet can cause damage not covered by your new vehicle warranty.
Power Outlet Fuses
1 — Cigar Lighter2 — Power Outlet
ELECTRONICS
75
Page 84 of 132
When the system detects a malfunction, the telltale will flash for approximately one
minute and then remain continuously illuminated. This sequence will continue upon
subsequent vehicle start-ups as long as the malfunction exists. When the malfunc-
tion indicator is illuminated, the system may not be able to detect or signal low tire
pressure as intended. TPMS malfunctions may occur for a variety of reasons,
including the installation of replacement or alternate tires or wheels on the vehicle
that prevent the TPMS from functioning properly. Always check the TPMS malfunc-
tion telltale after replacing one or more tires or wheels on your vehicle to ensure that
the replacement or alternate tires and wheels allow the TPMS to continue to function
properly.
NOTE:
Tire pressures change by approximately 1 psi (7 kPa) per 12° F (7° C) of air
temperature change. Keep this in mind when checking tire pressure inside a garage,
especially in the Winter. Example: If garage temperature is 68°F (20°C) and the
outside temperature is 32°F (0°C), then the cold tire inflation pressure should be
increased by 3 psi (21 kPa), which equals 1 psi (7 kPa) for every 12°F (7°C) for this
outside temperature condition.
CAUTION!
The TPMS has been optimized for the original equipment tires and wheels. TPMS
pressures and warning have been established for the tire size equipped on your
vehicle. Undesirable system operation or sensor damage may result when using
replacement equipment that is not of the same size, type, and/or style. Aftermar-
ket wheels can cause sensor damage. Do not use tire sealant from a can, or
balance beads if your vehicle is equipped with a TPMS, as damage to the sensors
may result.
- Brake Warning Light
The Brake Warning light illuminates when there is either a system malfunction or the
parking brake is applied. If the light is on and the parking brake is not applied, it
indicates a possible brake hydraulic malfunction, brake booster problem or an
Anti-Lock Brake System problem.
Please have your vehicle serviced immediately.
WARNING!
Driving a vehicle with the red brake light on is dangerous. Part of the brake system
may have failed. It will take longer to stop the vehicle. You could have a collision.
Have the vehicle checked immediately.
WHAT TO DO IN EMERGENCIES
82
Page 92 of 132
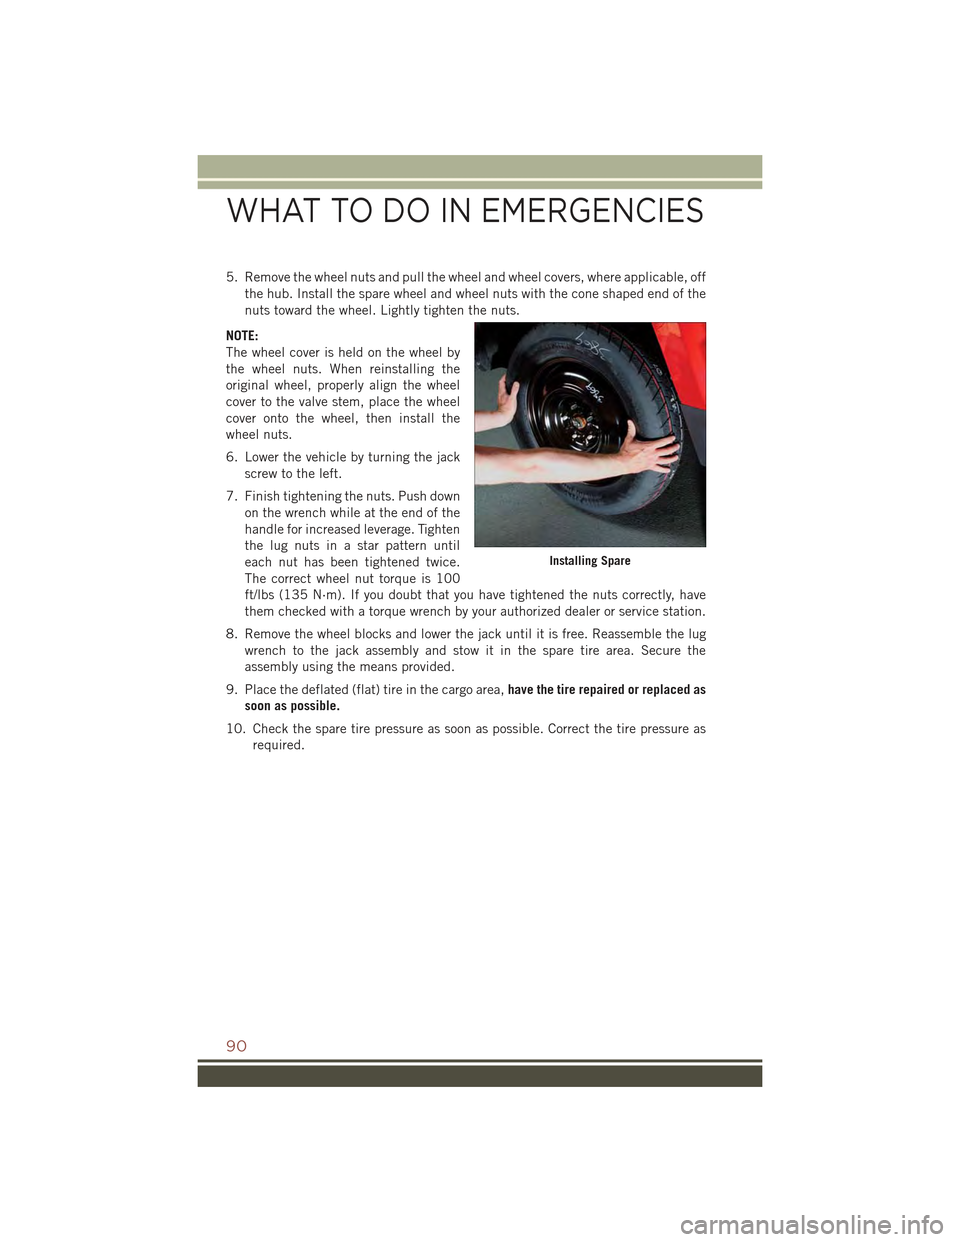
5. Remove the wheel nuts and pull the wheel and wheel covers, where applicable, off
the hub. Install the spare wheel and wheel nuts with the cone shaped end of the
nuts toward the wheel. Lightly tighten the nuts.
NOTE:
The wheel cover is held on the wheel by
the wheel nuts. When reinstalling the
original wheel, properly align the wheel
cover to the valve stem, place the wheel
cover onto the wheel, then install the
wheel nuts.
6. Lower the vehicle by turning the jack
screw to the left.
7. Finish tightening the nuts. Push down
on the wrench while at the end of the
handle for increased leverage. Tighten
the lug nuts in a star pattern until
each nut has been tightened twice.
The correct wheel nut torque is 100
ft/lbs (135 N·m). If you doubt that you have tightened the nuts correctly, have
them checked with a torque wrench by your authorized dealer or service station.
8. Remove the wheel blocks and lower the jack until it is free. Reassemble the lug
wrench to the jack assembly and stow it in the spare tire area. Secure the
assembly using the means provided.
9. Place the deflated (flat) tire in the cargo area,have the tire repaired or replaced as
soon as possible.
10. Check the spare tire pressure as soon as possible. Correct the tire pressure as
required.
Installing Spare
WHAT TO DO IN EMERGENCIES
90
Page 95 of 132
WARNING!
• Being under a jacked-up vehicle is dangerous. The vehicle could slip off the
jack and fall on you. You could be crushed. Never put any part of your body
under a vehicle that is on a jack. If you need to get under a raised vehicle, take
it to a service center where it can be raised on a lift.
• Never start or run the engine while the vehicle is on a jack.
• The jack is designed to be used as a tool for changing tires only. The jack
should not be used to lift the vehicle for service purposes. The vehicle should
be jacked on a firm level surface only. Avoid ice or slippery areas.
• Do not attempt to change a tire on the side of the vehicle close to moving
traffic, pull far enough off the road to avoid the danger of being hit when
operating the jack or changing the wheel.
• Carefully follow these tire changing warnings to help prevent personal injury or
damage to your vehicle:
• Always park on a firm, level surface as far from the edge of the roadway
as possible before raising the vehicle.
• Turn on the Hazard Warning flasher.
• Block the wheel diagonally opposite the wheel to be raised.
• Set the parking brake firmly and set an automatic transmission in PARK;
a manual transmission in REVERSE.
• Do not let anyone sit in the vehicle when it is on a jack.
• Do not get under the vehicle when it is on a jack.
• Only use the jack in the positions indicated and for lifting this vehicle during
a tire change.
• If working on or near a roadway, be extremely careful of motor traffic.
• To assure that spare tires, flat or inflated, are securely stowed, spares must be
stowed with the valve stem facing the ground.
• Raising the vehicle higher than necessary can make the vehicle less stable. It
could slip off the jack and hurt someone near it. Raise the vehicle only enough
to remove the tire.
• To avoid possible personal injury, handle the wheel covers with care to avoid
contact with any sharp edges.
• A loose tire or jack thrown forward in a collision or hard stop could injure the
occupants in the vehicle. Have the deflated (flat) tire repaired or replaced
immediately.
• To avoid the risk of forcing the vehicle off the jack, do not tighten the lug nuts
fully until the vehicle is lowered to the ground. Failure to follow this warning
may result in personal injury.
WHAT TO DO IN EMERGENCIES
93
Page 112 of 132
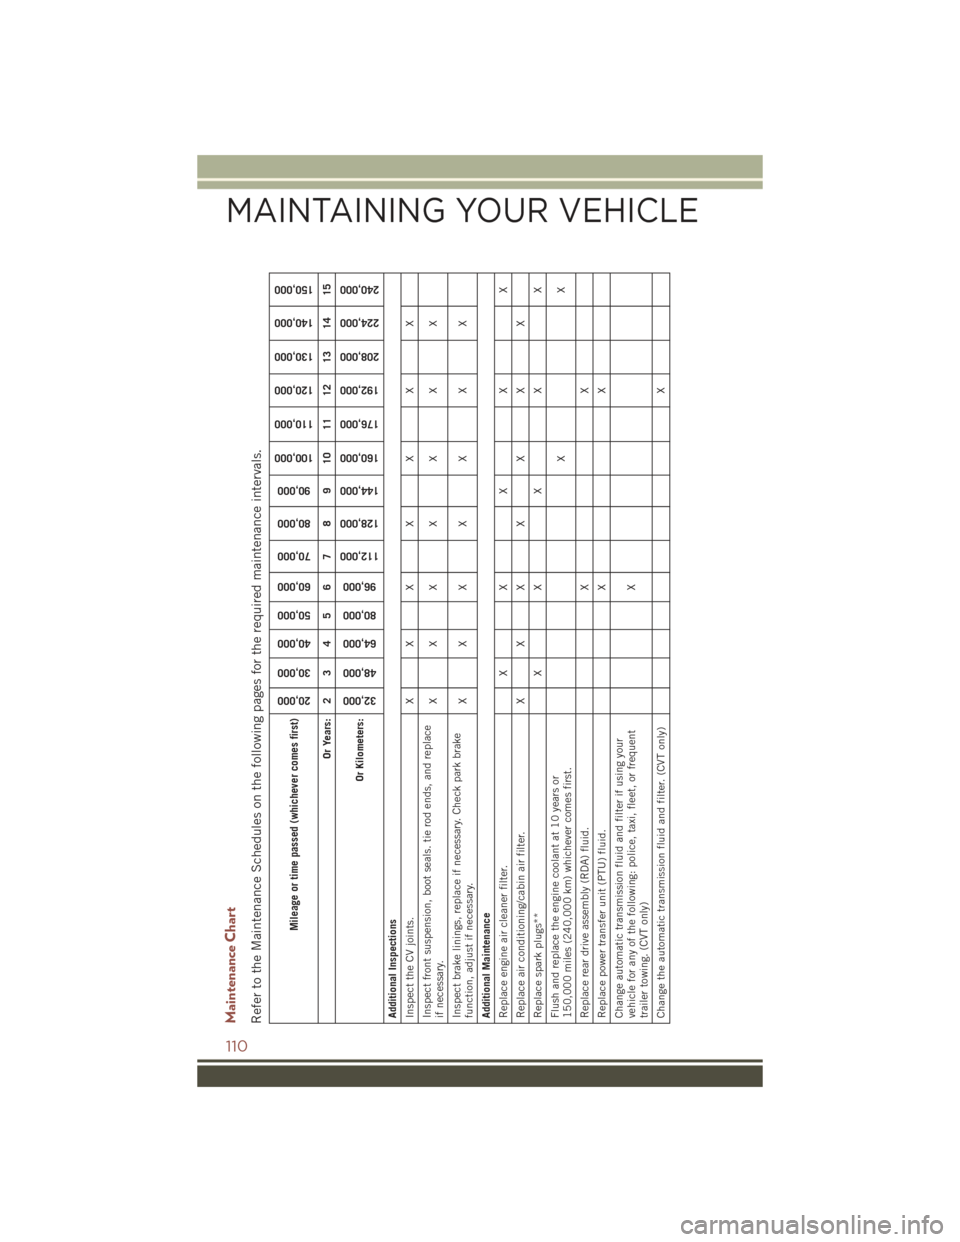
Maintenance ChartRefer to the Maintenance Schedules on the following pages for the required maintenance intervals.
Mileage or time passed (whichever comes first)
20,000
30,000
40,000
50,000
60,000
70,000
80,000
90,000
100,000
110,000
120,000
130,000
140,000
150,000
Or Years: 2 3 4 5 6 7 8 9 10 11 12 13 14 15
Or Kilometers:
32,000
48,000
64,000
80,000
96,000
112,000
128,000
144,000
160,000
176,000
192,000
208,000
224,000
240,000
Additional InspectionsInspect the CV joints. X X X X X X XInspect front suspension, boot seals. tie rod ends, and replaceif necessary.
XXX X X X X
Inspect brake linings, replace if necessary. Check park brakefunction, adjust if necessary.
XXX X X X X
Additional MaintenanceReplace engine air cleaner filter. X X X X XReplace air conditioning/cabin air filter. X X X X X X XReplace spark plugs** X X X X XFlush and replace the engine coolant at 10 years or150,000 miles (240,000 km) whichever comes first.
XX
Replace rear drive assembly (RDA) fluid. X XReplace power transfer unit (PTU) fluid. X XChange automatic transmission fluid and filter if using yourvehicle for any of the following: police, taxi, fleet, or frequenttrailer towing. (CVT only)
X
Change the automatic transmission fluid and filter. (CVT only) X
MAINTAINING YOUR VEHICLE
110
Page 113 of 132
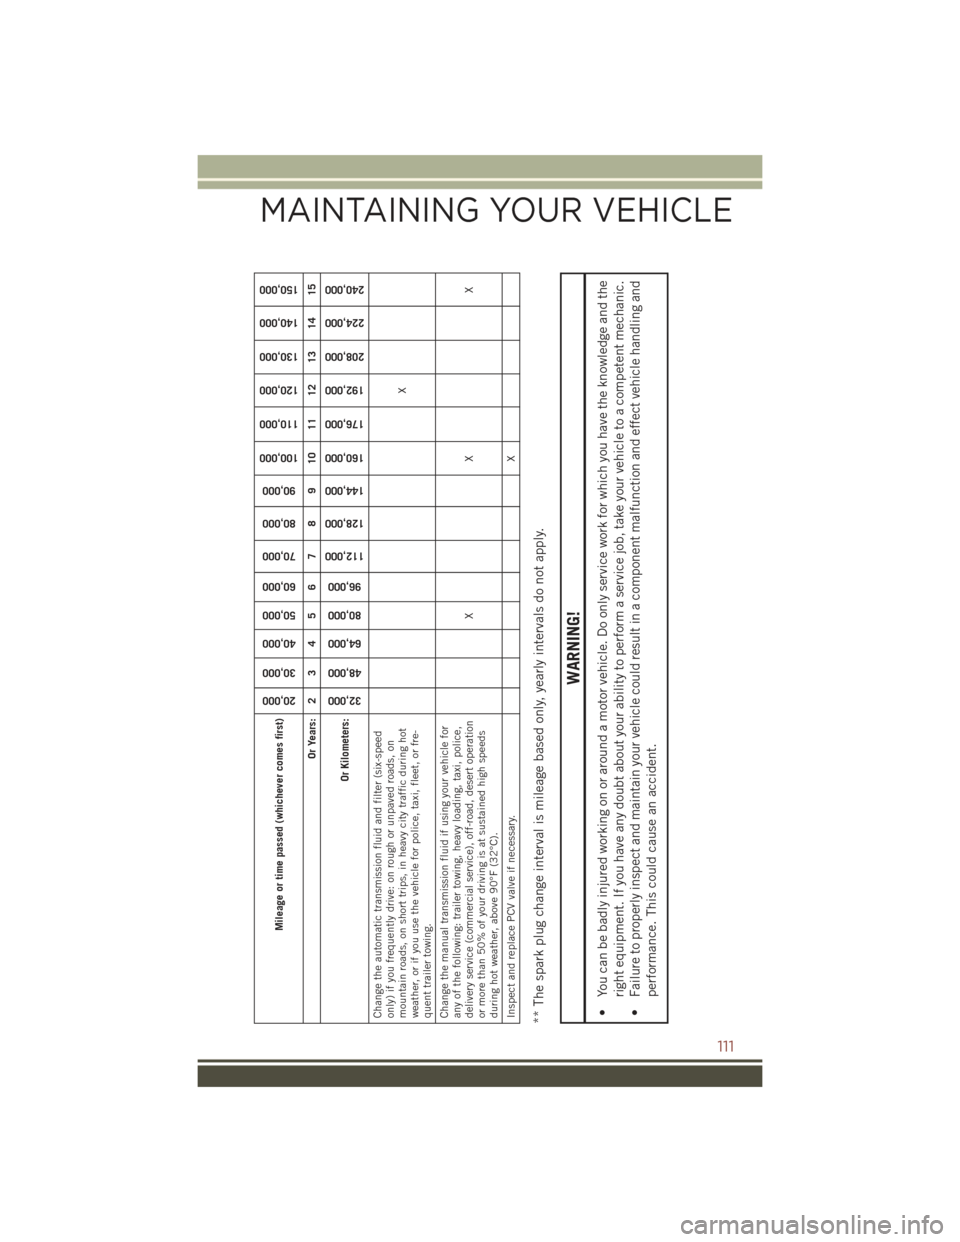
Mileage or time passed (whichever comes first)
20,000
30,000
40,000
50,000
60,000
70,000
80,000
90,000
100,000
110,000
120,000
130,000
140,000
150,000
Or Years: 2 3 4 5 6 7 8 9 10 11 12 13 14 15
Or Kilometers:
32,000
48,000
64,000
80,000
96,000
112,000
128,000
144,000
160,000
176,000
192,000
208,000
224,000
240,000
Change the automatic transmission fluid and filter (six-speedonly) if you frequently drive: on rough or unpaved roads, onmountain roads, on short trips, in heavy city traffic during hotweather, or if you use the vehicle for police, taxi, fleet, or fre-quent trailer towing.
X
Change the manual transmission fluid if using your vehicle forany of the following: trailer towing, heavy loading, taxi, police,delivery service (commercial service), off-road, desert operationor more than 50% of your driving is at sustained high speedsduring hot weather, above 90°F (32°C).
XX X
Inspect and replace PCV valve if necessary.
X
** The spark plug change interval is mileage based only, yearly intervals do not apply.
WARNING!
• You can be badly injured working on or around a motor vehicle. Do only service work for which you have the knowledge and the
right equipment. If you have any doubt about your ability to perform a service job, take your vehicle to a competent mechanic.
• Failure to properly inspect and maintain your vehicle could result in a component malfunction and effect vehicle handling and
performance. This could cause an accident.
MAINTAINING YOUR VEHICLE
111
Page 118 of 132
SPARE TIRES — IF EQUIPPED
NOTE:
For vehicles equipped with Tire Service Kit instead of a spare tire, please refer to “Tire
Service Kit” in “What To Do In Emergencies” for further information.
CAUTION!
Because of the reduced ground clearance, do not take your vehicle through an
automatic car wash with a compact, full size or limited-use temporary spare
installed. Damage to the vehicle may result.
Spare Tire Matching Original Equipped Tire And Wheel — If Equipped
Your vehicle may be equipped with a spare tire and wheel equivalent in look and
function to the original equipment tire and wheel found on the front or rear axle of
your vehicle. This spare tire may be used in the tire rotation for your vehicle. If your
vehicle has this option, refer to an authorized tire dealer for the recommended tire
rotation pattern.
Compact Spare Tire — If Equipped
The compact spare is for temporary emergency use only. You can identify if your
vehicle is equipped with a compact spare by looking at the spare tire description on
the Tire and Loading Information Placard located on the driver’s side door opening or
on the sidewall of the tire. Compact spare tire descriptions begin with the letter “T”
or “S” preceding the size designation. Example: T145/80D18 103M.
T, S = Temporary Spare Tire
Since this tire has limited tread life, the original equipment tire should be repaired
(or replaced) and reinstalled on your vehicle at the first opportunity.
Do not install a wheel cover or attempt to mount a conventional tire on the compact
spare wheel, since the wheel is designed specifically for the compact spare tire. Do
not install more than one compact spare tire and wheel on the vehicle at any given
time.
WARNING!
Compact spares are for temporary emergency use only. With these spares, do not
drive more than 50 mph (80 km/h). Temporary use spares have limited tread life.
When the tread is worn to the tread wear indicators, the temporary use spare tire
needs to be replaced. Be sure to follow the warnings, which apply to your spare.
Failure to do so could result in spare tire failure and loss of vehicle control.
MAINTAINING YOUR VEHICLE
116