stop start JEEP COMPASS 2017 2.G Owners Manual
[x] Cancel search | Manufacturer: JEEP, Model Year: 2017, Model line: COMPASS, Model: JEEP COMPASS 2017 2.GPages: 429, PDF Size: 3.46 MB
Page 24 of 429
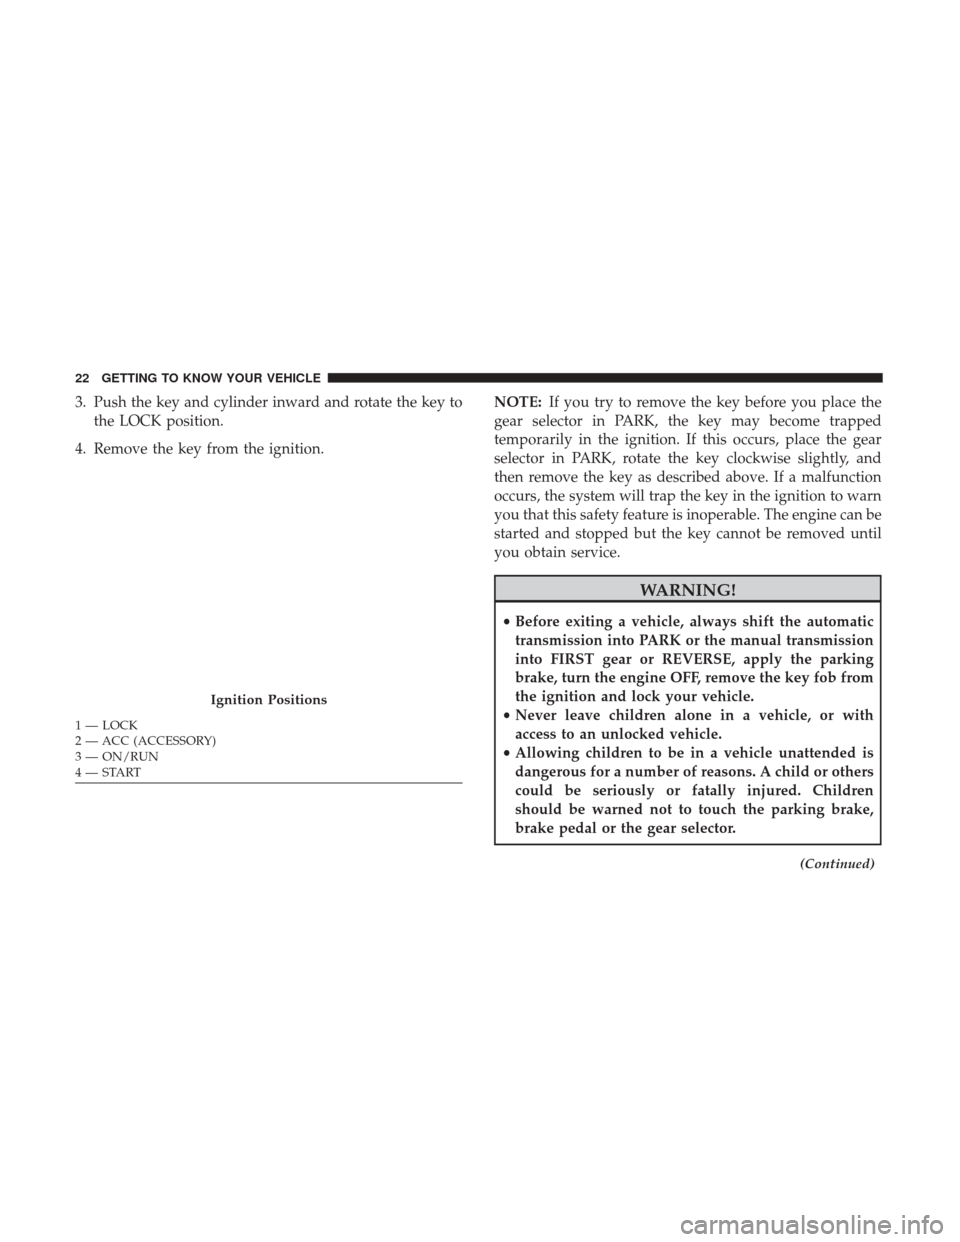
3. Push the key and cylinder inward and rotate the key tothe LOCK position.
4. Remove the key from the ignition. NOTE:
If you try to remove the key before you place the
gear selector in PARK, the key may become trapped
temporarily in the ignition. If this occurs, place the gear
selector in PARK, rotate the key clockwise slightly, and
then remove the key as described above. If a malfunction
occurs, the system will trap the key in the ignition to warn
you that this safety feature is inoperable. The engine can be
started and stopped but the key cannot be removed until
you obtain service.
WARNING!
• Before exiting a vehicle, always shift the automatic
transmission into PARK or the manual transmission
into FIRST gear or REVERSE, apply the parking
brake, turn the engine OFF, remove the key fob from
the ignition and lock your vehicle.
• Never leave children alone in a vehicle, or with
access to an unlocked vehicle.
• Allowing children to be in a vehicle unattended is
dangerous for a number of reasons. A child or others
could be seriously or fatally injured. Children
should be warned not to touch the parking brake,
brake pedal or the gear selector.
(Continued)
Ignition Positions
1 — LOCK
2 — ACC (ACCESSORY)
3 — ON/RUN
4 — START 22 GETTING TO KNOW YOUR VEHICLE
Page 27 of 429
Vehicle Security Light will begin to flash. Place the
ignition in the LOCK position and remove the second
key.
4. Insert a blank key into the ignition. Place the ignition in the ON/RUN position within 60 seconds. After 10
seconds, a single chime will sound. In addition, the
Vehicle Security Light will stop flashing. To indicate that
programming is complete, the Vehicle Security Light
will turn on again for three seconds and then turn off.
The new key is programmed. The key fob will also be
programmed during this procedure.
Repeat this procedure to program up to eight keys. If you
do not have a programmed key fob, contact your autho-
rized dealer for details.
NOTE: If a programmed key fob is lost, see your autho-
rized dealer to have all remaining key fobs erased from the
system’s memory. This will prevent the lost key from
starting your vehicle. The remaining key fobs must then be
reprogrammed. All vehicle key fobs must be taken to an
authorized dealer at the time of service to be repro-
grammed.General Information
The following regulatory statement applies to all radio
frequency (RF) devices equipped in this vehicle:
This device complies with Part 15 of the FCC Rules and
with Industry Canada license-exempt RSS standard(s).
Operation is subject to the following two conditions:
1. This device may not cause harmful interference, and
2. This device must accept any interference received, in- cluding interference that may cause undesired opera-
tion.
NOTE: Changes or modifications not expressly approved
by the party responsible for compliance could void the
user ’s authority to operate the equipment.
VEHICLE SECURITY ALARM — IF EQUIPPED
This Vehicle Security Alarm monitors the doors, liftgate,
and ignition switch for unauthorized operation.
When the alarm is activated, the interior switches for door
locks are disabled. The Vehicle Security Alarm provides
both audio and visual signals, the horn will sound, the
headlights, park lamps and/or turn signals will flash
repeatedly for three minutes. If the disturbance is still
3
GETTING TO KNOW YOUR VEHICLE 25
Page 102 of 429
button on the steering wheel to turn off the message. If the
problem continues, the message will appear the next time
the vehicle is started.
noFUSE
If the vehicle diagnostic system determines that the Igni-
tion Off Draw (IOD) fuse is improperly installed, or
damaged, a “noFUSE” message will display in the odom-
eter display area. Refer to “Fuses” in “In Case Of Emer-
gency” for further information on fuses and fuse locations.
CHAngE OIL
Your vehicle is equipped with an engine oil change indi-
cator system. The odometer display will toggle between
CHAngEandOilfor approximately 12 seconds, after a
single chime has sounded, to indicate the next scheduled
oil change interval. The engine oil change indicator system
is duty cycle-based, which means the engine oil change
interval may fluctuate dependent upon your personal
driving style.
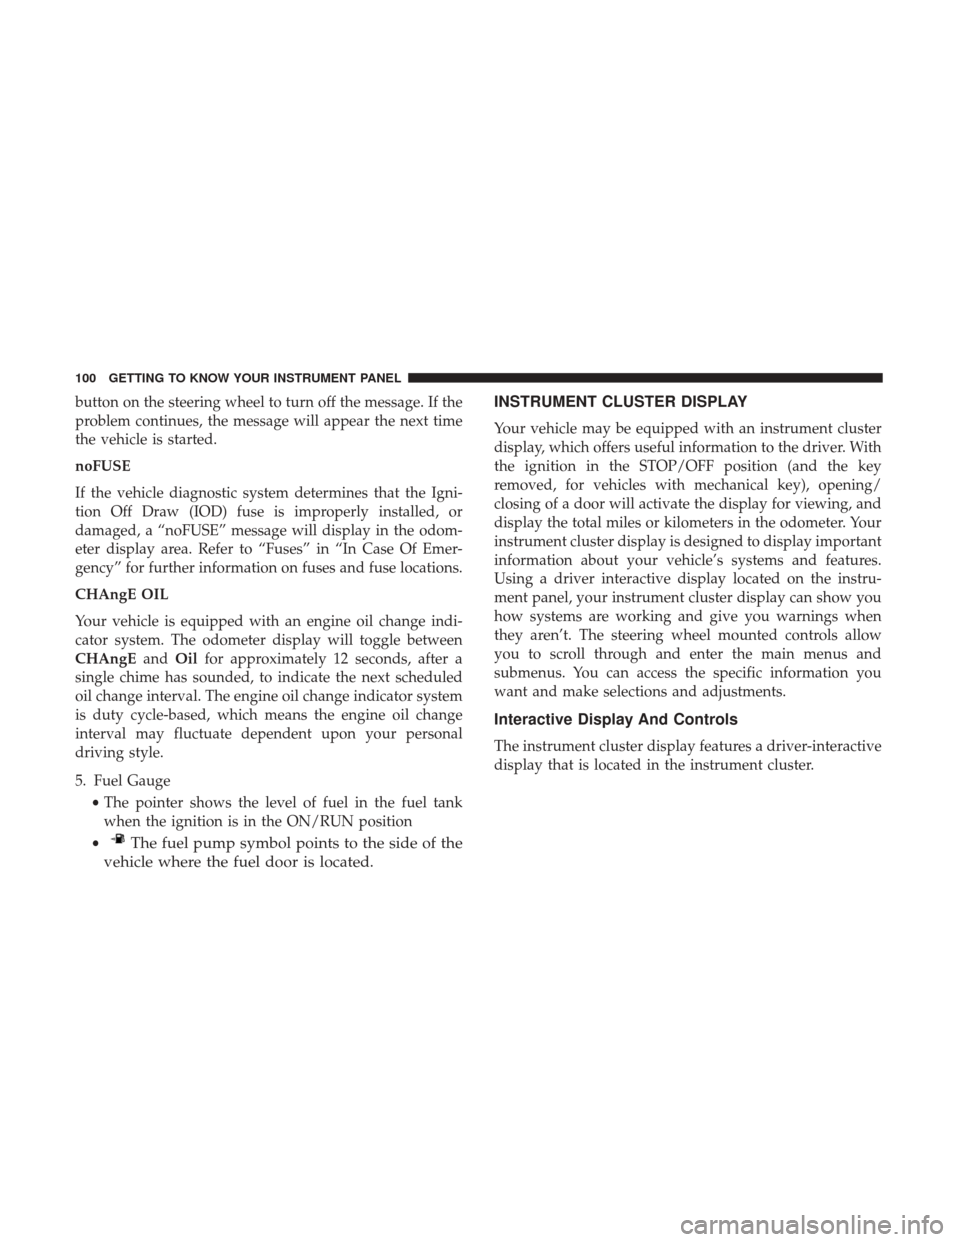
5. Fuel Gauge
•The pointer shows the level of fuel in the fuel tank
when the ignition is in the ON/RUN position
•
The fuel pump symbol points to the side of the
vehicle where the fuel door is located. INSTRUMENT CLUSTER DISPLAY
Your vehicle may be equipped with an instrument cluster
display, which offers useful information to the driver. With
the ignition in the STOP/OFF position (and the key
removed, for vehicles with mechanical key), opening/
closing of a door will activate the display for viewing, and
display the total miles or kilometers in the odometer. Your
instrument cluster display is designed to display important
information about your vehicle’s systems and features.
Using a driver interactive display located on the instru-
ment panel, your instrument cluster display can show you
how systems are working and give you warnings when
they aren’t. The steering wheel mounted controls allow
you to scroll through and enter the main menus and
submenus. You can access the specific information you
want and make selections and adjustments.
Interactive Display And Controls
The instrument cluster display features a driver-interactive
display that is located in the instrument cluster.
100 GETTING TO KNOW YOUR INSTRUMENT PANEL
Page 107 of 429
Elapsed Time
Shows the total elapsed time of travel since the last reset.
Elapsed time will increment when the ignition is placed in
the RUN/START position.
Elapsed time is displayed as follows:
hours: minutes: seconds
Elapsed time can be reset by pushing and holding theright
arrow button (as prompted in the display). Upon reset,
all digits will change to zeros, and time will start again if
the ignition is in the RUN or START position.
Display Units Of Measure In
To make your selection, push and release the rightar-
row button until “US” or “METRIC” appears.
Personal Settings (Customer-Programmable
Features)
This allows the driver to set and recall features when the
transmission is in PARK (automatic transmission) or the
vehicle is stopped (manual transmission).
Push and release the MENUordown
arrow button
until “Personal Settings” is displayed in the instrument
cluster display then push and release the right
arrow
button.
Use the rightarrow button to highlight your MENU/
SUBMENU choices:
Language
When in this display, you may select different languages
for all display nomenclature, including the trip functions.
Pushing the right
arrow button while in this display
selects English, Espanol, Deutsch, Italiano, Francais, or
NL depending on availability. As you continue, the
displayed information will be shown in the selected
language.
Auto Lock Doors — If Equipped
When ON is selected, all doors lock automatically when
the speed of the vehicle reaches 15 MPH (24 km/h). Push
and hold the right
arrow button when in this display
until “ON” or “OFF” appears to make your selection.
Auto Unlock On Exit
When ON is selected, all the vehicle’s doors will unlock
when the driver’s door is opened, if the vehicle is stopped
(manual transmission) or the vehicle is stopped and the
transmission is in the PARK or NEUTRAL position (auto-
matic transmission). Push and hold the right
arrow
button when in this display until “ON” or “OFF”
appears to make your selection. 4
GETTING TO KNOW YOUR INSTRUMENT PANEL 105
Page 116 of 429
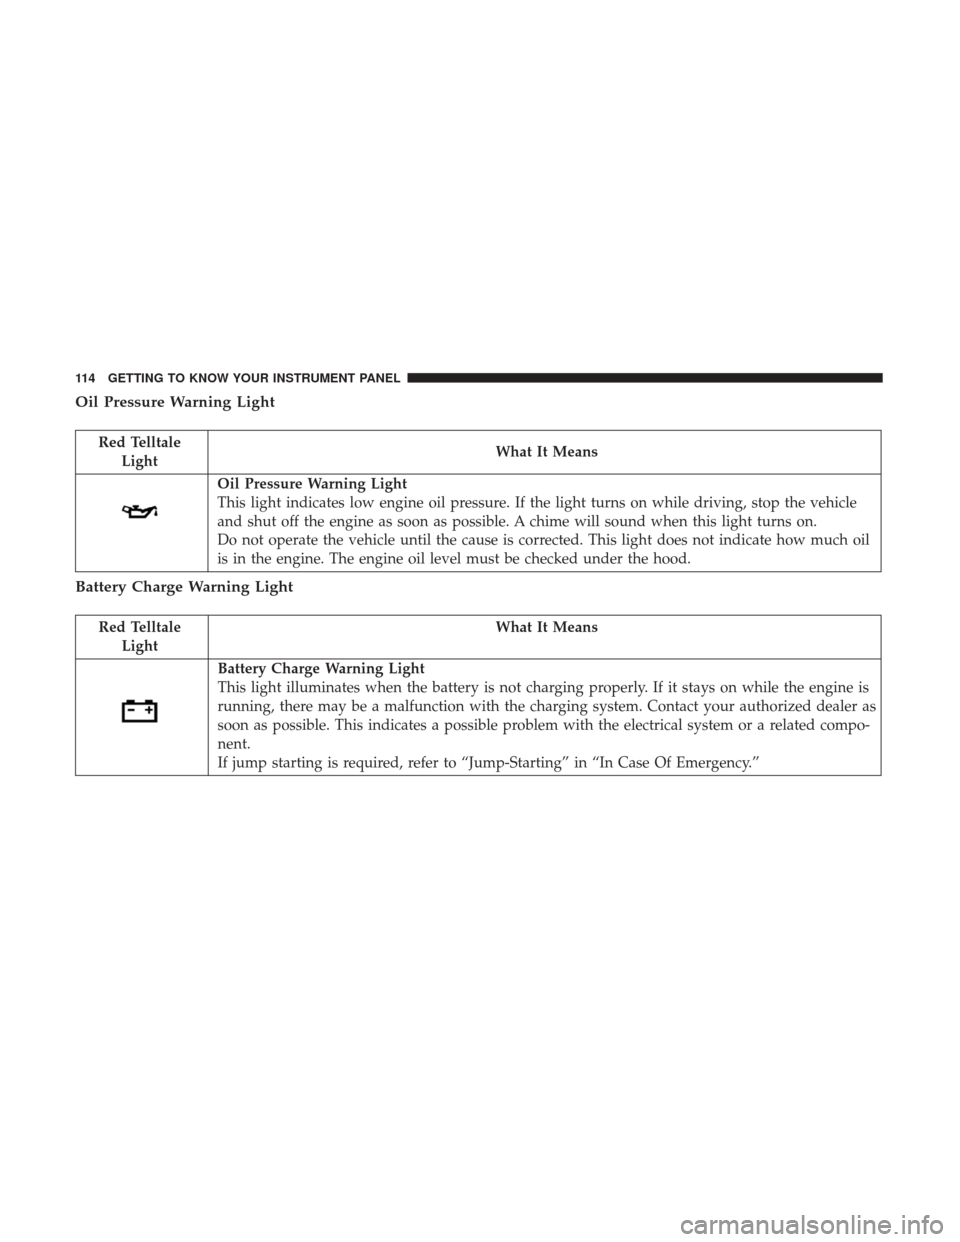
Oil Pressure Warning Light
Red TelltaleLight What It Means
Oil Pressure Warning Light
This light indicates low engine oil pressure. If the light turns on while driving, stop the vehicle
and shut off the engine as soon as possible. A chime will sound when this light turns on.
Do not operate the vehicle until the cause is corrected. This light does not indicate how much oil
is in the engine. The engine oil level must be checked under the hood.
Battery Charge Warning Light
Red Telltale
Light What It Means
Battery Charge Warning Light
This light illuminates when the battery is not charging properly. If it stays on while the engine is
running, there may be a malfunction with the charging system. Contact your authorized dealer as
soon as possible. This indicates a possible problem with the electrical system or a related compo-
nent.
If jump starting is required, refer to “Jump-Starting” in “In Case Of Emergency.”
114 GETTING TO KNOW YOUR INSTRUMENT PANEL
Page 117 of 429
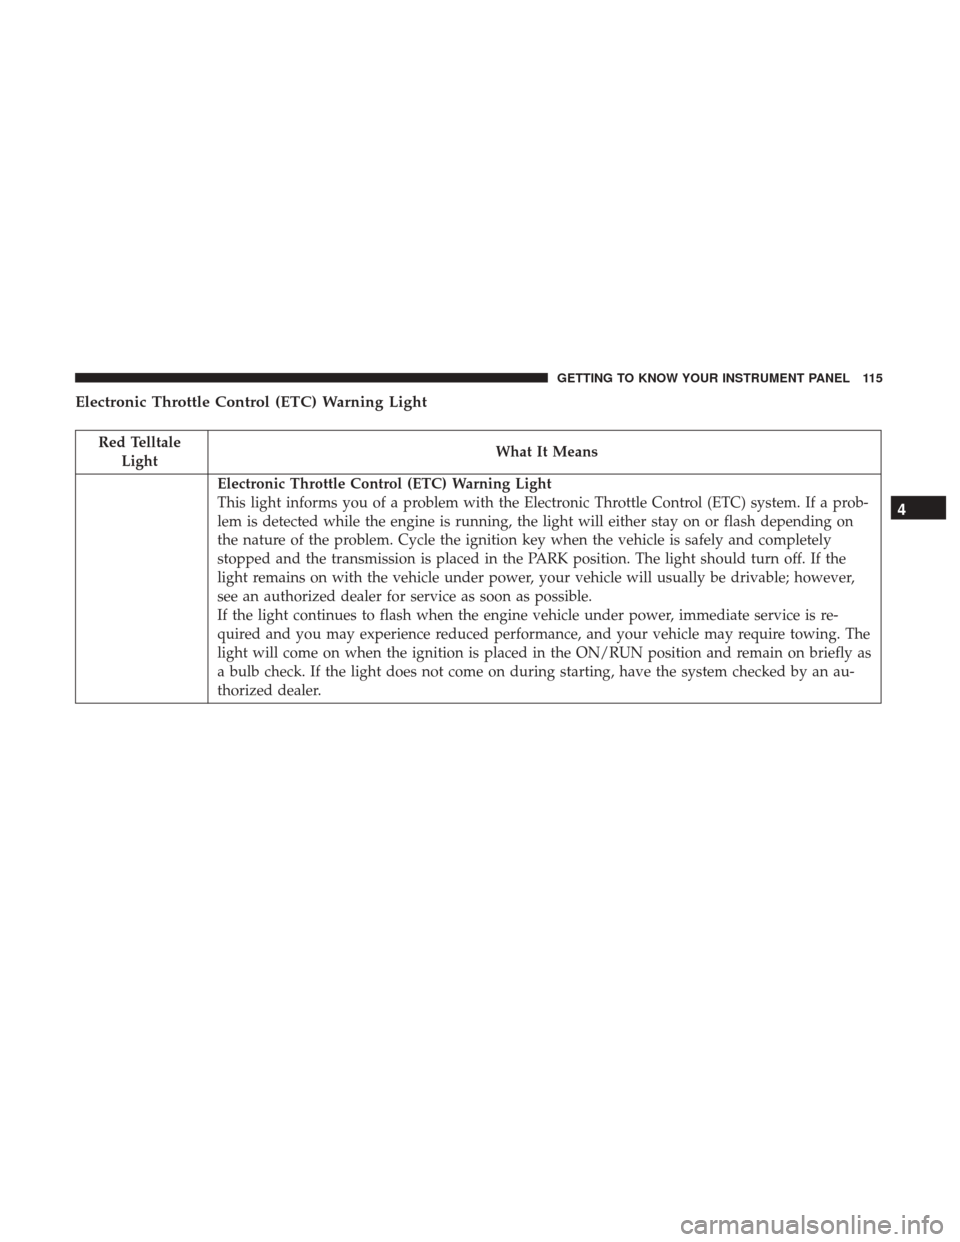
Electronic Throttle Control (ETC) Warning Light
Red TelltaleLight What It Means
Electronic Throttle Control (ETC) Warning Light
This light informs you of a problem with the Electronic Throttle Control (ETC) system. If a prob-
lem is detected while the engine is running, the light will either stay on or flash depending on
the nature of the problem. Cycle the ignition key when the vehicle is safely and completely
stopped and the transmission is placed in the PARK position. The light should turn off. If the
light remains on with the vehicle under power, your vehicle will usually be drivable; however,
see an authorized dealer for service as soon as possible.
If the light continues to flash when the engine vehicle under power, immediate service is re-
quired and you may experience reduced performance, and your vehicle may require towing. The
light will come on when the ignition is placed in the ON/RUN position and remain on briefly as
a bulb check. If the light does not come on during starting, have the system checked by an au-
thorized dealer.
4
GETTING TO KNOW YOUR INSTRUMENT PANEL 115
Page 132 of 429
SAFETY FEATURES
Anti-Lock Brake System (ABS)
The Anti-Lock Brake System (ABS) provides increased
vehicle stability and brake performance under most brak-
ing conditions. The system automatically prevents wheel
lock, and enhances vehicle control during braking.
The ABS performs a self-check cycle to ensure that the ABS
is working properly each time the vehicle is started and
driven. During this self-check, you may hear a slight
clicking sound as well as some related motor noises.
ABS is activated during braking when the system detects
one or more wheels begin to lock. Road conditions such as
ice, snow, gravel, bumps, railroad tracks, loose debris, or
panic stops may increase the likelihood of ABS activa-
tion(s).
You also may experience the following when ABS activates:
•The ABS motor noise (it may continue to run for a short
time after the stop).
• The clicking sound of solenoid valves.
• Brake pedal pulsations.
• A slight drop of the brake pedal at the end of the stop. These are all normal characteristics of ABS.
WARNING!
•
The ABS contains sophisticated electronic equip-
ment that may be susceptible to interference caused
by improperly installed or high output radio trans-
mitting equipment. This interference can cause pos-
sible loss of anti-lock braking capability. Installation
of such equipment should be performed by qualified
professionals.
• Pumping of the Anti-Lock Brakes will diminish their
effectiveness and may lead to a collision. Pumping
makes the stopping distance longer. Just press firmly
on your brake pedal when you need to slow down or
stop.
• The ABS cannot prevent the natural laws of physics
from acting on the vehicle, nor can it increase brak-
ing or steering efficiency beyond that afforded by the
condition of the vehicle brakes and tires or the
traction afforded.
• The ABS cannot prevent collisions, including those
resulting from excessive speed in turns, following
another vehicle too closely, or hydroplaning.
(Continued)
130 SAFETY
Page 134 of 429
If the “Brake System Warning Light” remains on or comes
on while driving, it indicates that the brake system is not
functioning properly and that immediate service is re-
quired. If the “Brake System Warning Light” does not come
on when the ignition is turned to the ON mode, have the
light repaired as soon as possible.
Brake Assist System (BAS)
The BAS is designed to optimize the vehicle’s braking
capability during emergency braking maneuvers. The sys-
tem detects an emergency braking situation by sensing the
rate and amount of brake application and then applies
optimum pressure to the brakes. This can help reduce
braking distances. The BAS complements the anti-lock
brake system (ABS). Applying the brakes very quickly
results in the best BAS assistance. To receive the benefit of
the system, you must apply continuous braking pressure
during the stopping sequence, (do not “pump” the brakes).
Do not reduce brake pedal pressure unless braking is no
longer desired. Once the brake pedal is released, the BAS is
deactivated.
WARNING!
The Brake Assist System (BAS) cannot prevent the
natural laws of physics from acting on the vehicle, nor
can it increase the traction afforded by prevailing road
conditions. BAS cannot prevent collisions, including
those resulting from excessive speed in turns, driving
on very slippery surfaces, or hydroplaning. The capa-
bilities of a BAS-equipped vehicle must never be
exploited in a reckless or dangerous manner, which
could jeopardize the user’s safety or the safety of
others.
Hill Start Assist (HSA)
The HSA system is designed to mitigate roll back from a
complete stop while on an incline. If the driver releases the
brake while stopped on an incline, HSA will continue to
hold the brake pressure for a short period. If the driver
does not apply the throttle before this time expires, the
system will release brake pressure and the vehicle will roll
down the hill as normal.
132 SAFETY
Page 135 of 429
The following conditions must be met in order for HSA to
activate:
•The feature must be enabled.
• The vehicle must be stopped.
• Park brake must be off.
• Driver door must be closed.
• The vehicle must be on a sufficient grade.
• The gear selection must match vehicle uphill direction
(i.e., vehicle facing uphill is in forward gear; vehicle
backing uphill is in REVERSE gear).
• HSA will work in REVERSE gear and all forward gears.
The system will not activate if the transmission is in
PARK or NEUTRAL. For vehicles equipped with a
manual transmission, if the clutch is pressed, HSA will
remain active.
WARNING!
There may be situations where the Hill Start Assist
(HSA) will not activate and slight rolling may occur,
such as on minor hills or with a loaded vehicle, or
(Continued)
WARNING! (Continued)
while pulling a trailer. HSA is not a substitute for
active driving involvement. It is always the driver ’s
responsibility to be attentive to distance to other ve-
hicles, people, and objects, and most importantly brake
operation to ensure safe operation of the vehicle under
all road conditions. Your complete attention is always
required while driving to maintain safe control of your
vehicle. Failure to follow these warnings can result in
a collision or serious personal injury.
Disabling And Enabling HSA
This feature can be turned on or turned off. To change the
current setting, proceed as follows:
•If disabling HSA using your instrument cluster display,
refer to “Instrument Cluster Display” in “Getting To
Know Your Instrument Panel” for further information.
• If disabling HSA using Uconnect Settings, refer to
“Uconnect Settings” in “Multimedia” for further infor-
mation.
5
SAFETY 133
Page 140 of 429
30 mph (48 km/h), see your authorized dealer as soon as
possible to have the problem diagnosed and corrected.
The “ESC Activation/Malfunction Indicator Light” (lo-
cated in the instrument cluster) starts to flash as soon as the
tires lose traction and the ESC system becomes active. The
“ESC Activation/Malfunction Indicator Light” also flashes
when TCS is active. If the “ESC Activation/Malfunction
Indicator Light” begins to flash during acceleration, ease
up on the accelerator and apply as little throttle as possible.
Be sure to adapt your speed and driving to the prevailing
road conditions.
NOTE:
•The “ESC Activation/Malfunction Indicator Light” and
the “ESC OFF Indicator Light” come on momentarily
each time the ignition is turned ON.
• Each time the ignition is turned ON, the ESC system will
be on even if it was turned off previously.
• The ESC system will make buzzing or clicking sounds
when it is active. This is normal; the sounds will stop when ESC becomes inactive following the maneuver
that caused the ESC activation.
The “ESC OFF Indicator Light” indicates the
customer has elected to have the Electronic Sta-
bility Control (ESC) in a reduced mode.
Electronic Roll Mitigation (ERM)
This system anticipates the potential for wheel lift by
monitoring the driver ’s steering wheel input and the speed
of the vehicle. When ERM determines that the rate of
change of the steering wheel angle and vehicle’s speed are
sufficient to potentially cause wheel lift, it then applies the
appropriate brake and may also reduce engine power to
lessen the chance that wheel lift will occur. ERM can only
reduce the chance of wheel lift occurring during severe or
evasive driving maneuvers; it cannot prevent wheel lift
due to other factors, such as road conditions, leaving the
roadway, or striking objects or other vehicles.
NOTE: ERM is disabled anytime the ESC is in “Full Off”
mode (if equipped). Refer to “Electronic Stability Control
(ESC)” in this section for a complete explanation of the
available ESC modes.
138 SAFETY