buttons JEEP COMPASS 2018 Owner handbook (in English)
[x] Cancel search | Manufacturer: JEEP, Model Year: 2018, Model line: COMPASS, Model: JEEP COMPASS 2018Pages: 348, PDF Size: 6.03 MB
Page 160 of 348
CAUTION!
All wheels must have the same size and
type tires. Unequal tire sizes must not be
used. Unequal tire size may cause failure
of the power transfer unit.
Four Wheel Drive (4x4)
The four wheel drive (4WD) is fully automatic
in normal driving mode.
NOTE:
It is not possible to carry out the change of
mode when the vehicle exceeds the speed of
75 mph (120 km/h).
Enabling Four Wheel Drive (4x4)
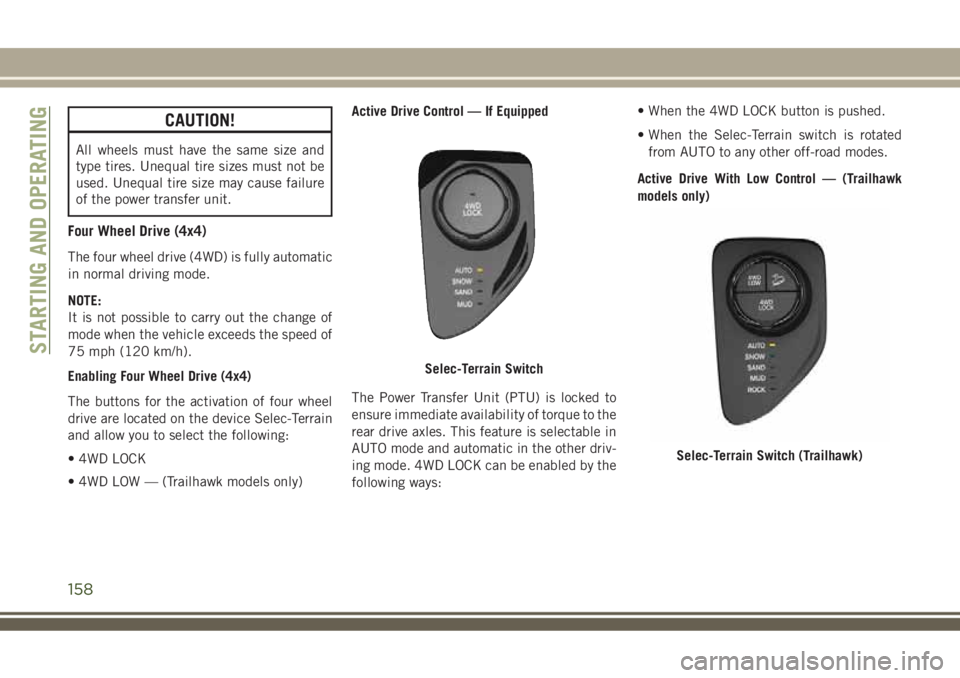
The buttons for the activation of four wheel
drive are located on the device Selec-Terrain
and allow you to select the following:
• 4WD LOCK
• 4WD LOW — (Trailhawk models only)Active Drive Control — If Equipped
The Power Transfer Unit (PTU) is locked to
ensure immediate availability of torque to the
rear drive axles. This feature is selectable in
AUTO mode and automatic in the other driv-
ing mode. 4WD LOCK can be enabled by the
following ways:• When the 4WD LOCK button is pushed.
• When the Selec-Terrain switch is rotated
from AUTO to any other off-road modes.
Active Drive With Low Control — (Trailhawk
models only)
Selec-Terrain Switch
Selec-Terrain Switch (Trailhawk)
STARTING AND OPERATING
158
Page 164 of 348
SPEED CONTROL
When engaged, the Speed Control takes over
accelerator operations at speeds greater than
25 mph (40 km/h).
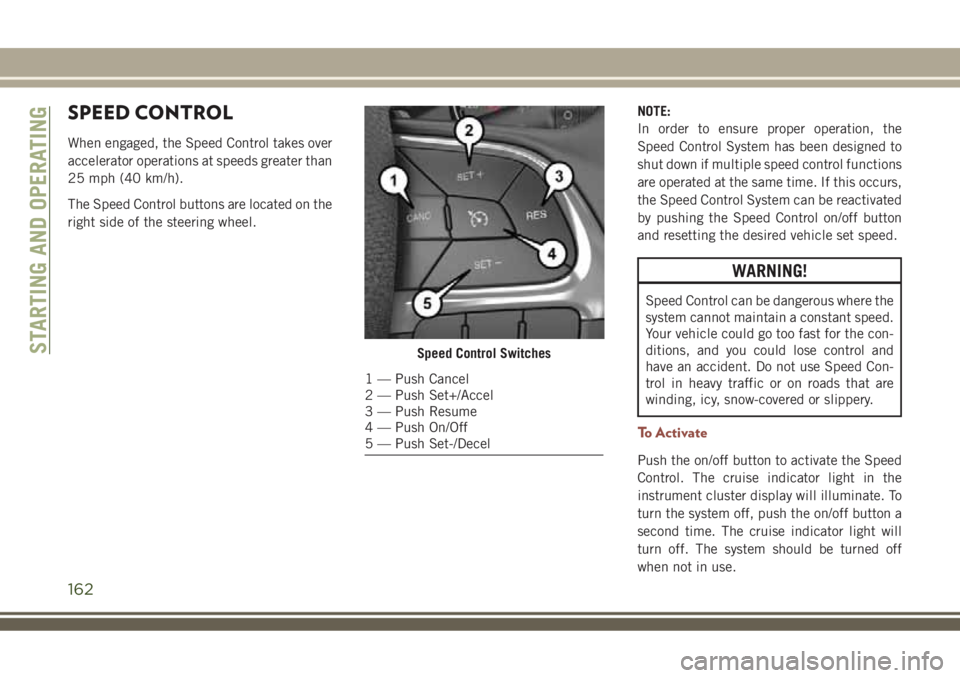
The Speed Control buttons are located on the
right side of the steering wheel.NOTE:
In order to ensure proper operation, the
Speed Control System has been designed to
shut down if multiple speed control functions
are operated at the same time. If this occurs,
the Speed Control System can be reactivated
by pushing the Speed Control on/off button
and resetting the desired vehicle set speed.
WARNING!
Speed Control can be dangerous where the
system cannot maintain a constant speed.
Your vehicle could go too fast for the con-
ditions, and you could lose control and
have an accident. Do not use Speed Con-
trol in heavy traffic or on roads that are
winding, icy, snow-covered or slippery.
To Activate
Push the on/off button to activate the Speed
Control. The cruise indicator light in the
instrument cluster display will illuminate. To
turn the system off, push the on/off button a
second time. The cruise indicator light will
turn off. The system should be turned off
when not in use.
Speed Control Switches
1 — Push Cancel
2 — Push Set+/Accel
3 — Push Resume
4 — Push On/Off
5 — Push Set-/Decel
STARTING AND OPERATING
162
Page 167 of 348
Activation
Push and release the Adaptive Cruise Control
(ACC) on/off button.
“ACC READY” will appear in the instrument
cluster display to indicate the ACC is on.
Setting A Desired Speed
When the vehicle reaches the speed desired,
push the SET(+)button or the SET(-)button
and release. The instrument cluster display
will show the set speed.
If the system is set when the vehicle speed is
below 19 mph (30 km/h), the set speed shall
be defaulted to 19 mph (30 km/h). If the
system is set when the vehicle speed is above
19 mph (30 km/h), the set speed shall be the
current speed of the vehicle.
NOTE:
ACC cannot be set if there is a stationary
vehicle in front of your vehicle in close prox-
imity.Remove your foot from the accelerator pedal.
If you do not, the vehicle may continue to
accelerate beyond the set speed. If this oc-
curs:
• The message “DRIVER OVERRIDE” will
appear in the instrument cluster display.
• The system will not be controlling the dis-
tance between your vehicle and the vehicle
ahead. The vehicle speed will only be de-
termined by the position of the accelerator
pedal.
Varying The Speed
Once the ACC has been activated, the speed
can be increased or decreased.
NOTE:
• When you override and push the SET (+)
button or SET (-) buttons, the new set
speed will be the current speed of the
vehicle.
• When you use the SET (-) button to decel-
erate, if the engine’s braking power does
not slow the vehicle sufficiently to reach
the set speed, the brake system will auto-
matically slow the vehicle.• If equipped with a automatic transmission,
The ACC system decelerates the vehicle to
a full stop when following a target vehicle.
If an ACC host vehicle follows a target
vehicle to a standstill, after two seconds the
driver will either have to push the RES
(resume) button, or apply the accelerator
pedal to reengage the ACC to the existing
set speed.
To Resume
If there is a set speed in the memory, push
the RES button and then remove your foot
from the accelerator pedal. The instrument
cluster display will show the last set speed.
WARNING!
The Resume function should only be used
if traffic and road conditions permit. Re-
suming a set speed that is too high or too
low for prevailing traffic and road condi-
tions could cause the vehicle to accelerate
or decelerate too sharply for safe opera-
tion. Failure to follow these warnings can
result in a collision and death or serious
personal injury.
165
Page 169 of 348
WARNING!
limited upon adverse sight distance con-
ditions.
• Does not always fully recognize complex
driving conditions, which can result in
wrong or missing distance warnings.
• Will bring the vehicle to a complete stop
while following a target vehicle and hold
the vehicle for 2 seconds in the stop
position. If the target vehicle does not
start moving within two seconds the ACC
system will display a message that the
system will release the brakes and that
the brakes must be applied manually. An
audible chime will sound when the
brakes are released.
You should switch off the ACC system:
• When driving in fog, heavy rain, heavy
snow, sleet, heavy traffic, and complex
driving situations (i.e., in highway con-
struction zones).
• When entering a turn lane or highway off
ramp; when driving on roads that are
winding, icy, snow-covered, slippery, or
have steep uphill or downhill slopes.
WARNING!
• When towing a trailer up or down steep
slopes.
• When circumstances do not allow safe
driving at a constant speed.
The Cruise Control system has two control
modes:
• Adaptive Cruise Control mode for main-
taining an appropriate distance between
vehicles.
• Normal (Fixed Speed) Cruise Control
mode for cruising at a constant preset
speed. For additional information, refer
to “Normal (Fixed Speed) Cruise Control
Mode” in your Owner’s Manual for fur-
ther information.
Normal (Fixed Speed) Cruise Control will
not react to preceding vehicles. Always be
aware of the mode selected. You can
change the mode by using the Cruise Con-
trol buttons. The two control modes func-
tion differently. Always confirm which
mode is selected.
PARKSENSE REAR PARK
ASSIST — IF EQUIPPED
The ParkSense Rear Park Assist system pro-
vides visual and audible indications of the
distance between the rear fascia and a de-
tected obstacle when backing up, e.g. during
a parking maneuver. Refer to “ParkSense
System Usage Precautions” for limitations of
this system and recommendations.
ParkSense will retain the last system state
(enabled or disabled) from the last ignition
cycle when the ignition is changed to the
ON/RUN position.
ParkSense can be active only when the gear
selector is in REVERSE. The system will
remain active while in REVERSE until the
vehicle speed is increased to approximately
7 mph (11 km/h) or above. While in RE-
VERSE, and above the system's operating
speed, a warning will appear within the in-
strument cluster display indicating the ve-
hicle speed is too fast. The system will be-
come active again when the vehicle speed is
decreased to speeds less than approximately
6 mph (9 km/h).
167
Page 267 of 348
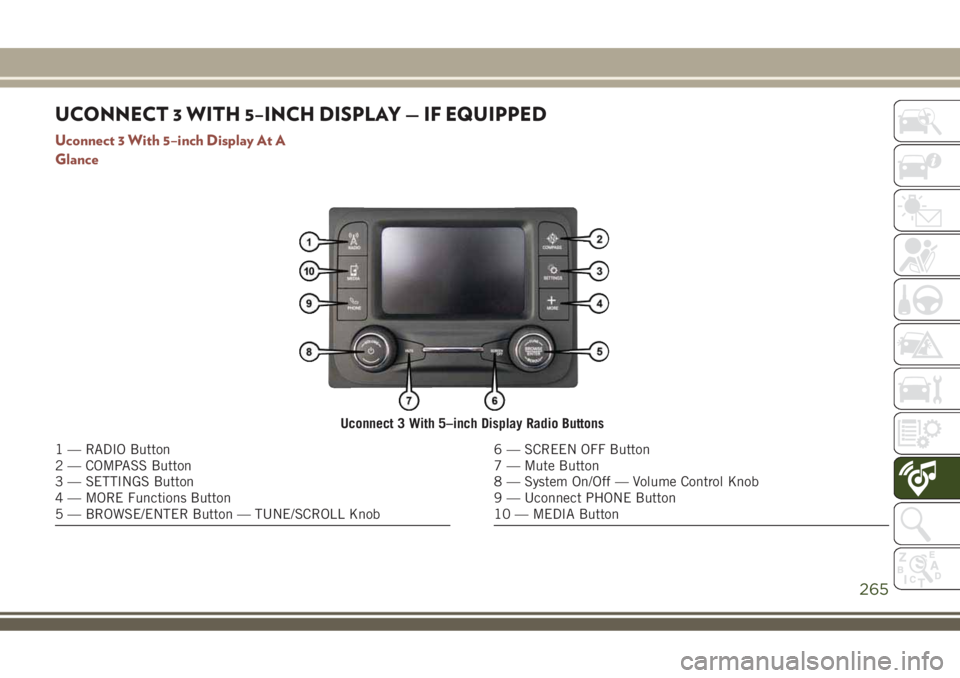
UCONNECT 3 WITH 5–INCH DISPLAY — IF EQUIPPED
Uconnect 3 With 5–inch Display At A
Glance
Uconnect 3 With 5–inch Display Radio Buttons
1 — RADIO Button
2 — COMPASS Button
3 — SETTINGS Button
4 — MORE Functions Button
5 — BROWSE/ENTER Button — TUNE/SCROLL Knob6 — SCREEN OFF Button
7 — Mute Button
8 — System On/Off — Volume Control Knob
9 — Uconnect PHONE Button
10 — MEDIA Button
265
Page 268 of 348
CAUTION!
Do NOT attach any object to the touchscreen,
doing so can result in damage to the touch-
screen.
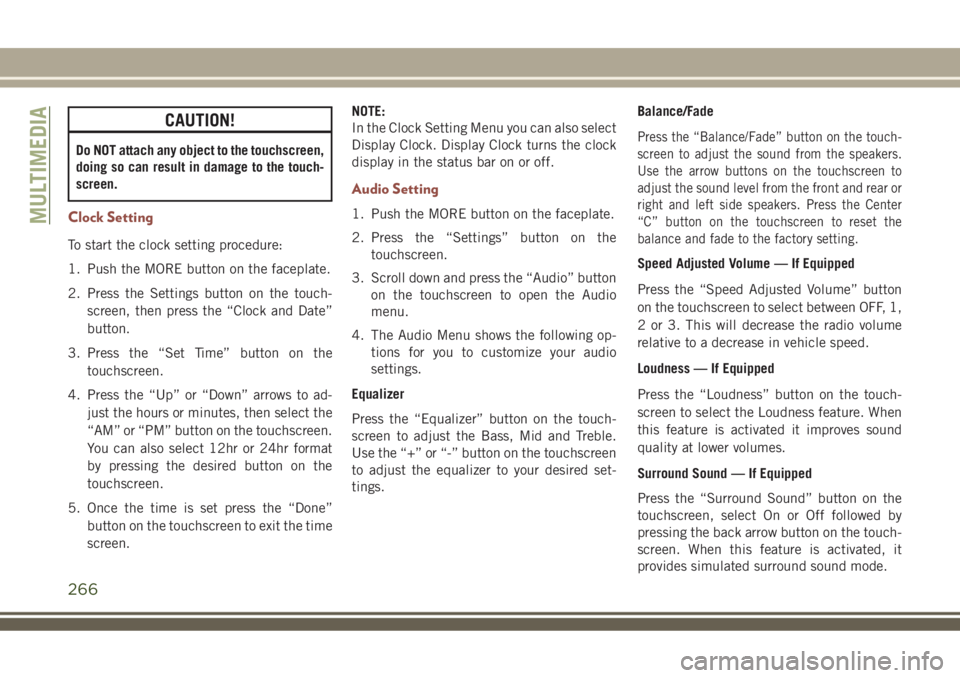
Clock Setting
To start the clock setting procedure:
1. Push the MORE button on the faceplate.
2. Press the Settings button on the touch-
screen, then press the “Clock and Date”
button.
3. Press the “Set Time” button on the
touchscreen.
4. Press the “Up” or “Down” arrows to ad-
just the hours or minutes, then select the
“AM” or “PM” button on the touchscreen.
You can also select 12hr or 24hr format
by pressing the desired button on the
touchscreen.
5. Once the time is set press the “Done”
button on the touchscreen to exit the time
screen.NOTE:
In the Clock Setting Menu you can also select
Display Clock. Display Clock turns the clock
display in the status bar on or off.
Audio Setting
1. Push the MORE button on the faceplate.
2. Press the “Settings” button on the
touchscreen.
3. Scroll down and press the “Audio” button
on the touchscreen to open the Audio
menu.
4. The Audio Menu shows the following op-
tions for you to customize your audio
settings.
Equalizer
Press the “Equalizer” button on the touch-
screen to adjust the Bass, Mid and Treble.
Use the “+” or “-” button on the touchscreen
to adjust the equalizer to your desired set-
tings.Balance/Fade
Press the “Balance/Fade” button on the touch-
screen to adjust the sound from the speakers.
Use the arrow buttons on the touchscreen to
adjust the sound level from the front and rear or
right and left side speakers. Press the Center
“C” button on the touchscreen to reset the
balance and fade to the factory setting.
Speed Adjusted Volume — If Equipped
Press the “Speed Adjusted Volume” button
on the touchscreen to select between OFF, 1,
2 or 3. This will decrease the radio volume
relative to a decrease in vehicle speed.
Loudness — If Equipped
Press the “Loudness” button on the touch-
screen to select the Loudness feature. When
this feature is activated it improves sound
quality at lower volumes.
Surround Sound — If Equipped
Press the “Surround Sound” button on the
touchscreen, select On or Off followed by
pressing the back arrow button on the touch-
screen. When this feature is activated, it
provides simulated surround sound mode.
MULTIMEDIA
266
Page 270 of 348
Store Radio Presets Manually
The Radio stores up to 12 presets in each of
the Radio modes. There are four visible pre-
sets at the top of the radio screen. Pressing
the “All” button on the touchscreen on the
radio home screen displays all of the preset
stations for that mode.
To store a radio preset manually, follow the
steps below:
1. Tune to the desired station.
2. Press and hold the desired numbered but-
ton on the touchscreen for more than two
seconds, or until you hear a confirmation
beep.
Seek Next/Previous Buttons
• Press the Seek up or Seek down button to
seek through radio stations in AM, FM or
DAB bands.
• Hold either button to bypass stations with-
out stopping.USB/Audio Jack (AUX)/Bluetooth
Operation
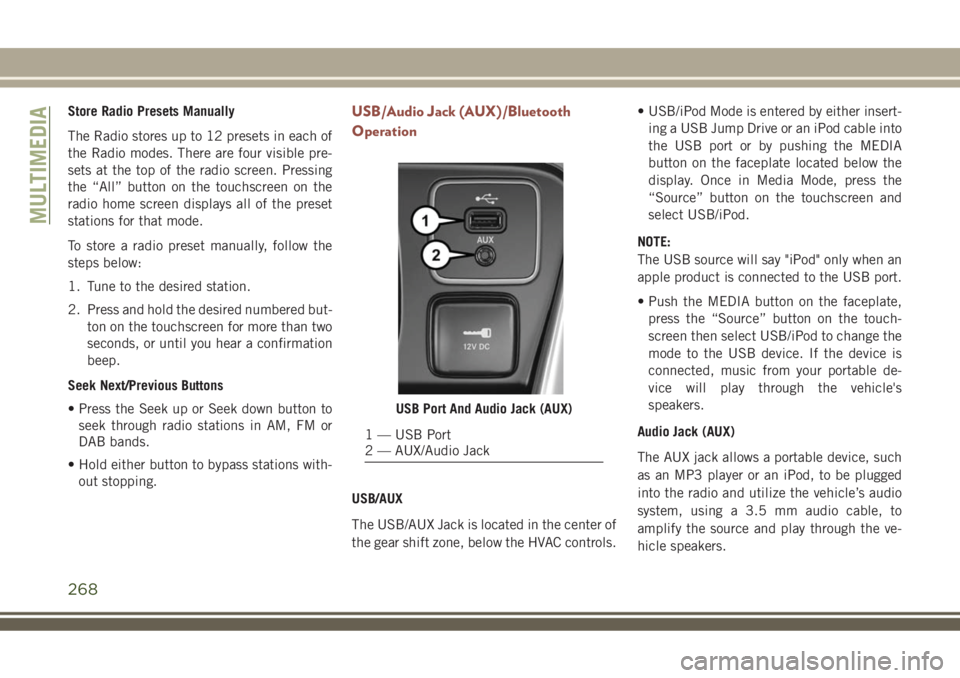
USB/AUX
The USB/AUX Jack is located in the center of
the gear shift zone, below the HVAC controls.• USB/iPod Mode is entered by either insert-
ing a USB Jump Drive or an iPod cable into
the USB port or by pushing the MEDIA
button on the faceplate located below the
display. Once in Media Mode, press the
“Source” button on the touchscreen and
select USB/iPod.
NOTE:
The USB source will say "iPod" only when an
apple product is connected to the USB port.
• Push the MEDIA button on the faceplate,
press the “Source” button on the touch-
screen then select USB/iPod to change the
mode to the USB device. If the device is
connected, music from your portable de-
vice will play through the vehicle's
speakers.
Audio Jack (AUX)
The AUX jack allows a portable device, such
as an MP3 player or an iPod, to be plugged
into the radio and utilize the vehicle’s audio
system, using a 3.5 mm audio cable, to
amplify the source and play through the ve-
hicle speakers.
USB Port And Audio Jack (AUX)
1 — USB Port
2 — AUX/Audio Jack
MULTIMEDIA
268
Page 273 of 348
UCONNECT 4 WITH 7-INCH
DISPLAY
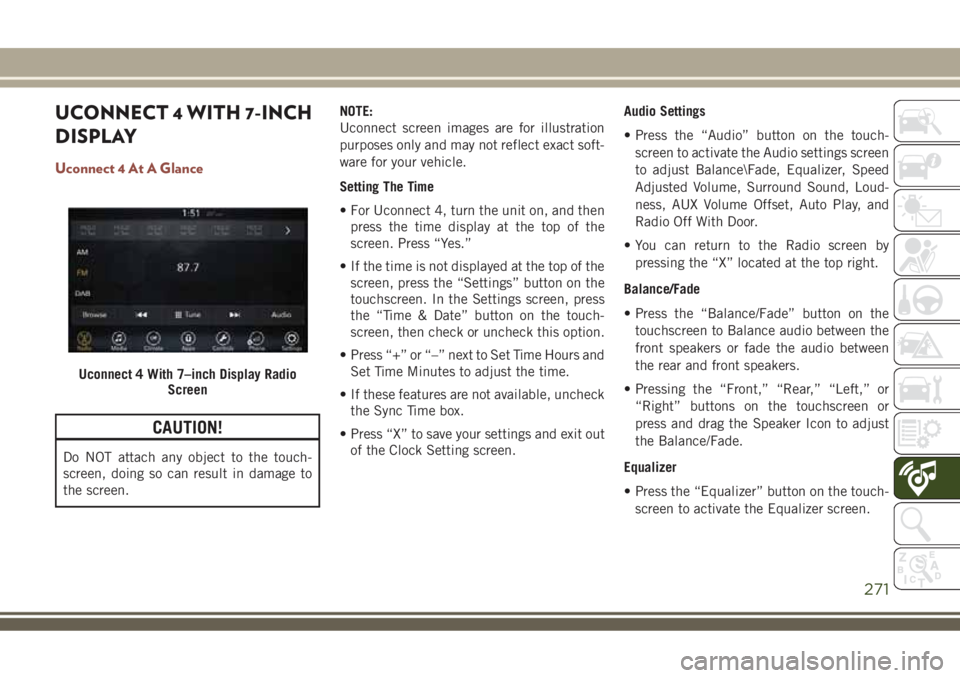
Uconnect 4 At A Glance
CAUTION!
Do NOT attach any object to the touch-
screen, doing so can result in damage to
the screen.NOTE:
Uconnect screen images are for illustration
purposes only and may not reflect exact soft-
ware for your vehicle.
Setting The Time
• For Uconnect 4, turn the unit on, and then
press the time display at the top of the
screen. Press “Yes.”
• If the time is not displayed at the top of the
screen, press the “Settings” button on the
touchscreen. In the Settings screen, press
the “Time & Date” button on the touch-
screen, then check or uncheck this option.
• Press “+” or “–” next to Set Time Hours and
Set Time Minutes to adjust the time.
• If these features are not available, uncheck
the Sync Time box.
• Press “X” to save your settings and exit out
of the Clock Setting screen.Audio Settings
• Press the “Audio” button on the touch-
screen to activate the Audio settings screen
to adjust Balance\Fade, Equalizer, Speed
Adjusted Volume, Surround Sound, Loud-
ness, AUX Volume Offset, Auto Play, and
Radio Off With Door.
• You can return to the Radio screen by
pressing the “X” located at the top right.
Balance/Fade
• Press the “Balance/Fade” button on the
touchscreen to Balance audio between the
front speakers or fade the audio between
the rear and front speakers.
• Pressing the “Front,” “Rear,” “Left,” or
“Right” buttons on the touchscreen or
press and drag the Speaker Icon to adjust
the Balance/Fade.
Equalizer
• Press the “Equalizer” button on the touch-
screen to activate the Equalizer screen.
Uconnect 4 With 7–inch Display Radio
Screen
271
Page 274 of 348
• Press the “+” or “–” buttons on the touch-
screen, or press and drag over the level bar
for each of the equalizer bands. The level
value, which spans between plus or minus
nine, is displayed at the bottom of each of
the bands.
Speed Adjusted Volume
• Press the “Speed Adjusted Volume” button
on the touchscreen to activate the Speed
Adjusted Volume screen. The Speed Ad-
justed Volume is adjusted by pressing the
volume level indicator. This alters the auto-
matic adjustment of the audio volume with
variation to vehicle speed.
Loudness
• Press the “On” button on the touchscreen
to activate Loudness. Press “Off” to deac-
tivate this feature. When Loudness is On,
the sound quality at lower volumes
improves.
AUX Volume Offset
• Press the “AUX Volume Offset” button on
the touchscreen to activate the AUX Vol-
ume Offset screen. The AUX Volume Offset
is adjusted by pressing of the “+” and “–”buttons. This alters the AUX input audio
volume. The level value, which spans be-
tween plus or minus three, is displayed
above the adjustment bar.
Auto Play
• Press the “Auto Play” button on the touch-
screen to activate the Auto Play screen. The
Auto Play feature has two settings “On”
and “Off.” With Auto Play on, music begins
playing from a connected device, immedi-
ately after it is connected to the radio.
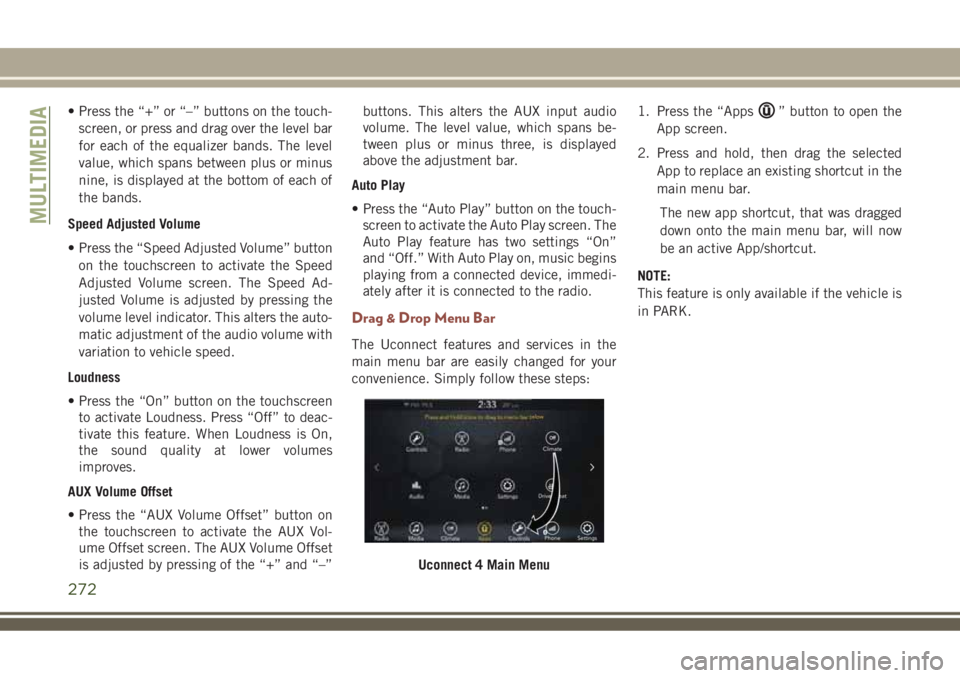
Drag & Drop Menu Bar
The Uconnect features and services in the
main menu bar are easily changed for your
convenience. Simply follow these steps:1. Press the “Apps
” button to open the
App screen.
2. Press and hold, then drag the selected
App to replace an existing shortcut in the
main menu bar.
The new app shortcut, that was dragged
down onto the main menu bar, will now
be an active App/shortcut.
NOTE:
This feature is only available if the vehicle is
in PARK.
Uconnect 4 Main Menu
MULTIMEDIA
272
Page 276 of 348
WARNING!
ALWAYS drive safely with your hands on
the wheel. You have full responsibility and
assume all risks related to the use of the
Uconnect features and applications in this
vehicle. Only use Uconnect when it is safe
to do so. Failure to do so may result in an
accident involving serious injury or death.
• To access the Radio mode, press the “Ra-
dio” button on the touchscreen.
Selecting Radio Stations
• Press the desired radio band (AM, FM or
DAB) button on the touchscreen.
Seek Up/Seek Down
• Press the Seek up or down arrow buttons on
the touchscreen for less than two seconds
to seek through radio stations.
• Press and hold either arrow button on the
touchscreen for more than two seconds to
bypass stations without stopping. The radio
will stop at the next listenable station once
the arrow button on the touchscreen is
released.Direct Tune
• Tune directly to a radio station by pressing
the “Tune” button on the screen, and en-
tering the desired station number.
Store Radio Presets Manually
Your radio can store 36 total preset stations,
12 presets per band (AM, FM and DAB). They
are shown at the top of your radio screen. To
see the 12 preset stations per band, press the
arrow button on the touchscreen at the top
right of the screen to toggle between the two
sets of six presets.
To store a radio preset manually, follow the
steps below:
1. Tune to the desired station.
2. Press and hold the desired numbered but-
ton on the touchscreen for more than two
seconds or until you hear a confirmation
beep.
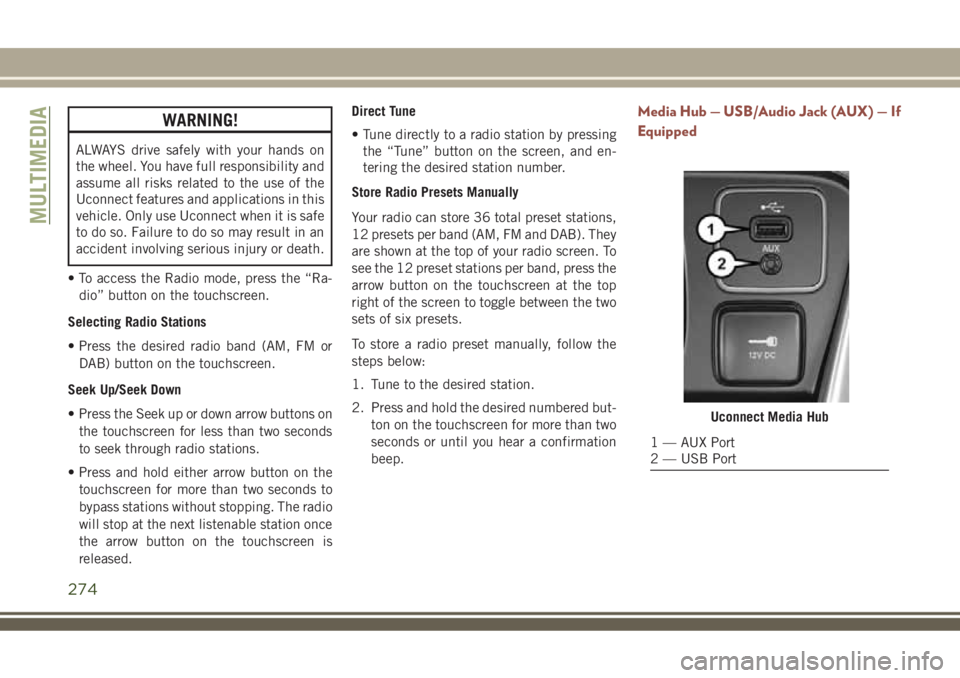
Media Hub — USB/Audio Jack (AUX) — If
Equipped
Uconnect Media Hub
1 — AUX Port
2 — USB Port
MULTIMEDIA
274