display JEEP COMPASS 2018 Owner handbook (in English)
[x] Cancel search | Manufacturer: JEEP, Model Year: 2018, Model line: COMPASS, Model: JEEP COMPASS 2018Pages: 348, PDF Size: 6.03 MB
Page 49 of 348
3. When the system is set up for your comfort
level, it is not necessary to change the
settings. You will experience the greatest
efficiency by simply allowing the system
to function automatically.
NOTE:
• It is not necessary to move the temperature
settings for cold or hot vehicles. The system
automatically adjusts the temperature,
mode, and blower speed to provide comfort
as quickly as possible.
• The temperature can be displayed in U.S.
or Metric units by selecting the US/Metric
customer-programmable feature.
To provide you with maximum comfort in the
Automatic mode during cold start-ups, the
blower fan will remain on low until the engine
warms up. The blower will increase in speed
and transition into Auto mode.
Manual Operation Override
This system offers a full complement of
manual override features. The AUTO symbol
in the front ATC display will be turned off
when the system is being used in the manual
mode.
Operating Tips
Summer Operation
The engine cooling system must be protected
with a high-quality antifreeze coolant to pro-
vide proper corrosion protection and to pro-
tect against engine overheating. OAT coolant
(conforming to MS.90032) is recommended.
Winter Operation
To ensure the best possible heater and de-
froster performance, make sure the engine
cooling system is functioning properly and
the proper amount, type, and concentration
of coolant is used. Use of the Air Recircula-
tion mode during Winter months is not rec-
ommended, because it may cause window
fogging.
Vacation/Storage
Before you store your vehicle, or keep it out of
service (i.e., vacation) for two weeks or more,
run the air conditioning system at idle for
about five minutes, in fresh air with the
blower setting on high. This will ensure ad-equate system lubrication to minimize the
possibility of compressor damage when the
system is started again.
Window Fogging
Vehicle windows tend to fog on the inside in
mild, rainy, and/or humid weather. To clear
the windows, select Defrost or Mix mode and
increase the front blower speed. Do not use
the Recirculation mode without A/C for long
periods, as fogging may occur.
Outside Air Intake
Make sure the air intake, located directly in
front of the windshield, is free of obstruc-
tions, such as leaves. Leaves collected in the
air intake may reduce airflow, and if they
enter the plenum, they could plug the water
drains. In Winter months, make sure the air
intake is clear of ice, slush, and snow.
Cabin Air Filter
The climate control system filters out dust
and pollen from the air. Contact an autho-
rized dealer to service your cabin air filter,
and to have it replaced when needed.
47
Page 61 of 348
GETTING TO KNOW YOUR INSTRUMENT PANEL
INSTRUMENT CLUSTER DIS-
PLAY .....................60
Instrument Cluster Display Location And
Controls.....................60
TRIP COMPUTER.............61
WARNING LIGHTS AND MES-
SAGES.....................61
Red Warning Lights..............61
Yellow Warning Lights............64
Yellow Indicator Lights............68
Green Indicator Lights............69
White Indicator Lights............70
Blue Indicator Lights.............71
Gray Indicator Lights.............71ONBOARD DIAGNOSTIC SYSTEM —
OBDII.....................71
Onboard Diagnostic System (OBD II)
Cybersecurity.................71
EMISSIONS INSPECTION AND
MAINTENANCE PROGRAMS....72
GETTING TO KNOW YOUR INSTRUMENT PANEL
59
Page 62 of 348
INSTRUMENT CLUSTER
DISPLAY
Your vehicle may be equipped with an instru-
ment cluster display, which offers useful in-
formation to the driver. With the ignition in
the STOP/OFF mode, opening/closing of a
door will activate the display for viewing, and
display the total miles, or kilometers, in the
odometer. Your instrument cluster display is
designed to display important information
about your vehicle’s systems and features.
Using a driver interactive display located on
the instrument panel, your instrument clus-
ter display can show you how systems are
working and give you warnings when they
aren’t. The steering wheel mounted controls
allow you to scroll through and enter the main
menus and submenus. You can access the
specific information you want and make se-
lections and adjustments.
Instrument Cluster Display Location And
Controls
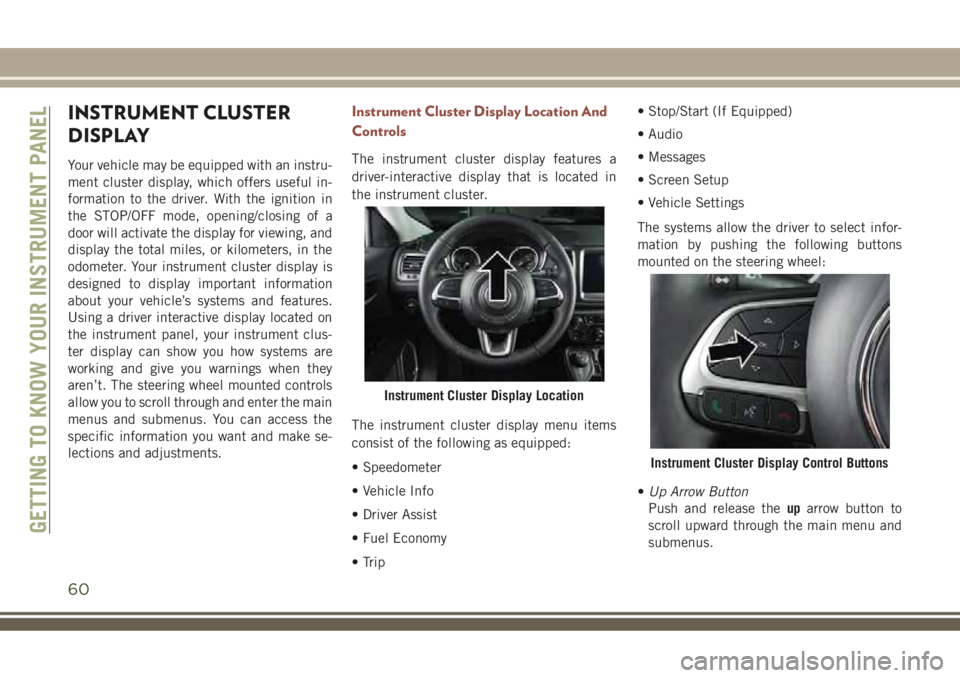
The instrument cluster display features a
driver-interactive display that is located in
the instrument cluster.
The instrument cluster display menu items
consist of the following as equipped:
• Speedometer
• Vehicle Info
• Driver Assist
• Fuel Economy
• Trip• Stop/Start (If Equipped)
• Audio
• Messages
• Screen Setup
• Vehicle Settings
The systems allow the driver to select infor-
mation by pushing the following buttons
mounted on the steering wheel:
•Up Arrow Button
Push and release theuparrow button to
scroll upward through the main menu and
submenus.
Instrument Cluster Display Location
Instrument Cluster Display Control Buttons
GETTING TO KNOW YOUR INSTRUMENT PANEL
60
Page 63 of 348
•Down Arrow Button
Push and release thedownarrow button to
scroll downward through the main menu
and submenus.
•Right Arrow Button
Push and release therightarrow button to
access the information screens or submenu
screens of a main menu item.
•Left Arrow Button
Push and release theleftarrow button to
access the information screens or submenu
screens of a main menu item.
•OK Button
Push theOKbutton to access/select the
information screens or submenu screens of
a main menu item. Push and hold theOK
button for one second to reset displayed/
selected features that can be reset.
TRIP COMPUTER
Push and release the up or down arrow button
until the Trip A or Trip B icon is highlighted in
the instrument cluster display (Toggle left or
right to select Trip A or Trip B). Push and
release the OK button to display the Trip
information.
WARNING LIGHTS AND
MESSAGES
The warning/indicator lights will illuminate in
the instrument panel together with a dedi-
cated message and/or acoustic signal when
applicable. These indications are indicative
and precautionary and as such must not be
considered as exhaustive and/or alternative
to the information contained in the Owner’s
Manual, which you are advised to read care-
fully in all cases. Always refer to the informa-
tion in this chapter in the event of a failure
indication. All active telltales will display first
if applicable. The system check menu may
appear different based upon equipment op-
tions and current vehicle status. Some tell-
tales are optional and may not appear.
Red Warning Lights
— Air Bag Warning Light
This light indicates a fault with the air bag,
and will turn on for four to eight seconds as a
bulb check when the ignition is placed in the
ON/RUN or ACC/ON/RUN position. This light
will illuminate with a single chime when afault with the air bag has been detected, it
will stay on until the fault is cleared. If the
light is either not on during startup, stays on,
or turns on while driving, have the system
inspected at an authorized dealer as soon as
possible.
— Brake Warning Light
This light monitors various brake functions,
including brake fluid level and parking brake
application. If the brake light turns on it may
indicate that the parking brake is applied,
that the brake fluid level is low, or that there
is a problem with the anti-lock brake system.
If the light remains on when the parking
brake has been disengaged, and the fluid
level is at the full mark on the master cylinder
reservoir, it indicates a possible brake hy-
draulic system malfunction or that a problem
with the Brake Booster has been detected by
the Anti-Lock Brake System (ABS) / Elec-
tronic Stability Control (ESC) system. In this
case, the light will remain on until the condi-
tion has been corrected. If the problem is
related to the brake booster, the ABS pump
will run when applying the brake, and a brake
pedal pulsation may be felt during each stop.
61
Page 66 of 348
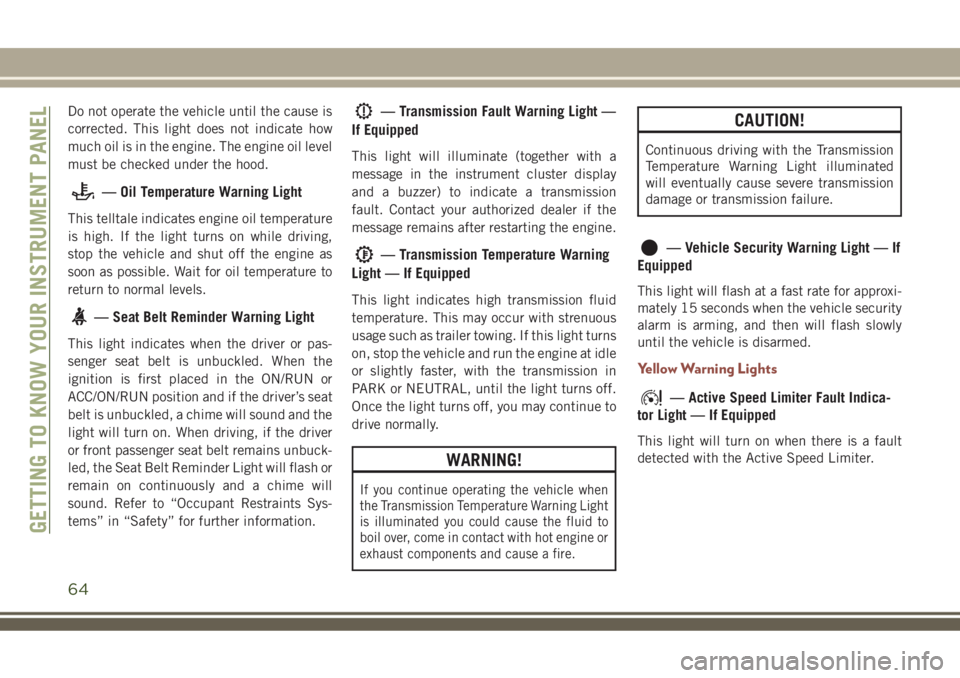
Do not operate the vehicle until the cause is
corrected. This light does not indicate how
much oil is in the engine. The engine oil level
must be checked under the hood.
— Oil Temperature Warning Light
This telltale indicates engine oil temperature
is high. If the light turns on while driving,
stop the vehicle and shut off the engine as
soon as possible. Wait for oil temperature to
return to normal levels.
— Seat Belt Reminder Warning Light
This light indicates when the driver or pas-
senger seat belt is unbuckled. When the
ignition is first placed in the ON/RUN or
ACC/ON/RUN position and if the driver’s seat
belt is unbuckled, a chime will sound and the
light will turn on. When driving, if the driver
or front passenger seat belt remains unbuck-
led, the Seat Belt Reminder Light will flash or
remain on continuously and a chime will
sound. Refer to “Occupant Restraints Sys-
tems” in “Safety” for further information.
— Transmission Fault Warning Light —
If Equipped
This light will illuminate (together with a
message in the instrument cluster display
and a buzzer) to indicate a transmission
fault. Contact your authorized dealer if the
message remains after restarting the engine.
— Transmission Temperature Warning
Light — If Equipped
This light indicates high transmission fluid
temperature. This may occur with strenuous
usage such as trailer towing. If this light turns
on, stop the vehicle and run the engine at idle
or slightly faster, with the transmission in
PARK or NEUTRAL, until the light turns off.
Once the light turns off, you may continue to
drive normally.
WARNING!
If you continue operating the vehicle when
the Transmission Temperature Warning Light
is illuminated you could cause the fluid to
boil over, come in contact with hot engine or
exhaust components and cause a fire.
CAUTION!
Continuous driving with the Transmission
Temperature Warning Light illuminated
will eventually cause severe transmission
damage or transmission failure.
— Vehicle Security Warning Light — If
Equipped
This light will flash at a fast rate for approxi-
mately 15 seconds when the vehicle security
alarm is arming, and then will flash slowly
until the vehicle is disarmed.
Yellow Warning Lights
— Active Speed Limiter Fault Indica-
tor Light — If Equipped
This light will turn on when there is a fault
detected with the Active Speed Limiter.
GETTING TO KNOW YOUR INSTRUMENT PANEL
64
Page 69 of 348
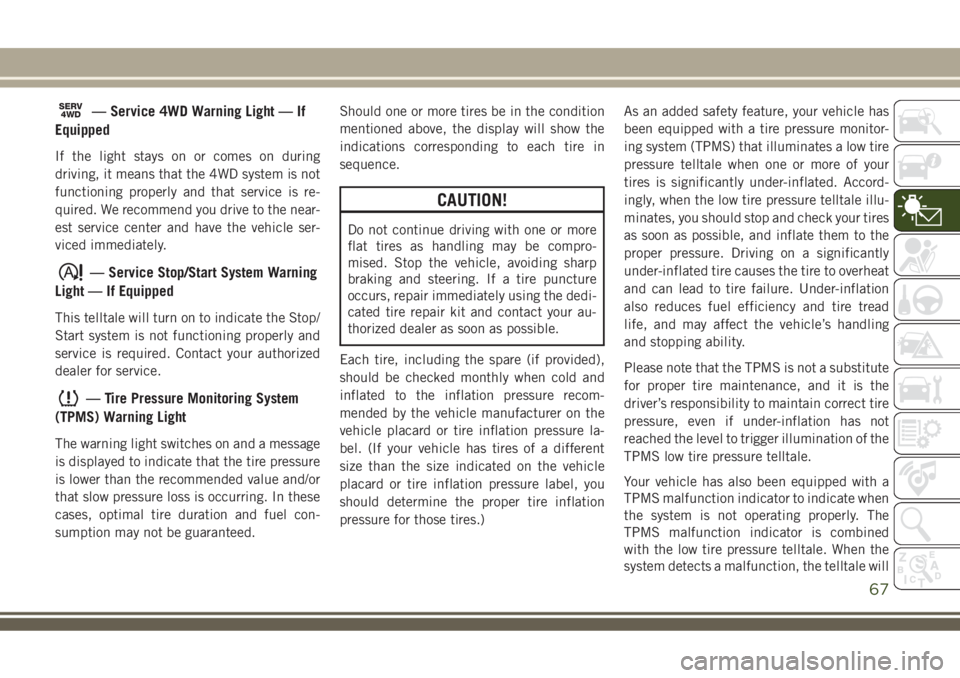
SERV4WD— Service 4WD Warning Light — If
Equipped
If the light stays on or comes on during
driving, it means that the 4WD system is not
functioning properly and that service is re-
quired. We recommend you drive to the near-
est service center and have the vehicle ser-
viced immediately.
— Service Stop/Start System Warning
Light — If Equipped
This telltale will turn on to indicate the Stop/
Start system is not functioning properly and
service is required. Contact your authorized
dealer for service.
— Tire Pressure Monitoring System
(TPMS) Warning Light
The warning light switches on and a message
is displayed to indicate that the tire pressure
is lower than the recommended value and/or
that slow pressure loss is occurring. In these
cases, optimal tire duration and fuel con-
sumption may not be guaranteed.Should one or more tires be in the condition
mentioned above, the display will show the
indications corresponding to each tire in
sequence.
CAUTION!
Do not continue driving with one or more
flat tires as handling may be compro-
mised. Stop the vehicle, avoiding sharp
braking and steering. If a tire puncture
occurs, repair immediately using the dedi-
cated tire repair kit and contact your au-
thorized dealer as soon as possible.
Each tire, including the spare (if provided),
should be checked monthly when cold and
inflated to the inflation pressure recom-
mended by the vehicle manufacturer on the
vehicle placard or tire inflation pressure la-
bel. (If your vehicle has tires of a different
size than the size indicated on the vehicle
placard or tire inflation pressure label, you
should determine the proper tire inflation
pressure for those tires.)As an added safety feature, your vehicle has
been equipped with a tire pressure monitor-
ing system (TPMS) that illuminates a low tire
pressure telltale when one or more of your
tires is significantly under-inflated. Accord-
ingly, when the low tire pressure telltale illu-
minates, you should stop and check your tires
as soon as possible, and inflate them to the
proper pressure. Driving on a significantly
under-inflated tire causes the tire to overheat
and can lead to tire failure. Under-inflation
also reduces fuel efficiency and tire tread
life, and may affect the vehicle’s handling
and stopping ability.
Please note that the TPMS is not a substitute
for proper tire maintenance, and it is the
driver’s responsibility to maintain correct tire
pressure, even if under-inflation has not
reached the level to trigger illumination of the
TPMS low tire pressure telltale.
Your vehicle has also been equipped with a
TPMS malfunction indicator to indicate when
the system is not operating properly. The
TPMS malfunction indicator is combined
with the low tire pressure telltale. When the
system detects a malfunction, the telltale will
67
Page 71 of 348
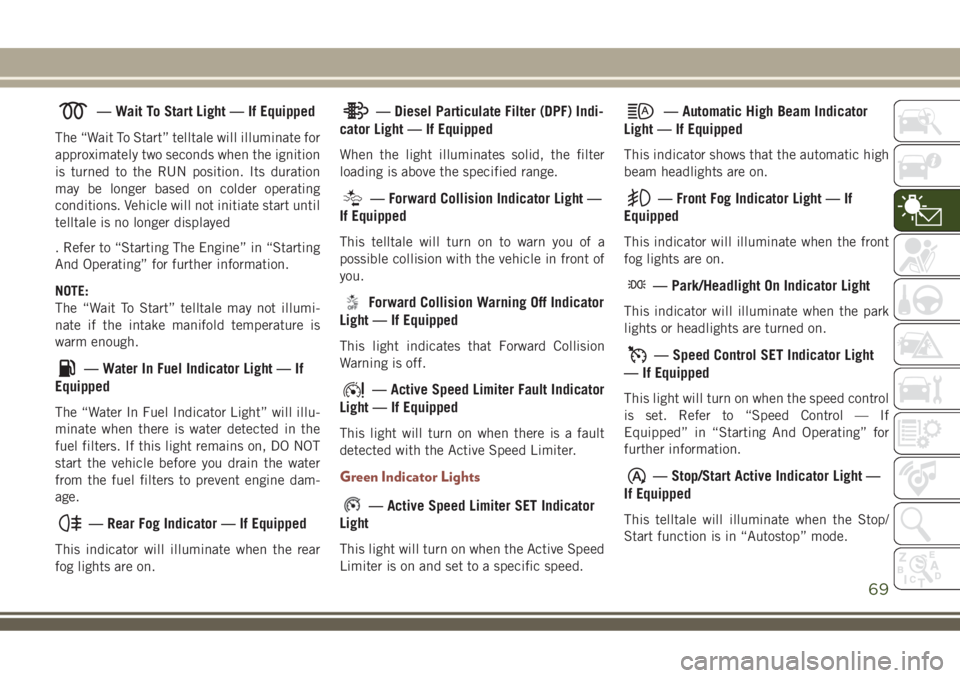
— Wait To Start Light — If Equipped
The “Wait To Start” telltale will illuminate for
approximately two seconds when the ignition
is turned to the RUN position. Its duration
may be longer based on colder operating
conditions. Vehicle will not initiate start until
telltale is no longer displayed
. Refer to “Starting The Engine” in “Starting
And Operating” for further information.
NOTE:
The “Wait To Start” telltale may not illumi-
nate if the intake manifold temperature is
warm enough.
— Water In Fuel Indicator Light — If
Equipped
The “Water In Fuel Indicator Light” will illu-
minate when there is water detected in the
fuel filters. If this light remains on, DO NOT
start the vehicle before you drain the water
from the fuel filters to prevent engine dam-
age.
— Rear Fog Indicator — If Equipped
This indicator will illuminate when the rear
fog lights are on.
— Diesel Particulate Filter (DPF) Indi-
cator Light — If Equipped
When the light illuminates solid, the filter
loading is above the specified range.
— Forward Collision Indicator Light —
If Equipped
This telltale will turn on to warn you of a
possible collision with the vehicle in front of
you.
Forward Collision Warning Off Indicator
Light — If Equipped
This light indicates that Forward Collision
Warning is off.
— Active Speed Limiter Fault Indicator
Light — If Equipped
This light will turn on when there is a fault
detected with the Active Speed Limiter.
Green Indicator Lights
— Active Speed Limiter SET Indicator
Light
This light will turn on when the Active Speed
Limiter is on and set to a specific speed.
— Automatic High Beam Indicator
Light — If Equipped
This indicator shows that the automatic high
beam headlights are on.
— Front Fog Indicator Light — If
Equipped
This indicator will illuminate when the front
fog lights are on.
— Park/Headlight On Indicator Light
This indicator will illuminate when the park
lights or headlights are turned on.
— Speed Control SET Indicator Light
— If Equipped
This light will turn on when the speed control
is set. Refer to “Speed Control — If
Equipped” in “Starting And Operating” for
further information.
— Stop/Start Active Indicator Light —
If Equipped
This telltale will illuminate when the Stop/
Start function is in “Autostop” mode.
69
Page 72 of 348
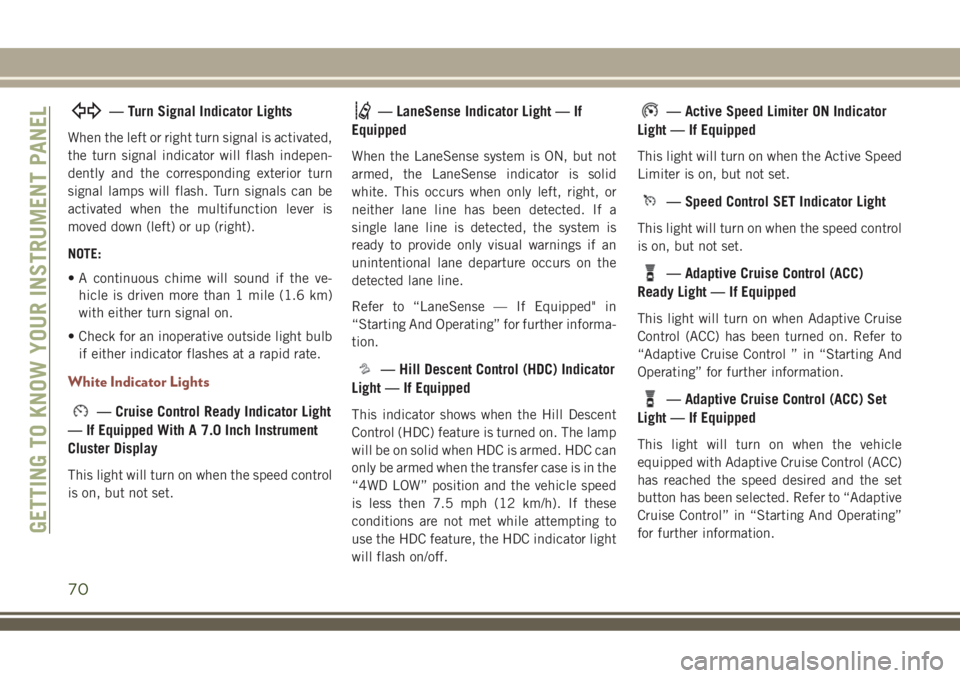
— Turn Signal Indicator Lights
When the left or right turn signal is activated,
the turn signal indicator will flash indepen-
dently and the corresponding exterior turn
signal lamps will flash. Turn signals can be
activated when the multifunction lever is
moved down (left) or up (right).
NOTE:
• A continuous chime will sound if the ve-
hicle is driven more than 1 mile (1.6 km)
with either turn signal on.
• Check for an inoperative outside light bulb
if either indicator flashes at a rapid rate.
White Indicator Lights
— Cruise Control Ready Indicator Light
— If Equipped With A 7.0 Inch Instrument
Cluster Display
This light will turn on when the speed control
is on, but not set.
— LaneSense Indicator Light — If
Equipped
When the LaneSense system is ON, but not
armed, the LaneSense indicator is solid
white. This occurs when only left, right, or
neither lane line has been detected. If a
single lane line is detected, the system is
ready to provide only visual warnings if an
unintentional lane departure occurs on the
detected lane line.
Refer to “LaneSense — If Equipped" in
“Starting And Operating” for further informa-
tion.
— Hill Descent Control (HDC) Indicator
Light — If Equipped
This indicator shows when the Hill Descent
Control (HDC) feature is turned on. The lamp
will be on solid when HDC is armed. HDC can
only be armed when the transfer case is in the
“4WD LOW” position and the vehicle speed
is less then 7.5 mph (12 km/h). If these
conditions are not met while attempting to
use the HDC feature, the HDC indicator light
will flash on/off.
— Active Speed Limiter ON Indicator
Light — If Equipped
This light will turn on when the Active Speed
Limiter is on, but not set.
— Speed Control SET Indicator Light
This light will turn on when the speed control
is on, but not set.
— Adaptive Cruise Control (ACC)
Ready Light — If Equipped
This light will turn on when Adaptive Cruise
Control (ACC) has been turned on. Refer to
“Adaptive Cruise Control ” in “Starting And
Operating” for further information.
— Adaptive Cruise Control (ACC) Set
Light — If Equipped
This light will turn on when the vehicle
equipped with Adaptive Cruise Control (ACC)
has reached the speed desired and the set
button has been selected. Refer to “Adaptive
Cruise Control” in “Starting And Operating”
for further information.
GETTING TO KNOW YOUR INSTRUMENT PANEL
70
Page 83 of 348
Full Off (Four-Wheel Drive Models Only)
This mode is intended for off-highway or
off-road use when ESC stability features
could inhibit vehicle maneuverability due to
trail conditions. This mode is entered by
pushing and holding the “ESC Off” switch for
five seconds when the vehicle is stopped and
the engine is running. After five seconds, the
"ESC OFF Indicator Light" will illuminate and
the “ESC OFF” message will appear in the
instrument cluster display.
In this mode, ESC and TCS, except for the
“limited slip” feature described in the TCS
section, are turned off until the vehicle
reaches a speed of 40 mph (64 km/h). At
40 mph (64 km/h), the system returns to
“Partial Off” mode, as described above. TCS
remains off. When the vehicle speed drops
below 30 mph (48 km/h), the ESC system
shuts off. ESC is deactivated at low vehicle
speeds so that it will not interfere with off-
road driving however, ESC function returns to
provide the stability feature at speeds above
40 mph (64 km/h). The "ESC OFF Indicator
Light" will always be illuminated when ESC is
off.To turn ESC on again, momentarily push the
“ESC Off” switch. This will restore the “ESC
On” mode of operation.
NOTE:
The “ESC OFF” message will display and an
audible chime will sound when the gear se-
lector is placed into the PARK position from
any other position, and then moved out of the
PARK position. This will occur even if the
message was previously cleared.
WARNING!
In the "Full Off" mode, the engine torque
reduction and stability features are disabled.
In an emergency evasive maneuver, the ESC
system will not engage to assist in maintain-
ing stability. “ESC Off” mode is intended for
off-highway or off-road use only.
ESC Activation/Malfunction Indicator Light
And ESC OFF Indicator Light
The “ESC Activation/
Malfunction Indicator Light” in
the instrument cluster will come
on when the ignition is turned tothe ON mode. It should go out with the
engine running. If the “ESC Activation/
Malfunction Indicator Light” comes on con-
tinuously with the engine running, a malfunc-
tion has been detected in the ESC system. If
this light remains on after several ignition
cycles, and the vehicle has been driven sev-
eral miles (kilometers) at speeds greater than
30 mph (48 km/h), see your authorized
dealer as soon as possible to have the prob-
lem diagnosed and corrected.
The “ESC Activation/Malfunction Indicator
Light” (located in the instrument cluster)
starts to flash as soon as the tires lose trac-
tion and the ESC system becomes active. The
“ESC Activation/Malfunction Indicator
Light” also flashes when TCS is active. If the
“ESC Activation/Malfunction Indicator
Light” begins to flash during acceleration,
ease up on the accelerator and apply as little
throttle as possible. Be sure to adapt your
speed and driving to the prevailing road con-
ditions.
81
Page 91 of 348
Forward Collision Warning (FCW) With
Mitigation — If Equipped
Forward Collision Warning (FCW) With Miti-
gation Operation
The Forward Collision Warning (FCW) system
with mitigation provides the driver with au-
dible warnings, visual warnings (within the
instrument cluster display), and may apply a
brake jerk to warn the driver when it detects a
potential frontal collision. The warnings and
limited braking are intended to provide the
driver with enough time to react, avoid or
mitigate the potential collision.
NOTE:
FCW monitors the information from the for-
ward looking sensors as well as the Electronic
Brake Controller (EBC), to calculate the prob-
ability of a forward collision. When the sys-
tem determines that a forward collision is
probable, the driver will be provided with
audible and visual warnings and may provide
a brake jerk warning.
If the driver does not take action based upon
these progressive warnings, then the system
will provide a limited level of active braking tohelp slow the vehicle and mitigate the poten-
tial forward collision. If the driver reacts to
the warnings by braking and the system de-
termines that the driver intends to avoid the
collision by braking but has not applied suf-
ficient brake force, the system will compen-
sate and provide additional brake force as
required.
If a Forward Collision Warning with Mitigation
event begins at a speed below 26 mph
(42 km/h), the system may provide the maxi-
mum braking possible to mitigate the poten-
tial forward collision. If the Forward Collision
Warning with Mitigation event stops the ve-
hicle completely, the system will hold the
vehicle at standstill for two seconds and then
release the brakes.
When the system determines a collision with
the vehicle in front of you is no longer prob-
able, the warning message will be deacti-
vated.
NOTE:
• The minimum speed for FCW activation is
1 mph (2 km/h).• The FCW alerts may be triggered on objects
other than vehicles such as guard rails or
sign posts based on the course prediction.
This is expected and is a part of normal
FCW activation and functionality.
• It is unsafe to test the FCW system. To
prevent such misuse of the system, after
four Active Braking events within a key
cycle, the Active Braking portion of FCW
will be deactivated until the next key cycle.
• The FCW system is intended for on-road use
only. If the vehicle is taken off-road, the
FCW system should be deactivated to pre-
vent unnecessary warnings to the
surroundings.
WARNING!
Forward Collision Warning (FCW) is not
intended to avoid a collision on its own,
nor can FCW detect every type of potential
collision. The driver has the responsibility
to avoid a collision by controlling the ve-
hicle via braking and steering. Failure to
follow this warning could lead to serious
injury or death.
89