Battery JEEP COMPASS 2018 Owner handbook (in English)
[x] Cancel search | Manufacturer: JEEP, Model Year: 2018, Model line: COMPASS, Model: JEEP COMPASS 2018Pages: 348, PDF Size: 6.03 MB
Page 213 of 348
4. Have the tire inspected and repaired or
replaced at the earliest opportunity at
your authorized dealer or tire service
center.
5. Remove the Speed Limit sticker from the
steering wheel after the tire has been
repaired.
6. Replace the Sealant Bottle at your autho-
rized dealer as soon as possible. Refer to
“Sealant Bottle Replacement”.
NOTE:
When having the tire serviced, advise the
authorized dealer or service center that the
tire has been sealed using the Tire Service
Kit.
Sealant Bottle Replacement:
1. Unwrap the power cord.
2. Unwrap the hose.
3. Remove the bottle cover.
4. Rotate the bottle up beyond vertical to
release.
5. Pull the bottle away from the Compressor.NOTE:
• For sealant bottle installation, follow these
steps reverse order.
• Replacement sealant bottles are available
at authorized service centers.
JUMP STARTING
If your vehicle has a discharged battery, it can
be jump started using a set of jumper cables
and a battery in another vehicle or by using a
portable battery booster pack. Jump starting
can be dangerous if done improperly, so
please follow the procedures in this section
carefully.
NOTE:
When using a portable battery booster pack,
follow the manufacturer’s operating instruc-
tions and precautions.
WARNING!
Do not attempt jump starting if the battery
is frozen. It could rupture or explode and
cause personal injury.
CAUTION!
Do not use a portable battery booster pack
or any other booster source with a system
voltage greater than 12 Volts or damage to
the battery, starter motor, alternator or
electrical system may occur.
Preparations For Jump Start
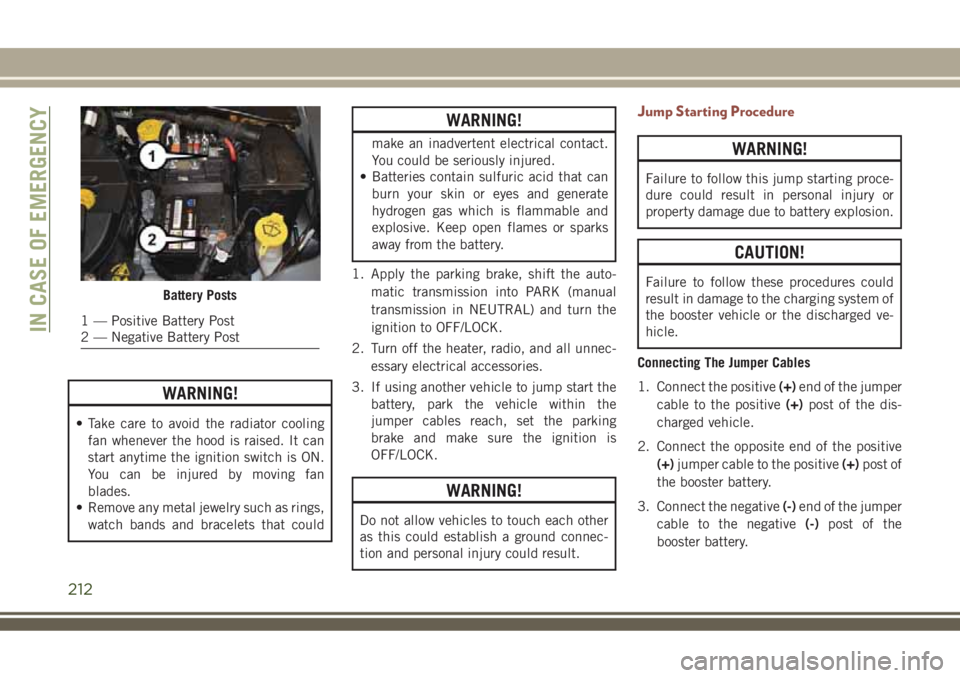
The battery in your vehicle is located in the
front of the engine compartment, behind the
left headlight assembly.
NOTE:
The positive battery post is covered with a
protective cap. Lift up on the cap to gain
access to the post.
211
Page 214 of 348
WARNING!
• Take care to avoid the radiator cooling
fan whenever the hood is raised. It can
start anytime the ignition switch is ON.
You can be injured by moving fan
blades.
• Remove any metal jewelry such as rings,
watch bands and bracelets that could
WARNING!
make an inadvertent electrical contact.
You could be seriously injured.
• Batteries contain sulfuric acid that can
burn your skin or eyes and generate
hydrogen gas which is flammable and
explosive. Keep open flames or sparks
away from the battery.
1. Apply the parking brake, shift the auto-
matic transmission into PARK (manual
transmission in NEUTRAL) and turn the
ignition to OFF/LOCK.
2. Turn off the heater, radio, and all unnec-
essary electrical accessories.
3. If using another vehicle to jump start the
battery, park the vehicle within the
jumper cables reach, set the parking
brake and make sure the ignition is
OFF/LOCK.
WARNING!
Do not allow vehicles to touch each other
as this could establish a ground connec-
tion and personal injury could result.
Jump Starting Procedure
WARNING!
Failure to follow this jump starting proce-
dure could result in personal injury or
property damage due to battery explosion.
CAUTION!
Failure to follow these procedures could
result in damage to the charging system of
the booster vehicle or the discharged ve-
hicle.
Connecting The Jumper Cables
1. Connect the positive(+)end of the jumper
cable to the positive(+)post of the dis-
charged vehicle.
2. Connect the opposite end of the positive
(+)jumper cable to the positive(+)post of
the booster battery.
3. Connect the negative(-)end of the jumper
cable to the negative(-)post of the
booster battery.Battery Posts
1 — Positive Battery Post
2 — Negative Battery PostIN CASE OF EMERGENCY
212
Page 215 of 348
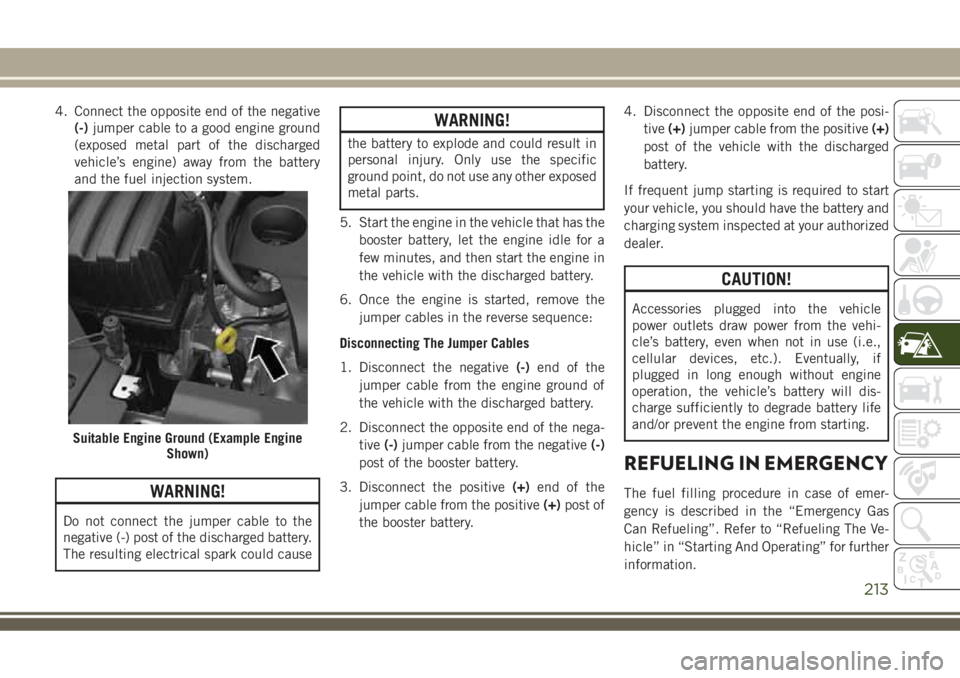
4. Connect the opposite end of the negative
(-)jumper cable to a good engine ground
(exposed metal part of the discharged
vehicle’s engine) away from the battery
and the fuel injection system.
WARNING!
Do not connect the jumper cable to the
negative (-) post of the discharged battery.
The resulting electrical spark could cause
WARNING!
the battery to explode and could result in
personal injury. Only use the specific
ground point, do not use any other exposed
metal parts.
5. Start the engine in the vehicle that has the
booster battery, let the engine idle for a
few minutes, and then start the engine in
the vehicle with the discharged battery.
6. Once the engine is started, remove the
jumper cables in the reverse sequence:
Disconnecting The Jumper Cables
1. Disconnect the negative(-)end of the
jumper cable from the engine ground of
the vehicle with the discharged battery.
2. Disconnect the opposite end of the nega-
tive(-)jumper cable from the negative(-)
post of the booster battery.
3. Disconnect the positive(+)end of the
jumper cable from the positive(+)post of
the booster battery.4. Disconnect the opposite end of the posi-
tive(+)jumper cable from the positive(+)
post of the vehicle with the discharged
battery.
If frequent jump starting is required to start
your vehicle, you should have the battery and
charging system inspected at your authorized
dealer.
CAUTION!
Accessories plugged into the vehicle
power outlets draw power from the vehi-
cle’s battery, even when not in use (i.e.,
cellular devices, etc.). Eventually, if
plugged in long enough without engine
operation, the vehicle’s battery will dis-
charge sufficiently to degrade battery life
and/or prevent the engine from starting.
REFUELING IN EMERGENCY
The fuel filling procedure in case of emer-
gency is described in the “Emergency Gas
Can Refueling”. Refer to “Refueling The Ve-
hicle” in “Starting And Operating” for further
information.
Suitable Engine Ground (Example Engine
Shown)
213
Page 219 of 348
NOTE:
• You must ensure that the Auto Park Brake
feature is disabled before towing this ve-
hicle to avoid inadvertent Electric Park
Brake engagement. The Auto Park Brake
feature is enabled or disabled via the cus-
tomer programmable features in the
Uconnect Settings.
• Vehicles with a discharged battery, or total
electrical failure when the electric park
brake (EPB) is engaged, will need a wheel
dolly or jack to raise the rear wheels off the
ground when moving the vehicle onto a
flatbed.
If you must use the accessories (wipers, de-
frosters, etc.) while being towed, the ignition
must be in the ON/RUN mode.
Note that the Safehold feature will engage
the Electric Park Brake whenever the driver's
door is opened (if the battery is connected,
ignition is ON, transmission is not in PARK,
and brake pedal is released). If you are towing
this vehicle with the ignition in the ON/RUNmode, you must manually disable the Elec-
tric Park Brake each time the driver's door is
opened by pressing the brake pedal and then
releasing the EPB.
If the vehicle’s battery is discharged, refer to
“Gear Selector Override” in this section for
instructions on shifting the automatic trans-
mission out of PARK so that the vehicle can
be moved.
CAUTION!
• Do not use sling-type equipment when
towing. Vehicle damage may occur.
• When securing the vehicle to a flatbed
truck, do not attach to front or rear
suspension components. Damage to
your vehicle may result from improper
towing.
• Ensure that the Electric Park Brake is
released, and remains released, while
being towed.
Without The Key Fob
Special care must be taken when the vehicle
is towed with the ignition in the LOCK/OFF
mode. The only approved method of towingwithout the key fob is with a flatbed truck.
Proper towing equipment is necessary to pre-
vent damage to the vehicle.
Front-Wheel Drive (FWD) Models — With
Key Fob
The manufacturer recommends towing your
vehicle with all four wheelsOFFthe ground
using a flatbed.
If flatbed equipment is not available, this
vehicle must be towed with the front wheels
OFFthe ground (using a towing dolly, or wheel
lift equipment with the front wheels raised).
Ensure that the Electric Park Brake is re-
leased, and remains released, while being
towed. The Electric Park Brake does not need
to be released if all four wheels are off the
ground.
CAUTION!
Towing this vehicle in violation of the
above requirements can cause severe en-
gine and/or transmission damage. Damage
from improper towing is not covered under
the New Vehicle Limited Warranty.
217
Page 223 of 348
SERVICING AND MAINTENANCE
SCHEDULED SERVICING......222
1.4L Gasoline Engine...........222
Diesel Engines................226
ENGINE COMPARTMENT.....230
1.4L Engine.................230
2.0L Diesel Engine.............231
1.6L Diesel Engine.............232
Checking Oil Level.............233
Adding Washer Fluid............233
Maintenance-Free Battery........233
DEALER SERVICE...........234
Air Conditioner Maintenance.......234Wiper Blades................235
Cooling System...............235
Brake System................236
Manual Transmission — If Equipped . .237
Automatic Transmission..........237
RAISING THE VEHICLE.......237
TIRES....................238
Tires — General Information.......238
Tire Types...................242
Spare Tires — If Equipped........243
Tire Chains (Traction Devices).......244Tire Rotation Recommendations.....245
STORING THE VEHICLE.......246
BODYWORK...............247
Protection From Atmospheric Agents . .247
Body And Underbody Maintenance . . .247
Preserving The Bodywork.........248
INTERIORS................249
Seats And Fabric Parts...........249
Plastic And Coated Parts..........250
Leather Parts.................250
Glass Surfaces...............251
SERVICING AND MAINTENANCE
221
Page 224 of 348
SCHEDULED SERVICING
1.4L Gasoline Engine
The scheduled services listed in this manual
must be done at the times or mileages speci-
fied to protect your vehicle warranty and
ensure the best vehicle performance and re-
liability. More frequent maintenance may be
needed for vehicles in severe operating con-
ditions, such as dusty areas and very short
trip driving. Inspection and service should
also be done anytime a malfunction is sus-
pected.
• Change your engine oil more often if you
drive your vehicle off-road for an extended
period of time.
• Under no circumstances should oil change
intervals exceed 7,500 miles (12,000 km)
or 12 months, whichever comes first.Once A Month Or Before A Long Trip
• Check engine oil level.
• Check windshield washer fluid level.
• Check tire pressure and look for unusual
wear or damage. Rotate tires at the first
sign of irregular wear, even if it occurs
before the oil indicator system turns on.
• Check the fluid levels of the coolant reser-
voir and brake master cylinder, fill as
needed.
• Check function of all interior and exterior
lights.
At Each Oil Change
• Change oil and filter.
• Rotate the tires.Rotate at the first sign of
irregular wear, even if it occurs before the oil
indicator system turns on.
• Inspect battery and clean and tighten ter-
minals as required.• Inspect brake pads, shoes, rotors, drums,
hoses and park brake.
• Inspect engine cooling system protection
and hoses.
• Inspect exhaust system.
• Inspect engine air cleaner if using in dusty
or off-road conditions.
Refer to the “Maintenance Plan” on the fol-
lowing page for the required maintenance
intervals.
CAUTION!
Failure to perform the required mainte-
nance items may result in damage to the
vehicle.
SERVICING AND MAINTENANCE
222
Page 232 of 348
ENGINE COMPARTMENT
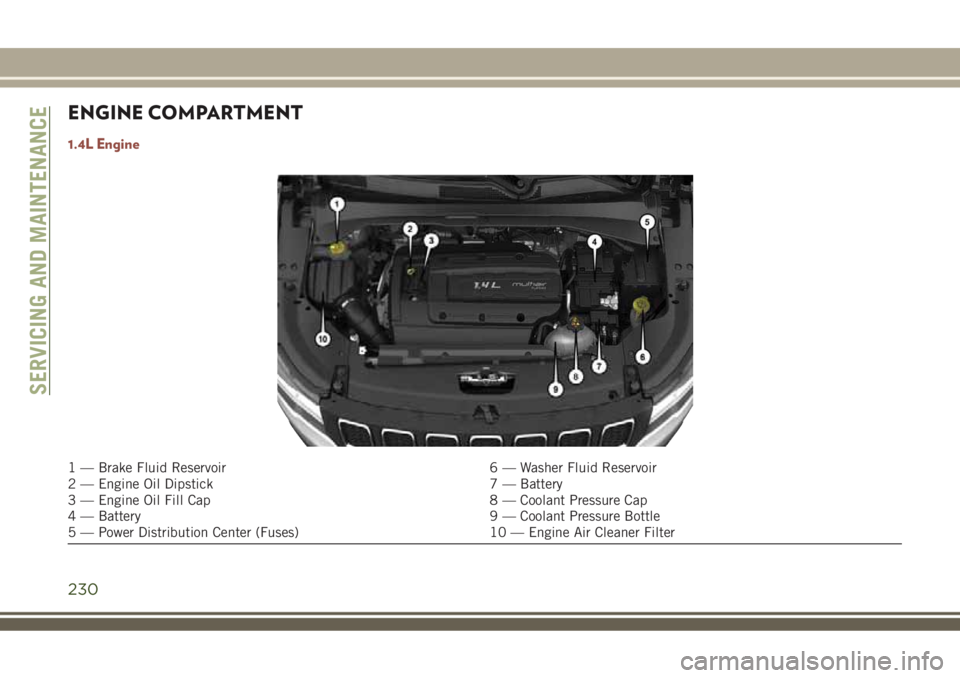
1.4L Engine
1 — Brake Fluid Reservoir 6 — Washer Fluid Reservoir
2 — Engine Oil Dipstick 7 — Battery
3 — Engine Oil Fill Cap 8 — Coolant Pressure Cap
4 — Battery 9 — Coolant Pressure Bottle
5 — Power Distribution Center (Fuses) 10 — Engine Air Cleaner Filter
SERVICING AND MAINTENANCE
230
Page 233 of 348
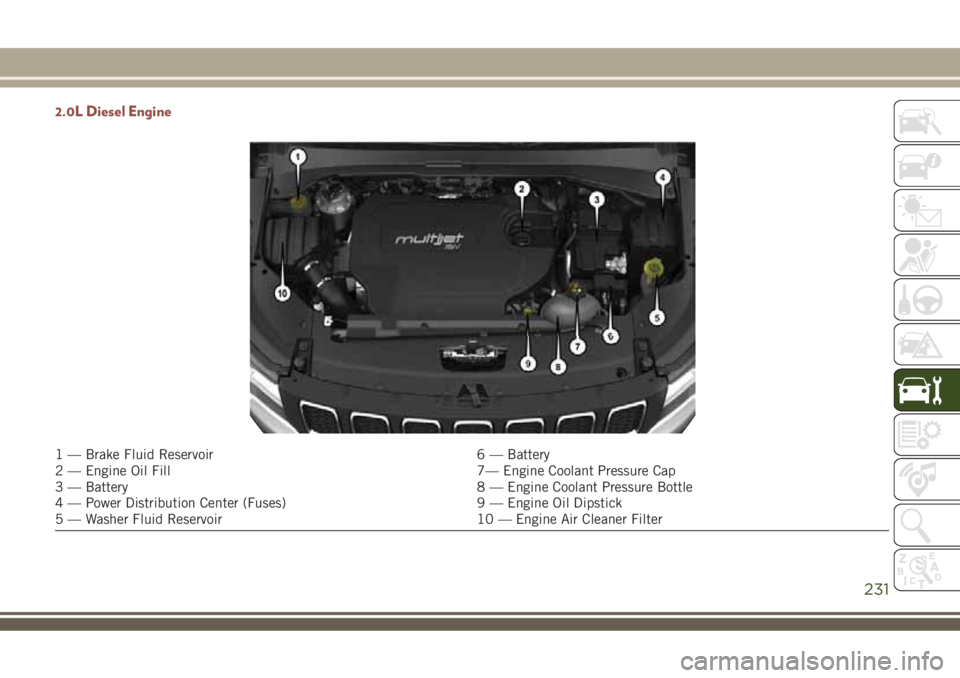
2.0L Diesel Engine
1 — Brake Fluid Reservoir 6 — Battery
2 — Engine Oil Fill 7— Engine Coolant Pressure Cap
3 — Battery 8 — Engine Coolant Pressure Bottle
4 — Power Distribution Center (Fuses) 9 — Engine Oil Dipstick
5 — Washer Fluid Reservoir 10 — Engine Air Cleaner Filter
231
Page 234 of 348
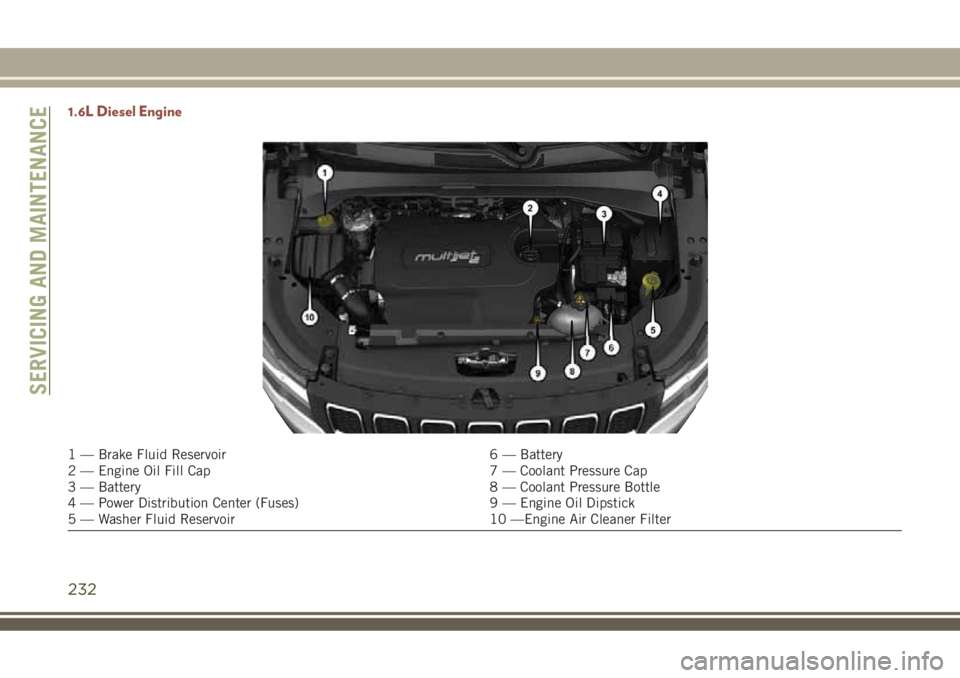
1.6L Diesel Engine
1 — Brake Fluid Reservoir 6 — Battery
2 — Engine Oil Fill Cap 7 — Coolant Pressure Cap
3 — Battery 8 — Coolant Pressure Bottle
4 — Power Distribution Center (Fuses) 9 — Engine Oil Dipstick
5 — Washer Fluid Reservoir 10 —Engine Air Cleaner Filter
SERVICING AND MAINTENANCE
232
Page 235 of 348
Checking Oil Level
To assure proper engine lubrication, the en-
gine oil must be maintained at the correct
level. Check the oil level at regular intervals,
such as once a month or before a long trip.
The best time to check the engine oil level is
approximately five minutes after a fully
warmed engine is shut off. Do not check oil
level before starting the engine after it has sat
overnight. Checking engine oil level when the
engine is cold will give you an incorrect read-
ing.
Checking the oil while the vehicle is on level
ground, and approximately five minutes after
a fully warmed engine is shut off, will improve
the accuracy of the oil level readings. Main-
tain the oil level between the range markings
on the dipstick. The safe range is indicated
by a crosshatch zone. Adding 1 quart (0.9 Li-
ters) of oil when the reading is at the low end
of the indicated range will result in the oil
level at the full end of the indicator range.
CAUTION!
• Overfilling or underfilling will cause oil
aeration, or loss of oil pressure. This
could damage your engine.
• Never use Non-Detergent Oil or Straight
Mineral Oil in the engine or damage may
result.
Adding Washer Fluid
The fluid reservoir is located in the front of
the engine compartment. Be sure to check
the fluid level in the reservoir at regular
intervals. Fill the reservoir with windshield
washer solvent (not radiator antifreeze) and
operate the system for a few seconds to flush
out the residual washer fluid.
When refilling the washer fluid reservoir, take
some washer fluid, apply it to a cloth or towel,
and wipe clean the wiper blades; this will
help blade performance.To prevent freeze-up of your windshield
washer system in cold weather, select a solu-
tion or mixture that meets or exceeds the
temperature range of your climate. This rat-
ing information can be found on most washer
fluid containers.
WARNING!
Commercially available windshield washer
solvents are flammable. They could ignite
and burn you. Care must be exercised
when filling or working around the washer
solution.
Maintenance-Free Battery
Your vehicle is equipped with a maintenance-
free battery. You will never have to add water,
nor is periodic maintenance required.
WARNING!
• Battery fluid is a corrosive acid solution
and can burn or even blind you. Do not
allow battery fluid to contact your eyes,
skin, or clothing. Do not lean over a
battery when attaching clamps. If acid
233