steering JEEP COMPASS 2018 Owner handbook (in English)
[x] Cancel search | Manufacturer: JEEP, Model Year: 2018, Model line: COMPASS, Model: JEEP COMPASS 2018Pages: 348, PDF Size: 6.03 MB
Page 174 of 348
PARKSENSE ACTIVE PARK
ASSIST
Enabling And Disabling ParkSense Active
Park Assist
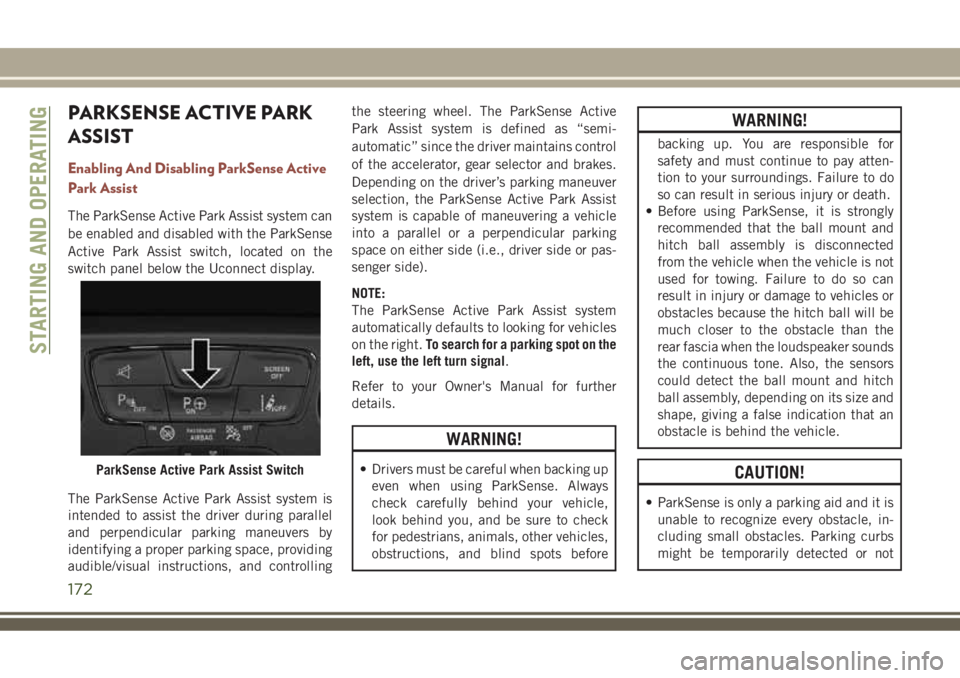
The ParkSense Active Park Assist system can
be enabled and disabled with the ParkSense
Active Park Assist switch, located on the
switch panel below the Uconnect display.
The ParkSense Active Park Assist system is
intended to assist the driver during parallel
and perpendicular parking maneuvers by
identifying a proper parking space, providing
audible/visual instructions, and controllingthe steering wheel. The ParkSense Active
Park Assist system is defined as “semi-
automatic” since the driver maintains control
of the accelerator, gear selector and brakes.
Depending on the driver’s parking maneuver
selection, the ParkSense Active Park Assist
system is capable of maneuvering a vehicle
into a parallel or a perpendicular parking
space on either side (i.e., driver side or pas-
senger side).
NOTE:
The ParkSense Active Park Assist system
automatically defaults to looking for vehicles
on the right.To search for a parking spot on the
left, use the left turn signal.
Refer to your Owner's Manual for further
details.
WARNING!
• Drivers must be careful when backing up
even when using ParkSense. Always
check carefully behind your vehicle,
look behind you, and be sure to check
for pedestrians, animals, other vehicles,
obstructions, and blind spots before
WARNING!
backing up. You are responsible for
safety and must continue to pay atten-
tion to your surroundings. Failure to do
so can result in serious injury or death.
• Before using ParkSense, it is strongly
recommended that the ball mount and
hitch ball assembly is disconnected
from the vehicle when the vehicle is not
used for towing. Failure to do so can
result in injury or damage to vehicles or
obstacles because the hitch ball will be
much closer to the obstacle than the
rear fascia when the loudspeaker sounds
the continuous tone. Also, the sensors
could detect the ball mount and hitch
ball assembly, depending on its size and
shape, giving a false indication that an
obstacle is behind the vehicle.
CAUTION!
• ParkSense is only a parking aid and it is
unable to recognize every obstacle, in-
cluding small obstacles. Parking curbs
might be temporarily detected or not
ParkSense Active Park Assist Switch
STARTING AND OPERATING
172
Page 175 of 348
CAUTION!
detected at all. Obstacles located above
or below the sensors will not be detected
when they are in close proximity.
• The vehicle must be driven slowly when
using ParkSense in order to be able to
stop in time when an obstacle is de-
tected. It is recommended that the
driver looks over his/her shoulder when
using ParkSense.
LANESENSE
LaneSense Operation
The LaneSense system is operational at
speeds above 37 mph (60 km/h) and below
112 mph (180 km/h). The LaneSense system
uses a forward looking camera to detect lane
markings and measure vehicle position
within the lane boundaries.
When both lane markings are detected and
the driver unintentionally drifts out of the
lane (no turn signal applied), the LaneSense
system provides a haptic warning in the form
of torque applied to the steering wheel, aswell as a visual warning in the instrument
cluster display, to prompt the driver to remain
within the lane boundaries.
The driver may manually override the haptic
warning by applying torque into the steering
wheel at any time.
When only a single lane marking is detected
and the driver unintentionally drifts across
the lane marking (no turn signal applied), the
LaneSense system provides a visual warning
through the instrument cluster display to
prompt the driver to remain within the lane.
When only a single lane marking is detected,
a haptic (torque) warning will not be pro-
vided.
NOTE:
When operating conditions have been met,
the LaneSense system will monitor if the
driver’s hands are on the steering wheel and
provide an audible and visual warning to the
driver when the driver’s hands are not de-
tected on the steering wheel. The system will
cancel if the driver does not return their
hands to the wheel.
Turning LaneSense On Or Off
The default status of LaneSense is “Off”.
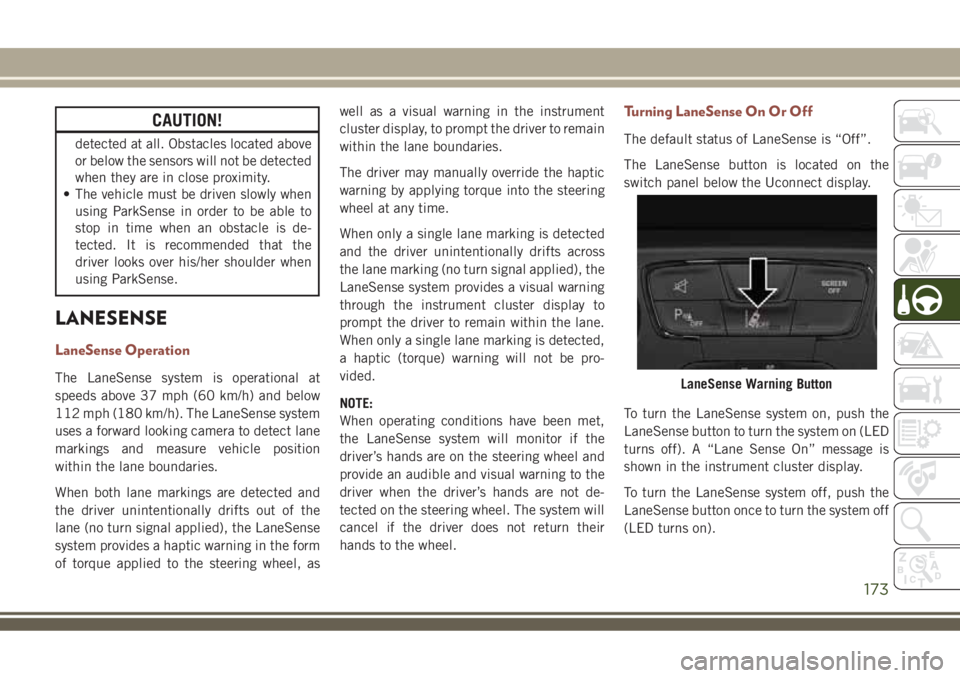
The LaneSense button is located on the
switch panel below the Uconnect display.
To turn the LaneSense system on, push the
LaneSense button to turn the system on (LED
turns off). A “Lane Sense On” message is
shown in the instrument cluster display.
To turn the LaneSense system off, push the
LaneSense button once to turn the system off
(LED turns on).
LaneSense Warning Button
173
Page 176 of 348
NOTE:
The LaneSense system will retain the last
system state on or off from the last ignition
cycle when the ignition is changed to the
ON/RUN position.
LaneSense Warning Message
The LaneSense system will indicate the cur-
rent lane drift condition through the instru-
ment cluster display.
Base Instrument Cluster Display — If
Equipped
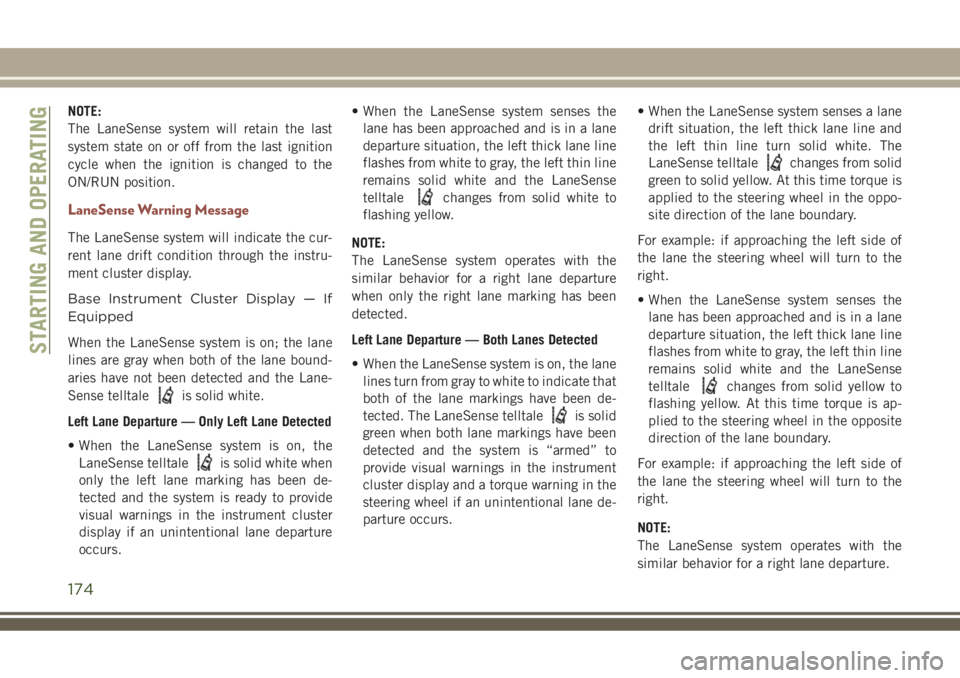
When the LaneSense system is on; the lane
lines are gray when both of the lane bound-
aries have not been detected and the Lane-
Sense telltale
is solid white.
Left Lane Departure — Only Left Lane Detected
• When the LaneSense system is on, the
LaneSense telltale
is solid white when
only the left lane marking has been de-
tected and the system is ready to provide
visual warnings in the instrument cluster
display if an unintentional lane departure
occurs.• When the LaneSense system senses the
lane has been approached and is in a lane
departure situation, the left thick lane line
flashes from white to gray, the left thin line
remains solid white and the LaneSense
telltale
changes from solid white to
flashing yellow.
NOTE:
The LaneSense system operates with the
similar behavior for a right lane departure
when only the right lane marking has been
detected.
Left Lane Departure — Both Lanes Detected
• When the LaneSense system is on, the lane
lines turn from gray to white to indicate that
both of the lane markings have been de-
tected. The LaneSense telltale
is solid
green when both lane markings have been
detected and the system is “armed” to
provide visual warnings in the instrument
cluster display and a torque warning in the
steering wheel if an unintentional lane de-
parture occurs.• When the LaneSense system senses a lane
drift situation, the left thick lane line and
the left thin line turn solid white. The
LaneSense telltale
changes from solid
green to solid yellow. At this time torque is
applied to the steering wheel in the oppo-
site direction of the lane boundary.
For example: if approaching the left side of
the lane the steering wheel will turn to the
right.
• When the LaneSense system senses the
lane has been approached and is in a lane
departure situation, the left thick lane line
flashes from white to gray, the left thin line
remains solid white and the LaneSense
telltale
changes from solid yellow to
flashing yellow. At this time torque is ap-
plied to the steering wheel in the opposite
direction of the lane boundary.
For example: if approaching the left side of
the lane the steering wheel will turn to the
right.
NOTE:
The LaneSense system operates with the
similar behavior for a right lane departure.
STARTING AND OPERATING
174
Page 177 of 348
Premium Instrument Cluster Display —
If Equipped
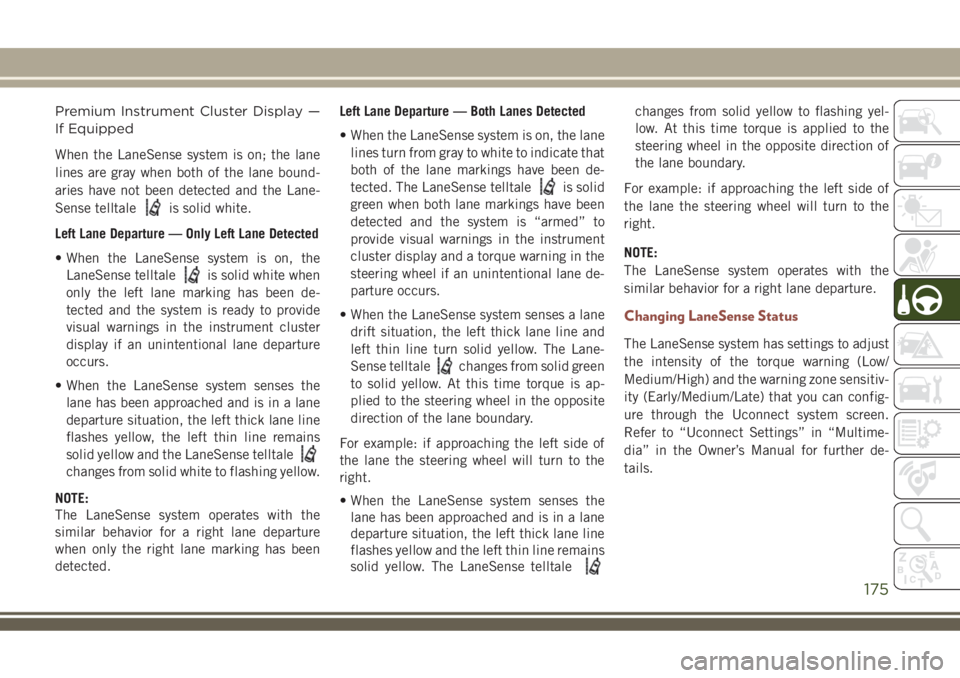
When the LaneSense system is on; the lane
lines are gray when both of the lane bound-
aries have not been detected and the Lane-
Sense telltale
is solid white.
Left Lane Departure — Only Left Lane Detected
• When the LaneSense system is on, the
LaneSense telltale
is solid white when
only the left lane marking has been de-
tected and the system is ready to provide
visual warnings in the instrument cluster
display if an unintentional lane departure
occurs.
• When the LaneSense system senses the
lane has been approached and is in a lane
departure situation, the left thick lane line
flashes yellow, the left thin line remains
solid yellow and the LaneSense telltale
changes from solid white to flashing yellow.
NOTE:
The LaneSense system operates with the
similar behavior for a right lane departure
when only the right lane marking has been
detected.Left Lane Departure — Both Lanes Detected
• When the LaneSense system is on, the lane
lines turn from gray to white to indicate that
both of the lane markings have been de-
tected. The LaneSense telltale
is solid
green when both lane markings have been
detected and the system is “armed” to
provide visual warnings in the instrument
cluster display and a torque warning in the
steering wheel if an unintentional lane de-
parture occurs.
• When the LaneSense system senses a lane
drift situation, the left thick lane line and
left thin line turn solid yellow. The Lane-
Sense telltale
changes from solid green
to solid yellow. At this time torque is ap-
plied to the steering wheel in the opposite
direction of the lane boundary.
For example: if approaching the left side of
the lane the steering wheel will turn to the
right.
• When the LaneSense system senses the
lane has been approached and is in a lane
departure situation, the left thick lane line
flashes yellow and the left thin line remains
solid yellow. The LaneSense telltale
changes from solid yellow to flashing yel-
low. At this time torque is applied to the
steering wheel in the opposite direction of
the lane boundary.
For example: if approaching the left side of
the lane the steering wheel will turn to the
right.
NOTE:
The LaneSense system operates with the
similar behavior for a right lane departure.
Changing LaneSense Status
The LaneSense system has settings to adjust
the intensity of the torque warning (Low/
Medium/High) and the warning zone sensitiv-
ity (Early/Medium/Late) that you can config-
ure through the Uconnect system screen.
Refer to “Uconnect Settings” in “Multime-
dia” in the Owner’s Manual for further de-
tails.
175
Page 178 of 348
NOTE:
• The system will not apply torque to the
steering wheel whenever a safety system
engages. (anti-lock brakes, traction control
system, electronic stability control, forward
collision warning, etc.).
• Use of the turn signals and Hazard Warning
flashers also suppresses the warnings.
PARKVIEW REAR BACK-UP
CAMERA
Symbols And Messages On The Display
You can see an on-screen image of the rear of
your vehicle whenever the transmission is
shifted into REVERSE. The ParkView Rear
Back-Up Camera image will be displayed on
the Uconnect Display, located on the center
stack of the instrument panel.
If the Uconnect Display appears foggy, clean
the camera lens located on the rear of the
vehicle above the rear license plate.
Refer to “ParkView Back-Up Camera” in
“Starting And Operating” in your Owner's
Manual for further information.
WARNING!
Drivers must be careful when backing up;
even when using the ParkView Rear
Back-Up Camera. Always check carefully
behind your vehicle, and be sure to check
for pedestrians, animals, other vehicles,
obstructions, or blind spots before backing
up. You must continue to pay attention
while backing up. Failure to do so can
result in serious injury or death.
CAUTION!
• To avoid vehicle damage, ParkView
should only be used as a parking aid.
The ParkView camera is unable to view
every obstacle or object in your drive
path.
• To avoid vehicle damage, the vehicle
must be driven slowly when using
ParkView to be able to stop in time when
an obstacle is seen. It is recommended
that the driver look frequently over his/
her shoulder when using ParkView.
REFUELING THE VEHICLE
The Capless Fuel System uses a flapper
placed at the filler pipe of the fuel tank; it
opens and closes automatically upon
insertion/extraction of the fuel nozzle. In cer-
tain countries, the Capless Fuel System is
designed so that it prevents the filling of an
incorrect type of fuel.
1. Unlock the Fuel Filler Door by pushing the
unlock button on the key fob or the unlock
button on the driver-side door trim panel.
2. Open the fuel filler door by pushing on the
outer edge of the Fuel Door.
STARTING AND OPERATING
176
Page 182 of 348
WARNING!
It is important that you do not exceed the
maximum front or rear GAWR. A danger-
ous driving condition can result if either
rating is exceeded. You could lose control
of the vehicle and have a collision.
Tongue Weight (TW)
The tongue weight is the downward force
exerted on the hitch ball by the trailer. You
must consider this as part of the load on your
vehicle.
Trailer Frontal Area
The frontal area is the maximum height mul-
tiplied by the maximum width of the front of
a trailer.
Trailer Sway Control
The trailer sway control can be a mechanical
telescoping link that can be installed be-
tween the hitch receiver and the trailertongue that typically provides adjustable fric-
tion associated with the telescoping motion
to dampen any unwanted trailer swaying mo-
tions while traveling.
If equipped, the electronic Trailer Sway Con-
trol (TSC) recognizes a swaying trailer and
automatically applies individual wheel
brakes and/or reduces engine power to at-
tempt to eliminate the trailer sway.
Weight-Carrying Hitch
A weight-carrying hitch supports the trailer
tongue weight, just as if it were luggage
located at a hitch ball or some other connect-
ing point of the vehicle. These kinds of
hitches are the most popular on the market
today and they are commonly used to tow
small and medium sized trailers.
Weight-Distributing Hitch
A weight-distributing system works by apply-
ing leverage through spring (load) bars. They
are typically used for heavier loads to distrib-
ute trailer tongue weight to the tow vehicle's
front axle and the trailer axle(s). When used
in accordance with the manufacturer's direc-tions, it provides for a more level ride, offer-
ing more consistent steering and brake con-
trol thereby enhancing towing safety. The
addition of a friction/hydraulic sway control
also dampens sway caused by traffic and
crosswinds and contributes positively to tow
vehicle and trailer stability. Trailer sway con-
trol and a weight distributing (load equaliz-
ing) hitch are recommended for heavier
Tongue Weights (TW) and may be required
depending on vehicle and trailer
configuration/loading to comply with Gross
Axle Weight Rating (GAWR) requirements.
WARNING!
• An improperly adjusted Weight Distrib-
uting Hitch system may reduce han-
dling, stability, braking performance,
and could result in a collision.
• Weight Distributing Systems may not be
compatible with Surge Brake Couplers.
Consult with your hitch and trailer
manufacturer or a reputable Recre-
ational Vehicle dealer for additional in-
formation.
STARTING AND OPERATING
180
Page 184 of 348
Perform the maintenance listed in the
“Scheduled Servicing”. Refer to “Scheduled
Servicing” in “Servicing And Maintenance”
for the proper maintenance intervals. When
towing a trailer, never exceed the GAWR or
GCWR ratings.
WARNING!
Improper towing can lead to a collision.
Follow these guidelines to make your
trailer towing as safe as possible:
• Make certain that the load is secured in
the trailer and will not shift during
travel. When trailering cargo that is not
fully secured, dynamic load shifts can
occur that may be difficult for the driver
to control. You could lose control of your
vehicle and have a collision.
WARNING!
• When hauling cargo or towing a trailer,
do not overload your vehicle or trailer.
Overloading can cause a loss of control,
poor performance or damage to brakes,
axle, engine, transmission, steering,
suspension, chassis structure or tires.
• Safety chains must always be used be-
tween your vehicle and trailer. Always
connect the chains to the hook retainers
of the vehicle hitch. Cross the chains
under the trailer tongue and allow
enough slack for turning corners.
• Vehicles with trailers should not be
parked on a grade. When parking, apply
the parking brake on the tow vehicle. Put
the tow vehicle transmission in PARK.
For four-wheel drive vehicles, make sure
WARNING!
the transfer case is not in NEUTRAL.
Always, block or "chock" the trailer
wheels.
• GCWR must not be exceeded.
•
Total weight must be distributed between
the tow vehicle and the trailer such that
the following four ratings are not ex-
ceeded:
1. GVWR
2. GTW
3. GAWR
4. Tongue weight rating for the trailer
hitch utilized.
STARTING AND OPERATING
182
Page 194 of 348
Reverse Lamps
1. Open the liftgate.
2. Using a suitable tool remove the access
panel for body side lamps, remove lift gate
access cover for lift gate lamps.
3. Disconnect the electrical connector by
pushing the release.
4. Remove bulb and replace making sure it
is properly locked.
5. Reconnect the electrical connector.
6. Reinstall the access panels making sure
they are locked in correctly.
7. Finally close the tailgate.
3rd Stop Lamp
The CHMSL is LED. For their replacement,
see an authorized dealer.
License Plate Lights
The license plate light is LED. For their
replacement, see an authorized dealer.FUSES
WARNING!
• When replacing a blown fuse, always use
an appropriate replacement fuse with
the same amp rating as the original fuse.
Never replace a fuse with another fuse of
higher amp rating. Never replace a
blown fuse with metal wires or any other
material. Do not place a fuse inside a
circuit breaker cavity or vice versa. Fail-
ure to use proper fuses may result in
serious personal injury, fire and/or prop-
erty damage.
• Before replacing a fuse, make sure that
the ignition is off and that all the other
services are switched off and/or disen-
gaged.
• If the replaced fuse blows again, contact
an authorized dealer.
• If a general protection fuse for safety
systems (air bag system, braking sys-
WARNING!
tem), power unit systems (engine sys-
tem, transmission system) or steering
system blows, contact an authorized
dealer.
General Information
The fuses protect electrical systems against
excessive current.
When a device does not work, you must check
the fuse element inside the blade fuse for a
break/melt.
Also, please be aware that when using power
outlets for extended periods of time with the
engine off may result in vehicle battery dis-
charge.
Fuse Location
The fuses are grouped into controllers lo-
cated in the engine compartment.
IN CASE OF EMERGENCY
192
Page 196 of 348
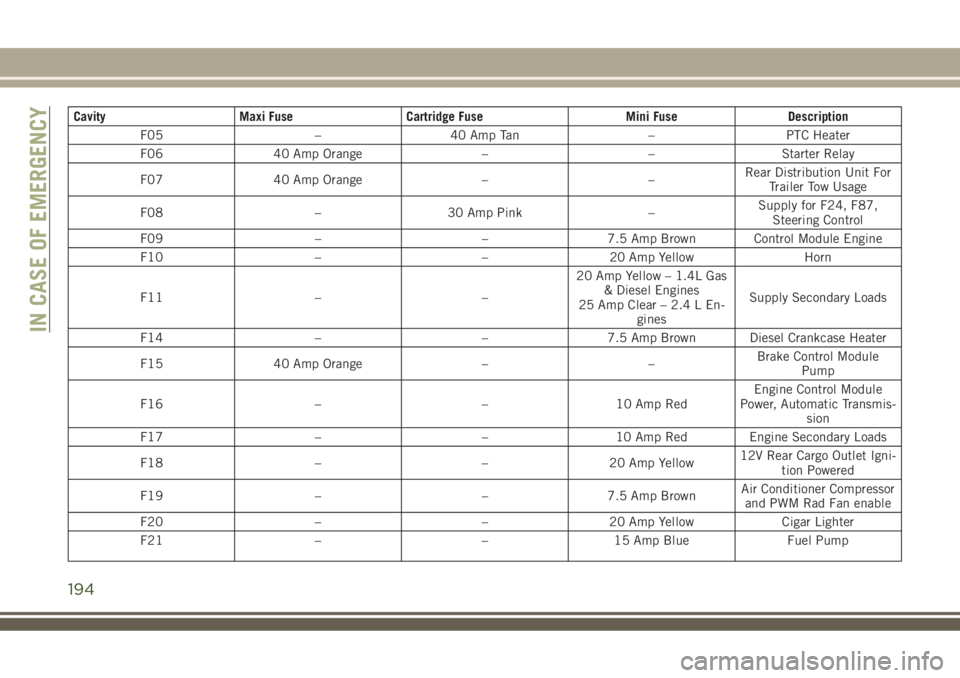
Cavity Maxi Fuse Cartridge Fuse Mini Fuse Description
F05 – 40 Amp Tan – PTC Heater
F06 40 Amp Orange – – Starter Relay
F07 40 Amp Orange – –Rear Distribution Unit For
Trailer Tow Usage
F08 – 30 Amp Pink –Supply for F24, F87,
Steering Control
F09 – – 7.5 Amp Brown Control Module Engine
F10 – – 20 Amp Yellow Horn
F11 – –20 Amp Yellow – 1.4L Gas
& Diesel Engines
25 Amp Clear – 2.4 L En-
ginesSupply Secondary Loads
F14 – – 7.5 Amp Brown Diesel Crankcase Heater
F15 40 Amp Orange – –Brake Control Module
Pump
F16 – – 10 Amp RedEngine Control Module
Power, Automatic Transmis-
sion
F17 – – 10 Amp Red Engine Secondary Loads
F18 – – 20 Amp Yellow12V Rear Cargo Outlet Igni-
tion Powered
F19 – – 7.5 Amp BrownAir Conditioner Compressor
and PWM Rad Fan enable
F20 – – 20 Amp Yellow Cigar Lighter
F21 – – 15 Amp Blue Fuel Pump
IN CASE OF EMERGENCY
194
Page 198 of 348
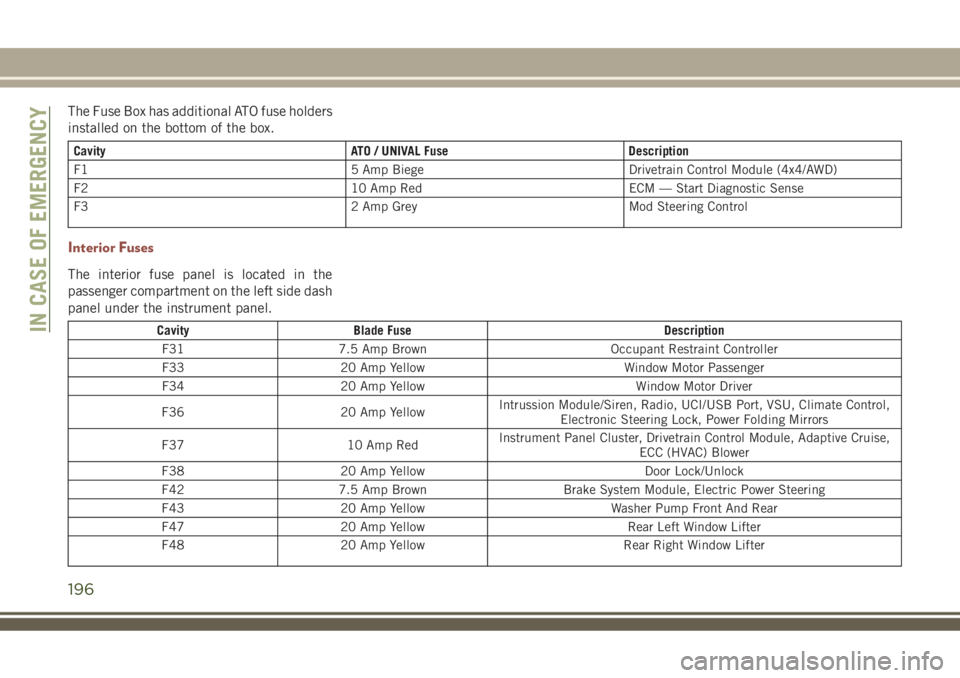
The Fuse Box has additional ATO fuse holders
installed on the bottom of the box.
Cavity ATO / UNIVAL Fuse Description
F1 5 Amp Biege Drivetrain Control Module (4x4/AWD)
F2 10 Amp Red ECM — Start Diagnostic Sense
F3 2 Amp Grey Mod Steering Control
Interior Fuses
The interior fuse panel is located in the
passenger compartment on the left side dash
panel under the instrument panel.
Cavity Blade Fuse Description
F31 7.5 Amp Brown Occupant Restraint Controller
F33 20 Amp Yellow Window Motor Passenger
F34 20 Amp Yellow Window Motor Driver
F36 20 Amp YellowIntrussion Module/Siren, Radio, UCI/USB Port, VSU, Climate Control,
Electronic Steering Lock, Power Folding Mirrors
F37 10 Amp RedInstrument Panel Cluster, Drivetrain Control Module, Adaptive Cruise,
ECC (HVAC) Blower
F38 20 Amp Yellow Door Lock/Unlock
F42 7.5 Amp Brown Brake System Module, Electric Power Steering
F43 20 Amp Yellow Washer Pump Front And Rear
F47 20 Amp Yellow Rear Left Window Lifter
F48 20 Amp Yellow Rear Right Window LifterIN CASE OF EMERGENCY
196