remote start JEEP COMPASS 2018 Owner handbook (in English)
[x] Cancel search | Manufacturer: JEEP, Model Year: 2018, Model line: COMPASS, Model: JEEP COMPASS 2018Pages: 348, PDF Size: 6.03 MB
Page 13 of 348
GETTING TO KNOW YOUR VEHICLE
KEYS .....................13
Key Fobs....................13
IGNITION SWITCH............14
Keyless Enter-N-Go — Ignition.......14
Integrated/Manual Ignition — If
Equipped....................15
Vehicle On Message.............16
Mechanical Steering Wheel Lock — If
Equipped....................16
Electronic Steering Wheel Lock — If
Equipped....................17
REMOTE STARTING SYSTEM — IF
EQUIPPED.................17
How To Use Remote Start — If
Equipped....................17
To Enter Remote Start Mode........18
To Exit Remote Start Mode Without
Driving The Vehicle.............18
To Exit Remote Start Mode And Drive
The Vehicle...................18
SENTRY KEY................19
Replacement Keys..............19Customer Key Programming........19
VEHICLE SECURITY ALARM — IF
EQUIPPED.................19
Rearming Of The System..........20
To Arm The System.............20
To Disarm The System............20
Security System Manual Override.....21
PREMIUM VEHICLE SECURITY
ALARM — IF EQUIPPED........21
To Arm The System..............21
To Disarm The System............22
Security System Manual Override.....22
DOORS...................22
Keyless Enter-N-Go — Passive Entry . . .22
Child-Protection Door Lock System —
Rear Doors...................25
SEATS ....................25
Driver Memory Seat — If Equipped....25
Front Heated Seats — If Equipped....28
Front Ventilated Seats — If Equipped. . .2860/40 Split Folding Rear Seat With
Fold-Flat Feature...............29
40/20/40 Rear Seat Armrest— If
Equipped....................30
HEAD RESTRAINTS...........30
Front Head Restraint Adjustment.....31
Rear Head Restraints.............32
STEERING WHEEL...........33
Tilt/Telescoping Steering Column.....33
Heated Steering Wheel............33
MIRRORS..................34
Folding Mirrors................34
Heated Mirrors — If Equipped.......34
EXTERIOR LIGHTS...........34
Headlight Switch...............34
Daytime Running Lights (DRL) — If
Equipped...................35
High/Low Beam Switch...........35
Flash-To-Pass.................35
Automatic Headlights — If Equipped . .35
Headlight Time Delay............36
GETTING TO KNOW YOUR VEHICLE
11
Page 15 of 348
KEYS
Key Fobs
Your vehicle uses either a key start ignition
system or keyless ignition system. The igni-
tion system consists of a key fob with a
Remote Keyless Entry (RKE) and an ignition
switch. The keyless ignition system consists
of a key fob and Keyless Enter-N-Go button.
NOTE:
The key fob may not be found if it is located
next to a mobile phone, laptop or other elec-
tronic device; these devices may block the
key fob’s wireless signal.
The key fob allows you to lock or unlock the
doors and liftgate from distances up to ap-
proximately 66 ft (20 m) using a handheld
key fob. The key fob does not need to be
pointed at the vehicle to activate the system.
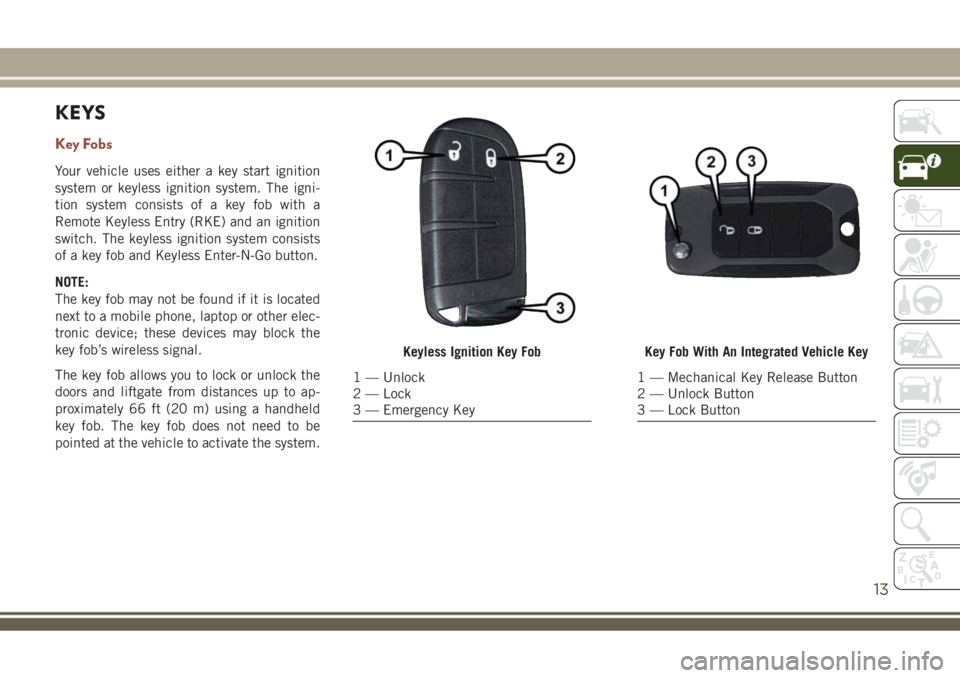
Keyless Ignition Key Fob
1 — Unlock
2 — Lock
3 — Emergency Key
Key Fob With An Integrated Vehicle Key
1 — Mechanical Key Release Button
2 — Unlock Button
3 — Lock Button
13
Page 19 of 348
Electronic Steering Wheel Lock — If
Equipped
Your vehicle may be equipped with a passive
electronic steering wheel lock. This lock pre-
vents steering the vehicle with the ignition
OFF. The steering wheel lock releases with
the ignition ON. If the lock does not disen-
gage and the vehicle does not start, turn the
wheel to the left and right to disengage the
lock.
REMOTE STARTING
SYSTEM — IF EQUIPPED
• Push the remote start button
on the key fob twice within five
seconds. Pushing the remote
start button a third time shuts
the engine off.
• To drive the vehicle, push the START/STOP
button to turn the ignition to the ON/RUN
mode.
• With remote start, the engine will only run
for 15 minutes (timeout) unless the igni-
tion is placed in the ON/RUN mode.• The vehicle must be started with the key
after two consecutive timeouts.
WARNING!
• Do not start or run an engine in a closed
garage or confined area. Exhaust gas
contains Carbon Monoxide (CO) which is
odorless and colorless. Carbon Monox-
ide is poisonous and can cause serious
injury or death when inhaled.
• Keep key fobs away from children. Op-
eration of the Remote Start System, win-
dows, door locks or other controls could
cause serious injury or death.
How To Use Remote Start — If Equipped
Push remote start button on the key fob twice
within five seconds. Pushing the remote start
button a third time shuts the engine off.
To drive the vehicle, push unlock button,
insert the key in the ignition and turn to the
ON/RUN position.NOTE:
•With remote start, the engine will only run
for 15 minutes (timeout) unless the igni-
tion key is placed in the ON/RUN position.
•The vehicle must be started with the key
after two consecutive timeouts.
All of the following conditions must be met
before the engine will remote start:
•Gear selector in PARK
•Doors closed
•Hood closed
•Liftgate closed
•Hazard switch off
•Brake switch inactive (brake pedal not
pushed)
•Battery at an acceptable charge level
•Check engine light shall not be present
•System not disabled from previous remote
start event
•Vehicle alarm system indicator flashing
•Ignition in STOP/OFF position
•Fuel level meets minimum requirement
• Vehicle security alarm is not signaling an
intrusion
17
Page 20 of 348
WARNING!
• Do not start or run an engine in a closed
garage or confined area. Exhaust gas
contains Carbon Monoxide (CO) which is
odorless and colorless. Carbon Monox-
ide is poisonous and can cause serious
injury or death when inhaled.
• Keep key fobs away from children. Op-
eration of the Remote Start System, win-
dows, door locks or other controls could
cause serious injury or death.
To Enter Remote Start Mode
Push and release the remote start button on
the key fob twice within five seconds. The
vehicle doors will lock, the parking lights will
flash, and the horn will chirp twice (if pro-
grammed). Then, the engine will start, and
the vehicle will remain in the Remote Start
mode for a 15-minute cycle.
NOTE:
• If an engine fault is present or fuel level is
low, the vehicle will start and then shut
down in 10 seconds.• The park lamps will turn on and remain on
during Remote Start mode.
• For security, power window and power sun-
roof operation (if equipped) are disabled
when the vehicle is in the Remote Start
mode.
• The engine can be started two consecutive
times with the key fob. However, the igni-
tion must be cycled by pushing the START/
STOP button twice (or the ignition switch
must be cycled to the ON/RUN position)
before you can repeat the start sequence
for a third cycle.
To Exit Remote Start Mode Without
Driving The Vehicle
Push and release the remote start button one
time or allow the engine to run for the entire
15-minute cycle.
NOTE:
To avoid unintentional shutdowns, the sys-
tem will disable with a one time push of the
remote start button for two seconds after
receiving a valid remote start request.
To Exit Remote Start Mode And Drive The
Vehicle
Before the end of 15-minute cycle, push and
release the unlock button on the key fob to
unlock the doors and disarm the vehicle se-
curity alarm (if equipped). Then, prior to the
end of the 15-minute cycle, push and release
the START/STOP button. If the START/STOP
button is not present, insert the key fob into
the ignition switch and turn the switch to the
ON/RUN position.
NOTE:
• For vehicles not equipped with the Keyless
Enter-N-Go — Passive Entry feature, the
ignition switch must be in the ON/RUN
position in order to drive the vehicle.
• For vehicles not equipped with the Keyless
Enter-N-Go — Passive Entry feature, the
message “Remote Start Active — Insert
Key and Turn To Run” will show in the
instrument cluster display until you insert
the key.
GETTING TO KNOW YOUR VEHICLE
18
Page 21 of 348
• For vehicles equipped with the Keyless
Enter-N-Go — Passive Entry feature, the
message “Remote Start Active — Push
Start Button” will will show in the instru-
ment cluster display until you push the
START button.
SENTRY KEY
The Sentry Key Immobilizer system prevents
unauthorized vehicle operation by disabling
the engine. The system does not need to be
armed or activated. Operation is automatic,
regardless of whether the vehicle is locked or
unlocked.
CAUTION!
The Sentry Key Immobilizer system is not
compatible with some aftermarket remote
starting systems. Use of these systems
may result in vehicle starting problems
and loss of security protection.
All of the key fobs provided with your new
vehicle have been programmed to the vehicle
electronics.
Replacement Keys
NOTE:
Only key fobs that are programmed to the
vehicle electronics can be used to start and
operate the vehicle. Once a key fob is pro-
grammed to a vehicle, it cannot be pro-
grammed to any other vehicle.
CAUTION!
• Always remove the key fobs from the
vehicle and lock all doors when leaving
the vehicle unattended.
• For vehicles equipped with Keyless
Enter-N-Go — Ignition, always remem-
ber to place the ignition in the OFF
position.
NOTE:
Duplication of key fobs may be performed at
an authorized dealer. This procedure consists
of programming a blank key fob to the vehicle
electronics. A blank key fob is one that has
never been programmed.
When having the Sentry Key Immobilizer Sys-
tem serviced, bring all vehicle keys with you
to an authorized dealer.
Customer Key Programming
Programming key fobs may be performed at
your authorized dealer.
VEHICLE SECURITY ALARM
— IF EQUIPPED
The vehicle security alarm monitors the ve-
hicle doors, hood, liftgate, and the Keyless
Enter-N-Go — Ignition for unauthorized op-
eration. While the vehicle security alarm is
armed, interior switches for door locks and
liftgate release are disabled. If something
triggers the alarm, the vehicle security alarm
will provide the following audible and visible
signals:
• The horn will pulse
• The turn signals will flash
• The vehicle security light in the instrument
cluster will flash
19
Page 24 of 348
To Disarm The System
The vehicle security alarm can be disarmed
using any of the following methods:
• Push the unlock button on the key fob.
• Grasp the passive entry door handle to
unlock the door, refer to "Doors" in "Getting
To Know Your Vehicle" in your Owner’s
Manual for further information).
• Cycle the vehicle ignition system out of the
OFF position.
– For vehicles equipped with Keyless
Enter-N-Go — Passive Entry, push the
Start/Stop ignition button (requires at
least one valid key fob in the vehicle).
– For vehicles not equipped with Keyless
Enter-N-Go — Passive Entry, insert a
valid Integrated Vehicle Key into the
ignition switch and turn the key to the
ON position.
NOTE:
• The driver's door key cylinder and the lift-
gate button on the key fob cannot arm or
disarm the vehicle security alarm.
• The vehicle security alarm remains armed
during power liftgate entry. Pushing theliftgate button will not disarm the vehicle
security alarm. If someone enters the ve-
hicle through the liftgate and opens any
door the alarm will sound.
• When the vehicle security alarm is armed,
the interior power door lock switches will
not unlock the doors.
• The ultrasonic intrusion sensor (motion de-
tector) actively monitors your vehicle every
time you arm the security system. If you
prefer, you can turn off the ultrasonic intru-
sion sensor when arming the security sys-
tem. To do so, push the lock button on the
key fob five times within five seconds of
arming the system (while the vehicle secu-
rity light is flashing rapidly).
The vehicle security alarm is designed to
protect your vehicle; however, you can create
conditions where the system will give you a
false alarm. If one of the previously described
arming sequences has occurred, the vehicle
security alarm will arm regardless of whether
you are in the vehicle or not. If you remain in
the vehicle and open a door, the alarm will
sound. If this occurs, disarm the vehicle
security alarm.If the vehicle security alarm is armed and the
battery becomes disconnected, the vehicle
security alarm will remain armed when the
battery is reconnected; the exterior lights will
flash, the horn will sound. If this occurs,
disarm the vehicle security alarm.
Security System Manual Override
The system will not arm if you lock the doors
using the manual door lock plunger.
DOORS
Keyless Enter-N-Go — Passive Entry
The Passive Entry system is an enhancement
to the vehicle’s Remote Keyless Entry system
and a feature of Keyless Enter-N-Go — Pas-
sive Entry. This feature allows you to lock and
unlock the vehicle’s door(s) and fuel door
without having to push the key fob lock or
unlock buttons.
To Unlock From The Driver's Side
With a valid Passive Entry key fob within 5 ft
(1.5 m) of the driver's door handle, grab the
front driver door handle to unlock the driver's
door automatically.
GETTING TO KNOW YOUR VEHICLE
22
Page 30 of 348
NOTE:
The Easy Entry/Exit feature is not enabled
when the vehicle is delivered from the fac-
tory. The Easy Entry/Exit feature is enabled
(or later disabled) through the programmable
features in the Uconnect system. Refer to
“Uconnect Settings/Customer Programmable
Features” in “Multimedia” in the Owner’s
Manual for further information.
Front Heated Seats — If Equipped
The front heated seats control buttons are
located within the Uconnect system. You can
gain access to the control buttons through
the climate screen or the controls screen.
• Press the heated seat button
once to
turn the HI setting on.
• Press the heated seat button
a second
time to turn the LO setting on.
• Press the heated seat button
a third
time to turn the heating elements off.
If your vehicle is equipped with automatic
temperature controls with an integrated cen-
ter stack, or manual temperature controls,
you’ll find the heated seat switches on the
switch bank below the radio screen.If the HI level setting is selected, the system
will automatically switch to LO level after
approximately 60 minutes of continuous op-
eration. At that time, the display will change
from HI to LO, indicating the change. The LO
level setting will turn off automatically after
approximately 45 minutes.
NOTE:
The engine must be running for the heated
seats to operate.
Vehicles With Remote Start — If Equipped
On models that are equipped with remote
start, the heated seats can be programmed to
come on during a remote start.
This feature can be programmed through the
Uconnect system. Refer to “Uconnect Set-
tings” in “Multimedia” in the Owner’s
Manual for further information.
WARNING!
• Persons who are unable to feel pain to
the skin because of advanced age,
chronic illness, diabetes, spinal cord in-
jury, medication, alcohol use, exhaus-
WARNING!
tion or other physical condition must
exercise care when using the seat
heater. It may cause burns even at low
temperatures, especially if used for long
periods of time.
• Do not place anything on the seat or
seatback that insulates against heat,
such as a blanket or cushion. This may
cause the seat heater to overheat. Sit-
ting in a seat that has been overheated
could cause serious burns due to the
increased surface temperature of the
seat.
Front Ventilated Seats — If Equipped
If your vehicle is equipped with ventilated
seats, the seat cushion and seat back will
have fans that draw the air from the passen-
ger compartment and move air through fine
perforations in the seat cover to help keep the
driver and front passenger cooler in higher
ambient temperatures. The fans operate at
two speeds, HI and LO.GETTING TO KNOW YOUR VEHICLE
28
Page 31 of 348
The front ventilated seats control buttons are
located within the Uconnect system. You can
gain access to the control buttons through
the climate screen or the controls screen.
• Press the ventilated seat button
once
to choose HI.
• Press the ventilated seat button
a
second time to choose LO.
• Press the ventilated seat button
a third
time to turn the ventilated seat OFF.
NOTE:
The engine must be running for the ventilated
seats to operate.
Vehicles With Remote Start — If Equipped
On models that are equipped with remote
start, the ventilated seats can be pro-
grammed to come on during a remote start.
This feature can be programmed through the
Uconnect system. Refer to your Owner's
Manual for further details.
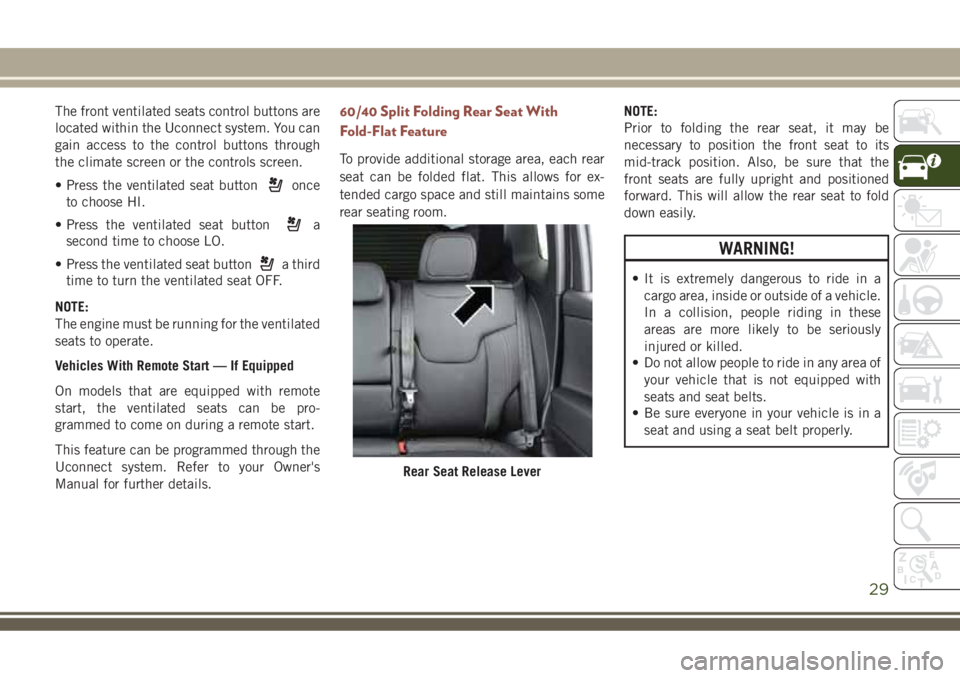
60/40 Split Folding Rear Seat With
Fold-Flat Feature
To provide additional storage area, each rear
seat can be folded flat. This allows for ex-
tended cargo space and still maintains some
rear seating room.NOTE:
Prior to folding the rear seat, it may be
necessary to position the front seat to its
mid-track position. Also, be sure that the
front seats are fully upright and positioned
forward. This will allow the rear seat to fold
down easily.
WARNING!
• It is extremely dangerous to ride in a
cargo area, inside or outside of a vehicle.
In a collision, people riding in these
areas are more likely to be seriously
injured or killed.
• Do not allow people to ride in any area of
your vehicle that is not equipped with
seats and seat belts.
• Be sure everyone in your vehicle is in a
seat and using a seat belt properly.
Rear Seat Release Lever
29
Page 35 of 348
STEERING WHEEL
Tilt/Telescoping Steering Column
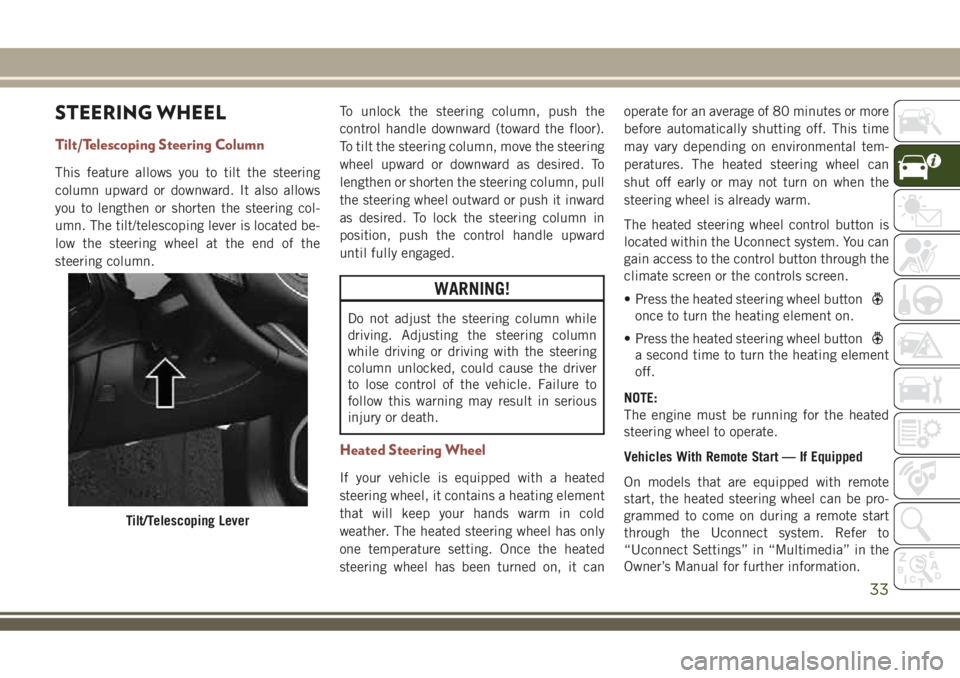
This feature allows you to tilt the steering
column upward or downward. It also allows
you to lengthen or shorten the steering col-
umn. The tilt/telescoping lever is located be-
low the steering wheel at the end of the
steering column.To unlock the steering column, push the
control handle downward (toward the floor).
To tilt the steering column, move the steering
wheel upward or downward as desired. To
lengthen or shorten the steering column, pull
the steering wheel outward or push it inward
as desired. To lock the steering column in
position, push the control handle upward
until fully engaged.
WARNING!
Do not adjust the steering column while
driving. Adjusting the steering column
while driving or driving with the steering
column unlocked, could cause the driver
to lose control of the vehicle. Failure to
follow this warning may result in serious
injury or death.
Heated Steering Wheel
If your vehicle is equipped with a heated
steering wheel, it contains a heating element
that will keep your hands warm in cold
weather. The heated steering wheel has only
one temperature setting. Once the heated
steering wheel has been turned on, it canoperate for an average of 80 minutes or more
before automatically shutting off. This time
may vary depending on environmental tem-
peratures. The heated steering wheel can
shut off early or may not turn on when the
steering wheel is already warm.
The heated steering wheel control button is
located within the Uconnect system. You can
gain access to the control button through the
climate screen or the controls screen.
• Press the heated steering wheel button
once to turn the heating element on.
• Press the heated steering wheel button
a second time to turn the heating element
off.
NOTE:
The engine must be running for the heated
steering wheel to operate.
Vehicles With Remote Start — If Equipped
On models that are equipped with remote
start, the heated steering wheel can be pro-
grammed to come on during a remote start
through the Uconnect system. Refer to
“Uconnect Settings” in “Multimedia” in the
Owner’s Manual for further information.
Tilt/Telescoping Lever
33
Page 41 of 348
shield washers of the vehicle ahead. Rotate
the end of the multifunction lever to one of
two settings to activate this feature.
Automatic Wiping
The sensitivity of the system can be adjusted
with the multifunction lever. Wiper delay po-
sition one is the least sensitive, and wiper
delay position two is the most sensitive. Place
the wiper switch in the O (off) position when
not using the system.
NOTE:
• The Rain Sensing feature will not operate
when the wiper switch is in the low or
high-speed position.
• The Rain Sensing feature may not function
properly when ice or dried salt water is
present on the windshield.
• Use of Rain-X or products containing wax or
silicone may reduce Rain Sensing perfor-
mance.
• The Rain Sensing feature can be turned on
and off using the Uconnect System, refer to
“Uconnect Settings” in “Multimedia” in
the Owner's Manual for further details.The Rain Sensing system has protection fea-
tures for the wiper blades and arms, and will
not operate under the following conditions:
•Change In Ignition Position— If the vehicle
is in Rain Sensing mode and the ignition is
cycled from OFF to ON, the auto wiper will
be suppressed until vehicle speed is greater
than 3 mph (5 km/h), or the wiper switch is
moved out of and back into the Intermittent
wipe position.
•Transmission In NEUTRAL Position— The
Rain Sensing system will not operate if the
NEUTRAL gear is selected in any speed
unless the wiper switch is moved or the gear
selector is moved out of NEUTRAL.
Remote Start Mode Inhibit— On vehicles
equipped with Remote Starting system, Rain
Sensing wipers are not operational when the
vehicle is in the remote start mode. Once the
operator is in the vehicle and has placed the
ignition switch in the ON/RUN position, Rain
Sensing wiper operation can resume, if it has
been selected, and no other inhibit condi-
tions (mentioned previously) exist.
Rear Wiper
The rear wiper/washer controls are located on
the windshield wiper/washer lever on the
right side of the steering column. The rear
wiper/washer is operated by rotating a switch,
located at the middle of the lever.
Rear Wiper Operation
Rotate the center portion of the lever upward
to the first detent for intermittent operation
and to the second detent for continuous rear
wiper operation.
Rear Washer Operation
Push the lever forward and hold while spray is
desired. Once the switch is released, it will
return to the OFF position and the wipers will
cycle several times before returning to the
parked position.
39