technical specifications JEEP COMPASS 2018 Owner handbook (in English)
[x] Cancel search | Manufacturer: JEEP, Model Year: 2018, Model line: COMPASS, Model: JEEP COMPASS 2018Pages: 348, PDF Size: 6.03 MB
Page 7 of 348
GRAPHICAL TABLE OF CONTENTS
GETTING TO KNOW YOUR VEHICLE
GETTING TO KNOW YOUR INSTRUMENT PANEL
SAFETY
STARTING AND OPERATING
IN CASE OF EMERGENCY
SERVICING AND MAINTENANCE
TECHNICAL SPECIFICATIONS
MULTIMEDIA
CUSTOMER ASSISTANCE
INDEX
Page 205 of 348
WARNING!
Raising the vehicle higher than necessary
can make the vehicle less stable. It could
slip off the jack and hurt someone near it.
Raise the vehicle only enough to remove
the tire.
6. Remove the wheel bolts and tire.
7. Remove the alignment pin from the jack
assembly and thread the pin into the
wheel hub to assist in mounting the spare
tire.
8. Mount the spare tire.
CAUTION!
Be sure to mount the spare tire with the
valve stem facing outward. The vehicle
could be damaged if the spare tire is
mounted incorrectly.NOTE:
• For vehicles equipped, do not attempt
to install a center cap or wheel cover on
the compact spare.
• Refer to “Compact Spare Tire” and to
“Limited-Use Spare” under “Tires—
General Information” in “Servicing And
Maintenance” in the Owner's Manual
for additional warnings, cautions, and
information about the spare tire, its
use, and operation.
9. Install and lightly tighten the wheel bolts.
WARNING!
To avoid the risk of forcing the vehicle off
the jack, do not tighten the wheel nuts
fully until the vehicle has been lowered.
Failure to follow this warning may result in
serious injury.
10. Lower the vehicle to the ground by turn-
ing the jack handle counterclockwise.
11. Finish tightening the wheel bolts. Push
down on the wrench while at the end ofthe handle for increased leverage.
Tighten the wheel bolts in a star pattern
until each wheel bolt has been tightened
twice. Refer to “Wheel And Tire Torque
Specifications” in “Technical Specifica-
tions” for the proper lug bolt torque. If in
doubt about the correct tightness, have
them checked with a torque wrench by
your authorized dealer or at a service
station.
12. Place the jack on the foam tray and open
it far enough so that it is secured. Once
placed in position, rotate it clockwise to
lock it in. Replace the alignment pin in
the center hole to lock the jack in place.
WARNING!
A loose tire or jack thrown forward in a
collision or hard stop could endanger the
occupants of the vehicle. Always stow the
jack parts and the spare tire in the places
provided. Have the deflated (flat) tire re-
paired or replaced immediately.
203
Page 206 of 348
Road Tire Installation
1. Mount the road tire on the axle.
2. Install the remaining wheel bolts with the
threaded end of the wheel bolt toward the
wheel. Lightly tighten the wheel bolts.
WARNING!
To avoid the risk of forcing the vehicle off
the jack, do not tighten the wheel bolts
fully until the vehicle has been lowered.
Failure to follow this warning may result in
serious injury.
3. Lower the vehicle to the ground by turning
the jack handle counterclockwise.
4. Finish tightening the wheel bolts. Push
down on the wrench while at the end of
the handle for increased leverage. Tighten
the wheel bolts in a star pattern until each
wheel bolt has been tightened twice. Re-
fer to “Wheel And Tire Torque Specifica-
tions” in “Technical Specifications” for
the proper lug bolt torque. If in doubt
about the correct tightness, have them
checked with a torque wrench by your
authorized dealer or service station.5. Lower the jack until it is free. Remove the
wheel blocks. Reassemble the lug wrench
to the jack assembly and stow it in the
spare tire area. Secure the assembly using
the means provided. Release the parking
brake before driving the vehicle.
6. After 25 miles (40 km), check the wheel
bolt torque with a torque wrench to ensure
that all wheel bolts are properly seated
against the wheel.
EC Declaration Of Conformance
1. The undersigned,Jaswant Singh, repre-
senting the Moonlight Tools Pvt. Ltd.,
herewith declares that the machinery de-
scribed below fulfills all the relevant pro-
visions of:
• The EC-directive 2006/42/EC on
Machinery
2. Description of machinery.
a.Generic Denomination:Pantograph
jack
b.Function:Lifting Motor Vehicle
Model
CodeModel
NameType Working
load
M6 (556) MPV MLF1 1250Kg
3. Manufacturer Detail
Moonlight Tools Pvt. Ltd.
Vill. Jaspalon, G.T. Road Doraha
Distt. Ludhiana (141421) Punjab (India)
Teh. PH. No. 01628 258302
4. Authorized Person to compile the techni-
cal file
Mr. jaswant Singh DGM (QA & Dev.)
Moonlight Tools Pvt. Ltd.
Ludhiana
5. Reference standard : PF-90065
Date Place Signature Seal
29–03–
2017Doraha
Ludhiana
IN CASE OF EMERGENCY
204
Page 238 of 348
WARNING!
• When working near the radiator cooling
fan, disconnect the fan motor lead or
turn the ignition to the OFF mode. The
fan is temperature controlled and can
start at any time the ignition is in the ON
mode.
Coolant Checks
Check engine coolant (antifreeze) protection
every 12 months (before the onset of freezing
weather, where applicable). If the engine
coolant (antifreeze) is dirty or rusty in appear-
ance, the system should be drained, flushed
and refilled with fresh engine coolant (anti-
freeze). Check the front of the A/C condenser
for any accumulation of bugs, leaves, etc. If
dirty, clean by gently spraying water from a
garden hose vertically down the face of the
condenser.
Brake System
In order to assure brake system performance,
all brake system components should be in-
spected periodically. Refer to the “Mainte-
nance Plan” in this section for the proper
maintenance intervals.
WARNING!
Riding the brakes can lead to brake failure
and possibly a collision. Driving with your
foot resting or riding on the brake pedal
can result in abnormally high brake tem-
peratures, excessive lining wear, and pos-
sible brake damage. You would not have
your full braking capacity in an emergency.
Brake Master Cylinder
The fluid in the master cylinder should be
checked when performing under hood ser-
vices or immediately if the “Brake Warning
Light” is illuminated.
Be sure to clean the top of the master cylin-
der area before removing the cap. If neces-
sary, add fluid to bring the fluid level up to
the requirements described on the brakefluid reservoir. With disc brakes, fluid level
can be expected to fall as the brake pads
wear. Brake fluid level should be checked
when pads are replaced. However, low fluid
level may be caused by a leak and a checkup
may be needed.
Use only manufacturer's recommended
brake fluid. Refer to “Fluids And Lubricants”
in “Technical Specifications” for further
information.
WARNING!
• Use only manufacturer's recommended
brake fluid. Refer to “Fluids And Lubri-
cants” in “Technical Specifications” for
further information. Using the wrong
type of brake fluid can severely damage
your brake system and/or impair its per-
formance. The proper type of brake fluid
for your vehicle is also identified on the
original factory installed hydraulic mas-
ter cylinder reservoir.
• To avoid contamination from foreign
matter or moisture, use only new brake
fluid or fluid that has been in a tightly
SERVICING AND MAINTENANCE
236
Page 255 of 348
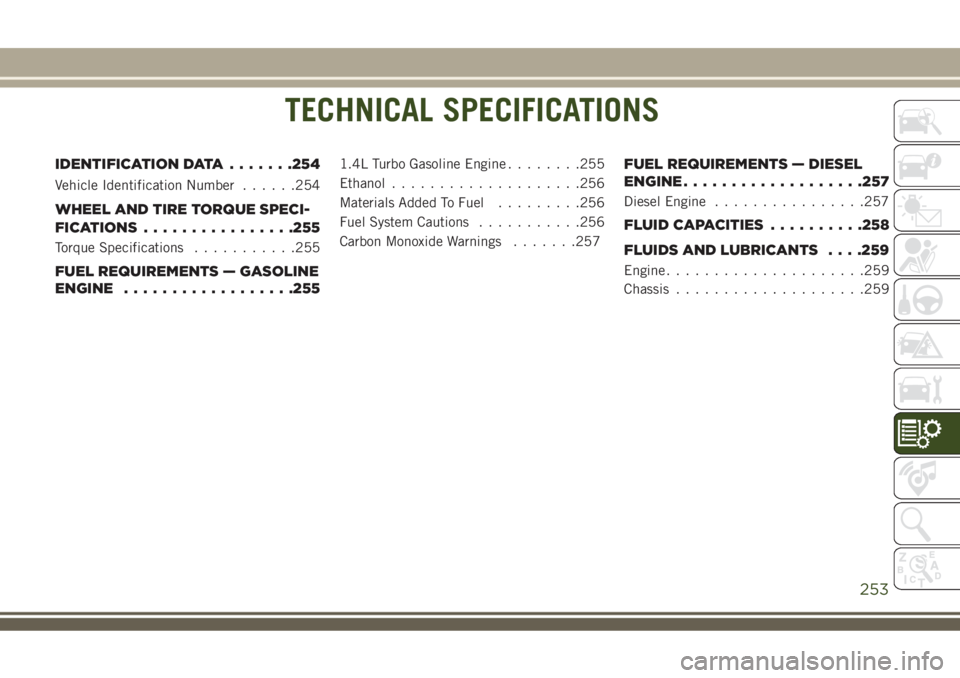
TECHNICAL SPECIFICATIONS
IDENTIFICATION DATA.......254
Vehicle Identification Number......254
WHEEL AND TIRE TORQUE SPECI-
FICATIONS................255
Torque Specifications...........255
FUEL REQUIREMENTS — GASOLINE
ENGINE..................255
1.4L Turbo Gasoline Engine........255
Ethanol....................256
Materials Added To Fuel.........256
Fuel System Cautions...........256
Carbon Monoxide Warnings.......257FUEL REQUIREMENTS — DIESEL
ENGINE...................257
Diesel Engine................257
FLUID CAPACITIES..........258
FLUIDS AND LUBRICANTS. . . .259
Engine.....................259
Chassis....................259
TECHNICAL SPECIFICATIONS
253
Page 256 of 348
IDENTIFICATION DATA
Vehicle Identification Number
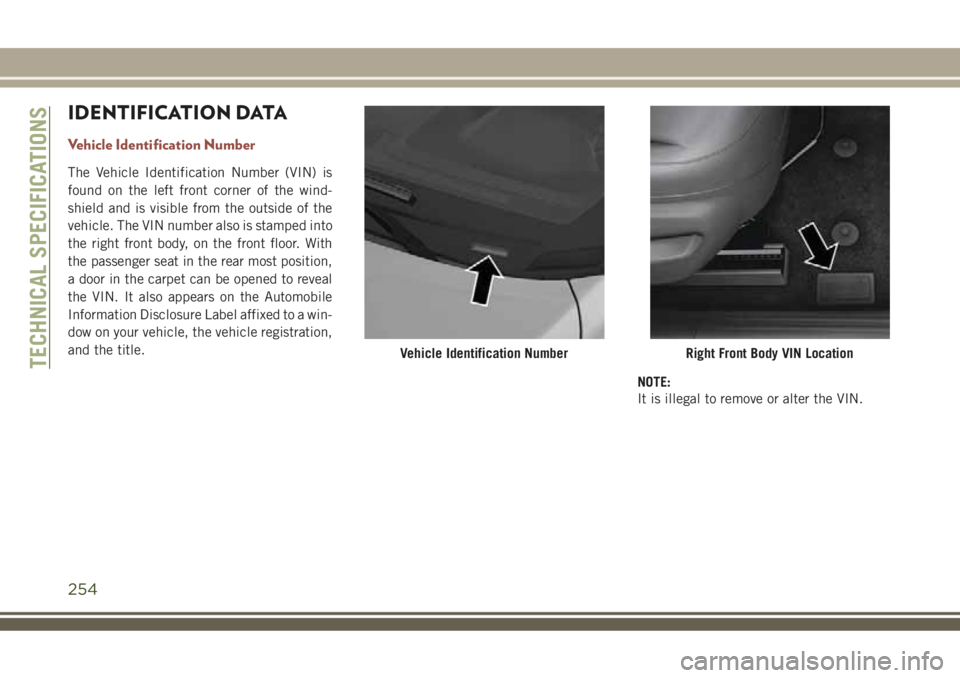
The Vehicle Identification Number (VIN) is
found on the left front corner of the wind-
shield and is visible from the outside of the
vehicle. The VIN number also is stamped into
the right front body, on the front floor. With
the passenger seat in the rear most position,
a door in the carpet can be opened to reveal
the VIN. It also appears on the Automobile
Information Disclosure Label affixed to a win-
dow on your vehicle, the vehicle registration,
and the title.
NOTE:
It is illegal to remove or alter the VIN.
Vehicle Identification NumberRight Front Body VIN LocationTECHNICAL SPECIFICATIONS
254
Page 258 of 348
Light spark knock at low engine speeds is not
harmful to your engine. However, continued
heavy spark knock at high speeds can cause
damage, and immediate service is required.
Poor quality gasoline can cause problems
such as hard starting, stalling, and hesita-
tions. If you experience these symptoms, try
another brand of gasoline before considering
service for the vehicle.
Poor quality gasoline can cause problems
such as hard starting, stalling, and hesita-
tions. If you experience these symptoms, try
another brand of gasoline before considering
service for the vehicle.
Ethanol
The manufacturer recommends that your ve-
hicle be operated on fuel containing no more
than 10% ethanol. Purchasing your fuel from
a reputable supplier may reduce the risk of
exceeding this 10% limit and/or of receiving
fuel with abnormal properties.
CAUTION!
Use of fuel with Ethanol content higher
than 10% may result in engine malfunc-
tion, starting and operating difficulties,
and materials degradation. These adverse
effects could result in permanent damage
to your vehicle.
Materials Added To Fuel
Indiscriminate use of fuel system cleaning
agents should be avoided. Many of these
materials intended for gum and varnish re-
moval may contain active solvents or similar
ingredients. These can harm fuel system gas-
ket and diaphragm materials.
Fuel System Cautions
CAUTION!
Follow these guidelines to maintain your
vehicle’s performance:
• The use of leaded gasoline is prohibited
by law. Using leaded gasoline can impair
CAUTION!
engine performance and damage the
emissions control system.
• An out-of-tune engine or certain fuel or
ignition malfunctions can cause the
catalytic converter to overheat. If you
notice a pungent burning odor or some
light smoke, your engine may be out of
tune or malfunctioning and may require
immediate service. Contact an autho-
rized dealer for service assistance.
• The use of fuel additives, which are now
being sold as octane enhancers, is not
recommended. Most of these products
contain high concentrations of metha-
nol. Fuel system damage or vehicle per-
formance problems resulting from the
use of such fuels or additives is not the
responsibility of the manufacturer and
may void or not be covered under the
New Vehicle Limited Warranty.
NOTE:
Intentional tampering with the emissions
control system can result in civil penalties
being assessed against you.
TECHNICAL SPECIFICATIONS
256
Page 260 of 348
FLUID CAPACITIES
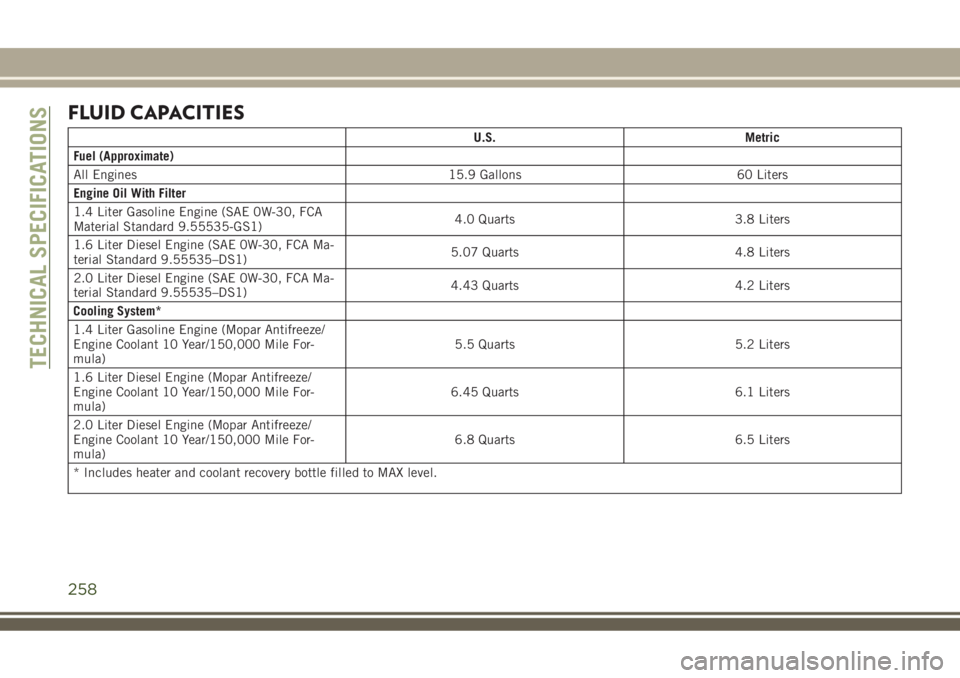
U.S. Metric
Fuel (Approximate)
All Engines 15.9 Gallons 60 Liters
Engine Oil With Filter
1.4 Liter Gasoline Engine (SAE 0W-30, FCA
Material Standard 9.55535-GS1)4.0 Quarts 3.8 Liters
1.6 Liter Diesel Engine (SAE 0W-30, FCA Ma-
terial Standard 9.55535–DS1)5.07 Quarts 4.8 Liters
2.0 Liter Diesel Engine (SAE 0W-30, FCA Ma-
terial Standard 9.55535–DS1)4.43 Quarts 4.2 Liters
Cooling System*
1.4 Liter Gasoline Engine (Mopar Antifreeze/
Engine Coolant 10 Year/150,000 Mile For-
mula)5.5 Quarts 5.2 Liters
1.6 Liter Diesel Engine (Mopar Antifreeze/
Engine Coolant 10 Year/150,000 Mile For-
mula)6.45 Quarts 6.1 Liters
2.0 Liter Diesel Engine (Mopar Antifreeze/
Engine Coolant 10 Year/150,000 Mile For-
mula)6.8 Quarts 6.5 Liters
* Includes heater and coolant recovery bottle filled to MAX level.
TECHNICAL SPECIFICATIONS
258
Page 262 of 348
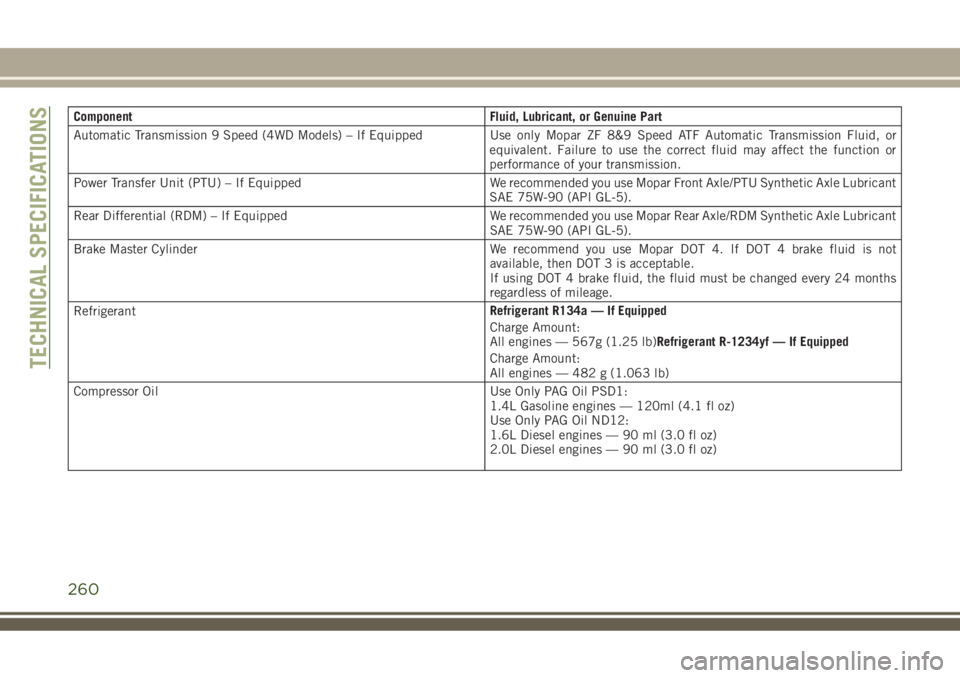
Component Fluid, Lubricant, or Genuine Part
Automatic Transmission 9 Speed (4WD Models) – If Equipped Use only Mopar ZF 8&9 Speed ATF Automatic Transmission Fluid, or
equivalent. Failure to use the correct fluid may affect the function or
performance of your transmission.
Power Transfer Unit (PTU) – If Equipped We recommended you use Mopar Front Axle/PTU Synthetic Axle Lubricant
SAE 75W-90 (API GL-5).
Rear Differential (RDM) – If Equipped We recommended you use Mopar Rear Axle/RDM Synthetic Axle Lubricant
SAE 75W-90 (API GL-5).
Brake Master Cylinder We recommend you use Mopar DOT 4. If DOT 4 brake fluid is not
available, then DOT 3 is acceptable.
If using DOT 4 brake fluid, the fluid must be changed every 24 months
regardless of mileage.
RefrigerantRefrigerant R134a — If Equipped
Charge Amount:
All engines — 567g (1.25 lb)Refrigerant R-1234yf — If Equipped
Charge Amount:
All engines — 482 g (1.063 lb)
Compressor Oil Use Only PAG Oil PSD1:
1.4L Gasoline engines — 120ml (4.1 fl oz)
Use Only PAG Oil ND12:
1.6L Diesel engines — 90 ml (3.0 fl oz)
2.0L Diesel engines — 90 ml (3.0 fl oz)
TECHNICAL SPECIFICATIONS
260