audio JEEP COMPASS 2019 Owner handbook (in English)
[x] Cancel search | Manufacturer: JEEP, Model Year: 2019, Model line: COMPASS, Model: JEEP COMPASS 2019Pages: 362, PDF Size: 6.23 MB
Page 11 of 362
WHEEL AND TIRE TORQUE SPECIFICATIONS.... 264Torque Specifications.............. 264
DIMENSIONS...................... 265
WHEELS........................ 267
WEIGHTS........................ 268
FUEL REQUIREMENTS — GASOLINE ENGINE.... 269
1.4L Turbo Gasoline Engine.......... 269
Ethanol....................... 269
Materials Added To Fuel............ 269
Fuel Icon Identification Compliant To
EN16942..................... 269
Fuel System Cautions.............. 271
Carbon Monoxide Warnings.......... 272
FUEL REQUIREMENTS — DIESEL ENGINE...... 272Diesel Engine.................. 272
Fuel Icon Identification Compliant To
EN16942..................... 273
FLUID CAPACITIES................... 274
FLUIDS AND LUBRICANTS............... 276
Engine....................... 276
Chassis....................... 279
FUEL CONSUMPTION AND CO2EMISSIONS..... 280
MOPAR ACCESSORIES................. 280
Authentic Accessories By Mopar........ 280
MULTIMEDIA
CYBERSECURITY................... 282
UCONNECT 3 WITH 5–INCH DISPLAY —
IF EQUIPPED...................... 283
Uconnect 3 With 5–inch Display At A
Glance....................... 283
Clock Setting................... 284
Audio Setting................... 284
Radio Operation................. 285USB/Audio Jack (AUX)/Bluetooth
Operation..................... 285
Voice Text Reply (Not Compatible
With iPhone)................... 286
Apps — If Equipped............... 287
UCONNECT 4 WITH 7-INCH DISPLAY......... 288Uconnect 4 At A Glance............ 288
Drag & Drop Menu Bar............. 289
Radio....................... 290
Media Hub — USB/Audio Jack (AUX) —
If Equipped.................... 291
Android Auto — If Equipped.......... 293
Apple CarPlay Integration — If Equipped . . 294
Apps — If Equipped............... 295
UCONNECT 4C/4C NAV WITH 8.4–INCH DISPLAY . . 296Uconnect 4C/4C NAV At A Glance...... 296
Drag & Drop Menu Bar............. 297
Radio........................ 298
Media Hub — USB/Audio Jack (AUX) —
If Equipped.................... 299
Android Auto — If Equipped.......... 301
Apple CarPlay Integration — If Equipped . . 304
Apps — If Equipped............... 306
UCONNECT SETTINGS................. 307
TIPS CONTROLS AND GENERAL INFORMATION . . . 307
Steering Wheel Audio Controls......... 307
Reception Conditions.............. 308
Care And Maintenance............. 308
Anti-Theft Protection.............. 308
NAVIGATION — IF EQUIPPED............. 308Changing The Navigation Voice
Prompt Volume................. 308
Finding Points Of Interest........... 310
Finding A Place By Spelling The Name . . . 310
One-Step Voice Destination Entry...... 310Setting Your Home Location.......... 310
Home........................ 311
Adding A Stop.................. 312
Taking A Detour.................. 312
Map Update.................... 312
UCONNECT PHONE.................. 313Uconnect Phone (Bluetooth
Hands Free Calling)............... 313
Pairing (Wirelessly Connecting) Your Mobile
Phone To The Uconnect System....... 316
Common Phone Commands (Examples) . . . 319
Mute (Or Unmute) Microphone During Call . 320
Transfer Ongoing Call Between Handset
And Vehicle.................... 320
Phonebook.................... 320
Voice Command Tips.............. 320
Changing The Volume.............. 320
Using Do Not Disturb.............. 320
Incoming Text Messages............ 321
Helpful Tips And Common Questions
To Improve Bluetooth Performance With
Your Uconnect System............. 322
UCONNECT VOICE RECOGNITION QUICK TIPS.... 323Introducing Uconnect.............. 323
Get Started.................... 323
Basic Voice Commands............. 324
Radio........................ 324
Media....................... 325
Phone....................... 326
Voice Text Reply — If Equipped........ 327
Climate....................... 328
Navigation (4C NAV) — If Equipped..... 328
Siri Eyes Free — If Equipped......... 329
Using Do Not Disturb.............. 329
Android Auto — If Equipped.......... 330
Apple CarPlay — If Equipped......... 330
9
Page 62 of 362
INSTRUMENT CLUSTER
DISPLAY
Your vehicle may be equipped with an instru-
ment cluster display, which offers useful in-
formation to the driver. With the ignition in
the STOP/OFF mode, opening/closing of a
door will activate the display for viewing, and
display the total miles, or kilometers, in the
odometer. Your instrument cluster display is
designed to display important information
about your vehicle’s systems and features.
Using a driver interactive display located on
the instrument panel, your instrument clus-
ter display can show you how systems are
working and give you warnings when they
aren’t. The steering wheel mounted controls
allow you to scroll through and enter the main
menus and submenus. You can access the
specific information you want and make se-
lections and adjustments.
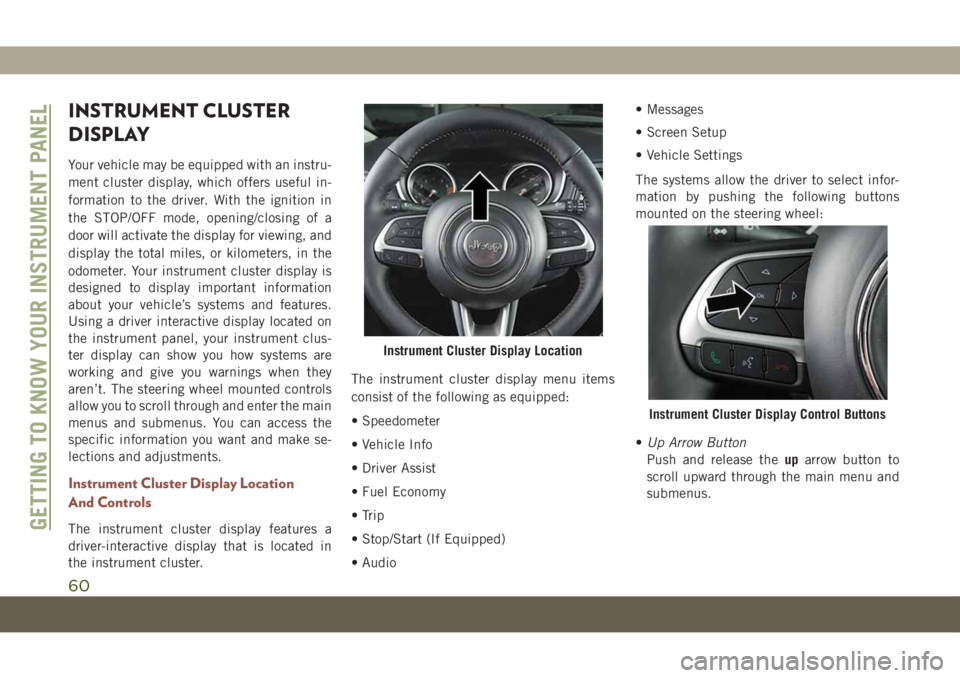
Instrument Cluster Display Location
And Controls
The instrument cluster display features a
driver-interactive display that is located in
the instrument cluster.The instrument cluster display menu items
consist of the following as equipped:
• Speedometer
• Vehicle Info
• Driver Assist
• Fuel Economy
• Trip
• Stop/Start (If Equipped)
• Audio• Messages
• Screen Setup
• Vehicle Settings
The systems allow the driver to select infor-
mation by pushing the following buttons
mounted on the steering wheel:
•Up Arrow Button
Push and release theuparrow button to
scroll upward through the main menu and
submenus.
Instrument Cluster Display Location
Instrument Cluster Display Control Buttons
GETTING TO KNOW YOUR INSTRUMENT PANEL
60
Page 91 of 362
when the vehicle speed reaches approxi-
mately 6 mph (10 km/h) or higher and will
alert the driver of vehicles in these areas.
NOTE:
• The BSM system does NOT alert the driver
about rapidly approaching vehicles that are
outside the detection zones.
• The BSM system detection zone DOES NOT
change if your vehicle is towing a trailer.
Therefore, visually verify the adjacent lane
is clear for both your vehicle and trailer
before making a lane change. If the trailer
or other object (i.e., bicycle, sports equip-
ment) extends beyond the side of your ve-
hicle, this may result in the BSM warning
light remaining illuminated the entire time
the vehicle is in a forward gear. It may be
necessary to deactivate the BSM system
manually to avoid miss-detection. Refer to
“Uconnect Settings” in “Multimedia” in
the Owner’s Manual for further information.• The Blind Spot Monitoring (BSM) system
may experience drop outs (blinking on and
off) of the side mirror Warning Indicator
lamps when a motorcycle or any small ob-
ject remains at the side of the vehicle for
extended periods of time (more than a
couple of seconds).
The area on the rear fascia where the radar
sensors are located must remain free of snow,
ice, and dirt/road contamination so that the
BSM system can function properly. Do not
block the area of the rear fascia where the
radar sensors are located with foreign objects
(bumper stickers, bicycle racks, etc.)
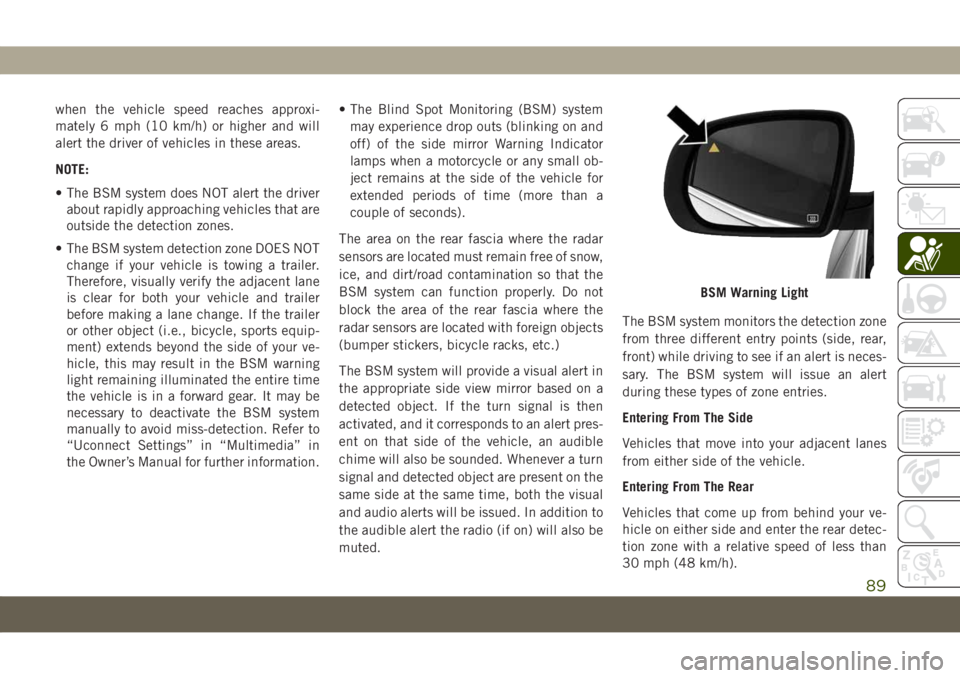
The BSM system will provide a visual alert in
the appropriate side view mirror based on a
detected object. If the turn signal is then
activated, and it corresponds to an alert pres-
ent on that side of the vehicle, an audible
chime will also be sounded. Whenever a turn
signal and detected object are present on the
same side at the same time, both the visual
and audio alerts will be issued. In addition to
the audible alert the radio (if on) will also be
muted.The BSM system monitors the detection zone
from three different entry points (side, rear,
front) while driving to see if an alert is neces-
sary. The BSM system will issue an alert
during these types of zone entries.
Entering From The Side
Vehicles that move into your adjacent lanes
from either side of the vehicle.
Entering From The Rear
Vehicles that come up from behind your ve-
hicle on either side and enter the rear detec-
tion zone with a relative speed of less than
30 mph (48 km/h).
BSM Warning Light
89
Page 209 of 362
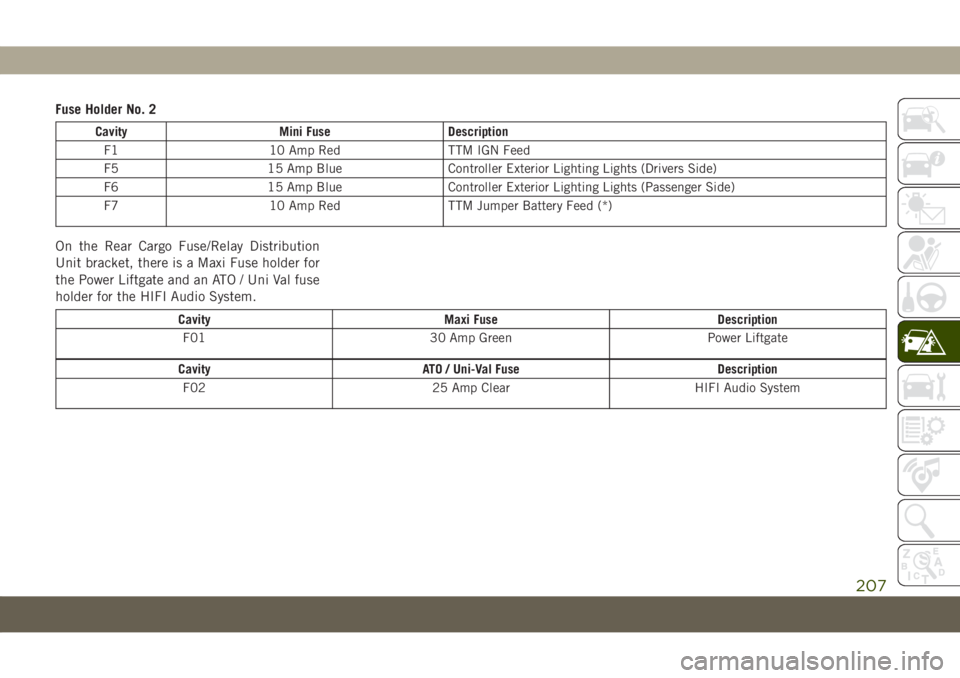
Fuse Holder No. 2
Cavity Mini Fuse Description
F1 10 Amp Red TTM IGN Feed
F5 15 Amp Blue Controller Exterior Lighting Lights (Drivers Side)
F6 15 Amp Blue Controller Exterior Lighting Lights (Passenger Side)
F7 10 Amp Red TTM Jumper Battery Feed (*)
On the Rear Cargo Fuse/Relay Distribution
Unit bracket, there is a Maxi Fuse holder for
the Power Liftgate and an ATO / Uni Val fuse
holder for the HIFI Audio System.
Cavity Maxi Fuse Description
F01 30 Amp Green Power Liftgate
Cavity ATO / Uni-Val Fuse Description
F02 25 Amp Clear HIFI Audio System
207
Page 286 of 362
CAUTION!
Do NOT attach any object to the touchscreen,
doing so can result in damage to the touch-
screen.
Clock Setting
To start the clock setting procedure:
1.
Press the “Settings” button on the faceplate,
then press the “Clock and Date” button.
2. Press the “Set Time” button on the
touchscreen.
3. Press the “Up” or “Down” arrows to ad-
just the hours or minutes, then select the
“AM” or “PM” button on the touchscreen.
You can also select 12hr or 24hr format
by pressing the desired button on the
touchscreen.
4. Once the time is set, press the “Done”
button on the touchscreen to exit the time
screen.
NOTE:
In the Clock Setting Menu you can also select
“Display Clock”. Display Clock turns the
clock display in the status bar on or off.
Audio Setting
1. Press the “Settings” button on the
faceplate.
2. Scroll down and press the “Audio” button
on the touchscreen to open the Audio
menu.
3. The Audio Menu shows the following op-
tions for you to customize your audio
settings.
Equalizer
Press the “Equalizer” button on the touch-
screen to adjust the Bass, Mid and Treble.
Use the “+” or “-” button on the touchscreen
to adjust the equalizer to your desired set-
tings.
Balance/Fade
Press the “Balance/Fade” button on the
touchscreen to adjust the sound from the
speakers. Use the arrow buttons on the
touchscreen to adjust the sound level from
the front and rear or right and left side speak-
ers. Press the center “C” button on the
touchscreen to reset the balance and fade to
the factory setting.Speed Adjusted Volume — If Equipped
Press the “Speed Adjusted Volume” button
on the touchscreen to select between OFF, 1,
2 or 3. This will decrease the radio volume
relative to a decrease in vehicle speed.
Loudness — If Equipped
Press the “Loudness” button on the touch-
screen to select the Loudness feature. When
this feature is activated it improves sound
quality at lower volumes.
Surround Sound — If Equipped
Press the “Surround Sound” button on the
touchscreen, select “On” or “Off” followed
by pressing the back arrow button on the
touchscreen. When this feature is activated,
it provides simulated surround sound mode.
MULTIMEDIA
284
Page 287 of 362
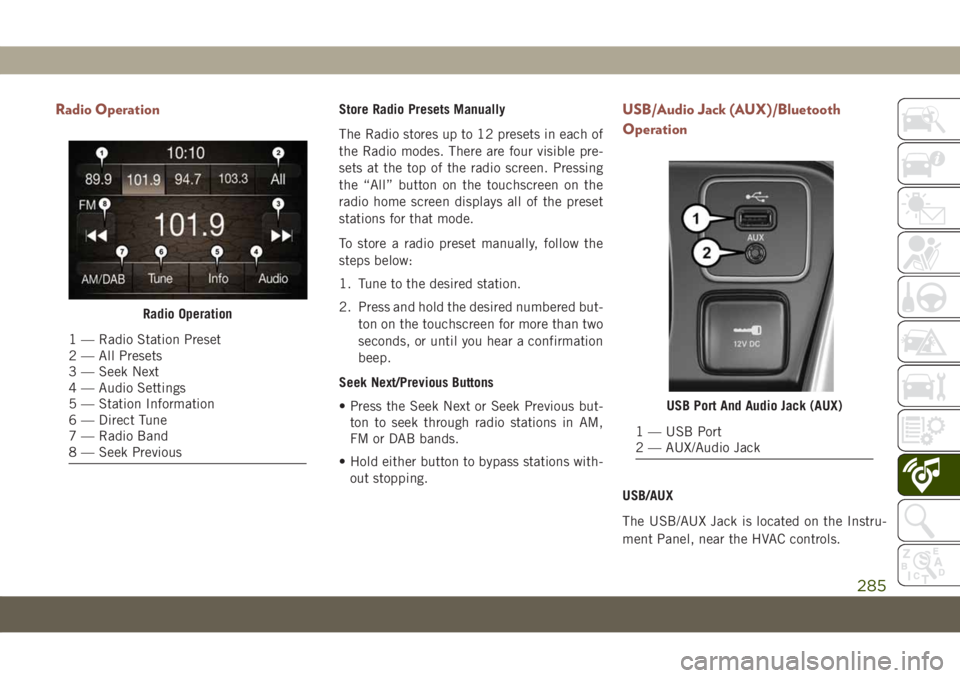
Radio OperationStore Radio Presets Manually
The Radio stores up to 12 presets in each of
the Radio modes. There are four visible pre-
sets at the top of the radio screen. Pressing
the “All” button on the touchscreen on the
radio home screen displays all of the preset
stations for that mode.
To store a radio preset manually, follow the
steps below:
1. Tune to the desired station.
2. Press and hold the desired numbered but-
ton on the touchscreen for more than two
seconds, or until you hear a confirmation
beep.
Seek Next/Previous Buttons
• Press the Seek Next or Seek Previous but-
ton to seek through radio stations in AM,
FM or DAB bands.
• Hold either button to bypass stations with-
out stopping.USB/Audio Jack (AUX)/Bluetooth
Operation
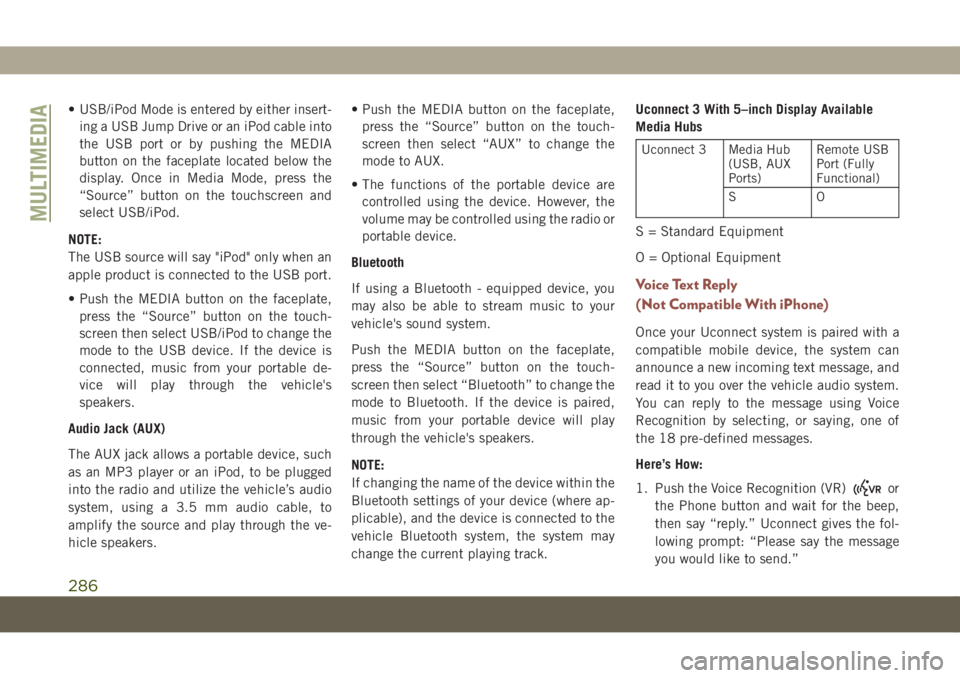
USB/AUX
The USB/AUX Jack is located on the Instru-
ment Panel, near the HVAC controls.
Radio Operation
1 — Radio Station Preset
2 — All Presets
3 — Seek Next
4 — Audio Settings
5 — Station Information
6 — Direct Tune
7 — Radio Band
8 — Seek Previous
USB Port And Audio Jack (AUX)
1 — USB Port
2 — AUX/Audio Jack
285
Page 288 of 362
• USB/iPod Mode is entered by either insert-
ing a USB Jump Drive or an iPod cable into
the USB port or by pushing the MEDIA
button on the faceplate located below the
display. Once in Media Mode, press the
“Source” button on the touchscreen and
select USB/iPod.
NOTE:
The USB source will say "iPod" only when an
apple product is connected to the USB port.
• Push the MEDIA button on the faceplate,
press the “Source” button on the touch-
screen then select USB/iPod to change the
mode to the USB device. If the device is
connected, music from your portable de-
vice will play through the vehicle's
speakers.
Audio Jack (AUX)
The AUX jack allows a portable device, such
as an MP3 player or an iPod, to be plugged
into the radio and utilize the vehicle’s audio
system, using a 3.5 mm audio cable, to
amplify the source and play through the ve-
hicle speakers.• Push the MEDIA button on the faceplate,
press the “Source” button on the touch-
screen then select “AUX” to change the
mode to AUX.
• The functions of the portable device are
controlled using the device. However, the
volume may be controlled using the radio or
portable device.
Bluetooth
If using a Bluetooth - equipped device, you
may also be able to stream music to your
vehicle's sound system.
Push the MEDIA button on the faceplate,
press the “Source” button on the touch-
screen then select “Bluetooth” to change the
mode to Bluetooth. If the device is paired,
music from your portable device will play
through the vehicle's speakers.
NOTE:
If changing the name of the device within the
Bluetooth settings of your device (where ap-
plicable), and the device is connected to the
vehicle Bluetooth system, the system may
change the current playing track.Uconnect 3 With 5–inch Display Available
Media Hubs
Uconnect 3 Media Hub
(USB, AUX
Ports)Remote USB
Port (Fully
Functional)
SO
S = Standard Equipment
O = Optional Equipment
Voice Text Reply
(Not Compatible With iPhone)
Once your Uconnect system is paired with a
compatible mobile device, the system can
announce a new incoming text message, and
read it to you over the vehicle audio system.
You can reply to the message using Voice
Recognition by selecting, or saying, one of
the 18 pre-defined messages.
Here’s How:
1. Push the Voice Recognition (VR)
or
the Phone button and wait for the beep,
then say “reply.” Uconnect gives the fol-
lowing prompt: “Please say the message
you would like to send.”
MULTIMEDIA
286
Page 290 of 362
UCONNECT 4 WITH 7-INCH
DISPLAY
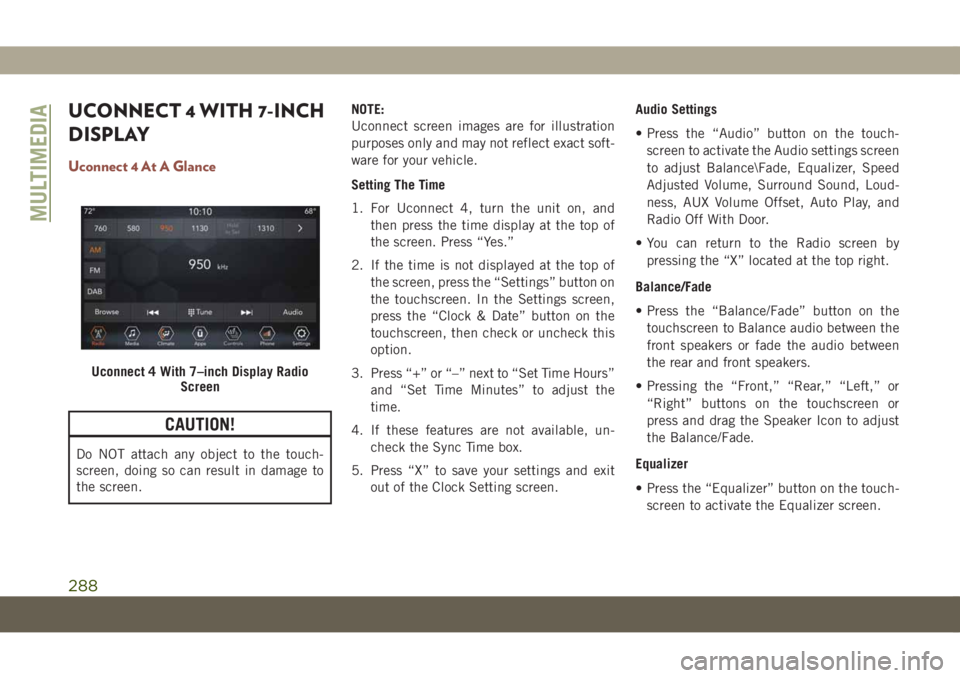
Uconnect 4 At A Glance
CAUTION!
Do NOT attach any object to the touch-
screen, doing so can result in damage to
the screen.NOTE:
Uconnect screen images are for illustration
purposes only and may not reflect exact soft-
ware for your vehicle.
Setting The Time
1. For Uconnect 4, turn the unit on, and
then press the time display at the top of
the screen. Press “Yes.”
2. If the time is not displayed at the top of
the screen, press the “Settings” button on
the touchscreen. In the Settings screen,
press the “Clock & Date” button on the
touchscreen, then check or uncheck this
option.
3. Press “+” or “–” next to “Set Time Hours”
and “Set Time Minutes” to adjust the
time.
4. If these features are not available, un-
check the Sync Time box.
5. Press “X” to save your settings and exit
out of the Clock Setting screen.Audio Settings
• Press the “Audio” button on the touch-
screen to activate the Audio settings screen
to adjust Balance\Fade, Equalizer, Speed
Adjusted Volume, Surround Sound, Loud-
ness, AUX Volume Offset, Auto Play, and
Radio Off With Door.
• You can return to the Radio screen by
pressing the “X” located at the top right.
Balance/Fade
• Press the “Balance/Fade” button on the
touchscreen to Balance audio between the
front speakers or fade the audio between
the rear and front speakers.
• Pressing the “Front,” “Rear,” “Left,” or
“Right” buttons on the touchscreen or
press and drag the Speaker Icon to adjust
the Balance/Fade.
Equalizer
• Press the “Equalizer” button on the touch-
screen to activate the Equalizer screen.
Uconnect 4 With 7–inch Display Radio
Screen
MULTIMEDIA
288
Page 291 of 362
• Press the “+” or “–” buttons on the touch-
screen, or press and drag over the level bar
for each of the equalizer bands. The level
value, which spans between plus or minus
nine, is displayed at the bottom of each of
the bands.
Speed Adjusted Volume
• Press the “Speed Adjusted Volume” button
on the touchscreen to activate the Speed
Adjusted Volume screen. The Speed Ad-
justed Volume is adjusted by pressing the
volume level indicator. This alters the auto-
matic adjustment of the audio volume with
variation to vehicle speed.
Loudness — If Equipped
• Press the “On” button on the touchscreen
to activate Loudness. Press “Off” to deac-
tivate this feature. When Loudness is On,
the sound quality at lower volumes
improves.
AUX Volume Offset
• Press the “AUX Volume Offset” button on
the touchscreen to activate the AUX Vol-
ume Offset screen. The AUX Volume Offset
is adjusted by pressing of the “+” and “–”buttons. This alters the AUX input audio
volume. The level value, which spans be-
tween plus or minus three, is displayed
above the adjustment bar.
Auto Play — If Equipped
• Press the “Auto Play” button on the touch-
screen to activate the Auto Play screen. The
Auto Play feature has two settings “On” and
“Off.” With Auto Play on, music begins
playing from a connected device, immedi-
ately after it is connected to the radio.
Auto On Radio — If Equipped
• The Radio automatically turns on when
vehicle is in run or will recall whether it was
on or off at last ignition off.
Radio Off With Door — If Equipped
• Press the “Radio Off With Door” button on
the touchscreen to activate the Radio Off
With Door screen. The Radio Off With Door
feature, when activated, keeps the radio on
until the driver or passenger door is opened,
or when the Radio Off Delay selected time
has expired.Drag & Drop Menu Bar
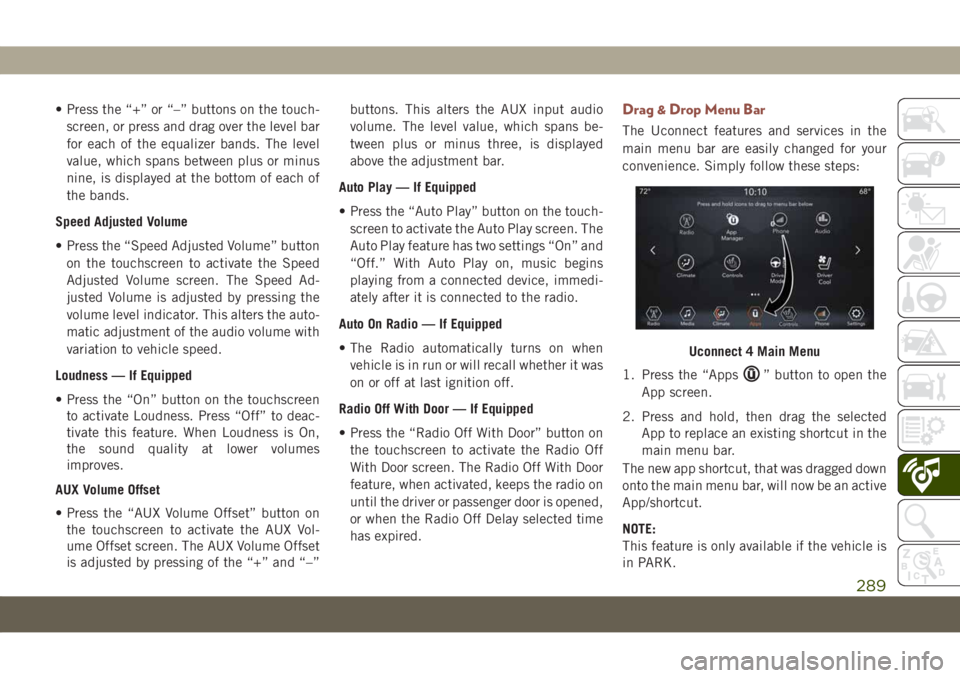
The Uconnect features and services in the
main menu bar are easily changed for your
convenience. Simply follow these steps:
1. Press the “Apps
” button to open the
App screen.
2. Press and hold, then drag the selected
App to replace an existing shortcut in the
main menu bar.
The new app shortcut, that was dragged down
onto the main menu bar, will now be an active
App/shortcut.
NOTE:
This feature is only available if the vehicle is
in PARK.
Uconnect 4 Main Menu
289
Page 292 of 362
Radio
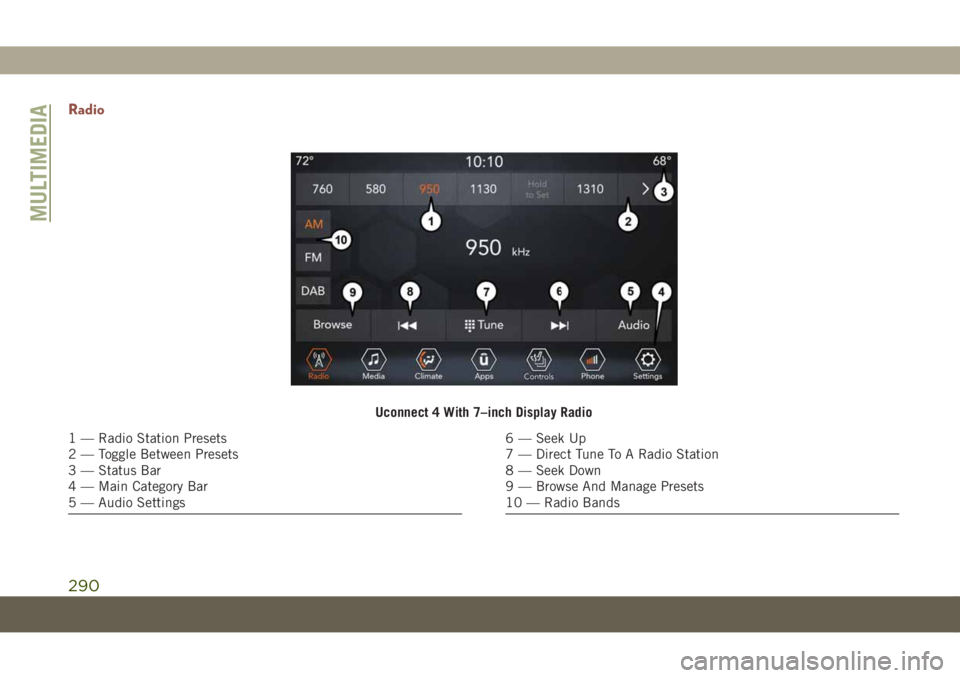
Uconnect 4 With 7–inch Display Radio
1 — Radio Station Presets
2 — Toggle Between Presets
3 — Status Bar
4 — Main Category Bar
5 — Audio Settings6 — Seek Up
7 — Direct Tune To A Radio Station
8 — Seek Down
9 — Browse And Manage Presets
10 — Radio Bands
MULTIMEDIA
290