change time JEEP COMPASS 2021 Owner handbook (in English)
[x] Cancel search | Manufacturer: JEEP, Model Year: 2021, Model line: COMPASS, Model: JEEP COMPASS 2021Pages: 328, PDF Size: 8.85 MB
Page 130 of 328
SAFETY
128
SAFETY TIPS
Transporting Passengers
NEVER TRANSPORT PASSENGERS IN THE
CARGO AREA.
Exhaust Gas
The best protection against carbon monoxide
entry into the vehicle body is a properly
maintained engine exhaust system.Whenever a change is noticed in the sound of
the exhaust system, when exhaust fumes can
be detected inside the vehicle, or when the
underside or rear of the vehicle is damaged,
have a competent mechanic inspect the
complete exhaust system and adjacent body
areas for broken, damaged, deteriorated, or
mispositioned parts. Open seams or loose
connections could permit exhaust fumes to
seep into the passenger compartment. In
addition, inspect the exhaust system each
time the vehicle is raised for lubrication or oil
change. Replace as required.
Safety Checks You Should Make Inside
The Vehicle
Seat Belts
Inspect the seat belt system periodically,
checking for cuts, frays, and loose parts.
Damaged parts must be replaced immedi
-
ately. Do not disassemble or modify the
system.
Front seat belt assemblies must be replaced
after a collision. Rear seat belt assemblies
must be replaced after a collision if they
have been damaged (i.e., bent retractor, torn
webbing, etc.). If there is any question
regarding seat belt or retractor condition,
replace the seat belt.
WARNING!
Do not leave children or animals inside
parked vehicles in hot weather. Interior
heat build-up may cause serious injury or
death.
It is extremely dangerous to ride in a
cargo area, inside or outside of a vehicle.
In a collision, people riding in these
areas are more likely to be seriously
injured or killed.
Do not allow people to ride in any area of
your vehicle that is not equipped with
seats and seat belts.
Be sure everyone in your vehicle is in a
seat and using a seat belt properly.
WARNING!
Exhaust gases can injure or kill. They
contain carbon monoxide (CO), which is
colorless and odorless. Breathing it can
make you unconscious and can eventually
poison you. To avoid breathing (CO), follow
these safety tips:
Do not run the engine in a closed garage
or in confined areas any longer than
needed to move your vehicle in or out of
the area.
If you are required to drive with the
trunk/liftgate/rear doors open, make sure
that all windows are closed and the
climate control BLOWER switch is set at
high speed. DO NOT use the recircula-
tion mode.
If it is necessary to sit in a parked vehicle
with the engine running, adjust your
heating or cooling controls to force
outside air into the vehicle. Set the
blower at high speed.
2020_JEEP_M6_UG_UK.book Page 128
Page 134 of 328
STARTING AND OPERATING
132
Keyless Ignition Functions — Using The
ENGINE START/STOP Button
1. The transmission must be in PARK orNEUTRAL.
2. Press and hold the brake pedal while pushing the ENGINE START/STOP
button once.
3. The system takes over and attempts to start the vehicle. If the vehicle fails to
start, the starter will disengage automat -
ically after 10 seconds.
4. If you wish to stop the cranking of the engine prior to the engine starting, push
the button again.
NOTE:
Normal starting of either a cold or a warm
engine is obtained without pumping or
pressing the accelerator pedal.
Keyless Ignition Functions — With Driver’s Foot
OFF The Brake Pedal/Clutch Pedal (In PARK Or
NEUTRAL Position)
The Keyless Ignition feature operates similar
to an ignition switch. It has three modes,
OFF, ON/RUN, and START. To change the
ignition modes without starting the vehicle and use the accessories follow these steps
starting with the ignition switch in the OFF
mode:
1. Push the ENGINE START/STOP button
once to change the ignition switch to the
ON/RUN mode.
2. Push the ENGINE START/STOP button a second time to change the ignition
switch to the OFF mode.
Manual Transmission
The gear selector must be in the NEUTRAL
position before you can start the engine.
Apply the brakes before shifting into any
driving gear.
Keyless Ignition Functions — Using The
ENGINE START/STOP Button
1. The transmission must be in NEUTRAL.
2. Press and hold the clutch pedal whilepushing the ENGINE START/STOP
button once.
3. The system takes over and attempts to start the vehicle. If the vehicle fails to
start, the starter will disengage automat -
ically after 10 seconds. 4. If you wish to stop the cranking of the
engine prior to the engine starting, push
the button again.
NOTE:
Normal starting of either a cold or a warm
engine is obtained without pumping or
pressing the accelerator pedal.
Keyless Ignition Functions — With Driver’s Foot
OFF The Brake Pedal/Clutch Pedal (In PARK Or
NEUTRAL Position)
The Keyless Ignition feature operates similar
to an ignition switch. It has three modes,
OFF, ON/RUN, and START. To change the
ignition modes without starting the vehicle
and use the accessories follow these steps
starting with the ignition switch in the OFF
position:
1. Push the ENGINE START/STOP button once to change the ignition to the ON/
RUN mode.
2. Push the ENGINE START/STOP button a second time to change the ignition
switch to the OFF mode.
2020_JEEP_M6_UG_UK.book Page 132
Page 156 of 328
STARTING AND OPERATING
154
If equipped with a automatic transmis-
sion, The ACC system decelerates the
vehicle to a full stop when following a
target vehicle. If an ACC host vehicle
follows a target vehicle to a standstill,
after two seconds the driver will either
have to push the RES (resume) button, or
apply the accelerator pedal to reengage
the ACC to the existing set speed.
The ACC system maintains set speed when
driving uphill and downhill. However, a
slight speed change on moderate hills is
normal. In addition, downshifting may
occur while climbing uphill or descending
downhill. This is normal operation and
necessary to maintain set speed. When
driving uphill and downhill, the ACC
system will cancel if the braking tempera-
ture exceeds normal range (overheated).
Setting The Following Distance In ACC
The specified following distance for ACC can
be set by varying the distance setting
between four bars (longest), three bars
(long), two bars (medium) and one bar
(short). Using this distance setting and the
vehicle speed, ACC calculates and sets the
distance to the vehicle ahead. This distance
setting will show in the instrument cluster
display.To decrease the distance setting, push the
Distance Button and release. Each time the
button is pushed, the distance setting
decreases by one bar (shorter). Once the
shortest setting is reached, if the button is
pushed again it will be set to the longest
setting available.
PARKSENSE REAR PARK
ASSIST — IF EQUIPPED
The ParkSense Rear Park Assist system
provides visual and audible indications of
the distance between the rear fascia and a
detected obstacle when backing up (e.g.
during a parking maneuver). Refer to “Park
-
Sense System Usage Precautions” for limita -
tions of this system and recommendations.
ParkSense will retain the last system state
(enabled or disabled) from the last ignition
cycle when the ignition is changed to the ON/
RUN position.
ParkSense can be active only when the gear
selector is in REVERSE. The system will
remain active until the vehicle speed is
increased to approximately 7 mph (11 km/h)
or above. While in REVERSE and above the
system's operating speed, a warning will
appear in the instrument cluster display indi -
cating the vehicle speed is too fast. The system will become active again if the
vehicle speed is decreased to speeds less
than approximately 6 mph (9 km/h).
ParkSense Sensors
The four ParkSense sensors, located in the
rear fascia/bumper, monitor the area behind
the vehicle that is within the sensors’ field of
view. The sensors can detect obstacles from
approximately 12 inches (30 cm) up to
79 inches (200 cm) from the rear fascia/
bumper in the horizontal direction,
depending on the location, type and orienta
-
tion of the obstacle.
ParkSense Warning Display
The ParkSense Warning screen will only be
displayed if “Sound and Display” is selected
from the Customer - Programmable Features
section of the Uconnect System. Refer to
"Uconnect Settings” in “Multimedia” in the
Owner’s Manual for further information.
The ParkSense Warning screen is located
within the instrument cluster display. It
provides visual warnings to indicate the
distance between the rear fascia/bumper and
the detected obstacle. Refer to “Instrument
Cluster Display” in “Getting To Know Your
Instrument Panel” in the Owner’s Manual for
further information.
2020_JEEP_M6_UG_UK.book Page 154
Page 158 of 328
STARTING AND OPERATING
156
PARKSENSE FRONT AND
REAR PARK ASSIST — IF
EQUIPPED
The ParkSense Park Assist system provides
visual and audible indications of the
distance between the rear and/or front fascia
and a detected obstacle when backing up or
moving forward (e.g. during a parking
maneuver).
Refer to “ParkSense System Usage Precau-
tions” in “Starting And Operating” in your Owner’s Manual for limitations of this system
and recommendations.
ParkSense will retain the last system state
(enabled or disabled) from the last ignition
cycle when the ignition is changed to the ON/
RUN position.
ParkSense is active in all gear selector posi
-
tions (including PARK), as long as the
system is on. The system will remain active
until the vehicle speed is increased to
approximately 7 mph (11 km/h) or above.
While in REVERSE and above the system's
operating speed, a warning will appear in the
instrument cluster display indicating the
vehicle speed is too fast. The system will
become active again if the vehicle speed is
decreased to speeds less than approximately
6 mph (9 km/h).
ParkSense Sensors
The six ParkSense sensors, located in the
rear fascia/bumper, monitor the area behind
the vehicle that is within the sensors’ field of
view. The sensors can detect obstacles from
approximately 12 inches (30 cm) up to
79 inches (200 cm) from the rear fascia/
bumper in the horizontal direction,
depending on the location, type and orienta -
tion of the obstacle.
WARNING!
Drivers must be careful when backing up
even when using ParkSense. Always
check carefully behind your vehicle, look
behind you, and be sure to check for
pedestrians, animals, other vehicles,
obstructions, and blind spots before
backing up. You are responsible for
safety and must continue to pay atten -
tion to your surroundings. Failure to do
so can result in serious injury or death.
Before using ParkSense, it is strongly
recommended that the ball mount and
hitch ball assembly is disconnected from
the vehicle when the vehicle is not used
for towing. Failure to do so can result in
injury or damage to vehicles or obstacles
because the hitch ball will be much
closer to the obstacle than the rear fascia
when the loudspeaker sounds the contin -
uous tone. Also, the sensors could detect
the ball mount and hitch ball assembly,
depending on its size and shape, giving
a false indication that an obstacle is
behind the vehicle.
CAUTION!
ParkSense is only a parking aid and it is
unable to recognize every obstacle,
including small obstacles. Parking curbs
might be temporarily detected or not
detected at all. Obstacles located above
or below the sensors will not be detected
when they are in close proximity.
The vehicle must be driven slowly when
using ParkSense in order to be able to
stop in time when an obstacle is
detected. It is recommended that the
driver looks over his/her shoulder when
using ParkSense.
2020_JEEP_M6_UG_UK.book Page 156
Page 164 of 328
STARTING AND OPERATING
162
Take great care to ensure that conditions
do not change during the parking
maneuver (e.g. if there are persons and/or
animals in the parking place, moving vehi-
cles, etc.) and intervene immediately if
necessary.
During parking maneuvers, pay attention
to vehicles approaching from the opposite
direction. Always abide by the law and
road regulations.
NOTE:
Correct system operation is not guaranteed
if snow chains or the space-saver wheel
are fitted.
The function only informs the driver about
the last appropriate parking place (parallel
or perpendicular) detected by the parking
sensors.
Some messages displayed are accompa-
nied by acoustic warnings.
LANESENSE — IF EQUIPPED
LaneSense Operation
The LaneSense system is operational at
speeds above 37 mph (60 km/h) and below
112 mph (180 km/h). The LaneSense system uses a forward looking camera to
detect lane markings and measure vehicle
position within the lane boundaries.
When both lane markings are detected and
the driver unintentionally drifts out of the
lane (no turn signal applied), the LaneSense
system provides a haptic warning in the form
of torque applied to the steering wheel, as
well as a visual warning in the instrument
cluster display, to prompt the driver to
remain within the lane boundaries.
The driver may manually override the haptic
warning by applying torque into the steering
wheel at any time.
When only a single lane marking is detected
and the driver unintentionally drifts across
the lane marking (no turn signal applied), the
LaneSense system provides a visual warning
through the instrument cluster display to
prompt the driver to remain within the lane.
When only a single lane marking is detected,
a haptic (torque) warning will not be
provided.
NOTE:
When operating conditions have been met,
the LaneSense system will monitor if the
driver’s hands are on the steering wheel and
provide an audible and visual warning to the
driver when the driver’s hands are not
detected on the steering wheel. The system
will cancel if the driver does not return their
hands to the wheel.
Turning LaneSense On Or Off
The default status of LaneSense is
“Off”.
The LaneSense button is located on the
switch panel below the Uconnect display.
To turn the LaneSense system on, push the
LaneSense button (LED turns off). A “Lane
Sense On” message is shown in the instru -
ment cluster display.
To turn the LaneSense system off, push the
LaneSense button again (LED turns on).
NOTE:
The LaneSense system will retain the last
system state on or off from the last ignition
cycle when the ignition is changed to the ON/
RUN position.
LaneSense Warning Message
The LaneSense system will indicate the
current lane drift condition through the
instrument cluster display.
2020_JEEP_M6_UG_UK.book Page 162
Page 165 of 328
163
Base Instrument Cluster Display — If Equipped
When the LaneSense system is on, the lane
lines are grey when both of the lane bound-
aries have not been detected and the Lane -
Sense telltale is solid white.
Left Lane Departure — Only Left Lane Detected
When the LaneSense system is on, the
LaneSense telltale is solid white when
only the left lane marking has been
detected and the system is ready to
provide visual warnings in the instrument
cluster display if an unintentional lane
departure occurs.
When the LaneSense system senses the
lane has been approached and is in a lane
departure situation, the left thick lane line
flashes from white to grey, the left thin
line remains solid white and the Lane-
Sense telltale changes from solid white
to flashing yellow.
NOTE:
The LaneSense system operates with the
similar behavior for a right lane departure
when only the right lane marking has been
detected. Left Lane Departure — Both Lanes Detected
When the LaneSense system is on, the
lane lines turn from grey to white to indi-
cate that both of the lane markings have
been detected. The LaneSense telltale
is solid green when both lane markings
have been detected and the system is
“armed” to provide visual warnings in the
instrument cluster display and a torque
warning in the steering wheel if an unin -
tentional lane departure occurs.
When the LaneSense system senses a lane
drift situation, the left thick lane line and
the left thin line turn solid white. The
LaneSense telltale changes from solid
green to solid yellow. At this time torque is
applied to the steering wheel in the oppo-
site direction of the lane boundary.
For example: if approaching the left side
of the lane the steering wheel will turn to
the right.
When the LaneSense system senses the
lane has been approached and is in a lane
departure situation, the left thick lane line
flashes from white to grey, the left thin
line remains solid white and the Lane-
Sense telltale changes from solid yellow to flashing yellow. At this time
torque is applied to the steering wheel in
the opposite direction of the lane
boundary.
For example: if approaching the left side
of the lane the steering wheel will turn to
the right.
NOTE:
The LaneSense system operates with the
similar behavior for a right lane departure.
Premium Instrument Cluster Display — If
Equipped
When the LaneSense system is on, the lane
lines are grey when both of the lane bound -
aries have not been detected and the Lane -
Sense telltale is solid white.
Left Lane Departure — Only Left Lane Detected
When the LaneSense system is on, the
LaneSense telltale is solid white when
only the left lane marking has been
detected and the system is ready to
provide visual warnings in the instrument
cluster display if an unintentional lane
departure occurs.
2020_JEEP_M6_UG_UK.book Page 163
Page 166 of 328
STARTING AND OPERATING
164
When the LaneSense system senses the
lane has been approached and is in a lane
departure situation, the left thick lane line
flashes yellow, the left thin line remains
solid yellow and the LaneSense telltale
changes from solid white to flashing
yellow.
NOTE:
The LaneSense system operates with the
similar behavior for a right lane departure
when only the right lane marking has been
detected.
Left Lane Departure — Both Lanes Detected
When the LaneSense system is on, the
lane lines turn from grey to white to indi-
cate that both of the lane markings have
been detected. The LaneSense telltale
is solid green when both lane markings
have been detected and the system is
“armed” to provide visual warnings in the
instrument cluster display and a torque
warning in the steering wheel if an unin -
tentional lane departure occurs.
When the LaneSense system senses a lane
drift situation, the left thick lane line and
left thin line turn solid yellow. The Lane-
Sense telltale changes from solid green to solid yellow. At this time torque is
applied to the steering wheel in the oppo-
site direction of the lane boundary.
For example: if approaching the left side
of the lane the steering wheel will turn to
the right.
When the LaneSense system senses the
lane has been approached and is in a lane
departure situation, the left thick lane line
flashes yellow and the left thin line
remains solid yellow. The LaneSense tell
-
tale stays solid yellow. At this time
torque is applied to the steering wheel in
the opposite direction of the lane
boundary.
For example: if approaching the left side
of the lane the steering wheel will turn to
the right.
NOTE:
The LaneSense system operates with the
similar behavior for a right lane departure.
Changing LaneSense Status
The LaneSense system has settings to adjust
the intensity of the torque warning (Low/
Medium/High) and the warning zone sensi -
tivity (Early/Medium/Late) that you can
configure through the Uconnect system screen. Refer to “Uconnect Settings” in
“Multimedia” in the Owner’s Manual for
further details.
NOTE:
The system will not apply torque to the
steering wheel whenever a safety system
engages (Anti-Lock Brakes, Traction
Control System, Electronic Stability
Control, Forward Collision Warning, etc.).
Use of the turn signals and Hazard
Warning flashers also suppresses the
warnings.
PARKVIEW REAR BACK UP
CAMERA — IF EQUIPPED
You can see an on-screen image of the rear
of your vehicle whenever the transmission is
shifted into REVERSE. The ParkView Rear
Back Up Camera image will be displayed on
the Uconnect Display, located on the center
stack of the instrument panel.
If the Uconnect Display appears foggy, clean
the camera lens located on the rear of the
vehicle above the rear license plate
Refer to “ParkView Back Up Camera” in
“Starting And Operating” in your Owner's
Manual for further information.
2020_JEEP_M6_UG_UK.book Page 164
Page 214 of 328
212
SERVICING AND MAINTENANCE
SCHEDULED SERVICING
Correct servicing is crucial for guaranteeing a
long life for the car under the best condi-
tions. For this reason, Jeep has planned a
series of checks and services at fixed
distance intervals and, where provided, at
fixed time intervals, as described in the
Scheduled Servicing plan. To keep the car’s
efficiency in tip-top condition, in the
following Scheduled Service plan pages a
few additional checks are listed that should
be carried out more frequently with respect
to the normal coupon redemption schedule.
Scheduled Servicing is offered by all autho -
rized dealerships according to fixed time or
mileage intervals. If, during each operation,
in addition to the ones scheduled, the need
arises for further replacements or repairs,
these may be carried out with the owner's
explicit agreement only.
The technicians at your dealership know your
vehicle best, and have access to factory
trained information, genuine Mopar parts,
and specially designed electronic and
mechanical tools that can help prevent
future costly repairs. If your car is used
frequently for towing, the interval between
one scheduled servicing operation and the next should be reduced. More frequent main
-
tenance may be needed for vehicles in severe
operating conditions, such as dusty areas
and very short trip driving.
NOTE:
Scheduled Servicing interventions are set
out by the Manufacturer. Failure to have
them carried out may invalidate the
warranty. It is advised to inform an autho -
rized dealership of any small operating irreg -
ularities without waiting for the next service.
1.4L Gasoline Engine
NOTE:
Under no circumstances should oil change
intervals exceed 9,000 miles (15,000 km)
or 12 months, whichever comes first.
Once A Month Or Before A Long Trip
Check engine oil level.
Check windshield washer fluid level.
Check tire pressure and look for unusual
wear or damage. Rotate tires at the first
sign of irregular wear, even if it occurs
before the oil indicator system turns on.
Check the fluid levels of the coolant reser -
voir and brake master cylinder, fill as
needed.
Check function of all interior and exterior
lights.
At Each Oil Change
Change oil and filter.
Rotate the tires. Rotate at the first sign of
irregular wear, even if it occurs before the
oil indicator system turns on.
Inspect battery and clean and tighten
terminals as required.
Inspect the CV/Universal joints.
Inspect brake pads, shoes, rotors, drums,
hoses and park brake.
Inspect engine cooling system protection
and hoses.
Inspect exhaust system.
Inspect engine air cleaner if using in dusty
or off-road conditions. Replace air cleaner
filter, if necessary.
Refer to the “Maintenance Plan” on the
following page for the required maintenance
intervals.
2020_JEEP_M6_UG_UK.book Page 212
Page 215 of 328
213
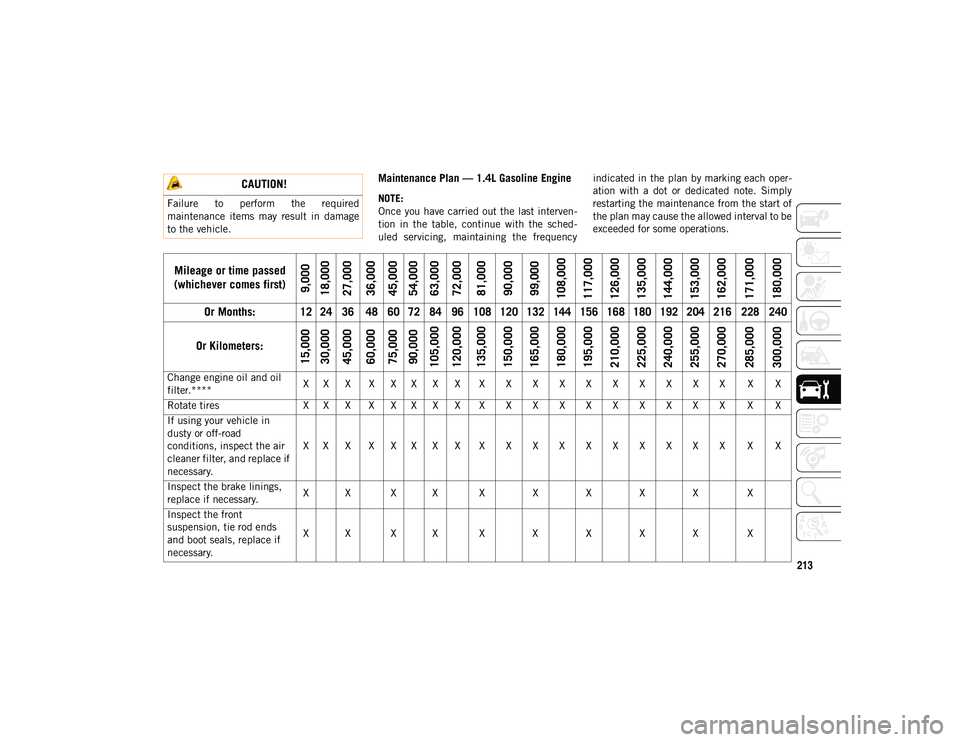
Maintenance Plan — 1.4L Gasoline Engine
NOTE:
Once you have carried out the last interven-
tion in the table, continue with the sched -
uled servicing, maintaining the frequency indicated in the plan by marking each oper
-
ation with a dot or dedicated note. Simply
restarting the maintenance from the start of
the plan may cause the allowed interval to be
exceeded for some operations.
CAUTION!
Failure to perform the required
maintenance items may result in damage
to the vehicle.
Mileage or time passed
(whichever comes first)
9,000
18,000
27,000
36,000
45,000
54,000
63,000
72,000
81,000
90,000
99,000
108,000
117,000
126,000
135,000
144,000
153,000
162,000
171,000
180,000
Or Months:
12 24 36 48 60 72 84 96 108 120 132 144 156 168 180 192 204 216 228 240
Or Kilometers:
15,000
30,000
45,000
60,000
75,000
90,000
105,000
120,000
135,000
150,000
165,000
180,000
195,000
210,000
225,000
240,000
255,000
270,000
285,000
300,000
Change engine oil and oil
filter.**** X X X X X X X X X X X X X X X X X X X X
Rotate tires X X X X X X X X X X X X X X X X X X X X
If using your vehicle in
dusty or off-road
conditions, inspect the air
cleaner filter, and replace if
necessary. X X X X X X X X X X X X X X X X X X X X
Inspect the brake linings,
replace if necessary. X X X X X X X X X X
Inspect the front
suspension, tie rod ends
and boot seals, replace if
necessary. X X X X X X X X X X
2020_JEEP_M6_UG_UK.book Page 213
Page 216 of 328
SERVICING AND MAINTENANCE
214
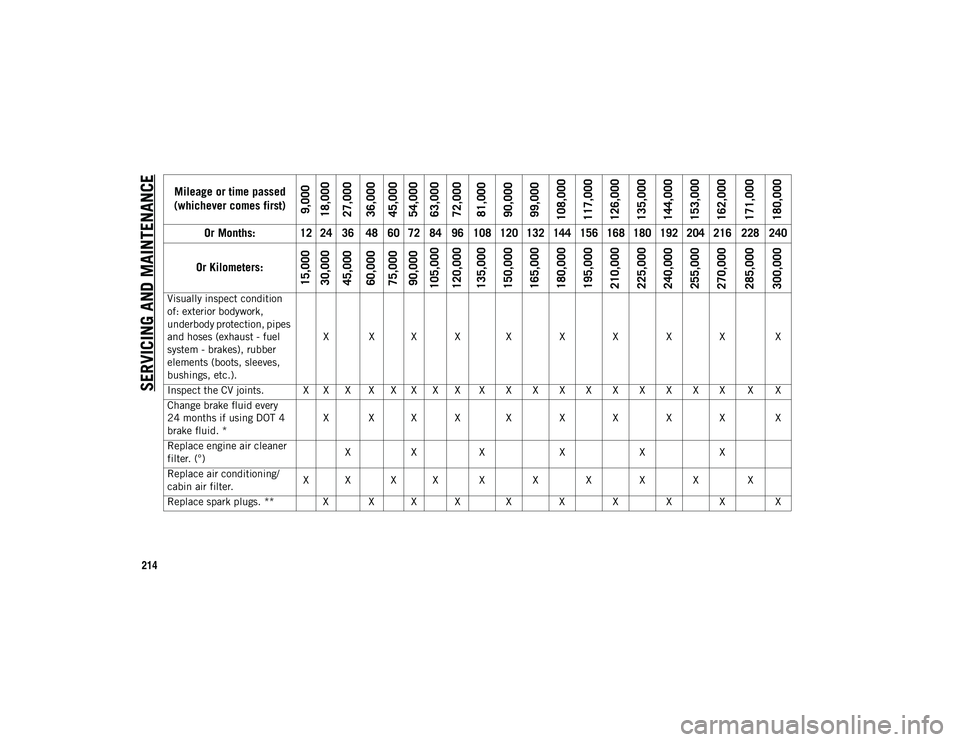
Visually inspect condition
of: exterior bodywork,
underbody protection, pipes
and hoses (exhaust - fuel
system - brakes), rubber
elements (boots, sleeves,
bushings, etc.).X X X X X X X X X X
Inspect the CV joints. X X X X X X X X X X X X X X X X X X X X
Change brake fluid every
24 months if using DOT 4
brake fluid. * X X X X X X X X X X
Replace engine air cleaner
filter. (°) X
X X XXX
Replace air conditioning/
cabin air filter. X X X X X X X X X X
Replace spark plugs. ** X X X X X X X X X X
Mileage or time passed
(whichever comes first)
9,000
18,000
27,000
36,000
45,000
54,000
63,000
72,000
81,000
90,000
99,000
108,000
117,000
126,000
135,000
144,000
153,000
162,000
171,000
180,000
Or Months:
12 24 36 48 60 72 84 96 108 120 132 144 156 168 180 192 204 216 228 240
Or Kilometers:
15,000
30,000
45,000
60,000
75,000
90,000
105,000
120,000
135,000
150,000
165,000
180,000
195,000
210,000
225,000
240,000
255,000
270,000
285,000
300,000
2020_JEEP_M6_UG_UK.book Page 214