pressure JEEP COMPASS 2021 Owner handbook (in English)
[x] Cancel search | Manufacturer: JEEP, Model Year: 2021, Model line: COMPASS, Model: JEEP COMPASS 2021Pages: 328, PDF Size: 8.85 MB
Page 168 of 328
STARTING AND OPERATING
166
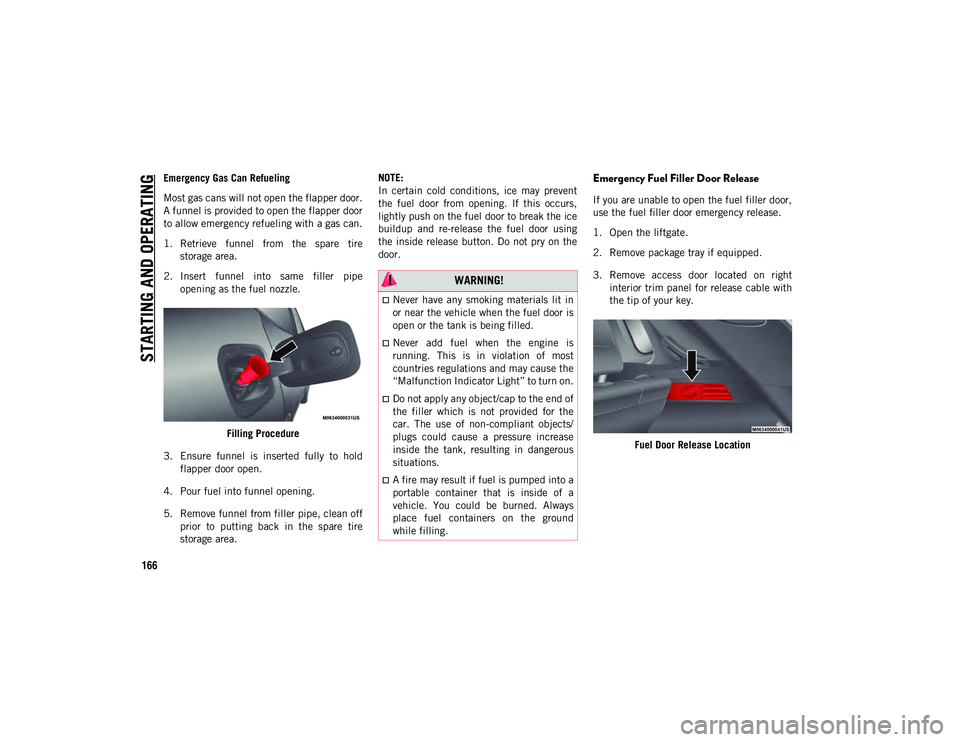
Emergency Gas Can Refueling
Most gas cans will not open the flapper door.
A funnel is provided to open the flapper door
to allow emergency refueling with a gas can.
1. Retrieve funnel from the spare tirestorage area.
2. Insert funnel into same filler pipe opening as the fuel nozzle.
Filling Procedure
3. Ensure funnel is inserted fully to hold flapper door open.
4. Pour fuel into funnel opening.
5. Remove funnel from filler pipe, clean off prior to putting back in the spare tire
storage area. NOTE:
In certain cold conditions, ice may prevent
the fuel door from opening. If this occurs,
lightly push on the fuel door to break the ice
buildup and re-release the fuel door using
the inside release button. Do not pry on the
door.Emergency Fuel Filler Door Release
If you are unable to open the fuel filler door,
use the fuel filler door emergency release.
1. Open the liftgate.
2. Remove package tray if equipped.
3. Remove access door located on right
interior trim panel for release cable with
the tip of your key.
Fuel Door Release Location
WARNING!
Never have any smoking materials lit in
or near the vehicle when the fuel door is
open or the tank is being filled.
Never add fuel when the engine is
running. This is in violation of most
countries regulations and may cause the
“Malfunction Indicator Light” to turn on.
Do not apply any object/cap to the end of
the filler which is not provided for the
car. The use of non-compliant objects/
plugs could cause a pressure increase
inside the tank, resulting in dangerous
situations.
A fire may result if fuel is pumped into a
portable container that is inside of a
vehicle. You could be burned. Always
place fuel containers on the ground
while filling.
2020_JEEP_M6_UG_UK.book Page 166
Page 170 of 328
STARTING AND OPERATING
168
(Continued)
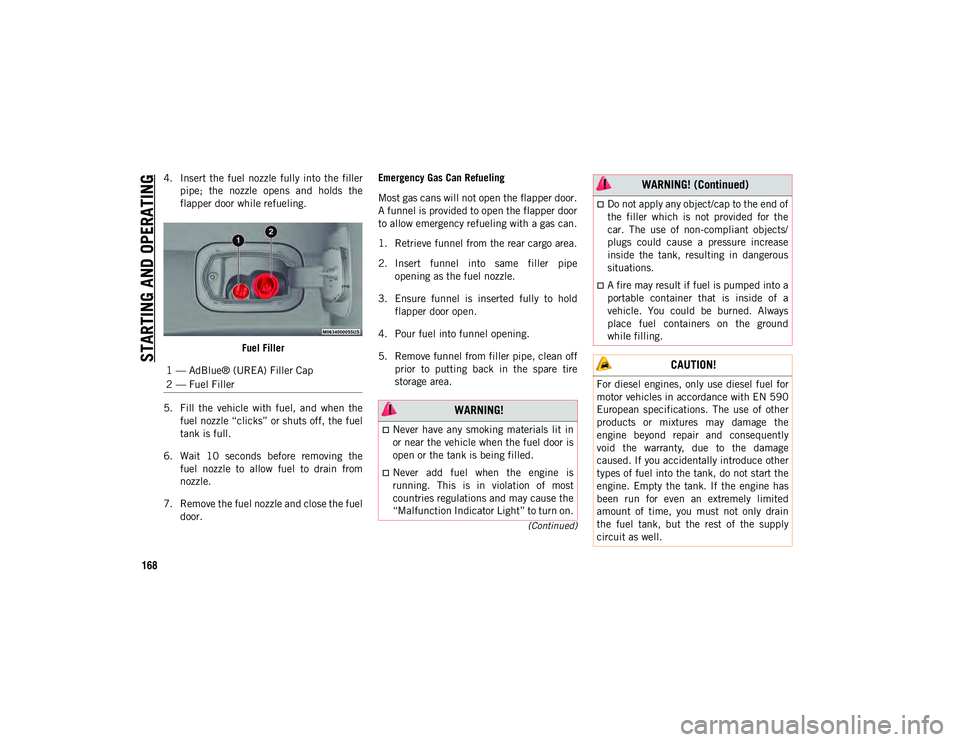
4. Insert the fuel nozzle fully into the fillerpipe; the nozzle opens and holds the
flapper door while refueling.
Fuel Filler
5. Fill the vehicle with fuel, and when the fuel nozzle “clicks” or shuts off, the fuel
tank is full.
6. Wait 10 seconds before removing the fuel nozzle to allow fuel to drain from
nozzle.
7. Remove the fuel nozzle and close the fuel door. Emergency Gas Can Refueling
Most gas cans will not open the flapper door.
A funnel is provided to open the flapper door
to allow emergency refueling with a gas can.
1. Retrieve funnel from the rear cargo area.
2. Insert funnel into same filler pipe
opening as the fuel nozzle.
3. Ensure funnel is inserted fully to hold flapper door open.
4. Pour fuel into funnel opening.
5. Remove funnel from filler pipe, clean off prior to putting back in the spare tire
storage area.
1 — AdBlue® (UREA) Filler Cap
2 — Fuel Filler
WARNING!
Never have any smoking materials lit in
or near the vehicle when the fuel door is
open or the tank is being filled.
Never add fuel when the engine is
running. This is in violation of most
countries regulations and may cause the
“Malfunction Indicator Light” to turn on.
Do not apply any object/cap to the end of
the filler which is not provided for the
car. The use of non-compliant objects/
plugs could cause a pressure increase
inside the tank, resulting in dangerous
situations.
A fire may result if fuel is pumped into a
portable container that is inside of a
vehicle. You could be burned. Always
place fuel containers on the ground
while filling.
CAUTION!
For diesel engines, only use diesel fuel for
motor vehicles in accordance with EN 590
European specifications. The use of other
products or mixtures may damage the
engine beyond repair and consequently
void the warranty, due to the damage
caused. If you accidentally introduce other
types of fuel into the tank, do not start the
engine. Empty the tank. If the engine has
been run for even an extremely limited
amount of time, you must not only drain
the fuel tank, but the rest of the supply
circuit as well.
WARNING! (Continued)
2020_JEEP_M6_UG_UK.book Page 168
Page 198 of 328
IN CASE OF EMERGENCY
196
NOTE:
The jack requires no adjustment.
The jack cannot be repaired, and in the
event of a fault, it must be replaced by
another genuine one.
No tool other than its cranking device may
be fitted on the jack.
TIRE SERVICE KIT — IF
EQUIPPED
Your vehicle may be equipped with a Tire
Service Kit. Small punctures up to 1/4 inch
(6 mm) in the tire tread can be sealed with
Tire Service Kit. Foreign objects (e.g., screws
or nails) should not be removed from the tire.
Tire Service Kit can be used in outside
temperatures down to approximately -4°F
(-20°C). This kit will provide a temporary tire
seal, allowing you to drive your vehicle up to
100 miles (160 km) with a maximum speed
of 50 mph (80 km/h).Tire Service Kit Storage
The Tire Service Kit is stowed under the load
floor behind the rear seat.
1. Open the liftgate.
2. Lift the access cover using the load floor
handle.
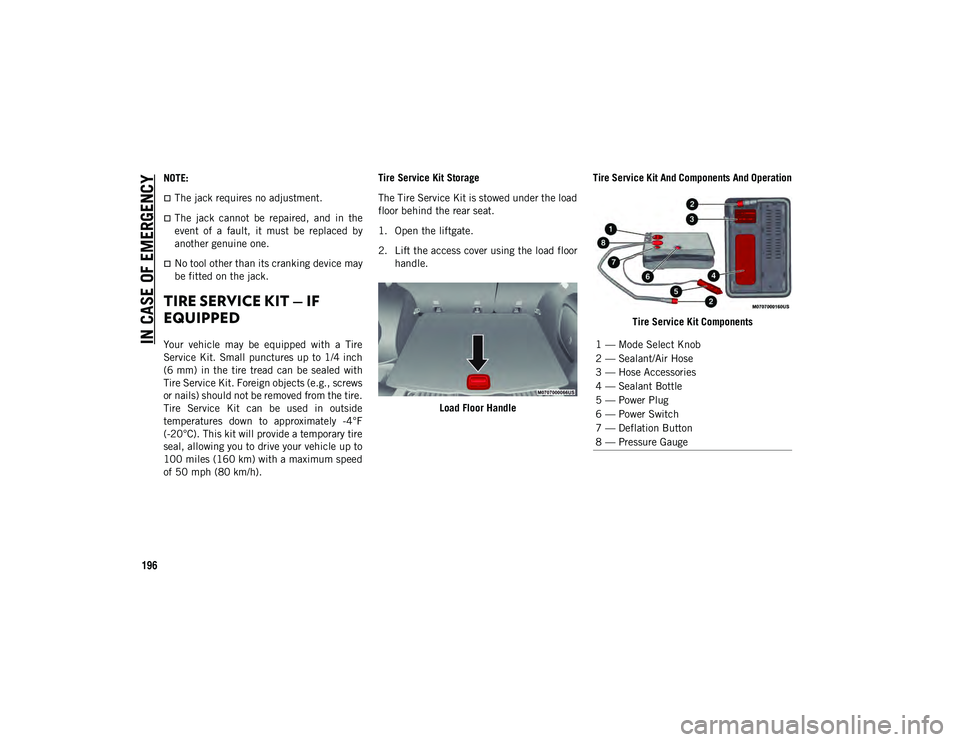
Load Floor Handle Tire Service Kit And Components And Operation
Tire Service Kit Components1 — Mode Select Knob
2 — Sealant/Air Hose
3 — Hose Accessories
4 — Sealant Bottle
5 — Power Plug
6 — Power Switch
7 — Deflation Button
8 — Pressure Gauge
2020_JEEP_M6_UG_UK.book Page 196
Page 199 of 328
197
(Continued)
Using The Mode Select Knob And Hoses
Your Tire Service Kit is equipped with the
following symbols to indicate the air or
sealant mode.
Selecting Air Mode
Push in the Mode Select Knob and turn
to this position for air pump operation on -
ly.
Selecting Sealant Mode
Push in the Mode Select Knob and turn
to this position to inject the Tire Service
Kit Sealant and to inflate the tire.
Using The Power Button
Push and release the Power Button once
to turn the Tire Service Kit on. Push and
release the Power Button again to turn
the Tire Service Kit off.
Using The Deflation Button
Push the Deflation Button to reduce the
air pressure in the tire if it becomes over
inflated. Tire Service Kit Usage Precautions
Replace the Tire Service Kit Sealant
Bottle prior to the expiration date (printed
at the lower right hand corner on the bottle
label) to assure optimum operation of the
system. Refer to “Sealant Bottle Replace-
ment” in this section.
The Sealant Bottle is a one tire application
use and needs to be replaced after each
use. Always replace these components
immediately from an authorized dealer.
When the Tire Service Kit sealant is in a
liquid form, clean water, and a damp cloth
will remove the material from the vehicle
or tire and wheel components. Once the
sealant dries, it can easily be peeled off
and properly discarded.
For optimum performance, make sure the
valve stem on the wheel is free of debris
before connecting the Tire Service Kit.
You can use the Tire Service Kit air pump
to inflate bicycle tires. The kit also comes
with two needles, located in the Accessory
Storage Compartment (on the bottom of
the air pump) for inflating sport balls,
rafts, or similar inflatable items. However,
use only the Air Pump and make sure the
Mode Select Knob is in the Air Mode when inflating such items to avoid injecting
sealant into them. The Tire Service Kit
Sealant is only intended to seal punctures
less than 1/4 inch (6 mm) diameter in the
tread of your vehicle.
Do not lift or carry the Tire Service Kit by
the hoses.
WARNING!
Do not attempt to seal a tire on the side
of the vehicle closest to traffic. Pull far
enough off the road to avoid the danger
of being hit when using the Tire Service
Kit.
Do not use Tire Service Kit or drive the
vehicle under the following circum
-
stances:
If the puncture in the tire tread is approximately 1/4 inch (6 mm) orlarger.
If the tire has any sidewall damage.
If the tire has any damage from driving with extremely low tire pres-
sure.
If the tire has any damage from driving on a flat tire.
2020_JEEP_M6_UG_UK.book Page 197
Page 201 of 328
199
3. After pushing the Power Button, thesealant (white fluid) will flow from the
Sealant Bottle through the Sealant Hose
and into the tire.
NOTE:
Sealant may leak out through the puncture in
the tire.
If the sealant (white fluid) does not flow within
0 – 10 seconds through the Sealant Hose:
1. Push the Power Button to turn the Tire Service Kit off. Disconnect the Sealant
Hose from the valve stem. Make sure the
valve stem is free of debris. Reconnect
the Sealant Hose to the valve stem.
Check that the Mode Select Knob is in
the Sealant Mode position and not Air
Mode. Push the Power Button to turn the
Tire Service Kit on.
2. Connect the Power Plug to a different 12 Volt power outlet in your vehicle or
another vehicle, if available. Make sure
the vehicle is running before turning the
Tire Service Kit on.
3. The Sealant Bottle may be empty due to previous use. Call for assistance. If the sealant (white fluid) does flow through the
Sealant Hose:
1. Continue to operate the pump until
sealant is no longer flowing through
hose (typically takes 30 - 70 seconds).
As the sealant flows through the Sealant
Hose, the Pressure Gauge can read as
high as 70 psi (4.8 Bar). The Pressure
Gauge will decrease quickly from
approximately 70 psi (4.8 Bar) to the
actual tire pressure when the Sealant
Bottle is empty.
2. The pump will start to inject air into the tire immediately after the Sealant Bottle
is empty. Continue to operate the pump
and inflate the tire to the cold tire infla -
tion pressure found on the tire and
loading information label located in the
driver-side door opening. Check the tire
pressure by looking at the Pressure
Gauge.
If the tire does not inflate to at least 26 psi (1.8
Bar) pressure within 15 minutes:
The tire is too badly damaged. Do not
attempt to drive the vehicle further. Call
for assistance. If the tire inflates to the recommended pressure
or is at least 26 psi (1.8 Bar) pressure within
15 minutes:
NOTE:
If the tire becomes over-inflated, push the
Deflation Button to reduce the tire pressure
to the recommended inflation pressure
before continuing.
1. Push the Power Button to turn off the
Tire Service Kit.
2. Remove the speed limit label from the Tire Service Kit and place sticker on the
steering wheel.
3. Immediately disconnect the Sealant Hose from the valve stem, reinstall the
cap on the fitting at the end of the hose,
and place the Tire Service Kit in the
vehicle storage location. Proceed to
“Drive Vehicle.”
Drive Vehicle:
Immediately after injecting sealant and
inflating the tire, drive the vehicle 5 miles
(8 km) or 10 minutes to ensure distribution
of the Tire Service Kit Sealant within the tire.
Do not exceed 50 mph (80 km/h).
2020_JEEP_M6_UG_UK.book Page 199
Page 202 of 328
IN CASE OF EMERGENCY
200
After Driving:
Pull over to a safe location. Refer to “When-
ever You Stop To Use Tire Service Kit” in this
section before continuing.
1. Uncoil the Sealant Hose, and then remove the cap from the fitting at the end
of the hose.
2. Place the Tire Service Kit flat on the ground next to the deflated tire.
3. Remove the cap from the valve stem, and then screw the fitting at the end of the
Sealant Hose onto the valve stem.
4. Uncoil the power plug and insert the plug into the vehicle's 12 Volt power outlet. 5. Uncoil the Hose and screw the fitting at
the end of the hose onto the valve stem.
6. Turn the Mode Select Knob and turn to the Air Mode position.
7. Check the pressure in the tire by reading the Pressure Gauge.
If tire pressure is less than 19 psi (1.3 Bar):
The tire is too badly damaged. Do not
attempt to drive the vehicle further. Call for
assistance.
If the tire pressure is 19 psi (1.3 Bar) or higher:
1. Push the Power Button to turn on Tire Service Kit and inflate the tire to the cold
tire inflation pressure found on the tire
and loading information label located in
the driver-side door opening.
NOTE:
If the tire becomes over-inflated, push the
Deflation Button to reduce the tire pressure
to the recommended inflation pressure
before continuing.
2. Disconnect the Tire Service Kit from the valve stem, reinstall the cap on the valve
stem and unplug from 12 Volt outlet. 3. Place the Tire Service Kit in its proper
storage area in the vehicle.
4. Have the tire inspected and repaired or replaced at the earliest opportunity at an
authorized dealer or tire service center.
5. Remove the Speed Limit sticker from the steering wheel after the tire has been
repaired.
6. Replace the Sealant Bottle at an autho -
rized dealer as soon as possible. Refer to
“Sealant Bottle Replacement”.
NOTE:
When having the tire serviced, advise the
authorized dealer or service center that the
tire has been sealed using the Tire Service
Kit.
WARNING!
The Tire Service Kit is not a permanent flat
tire repair. Have the tire inspected and
repaired or replaced after using the Tire
Service Kit. Do not exceed 50 mph
(80 km/h) until the tire is repaired or
replaced. Failure to follow this warning
can result in injuries that are serious or
fatal to you, your passengers, and others
around you. Have the tire checked as soon
as possible at an authorized dealer.
WARNING!
You must always indicate that the tire was
repaired using the Tire Service Kit. Give
the booklet to the technicians who will be
handling the tire that was treated using
the Tire Service Kit.
2020_JEEP_M6_UG_UK.book Page 200
Page 207 of 328
205
NOTE:
There are steps that you can take to slow
down an impending overheat condition:
If your Air Conditioner (A/C) is on, turn it
off. The A/C system adds heat to the
engine cooling system and turning the A/C
off can help remove this heat.
You can also turn the temperature control
to maximum heat, the mode control to
floor and the blower control to high. This
allows the heater core to act as a supple-
ment to the radiator and aids in removing
heat from the engine cooling system.
GEAR SELECTOR OVERRIDE
If a malfunction occurs, and the gear
selector cannot be moved out of the PARK
position, you can use the following procedure
to temporarily move the gear selector:
1. Turn the engine OFF.
2. Apply the park brake.
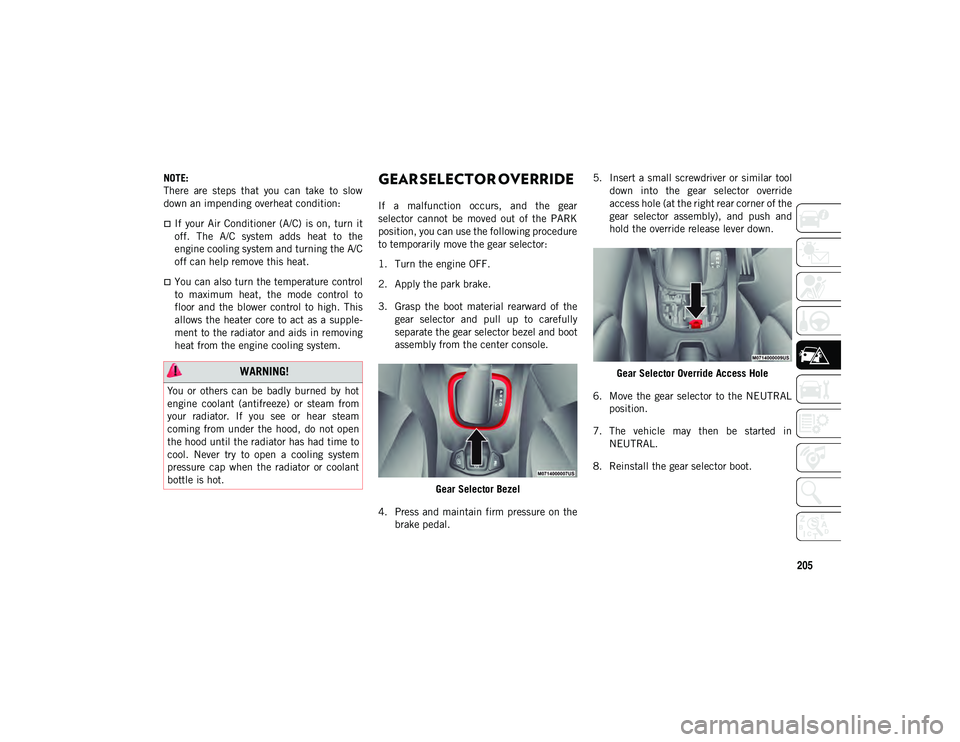
3. Grasp the boot material rearward of thegear selector and pull up to carefully
separate the gear selector bezel and boot
assembly from the center console.
Gear Selector Bezel
4. Press and maintain firm pressure on the brake pedal. 5. Insert a small screwdriver or similar tool
down into the gear selector override
access hole (at the right rear corner of the
gear selector assembly), and push and
hold the override release lever down.
Gear Selector Override Access Hole
6. Move the gear selector to the NEUTRAL position.
7. The vehicle may then be started in NEUTRAL.
8. Reinstall the gear selector boot.
WARNING!
You or others can be badly burned by hot
engine coolant (antifreeze) or steam from
your radiator. If you see or hear steam
coming from under the hood, do not open
the hood until the radiator has had time to
cool. Never try to open a cooling system
pressure cap when the radiator or coolant
bottle is hot.
2020_JEEP_M6_UG_UK.book Page 205
Page 208 of 328
IN CASE OF EMERGENCY
206
FREEING A STUCK VEHICLE
If your vehicle becomes stuck in mud, sand
or snow, it can often be moved using a
rocking motion. Turn the steering wheel right
and left to clear the area around the front
wheels. For vehicles with automatic trans-
mission, push and hold the lock button on
the gear selector. Then shift back and forth
between DRIVE (D) and REVERSE (R) (for
automatic transmission) or SECOND GEAR
and REVERSE (for manual transmission)
while gently pressing the accelerator.
NOTE:
For vehicles with automatic transmission,
shifts between DRIVE (D) and REVERSE (R)
can only be achieved at wheel speeds of
5 mph (8 km/h) or less. Whenever the trans -
mission remains in NEUTRAL (N) for more
than two seconds, you must press the brake
pedal to engage DRIVE or REVERSE.
Use the least amount of accelerator pedal
pressure that will maintain the rocking
motion without spinning the wheels or racing
the engine. NOTE:
Push the “ESC Off” switch (if necessary), to
place the Electronic Stability Control (ESC)
system in “Partial Off” mode, before rocking
the vehicle. Refer to “Electronic Brake
Control System” in “Safety” in the Owner’s
Manual for further information. Once the
vehicle has been freed, push the “ESC Off”
switch again to restore “ESC On” mode.
WARNING!
Fast spinning tires can be dangerous.
Forces generated by excessive wheel
speeds may cause damage, or even failure,
of the axle and tires. A tire could explode
and injure someone. Do not spin your
vehicle's wheels faster than 30 mph
(48 km/h) or for longer than 30 seconds
continuously without stopping when you
are stuck and do not let anyone near a
spinning wheel, no matter what the speed.
CAUTION!
Racing the engine or spinning the wheels
may lead to transmission overheating
and failure. Allow the engine to idle with
the transmission in NEUTRAL for at
least one minute after every five
rocking-motion cycles. This will mini
-
mize overheating and reduce the risk of
clutch or transmission failure during
prolonged efforts to free a stuck vehicle.
When “rocking” a stuck vehicle by
shifting between DRIVE/SECOND gear
and REVERSE, do not spin the wheels
faster than 15 mph (24 km/h), or drive -
train damage may result.
Revving the engine or spinning the
wheels too fast may lead to transmission
overheating and failure. It can also
damage the tires. Do not spin the wheels
above 30 mph (48 km/h) while in gear
(no transmission shifting occurring).
2020_JEEP_M6_UG_UK.book Page 206
Page 214 of 328
212
SERVICING AND MAINTENANCE
SCHEDULED SERVICING
Correct servicing is crucial for guaranteeing a
long life for the car under the best condi-
tions. For this reason, Jeep has planned a
series of checks and services at fixed
distance intervals and, where provided, at
fixed time intervals, as described in the
Scheduled Servicing plan. To keep the car’s
efficiency in tip-top condition, in the
following Scheduled Service plan pages a
few additional checks are listed that should
be carried out more frequently with respect
to the normal coupon redemption schedule.
Scheduled Servicing is offered by all autho -
rized dealerships according to fixed time or
mileage intervals. If, during each operation,
in addition to the ones scheduled, the need
arises for further replacements or repairs,
these may be carried out with the owner's
explicit agreement only.
The technicians at your dealership know your
vehicle best, and have access to factory
trained information, genuine Mopar parts,
and specially designed electronic and
mechanical tools that can help prevent
future costly repairs. If your car is used
frequently for towing, the interval between
one scheduled servicing operation and the next should be reduced. More frequent main
-
tenance may be needed for vehicles in severe
operating conditions, such as dusty areas
and very short trip driving.
NOTE:
Scheduled Servicing interventions are set
out by the Manufacturer. Failure to have
them carried out may invalidate the
warranty. It is advised to inform an autho -
rized dealership of any small operating irreg -
ularities without waiting for the next service.
1.4L Gasoline Engine
NOTE:
Under no circumstances should oil change
intervals exceed 9,000 miles (15,000 km)
or 12 months, whichever comes first.
Once A Month Or Before A Long Trip
Check engine oil level.
Check windshield washer fluid level.
Check tire pressure and look for unusual
wear or damage. Rotate tires at the first
sign of irregular wear, even if it occurs
before the oil indicator system turns on.
Check the fluid levels of the coolant reser -
voir and brake master cylinder, fill as
needed.
Check function of all interior and exterior
lights.
At Each Oil Change
Change oil and filter.
Rotate the tires. Rotate at the first sign of
irregular wear, even if it occurs before the
oil indicator system turns on.
Inspect battery and clean and tighten
terminals as required.
Inspect the CV/Universal joints.
Inspect brake pads, shoes, rotors, drums,
hoses and park brake.
Inspect engine cooling system protection
and hoses.
Inspect exhaust system.
Inspect engine air cleaner if using in dusty
or off-road conditions. Replace air cleaner
filter, if necessary.
Refer to the “Maintenance Plan” on the
following page for the required maintenance
intervals.
2020_JEEP_M6_UG_UK.book Page 212
Page 220 of 328
SERVICING AND MAINTENANCE
218
Once A Month Or Before A Long Trip
Check engine oil level.
Check windshield washer fluid level.
Check tire pressure and look for unusual
wear or damage. Rotate tires at the first
sign of irregular wear, even if it occurs
before the oil indicator system turns on.
Check the fluid levels of the coolant reser-
voir and brake master cylinder, fill as
needed.
Check function of all interior and exterior
lights.
Control and recovery of additive level for
AdBlue® Diesel emissions (UREA) (if
equipped). At Each Oil Change
Change the engine oil filter.
Inspect the brake hoses and lines.
Inspect for the presence of water in the
fuel filter/water separator unit.
Inspect air cleaner filter if using in dusty
or off-road conditions. Replace air cleaner
filter, if necessary.
Demanding Vehicle Use
Restore additive level for AdBlue® Diesel
emissions (UREA) (if equipped), when the
lamp is illuminated or the message on the
instrument panel.
Maintenance Plan — Diesel Engines
NOTE:
Once you have carried out the last interven -
tion in the table, continue with the sched -
uled servicing, maintaining the frequency
indicated in the plan by marking each oper -
ation with a dot or dedicated note. Simply
restarting the maintenance from the start of
the plan may cause the allowed interval to be
exceeded for some operations.
CAUTION!
Failure to perform the required
maintenance items may result in damage
to the vehicle.
2020_JEEP_M6_UG_UK.book Page 218