headlamp JEEP GLADIATOR 2023 Owners Manual
[x] Cancel search | Manufacturer: JEEP, Model Year: 2023, Model line: GLADIATOR, Model: JEEP GLADIATOR 2023Pages: 448, PDF Size: 17.37 MB
Page 5 of 448

3
EXTERIOR LIGHTS.................................................. 56 Headlight Switch...............................................56
Daytime Running Lights (DRLs) —
If Equipped .......................................................57
High/Low Beam Switch....................................57
Automatic High Beam Headlamp Control —
If Equipped .......................................................58
Flash-To-Pass....................................................58
Automatic Headlights — If Equipped ..............58
Lights-On Reminder..........................................58
Front Fog Lights — If Equipped .......................58
Turn Signals ......................................................59
Lane Change Assist — If Equipped ..................59
Bed Lights — If Equipped ................................59
INTERIOR LIGHTS ................................................. 59
Interior Courtesy Lights ....................................59
Dimmer Control ................................................60
WINDSHIELD WIPERS AND WASHERS .............. 60
Windshield Wiper Operation ............................60
CLIMATE CONTROLS ............................................. 61
Automatic Climate Control Descriptions And
Functions ..........................................................62
Manual Climate Control Descriptions And
Functions ..........................................................64
Automatic Temperature Control (ATC) —
If Equipped........................................................67
Climate Voice Commands................................67
Operating Tips .................................................67 INTERIOR STORAGE AND EQUIPMENT ............... 68
Storage..............................................................68
Lighted Cupholders — If Equipped ..................71
AUX/USB Control ..............................................71
Jeep® Wireless Speaker —
If Equipped........................................................72
Power Outlets ..................................................77
Power Inverters — If Equipped ........................78
Auxiliary Switches — If Equipped ....................79
POWER WINDOWS — IF EQUIPPED .....................81
Auto-Down Feature .........................................81
Manual Sliding Rear Window —
If Equipped........................................................81
Window Lockout Switch ...................................82
Wind Buffeting .................................................82
GLADIATOR TOPS .................................................82
Provided Tools ..................................................82
Lowering The Soft Top
S
..............................83
Raising The Soft Top
S
.................................89
Removing The Soft Top
S
.............................92
Installing The Soft Top .....................................93
Hard Top Front Panel(s) Removal
S
............95
Hard Top Front Panel(s) Installation ..............98
Removing The Hard Top
S
...........................98
Installing The Hard Top ................................. 100
Sunrider® For Hard Top —
If Equipped..................................................... 101 DOOR FRAME — IF EQUIPPED WITH A
SOFT TOP ............................................................. 104
Door Frame Removal .................................... 104
Door Frame Installation ................................ 105
FOLDING WINDSHIELD ...................................... 106
Lowering The Windshield.............................. 106
Raising The Windshield ................................ 108
HOOD .................................................................... 109
Opening The Hood ........................................ 109
Closing The Hood .......................................... 109
TAILGATE .............................................................. 110
Opening.......................................................... 110Three-Position Tailgate ................................. 110
Closing ........................................................... 111
BED RAIL TIE DOWN SYSTEM —
IF EQUIPPED ........................................................ 111
TONNEAU COVER — IF EQUIPPED ..................... 112
Tonneau Cover Installation .......................... 112
Tonneau Cover Removal .............................. 114
ROOF LUGGAGE RACK — IF EQUIPPED ............ 115
GETTING TO KNOW YOUR
INSTRUMENT PANEL
GASOLINE INSTRUMENT CLUSTERS ................ 116
Instrument Cluster Descriptions
S
........... 118
DIESEL INSTRUMENT CLUSTERS ...................... 119
Instrument Cluster Descriptions .................. 121
23_JT_OM_EN_USC_t.book Page 3
Page 60 of 448

58GETTING TO KNOW YOUR VEHICLE
AUTOMATIC HIGH BEAM HEADLAMP
C
ONTROL — IF EQUIPPED
The Automatic High Beam Headlamp Control
system provides increased forward lighting at night
by automatically controlling the high beams
through the use of a camera mounted on the
vehicle’s header. This camera detects vehicle
specific light and automatically switches from high
beams to low beams until the approaching vehicle
is out of view.
NOTE:
The Automatic High Beam Headlamp Control
can be turned on or off by selecting “ON” under
“Auto Dim High Beams” within your Uconnect
Settings Ú page 215, as well as turning the
headlight switch to the AUTO position and
placing the multifunction lever in the high beam
position.
Broken, muddy, or obstructed headlights and
taillights of vehicles in the field of view will
cause headlights to remain on longer (closer to
the vehicle). Also, dirt, film, and other obstruc -
tions on the windshield or camera lens will
cause the system to function improperly.
FLASH-TO-PASS
The Flash-To-Pass feature will illuminate the high
beam headlights temporarily to signal another
vehicle of a passing occurrence. Pull and hold the
Multifunction Lever to activate the Flash-To-Pass
feature. When the lever is released, the
Flash-To-Pass feature will deactivate.
AUTOMATIC HEADLIGHTS — IF EQUIPPED
The Automatic Headlight System will turn the
headlights on or off according to ambient light
levels. To turn the system on, rotate the headlight
switch clockwise to the last detent for automatic
headlight operation. When the system is on, the
headlight time delay feature is also on. This means
the headlights will stay on for up to 90 seconds
(programmable through the Uconnect Settings
Ú
page 215) after you place the ignition into the
OFF position. To turn the automatic system off,
move the headlight switch out of the AUTO position.
NOTE:The engine must be running before the headlights
will come on in the automatic mode.
LIGHTS-ON REMINDER
If the headlights or parking lights are left on after
the ignition is placed in the OFF position, the vehicle
will chime when the driver’s door is opened.
FRONT FOG LIGHTS — IF EQUIPPED
The Front Fog Lights are located on the front of the
vehicle below the headlights. When activated,
these lights add illumination directed at the driving
surface to aid in poor visibility conditions.
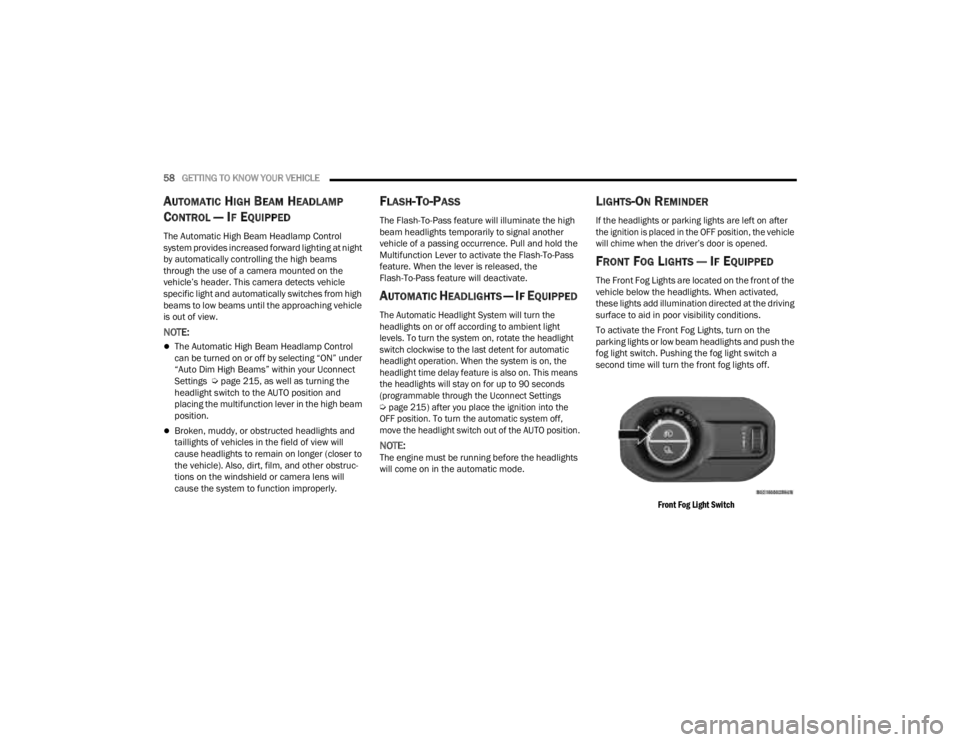
To activate the Front Fog Lights, turn on the
parking lights or low beam headlights and push the
fog light switch. Pushing the fog light switch a
second time will turn the front fog lights off.
Front Fog Light Switch
23_JT_OM_EN_USC_t.book Page 58
Page 394 of 448

392SERVICING AND MAINTENANCE
BULB REPLACEMENT
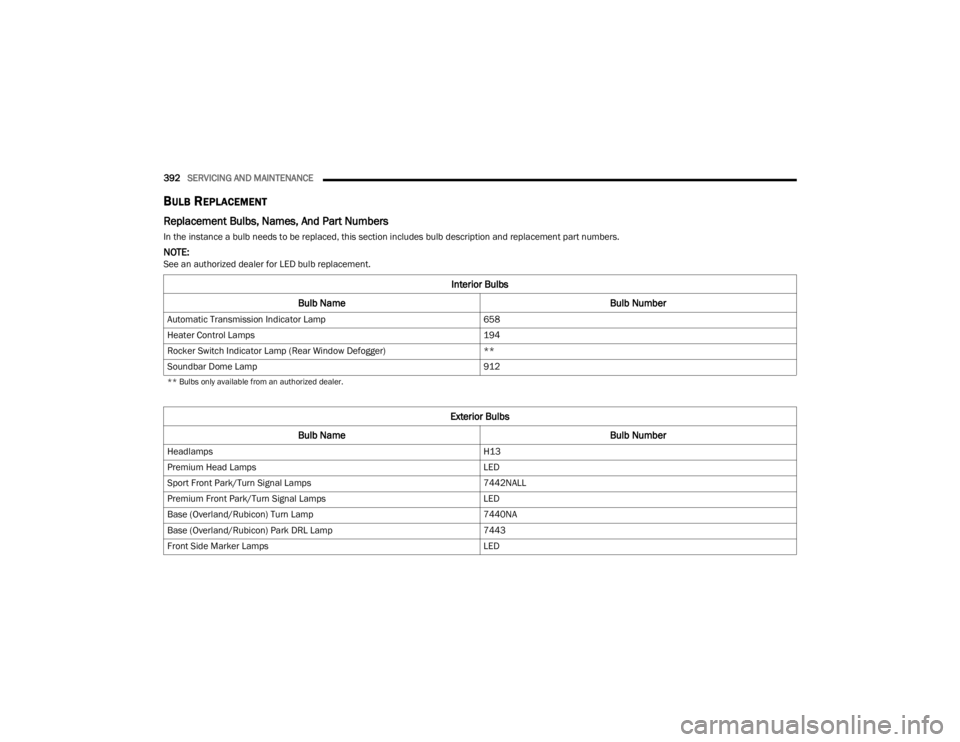
Replacement Bulbs, Names, And Part Numbers
In the instance a bulb needs to be replaced, this section includes bulb description and replacement part numbers.
NOTE:See an authorized dealer for LED bulb replacement.
Interior Bulbs
Bulb Name Bulb Number
Automatic Transmission Indicator Lamp 658
Heater Control Lamps 194
Rocker Switch Indicator Lamp (Rear Window Defogger) **
Soundbar Dome Lamp 912
** Bulbs only available from an authorized dealer.
Exterior Bulbs
Bulb Name Bulb Number
Headlamps H13
Premium Head Lamps LED
Sport Front Park/Turn Signal Lamps 7442NALL
Premium Front Park/Turn Signal Lamps LED
Base (Overland/Rubicon) Turn Lamp 7440NA
Base (Overland/Rubicon) Park DRL Lamp 7443
Front Side Marker Lamps LED
23_JT_OM_EN_USC_t.book Page 392
Page 395 of 448

SERVICING AND MAINTENANCE393
Bulb Replacement
NOTE:Lens fogging can occur under certain atmospheric
conditions. This will usually clear as atmospheric
conditions occur to allow the condensation to
change back into a vapor. Turning the lamps on will
usually accelerate the clearing process.
HALOGEN HEADLAMPS — IF EQUIPPED
See the following steps to replace:
1. Open hood and support using prop rod.
2. Remove the front grille. Turn the retainers
along the top a quarter turn counterclockwise
and remove.
3. Pull the bottom of the grille away, starting at one side and working toward the other. 4. Remove the three screws holding the
headlamp to the vehicle.
5. Remove lamp from the vehicle.
6. Remove the lamp from the collar.
7. Grab the bulb and turn a quarter turn counter -
clockwise.
8. Pull the bulb from the housing.
9. Push connector locking tab to the unlock position.
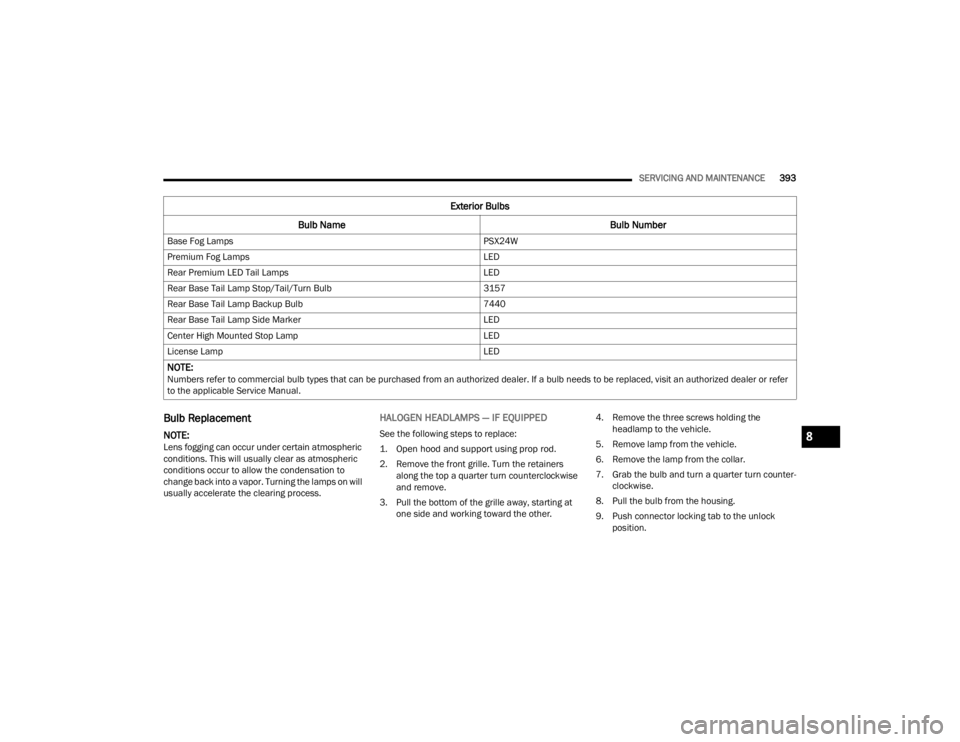
Base Fog Lamps
PSX24W
Premium Fog Lamps LED
Rear Premium LED Tail Lamps LED
Rear Base Tail Lamp Stop/Tail/Turn Bulb 3157
Rear Base Tail Lamp Backup Bulb 7440
Rear Base Tail Lamp Side Marker LED
Center High Mounted Stop Lamp LED
License Lamp LED
NOTE: Numbers refer to commercial bulb types that can be purchased from an authorized dealer. If a bulb needs to be replaced, visit an authorized dealer or refer
to the applicable Service Manual.
Exterior Bulbs
Bulb Name Bulb Number
8
23_JT_OM_EN_USC_t.book Page 393