spare tire JEEP GLADIATOR 2023 Owners Manual
[x] Cancel search | Manufacturer: JEEP, Model Year: 2023, Model line: GLADIATOR, Model: JEEP GLADIATOR 2023Pages: 448, PDF Size: 17.37 MB
Page 8 of 448
6
CONNECTED VEHICLE SERVICES —
IF EQUIPPED ........................................................ 258 Is My Vehicle Connected?............................. 258
Introduction To Connected Vehicle
Services ......................................................... 258
Getting Started With Connected Vehicle
Services ......................................................... 260
Using SiriusXM Guardian™ .......................... 261
Manage My SiriusXM Guardian™ Account .. 272
CONNECTED SERVICES FAQS ........................... 272
Connected Services SOS FAQs —
If Equipped .................................................... 272
Connected Services Remote Door Lock/
Unlock FAQs .................................................. 272
Connected Services Roadside Assistance
FAQs .............................................................. 272
Connected Services Send & Go FAQs —
If Equipped .................................................... 273
Connected Services Vehicle Finder FAQs ... 273
Connected Services Stolen Vehicle
Assistance FAQs — If Equipped ................... 273
Connected Services Remote Vehicle
Start FAQs ..................................................... 274
Connected Services Remote Horn &
Lights FAQs .................................................... 274
Connected Services Account
FAQs — If Equipped ....................................... 274
Data Collection & Privacy.............................. 276 RADIO OPERATION AND MOBILE PHONES ..... 276
Regulatory And Safety Information .............. 277
OFF-ROAD PAGES — IF EQUIPPED.................... 277
Off-Road Pages Status Bar ........................... 277Drivetrain ....................................................... 278
Accessory Gauge ........................................... 278Pitch & Roll ................................................... 278
SAFETY
SAFETY FEATURES .............................................. 279
Anti-Lock Brake System (ABS) ..................... 279
Electronic Brake Control (EBC) System ...... 280
AUXILIARY DRIVING SYSTEMS.......................... 287
Blind Spot Monitoring (BSM) —
If Equipped .................................................... 287
Forward Collision Warning (FCW) With
Mitigation — If Equipped ............................... 291
Tire Pressure Monitoring System (TPMS) .... 294
OCCUPANT RESTRAINT SYSTEMS ................... 299
Occupant Restraint Systems Features ....... 299
Important Safety Precautions ...................... 299Seat Belt Systems ........................................ 300Supplemental Restraint Systems (SRS) ...... 306Child Restraints ............................................. 318 SAFETY TIPS ......................................................... 328
Transporting Passengers.............................. 328
Transporting Pets .......................................... 329Connected Vehicles ...................................... 329
Safety Checks You Should Make Inside
The Vehicle ................................................... 329
Periodic Safety Checks You Should Make
Outside The Vehicle ...................................... 330
Exhaust Gas................................................... 331
Carbon Monoxide Warnings ......................... 331
IN CASE OF EMERGENCY
HAZARD WARNING FLASHERS ......................... 332
ASSIST AND SOS SYSTEM — IF EQUIPPED ...... 332
JACKING AND TIRE CHANGING
S
.................. 335
Preparations For Jacking ............................. 336 Jack Location ................................................ 336
Spare Tire Location And Removal ............... 338
Jacking Instructions ...................................... 339
To Stow The Flat Or Spare ............................ 342
Reinstalling The Jack And Tools ................... 343
JUMP STARTING ................................................. 343
Preparations For Jump Start ........................ 344Jump Starting Procedure .............................. 345
REFUELING IN EMERGENCY – IF EQUIPPED .. 346
IF YOUR ENGINE OVERHEATS ............................ 347
MANUAL PARK RELEASE ................................... 348
FREEING A STUCK VEHICLE .............................. 349
23_JT_OM_EN_USC_t.book Page 6
Page 9 of 448
7
TOWING A DISABLED VEHICLE .......................... 350 Four–Wheel Drive Models ............................ 351
Without The Key Fob ..................................... 351
Emergency Tow Hooks —
If Equipped .................................................... 351
ENHANCED ACCIDENT RESPONSE SYSTEM
(EARS) .................................................................. 352
EVENT DATA RECORDER (EDR) ......................... 352
SERVICING AND MAINTENANCE
SCHEDULED SERVICING — GASOLINE
ENGINE ................................................................. 353
Maintenance Plan ......................................... 354
SCHEDULED SERVICING — DIESEL ENGINE .... 357
Maintenance Plan — Diesel Fuel Up To
B5 Biodiesel................................................... 358Additional Maintenance — B6 To B20
Biodiesel ........................................................ 361
ENGINE COMPARTMENT .................................... 362
3.6L Gasoline Engine ................................... 3623.0L Diesel Engine ........................................ 363
Checking Oil Level ......................................... 364
Adding Washer Fluid ..................................... 364
Maintenance-Free Battery ............................ 364
Pressure Washing ......................................... 365 VEHICLE MAINTENANCE..................................... 365
Engine Oil ....................................................... 365
Engine Oil Filter ............................................. 366Engine Air Cleaner Filter ............................... 366
Draining Fuel/Water Separator Filter —
Diesel Engine ................................................. 368
Fuel Filter Replacement — Diesel Engine .... 369
Priming If The Engine Has Run Out Of
Fuel — Diesel Engine .................................... 370
Intervention Regeneration Strategy —
Message Process Flow ................................ 371Diesel Exhaust Fluid ..................................... 371
Accessory Drive Belt Inspection ................... 372Air Conditioner Maintenance........................ 372
Body Lubrication ........................................... 374Windshield Wiper Blades.............................. 374Exhaust System ............................................ 376
Cooling System .............................................. 377
Charge Air Cooler — Inter-Cooler
(Diesel Engine) .............................................. 379
Brake System ............................................... 380
Front/Rear Axle Fluid ................................... 380Transfer Case ............................................... 381
Manual Transmission — If Equipped............ 381
Automatic Transmission —
If Equipped .................................................... 381
Fuses ............................................................. 382Bulb Replacement ........................................ 392 TIRES ..................................................................... 395
Tire Safety Information ................................. 395
Tires — General Information ......................... 401
Tire Types....................................................... 405Spare Tires — If Equipped ............................ 406
Wheel And Wheel Trim Care......................... 407
Snow Traction Devices ................................. 408
Tire Rotation Recommendations ................. 409
DEPARTMENT OF TRANSPORTATION
UNIFORM TIRE QUALITY GRADES .................... 410
Treadwear...................................................... 410
Traction Grades ............................................. 410Temperature Grades..................................... 410
STORING THE VEHICLE ....................................... 411
BODYWORK .......................................................... 411
Protection From Atmospheric Agents .......... 411
Body And Underbody Maintenance ............. 412
Preserving The Bodywork ............................. 412
INTERIORS ........................................................... 414
Carpet Safety Information ............................ 414
Carpet Removal............................................. 415Seats And Fabric Parts ................................. 416
Plastic And Coated Parts .............................. 417
Leather Surfaces........................................... 417
Glass Surfaces ............................................. 417
23_JT_OM_EN_USC_t.book Page 7
Page 85 of 448
GETTING TO KNOW YOUR VEHICLE83
(Continued)
LOWERING THE SOFT TOP
Use this QR code to access your
digital experience. If the temperature is below 72°F (24°C) and/or
the top has been folded down for a period of time,
the top will appear to have shrunk when you raise
it, making it difficult to put up. This is caused by a
natural contraction of the vinyl or acrylic materials
of the fabric top.
Place the vehicle in a warm area. Pull steadily on
the top fabric. The vinyl will stretch back to its
original size and the top can then be installed. If
the temperature is 41°F (5°C) or below, do not
attempt to put the top down or roll the rear or side
curtains.
WARNING!
Do not drive the vehicle with the rear window
up/removed unless the quarter windows are
also removed. Dangerous exhaust gases
could enter the vehicle causing harm to the
driver and passengers.
The fabric quarter windows and fabric top are
designed only for protection against the
elements. Do not rely on them to contain occu -
pants within the vehicle or to protect against
injury during an accident. Remember, always
wear seat belts.
Make sure hands and fingers are clear of all
pinch points when installing and removing the
soft top. The lift assist mechanism and side
bows may cause serious injury if fingers or
hands get caught in between.
CAUTION!
The soft top is not designed to carry any
additional loads such as roof racks, spare tires,
building, hunting or camping supplies, and/or
luggage, etc. Also, it was not designed as a
structural member of the vehicle and, thus,
cannot properly carry any additional loads other
than environmental (rain, snow, etc.).
CAUTION!
Do not run a fabric top through an automatic
car wash. Window scratches and wax buildup
may result.
Do not lower the top when the temperature is
below 41°F (5°C). Damage to the top may
result.
Do not move your vehicle until the top has been
either fully attached to the windshield frame, or
fully lowered.
Follow the proper steps for cleaning and caring
for your vehicle’s fabric top
Ú
page 413.
Do not use any tools (screwdrivers, etc.) to pry
or force any of the clamps, clips, or retainers
securing the soft top. Do not force or pry the soft
top framework when opening or closing.
Damage to the top may result.
Failure to follow these cautions may cause interior
water damage, stains, or mildew on the top
material:
It is recommended that the top be free of water
prior to opening it. Operating the top, opening a
door or lowering a window while the top is wet
may allow water to drip into the vehicle's interior.
Careless handling and storage of the soft top
may damage the seals, causing water to leak
into the vehicle's interior.
The soft top must be positioned properly to
ensure sealing. Improper installation can cause
water to leak into the vehicle's interior.
CAUTION!
2
23_JT_OM_EN_USC_t.book Page 83
Page 97 of 448
GETTING TO KNOW YOUR VEHICLE95
(Continued)
HARD TOP FRONT PANEL(S) REMOVAL
Use this QR code to access your
digital experience.
CAUTION!
The hard top is not designed to carry any addi -
tional loads, such as after-market roof racks,
spare tires, building materials, hunting or
camping supplies, etc. Ú page 115.
Do not move your vehicle until the top has
been either fully attached to the front header,
sport bar, and body, or fully removed.
Failure to follow these cautions may cause
interior water damage, stains or mildew:
It is recommended that the top be free of
water prior to panel removal. Removing the
top, opening a door, or lowering a window
while the top is wet may allow water to drip
into the vehicle’s interior.
The hard top assembly must be positioned
properly to ensure sealing. Improper installa -
tion can cause water to leak into the vehicle’s
interior.
Careless handling and storage of the remov -
able roof panels may damage the seals,
causing water to leak into the vehicle’s inte -
rior.
The front panel(s) must be positioned properly
to ensure sealing. Improper installation can
cause water to leak into the vehicle’s interior.
CAUTION!
2
23_JT_OM_EN_USC_t.book Page 95
Page 102 of 448
100GETTING TO KNOW YOUR VEHICLE
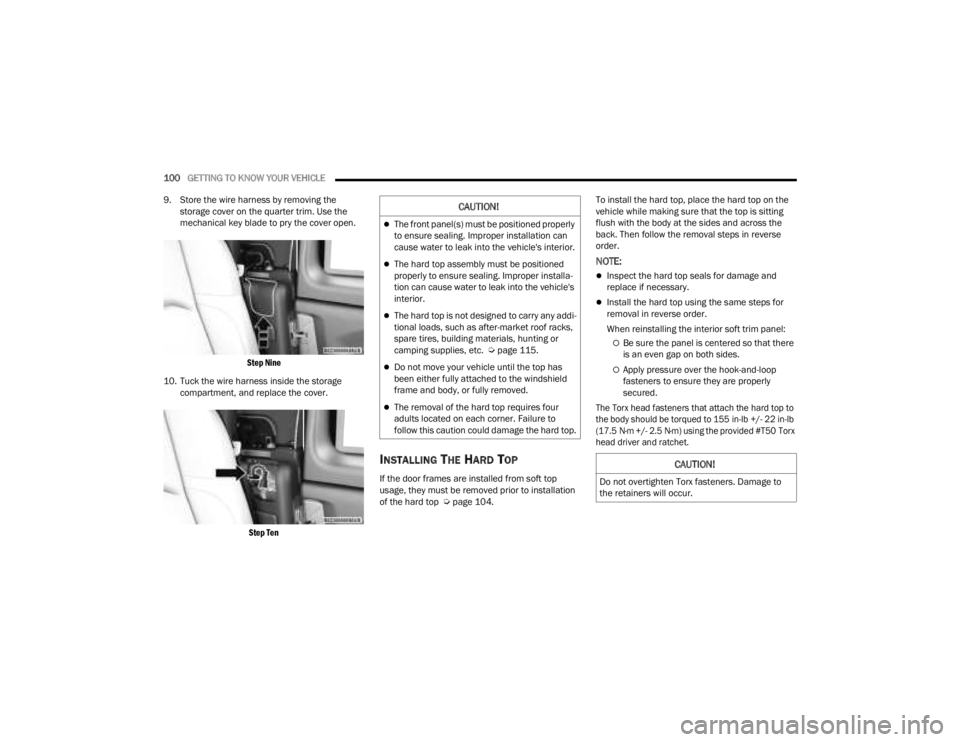
9. Store the wire harness by removing the storage cover on the quarter trim. Use the
mechanical key blade to pry the cover open.
Step Nine
10. Tuck the wire harness inside the storage compartment, and replace the cover.
Step Ten
INSTALLING THE HARD TOP
If the door frames are installed from soft top
usage, they must be removed prior to installation
of the hard top Ú page 104. To install the hard top, place the hard top on the
vehicle while making sure that the top is sitting
flush with the body at the sides and across the
back. Then follow the removal steps in reverse
order.
NOTE:
Inspect the hard top seals for damage and
replace if necessary.
Install the hard top using the same steps for
removal in reverse order.
When reinstalling the interior soft trim panel:
Be sure the panel is centered so that there
is an even gap on both sides.
Apply pressure over the hook-and-loop
fasteners to ensure they are properly
secured.
The Torx head fasteners that attach the hard top to
the body should be torqued to 155 in-lb +/- 22 in-lb
(17.5 N·m +/- 2.5 N·m) using the provided #T50 Torx
head driver and ratchet.
CAUTION!
The front panel(s) must be positioned properly
to ensure sealing. Improper installation can
cause water to leak into the vehicle's interior.
The hard top assembly must be positioned
properly to ensure sealing. Improper installa -
tion can cause water to leak into the vehicle's
interior.
The hard top is not designed to carry any addi -
tional loads, such as after-market roof racks,
spare tires, building materials, hunting or
camping supplies, etc. Ú page 115.
Do not move your vehicle until the top has
been either fully attached to the windshield
frame and body, or fully removed.
The removal of the hard top requires four
adults located on each corner. Failure to
follow this caution could damage the hard top.
CAUTION!
Do not overtighten Torx fasteners. Damage to
the retainers will occur.
23_JT_OM_EN_USC_t.book Page 100
Page 139 of 448
GETTING TO KNOW YOUR INSTRUMENT PANEL137
Service Forward Collision Warning (FCW)
Light — If Equipped
This warning light will illuminate to
indicate a fault in the Forward Collision
Warning System. Contact an authorized
dealer for service Úpage 291.
Service Stop/Start System Warning Light —
If Equipped
This warning light will illuminate when the
Stop/Start system is not functioning
properly and service is required. Contact
an authorized dealer for service.
Sway Bar Fault Warning Light —
If Equipped
This light will illuminate when there is a
fault in the sway bar disconnect system
Úpage 166.
Tire Pressure Monitoring System (TPMS)
Warning Light
The warning light switches on and a
message is displayed to indicate that the
tire pressure is lower than the
recommended value and/or that slow
pressure loss is occurring. In these cases, optimal
tire life and fuel consumption may not be
guaranteed. Should one or more tires be in the condition
previously mentioned, the display will show the
indications corresponding to each tire.
Each tire, including the spare (if provided), should
be checked monthly when cold and inflated to the
inflation pressure recommended by the vehicle
manufacturer on the vehicle placard or tire
inflation pressure label. If your vehicle has tires of
a different size than the size indicated on the
vehicle placard or tire inflation pressure label, you
should determine the proper tire inflation pressure
for those tires.
As an added safety feature, your vehicle has been
equipped with a TPMS that illuminates a low tire
pressure telltale when one or more of your tires is
significantly underinflated. Accordingly, when the
low tire pressure telltale illuminates, you should
stop and check your tires as soon as possible and
inflate them to the proper pressure. Driving on a
significantly underinflated tire causes the tire to
overheat and can lead to tire failure. Underinflation also reduces fuel efficiency and tire tread life, and
may affect the vehicle’s handling and stopping
ability.
Please note that the TPMS is not a substitute for
proper tire maintenance, and it is the driver’s
responsibility to maintain correct tire pressure,
even if underinflation has not reached the level to
trigger illumination of the TPMS low tire pressure
telltale.
Your vehicle has also been equipped with a TPMS
malfunction indicator to indicate when the system
is not operating properly. The TPMS malfunction
indicator is combined with the low tire pressure
telltale. When the system detects a malfunction,
the telltale will flash for approximately one minute
and then remain continuously illuminated. This
sequence will continue upon subsequent vehicle
start-ups as long as the malfunction exists. When
the malfunction indicator is illuminated, the
system may not be able to detect or signal low tire
pressure as intended. TPMS malfunctions may
occur for a variety of reasons, including the
installation of replacement or alternate tires or
wheels on the vehicle that prevent the TPMS from
functioning properly. Always check the TPMS
malfunction telltale after replacing one or more
tires or wheels on your vehicle to ensure that the
replacement or alternate tires and wheels allow
the TPMS to continue to function properly.
WARNING!
Do not continue driving with one or more flat
tires as handling may be compromised. Stop the
vehicle, avoiding sharp braking and steering. If a
tire puncture occurs, repair immediately using
the dedicated tire repair kit and contact an
authorized dealer as soon as possible.
3
23_JT_OM_EN_USC_t.book Page 137
Page 299 of 448
SAFETY297
Vehicles With A Full-Size Matching Spare
1. If your vehicle is equipped with a matching full-size spare wheel and tire assembly, it has
a Tire Pressure Monitoring System sensor,
and can be monitored by the Tire Pressure
Monitoring System (TPMS) when swapped
with a low pressure road tire.
2. In the event that the matching full-size spare tire is swapped with a low pressure road tire,
the next ignition switch cycle will still show the
TPMS Warning Light to be on, a chime to
sound, an “Inflate to XX” message to appear in
the instrument cluster, and the graphic display
will still show the low tire pressure value in a
different color.
3. Driving the vehicle for up to 20 minutes above 15 mph (24 km/h) will turn off the TPMS
Warning Light as long as none of road tires are
below the low pressure warning threshold.
TIRE FILL ALERT
This feature notifies the user when the placard tire
pressure is attained while inflating or deflating the
tire.
The customer may choose to disable or enable the
Tire Fill Alert feature in the apps menu of the
Uconnect system.
NOTE:
Only one tire can be filled at a time when using
the Tire Fill Alert system.
The Tire Fill Alert feature cannot be entered if an
existing TPMS system fault is set to “active” or if
the system is in deactivation mode (if equipped).
The system will be activated when the system
detects an increase in tire pressure while filling the
tire. The ignition must be in the ON/RUN mode with
the transmission in PARK for vehicles equipped
with an automatic transmission. For vehicles
equipped with a manual transmission, the parking
brake must be applied.
NOTE:It is not required to have the engine running to
enter Tire Fill Alert mode.
The hazard lamps will come on to confirm the
vehicle is in Tire Fill Alert mode. If the hazard lamps
do not come on while inflating the tire, the Tire
Pressure Monitoring System (TPMS) sensor may
be in an inoperative position, preventing the TPMS
sensor signal from being received. In this case, the
vehicle may need to be moved slightly forward or
backward. The Tire Fill Alert system will only inflate or deflate
one tire at a time. Wait until the hazard lights have
stopped flashing for 30 seconds after the desired
pressure is achieved in one tire before switching to
another.
When Tire Fill Alert mode is entered, the tire
pressure display screen will be displayed in the
instrument cluster.
Operation:
The horn will chirp once to let the user know
when to stop filling the tire, when it reaches
recommended pressure.
The horn will chirp three times if the tire is over
-
filled and will continue to chirp every five
seconds if the user continues to inflate the tire.
The horn will chirp once again when enough air
is let out to reach proper inflation level.
The horn will also chirp three times if the tire is
then underinflated and will continue to chirp
every five seconds if the user continues to
deflate the tire.
NOTE:The Tire Fill Alert feature is set to “Disabled” every
time the ignition is turned to “OFF”. To re-enable
the Tire Fill Alert feature at the next ignition “RUN”
state, the customer must re-enable the feature
through use of the customer settings in the radio.
6
23_JT_OM_EN_USC_t.book Page 297
Page 332 of 448
330SAFETY
(Continued)
PERIODIC SAFETY CHECKS YOU SHOULD
M
AKE OUTSIDE THE VEHICLE
Tires
Examine tires for excessive tread wear and uneven
wear patterns. Check for stones, nails, glass, or
other objects lodged in the tread or sidewall.
Inspect the tread for cuts and cracks. Inspect
sidewalls for cuts, cracks, and bulges. Check the
lug nut/bolt torque for tightness. Check the tires
(including spare) for proper cold inflation pressure.
Lights
Have someone observe the operation of brake
lights and exterior lights while you work the
controls. Check turn signal and high beam
indicator lights on the instrument panel.
Door Latches
Check for proper closing, latching, and locking.
Fluid Leaks
Check the area under vehicle after overnight
parking for fuel, coolant, oil, or other fluid leaks.
Also, if gasoline fumes are detected or if fuel or
brake fluid leaks are suspected, the cause should
be located and corrected immediately.
ALWAYS REMOVE THE EXISTING
FLOOR MAT FROM THE VEHICLE before
installing any other floor mat. NEVER
install or stack an additional floor mat
on top of an existing floor mat.
ONLY install floor mats designed to fit your
vehicle. NEVER install a floor mat that cannot
be properly attached and secured to your
vehicle. If a floor mat needs to be replaced,
only use a FCA approved floor mat for the
specific make, model, and year of your
vehicle.
ONLY use the driver’s side floor mat on the
driver’s side floor area. To check for interfer -
ence, with the vehicle properly parked with the
engine off, fully press the accelerator, the
brake, and the clutch pedal (if present) to
check for interference. If your floor mat inter -
feres with the operation of any pedal, or is not
secure to the floor, remove the floor mat from
the vehicle and place the floor mat in your
trunk.
ONLY use the passenger’s side floor mat on
the passenger’s side floor area.
WARNING!
ALWAYS make sure objects cannot fall or slide
into the driver’s side floor area when the
vehicle is moving. Objects can become
trapped under accelerator, brake, or clutch
pedals and could cause a loss of vehicle
control.
NEVER place any objects under the floor mat
(e.g., towels, keys, etc.). These objects could
change the position of the floor mat and may
cause interference with the accelerator,
brake, or clutch pedals.
If the vehicle carpet has been removed and
re-installed, always properly attach carpet to
the floor and check the floor mat fasteners are
secure to the vehicle carpet. Fully press each
pedal to check for interference with the accel -
erator, brake, or clutch pedals then re-install
the floor mats.
It is recommended to only use mild soap and
water to clean your floor mats. After cleaning,
always check your floor mat has been properly
installed and is secured to your vehicle using
the floor mat fasteners by lightly pulling mat.
WARNING!
23_JT_OM_EN_USC_t.book Page 330
Page 339 of 448
IN CASE OF EMERGENCY337
(Continued)
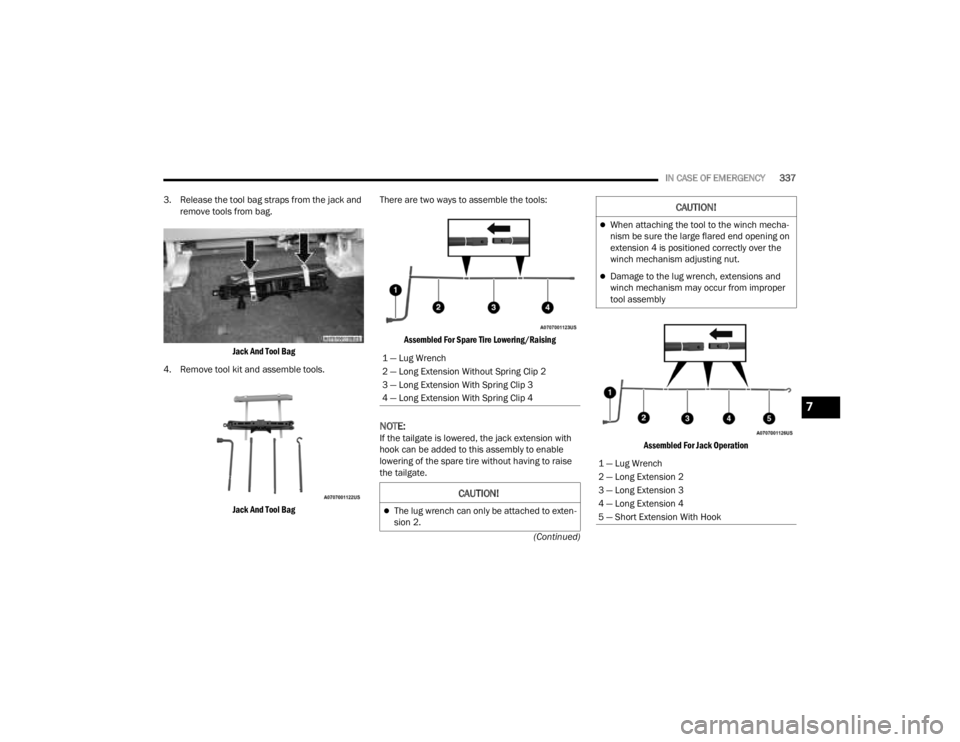
3. Release the tool bag straps from the jack and
remove tools from bag.
Jack And Tool Bag
4. Remove tool kit and assemble tools.
Jack And Tool Bag
There are two ways to assemble the tools:
Assembled For Spare Tire Lowering/Raising
NOTE:If the tailgate is lowered, the jack extension with
hook can be added to this assembly to enable
lowering of the spare tire without having to raise
the tailgate.
Assembled For Jack Operation
1 — Lug Wrench
2 — Long Extension Without Spring Clip 2
3 — Long Extension With Spring Clip 3
4 — Long Extension With Spring Clip 4
CAUTION!
The lug wrench can only be attached to exten
-
sion 2.
When attaching the tool to the winch mecha -
nism be sure the large flared end opening on
extension 4 is positioned correctly over the
winch mechanism adjusting nut.
Damage to the lug wrench, extensions and
winch mechanism may occur from improper
tool assembly
1 — Lug Wrench
2 — Long Extension 2
3 — Long Extension 3
4 — Long Extension 4
5 — Short Extension With Hook
CAUTION!
7
23_JT_OM_EN_USC_t.book Page 337
Page 340 of 448

338IN CASE OF EMERGENCY
SPARE TIRE LOCATION AND REMOVAL
Remove the spare tire before attempting to jack up
the truck. The spare tire is secured under the rear
of the vehicle with a winch and cable mechanism.
Spare Tire Location
For spare tire removal, see the following steps:
1. Locate the winch access hole at the rear of
the vehicle.
Access Hole Location
2. Attach the lug wrench to the extension tubes with the curved angle facing away from the
vehicle. Insert the extension tube through the
access hole between the lower tailgate and
the top of the fascia/bumper and into the
winch mechanism tube.
Winch Mechanism Tube
Inserting The Extensions Into The Winch Mechanism Access Hole
WARNING!
After using the jack and tools, always reinstall
them in the original carrier and location. While
driving you may experience abrupt stopping,
rapid acceleration or sharp turns. A loose jack,
tools, bracket or other objects in the vehicle may
move around with force, resulting in serious
injury.
23_JT_OM_EN_USC_t.book Page 338