tire size JEEP GLADIATOR 2023 Owners Manual
[x] Cancel search | Manufacturer: JEEP, Model Year: 2023, Model line: GLADIATOR, Model: JEEP GLADIATOR 2023Pages: 448, PDF Size: 17.37 MB
Page 41 of 448
GETTING TO KNOW YOUR VEHICLE39
2. With the bolts loose, the door can be moved forward by pushing the door handle toward the
front of the vehicle, and/or upward by grabbing
the door handle and lifting towards the roof.
3. Once the gaps between the door and vehicle body are uniform around the entire door,
tighten the door hinge bolts to 20.3 ft· lb /
27.5 N·m (Max Torque: 27.3 ft· lb / 37 N·m).
Upper Door Adjustment
After installation of the half-doors, if water leaks or
wind noise is observed, the seal of the upper
half-door to the door opening may need to be
adjusted.
To determine if the upper half-door needs to be
adjusted, proceed as follows:
1. Determine which door is affected.
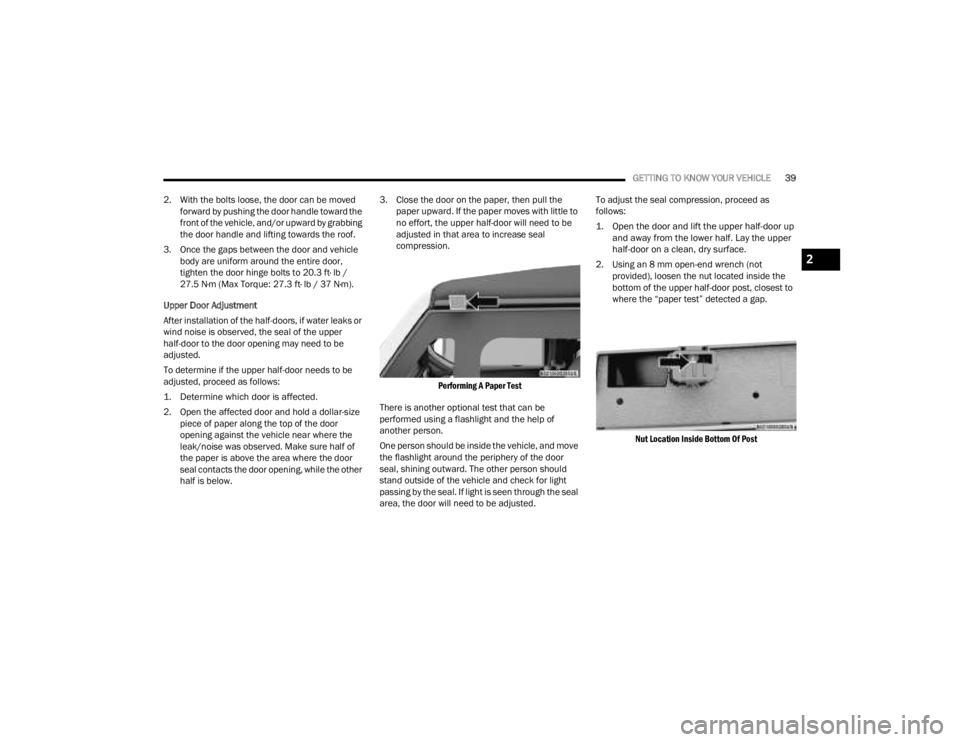
2. Open the affected door and hold a dollar-size piece of paper along the top of the door
opening against the vehicle near where the
leak/noise was observed. Make sure half of
the paper is above the area where the door
seal contacts the door opening, while the other
half is below. 3. Close the door on the paper, then pull the
paper upward. If the paper moves with little to
no effort, the upper half-door will need to be
adjusted in that area to increase seal
compression.
Performing A Paper Test
There is another optional test that can be
performed using a flashlight and the help of
another person.
One person should be inside the vehicle, and move
the flashlight around the periphery of the door
seal, shining outward. The other person should
stand outside of the vehicle and check for light
passing by the seal. If light is seen through the seal
area, the door will need to be adjusted. To adjust the seal compression, proceed as
follows:
1. Open the door and lift the upper half-door up
and away from the lower half. Lay the upper
half-door on a clean, dry surface.
2. Using an 8 mm open-end wrench (not provided), loosen the nut located inside the
bottom of the upper half-door post, closest to
where the “paper test” detected a gap.
Nut Location Inside Bottom Of Post
2
23_JT_OM_EN_USC_t.book Page 39
Page 85 of 448
GETTING TO KNOW YOUR VEHICLE83
(Continued)
LOWERING THE SOFT TOP
Use this QR code to access your
digital experience. If the temperature is below 72°F (24°C) and/or
the top has been folded down for a period of time,
the top will appear to have shrunk when you raise
it, making it difficult to put up. This is caused by a
natural contraction of the vinyl or acrylic materials
of the fabric top.
Place the vehicle in a warm area. Pull steadily on
the top fabric. The vinyl will stretch back to its
original size and the top can then be installed. If
the temperature is 41°F (5°C) or below, do not
attempt to put the top down or roll the rear or side
curtains.
WARNING!
Do not drive the vehicle with the rear window
up/removed unless the quarter windows are
also removed. Dangerous exhaust gases
could enter the vehicle causing harm to the
driver and passengers.
The fabric quarter windows and fabric top are
designed only for protection against the
elements. Do not rely on them to contain occu -
pants within the vehicle or to protect against
injury during an accident. Remember, always
wear seat belts.
Make sure hands and fingers are clear of all
pinch points when installing and removing the
soft top. The lift assist mechanism and side
bows may cause serious injury if fingers or
hands get caught in between.
CAUTION!
The soft top is not designed to carry any
additional loads such as roof racks, spare tires,
building, hunting or camping supplies, and/or
luggage, etc. Also, it was not designed as a
structural member of the vehicle and, thus,
cannot properly carry any additional loads other
than environmental (rain, snow, etc.).
CAUTION!
Do not run a fabric top through an automatic
car wash. Window scratches and wax buildup
may result.
Do not lower the top when the temperature is
below 41°F (5°C). Damage to the top may
result.
Do not move your vehicle until the top has been
either fully attached to the windshield frame, or
fully lowered.
Follow the proper steps for cleaning and caring
for your vehicle’s fabric top
Ú
page 413.
Do not use any tools (screwdrivers, etc.) to pry
or force any of the clamps, clips, or retainers
securing the soft top. Do not force or pry the soft
top framework when opening or closing.
Damage to the top may result.
Failure to follow these cautions may cause interior
water damage, stains, or mildew on the top
material:
It is recommended that the top be free of water
prior to opening it. Operating the top, opening a
door or lowering a window while the top is wet
may allow water to drip into the vehicle's interior.
Careless handling and storage of the soft top
may damage the seals, causing water to leak
into the vehicle's interior.
The soft top must be positioned properly to
ensure sealing. Improper installation can cause
water to leak into the vehicle's interior.
CAUTION!
2
23_JT_OM_EN_USC_t.book Page 83
Page 139 of 448
GETTING TO KNOW YOUR INSTRUMENT PANEL137
Service Forward Collision Warning (FCW)
Light — If Equipped
This warning light will illuminate to
indicate a fault in the Forward Collision
Warning System. Contact an authorized
dealer for service Úpage 291.
Service Stop/Start System Warning Light —
If Equipped
This warning light will illuminate when the
Stop/Start system is not functioning
properly and service is required. Contact
an authorized dealer for service.
Sway Bar Fault Warning Light —
If Equipped
This light will illuminate when there is a
fault in the sway bar disconnect system
Úpage 166.
Tire Pressure Monitoring System (TPMS)
Warning Light
The warning light switches on and a
message is displayed to indicate that the
tire pressure is lower than the
recommended value and/or that slow
pressure loss is occurring. In these cases, optimal
tire life and fuel consumption may not be
guaranteed. Should one or more tires be in the condition
previously mentioned, the display will show the
indications corresponding to each tire.
Each tire, including the spare (if provided), should
be checked monthly when cold and inflated to the
inflation pressure recommended by the vehicle
manufacturer on the vehicle placard or tire
inflation pressure label. If your vehicle has tires of
a different size than the size indicated on the
vehicle placard or tire inflation pressure label, you
should determine the proper tire inflation pressure
for those tires.
As an added safety feature, your vehicle has been
equipped with a TPMS that illuminates a low tire
pressure telltale when one or more of your tires is
significantly underinflated. Accordingly, when the
low tire pressure telltale illuminates, you should
stop and check your tires as soon as possible and
inflate them to the proper pressure. Driving on a
significantly underinflated tire causes the tire to
overheat and can lead to tire failure. Underinflation also reduces fuel efficiency and tire tread life, and
may affect the vehicle’s handling and stopping
ability.
Please note that the TPMS is not a substitute for
proper tire maintenance, and it is the driver’s
responsibility to maintain correct tire pressure,
even if underinflation has not reached the level to
trigger illumination of the TPMS low tire pressure
telltale.
Your vehicle has also been equipped with a TPMS
malfunction indicator to indicate when the system
is not operating properly. The TPMS malfunction
indicator is combined with the low tire pressure
telltale. When the system detects a malfunction,
the telltale will flash for approximately one minute
and then remain continuously illuminated. This
sequence will continue upon subsequent vehicle
start-ups as long as the malfunction exists. When
the malfunction indicator is illuminated, the
system may not be able to detect or signal low tire
pressure as intended. TPMS malfunctions may
occur for a variety of reasons, including the
installation of replacement or alternate tires or
wheels on the vehicle that prevent the TPMS from
functioning properly. Always check the TPMS
malfunction telltale after replacing one or more
tires or wheels on your vehicle to ensure that the
replacement or alternate tires and wheels allow
the TPMS to continue to function properly.
WARNING!
Do not continue driving with one or more flat
tires as handling may be compromised. Stop the
vehicle, avoiding sharp braking and steering. If a
tire puncture occurs, repair immediately using
the dedicated tire repair kit and contact an
authorized dealer as soon as possible.
3
23_JT_OM_EN_USC_t.book Page 137
Page 140 of 448
138GETTING TO KNOW YOUR INSTRUMENT PANEL
AdBlue® (UREA) Injection System Failure
Warning Light — If Equipped
This warning light will illuminate along
with a dedicated message on the display
(if equipped) if an unknown fluid not
conforming with acceptable
characteristics is inserted, or if an average
consumption of AdBlue® (UREA) over 50% is
detected. Contact an authorized dealer as soon as
possible. If the problem is not solved, a specific message will
appear on the Instrument Cluster Display
whenever a certain threshold is reached until it will
no longer be possible to start the engine.
When about 125 miles (200 km) are remaining
before the AdBlue® (UREA) tank is empty, a
continuous dedicated message will appear on the
instrument panel, accompanied by a buzzer sound
(if equipped).
YELLOW INDICATOR LIGHTS
4WD Indicator Light — If Equipped
This light alerts the driver that the vehicle
is in the four-wheel drive mode, and the
front and rear driveshafts are
mechanically locked together forcing the
front and rear wheels to rotate at the same speed.
4WD Low Indicator Light — If Equipped
This light alerts the driver that the vehicle
is in the 4WD Low mode. The front and
rear driveshafts are mechanically locked
together forcing the front and rear
wheels to rotate at the same speed. Low range
provides a greater gear reduction ratio to provide
increased torque at the wheels.
4WD Part Time Indicator Light —
If Equipped
This light alerts the driver that the vehicle
is in the four-wheel drive part time mode,
and the front and rear driveshafts are
mechanically locked together forcing the
front and rear wheels to rotate at the same speed.
Axle Locker Fault Indicator Light —
If Equipped
This light indicates when front and/or
rear axle locker fault has been detected.
Rear Axle Lock Indicator Light —
If Equipped
This light indicates when the rear axle
lock has been activated Ú page 161.
Front And Rear Axle Lock Indicator Light —
If Equipped
This light indicates when the front, rear,
or both axles have been locked. The
telltale will display the lock icon on the
front and rear axles to indicate the
current lock status.
CAUTION!
The TPMS has been optimized for the original
equipment tires and wheels. TPMS pressures
and warning have been established for the tire
size equipped on your vehicle. Undesirable
system operation or sensor damage may result
when using replacement equipment that is not
of the same size, type, and/or style. Aftermarket
wheels can cause sensor damage. Using
aftermarket tire sealants may cause the Tire
Pressure Monitoring System (TPMS) sensor to
become inoperable. After using an aftermarket
tire sealant it is recommended that you take
your vehicle to an authorized dealer to have your
sensor function checked.
23_JT_OM_EN_USC_t.book Page 138
Page 164 of 448
162STARTING AND OPERATING
4L
Four-Wheel Drive Low Range — This range provides
low speed four-wheel drive. It maximizes torque to
the front driveshaft, forcing the front and rear
wheels to rotate at the same speed. This range
provides additional traction and maximum pulling
power for loose, slippery road surfaces only. Do not
exceed 25 mph (40 km/h).
The transfer case is intended to be driven in the 2H
position for normal street and highway conditions,
such as hard-surfaced roads.
In the event that additional traction is required, the
transfer case 4H and 4L positions can be used to
lock the front and rear driveshafts together, forcing
the front and rear wheels to rotate at the same
speed. The 4H and 4L positions are intended for
loose, slippery road surfaces only and not intended
for normal driving. Driving in the 4H and 4L
positions on hard-surfaced roads will cause
increased tire wear and damage to the driveline
components. For further information on shifting
into 4H or 4L Ú page 162.
The instrument cluster alerts the driver that the
vehicle is in four-wheel drive, and the front and
rear driveshafts are locked together. The light will
illuminate when the transfer case is shifted into
the 4H position.
When operating your vehicle in 4L, the engine
speed will be approximately three times (four times
for Rubicon models) that of the 2H or 4H positions at a given road speed. Take care not to overspeed
the engine.
Proper operation of four-wheel drive vehicles
depends on tires of equal size, type, and
circumference on each wheel. Any difference will
adversely affect shifting and cause damage to the
transfer case.
Because four-wheel drive provides improved
traction, there is a tendency to exceed safe turning
and stopping speeds. Do not go faster than road
conditions permit.
Shifting Procedures
2H TO 4H OR 4H TO 2H
Shifting between 2H and 4H can be made with the
vehicle stopped or in motion. The preferred shifting
speed would be 0 to 45 mph (72 km/h). With the
vehicle in motion, the transfer case will engage/
disengage faster if you momentarily release the
accelerator pedal after completing the shift. Do not
accelerate while shifting the transfer case. Apply a
constant force when shifting the transfer case lever.
NOTE:
Do not attempt to make a shift while only the
front or rear wheels are spinning. The front and
rear driveshaft speeds must be equal for the
shift to take place. Shifting while only the front
or rear wheels are spinning can cause damage
to the transfer case.
Delayed shifts out of four-wheel drive may be
experienced due to uneven tire wear, low or
uneven tire pressures, excessive vehicle
loading, or cold temperatures.
Shifting effort will increase with speed, this is
normal.
During cold weather, you may experience
increased effort in shifting until the transfer case
fluid warms up. This is normal.
4H TO 4L OR 4L TO 4H
With the vehicle rolling at 1 to 3 mph (2 to 5 km/h),
shift an automatic transmission into NEUTRAL (N), or
press the clutch pedal on a manual transmission.
While the vehicle is coasting at 1 to 3 mph (2 to
5 km/h), shift the transfer case lever firmly to the
desired position. Do not pause with the transfer case
in N (Neutral). Once the shift is completed, place the
automatic transmission into DRIVE or release the
clutch pedal on a manual transmission.
NOTE:Shifting into or out of 4L is possible with the vehicle
completely stopped; however, difficulty may occur
due to the mating teeth not being properly aligned.
Several attempts may be required for clutch teeth
alignment and shift completion to occur. The
preferred method is with the vehicle rolling at 1 to
3 mph (2 to 5 km/h). Avoid attempting to engage
or disengage 4L with the vehicle moving faster
than 1 to 3 mph (2 to 5 km/h).
23_JT_OM_EN_USC_t.book Page 162
Page 166 of 448
164STARTING AND OPERATING
For variable driving conditions, the 4H AUTO mode
can be used. In this mode, the front axle is
engaged, but the vehicle's power is sent to the rear
wheels. Four-wheel drive will be automatically
engaged when the vehicle senses a loss of
traction. Because the front axle is engaged, this
mode will result in lower fuel economy than the 2H
mode.
In the event that additional traction is required, the
transfer case 4H and 4L positions can be used to
lock the front and rear driveshafts together, forcing
the front and rear wheels to rotate at the same
speed. The 4H and 4L positions are intended for
loose, slippery road surfaces only and not intended
for normal driving. Driving in the 4H and 4L
positions on hard-surfaced roads will cause
increased tire wear and damage to the driveline
components. For further information on shifting
into 4H or 4L Ú page 164.
The instrument cluster alerts the driver that the
vehicle is in four-wheel drive, and the front and
rear driveshafts are locked together. The light will
illuminate when the transfer case is shifted into
the 4H position.
When operating your vehicle in 4L, the engine
speed will be approximately three times (four times
for Rubicon models) that of the 2H or 4H positions
at a given road speed. Take care not to overspeed
the engine. Proper operation of four-wheel drive vehicles
depends on tires of equal size, type, and
circumference on each wheel. Any difference will
adversely affect shifting and cause damage to the
transfer case.
Because four-wheel drive provides improved
traction, there is a tendency to exceed safe turning
and stopping speeds. Do not go faster than road
conditions permit.
Shifting Procedures
2H TO 4H AUTO OR 4H AUTO TO 2H
Shifting between 2H and 4H AUTO can be made
with the vehicle stopped or in motion. The
preferred shifting speed would be 0 to 45 mph
(72 km/h). With the vehicle in motion, the transfer
case will engage/disengage faster if you
momentarily release the accelerator pedal after
completing the shift. Do not accelerate while
shifting the transfer case. Apply a constant force
when shifting the transfer case lever.
2H/4H AUTO TO 4H PART TIME OR 4H PART
TIME TO 2H/4H AUTO
Shifting between 2H/4H AUTO to 4H PART TIME
can be made with the vehicle stopped or in motion.
The preferred shifting speed would be 0 to 45 mph
(72 km/h). With the vehicle in motion, the transfer
case will engage/disengage faster if you
momentarily release the accelerator pedal after completing the shift. Do not accelerate while
shifting the transfer case. Apply a constant force
when shifting the transfer case lever.
NOTE:
Do not attempt to make a shift while only the
front or rear wheels are spinning. The front and
rear driveshaft speeds must be equal for the
shift to take place. Shifting while only the front
or rear wheels are spinning can cause damage
to the transfer case.
Delayed shifts out of four-wheel drive may be
experienced due to uneven tire wear, low or
uneven tire pressures, excessive vehicle
loading, or cold temperatures.
Shifting effort will increase with speed, this is
normal.
During cold weather, you may experience
increased effort in shifting until the transfer case
fluid warms up. This is normal.
4H PART TIME/4H AUTO TO 4L OR 4L TO 4H
PART TIME/4H AUTO
With the vehicle rolling at 1 to 3 mph (2 to 5 km/h),
shift an automatic transmission into NEUTRAL (N),
or press the clutch pedal on a manual
transmission. While the vehicle is coasting at 1 to
3 mph (2 to 5 km/h), shift the transfer case lever
firmly to the desired position. Do not pause with
the transfer case in N (Neutral). Once the shift is
23_JT_OM_EN_USC_t.book Page 164
Page 177 of 448
STARTING AND OPERATING175
To Accelerate For Passing
While the Cruise Control is set, press the
accelerator to pass as you would normally. When
the pedal is released, the vehicle will return to the
set speed.
USING CRUISE CONTROL ON HILLS
The transmission may downshift on hills to
maintain the vehicle set speed.
The Cruise Control system maintains speed up and
down hills. A slight speed change on moderate hills
is normal. On steep hills, a greater speed loss or
gain may occur so it may be preferable to drive
without Cruise Control.
To Resume Speed
To resume a previously set speed, push the RES
button and release. Resume can be used at any
speed above 20 mph (32 km/h).
To Deactivate
A soft tap on the brake pedal, pushing the CANC
(cancel) button, or normal brake pressure while
slowing the vehicle will deactivate the Cruise
Control without erasing the set speed from
memory.
The following conditions will also deactivate the
Cruise Control without erasing the set speed from
memory:
Vehicle parking brake is applied
Stability event occurs
Gear selector is moved out of DRIVE
Engine overspeed occurs
Clutch pedal is pressed (manual transmission
only)
Vehicle is operating at a low RPM (manual trans -
mission only)
Pushing the on/off button or placing the ignition in
the OFF position, erases the set speed from
memory.
ADAPTIVE CRUISE CONTROL (ACC)
Adaptive Cruise Control (ACC) increases the driving
convenience provided by Cruise Control while
traveling on highways and major roadways.
However, it is not a safety system and not designed
to prevent collisions. The Cruise Control function
performs differently if your vehicle is not equipped
with ACC Ú page 173.
ACC will allow you to keep Cruise Control engaged
in light to moderate traffic conditions without the
constant need to reset your speed. ACC utilizes a
radar sensor and a forward-facing camera
designed to detect a vehicle directly ahead of you
to maintain a set speed.
NOTE:
If the ACC sensor detects a vehicle ahead, ACC
will apply limited braking or accelerate (not to
exceed the original set speed) automatically to
maintain a preset following distance, while
matching the speed of the vehicle ahead.
Any chassis/suspension or tire size modifica -
tions to the vehicle will affect the performance
of the Adaptive Cruise Control and Forward Colli -
sion Warning system.
Fixed Speed Cruise Control (ACC not enabled)
will not detect vehicles directly ahead of you.
Always be aware of the feature selected
Ú page 432.
WARNING!
Cruise Control can be dangerous where the
system cannot maintain a constant speed. Your
vehicle could go too fast for the conditions, and
you could lose control and have an accident. Do
not use Cruise Control in heavy traffic or on
roads that are winding, icy, snow-covered or
slippery.
4
23_JT_OM_EN_USC_t.book Page 175
Page 198 of 448
196STARTING AND OPERATING
This label contains the month and year of
manufacture, Gross Vehicle Weight Rating
(GVWR), front and rear Gross Axle Weight Rating
(GAWR), and Vehicle Identification Number (VIN). A
Month-Day-Hour (MDH) number is included on this
label and indicates the Month, Day and Hour of
manufacture. The bar code that appears on the
bottom of the label is your VIN.
Gross Vehicle Weight Rating (GVWR)
The GVWR is the total permissible weight of your
vehicle including driver, passengers, vehicle,
options and cargo. The label also specifies
maximum capacities of front and rear Gross Axle
Weight Rating (GAWR). Total load must be limited
so GVWR on front and rear GAWR are not
exceeded.
Payload
The payload of a vehicle is defined as the allowable
load weight a truck can carry, including the weight
of the driver, all passengers, options and cargo.
Gross Axle Weight Rating (GAWR)
The GAWR is the maximum permissible load on the
front and rear axles. The load must be distributed
in the cargo area so that the GAWR of each axle is
not exceeded.
Each axle GAWR is determined by the components
in the system with the lowest load carrying capacity
(axle, springs, tires or wheels). Heavier axles or
suspension components sometimes specified by purchasers for increased durability does not
necessarily increase the vehicle's GVWR.
Tire Size
The tire size on the Vehicle Certification Label
represents the actual tire size on your vehicle.
Replacement tires must be equal to the load
capacity of this tire size.
Rim Size
This is the rim size that is appropriate for the tire
size listed.
Inflation Pressure
This is the cold tire inflation pressure for your
vehicle for all loading conditions up to full GAWR.
Curb Weight
The curb weight of a vehicle is defined as the total
weight of the vehicle with all fluids, including
vehicle fuel, at full capacity conditions, and with no
occupants or cargo loaded into the vehicle. The
front and rear curb weight values are determined
by weighing your vehicle on a commercial scale
before any occupants or cargo are added.
Loading
The actual total weight and the weight of the front
and rear of your vehicle at the ground can best be
determined by weighing it when it is loaded and
ready for operation.
The entire vehicle should first be weighed on a
commercial scale to ensure that the GVWR has not
been exceeded. The weight on the front and rear of
the vehicle should then be determined separately
to be sure that the load is properly distributed over
the front and rear axle. Weighing the vehicle may
show that the GAWR of either the front or rear axles
has been exceeded but the total load is within the
specified GVWR. If so, weight must be shifted from
front to rear or rear to front as appropriate until the
specified weight limitations are met. Store the
heavier items down low and be sure that the
weight is distributed equally. Stow all loose items
securely before driving.
Improper weight distributions can have an adverse
effect on the way your vehicle steers and handles
and the way the brakes operate.
WARNING!
Do not load your vehicle any heavier than the
GVWR or the maximum front and rear GAWR. If
you do, parts on your vehicle can break, or it can
change the way your vehicle handles. This could
cause you to lose control. Overloading can
shorten the life of your vehicle.
23_JT_OM_EN_USC_t.book Page 196
Page 199 of 448
STARTING AND OPERATING197
TRAILER TOWING
In this section you will find safety tips and
information on limits to the type of towing you can
reasonably do with your vehicle. Before towing a
trailer, carefully review this information to tow your
load as efficiently and safely as possible.
To maintain the New Vehicle Limited Warranty
coverage, follow the requirements and
recommendations in this manual concerning
vehicles used for trailer towing.
COMMON TOWING DEFINITIONS
The following trailer towing related definitions will
assist you in understanding the following
information:
Gross Vehicle Weight Rating (GVWR)
The GVWR is the total allowable weight of your
vehicle. This includes driver, passengers, cargo
and tongue weight. The total load must be limited
so that you do not exceed the GVWR Ú page 195.
Gross Trailer Weight (GTW)
The GTW is the weight of the trailer plus the weight
of all cargo, consumables and equipment
(permanent or temporary) loaded in or on the trailer
in its "loaded and ready for operation" condition.
The recommended way to measure GTW is to put
your fully loaded trailer on a vehicle scale. The
entire weight of the trailer must be supported by
the scale.
Gross Combination Weight Rating (GCWR)
The GCWR is the total permissible weight of your
vehicle and trailer when weighed in combination.
Gross Axle Weight Rating (GAWR)
The GAWR is the maximum capacity of the front
and rear axles. Distribute the load over the front
and rear axles evenly. Make sure that you do not
exceed either front or rear GAWR Úpage 195.
Tongue Weight (TW)
The TW is the downward force exerted on the hitch
ball by the trailer. You must consider this as part of
the load on your vehicle.
Frontal Area
The frontal area is the maximum height multiplied
by the maximum width of the front of a trailer.
Trailer Sway Control (TSC) — If Equipped
The TSC is a telescoping link that can be installed
between the hitch receiver and the trailer tongue.
It typically provides adjustable friction associated
with the telescoping motion to dampen any
unwanted trailer swaying motions while traveling.
Weight-Carrying Hitch
A weight-carrying hitch supports the trailer tongue
weight, just as if it were luggage located at a hitch
ball or some other connecting point of the vehicle.
These kinds of hitches are commonly used to tow
small and medium sized trailers.
Weight-Distributing Hitch
A Weight-Distributing Hitch system works by
applying leverage through spring (load) bars. They
are typically used for heavier loads to distribute
trailer tongue weight to the tow vehicle's front axle
and the trailer axle(s). When used in accordance
with the manufacturer's directions, it provides for a
more level ride, offering more consistent steering
and brake control thereby enhancing towing
safety. The addition of a friction/hydraulic sway
control also dampens sway caused by traffic and
crosswinds and contributes positively to tow
vehicle and trailer stability. Trailer sway control and
WARNING!
If the gross trailer weight is 2,000 lb (907 kg) or
more, it is recommended to use a weight-
distributing hitch to ensure stable handling of
your vehicle. If you use a standard weight-
carrying hitch, you could lose control of your
vehicle and cause a collision.
WARNING!
It is important that you do not exceed the
maximum front or rear GAWR. A dangerous
driving condition can result if either rating is
exceeded.
4
23_JT_OM_EN_USC_t.book Page 197
Page 205 of 448
STARTING AND OPERATING203
Towing Requirements — Tires
Proper tire inflation pressures are essential to
the safe and satisfactory operation of your
vehicle.
Check the trailer tires for proper tire inflation
pressures before trailer usage.
Check for signs of tire wear or visible tire
damage before towing a trailer.
Replacing tires with a higher load carrying
capacity will not increase the vehicle's GVWR
and GAWR limits.
For further information Úpage 395.
Towing Requirements — Trailer Brakes
Do not interconnect the hydraulic brake system
or vacuum system of your vehicle with that of
the trailer. This could cause inadequate braking
and possible personal injury.
An electronically actuated trailer brake
controller is required when towing a trailer with
electronically actuated brakes. When towing a
trailer equipped with a hydraulic surge actuated
brake system, an electronic brake controller is
not required.
NOTE:This vehicle has an aftermarket brake controller
connector under the dash to the left of the brake
pedal. This will be a four pin connector and will be
gray in color.
Trailer brakes are recommended for trailers
over 1,000 lb (453 kg) and required for trailers
in excess of 2,000 lb (907 kg).Towing Requirements — Trailer Lights And
Wiring
Whenever you pull a trailer, regardless of the trailer
size, stop lights and turn signals on the trailer are
required for motoring safety.
The Trailer Tow Package may include a four- and
seven-pin wiring harness. Use a factory approved
trailer harness and connector.
NOTE:Do not cut or splice wiring into the vehicle’s wiring
harness.
The electrical connections are all complete to the
vehicle but you must mate the harness to a trailer
connector. Refer to the following illustrations.
NOTE:
Disconnect the trailer wiring connector from the
vehicle (or any other device plugged into
vehicle’s electrical connectors) before
launching a boat into water.
Be sure to reconnect once clear from water
area.
WARNING!
Do not connect trailer brakes to your vehicle's
hydraulic brake lines. It can overload your
brake system and cause it to fail. You might
not have brakes when you need them and
could have an accident.
Towing any trailer will increase your stopping
distance. When towing, you should allow for
additional space between your vehicle and the
vehicle in front of you. Failure to do so could
result in an accident.
CAUTION!
If the trailer weighs more than 1,000 lb (453 kg)
loaded, it should have its own brakes and they
should be of adequate capacity. Failure to do
this could lead to accelerated brake lining wear,
higher brake pedal effort, and longer stopping
distances.
4
23_JT_OM_EN_USC_t.book Page 203