Wire JEEP GRAND CHEROKEE 2002 WJ / 2.G Workshop Manual
[x] Cancel search | Manufacturer: JEEP, Model Year: 2002, Model line: GRAND CHEROKEE, Model: JEEP GRAND CHEROKEE 2002 WJ / 2.GPages: 2199, PDF Size: 76.01 MB
Page 1782 of 2199

INSTALLATION
(1) Place the floor shifter lever in PARK position.
(2) Loosen the adjustment screw on the shift cable.
(3) Verify that the park lock cable adjustment tab
is pulled upward to the unlocked position.
(4) Install wiring harness to the shifter assembly
bracket. Engage any wire connectors removed from
the shifter assembly.
(5) Install the transfer case shift cable to the
shifter assembly bracket. Install clip to hold cable to
the bracket.
(6) Snap the transfer case shift cable, if equipped,
onto the transfer case shift lever pin.
(7) Install the park lock cable into the shifter
assembly bracket and into the shifter BTSI lever.(Re-
fer to 21 - TRANSMISSION/TRANSAXLE/AUTO-
MATIC/SHIFT INTERLOCK MECHANISM -
ADJUSTMENTS)
(8) Install the shift cable to the shifter assembly
bracket. Push cable into the bracket until secure.
(9) Install shifter assembly onto the shifter assem-
bly studs on the floor pan.
(10) Install the nuts to hold the shifter assembly
onto the floor pan. Tighten nuts to 28 N´m (250
in.lbs.).
(11) Snap the shift cable onto the shift lever pin.
(12) Verify that the shift lever is in the PARK posi-
tion.
(13) Tighten the adjustment screw to 7 N´m (65
in.lbs.).
(14) Place the key in the accessory position.
(15) Push downward on the park lock cable adjust-
ment tab to lock the adjustment.
(16) Verify correct shifter, park lock, and BTSI
operation.
(17) Install any console parts removed for access to
shift lever assembly and shift cables. (Refer to 23 -
BODY/INTERIOR/FLOOR CONSOLE - INSTALLA-
TION)
SOLENOID SWITCH VALVE
DESCRIPTION
The Solenoid Switch Valve (SSV) is located in the
valve body and controls the direction of the transmis-
sion fluid when the L/R-TCC solenoid is energized.
OPERATION
The Solenoid Switch Valve controls line pressure
from the LR-TCC solenoid. In 1st gear, the SSV will
be in the downshifted position, thus directing fluid to
the L/R clutch circuit. In 2nd, 3rd, 4th,and 5th gears,
the solenoid switch valve will be in the upshifted
position and directs the fluid into the torque con-
verter clutch (TCC) circuit.When shifting into 1st gear, a special hydraulic
sequence is performed to ensure SSV movement into
the downshifted position. The L/R pressure switch is
monitored to confirm SSV movement. If the move-
ment is not confirmed (the L/R pressure switch does
not close), 2nd gear is substituted for 1st. A DTC will
be set after three unsuccessful attempts are made to
get into 1st gear in one given key start.
SOLENOIDS
DESCRIPTION
The typical electrical solenoid used in automotive
applications is a linear actuator. It is a device that
produces motion in a straight line. This straight line
motion can be either forward or backward in direc-
tion, and short or long distance.
A solenoid is an electromechanical device that uses
a magnetic force to perform work. It consists of a coil
of wire, wrapped around a magnetic core made from
steel or iron, and a spring loaded, movable plunger,
which performs the work, or straight line motion.
The solenoids used in transmission applications
are attached to valves which can be classified asnor-
mally openornormally closed. Thenormally
opensolenoid valve is defined as a valve which
allows hydraulic flow when no current or voltage is
applied to the solenoid. Thenormally closedsole-
noid valve is defined as a valve which does not allow
hydraulic flow when no current or voltage is applied
to the solenoid. These valves perform hydraulic con-
trol functions for the transmission and must there-
fore be durable and tolerant of dirt particles. For
these reasons, the valves have hardened steel pop-
pets and ball valves. The solenoids operate the valves
directly, which means that the solenoids must have
very high outputs to close the valves against the siz-
able flow areas and line pressures found in current
transmissions. Fast response time is also necessary
to ensure accurate control of the transmission.
The strength of the magnetic field is the primary
force that determines the speed of operation in a par-
ticular solenoid design. A stronger magnetic field will
cause the plunger to move at a greater speed than a
weaker one. There are basically two ways to increase
the force of the magnetic field:
1. Increase the amount of current applied to the
coil or
2. Increase the number of turns of wire in the coil.
The most common practice is to increase the num-
ber of turns by using thin wire that can completely
fill the available space within the solenoid housing.
The strength of the spring and the length of the
plunger also contribute to the response speed possi-
ble by a particular solenoid design.
WJAUTOMATIC TRANSMISSION - 545RFE 21 - 263
SHIFT MECHANISM (Continued)
Page 1790 of 2199
TRANSMISSION SOLENOID/
TRS ASSEMBLY
DESCRIPTION
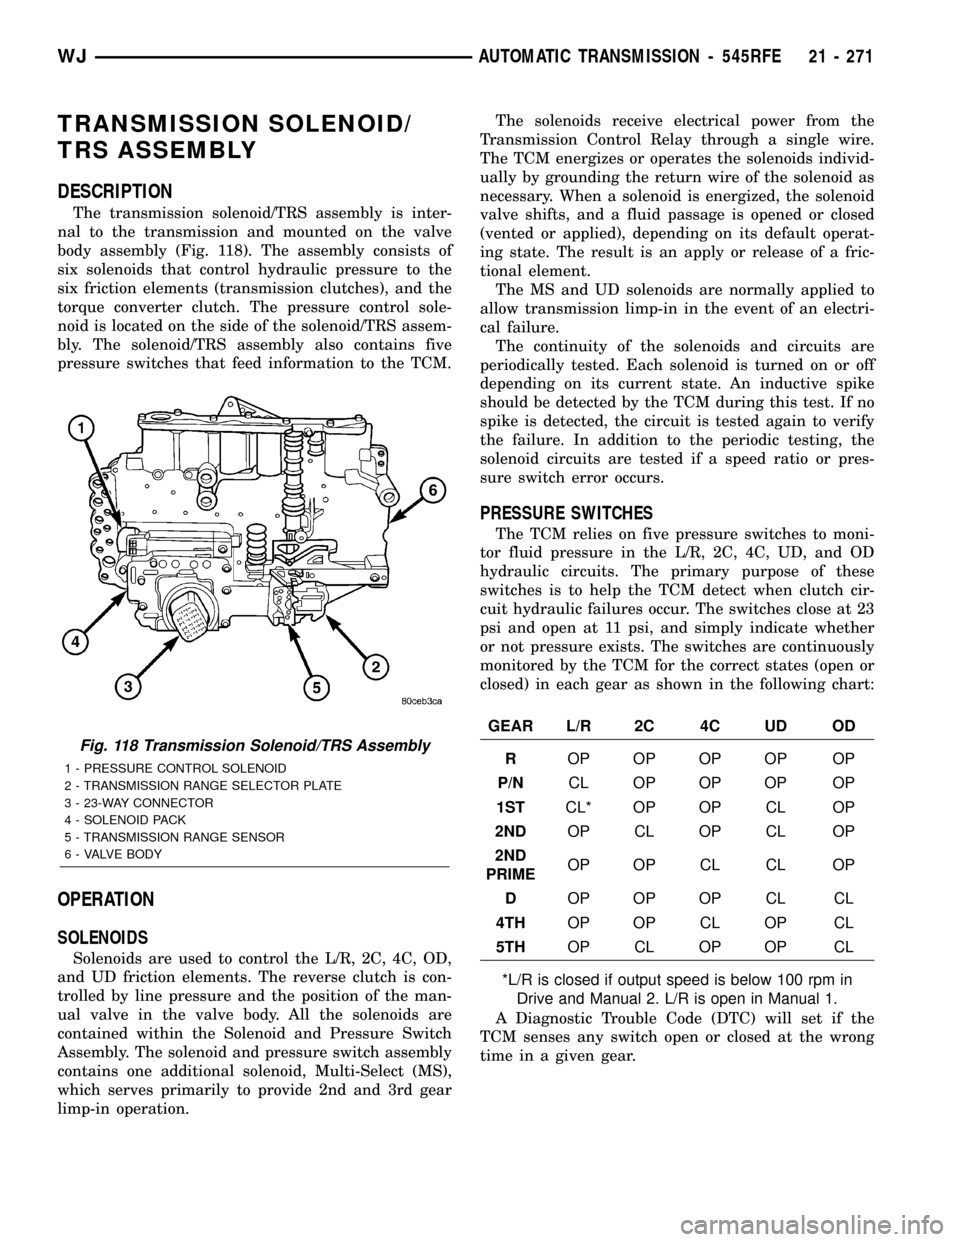
The transmission solenoid/TRS assembly is inter-
nal to the transmission and mounted on the valve
body assembly (Fig. 118). The assembly consists of
six solenoids that control hydraulic pressure to the
six friction elements (transmission clutches), and the
torque converter clutch. The pressure control sole-
noid is located on the side of the solenoid/TRS assem-
bly. The solenoid/TRS assembly also contains five
pressure switches that feed information to the TCM.
OPERATION
SOLENOIDS
Solenoids are used to control the L/R, 2C, 4C, OD,
and UD friction elements. The reverse clutch is con-
trolled by line pressure and the position of the man-
ual valve in the valve body. All the solenoids are
contained within the Solenoid and Pressure Switch
Assembly. The solenoid and pressure switch assembly
contains one additional solenoid, Multi-Select (MS),
which serves primarily to provide 2nd and 3rd gear
limp-in operation.The solenoids receive electrical power from the
Transmission Control Relay through a single wire.
The TCM energizes or operates the solenoids individ-
ually by grounding the return wire of the solenoid as
necessary. When a solenoid is energized, the solenoid
valve shifts, and a fluid passage is opened or closed
(vented or applied), depending on its default operat-
ing state. The result is an apply or release of a fric-
tional element.
The MS and UD solenoids are normally applied to
allow transmission limp-in in the event of an electri-
cal failure.
The continuity of the solenoids and circuits are
periodically tested. Each solenoid is turned on or off
depending on its current state. An inductive spike
should be detected by the TCM during this test. If no
spike is detected, the circuit is tested again to verify
the failure. In addition to the periodic testing, the
solenoid circuits are tested if a speed ratio or pres-
sure switch error occurs.
PRESSURE SWITCHES
The TCM relies on five pressure switches to moni-
tor fluid pressure in the L/R, 2C, 4C, UD, and OD
hydraulic circuits. The primary purpose of these
switches is to help the TCM detect when clutch cir-
cuit hydraulic failures occur. The switches close at 23
psi and open at 11 psi, and simply indicate whether
or not pressure exists. The switches are continuously
monitored by the TCM for the correct states (open or
closed) in each gear as shown in the following chart:
GEAR L/R 2C 4C UD OD
ROP OP OP OP OP
P/NCL OP OP OP OP
1STCL* OP OP CL OP
2NDOP CL OP CL OP
2ND
PRIMEOP OP CL CL OP
DOP OP OP CL CL
4THOP OP CL OP CL
5THOP CL OP OP CL
*L/R is closed if output speed is below 100 rpm in
Drive and Manual 2. L/R is open in Manual 1.
A Diagnostic Trouble Code (DTC) will set if the
TCM senses any switch open or closed at the wrong
time in a given gear.
Fig. 118 Transmission Solenoid/TRS Assembly
1 - PRESSURE CONTROL SOLENOID
2 - TRANSMISSION RANGE SELECTOR PLATE
3 - 23-WAY CONNECTOR
4 - SOLENOID PACK
5 - TRANSMISSION RANGE SENSOR
6 - VALVE BODY
WJAUTOMATIC TRANSMISSION - 545RFE 21 - 271
Page 1793 of 2199

be in the downshifted position, thus directing fluid to
the L/R clutch circuit. In 2nd, 3rd, 4th, and fifth
gears, the solenoid switch valve will be in the
upshifted position and directs the fluid into the
torque converter clutch (TCC) circuit.
When shifting into 1st gear, a special hydraulic
sequence is performed to ensure SSV movement into
the downshifted position. The L/R pressure switch is
monitored to confirm SSV movement. If the move-
ment is not confirmed (the L/R pressure switch does
not close), 2nd gear is substituted for 1st. A DTC will
be set after three unsuccessful attempts are made to
get into 1st gear in one given key start.
MANUAL VALVE
The manual valve is a relay valve. The purpose of
the manual valve is to direct fluid to the correct cir-
cuit needed for a specific gear or driving range. The
manual valve, as the name implies, is manually oper-
ated by the driver with a lever located on the top of
the valve body. The valve is connected mechanically
by a cable to the gearshift mechanism. The valve is
held in each of its positions by a roller detent spring
(Fig. 123) that engages the ªroostercombº of the TRS
selector plate.
LOW/REVERSE SWITCH VALVE
The low/reverse switch valve allows the low/reverse
clutch to be operated by either the LR/CC solenoid or
the MS solenoid.
REMOVAL
The valve body can be removed for service without
having to remove the transmission assembly.
The valve body can be disassembled for cleaning
and inspection of the individual components. (Refer
to 21 - TRANSMISSION/TRANSAXLE/AUTOMATIC
- 45RFE/VALVE BODY - DISASSEMBLY)
(1) Shift transmission into PARK.
(2) Raise vehicle.
(3) Disconnect wires at the solenoid and pressure
switch assembly connector.
(4) Position drain pan under transmission oil pan.
(5) Remove transmission oil pan.
(6) Remove the primary oil filter from valve body.
(Fig. 124)
Fig. 123 TRS Selector Plate and Detent Spring
1 - TRS SELECTOR PLATE
2 - DETENT SPRING
3 - CLUTCH PASSAGE SEALS
Fig. 124 Remove Primary Oil Filter
1 - PRIMARY OIL FILTER
2 - COOLER RETURN FILTER
3 - COOLER RETURN FILTER BYPASS VALVE
4 - VALVE BODY
21 - 274 AUTOMATIC TRANSMISSION - 545RFEWJ
VALVE BODY (Continued)
Page 1868 of 2199
CLEANING
Remove the protective coating on the tires before
delivery of a vehicle. This coating may cause deteri-
oration of the tires.
To remove the protective coating, apply warm
water and let it soak for a few minutes. Afterwards,
scrub the coating away with a soft bristle brush.
Steam cleaning may also be used to remove the coat-
ing.
NOTE: DO NOT use gasoline, mineral oil, oil-based
solvent or a wire brush for cleaning.
SPECIFICATIONS
TIRES
SPECIFICATIONS
DESCRIPTION SPECIFICATION
TIRE P225/75R16
TIRE P245/70R16
TIRE P235/65R17
SPECIFICATIONS -
SPECIFICATIONS
DESCRIPTION - RIM SPECIFICATION - TIRE
BASE LAREDO (2.7L &
4.0L)
16x7P225/75R16
OPTIONAL LAREDO
(2.7L, 4.0L, 4.7L)
16x7P245/70R16
LAREDO 4.7L (JAPAN &
AUSTRALIA)
17x7.5P235/65R17
OPTIONAL LAREDO (UP
COUNTRY)
17x7.5P235/65R17
BASE LIMITED
17x7.5P235/65R17
OPTIONAL LIMITED (UP
COUNTRY)
& OVERLAND
17x7.5P235/65R17
BASE WHEEL / SNOW
TIREP235/65R17
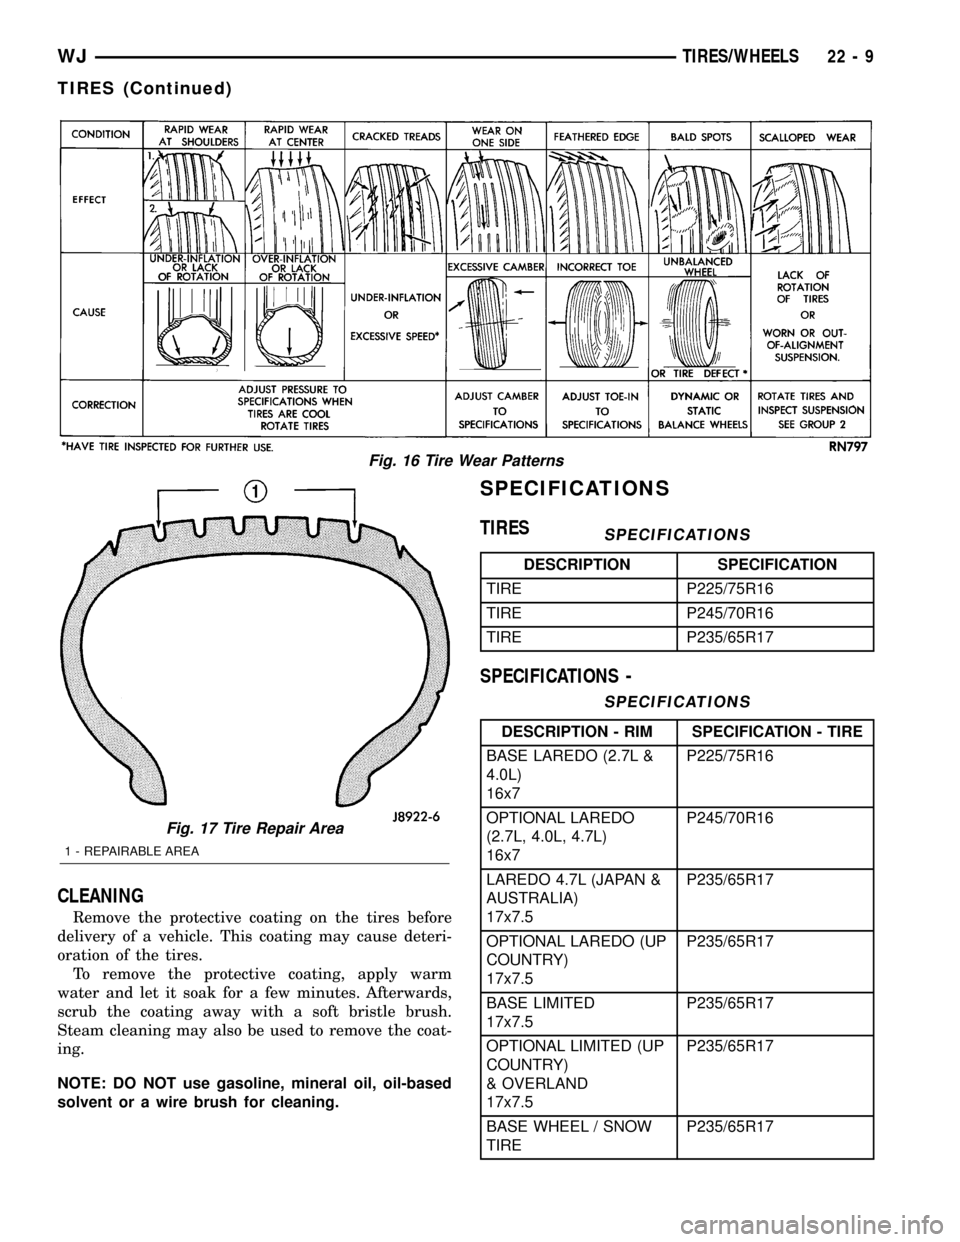
Fig. 16 Tire Wear Patterns
Fig. 17 Tire Repair Area
1 - REPAIRABLE AREA
WJTIRES/WHEELS 22 - 9
TIRES (Continued)
Page 1882 of 2199

LIFTGATE
REMOVAL
CAUTION: DO NOT DISCONNECT THE SUPPORT ROD
CYLINDERS WITH THE LIFTGATE CLOSED. THE SUP-
PORT ROD PISTONS ARE OPERATED BY HIGH PRES-
SURE GAS. THIS PRESSURE COULD CAUSE DAMAGE
AND /OR PERSONAL INJURY IF THEY ARE REMOVED
WHILE THE PISTONS ARE COMPRESSED.
(1) Open the liftgate. Support the liftgate for ease
of repair.
(2) Remove the liftgate trim panel.
(3) Remove the prop rods from the liftgate.
(4) Unplug the wire harnesses and disconnect the
washer hose.
(5) Mark the hinge location with a wax pencil or
other suitable device (Fig. 5).
(6) Remove the hinge screws and remove liftgate
from vehicle.
INSTALLATION
(1) Position the liftgate on the vehicle and align
the witness marks.
(2) Install the hinge screws at liftgate. Tighten
hinge screws to 28N´m (21ft. lbs.).
(3) Connect the wire harnesses and the washer
hose.
(4) Install the trim panel.
(5) Install the prop rods.
(6) Close the liftgate and check for proper latching
and alignment.
ADJUSTMENTS
LIFTGATE ADJUSTMENT
The position of the liftgate can be adjusted upward
or downward by the use of slots in the hinge. An
inward or outward adjustment is achieved by use of
slots in the body. If an inward or outward adjustment
is needed, use 3MŸ Fast and Firm or equivalent on
the hinge to body mating surface as a sealant.
TRIM PANEL
REMOVAL
REMOVAL - LIFTGATE TRIM PANEL
NOTE: The liftgate trim panel is attached with
screws and spring clips.
(1) Raise the liftgate.
(2) Remove the screws securing the liftgate trim
panel to the liftgate (Fig. 6).
(3) Disconnect the rear window defroster wires.
(4) Using a trim stick, or other suitable tool, pry
the liftgate trim panel off the liftgate.
Fig. 5 Liftgate
1 - HINGE
2 - LIFTGATE
Fig. 6 Liftgate Trim Panel
1 - LIFTGATE
2 - LIFTGATE TRIM PANEL
WJDECKLID/HATCH/LIFTGATE/TAILGATE 23 - 9
Page 1883 of 2199
REMOVAL - LOWER LIFTGATE OPENING TRIM
PANEL
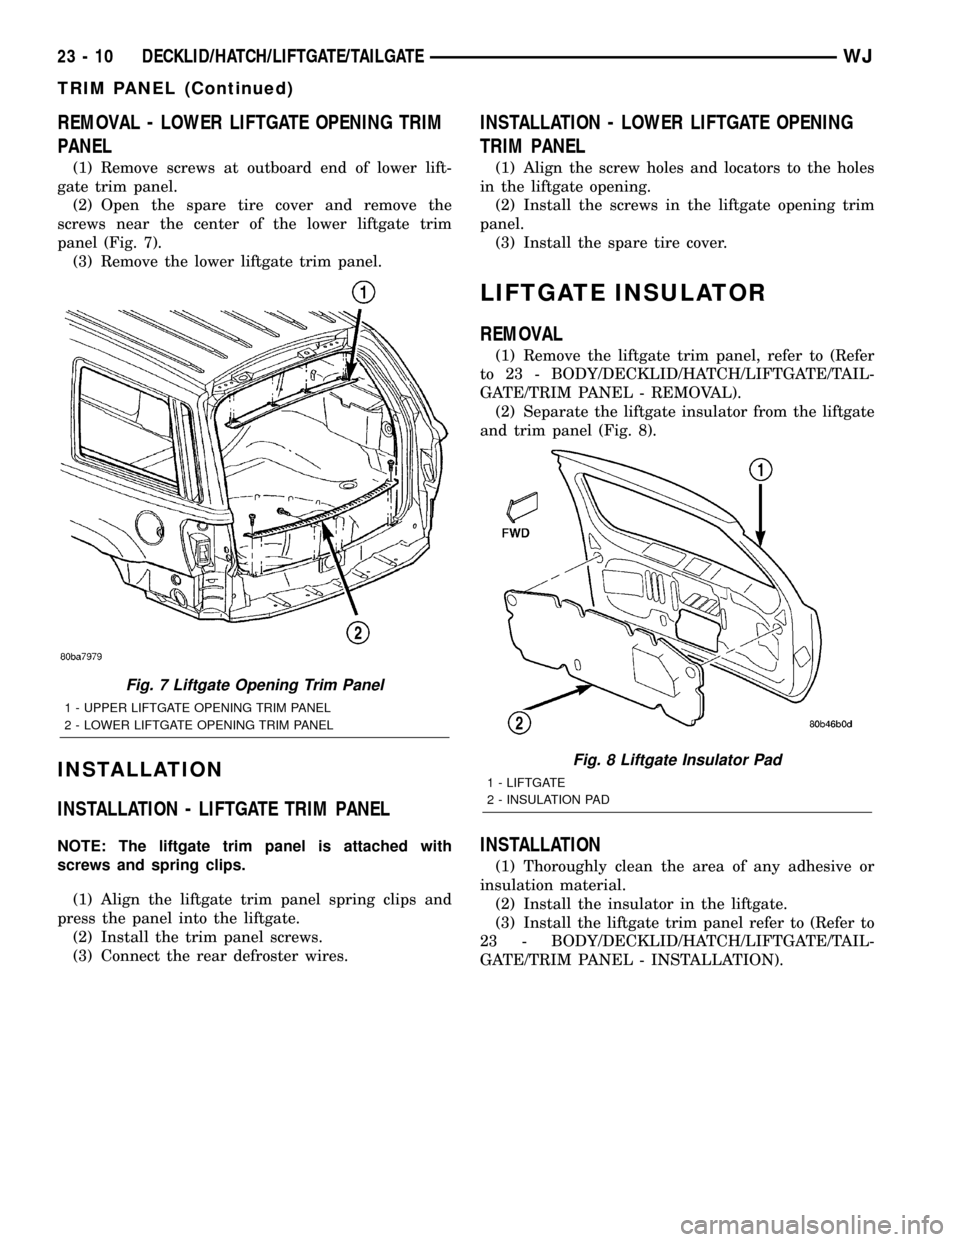
(1) Remove screws at outboard end of lower lift-
gate trim panel.
(2) Open the spare tire cover and remove the
screws near the center of the lower liftgate trim
panel (Fig. 7).
(3) Remove the lower liftgate trim panel.
INSTALLATION
INSTALLATION - LIFTGATE TRIM PANEL
NOTE: The liftgate trim panel is attached with
screws and spring clips.
(1) Align the liftgate trim panel spring clips and
press the panel into the liftgate.
(2) Install the trim panel screws.
(3) Connect the rear defroster wires.
INSTALLATION - LOWER LIFTGATE OPENING
TRIM PANEL
(1) Align the screw holes and locators to the holes
in the liftgate opening.
(2) Install the screws in the liftgate opening trim
panel.
(3) Install the spare tire cover.
LIFTGATE INSULATOR
REMOVAL
(1) Remove the liftgate trim panel, refer to (Refer
to 23 - BODY/DECKLID/HATCH/LIFTGATE/TAIL-
GATE/TRIM PANEL - REMOVAL).
(2) Separate the liftgate insulator from the liftgate
and trim panel (Fig. 8).
INSTALLATION
(1) Thoroughly clean the area of any adhesive or
insulation material.
(2) Install the insulator in the liftgate.
(3) Install the liftgate trim panel refer to (Refer to
23 - BODY/DECKLID/HATCH/LIFTGATE/TAIL-
GATE/TRIM PANEL - INSTALLATION).
Fig. 7 Liftgate Opening Trim Panel
1 - UPPER LIFTGATE OPENING TRIM PANEL
2 - LOWER LIFTGATE OPENING TRIM PANEL
Fig. 8 Liftgate Insulator Pad
1 - LIFTGATE
2 - INSULATION PAD
23 - 10 DECKLID/HATCH/LIFTGATE/TAILGATEWJ
TRIM PANEL (Continued)
Page 1887 of 2199

(7) Remove glass run channel from door.
INSTALLATION
(1) Position glass run channel in door (Fig. 6).
(2) Align glass run channel with door frame run
channel and slide channel upward to secure door.
(3) Press glass run channel weatherstrip into rear
run channel.
(4) Install bolt attaching run channel to inner door
panel.
(5) Install outer belt weatherstrip, (Refer to 23 -
BODY/WEATHERSTRIP/SEALS/FDR OUTER BELT
WEATHERSTRIP - INSTALLATION).
(6) Install inner belt weatherstrip, (Refer to 23 -
BODY/WEATHERSTRIP/SEALS/FDR INNER BELT
WEATHERSTRIP - INSTALLATION).
(7) Install the waterdam, (Refer to 23 - BODY/
DOOR - FRONT/WATERDAM - INSTALLATION).
HINGE
REMOVAL
(1) Open and support door.
(2) Using a wax pencil, or other suitable device,
reference mark the hinge placement
(3) Disconnect the door wire harness.
(4) Remove the door check from the ªAº pillar (Fig.
7).
(5) Remove the fasteners retaining the door hinge
to the door (Fig. 8).
(6) Remove the door.
(7) Remove the hinge from the ªAº pillar.
Fig. 6 Front Door Glass Run Channel
1 - DOOR
2 - GLASS
3 - GLASS RUN CHANNEL
4 - REGULATOR
Fig. 7 Front Door Check
1 - DOOR CHECK
2 - FRONT DOOR
Fig. 8 Front Door Hinges
1 - WASHER
2 - UPPER HINGE
3 - FRONT DOOR
4 - LOWER HINGE
5 - WASHER
23 - 14 DOOR - FRONTWJ
GLASS RUN CHANNEL (Continued)
Page 1888 of 2199
INSTALLATION
(1) Position hinge on ªAº pillar. (Use 3MtFast and
Firm or equivalent on the hinge to body mating sur-
face as a sealant.)
(2) Install hinge to body bolts, but do not tighten.
(3) Align the hinge to the reference marks and
torque the bolts to 35N´m (26 ft. lbs.).
(4) Install the door on the hinge and align with the
reference marks.
(5) Tighten the door to hinge fasteners.
(6) For adjustment see door adjustment procedure.
INSIDE HANDLE ACTUATOR
REMOVAL
(1) Remove door trim panel, refer to (Refer to 23 -
BODY/DOOR - FRONT/TRIM PANEL - REMOVAL).
(2) Disconnect latch and lock rods from inside han-
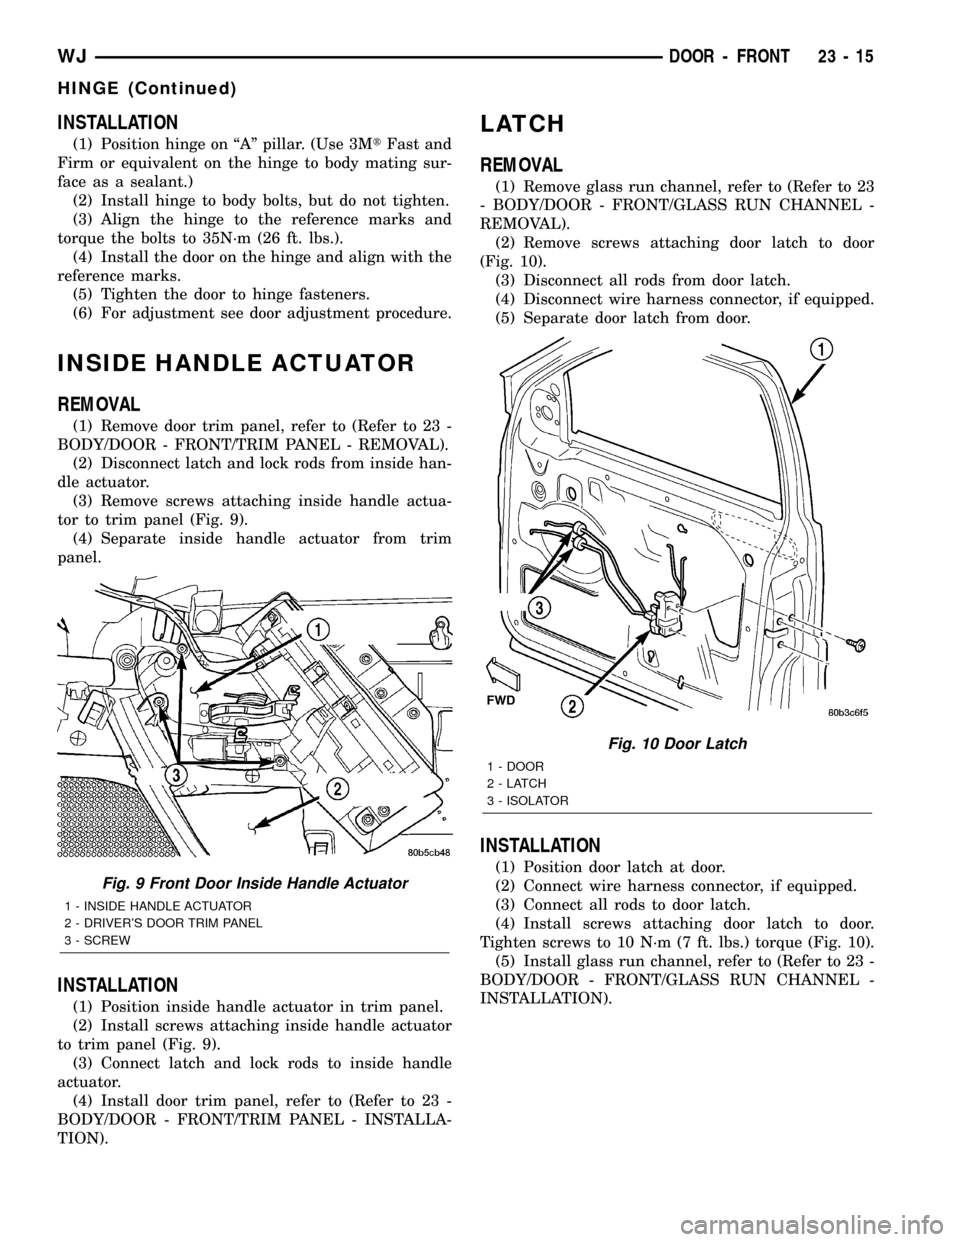
dle actuator.
(3) Remove screws attaching inside handle actua-
tor to trim panel (Fig. 9).
(4) Separate inside handle actuator from trim
panel.
INSTALLATION
(1) Position inside handle actuator in trim panel.
(2) Install screws attaching inside handle actuator
to trim panel (Fig. 9).
(3) Connect latch and lock rods to inside handle
actuator.
(4) Install door trim panel, refer to (Refer to 23 -
BODY/DOOR - FRONT/TRIM PANEL - INSTALLA-
TION).
LATCH
REMOVAL
(1) Remove glass run channel, refer to (Refer to 23
- BODY/DOOR - FRONT/GLASS RUN CHANNEL -
REMOVAL).
(2) Remove screws attaching door latch to door
(Fig. 10).
(3) Disconnect all rods from door latch.
(4) Disconnect wire harness connector, if equipped.
(5) Separate door latch from door.
INSTALLATION
(1) Position door latch at door.
(2) Connect wire harness connector, if equipped.
(3) Connect all rods to door latch.
(4) Install screws attaching door latch to door.
Tighten screws to 10 N´m (7 ft. lbs.) torque (Fig. 10).
(5) Install glass run channel, refer to (Refer to 23 -
BODY/DOOR - FRONT/GLASS RUN CHANNEL -
INSTALLATION).
Fig. 9 Front Door Inside Handle Actuator
1 - INSIDE HANDLE ACTUATOR
2 - DRIVER'S DOOR TRIM PANEL
3 - SCREW
Fig. 10 Door Latch
1 - DOOR
2-LATCH
3 - ISOLATOR
WJDOOR - FRONT 23 - 15
HINGE (Continued)
Page 1903 of 2199

(3) Install fascia, refer to (Refer to 13 - FRAMES
& BUMPERS/BUMPERS/FRONT FASCIA - INSTAL-
LATION).
HEADLAMP MOUNTING
MODULE
REMOVAL
CAUTION: Take special care when handling the
HMM not to damage the upper mounting tabs. Step
#3 must be performed prior to removing HMM from
the vehicle to prevent damage to HMM.
(1) Remove fascia, refer to (Refer to 13 - FRAMES
& BUMPERS/BUMPERS/FRONT FASCIA - REMOV-
AL).
(2) Remove inner fender liner.
(3) Reach into the wheelhouse opening and disen-
gage the retainer attaching the HMM to each side of
the body.
(4) Remove bolts attaching headlamp mounting
module to body (Fig. 10).
(5) Disconnect headlamp wire harness connectors.
(6) Separate headlamp mounting module from
vehicle.
INSTALLATION
(1) Position headlamp mounting module at vehicle.
(2) Connect headlamp wire harness connectors.
(3) Engage the retainer attaching the HMM to
each side of the body.
(4) Install bolts attaching headlamp mounting
module to body (Fig. 10).
(5) Install inner fender liner.
(6) Install front fascia, refer to (Refer to 13 -
FRAMES & BUMPERS/BUMPERS/FRONT FASCIA
- INSTALLATION).
LUGGAGE RACK
REMOVAL
NOTE: The skid strips are attached to the roof
panel with adhesive.
(1) Using a trim stick, or other suitable device, pry
support cover off.
(2) If necessary, slide the crossbars to expose the
screws attaching the slide rails to the supports.
(3) Remove the screws retaining the slide rails to
the supports.
Fig. 10 Headlamp Mounting Module
1 - CONNECTOR
2 - CONNECTOR3 - MOUNTING BRACKET
4 - HEADLAMP MODULE
23 - 30 EXTERIORWJ
GRILLE (Continued)
Page 1904 of 2199
(4) Remove the screws attaching the supports to
the roof panel.
(5) Separate the supports from the roof panel.
NOTE: If a crossbar needs to be serviced, the for-
ward or rearward supports will have to be removed.
INSTALLATION
(1) Position the supports on the roof panel and
install the screw. Be sure that the gasket is properly
seated.
(2) Position the luggage rack on the supports.
(3) Install the screws attaching the side rails to
the supports.
(4) Position the supports covers on the supports
and press into place.
SIDE VIEW MIRROR GLASS
REMOVAL
(1) With damaged mirror still on vehicle, position
mirror glass down and centered.
(2) Position a wide leverage device between the
bottom edge of the glass and the mirror shell.
(3) Firmly apply pressure in an upward direction
until glass assembly disengages from adapter plate.
(4) Disconnect the heater wire terminal, if
equipped, or the EC plug, if equipped.
INSTALLATION
(1) Connect the heater wire terminal or the EC
plug, if equipped.
(2) Position the replacement glass in the mirror
shell and align the four snap tabs with the four cav-
ities in the shell.
(3) Apply firm pressure inward until the replace-
ment glass assembly engages with the adapter plate.
Correct assembly will result in a firm click. Glass
assembly should exhibit even gaps to the shell when
complete.
(4) Pull lightly on corners of glass assembly to
ensure all four snaps are engaged and there is no
free play.
SIDE VIEW MIRROR
REMOVAL
(1) Remove door trim panel, refer to (Refer to 23 -
BODY/DOOR - FRONT/TRIM PANEL - REMOVAL).
(2) Disengage power mirror harness connector, if
equipped.
(3) Remove mirror flag seal.
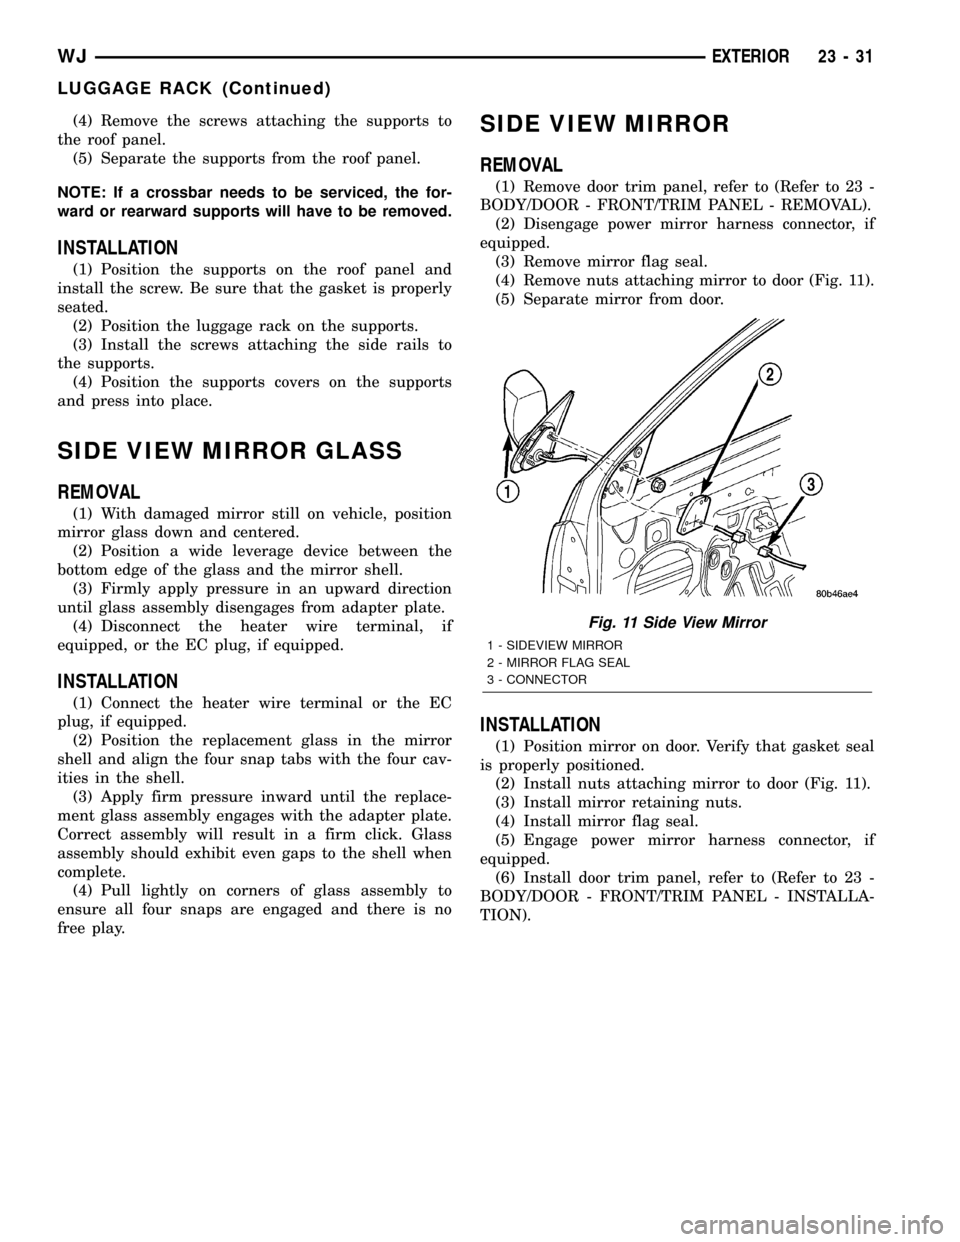
(4) Remove nuts attaching mirror to door (Fig. 11).
(5) Separate mirror from door.
INSTALLATION
(1) Position mirror on door. Verify that gasket seal
is properly positioned.
(2) Install nuts attaching mirror to door (Fig. 11).
(3) Install mirror retaining nuts.
(4) Install mirror flag seal.
(5) Engage power mirror harness connector, if
equipped.
(6) Install door trim panel, refer to (Refer to 23 -
BODY/DOOR - FRONT/TRIM PANEL - INSTALLA-
TION).
Fig. 11 Side View Mirror
1 - SIDEVIEW MIRROR
2 - MIRROR FLAG SEAL
3 - CONNECTOR
WJEXTERIOR 23 - 31
LUGGAGE RACK (Continued)