belt JEEP GRAND CHEROKEE 2002 WJ / 2.G Repair Manual
[x] Cancel search | Manufacturer: JEEP, Model Year: 2002, Model line: GRAND CHEROKEE, Model: JEEP GRAND CHEROKEE 2002 WJ / 2.GPages: 2199, PDF Size: 76.01 MB
Page 571 of 2199
INSTALLATION
WARNING: DURING AND FOLLOWING ANY SEAT
BELT SERVICE, CAREFULLY INSPECT ALL SEAT
BELTS, BUCKLES, MOUNTING HARDWARE, AND
RETRACTORS FOR PROPER INSTALLATION,
OPERATION, OR DAMAGE. REPLACE ANY BELT
THAT IS CUT, FRAYED, OR TORN. STRAIGHTEN
ANY BELT THAT IS TWISTED. TIGHTEN ANY
LOOSE FASTENERS. REPLACE ANY BELT THAT
HAS A DAMAGED OR INOPERATIVE BUCKLE OR
RETRACTOR. REPLACE ANY BELT THAT HAS A
BENT OR DAMAGED LATCH PLATE OR ANCHOR
PLATE. NEVER ATTEMPT TO REPAIR A SEAT BELT
COMPONENT. ALWAYS REPLACE DAMAGED OR
FAULTY SEAT BELT COMPONENTS WITH THE COR-
RECT, NEW AND UNUSED REPLACEMENT PARTS
LISTED IN THE MOPAR PARTS CATALOG.
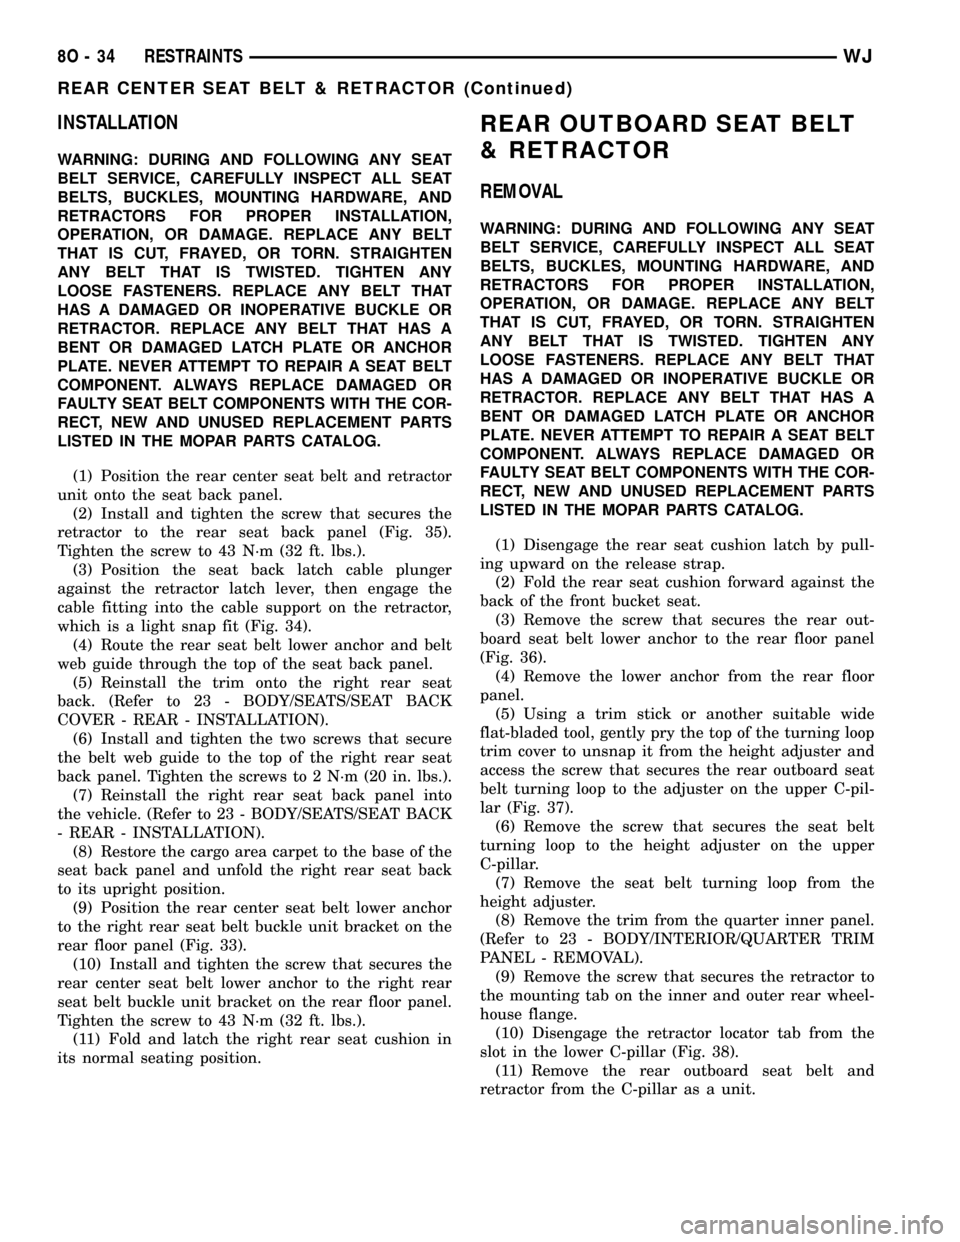
(1) Position the rear center seat belt and retractor
unit onto the seat back panel.
(2) Install and tighten the screw that secures the
retractor to the rear seat back panel (Fig. 35).
Tighten the screw to 43 N´m (32 ft. lbs.).
(3) Position the seat back latch cable plunger
against the retractor latch lever, then engage the
cable fitting into the cable support on the retractor,
which is a light snap fit (Fig. 34).
(4) Route the rear seat belt lower anchor and belt
web guide through the top of the seat back panel.
(5) Reinstall the trim onto the right rear seat
back. (Refer to 23 - BODY/SEATS/SEAT BACK
COVER - REAR - INSTALLATION).
(6) Install and tighten the two screws that secure
the belt web guide to the top of the right rear seat
back panel. Tighten the screws to 2 N´m (20 in. lbs.).
(7) Reinstall the right rear seat back panel into
the vehicle. (Refer to 23 - BODY/SEATS/SEAT BACK
- REAR - INSTALLATION).
(8) Restore the cargo area carpet to the base of the
seat back panel and unfold the right rear seat back
to its upright position.
(9) Position the rear center seat belt lower anchor
to the right rear seat belt buckle unit bracket on the
rear floor panel (Fig. 33).
(10) Install and tighten the screw that secures the
rear center seat belt lower anchor to the right rear
seat belt buckle unit bracket on the rear floor panel.
Tighten the screw to 43 N´m (32 ft. lbs.).
(11) Fold and latch the right rear seat cushion in
its normal seating position.
REAR OUTBOARD SEAT BELT
& RETRACTOR
REMOVAL
WARNING: DURING AND FOLLOWING ANY SEAT
BELT SERVICE, CAREFULLY INSPECT ALL SEAT
BELTS, BUCKLES, MOUNTING HARDWARE, AND
RETRACTORS FOR PROPER INSTALLATION,
OPERATION, OR DAMAGE. REPLACE ANY BELT
THAT IS CUT, FRAYED, OR TORN. STRAIGHTEN
ANY BELT THAT IS TWISTED. TIGHTEN ANY
LOOSE FASTENERS. REPLACE ANY BELT THAT
HAS A DAMAGED OR INOPERATIVE BUCKLE OR
RETRACTOR. REPLACE ANY BELT THAT HAS A
BENT OR DAMAGED LATCH PLATE OR ANCHOR
PLATE. NEVER ATTEMPT TO REPAIR A SEAT BELT
COMPONENT. ALWAYS REPLACE DAMAGED OR
FAULTY SEAT BELT COMPONENTS WITH THE COR-
RECT, NEW AND UNUSED REPLACEMENT PARTS
LISTED IN THE MOPAR PARTS CATALOG.
(1) Disengage the rear seat cushion latch by pull-
ing upward on the release strap.
(2) Fold the rear seat cushion forward against the
back of the front bucket seat.
(3) Remove the screw that secures the rear out-
board seat belt lower anchor to the rear floor panel
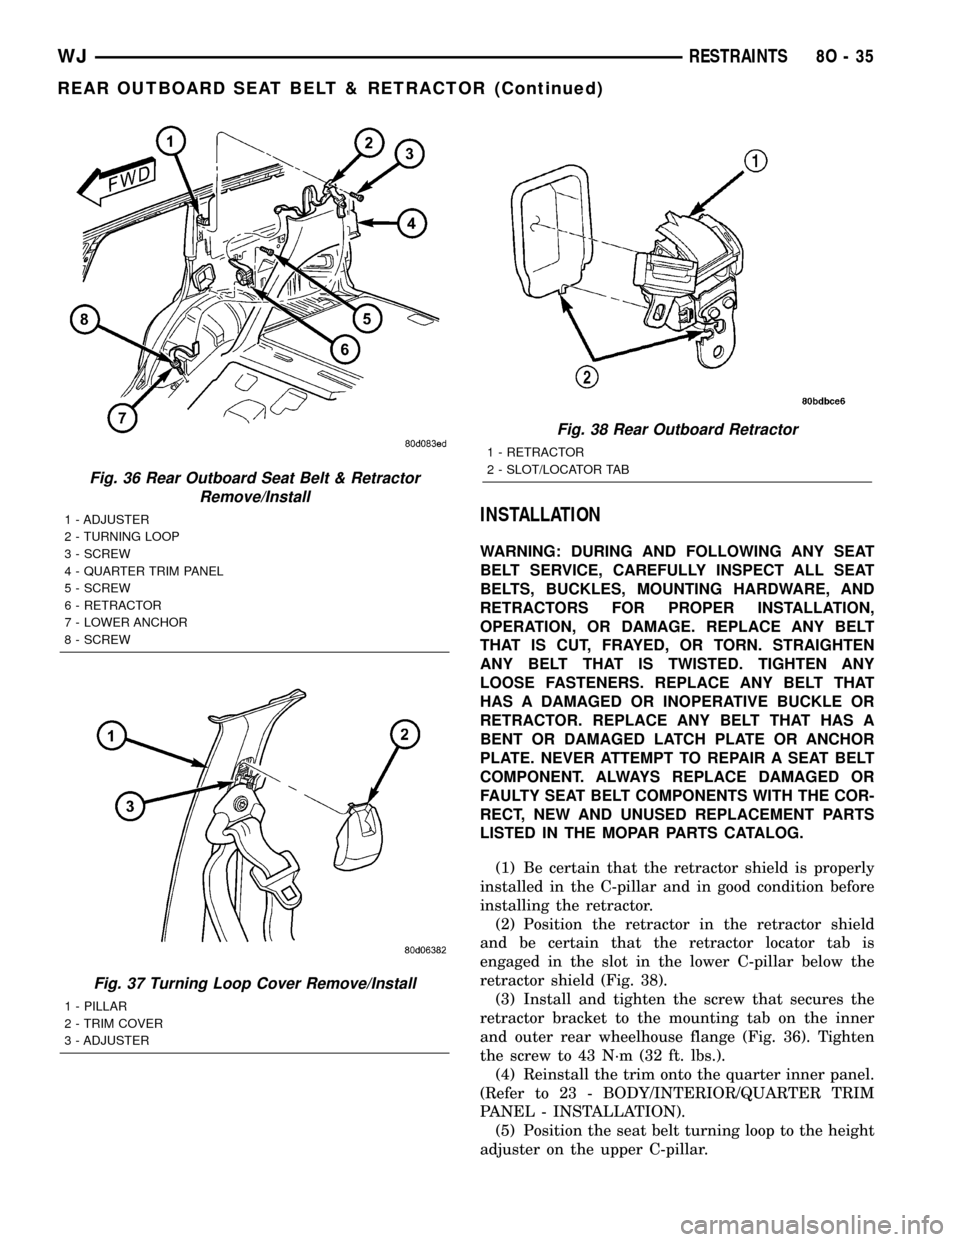
(Fig. 36).
(4) Remove the lower anchor from the rear floor
panel.
(5) Using a trim stick or another suitable wide
flat-bladed tool, gently pry the top of the turning loop
trim cover to unsnap it from the height adjuster and
access the screw that secures the rear outboard seat
belt turning loop to the adjuster on the upper C-pil-
lar (Fig. 37).
(6) Remove the screw that secures the seat belt
turning loop to the height adjuster on the upper
C-pillar.
(7) Remove the seat belt turning loop from the
height adjuster.
(8) Remove the trim from the quarter inner panel.
(Refer to 23 - BODY/INTERIOR/QUARTER TRIM
PANEL - REMOVAL).
(9) Remove the screw that secures the retractor to
the mounting tab on the inner and outer rear wheel-
house flange.
(10) Disengage the retractor locator tab from the
slot in the lower C-pillar (Fig. 38).
(11) Remove the rear outboard seat belt and
retractor from the C-pillar as a unit.
8O - 34 RESTRAINTSWJ
REAR CENTER SEAT BELT & RETRACTOR (Continued)
Page 572 of 2199
INSTALLATION
WARNING: DURING AND FOLLOWING ANY SEAT
BELT SERVICE, CAREFULLY INSPECT ALL SEAT
BELTS, BUCKLES, MOUNTING HARDWARE, AND
RETRACTORS FOR PROPER INSTALLATION,
OPERATION, OR DAMAGE. REPLACE ANY BELT
THAT IS CUT, FRAYED, OR TORN. STRAIGHTEN
ANY BELT THAT IS TWISTED. TIGHTEN ANY
LOOSE FASTENERS. REPLACE ANY BELT THAT
HAS A DAMAGED OR INOPERATIVE BUCKLE OR
RETRACTOR. REPLACE ANY BELT THAT HAS A
BENT OR DAMAGED LATCH PLATE OR ANCHOR
PLATE. NEVER ATTEMPT TO REPAIR A SEAT BELT
COMPONENT. ALWAYS REPLACE DAMAGED OR
FAULTY SEAT BELT COMPONENTS WITH THE COR-
RECT, NEW AND UNUSED REPLACEMENT PARTS
LISTED IN THE MOPAR PARTS CATALOG.
(1) Be certain that the retractor shield is properly
installed in the C-pillar and in good condition before
installing the retractor.
(2) Position the retractor in the retractor shield
and be certain that the retractor locator tab is
engaged in the slot in the lower C-pillar below the
retractor shield (Fig. 38).
(3) Install and tighten the screw that secures the
retractor bracket to the mounting tab on the inner
and outer rear wheelhouse flange (Fig. 36). Tighten
the screw to 43 N´m (32 ft. lbs.).
(4) Reinstall the trim onto the quarter inner panel.
(Refer to 23 - BODY/INTERIOR/QUARTER TRIM
PANEL - INSTALLATION).
(5) Position the seat belt turning loop to the height
adjuster on the upper C-pillar.
Fig. 36 Rear Outboard Seat Belt & Retractor
Remove/Install
1 - ADJUSTER
2 - TURNING LOOP
3 - SCREW
4 - QUARTER TRIM PANEL
5 - SCREW
6 - RETRACTOR
7 - LOWER ANCHOR
8 - SCREW
Fig. 37 Turning Loop Cover Remove/Install
1 - PILLAR
2 - TRIM COVER
3 - ADJUSTER
Fig. 38 Rear Outboard Retractor
1 - RETRACTOR
2 - SLOT/LOCATOR TAB
WJRESTRAINTS 8O - 35
REAR OUTBOARD SEAT BELT & RETRACTOR (Continued)
Page 573 of 2199
(6) Install and tighten the screw that secures the
seat belt turning loop to the height adjuster. Tighten
the screw to 37 N´m (27 ft. lbs.).
(7) Using hand pressure, press the top of the turn-
ing loop trim cover to snap it onto the height
adjuster and cover the screw that secures the rear
outboard seat belt turning loop to the adjuster on the
upper C-pillar (Fig. 37).
(8) Position the rear outboard seat belt lower
anchor to the rear floor panel.
(9) Install and tighten the screw that secures the
seat belt lower anchor to the rear floor panel.
Tighten the screw to 43 N´m (32 ft. lbs.).
(10) Fold the rear seat cushion back into the seat-
ing position.
REAR SEAT BELT BUCKLE
REMOVAL
WARNING: DURING AND FOLLOWING ANY SEAT
BELT SERVICE, CAREFULLY INSPECT ALL SEAT
BELTS, BUCKLES, MOUNTING HARDWARE, AND
RETRACTORS FOR PROPER INSTALLATION,
OPERATION, OR DAMAGE. REPLACE ANY BELT
THAT IS CUT, FRAYED, OR TORN. STRAIGHTEN
ANY BELT THAT IS TWISTED. TIGHTEN ANY
LOOSE FASTENERS. REPLACE ANY BELT THAT
HAS A DAMAGED OR INOPERATIVE BUCKLE OR
RETRACTOR. REPLACE ANY BELT THAT HAS A
BENT OR DAMAGED LATCH PLATE OR ANCHOR
PLATE. NEVER ATTEMPT TO REPAIR A SEAT BELT
COMPONENT. ALWAYS REPLACE DAMAGED OR
FAULTY SEAT BELT COMPONENTS WITH THE COR-
RECT, NEW AND UNUSED REPLACEMENT PARTS
LISTED IN THE MOPAR PARTS CATALOG.
(1) Disengage the rear seat cushion latch by pull-
ing upward on the release strap.
(2) Fold the rear seat cushion forward against the
back of the front bucket seat.
(3) Remove the screw that secures the anchor
plate of the rear seat lap belt/buckle unit (right side)
or buckle/buckle unit (left side) to the rear floor
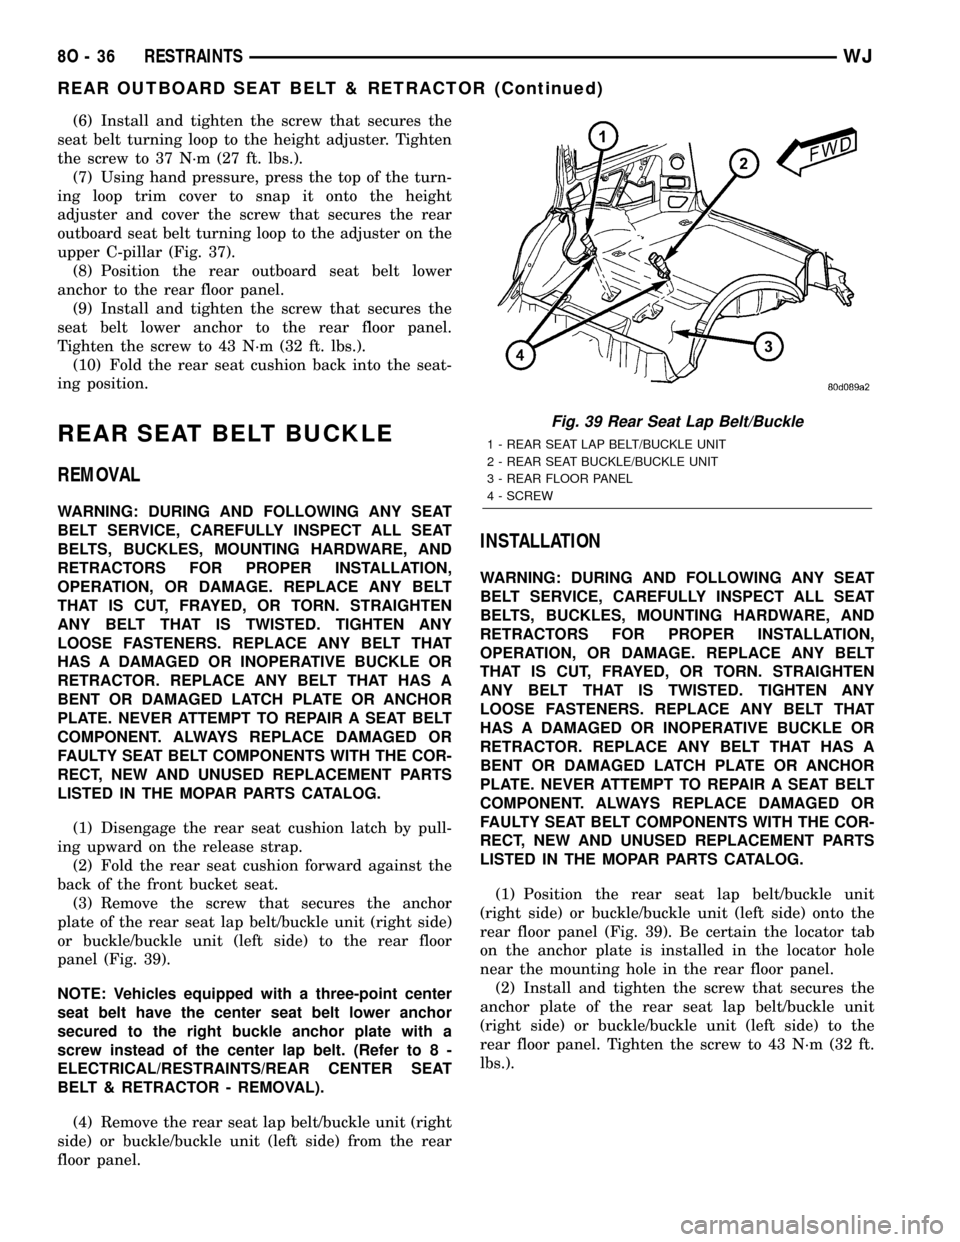
panel (Fig. 39).
NOTE: Vehicles equipped with a three-point center
seat belt have the center seat belt lower anchor
secured to the right buckle anchor plate with a
screw instead of the center lap belt. (Refer to 8 -
ELECTRICAL/RESTRAINTS/REAR CENTER SEAT
BELT & RETRACTOR - REMOVAL).
(4) Remove the rear seat lap belt/buckle unit (right
side) or buckle/buckle unit (left side) from the rear
floor panel.
INSTALLATION
WARNING: DURING AND FOLLOWING ANY SEAT
BELT SERVICE, CAREFULLY INSPECT ALL SEAT
BELTS, BUCKLES, MOUNTING HARDWARE, AND
RETRACTORS FOR PROPER INSTALLATION,
OPERATION, OR DAMAGE. REPLACE ANY BELT
THAT IS CUT, FRAYED, OR TORN. STRAIGHTEN
ANY BELT THAT IS TWISTED. TIGHTEN ANY
LOOSE FASTENERS. REPLACE ANY BELT THAT
HAS A DAMAGED OR INOPERATIVE BUCKLE OR
RETRACTOR. REPLACE ANY BELT THAT HAS A
BENT OR DAMAGED LATCH PLATE OR ANCHOR
PLATE. NEVER ATTEMPT TO REPAIR A SEAT BELT
COMPONENT. ALWAYS REPLACE DAMAGED OR
FAULTY SEAT BELT COMPONENTS WITH THE COR-
RECT, NEW AND UNUSED REPLACEMENT PARTS
LISTED IN THE MOPAR PARTS CATALOG.
(1) Position the rear seat lap belt/buckle unit
(right side) or buckle/buckle unit (left side) onto the
rear floor panel (Fig. 39). Be certain the locator tab
on the anchor plate is installed in the locator hole
near the mounting hole in the rear floor panel.
(2) Install and tighten the screw that secures the
anchor plate of the rear seat lap belt/buckle unit
(right side) or buckle/buckle unit (left side) to the
rear floor panel. Tighten the screw to 43 N´m (32 ft.
lbs.).
Fig. 39 Rear Seat Lap Belt/Buckle
1 - REAR SEAT LAP BELT/BUCKLE UNIT
2 - REAR SEAT BUCKLE/BUCKLE UNIT
3 - REAR FLOOR PANEL
4 - SCREW
8O - 36 RESTRAINTSWJ
REAR OUTBOARD SEAT BELT & RETRACTOR (Continued)
Page 574 of 2199
NOTE: Vehicles equipped with a three-point center
seat belt have the center seat belt lower anchor
secured to the right buckle anchor plate with a
screw instead of the center lap belt. (Refer to 8 -
ELECTRICAL/RESTRAINTS/REAR CENTER SEAT
BELT & RETRACTOR - INSTALLATION).
(3) Fold the rear seat cushion back into the seat-
ing position.
SEAT BELT SWITCH
DESCRIPTION
The seat belt switch for this model is actually a
Hall Effect-type sensor. This sensor consists of a
fixed-position, Hall Effect Integrated Circuit (IC) chip
and a small permanent magnet that are integral to
each front seat belt buckle. The front seat belt buck-
les are each located on a stamped steel stanchion
within a molded plastic scabbard and secured with a
screw to the floor panel transmission tunnel on the
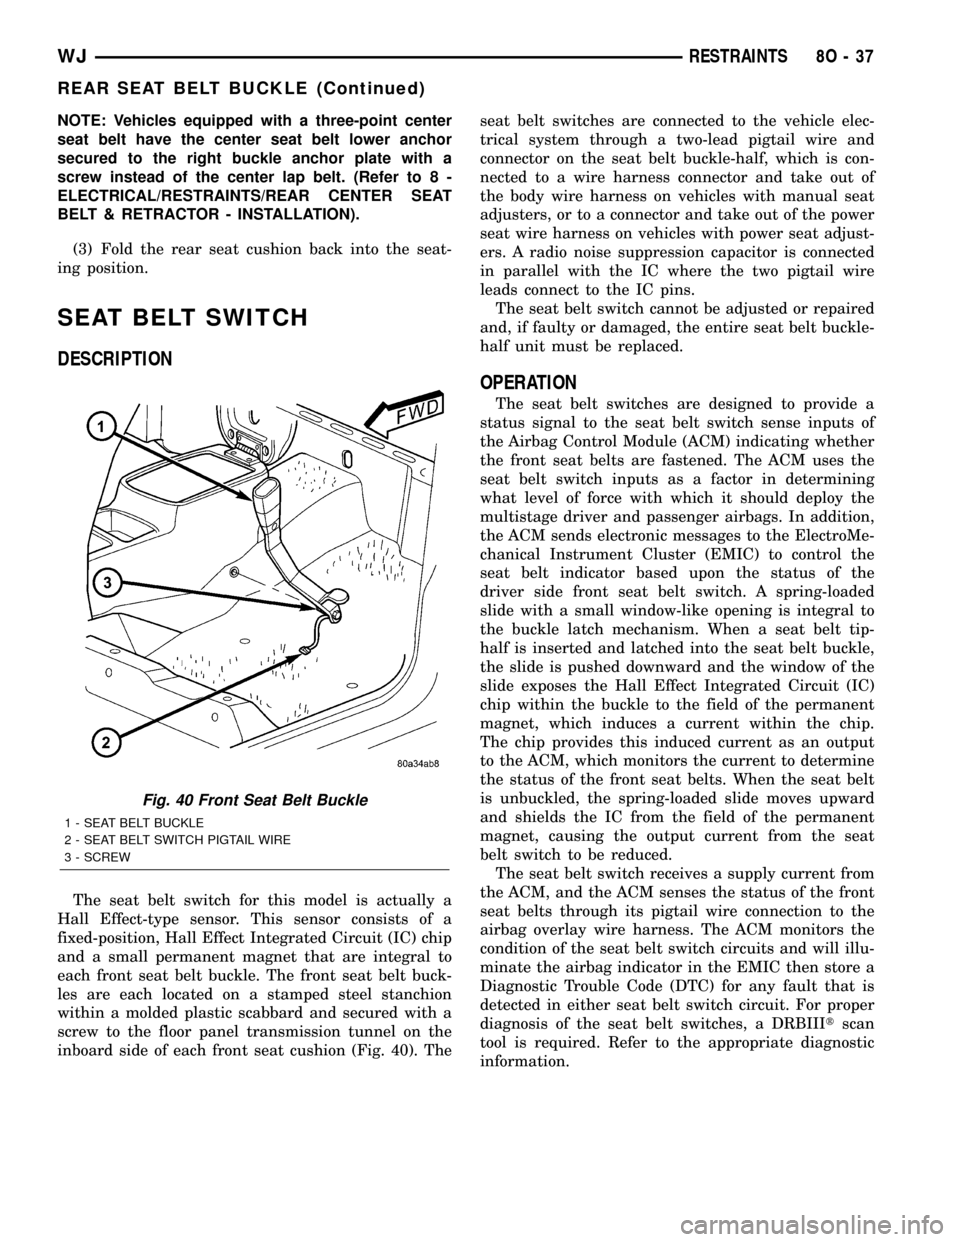
inboard side of each front seat cushion (Fig. 40). Theseat belt switches are connected to the vehicle elec-
trical system through a two-lead pigtail wire and
connector on the seat belt buckle-half, which is con-
nected to a wire harness connector and take out of
the body wire harness on vehicles with manual seat
adjusters, or to a connector and take out of the power
seat wire harness on vehicles with power seat adjust-
ers. A radio noise suppression capacitor is connected
in parallel with the IC where the two pigtail wire
leads connect to the IC pins.
The seat belt switch cannot be adjusted or repaired
and, if faulty or damaged, the entire seat belt buckle-
half unit must be replaced.
OPERATION
The seat belt switches are designed to provide a
status signal to the seat belt switch sense inputs of
the Airbag Control Module (ACM) indicating whether
the front seat belts are fastened. The ACM uses the
seat belt switch inputs as a factor in determining
what level of force with which it should deploy the
multistage driver and passenger airbags. In addition,
the ACM sends electronic messages to the ElectroMe-
chanical Instrument Cluster (EMIC) to control the
seat belt indicator based upon the status of the
driver side front seat belt switch. A spring-loaded
slide with a small window-like opening is integral to
the buckle latch mechanism. When a seat belt tip-
half is inserted and latched into the seat belt buckle,
the slide is pushed downward and the window of the
slide exposes the Hall Effect Integrated Circuit (IC)
chip within the buckle to the field of the permanent
magnet, which induces a current within the chip.
The chip provides this induced current as an output
to the ACM, which monitors the current to determine
the status of the front seat belts. When the seat belt
is unbuckled, the spring-loaded slide moves upward
and shields the IC from the field of the permanent
magnet, causing the output current from the seat
belt switch to be reduced.
The seat belt switch receives a supply current from
the ACM, and the ACM senses the status of the front
seat belts through its pigtail wire connection to the
airbag overlay wire harness. The ACM monitors the
condition of the seat belt switch circuits and will illu-
minate the airbag indicator in the EMIC then store a
Diagnostic Trouble Code (DTC) for any fault that is
detected in either seat belt switch circuit. For proper
diagnosis of the seat belt switches, a DRBIIItscan
tool is required. Refer to the appropriate diagnostic
information.
Fig. 40 Front Seat Belt Buckle
1 - SEAT BELT BUCKLE
2 - SEAT BELT SWITCH PIGTAIL WIRE
3 - SCREW
WJRESTRAINTS 8O - 37
REAR SEAT BELT BUCKLE (Continued)
Page 575 of 2199
SEAT BELT TURNING LOOP
ADJUSTER
REMOVAL
WARNING: DURING AND FOLLOWING ANY SEAT
BELT SERVICE, CAREFULLY INSPECT ALL SEAT
BELTS, BUCKLES, MOUNTING HARDWARE, AND
RETRACTORS FOR PROPER INSTALLATION,
OPERATION, OR DAMAGE. REPLACE ANY BELT
THAT IS CUT, FRAYED, OR TORN. STRAIGHTEN
ANY BELT THAT IS TWISTED. TIGHTEN ANY
LOOSE FASTENERS. REPLACE ANY BELT THAT
HAS A DAMAGED OR INOPERATIVE BUCKLE OR
RETRACTOR. REPLACE ANY BELT THAT HAS A
BENT OR DAMAGED LATCH PLATE OR ANCHOR
PLATE. NEVER ATTEMPT TO REPAIR A SEAT BELT
COMPONENT. ALWAYS REPLACE DAMAGED OR
FAULTY SEAT BELT COMPONENTS WITH THE COR-
RECT, NEW AND UNUSED REPLACEMENT PARTS
LISTED IN THE MOPAR PARTS CATALOG.
(1) Remove the turning loop from the front or rear
seat belt turning loop adjuster. (Refer to 8 - ELEC-
TRICAL/RESTRAINTS/FRONT SEAT BELT &
RETRACTOR - REMOVAL) or (Refer to 8 - ELEC-
TRICAL/RESTRAINTS/REAR OUTBOARD SEAT
BELT & RETRACTOR - REMOVAL).
(2) Remove the trim from the upper B-pillar (front
seat belt adjuster) or upper C-pillar (rear seat belt
adjuster). (Refer to 23 - BODY/INTERIOR/B-PILLAR
UPPER TRIM - REMOVAL) or (Refer to 23 - BODY/
INTERIOR/C-PILLAR TRIM - REMOVAL).
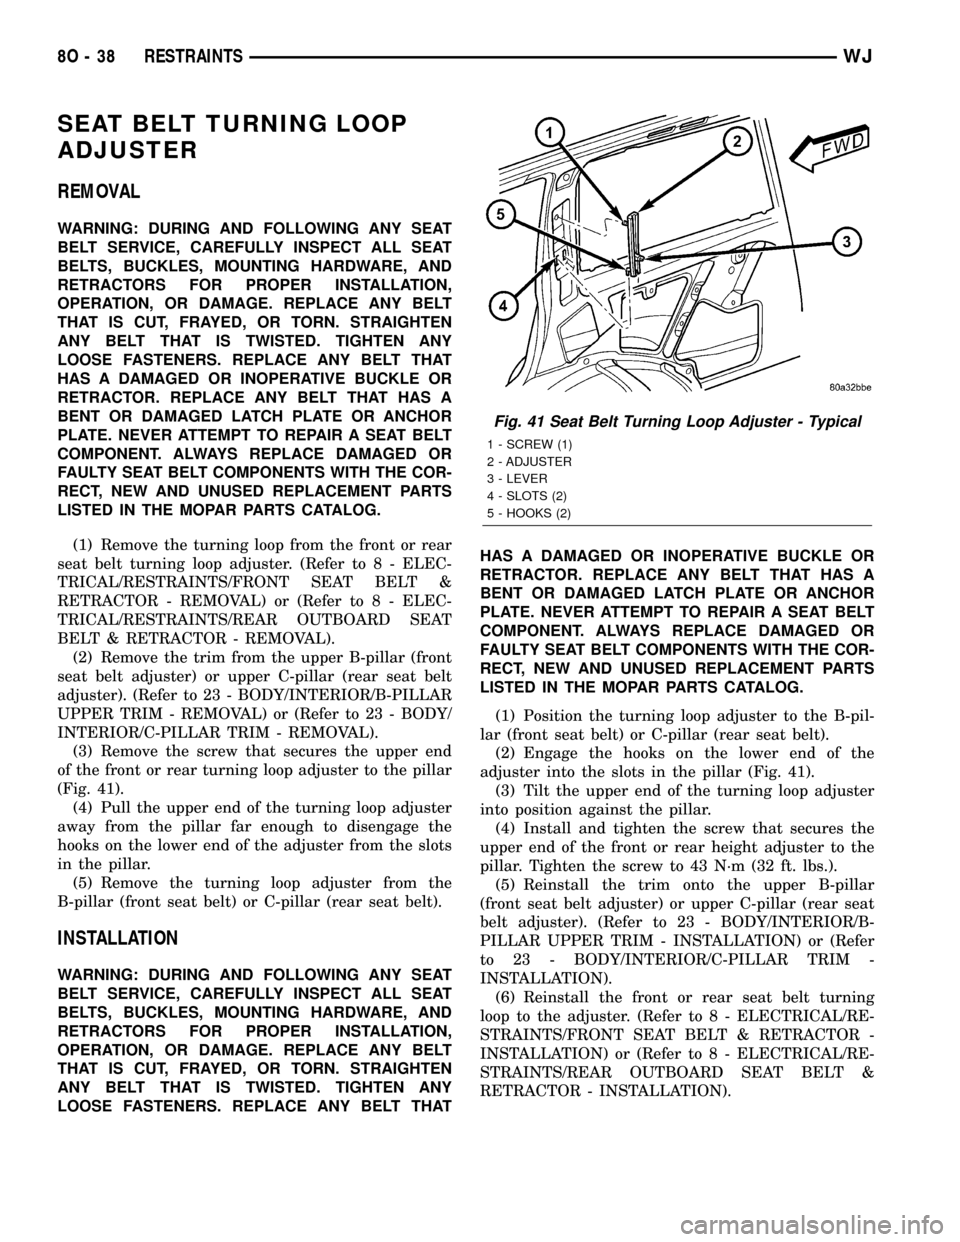
(3) Remove the screw that secures the upper end
of the front or rear turning loop adjuster to the pillar
(Fig. 41).
(4) Pull the upper end of the turning loop adjuster
away from the pillar far enough to disengage the
hooks on the lower end of the adjuster from the slots
in the pillar.
(5) Remove the turning loop adjuster from the
B-pillar (front seat belt) or C-pillar (rear seat belt).
INSTALLATION
WARNING: DURING AND FOLLOWING ANY SEAT
BELT SERVICE, CAREFULLY INSPECT ALL SEAT
BELTS, BUCKLES, MOUNTING HARDWARE, AND
RETRACTORS FOR PROPER INSTALLATION,
OPERATION, OR DAMAGE. REPLACE ANY BELT
THAT IS CUT, FRAYED, OR TORN. STRAIGHTEN
ANY BELT THAT IS TWISTED. TIGHTEN ANY
LOOSE FASTENERS. REPLACE ANY BELT THATHAS A DAMAGED OR INOPERATIVE BUCKLE OR
RETRACTOR. REPLACE ANY BELT THAT HAS A
BENT OR DAMAGED LATCH PLATE OR ANCHOR
PLATE. NEVER ATTEMPT TO REPAIR A SEAT BELT
COMPONENT. ALWAYS REPLACE DAMAGED OR
FAULTY SEAT BELT COMPONENTS WITH THE COR-
RECT, NEW AND UNUSED REPLACEMENT PARTS
LISTED IN THE MOPAR PARTS CATALOG.
(1) Position the turning loop adjuster to the B-pil-
lar (front seat belt) or C-pillar (rear seat belt).
(2) Engage the hooks on the lower end of the
adjuster into the slots in the pillar (Fig. 41).
(3) Tilt the upper end of the turning loop adjuster
into position against the pillar.
(4) Install and tighten the screw that secures the
upper end of the front or rear height adjuster to the
pillar. Tighten the screw to 43 N´m (32 ft. lbs.).
(5) Reinstall the trim onto the upper B-pillar
(front seat belt adjuster) or upper C-pillar (rear seat
belt adjuster). (Refer to 23 - BODY/INTERIOR/B-
PILLAR UPPER TRIM - INSTALLATION) or (Refer
to 23 - BODY/INTERIOR/C-PILLAR TRIM -
INSTALLATION).
(6) Reinstall the front or rear seat belt turning
loop to the adjuster. (Refer to 8 - ELECTRICAL/RE-
STRAINTS/FRONT SEAT BELT & RETRACTOR -
INSTALLATION) or (Refer to 8 - ELECTRICAL/RE-
STRAINTS/REAR OUTBOARD SEAT BELT &
RETRACTOR - INSTALLATION).
Fig. 41 Seat Belt Turning Loop Adjuster - Typical
1 - SCREW (1)
2 - ADJUSTER
3 - LEVER
4 - SLOTS (2)
5 - HOOKS (2)
8O - 38 RESTRAINTSWJ
Page 579 of 2199
INSTALLATION
The following procedure is for replacement of a
faulty or damaged side curtain airbag. If the airbag
is faulty or damaged, but not deployed, review the
recommended procedures for handling non-deployed
supplemental restraints. (Refer to 8 - ELECTRICAL/
RESTRAINTS - STANDARD PROCEDURE - HAN-
DLING NON-DEPLOYED SUPPLEMENTAL
RESTRAINTS). If the side curtain airbag has been
deployed, review the recommended procedures for
service after a supplemental restraint deployment
before removing the airbag from the vehicle. (Refer to
8 - ELECTRICAL/RESTRAINTS - STANDARD PRO-
CEDURE - SERVICE AFTER A SUPPLEMENTAL
RESTRAINT DEPLOYMENT).
WARNING: ON VEHICLES EQUIPPED WITH AIR-
BAGS, DISABLE THE SUPPLEMENTAL RESTRAINT
SYSTEM BEFORE ATTEMPTING ANY STEERING
WHEEL, STEERING COLUMN, DRIVER AIRBAG,
PASSENGER AIRBAG, FRONT IMPACT SENSOR,
SIDE IMPACT SENSOR, SIDE CURTAIN AIRBAG, OR
INSTRUMENT PANEL COMPONENT DIAGNOSIS OR
SERVICE. DISCONNECT AND ISOLATE THE BAT-
TERY NEGATIVE (GROUND) CABLE, THEN WAIT
TWO MINUTES FOR THE SYSTEM CAPACITOR TO
DISCHARGE BEFORE PERFORMING FURTHER
DIAGNOSIS OR SERVICE. THIS IS THE ONLY SURE
WAY TO DISABLE THE SUPPLEMENTAL
RESTRAINT SYSTEM. FAILURE TO TAKE THE
PROPER PRECAUTIONS COULD RESULT IN ACCI-
DENTAL AIRBAG DEPLOYMENT AND POSSIBLE
PERSONAL INJURY.
WARNING: WHEN REMOVING A DEPLOYED AIR-
BAG, RUBBER GLOVES, EYE PROTECTION, AND A
LONG-SLEEVED SHIRT SHOULD BE WORN. THERE
MAY BE DEPOSITS ON THE AIRBAG UNIT AND
OTHER INTERIOR SURFACES. IN LARGE DOSES,
THESE DEPOSITS MAY CAUSE IRRITATION TO THE
SKIN AND EYES.
WARNING: USE EXTREME CARE TO PREVENT ANY
FOREIGN MATERIAL FROM ENTERING THE SIDE
CURTAIN AIRBAG, OR BECOMING ENTRAPPED
BETWEEN THE SIDE CURTAIN AIRBAG CUSHION
AND THE HEADLINER. FAILURE TO OBSERVE THIS
WARNING COULD RESULT IN OCCUPANT INJURIES
UPON AIRBAG DEPLOYMENT.
(1) Position the side curtain airbag into the vehicle
as a unit.(2) Align the push-in fastener that secures the
inflator of the side curtain airbag to the locating hole
in the roof side rail and, using hand pressure, push
firmly on the retainer until it is fully seated (Fig. 45).
(3) Align the three push-in fasteners that secure
the extruded plastic channel of the side curtain air-
bag to the locating holes in the roof side rail and,
using hand pressure, push firmly on each retainer
until it is fully seated.
(4) Install and tighten the nine screws that secure
the side curtain airbag channel and inflator mount-
ing bracket to the spring nuts in the roof side rail.
Tighten the screws to 6 N´m (50 in. lbs.).
(5) Align the side curtain airbag front tether plas-
tic retainer with the hole in the upper A-pillar and,
using hand pressure, push firmly on the retainer
until it is fully seated.
(6) Engage the side curtain airbag front tether
hook and plastic retainer clip into the slot in the
lower A-pillar.
(7) Engage the side curtain airbag rear tether
hook and plastic retainer clip into the slot in the roof
rail near the D-pillar (Fig. 44).
(8) Reconnect the body wire harness connector for
the side curtain airbag inflator to the inflator connec-
tor receptacle.
(9) Reinstall the headliner into the vehicle. (Refer
to 23 - BODY/INTERIOR/HEADLINER - INSTALLA-
TION).
(10) Do not reconnect the battery negative cable at
this time. The supplemental restraint system verifi-
cation test procedure should be performed following
service of any supplemental restraint system compo-
nent. (Refer to 8 - ELECTRICAL/RESTRAINTS -
STANDARD PROCEDURE - VERIFICATION TEST).
SIDE IMPACT SENSOR
DESCRIPTION
Two side impact sensors are used on this model
when it is equipped with the optional side curtain
airbags, one each for the left and right sides of the
vehicle (Fig. 46). These sensors are mounted
remotely from the bi-directional safing sensor that is
internal to the Airbag Control Module (ACM). The
side and front impact sensors are identical in con-
struction and calibration with the exception of the
right-hand and left-hand die cast aluminum mount-
ing brackets to which each front impact sensor is
secured with two screws. The side impact sensors are
secured with two screws to the base of the right and
left B-pillars just below the front seat belt retractors
and behind the lower B-pillar trim within the pas-
senger compartment.
8O - 42 RESTRAINTSWJ
SIDE CURTAIN AIRBAG (Continued)
Page 662 of 2199
DESCRIPTION - CONNECTOR, GROUND AND
SPLICE INFORMATION
CAUTION: Not all connectors are serviced. Some
connectors are serviced only with a harness. A typ-
ical example might be the Supplemental Restraint
System connectors. Always check parts availability
before attempting a repair.
IDENTIFICATION
In-line connectors are identified by a number, as
follows:
²In-line connectors located in the engine compart-
ment are C100 series numbers
²In-line connectors located in the Instrument
Panel area are C200 series numbers.
²In-line connectors located in the body are C300
series numbers.
²Jumper harness connectors are C400 series
numbers.
²Grounds and ground connectors are identified
with a ªGº and follow the same series numbering as
the in-line connectors.
²Splices are identified with an ªSº and follow the
same series numbering as the in-line connectors.
²Component connectors are identified by the com-
ponent name instead of a number. Multiple connec-
tors on a component use a C1, C2, etc. identifier.
LOCATIONS
Section 8W-91 contains connector/ground/splice
location illustrations. The illustrations contain the
connector name (or number)/ground number/splice
number and component identification. Connector/
ground/splice location charts in section 8W-91 refer-
ence the figure numbers of the illustrations.
The abbreviation T/O is used in the component
location section to indicate a point in which the wir-
ing harness branches out to a component. The abbre-
viation N/S means Not Shown in the illustrations
WARNING
WARNINGS - GENERAL
WARNINGSprovide information to prevent per-
sonal injury and vehicle damage. Below is a list of
general warnings that should be followed any time a
vehicle is being serviced.
WARNING: ALWAYS WEAR SAFETY GLASSES FOR
EYE PROTECTION.
WARNING: USE SAFETY STANDS ANYTIME A PRO-
CEDURE REQUIRES BEING UNDER A VEHICLE.WARNING: BE SURE THAT THE IGNITION SWITCH
ALWAYS IS IN THE OFF POSITION, UNLESS THE
PROCEDURE REQUIRES IT TO BE ON.
WARNING: SET THE PARKING BRAKE WHEN
WORKING ON ANY VEHICLE. AN AUTOMATIC
TRANSMISSION SHOULD BE IN PARK. A MANUAL
TRANSMISSION SHOULD BE IN NEUTRAL.
WARNING: OPERATE THE ENGINE ONLY IN A
WELL-VENTILATED AREA.
WARNING: KEEP AWAY FROM MOVING PARTS
WHEN THE ENGINE IS RUNNING, ESPECIALLY THE
FAN AND BELTS.
WARNING: TO PREVENT SERIOUS BURNS, AVOID
CONTACT WITH HOT PARTS SUCH AS THE RADIA-
TOR, EXHAUST MANIFOLD(S), TAIL PIPE, CATA-
LYTIC CONVERTER AND MUFFLER.
WARNING: DO NOT ALLOW FLAME OR SPARKS
NEAR THE BATTERY. GASES ARE ALWAYS
PRESENT IN AND AROUND THE BATTERY.
WARNING: ALWAYS REMOVE RINGS, WATCHES,
LOOSE HANGING JEWELRY AND AVOID LOOSE
CLOTHING.
DIAGNOSIS AND TESTING - WIRING HARNESS
TROUBLESHOOTING TOOLS
When diagnosing a problem in an electrical circuit
there are several common tools necessary. These tools
are listed and explained below.
²Jumper Wire - This is a test wire used to con-
nect two points of a circuit. It can be used to bypass
an open in a circuit.
WARNING: NEVER USE A JUMPER WIRE ACROSS
A LOAD, SUCH AS A MOTOR, CONNECTED
BETWEEN A BATTERY FEED AND GROUND.
²Voltmeter - Used to check for voltage on a cir-
cuit. Always connect the black lead to a known good
ground and the red lead to the positive side of the
circuit.
CAUTION: Most of the electrical components used
in today's vehicles are Solid State. When checking
voltages in these circuits, use a meter with a 10 -
megohm or greater impedance rating.
WJ8W-01 WIRING DIAGRAM INFORMATION 8W - 01 - 7
WIRING DIAGRAM INFORMATION (Continued)
Page 673 of 2199
Component Page
Power Outlet......................... 8W-41
Power Seats.......................... 8W-63
Power Windows....................... 8W-60
Powertrain Control Module.............. 8W-30
Radio............................... 8W-47
Rain Sensor.......................... 8W-49
Recirculation Door Motor/Actuator........ 8W-42
Red Brake Warning Indicator Switch....... 8W-35
Remote Keyless Module................. 8W-39
Remote Radio Switches................. 8W-47
Splices.............................. 8W-10
Seat Belt Switch...................... 8W-43
Seat Module.......................... 8W-63
Sentry Key Immobilizer Module.......... 8W-39
Shifter Assembly...................... 8W-31
Side Impact Sensors................... 8W-43
Side Marker Lamps.................... 8W-50
Side Repeater Lamps................... 8W-52
Siren............................... 8W-49
Speakers............................ 8W-47Component Page
Speed Control Switches................. 8W-33
Sunroof............................. 8W-64
Temperature Valve Actuator............. 8W-42
Throttle Position Sensor................ 8W-30
Trailer Tow.......................... 8W-54
Transfer Case Position Sensor............ 8W-31
Transmission......................... 8W-31
Turn Signal Lamps.................... 8W-52
Underhood Lamp...................... 8W-44
Vehicle Information Center.............. 8W-49
Viscous/Cabin Heater................... 8W-30
Visor/Vanity Lamps.................... 8W-44
Washer Fluid Level Switch.............. 8W-53
Wastegate Solenoid.................... 8W-30
Water In Fuel Sensor................... 8W-30
Wheel Speed Sensors................... 8W-35
Window Defogger...................... 8W-48
Wiper High/Low Relay.................. 8W-53
Wiper Motor.......................... 8W-53
Washer Pump......................... 8W-5
8W - 02 - 2 8W-02 COMPONENT INDEXWJ
Page 906 of 2199
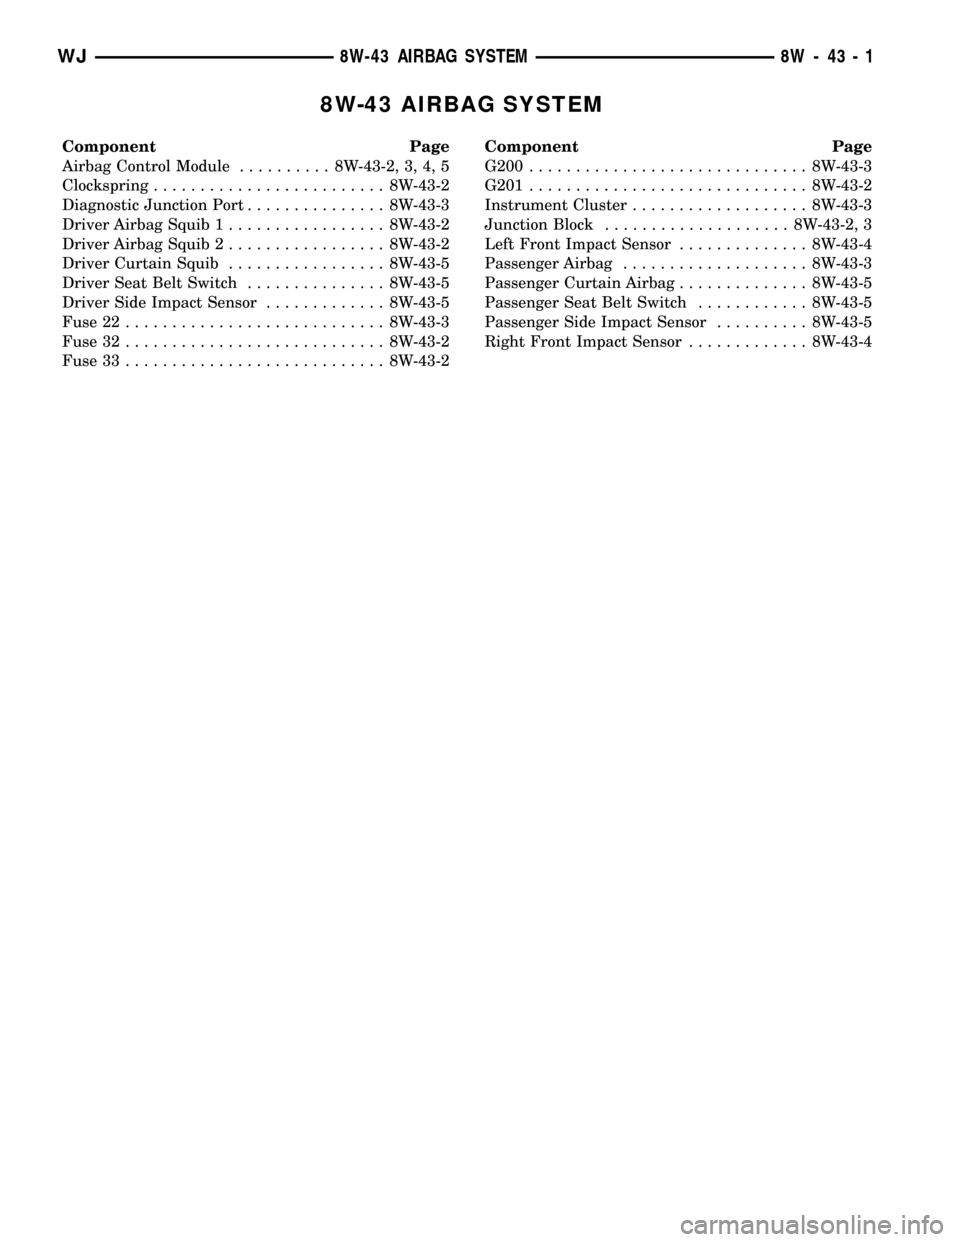
8W-43 AIRBAG SYSTEM
Component Page
Airbag Control Module.......... 8W-43-2, 3, 4, 5
Clockspring......................... 8W-43-2
Diagnostic Junction Port............... 8W-43-3
Driver Airbag Squib 1................. 8W-43-2
Driver Airbag Squib 2................. 8W-43-2
Driver Curtain Squib................. 8W-43-5
Driver Seat Belt Switch............... 8W-43-5
Driver Side Impact Sensor............. 8W-43-5
Fuse 22............................ 8W-43-3
Fuse 32............................ 8W-43-2
Fuse 33............................ 8W-43-2Component Page
G200.............................. 8W-43-3
G201.............................. 8W-43-2
Instrument Cluster................... 8W-43-3
Junction Block.................... 8W-43-2, 3
Left Front Impact Sensor.............. 8W-43-4
Passenger Airbag.................... 8W-43-3
Passenger Curtain Airbag.............. 8W-43-5
Passenger Seat Belt Switch............ 8W-43-5
Passenger Side Impact Sensor.......... 8W-43-5
Right Front Impact Sensor............. 8W-43-4
WJ8W-43 AIRBAG SYSTEM 8W - 43 - 1
Page 1050 of 2199
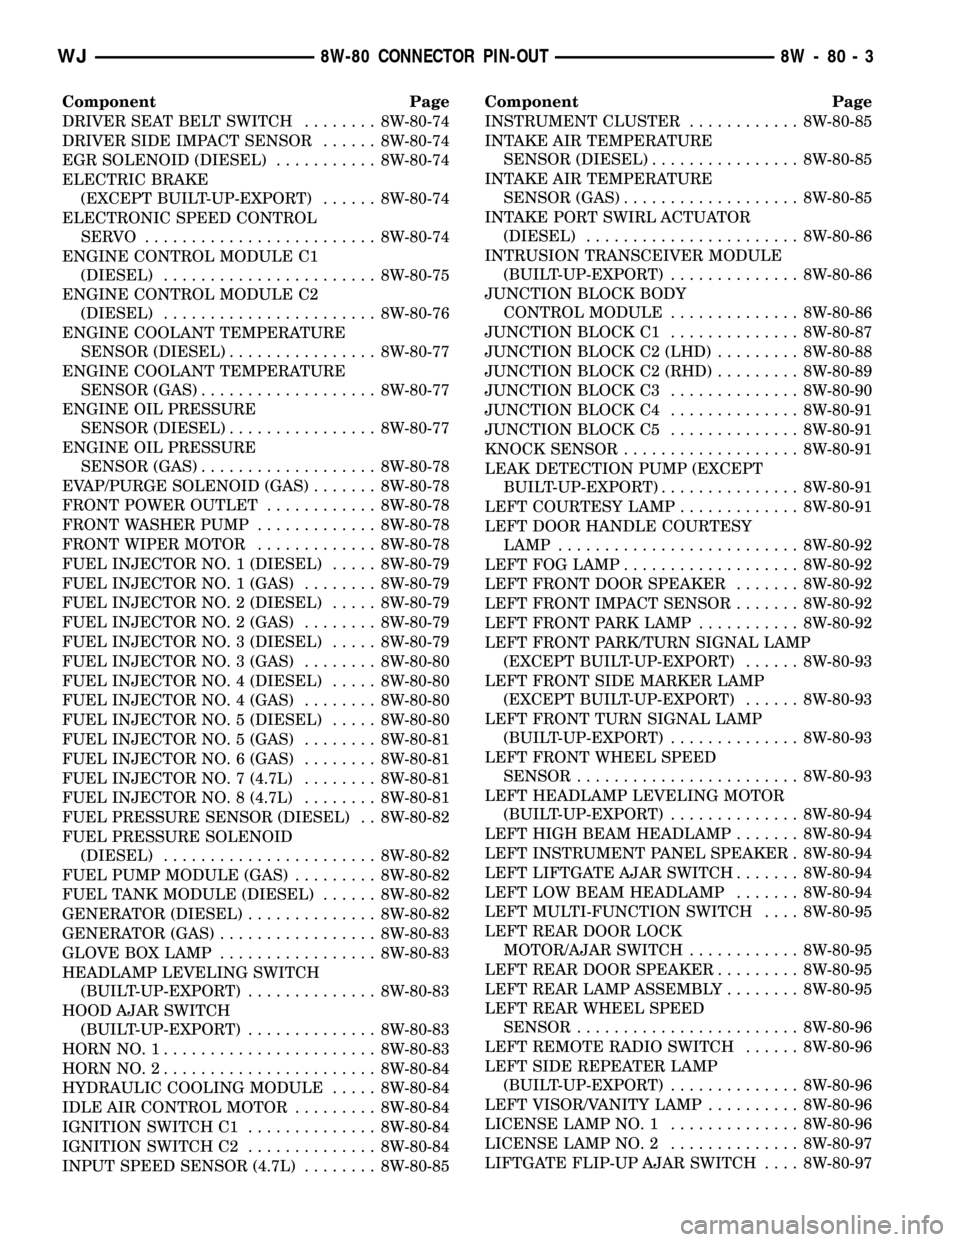
Component Page
DRIVER SEAT BELT SWITCH........ 8W-80-74
DRIVER SIDE IMPACT SENSOR...... 8W-80-74
EGR SOLENOID (DIESEL)........... 8W-80-74
ELECTRIC BRAKE
(EXCEPT BUILT-UP-EXPORT)...... 8W-80-74
ELECTRONIC SPEED CONTROL
SERVO ......................... 8W-80-74
ENGINE CONTROL MODULE C1
(DIESEL)....................... 8W-80-75
ENGINE CONTROL MODULE C2
(DIESEL)....................... 8W-80-76
ENGINE COOLANT TEMPERATURE
SENSOR (DIESEL)................ 8W-80-77
ENGINE COOLANT TEMPERATURE
SENSOR (GAS)................... 8W-80-77
ENGINE OIL PRESSURE
SENSOR (DIESEL)................ 8W-80-77
ENGINE OIL PRESSURE
SENSOR (GAS)................... 8W-80-78
EVAP/PURGE SOLENOID (GAS)....... 8W-80-78
FRONT POWER OUTLET............ 8W-80-78
FRONT WASHER PUMP............. 8W-80-78
FRONT WIPER MOTOR............. 8W-80-78
FUEL INJECTOR NO. 1 (DIESEL)..... 8W-80-79
FUEL INJECTOR NO. 1 (GAS)........ 8W-80-79
FUEL INJECTOR NO. 2 (DIESEL)..... 8W-80-79
FUEL INJECTOR NO. 2 (GAS)........ 8W-80-79
FUEL INJECTOR NO. 3 (DIESEL)..... 8W-80-79
FUEL INJECTOR NO. 3 (GAS)........ 8W-80-80
FUEL INJECTOR NO. 4 (DIESEL)..... 8W-80-80
FUEL INJECTOR NO. 4 (GAS)........ 8W-80-80
FUEL INJECTOR NO. 5 (DIESEL)..... 8W-80-80
FUEL INJECTOR NO. 5 (GAS)........ 8W-80-81
FUEL INJECTOR NO. 6 (GAS)........ 8W-80-81
FUEL INJECTOR NO. 7 (4.7L)........ 8W-80-81
FUEL INJECTOR NO. 8 (4.7L)........ 8W-80-81
FUEL PRESSURE SENSOR (DIESEL) . . 8W-80-82
FUEL PRESSURE SOLENOID
(DIESEL)....................... 8W-80-82
FUEL PUMP MODULE (GAS)......... 8W-80-82
FUEL TANK MODULE (DIESEL)...... 8W-80-82
GENERATOR (DIESEL).............. 8W-80-82
GENERATOR (GAS)................. 8W-80-83
GLOVE BOX LAMP................. 8W-80-83
HEADLAMP LEVELING SWITCH
(BUILT-UP-EXPORT).............. 8W-80-83
HOOD AJAR SWITCH
(BUILT-UP-EXPORT).............. 8W-80-83
HORN NO. 1....................... 8W-80-83
HORN NO. 2....................... 8W-80-84
HYDRAULIC COOLING MODULE..... 8W-80-84
IDLE AIR CONTROL MOTOR......... 8W-80-84
IGNITION SWITCH C1.............. 8W-80-84
IGNITION SWITCH C2.............. 8W-80-84
INPUT SPEED SENSOR (4.7L)........ 8W-80-85Component Page
INSTRUMENT CLUSTER............ 8W-80-85
INTAKE AIR TEMPERATURE
SENSOR (DIESEL)................ 8W-80-85
INTAKE AIR TEMPERATURE
SENSOR (GAS)................... 8W-80-85
INTAKE PORT SWIRL ACTUATOR
(DIESEL)....................... 8W-80-86
INTRUSION TRANSCEIVER MODULE
(BUILT-UP-EXPORT).............. 8W-80-86
JUNCTION BLOCK BODY
CONTROL MODULE.............. 8W-80-86
JUNCTION BLOCK C1.............. 8W-80-87
JUNCTION BLOCK C2 (LHD)......... 8W-80-88
JUNCTION BLOCK C2 (RHD)......... 8W-80-89
JUNCTION BLOCK C3.............. 8W-80-90
JUNCTION BLOCK C4.............. 8W-80-91
JUNCTION BLOCK C5.............. 8W-80-91
KNOCK SENSOR................... 8W-80-91
LEAK DETECTION PUMP (EXCEPT
BUILT-UP-EXPORT)............... 8W-80-91
LEFT COURTESY LAMP............. 8W-80-91
LEFT DOOR HANDLE COURTESY
LAMP.......................... 8W-80-92
LEFT FOG LAMP................... 8W-80-92
LEFT FRONT DOOR SPEAKER....... 8W-80-92
LEFT FRONT IMPACT SENSOR....... 8W-80-92
LEFT FRONT PARK LAMP........... 8W-80-92
LEFT FRONT PARK/TURN SIGNAL LAMP
(EXCEPT BUILT-UP-EXPORT)...... 8W-80-93
LEFT FRONT SIDE MARKER LAMP
(EXCEPT BUILT-UP-EXPORT)...... 8W-80-93
LEFT FRONT TURN SIGNAL LAMP
(BUILT-UP-EXPORT).............. 8W-80-93
LEFT FRONT WHEEL SPEED
SENSOR........................ 8W-80-93
LEFT HEADLAMP LEVELING MOTOR
(BUILT-UP-EXPORT).............. 8W-80-94
LEFT HIGH BEAM HEADLAMP....... 8W-80-94
LEFT INSTRUMENT PANEL SPEAKER . 8W-80-94
LEFT LIFTGATE AJAR SWITCH....... 8W-80-94
LEFT LOW BEAM HEADLAMP....... 8W-80-94
LEFT MULTI-FUNCTION SWITCH.... 8W-80-95
LEFT REAR DOOR LOCK
MOTOR/AJAR SWITCH............ 8W-80-95
LEFT REAR DOOR SPEAKER......... 8W-80-95
LEFT REAR LAMP ASSEMBLY........ 8W-80-95
LEFT REAR WHEEL SPEED
SENSOR........................ 8W-80-96
LEFT REMOTE RADIO SWITCH...... 8W-80-96
LEFT SIDE REPEATER LAMP
(BUILT-UP-EXPORT).............. 8W-80-96
LEFT VISOR/VANITY LAMP.......... 8W-80-96
LICENSE LAMP NO. 1.............. 8W-80-96
LICENSE LAMP NO. 2.............. 8W-80-97
LIFTGATE FLIP-UP AJAR SWITCH.... 8W-80-97
WJ8W-80 CONNECTOR PIN-OUT 8W - 80 - 3