Ads JEEP GRAND CHEROKEE 2003 WJ / 2.G Workshop Manual
[x] Cancel search | Manufacturer: JEEP, Model Year: 2003, Model line: GRAND CHEROKEE, Model: JEEP GRAND CHEROKEE 2003 WJ / 2.GPages: 2199, PDF Size: 76.01 MB
Page 1819 of 2199
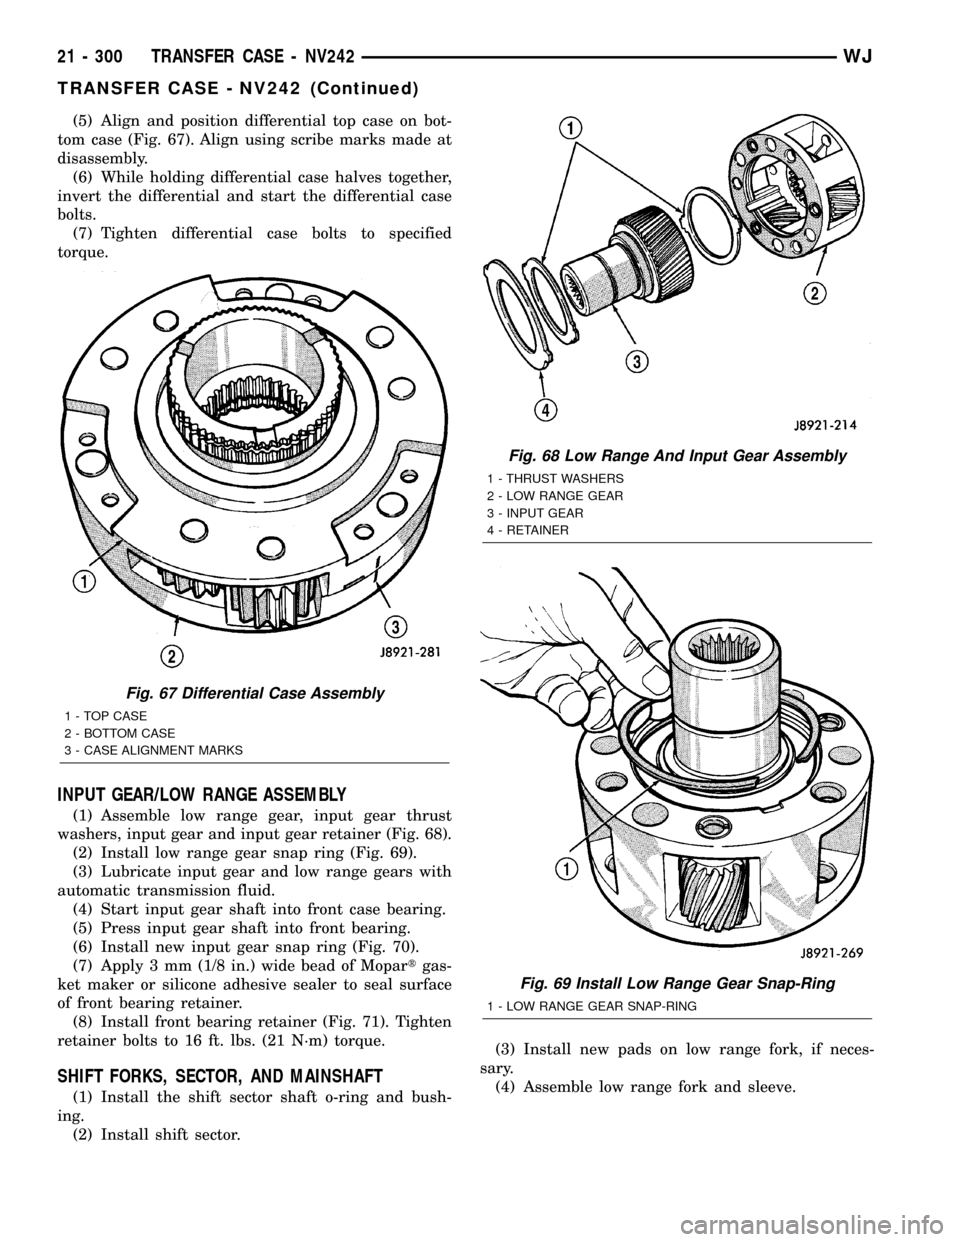
(5) Align and position differential top case on bot-
tom case (Fig. 67). Align using scribe marks made at
disassembly.
(6) While holding differential case halves together,
invert the differential and start the differential case
bolts.
(7) Tighten differential case bolts to specified
torque.
INPUT GEAR/LOW RANGE ASSEMBLY
(1) Assemble low range gear, input gear thrust
washers, input gear and input gear retainer (Fig. 68).
(2) Install low range gear snap ring (Fig. 69).
(3) Lubricate input gear and low range gears with
automatic transmission fluid.
(4) Start input gear shaft into front case bearing.
(5) Press input gear shaft into front bearing.
(6) Install new input gear snap ring (Fig. 70).
(7) Apply 3 mm (1/8 in.) wide bead of Mopartgas-
ket maker or silicone adhesive sealer to seal surface
of front bearing retainer.
(8) Install front bearing retainer (Fig. 71). Tighten
retainer bolts to 16 ft. lbs. (21 N´m) torque.
SHIFT FORKS, SECTOR, AND MAINSHAFT
(1) Install the shift sector shaft o-ring and bush-
ing.
(2) Install shift sector.(3) Install new pads on low range fork, if neces-
sary.
(4) Assemble low range fork and sleeve.
Fig. 67 Differential Case Assembly
1 - TOP CASE
2 - BOTTOM CASE
3 - CASE ALIGNMENT MARKS
Fig. 68 Low Range And Input Gear Assembly
1 - THRUST WASHERS
2 - LOW RANGE GEAR
3 - INPUT GEAR
4 - RETAINER
Fig. 69 Install Low Range Gear Snap-Ring
1 - LOW RANGE GEAR SNAP-RING
21 - 300 TRANSFER CASE - NV242WJ
TRANSFER CASE - NV242 (Continued)
Page 1821 of 2199
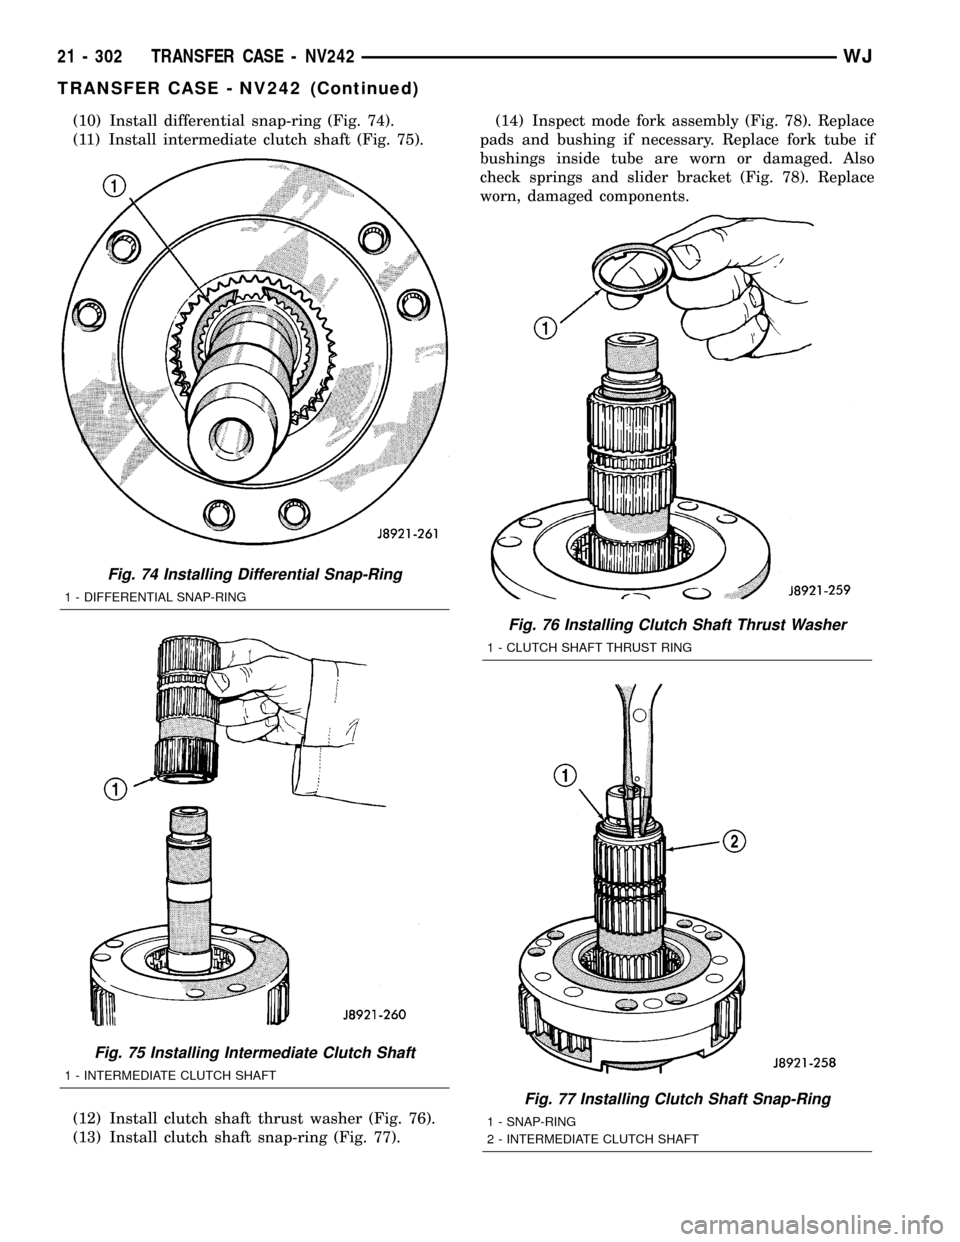
(10) Install differential snap-ring (Fig. 74).
(11) Install intermediate clutch shaft (Fig. 75).
(12) Install clutch shaft thrust washer (Fig. 76).
(13) Install clutch shaft snap-ring (Fig. 77).(14) Inspect mode fork assembly (Fig. 78). Replace
pads and bushing if necessary. Replace fork tube if
bushings inside tube are worn or damaged. Also
check springs and slider bracket (Fig. 78). Replace
worn, damaged components.
Fig. 74 Installing Differential Snap-Ring
1 - DIFFERENTIAL SNAP-RING
Fig. 75 Installing Intermediate Clutch Shaft
1 - INTERMEDIATE CLUTCH SHAFT
Fig. 76 Installing Clutch Shaft Thrust Washer
1 - CLUTCH SHAFT THRUST RING
Fig. 77 Installing Clutch Shaft Snap-Ring
1 - SNAP-RING
2 - INTERMEDIATE CLUTCH SHAFT
21 - 302 TRANSFER CASE - NV242WJ
TRANSFER CASE - NV242 (Continued)
Page 1822 of 2199
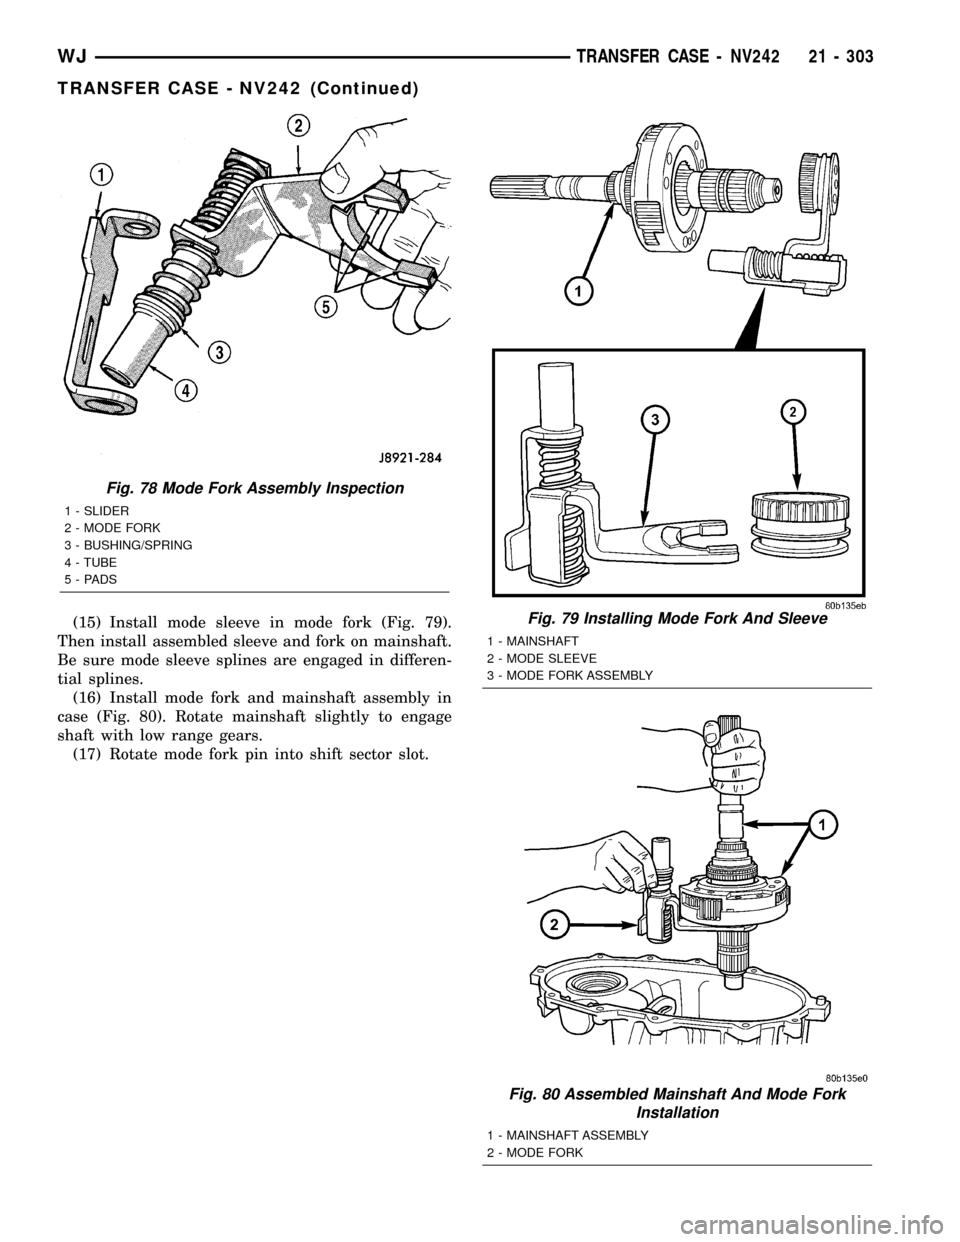
(15) Install mode sleeve in mode fork (Fig. 79).
Then install assembled sleeve and fork on mainshaft.
Be sure mode sleeve splines are engaged in differen-
tial splines.
(16) Install mode fork and mainshaft assembly in
case (Fig. 80). Rotate mainshaft slightly to engage
shaft with low range gears.
(17) Rotate mode fork pin into shift sector slot.Fig. 79 Installing Mode Fork And Sleeve
1 - MAINSHAFT
2 - MODE SLEEVE
3 - MODE FORK ASSEMBLY
Fig. 80 Assembled Mainshaft And Mode Fork
Installation
1 - MAINSHAFT ASSEMBLY
2 - MODE FORK
Fig. 78 Mode Fork Assembly Inspection
1 - SLIDER
2 - MODE FORK
3 - BUSHING/SPRING
4 - TUBE
5-PADS
WJTRANSFER CASE - NV242 21 - 303
TRANSFER CASE - NV242 (Continued)
Page 1844 of 2199
INPUT AND LOW RANGE GEARS
Inspect the low range gear pinions and pinion pins.
Replace the low range gear if any of the pins or pin-
ions are worn or damaged.
Inspect the thrust washers, retainer, and snap-
ring. Replace the snap-ring if bent, or distorted.
Replace the thrust washers and retainer if worn,
cracked or damaged in any way.
Examine the input gear carefully. Be sure the gear
teeth and bearing surfaces are in good condition.
Replace the gear if wear or damage is evident.
Check the input gear pilot bearing. Rotate the
bearing and check for roughness or noise. Also check
bearing position in the bore. The bearing should be
recessed approximately 2.5 mm (0.100 in.) below the
top edge of the bore. The bearing should not be
seated at the bottom of the bore. Replace the bearing
if worn, or roughness is evident. Replace both the
gear and bearing if the bearing is a loose fit in the
bore.
GEAR CASE AND RETAINERS
Examine both case halves and retainers carefully.
Replace any retainer or case half if wear, cracks, or
other damage is evident.
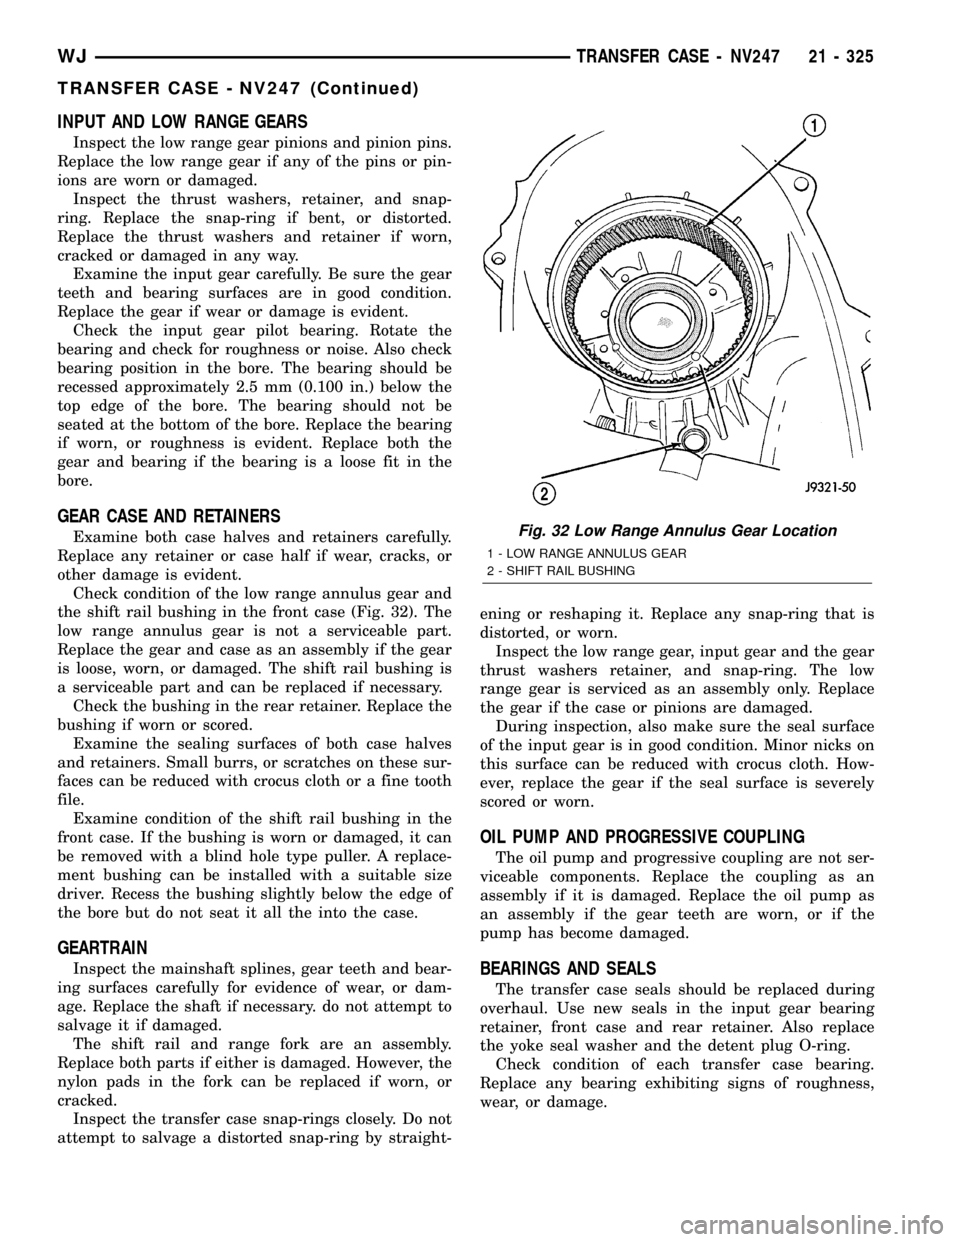
Check condition of the low range annulus gear and
the shift rail bushing in the front case (Fig. 32). The
low range annulus gear is not a serviceable part.
Replace the gear and case as an assembly if the gear
is loose, worn, or damaged. The shift rail bushing is
a serviceable part and can be replaced if necessary.
Check the bushing in the rear retainer. Replace the
bushing if worn or scored.
Examine the sealing surfaces of both case halves
and retainers. Small burrs, or scratches on these sur-
faces can be reduced with crocus cloth or a fine tooth
file.
Examine condition of the shift rail bushing in the
front case. If the bushing is worn or damaged, it can
be removed with a blind hole type puller. A replace-
ment bushing can be installed with a suitable size
driver. Recess the bushing slightly below the edge of
the bore but do not seat it all the into the case.
GEARTRAIN
Inspect the mainshaft splines, gear teeth and bear-
ing surfaces carefully for evidence of wear, or dam-
age. Replace the shaft if necessary. do not attempt to
salvage it if damaged.
The shift rail and range fork are an assembly.
Replace both parts if either is damaged. However, the
nylon pads in the fork can be replaced if worn, or
cracked.
Inspect the transfer case snap-rings closely. Do not
attempt to salvage a distorted snap-ring by straight-ening or reshaping it. Replace any snap-ring that is
distorted, or worn.
Inspect the low range gear, input gear and the gear
thrust washers retainer, and snap-ring. The low
range gear is serviced as an assembly only. Replace
the gear if the case or pinions are damaged.
During inspection, also make sure the seal surface
of the input gear is in good condition. Minor nicks on
this surface can be reduced with crocus cloth. How-
ever, replace the gear if the seal surface is severely
scored or worn.
OIL PUMP AND PROGRESSIVE COUPLING
The oil pump and progressive coupling are not ser-
viceable components. Replace the coupling as an
assembly if it is damaged. Replace the oil pump as
an assembly if the gear teeth are worn, or if the
pump has become damaged.
BEARINGS AND SEALS
The transfer case seals should be replaced during
overhaul. Use new seals in the input gear bearing
retainer, front case and rear retainer. Also replace
the yoke seal washer and the detent plug O-ring.
Check condition of each transfer case bearing.
Replace any bearing exhibiting signs of roughness,
wear, or damage.
Fig. 32 Low Range Annulus Gear Location
1 - LOW RANGE ANNULUS GEAR
2 - SHIFT RAIL BUSHING
WJTRANSFER CASE - NV247 21 - 325
TRANSFER CASE - NV247 (Continued)
Page 1849 of 2199
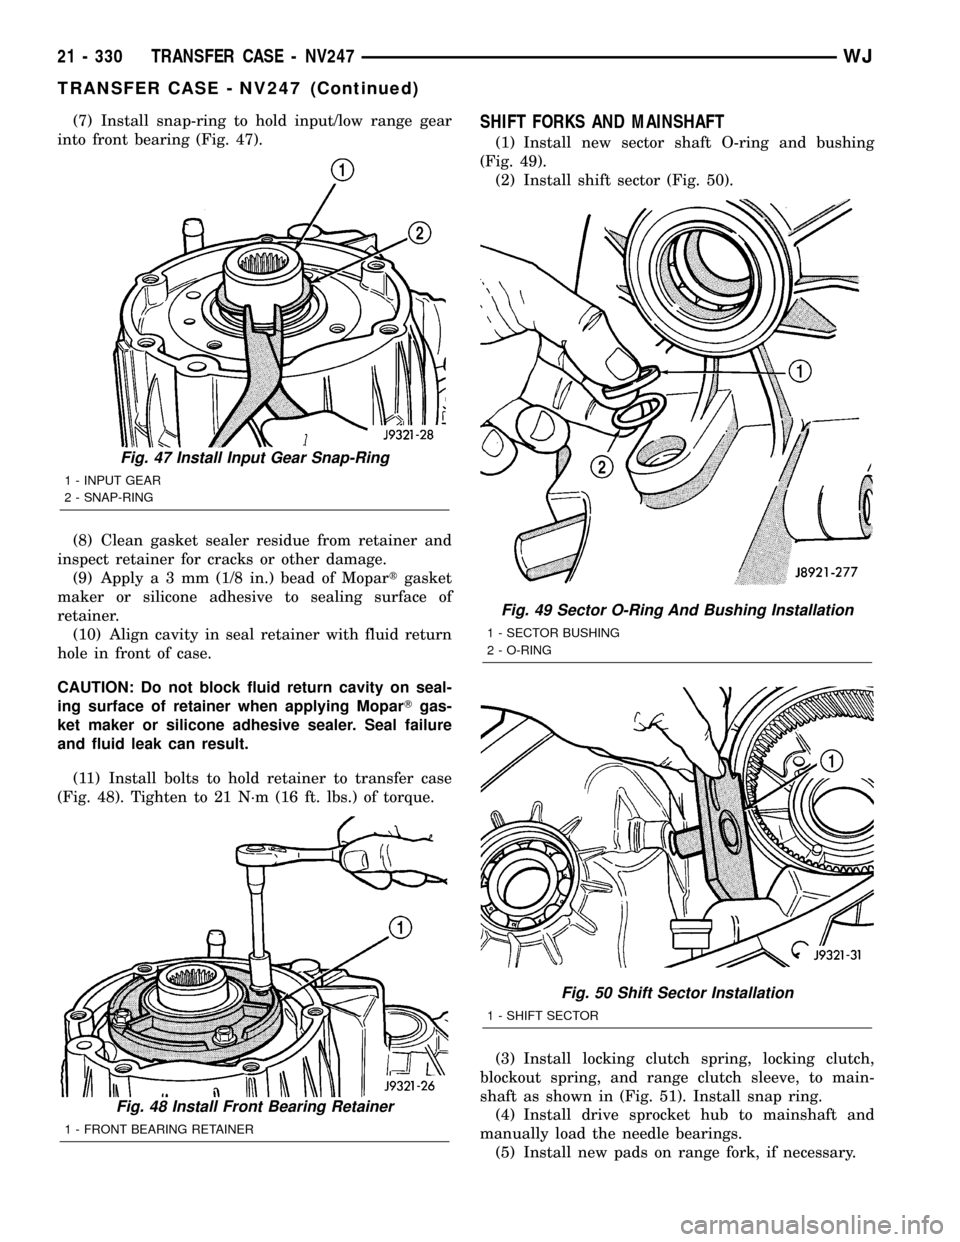
(7) Install snap-ring to hold input/low range gear
into front bearing (Fig. 47).
(8) Clean gasket sealer residue from retainer and
inspect retainer for cracks or other damage.
(9) Applya3mm(1/8 in.) bead of Mopartgasket
maker or silicone adhesive to sealing surface of
retainer.
(10) Align cavity in seal retainer with fluid return
hole in front of case.
CAUTION: Do not block fluid return cavity on seal-
ing surface of retainer when applying MoparTgas-
ket maker or silicone adhesive sealer. Seal failure
and fluid leak can result.
(11) Install bolts to hold retainer to transfer case
(Fig. 48). Tighten to 21 N´m (16 ft. lbs.) of torque.SHIFT FORKS AND MAINSHAFT
(1) Install new sector shaft O-ring and bushing
(Fig. 49).
(2) Install shift sector (Fig. 50).
(3) Install locking clutch spring, locking clutch,
blockout spring, and range clutch sleeve, to main-
shaft as shown in (Fig. 51). Install snap ring.
(4) Install drive sprocket hub to mainshaft and
manually load the needle bearings.
(5) Install new pads on range fork, if necessary.
Fig. 47 Install Input Gear Snap-Ring
1 - INPUT GEAR
2 - SNAP-RING
Fig. 48 Install Front Bearing Retainer
1 - FRONT BEARING RETAINER
Fig. 49 Sector O-Ring And Bushing Installation
1 - SECTOR BUSHING
2 - O-RING
Fig. 50 Shift Sector Installation
1 - SHIFT SECTOR
21 - 330 TRANSFER CASE - NV247WJ
TRANSFER CASE - NV247 (Continued)
Page 1864 of 2199
STANDARD PROCEDURE - TIRE ROTATION
Tires on the front and rear operate at different
loads and perform different steering, driving, and
braking functions. For these reasons they wear at
unequal rates and tend to develop irregular wear
patterns. These effects can be reduced by rotating
the tires at regular intervals. The benefits of tire
rotation are:
²Increase tread life
²Maintain traction levels
²A smooth, quiet ride
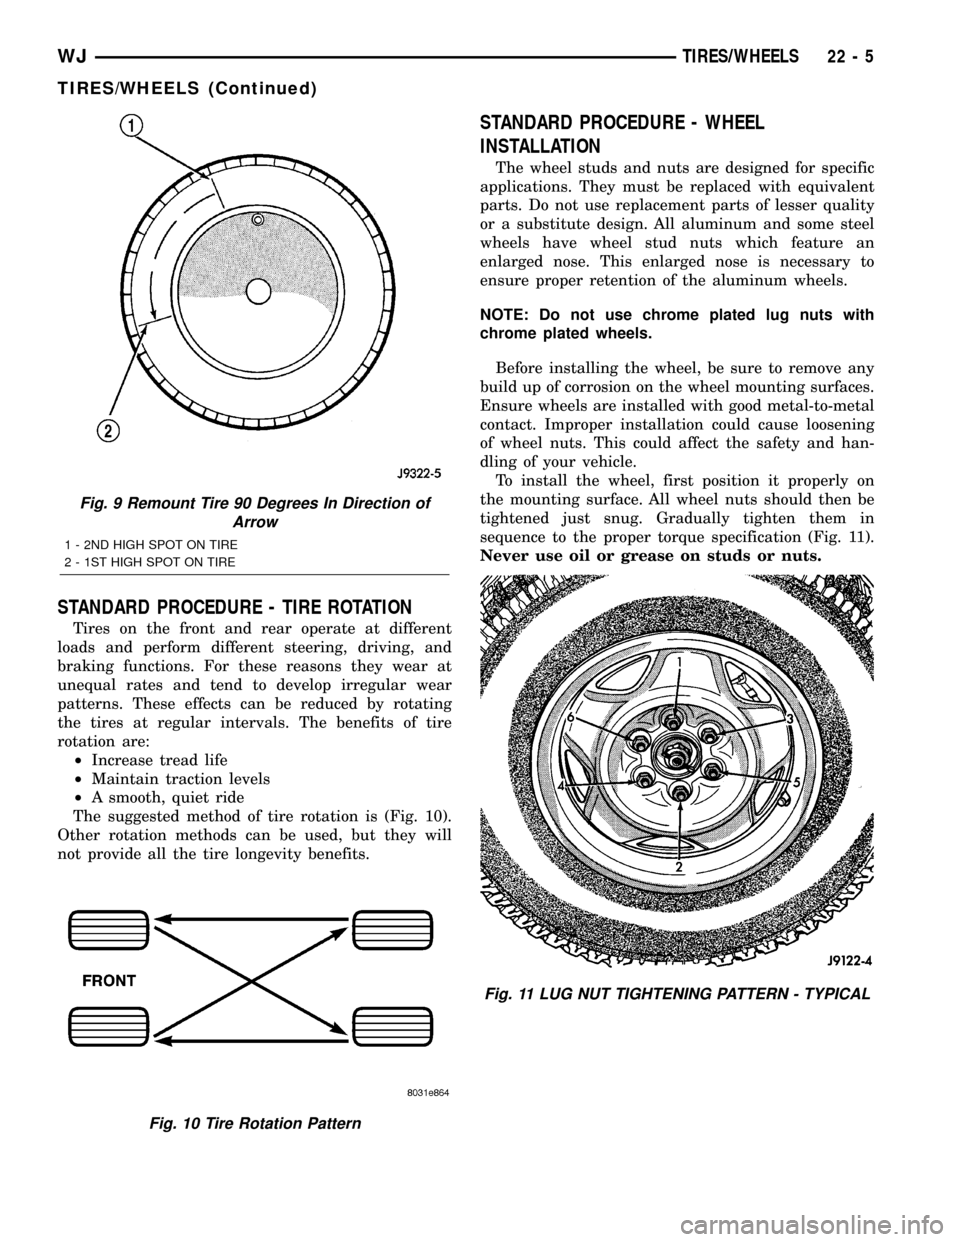
The suggested method of tire rotation is (Fig. 10).
Other rotation methods can be used, but they will
not provide all the tire longevity benefits.
STANDARD PROCEDURE - WHEEL
INSTALLATION
The wheel studs and nuts are designed for specific
applications. They must be replaced with equivalent
parts. Do not use replacement parts of lesser quality
or a substitute design. All aluminum and some steel
wheels have wheel stud nuts which feature an
enlarged nose. This enlarged nose is necessary to
ensure proper retention of the aluminum wheels.
NOTE: Do not use chrome plated lug nuts with
chrome plated wheels.
Before installing the wheel, be sure to remove any
build up of corrosion on the wheel mounting surfaces.
Ensure wheels are installed with good metal-to-metal
contact. Improper installation could cause loosening
of wheel nuts. This could affect the safety and han-
dling of your vehicle.
To install the wheel, first position it properly on
the mounting surface. All wheel nuts should then be
tightened just snug. Gradually tighten them in
sequence to the proper torque specification (Fig. 11).
Never use oil or grease on studs or nuts.
Fig. 9 Remount Tire 90 Degrees In Direction of
Arrow
1 - 2ND HIGH SPOT ON TIRE
2 - 1ST HIGH SPOT ON TIRE
Fig. 10 Tire Rotation Pattern
Fig. 11 LUG NUT TIGHTENING PATTERN - TYPICAL
WJTIRES/WHEELS 22 - 5
TIRES/WHEELS (Continued)
Page 1968 of 2199
INSTALLATION
WARNING: REVIEW ALL WARNINGS AND CAU-
TIONS IN THIS GROUP BEFORE PRECEDING WITH
INSTALLATION.
CAUTION: Open a window before installing wind-
shield. This will avoid pressurizing the passenger
compartment. If a door or liftgate is slammed before
urethane is cured, water leaks can result.
The windshield fence should be cleaned of old ure-
thane bonding material. Support spacers should be
cleaned and properly installed on weld studs or
repair screws at bottom of windshield opening.
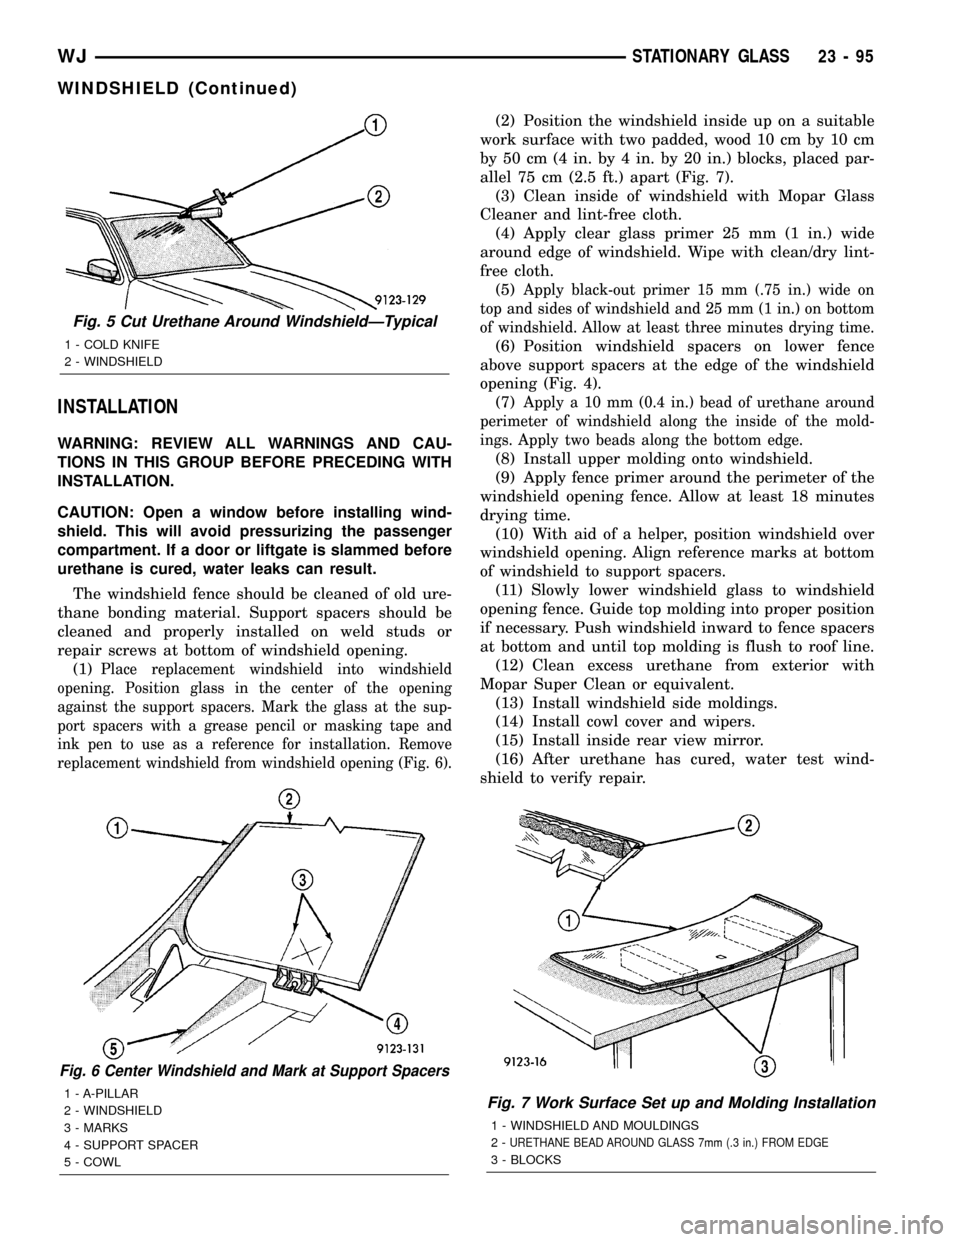
(1)
Place replacement windshield into windshield
opening. Position glass in the center of the opening
against the support spacers. Mark the glass at the sup-
port spacers with a grease pencil or masking tape and
ink pen to use as a reference for installation. Remove
replacement windshield from windshield opening (Fig. 6).
(2) Position the windshield inside up on a suitable
work surface with two padded, wood 10 cm by 10 cm
by 50 cm (4 in. by 4 in. by 20 in.) blocks, placed par-
allel 75 cm (2.5 ft.) apart (Fig. 7).
(3) Clean inside of windshield with Mopar Glass
Cleaner and lint-free cloth.
(4) Apply clear glass primer 25 mm (1 in.) wide
around edge of windshield. Wipe with clean/dry lint-
free cloth.
(5)
Apply black-out primer 15 mm (.75 in.) wide on
top and sides of windshield and 25 mm (1 in.) on bottom
of windshield. Allow at least three minutes drying time.
(6) Position windshield spacers on lower fence
above support spacers at the edge of the windshield
opening (Fig. 4).
(7)
Apply a 10 mm (0.4 in.) bead of urethane around
perimeter of windshield along the inside of the mold-
ings. Apply two beads along the bottom edge.
(8) Install upper molding onto windshield.
(9) Apply fence primer around the perimeter of the
windshield opening fence. Allow at least 18 minutes
drying time.
(10) With aid of a helper, position windshield over
windshield opening. Align reference marks at bottom
of windshield to support spacers.
(11) Slowly lower windshield glass to windshield
opening fence. Guide top molding into proper position
if necessary. Push windshield inward to fence spacers
at bottom and until top molding is flush to roof line.
(12) Clean excess urethane from exterior with
Mopar Super Clean or equivalent.
(13) Install windshield side moldings.
(14) Install cowl cover and wipers.
(15) Install inside rear view mirror.
(16) After urethane has cured, water test wind-
shield to verify repair.
Fig. 6 Center Windshield and Mark at Support Spacers
1 - A-PILLAR
2 - WINDSHIELD
3 - MARKS
4 - SUPPORT SPACER
5 - COWLFig. 7 Work Surface Set up and Molding Installation
1 - WINDSHIELD AND MOULDINGS
2-
URETHANE BEAD AROUND GLASS 7mm (.3 in.) FROM EDGE
3 - BLOCKS
Fig. 5 Cut Urethane Around WindshieldÐTypical
1 - COLD KNIFE
2 - WINDSHIELD
WJSTATIONARY GLASS 23 - 95
WINDSHIELD (Continued)
Page 1969 of 2199

SUNROOF
TABLE OF CONTENTS
page page
SUNROOF
DESCRIPTION.........................96
DIAGNOSIS AND TESTING - SUNROOF......96
DRAIN TUBE
REMOVAL............................100
INSTALLATION........................100
CONTROL MODULE
REMOVAL............................101
INSTALLATION........................101
DRIVE MOTOR
REMOVAL............................101
INSTALLATION........................101
WIND DEFLECTOR
REMOVAL............................102INSTALLATION........................102
GLASS PANEL
REMOVAL............................102
INSTALLATION........................103
ADJUSTMENTS
ADJUSTMENTS - FIT.................103
ADJUSTMENT - TIMING...............103
SUNSHADE
REMOVAL............................103
INSTALLATION........................103
HOUSING ASSEMBLY
REMOVAL............................104
INSTALLATION........................104
SUNROOF
DESCRIPTION
WARNING: Keep fingers and other body parts out
of sunroof opening at all times.
The sunroof features a power sliding glass panel
and a sunshade which can be manually positioned
anywhere along its travel, rearward of glass panel
front edge.
The sunroof is electrically operated from a switch
located on the mini overhead console. To operate the
sunroof the ignition switch must be in the On/Run
position. The sunroof has both manual and Express
Open modes of operation when opening. To open the
sunroof in the Express Open mode, the switch is
pressed rearward for less than1 second.This causes
the sunroof glass to automatically retract and stop at
a position slightly forward of full open that reduces
low speed wind buffeting. The sunroof can also be
opened manually by pressing and holding the switch
rearward. Once the switch is held reward for more
than1 second,the glass will retract in the manual
mode. Releasing the switch at any time during travel
will cause the sunroof to stop at the current position.
To close the sunroof from an open position, the
switch must be pushed forward and held until the
sunroof glass comes to a complete stop. Releasing the
switch at any time in this mode will cause the sun-
roof to stop at the current position.
To vent the sunroof from the closed position, the
switch is pushed forward and held. Releasing theswitch at any time during travel will cause the sun-
roof to stop at the current vent position. To reach the
fully vented position, continue to hold the switch for-
ward until vent motion stops. To close the sunroof
from the vent position, push and hold the switch
rearward until the glass comes to a complete stop.
DIAGNOSIS AND TESTING - SUNROOF
CAUTION: The sunroof motor is only to be powered
through the vehicle battery and vehicle wire har-
ness. Applying power to the sunroof motor leads
will cause failure of the sunroof control unit.
Before beginning sunroof diagnostics verify that all
other power accessories are in proper operating con-
dition. Refer to Sunroof Diagnostic Chart for possible
causes. If not, a common electrical problem may
exist. Refer to Group 8W, Wiring Diagrams, of this
publication for circuit, splice and component descrip-
tions. Check the condition of the circuit protection
(20 amp high current fuse (battery feed) located in
the Power Distribution Center (PDC). Check the
cover of the PDC for location of the fuse. Check for
correct operation of the sunroof delay relay. Inspect
all wiring connector pins for proper engagement and
continuity. Check for battery voltage at battery and
ignition pins of the power sunroof express module
wiring connector. Refer to Group 8W, Wiring Dia-
grams, for circuit information. The controller will not
operate at less than 10 volts. Check the ground at
the sunroof express module.
Before beginning diagnosis for wind noise or water
leaks, verify that the problem was not caused by
23 - 96 SUNROOFWJ
Page 1971 of 2199

SYMPTOM STEP POSSIBLE CAUSE
2 Check mechanism for binding (result of forcing the glass closed/
broken components).
3 See motor inoperative above.
Sunroof9rattles9, anytime,
closed/open.1 Loose attachment screws (module), re-fasten and adjust module.
2 Loose glass panel, re-fasten and adjust glass panel.
3 Loose drain channel, refasten/secure to repair.
4 Broken mechanism, replace the sunroof assembly module.
5 Mechanism not fully closed.
A) Motor out of time, re-time motor/mechanism. Refer to glass
panel adjustments in this section.
B) Cable ratcheting, replace cables and motor bracket.
6 Check for sunshade out of track or for sunshade broken slide
block.
7 Loose wind deflector. Replace if broken.
8 Loose wind deflector spring. Replace if loose.
Sunshade squeaks/rattles,
anytime.1 Sunshade slide blocks out of track(s), put back in tracks.
-OR- 2 Missing felt pads on the drain channel, add felt pads.
Sunshade force high/low or
binding during operation.3 Felt on the drain channel rolling off, (sunshade rubs on adhesive),
replace felt pads.
4 Slide block binding in sunshade, free-up slide block by actuating a
couple times, grease slide block(s) and spring(s).
5 Broken slide block in sunshade, replace slide block.
6 Slide block spring missing, replace spring and slide block.
7 Sunshade interference with drain channel or trim welt, replace trim
welt and/or sunshade.
Motor/sunroof control module
operation: Auto open doesn't
work, or doesn't stop at closed
position.1 After power disconnect or replacement, sunroof module has to
complete on full cycle to program the sunroof control module. Full
cycle = close > open > close > vent > close.
23 - 98 SUNROOFWJ
SUNROOF (Continued)
Page 1974 of 2199

CONTROL MODULE
REMOVAL
(1) Move the glass panel to the fully closed posi-
tion.
(2) Remove the A-pillar trim. (Refer to 23 - BODY/
INTERIOR/A-PILLAR TRIM - REMOVAL)
(3) Remove the sun visors. (Refer to 23 - BODY/
INTERIOR/SUN VISOR - REMOVAL)
(4) Remove the overhead console. (Refer to 8 -
ELECTRICAL/OVERHEAD CONSOLE - REMOVAL)
(5) Lower headliner as necessary to gain access to
the sunroof express module.
(6) Disconnect the express module wire harness
connectors.
(7) Remove express module screw.
(8) Remove express module from the keyway by
sliding module towards the center of the vehicle.
INSTALLATION
(1) Insert sunroof express module in the keyway
located in the sunroof module and slide the module
outward to lock it into position.
(2) Install the sunroof express module screw.
(3) Connect the wire connectors to the sunroof
express module.
(4) Install the headliner into position.
(5) Install the overhead console. (Refer to 8 -
ELECTRICAL/OVERHEAD CONSOLE - INSTALLA-
TION)
(6) Install the sun visors. (Refer to 23 - BODY/IN-
TERIOR/SUN VISOR - INSTALLATION)
(7) Install the A-pillar trim. (Refer to 23 - BODY/
INTERIOR/A-PILLAR TRIM - INSTALLATION)
(8) Test sunroof operation, adjust if necessary.
(Refer to 23 - BODY/SUNROOF/GLASS PANEL -
ADJUSTMENTS)
DRIVE MOTOR
REMOVAL
CAUTION: The sunroof system is timed from the
factory so that the motor shuts off automatically
when the sunroof window reaches a certain posi-
tion. Extreme care must be taken when removing
the motor, timing may be thrown off causing possi-
ble damage to the sunroof system. Anytime the
motor is removed from the sunroof assembly the
sunroof glass panel must be in the FULLY CLOSED
POSITION or the unit will be out of timing. The drive
motor cannot be reset to the park position after
being removed.CAUTION: The sunroof motor should only be pow-
ered through the vehicle battery and sunroof wire
harness. Applying power to the sunroof motor leads
will cause failure of the control module.
(1) Move glass panel to the fully closed position.
(2) Remove the A-pillar trim. (Refer to 23 - BODY/
INTERIOR/A-PILLAR TRIM - REMOVAL)
(3) Remove the B-pillar upper trim. (Refer to 23 -
BODY/INTERIOR/B-PILLAR UPPER TRIM -
REMOVAL)
(4) Remove the C-pillar trim. (Refer to 23 - BODY/
INTERIOR/C-PILLAR TRIM - REMOVAL)
(5) Remove the D-pillar trim. (Refer to 23 - BODY/
INTERIOR/D-PILLAR TRIM - REMOVAL)
(6) Remove the sunvisors. (Refer to 23 - BODY/IN-
TERIOR/SUN VISOR - REMOVAL)
(7) Remove the overhead console. (Refer to 8 -
ELECTRICAL/OVERHEAD CONSOLE - REMOVAL)
(8) Disconnect the control switch wire connector.
(9) Remove headliner as necessary to gain access
to sunroof drive motor. Refer to Headliner Removal
and Installation for proper procedures.
(10) Disconnect the drive motor wire harness con-
nectors (Fig. 3).
(11) Remove drive motor fasteners and remove
motor from the sunroof housing.
INSTALLATION
(1) Ensure that the window is in the fully closed
position before mounting the motor. If motor fails
with the window in the open position the sunroof
glass panel timing will have to be timed. The new
motor comes in the fully closed position and with a
gage for setting cable timing. (Refer to 23 - BODY/
SUNROOF/GLASS PANEL - ADJUSTMENTS - TIM-
ING)
(2) Place drive motor into position on the sunroof
housing and install fasteners.
Fig. 3 Sunroof Drive Motor and Express Module
1 - EXPRESS MODULE
2 - SCREW
WJSUNROOF 23 - 101