lamp JEEP GRAND CHEROKEE 2003 WJ / 2.G Workshop Manual
[x] Cancel search | Manufacturer: JEEP, Model Year: 2003, Model line: GRAND CHEROKEE, Model: JEEP GRAND CHEROKEE 2003 WJ / 2.GPages: 2199, PDF Size: 76.01 MB
Page 1929 of 2199

INSTRUMENT PANEL C-
CHANNEL COVER BRACKET
REMOVAL
WARNING: ON VEHICLES EQUIPPED WITH AIRBAGS,
DISABLE THE AIRBAG SYSTEM BEFORE ATTEMPT-
ING ANY STEERING WHEEL, STEERING COLUMN, OR
INSTRUMENT PANEL COMPONENT DIAGNOSIS OR
SERVICE. DISCONNECT AND ISOLATE THE BATTERY
NEGATIVE (GROUND) CABLE, THEN WAIT TWO MIN-
UTES FOR THE AIRBAG SYSTEM CAPACITOR TO DIS-
CHARGE BEFORE PERFORMING FURTHER
DIAGNOSIS OR SERVICE. THIS IS THE ONLY SURE
WAY TO DISABLE THE AIRBAG SYSTEM. FAILURE TO
TAKE THE PROPER PRECAUTIONS COULD RESULT
IN ACCIDENTAL AIRBAG DEPLOYMENT AND POSSI-
BLE PERSONAL INJURY.
(1)Disconnect and isolate the battery negative cable.
(2) Remove the instrument panel from the vehicle.
(Refer to 23 - BODY/INSTRUMENT PANEL -
REMOVAL).
(3) Place the instrument panel top down on a suit-
able work surface. Be certain to take the proper pre-
cautions to protect the top of the instrument panel
from any possible cosmetic damage.
(4) Disengage the radio antenna coaxial cable
retainer from the mounting hole in the instrument
panel wire harness mounting tab on the passenger
side outboard end of the instrument panel C-channel
cover bracket.
(5) Remove the screw that secures the instrument
panel wire harness mounting tab on the passenger
side outboard end of the instrument panel C-channel
cover bracket (Fig. 26).
(6) Remove the screw that secures the passenger
side courtesy lamp to the lower tab of instrument
panel C-channel cover bracket.
(7) Remove the eight screws that secure the
C-channel cover bracket to the instrument panel
structural duct.
(8) Remove the C-channel cover bracket from the
instrument panel structural duct.
INSTALLATION
WARNING: ON VEHICLES EQUIPPED WITH AIRBAGS,
DISABLE THE AIRBAG SYSTEM BEFORE ATTEMPT-
ING ANY STEERING WHEEL, STEERING COLUMN, OR
INSTRUMENT PANEL COMPONENT DIAGNOSIS OR
SERVICE. DISCONNECT AND ISOLATE THE BATTERY
NEGATIVE (GROUND) CABLE, THEN WAIT TWO MIN-
UTES FOR THE AIRBAG SYSTEM CAPACITOR TO DIS-
CHARGE BEFORE PERFORMING FURTHER
DIAGNOSIS OR SERVICE. THIS IS THE ONLY SUREWAY TO DISABLE THE AIRBAG SYSTEM. FAILURE TO
TAKE THE PROPER PRECAUTIONS COULD RESULT
IN ACCIDENTAL AIRBAG DEPLOYMENT AND POSSI-
BLE PERSONAL INJURY.
(1) Position the C-channel cover bracket to the
instrument panel structural duct.
(2) Install and tighten the eight screws that secure
the C-channel cover bracket to the instrument panel
structural duct (Fig. 26). Tighten the screws to 2.2
N´m (20 in. lbs.).
(3) Position the passenger side courtesy lamp to
the lower tab of instrument panel C-channel cover
bracket.
(4) Install and tighten the screw that secures the
passenger side courtesy lamp to the lower tab of
instrument panel C-channel cover bracket. Tighten
the screw to 2.2 N´m (20 in. lbs.).
(5) Position the instrument panel wire harness
mounting tab to the passenger side outboard end of
the instrument panel C-channel cover bracket.
(6) Install and tighten the screw that secures the
instrument panel wire harness mounting tab to the
passenger side outboard end of the instrument panel
C-channel cover bracket. Tighten the screw to 2.2
N´m (20 in. lbs.).
(7) Engage the radio antenna coaxial cable
retainer in the mounting hole in the instrument
panel wire harness mounting tab on the passenger
side outboard end of the instrument panel C-channel
cover bracket.
(8) Reinstall the instrument panel into the vehicle.
(Refer to 23 - BODY/INSTRUMENT PANEL -
INSTALLATION).
(9) Reconnect the battery negative cable.
Fig. 26 Instrument Panel C-Channel Cover Bracket
Remove/Install
1 - C-CHANNEL COVER BRACKET
2 - SCREWS (8)
3 - PASSENGER SIDE COURTESY LAMP
4 - INSTRUMENT PANEL WIRE HARNESS
5 - STRUCTURAL DUCT
23 - 56 INSTRUMENT PANEL SYSTEMWJ
Page 1930 of 2199

INSTRUMENT PANEL CENTER
BEZEL - LOWER
REMOVAL
WARNING: ON VEHICLES EQUIPPED WITH AIRBAGS,
DISABLE THE AIRBAG SYSTEM BEFORE ATTEMPT-
ING ANY STEERING WHEEL, STEERING COLUMN, OR
INSTRUMENT PANEL COMPONENT DIAGNOSIS OR
SERVICE. DISCONNECT AND ISOLATE THE BATTERY
NEGATIVE (GROUND) CABLE, THEN WAIT TWO MIN-
UTES FOR THE AIRBAG SYSTEM CAPACITOR TO DIS-
CHARGE BEFORE PERFORMING FURTHER
DIAGNOSIS OR SERVICE. THIS IS THE ONLY SURE
WAY TO DISABLE THE AIRBAG SYSTEM. FAILURE TO
TAKE THE PROPER PRECAUTIONS COULD RESULT
IN ACCIDENTAL AIRBAG DEPLOYMENT AND POSSI-
BLE PERSONAL INJURY.
(1) Disconnect and isolate the battery negative
cable.
(2) Using a trim stick or another suitable wide
flat-bladed tool, gently pry each of the four corners of
the center lower bezel away from the instrument
panel far enough to disengage the four snap clips
from their receptacles (Fig. 27).
(3) Pull the center lower bezel away from the
instrument panel far enough to access the instru-
ment panel wire harness connectors.
(4) Squeeze the mounting legs of the ash receiver
lamp hood and remove it from the rectangular hole
in the ash receiver flame shield.(5) If the vehicle is so equipped, disconnect the
instrument panel wire harness connectors for the two
heated seat switches from the switch connector
receptacles.
(6) Disconnect the instrument panel wire harness
connectors for the cigar lighter and accessory power
outlet from the lighter and outlet connector recepta-
cles.
(7) Remove the center lower bezel from the instru-
ment panel.
INSTALLATION
WARNING: ON VEHICLES EQUIPPED WITH AIR-
BAGS, DISABLE THE AIRBAG SYSTEM BEFORE
ATTEMPTING ANY STEERING WHEEL, STEERING
COLUMN, OR INSTRUMENT PANEL COMPONENT
DIAGNOSIS OR SERVICE. DISCONNECT AND ISO-
LATE THE BATTERY NEGATIVE (GROUND) CABLE,
THEN WAIT TWO MINUTES FOR THE AIRBAG SYS-
TEM CAPACITOR TO DISCHARGE BEFORE PER-
FORMING FURTHER DIAGNOSIS OR SERVICE. THIS
IS THE ONLY SURE WAY TO DISABLE THE AIRBAG
SYSTEM. FAILURE TO TAKE THE PROPER PRE-
CAUTIONS COULD RESULT IN ACCIDENTAL AIR-
BAG DEPLOYMENT AND POSSIBLE PERSONAL
INJURY.
(1) Position the center lower bezel to the instru-
ment panel.
(2) Reconnect the instrument panel wire harness
connectors for the cigar lighter and the accessory
power outlet to the lighter and outlet connector
receptacles.
(3) If the vehicle is so equipped, reconnect the
instrument panel wire harness connectors for the two
heated seat switches to the switch connector recepta-
cles.
(4) Squeeze the mounting legs of the ash receiver
lamp hood and install them into the rectangular hole
in the ash receiver flame shield.
(5) Align the two lower snap clips on the center
lower bezel with their receptacles in the instrument
panel top pad.
(6) Using hand pressure, press firmly and evenly
on the center lower bezel over each of the lower snap
clip locations until each of the snap clips is fully
engaged in its receptacle.
(7) Align the two upper snap clips on the center
lower bezel with their receptacles in the instrument
panel top pad.
(8) Using hand pressure, press firmly and evenly
on the center lower bezel over each of the upper snap
clip locations until each of the snap clips is fully
engaged in its receptacle.
(9) Reconnect the battery negative cable.
Fig. 27 Instrument Panel Center Lower Bezel
Remove/Install
1 - HEATER AND AIR CONDITIONER CONTROLS
2 - TRIM STICK
3 - CENTER LOWER BEZEL
WJINSTRUMENT PANEL SYSTEM 23 - 57
Page 1932 of 2199
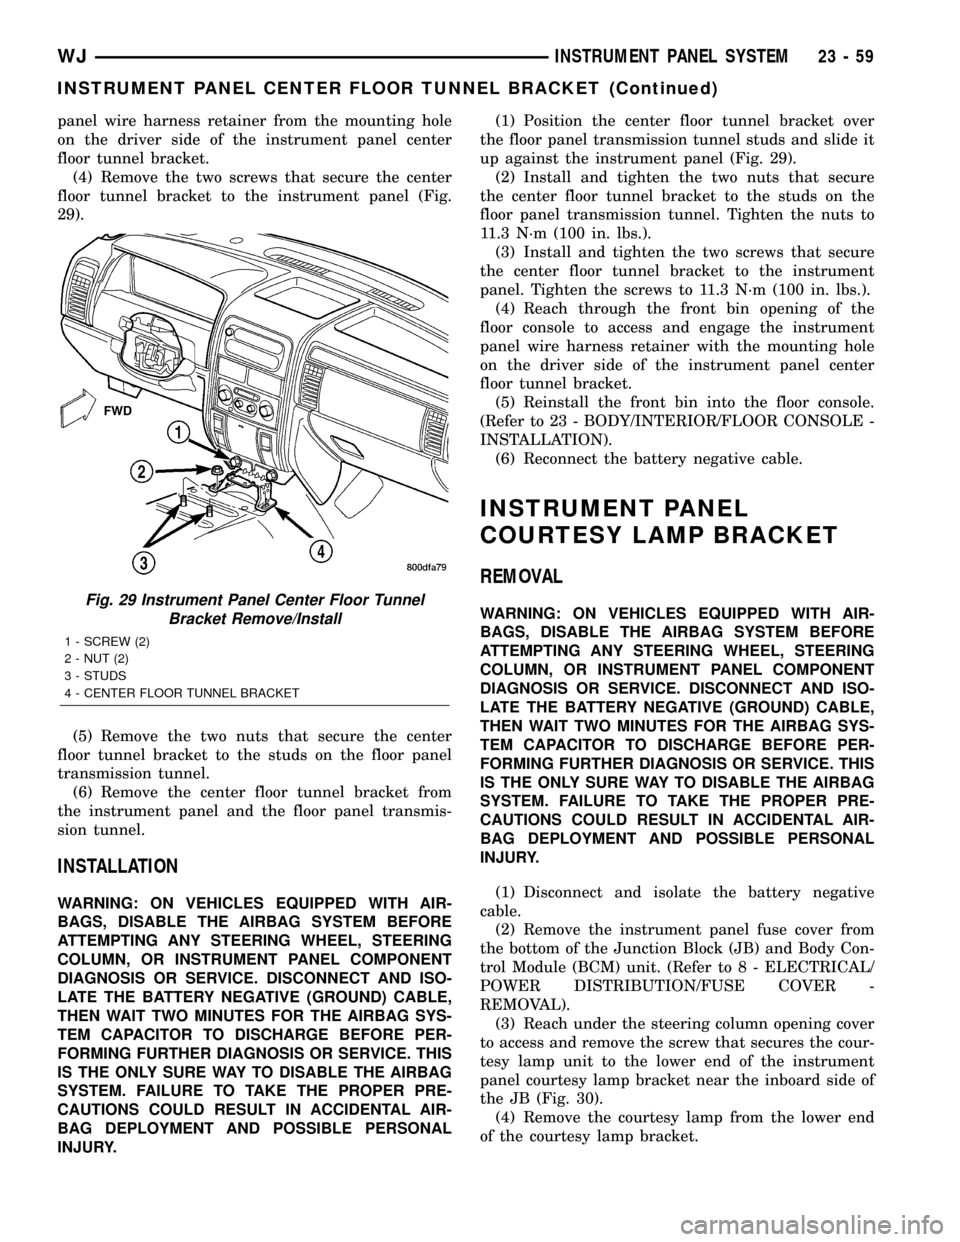
panel wire harness retainer from the mounting hole
on the driver side of the instrument panel center
floor tunnel bracket.
(4) Remove the two screws that secure the center
floor tunnel bracket to the instrument panel (Fig.
29).
(5) Remove the two nuts that secure the center
floor tunnel bracket to the studs on the floor panel
transmission tunnel.
(6) Remove the center floor tunnel bracket from
the instrument panel and the floor panel transmis-
sion tunnel.
INSTALLATION
WARNING: ON VEHICLES EQUIPPED WITH AIR-
BAGS, DISABLE THE AIRBAG SYSTEM BEFORE
ATTEMPTING ANY STEERING WHEEL, STEERING
COLUMN, OR INSTRUMENT PANEL COMPONENT
DIAGNOSIS OR SERVICE. DISCONNECT AND ISO-
LATE THE BATTERY NEGATIVE (GROUND) CABLE,
THEN WAIT TWO MINUTES FOR THE AIRBAG SYS-
TEM CAPACITOR TO DISCHARGE BEFORE PER-
FORMING FURTHER DIAGNOSIS OR SERVICE. THIS
IS THE ONLY SURE WAY TO DISABLE THE AIRBAG
SYSTEM. FAILURE TO TAKE THE PROPER PRE-
CAUTIONS COULD RESULT IN ACCIDENTAL AIR-
BAG DEPLOYMENT AND POSSIBLE PERSONAL
INJURY.(1) Position the center floor tunnel bracket over
the floor panel transmission tunnel studs and slide it
up against the instrument panel (Fig. 29).
(2) Install and tighten the two nuts that secure
the center floor tunnel bracket to the studs on the
floor panel transmission tunnel. Tighten the nuts to
11.3 N´m (100 in. lbs.).
(3) Install and tighten the two screws that secure
the center floor tunnel bracket to the instrument
panel. Tighten the screws to 11.3 N´m (100 in. lbs.).
(4) Reach through the front bin opening of the
floor console to access and engage the instrument
panel wire harness retainer with the mounting hole
on the driver side of the instrument panel center
floor tunnel bracket.
(5) Reinstall the front bin into the floor console.
(Refer to 23 - BODY/INTERIOR/FLOOR CONSOLE -
INSTALLATION).
(6) Reconnect the battery negative cable.
INSTRUMENT PANEL
COURTESY LAMP BRACKET
REMOVAL
WARNING: ON VEHICLES EQUIPPED WITH AIR-
BAGS, DISABLE THE AIRBAG SYSTEM BEFORE
ATTEMPTING ANY STEERING WHEEL, STEERING
COLUMN, OR INSTRUMENT PANEL COMPONENT
DIAGNOSIS OR SERVICE. DISCONNECT AND ISO-
LATE THE BATTERY NEGATIVE (GROUND) CABLE,
THEN WAIT TWO MINUTES FOR THE AIRBAG SYS-
TEM CAPACITOR TO DISCHARGE BEFORE PER-
FORMING FURTHER DIAGNOSIS OR SERVICE. THIS
IS THE ONLY SURE WAY TO DISABLE THE AIRBAG
SYSTEM. FAILURE TO TAKE THE PROPER PRE-
CAUTIONS COULD RESULT IN ACCIDENTAL AIR-
BAG DEPLOYMENT AND POSSIBLE PERSONAL
INJURY.
(1) Disconnect and isolate the battery negative
cable.
(2) Remove the instrument panel fuse cover from
the bottom of the Junction Block (JB) and Body Con-
trol Module (BCM) unit. (Refer to 8 - ELECTRICAL/
POWER DISTRIBUTION/FUSE COVER -
REMOVAL).
(3) Reach under the steering column opening cover
to access and remove the screw that secures the cour-
tesy lamp unit to the lower end of the instrument
panel courtesy lamp bracket near the inboard side of
the JB (Fig. 30).
(4) Remove the courtesy lamp from the lower end
of the courtesy lamp bracket.Fig. 29 Instrument Panel Center Floor Tunnel
Bracket Remove/Install
1 - SCREW (2)
2 - NUT (2)
3 - STUDS
4 - CENTER FLOOR TUNNEL BRACKET
WJINSTRUMENT PANEL SYSTEM 23 - 59
INSTRUMENT PANEL CENTER FLOOR TUNNEL BRACKET (Continued)
Page 1933 of 2199
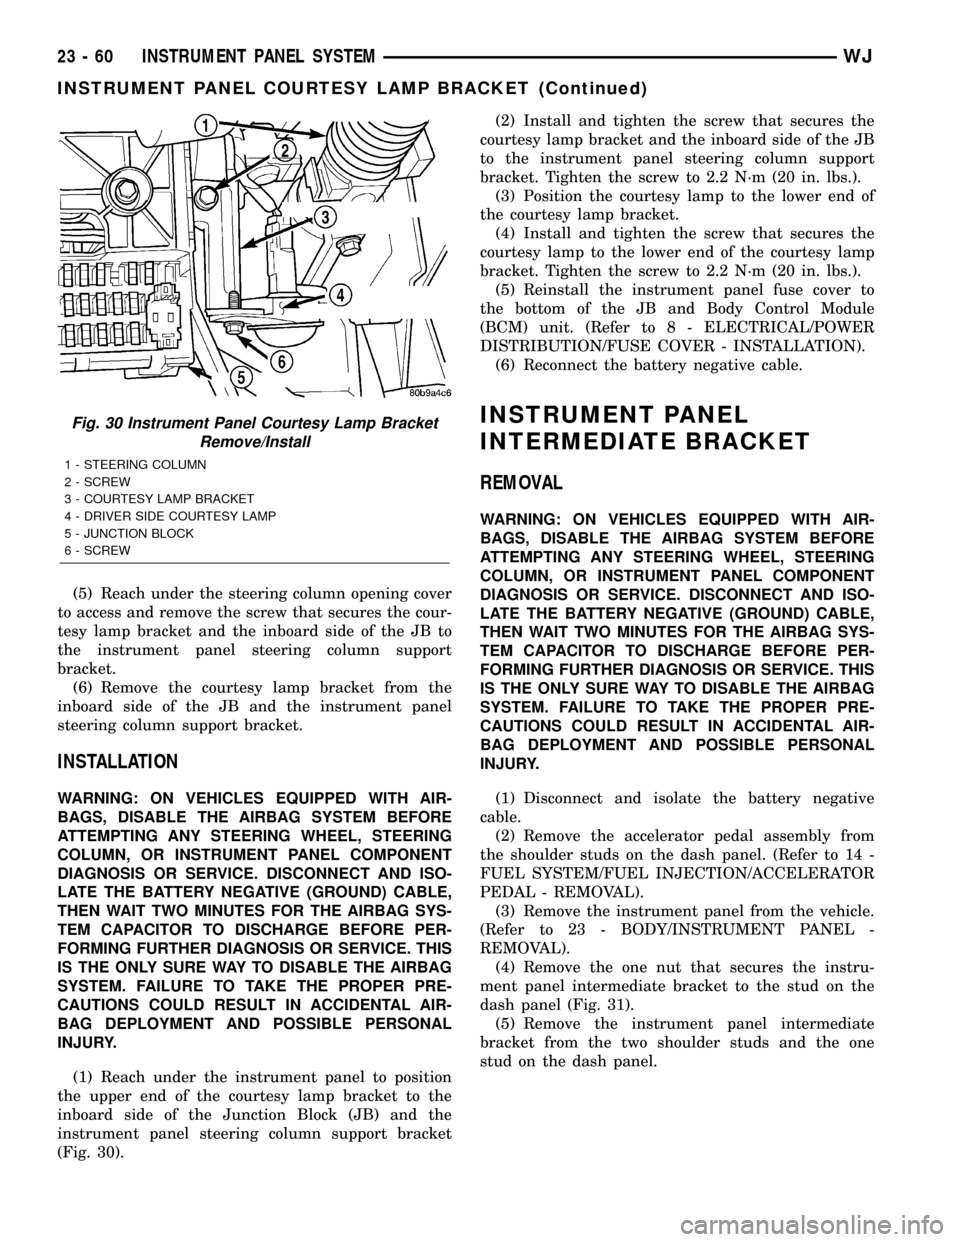
(5) Reach under the steering column opening cover
to access and remove the screw that secures the cour-
tesy lamp bracket and the inboard side of the JB to
the instrument panel steering column support
bracket.
(6) Remove the courtesy lamp bracket from the
inboard side of the JB and the instrument panel
steering column support bracket.
INSTALLATION
WARNING: ON VEHICLES EQUIPPED WITH AIR-
BAGS, DISABLE THE AIRBAG SYSTEM BEFORE
ATTEMPTING ANY STEERING WHEEL, STEERING
COLUMN, OR INSTRUMENT PANEL COMPONENT
DIAGNOSIS OR SERVICE. DISCONNECT AND ISO-
LATE THE BATTERY NEGATIVE (GROUND) CABLE,
THEN WAIT TWO MINUTES FOR THE AIRBAG SYS-
TEM CAPACITOR TO DISCHARGE BEFORE PER-
FORMING FURTHER DIAGNOSIS OR SERVICE. THIS
IS THE ONLY SURE WAY TO DISABLE THE AIRBAG
SYSTEM. FAILURE TO TAKE THE PROPER PRE-
CAUTIONS COULD RESULT IN ACCIDENTAL AIR-
BAG DEPLOYMENT AND POSSIBLE PERSONAL
INJURY.
(1) Reach under the instrument panel to position
the upper end of the courtesy lamp bracket to the
inboard side of the Junction Block (JB) and the
instrument panel steering column support bracket
(Fig. 30).(2) Install and tighten the screw that secures the
courtesy lamp bracket and the inboard side of the JB
to the instrument panel steering column support
bracket. Tighten the screw to 2.2 N´m (20 in. lbs.).
(3) Position the courtesy lamp to the lower end of
the courtesy lamp bracket.
(4) Install and tighten the screw that secures the
courtesy lamp to the lower end of the courtesy lamp
bracket. Tighten the screw to 2.2 N´m (20 in. lbs.).
(5) Reinstall the instrument panel fuse cover to
the bottom of the JB and Body Control Module
(BCM) unit. (Refer to 8 - ELECTRICAL/POWER
DISTRIBUTION/FUSE COVER - INSTALLATION).
(6) Reconnect the battery negative cable.
INSTRUMENT PANEL
INTERMEDIATE BRACKET
REMOVAL
WARNING: ON VEHICLES EQUIPPED WITH AIR-
BAGS, DISABLE THE AIRBAG SYSTEM BEFORE
ATTEMPTING ANY STEERING WHEEL, STEERING
COLUMN, OR INSTRUMENT PANEL COMPONENT
DIAGNOSIS OR SERVICE. DISCONNECT AND ISO-
LATE THE BATTERY NEGATIVE (GROUND) CABLE,
THEN WAIT TWO MINUTES FOR THE AIRBAG SYS-
TEM CAPACITOR TO DISCHARGE BEFORE PER-
FORMING FURTHER DIAGNOSIS OR SERVICE. THIS
IS THE ONLY SURE WAY TO DISABLE THE AIRBAG
SYSTEM. FAILURE TO TAKE THE PROPER PRE-
CAUTIONS COULD RESULT IN ACCIDENTAL AIR-
BAG DEPLOYMENT AND POSSIBLE PERSONAL
INJURY.
(1) Disconnect and isolate the battery negative
cable.
(2) Remove the accelerator pedal assembly from
the shoulder studs on the dash panel. (Refer to 14 -
FUEL SYSTEM/FUEL INJECTION/ACCELERATOR
PEDAL - REMOVAL).
(3) Remove the instrument panel from the vehicle.
(Refer to 23 - BODY/INSTRUMENT PANEL -
REMOVAL).
(4) Remove the one nut that secures the instru-
ment panel intermediate bracket to the stud on the
dash panel (Fig. 31).
(5) Remove the instrument panel intermediate
bracket from the two shoulder studs and the one
stud on the dash panel.
Fig. 30 Instrument Panel Courtesy Lamp Bracket
Remove/Install
1 - STEERING COLUMN
2 - SCREW
3 - COURTESY LAMP BRACKET
4 - DRIVER SIDE COURTESY LAMP
5 - JUNCTION BLOCK
6 - SCREW
23 - 60 INSTRUMENT PANEL SYSTEMWJ
INSTRUMENT PANEL COURTESY LAMP BRACKET (Continued)
Page 1950 of 2199
HEADLINER
REMOVAL
CAUTION: The headliner is a one-piece, molded
component. It has limited flexibility and must not be
bent. Damage may possibly result.
(1) Record radio presets and disconnect negative
battery cable.
(2) Remove A pillar trim moldings (Refer to 23 -
BODY/INTERIOR/A-PILLAR TRIM - REMOVAL).
(3) Remove B pillar upper trim moldings (Refer to
23 - BODY/INTERIOR/B-PILLAR UPPER TRIM -
REMOVAL).
(4) Remove C pillar trim moldings (Refer to 23 -
BODY/INTERIOR/C-PILLAR TRIM - REMOVAL).
(5) Remove D pillar trim molding (Refer to 23 -
BODY/INTERIOR/D-PILLAR TRIM - REMOVAL).
(6) Remove the sun visors (Refer to 23 - BODY/IN-
TERIOR/SUN VISOR - REMOVAL).
(7) Disconnect the vanity lamp electrical connector.
(8) Remove assist handles from roof rails (Refer to
23 - BODY/INTERIOR/ASSIST HANDLE - REMOV-
AL).
(9) Remove dome lamp and overhead console, if
equipped.
(10) Remove rear cargo/dome lamp.
(11) Remove sun roof pinch welt, if equipped.
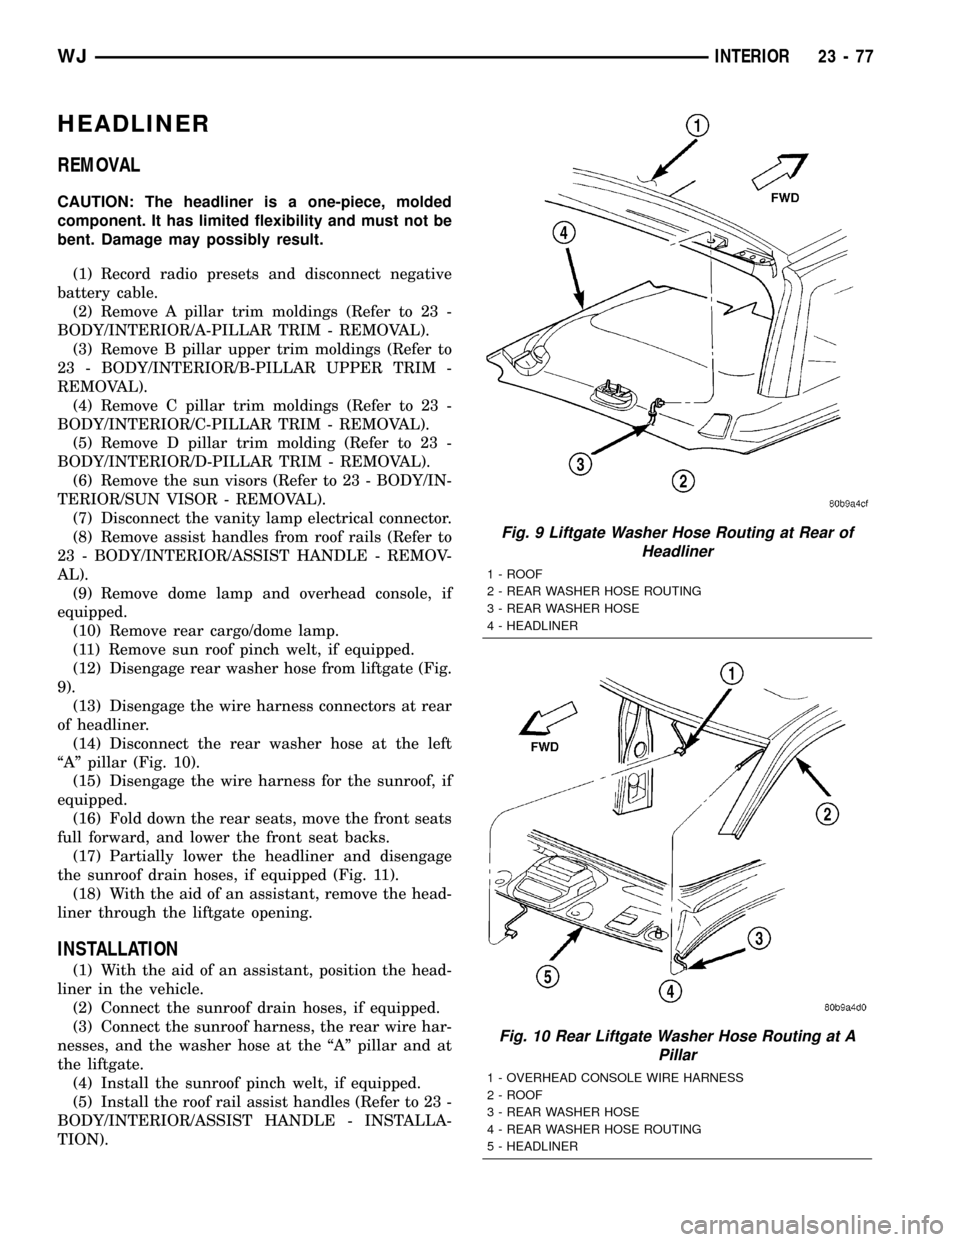
(12) Disengage rear washer hose from liftgate (Fig.
9).
(13) Disengage the wire harness connectors at rear
of headliner.
(14) Disconnect the rear washer hose at the left
ªAº pillar (Fig. 10).
(15) Disengage the wire harness for the sunroof, if
equipped.
(16) Fold down the rear seats, move the front seats
full forward, and lower the front seat backs.
(17) Partially lower the headliner and disengage
the sunroof drain hoses, if equipped (Fig. 11).
(18) With the aid of an assistant, remove the head-
liner through the liftgate opening.
INSTALLATION
(1) With the aid of an assistant, position the head-
liner in the vehicle.
(2) Connect the sunroof drain hoses, if equipped.
(3) Connect the sunroof harness, the rear wire har-
nesses, and the washer hose at the ªAº pillar and at
the liftgate.
(4) Install the sunroof pinch welt, if equipped.
(5) Install the roof rail assist handles (Refer to 23 -
BODY/INTERIOR/ASSIST HANDLE - INSTALLA-
TION).
Fig. 9 Liftgate Washer Hose Routing at Rear of
Headliner
1 - ROOF
2 - REAR WASHER HOSE ROUTING
3 - REAR WASHER HOSE
4 - HEADLINER
Fig. 10 Rear Liftgate Washer Hose Routing at A
Pillar
1 - OVERHEAD CONSOLE WIRE HARNESS
2 - ROOF
3 - REAR WASHER HOSE
4 - REAR WASHER HOSE ROUTING
5 - HEADLINER
WJINTERIOR 23 - 77
Page 1951 of 2199

(6) Install the sun visors (Refer to 23 - BODY/IN-
TERIOR/SUN VISOR - INSTALLATION).
(7) Install the overhead console, if equipped.
(8) Install the rear cargo/dome lamp.
(9) Install the D pillar trim (Refer to 23 - BODY/
INTERIOR/D-PILLAR TRIM - INSTALLATION).(10) Install the C pillar trim (Refer to 23 - BODY/
INTERIOR/C-PILLAR TRIM - INSTALLATION).
(11) Install the upper B pillar trim (Refer to 23 -
BODY/INTERIOR/B-PILLAR UPPER TRIM -
INSTALLATION).
(12) Install the A pillar trim (Refer to 23 - BODY/
INTERIOR/A-PILLAR TRIM - INSTALLATION).
(13) Connect the negative battery cable.
Fig. 11 Headliner
1 - SUNROOF PINCH WELT
2 - ROOF
3 - REAR WASHER HOSE4 - HEADLINER
5 - SUNROOF
23 - 78 INTERIORWJ
HEADLINER (Continued)
Page 1973 of 2199

DRAIN TUBE
REMOVAL
(1) Remove the headliner. (Refer to 23 - BODY/IN-
TERIOR/HEADLINER - REMOVAL)
(2) Disengage clamps attaching drain tube to sun-
roof (Fig. 2).
(3) Tape the end of the old drain tube to the new
drain tube. Ensure that the tape build up on the tube
ends is not excessive.
(4) Remove front/rear trim panels as necessary to
disengage clamps securing drain tube to body.
(5) Remove the drain tube plug from the underside
of the vehicle.
(6) From the underside of the vehicle carefully,
pull/route the drain tube through the body panel.
Applying a soapy water solution to the new tube may
aid in this procedure.
INSTALLATION
(1) Install the plug adapter to the bottom of the
drain tube.
(2) Engage clamps securing drain tube to body
(Fig. 2).
(3) Install front/rear trim panels as necessary.
(4) Install drain tube to sunroof and engage clamp.
(5) Install the headliner. (Refer to 23 - BODY/IN-
TERIOR/HEADLINER - INSTALLATION)
Fig. 2 Sunroof Drain Hose Routing
1 - DRAIN HOSE
2 - CLAMPS
3 - PLUG
4 - FLOOR5 - CLAMPS
6 - DRAIN HOSE
23 - 100 SUNROOFWJ
Page 1977 of 2199

(6) Push sunshade down until the sunshade clears
the glass then move sunshade rearward behind the
glass panel.
HOUSING ASSEMBLY
REMOVAL
(1) Move glass panel to the fully closed position.
(2) Disconnect battery negative cable.
(3) Recline both front seats.
(4) Remove headliner. (Refer to 23 - BODY/INTE-
RIOR/HEADLINER - REMOVAL)
(5) Disconnect the drain tubes from sunroof hous-
ing (Fig. 7).
(6) Loosen fasteners attaching sunroof housing
assembly.
(7) With the aid of a helper, remove fasteners
attaching sunroof housing assembly to roof panel.
INSTALLATION
(1) Raise the sunroof housing assembly and guide
into position and start fasteners (Fig. 7).
(2) Tighten the fasteners, front to rear, attaching
the sunroof module to roof panel. Tighten the fasten-
ers, front to rear, to 11 N´m (97 in. lbs.) torque.
(3) Connect the drain tubes to the sunroof housing.
(4) Set headliner into position.
(5) Connect express module, drive motor, and con-
trol switch wire connectors.
(6) Test sunroof operation, adjust as necessary.
(7) Finish installing the headliner. (Refer to 23 -
BODY/INTERIOR/HEADLINER - INSTALLATION)
(8) Connect battery negative cable.
Fig. 7 SUNROOF ASSEMBLY
1 - ROOF
2 - DRAIN HOSE
3 - CLAMP
4 - SUNROOF ASSEMBLY
5 - CLAMP
6 - DRAIN HOSE
23 - 104 SUNROOFWJ
SUNSHADE (Continued)
Page 1985 of 2199
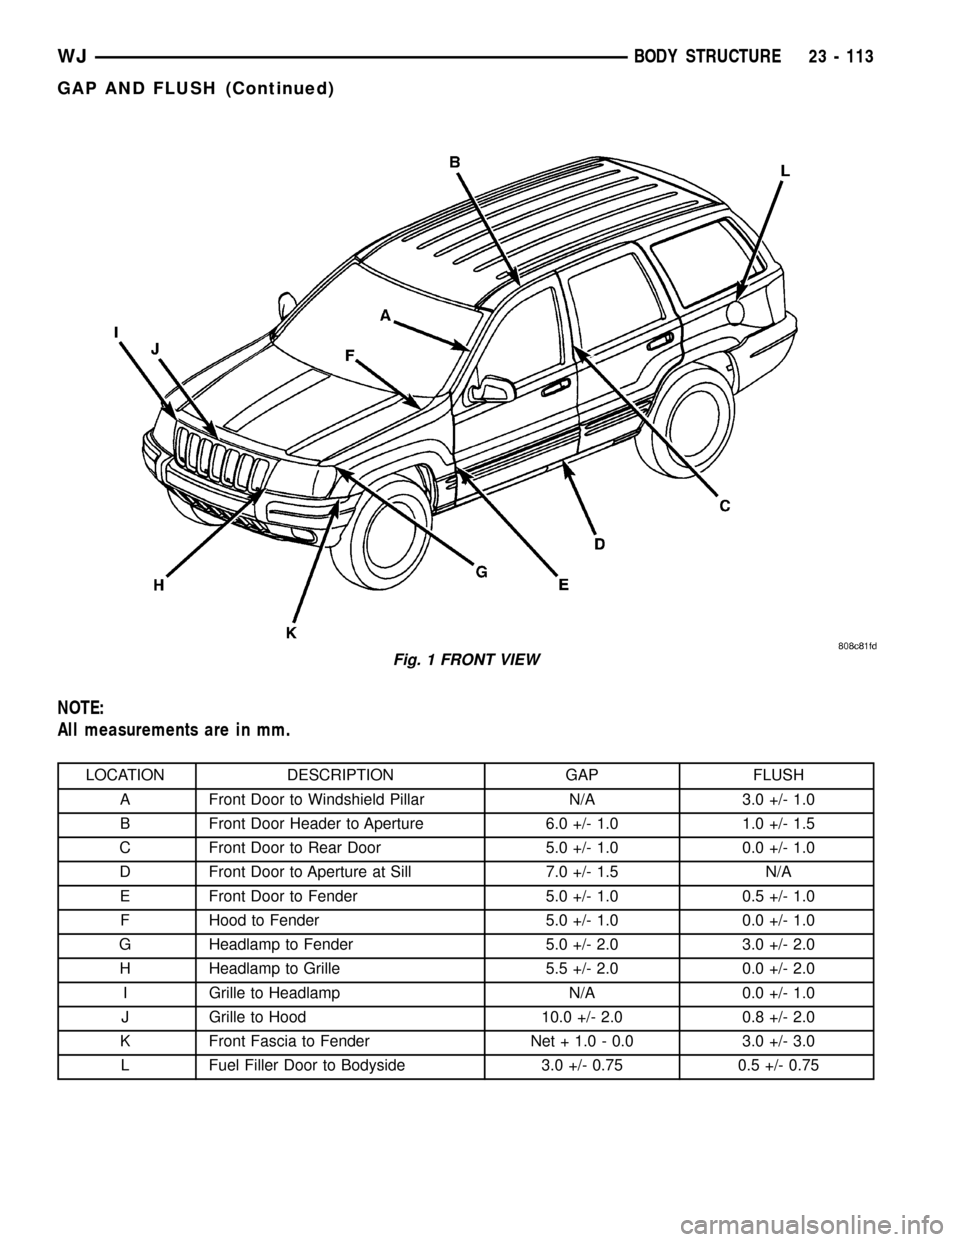
NOTE:
All measurements are in mm.
LOCATION DESCRIPTION GAP FLUSH
A Front Door to Windshield Pillar N/A 3.0 +/- 1.0
B Front Door Header to Aperture 6.0 +/- 1.0 1.0 +/- 1.5
C Front Door to Rear Door 5.0 +/- 1.0 0.0 +/- 1.0
D Front Door to Aperture at Sill 7.0 +/- 1.5 N/A
E Front Door to Fender 5.0 +/- 1.0 0.5 +/- 1.0
F Hood to Fender 5.0 +/- 1.0 0.0 +/- 1.0
G Headlamp to Fender 5.0 +/- 2.0 3.0 +/- 2.0
H Headlamp to Grille 5.5 +/- 2.0 0.0 +/- 2.0
I Grille to Headlamp N/A 0.0 +/- 1.0
J Grille to Hood 10.0 +/- 2.0 0.8 +/- 2.0
K Front Fascia to Fender Net + 1.0 - 0.0 3.0 +/- 3.0
L Fuel Filler Door to Bodyside 3.0 +/- 0.75 0.5 +/- 0.75
Fig. 1 FRONT VIEW
WJBODY STRUCTURE 23 - 113
GAP AND FLUSH (Continued)
Page 1986 of 2199
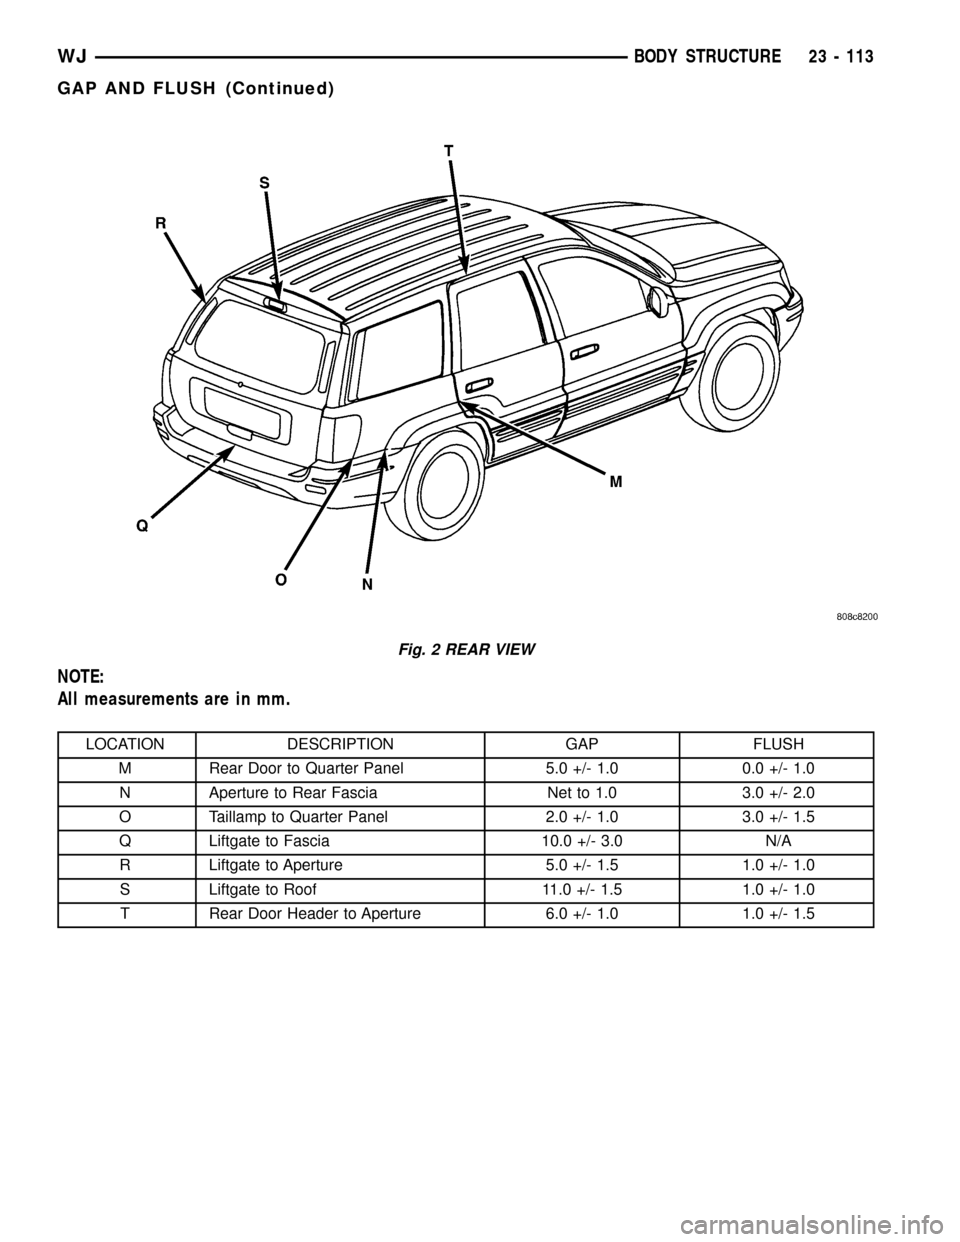
NOTE:
All measurements are in mm.
LOCATION DESCRIPTION GAP FLUSH
M Rear Door to Quarter Panel 5.0 +/- 1.0 0.0 +/- 1.0
N Aperture to Rear Fascia Net to 1.0 3.0 +/- 2.0
O Taillamp to Quarter Panel 2.0 +/- 1.0 3.0 +/- 1.5
Q Liftgate to Fascia 10.0 +/- 3.0 N/A
R Liftgate to Aperture 5.0 +/- 1.5 1.0 +/- 1.0
S Liftgate to Roof 11.0 +/- 1.5 1.0 +/- 1.0
T Rear Door Header to Aperture 6.0 +/- 1.0 1.0 +/- 1.5
Fig. 2 REAR VIEW
WJBODY STRUCTURE 23 - 113
GAP AND FLUSH (Continued)