JEEP GRAND CHEROKEE 2007 WK / 3.G SRT Owners Manual
GRAND CHEROKEE 2007 WK / 3.G
JEEP
JEEP
https://www.carmanualsonline.info/img/16/7090/w960_7090-0.png
JEEP GRAND CHEROKEE 2007 WK / 3.G SRT Owners Manual
Trending: ignition, CD player, turn signal, audio, low beam, oil temperature, brakes
Page 161 of 395
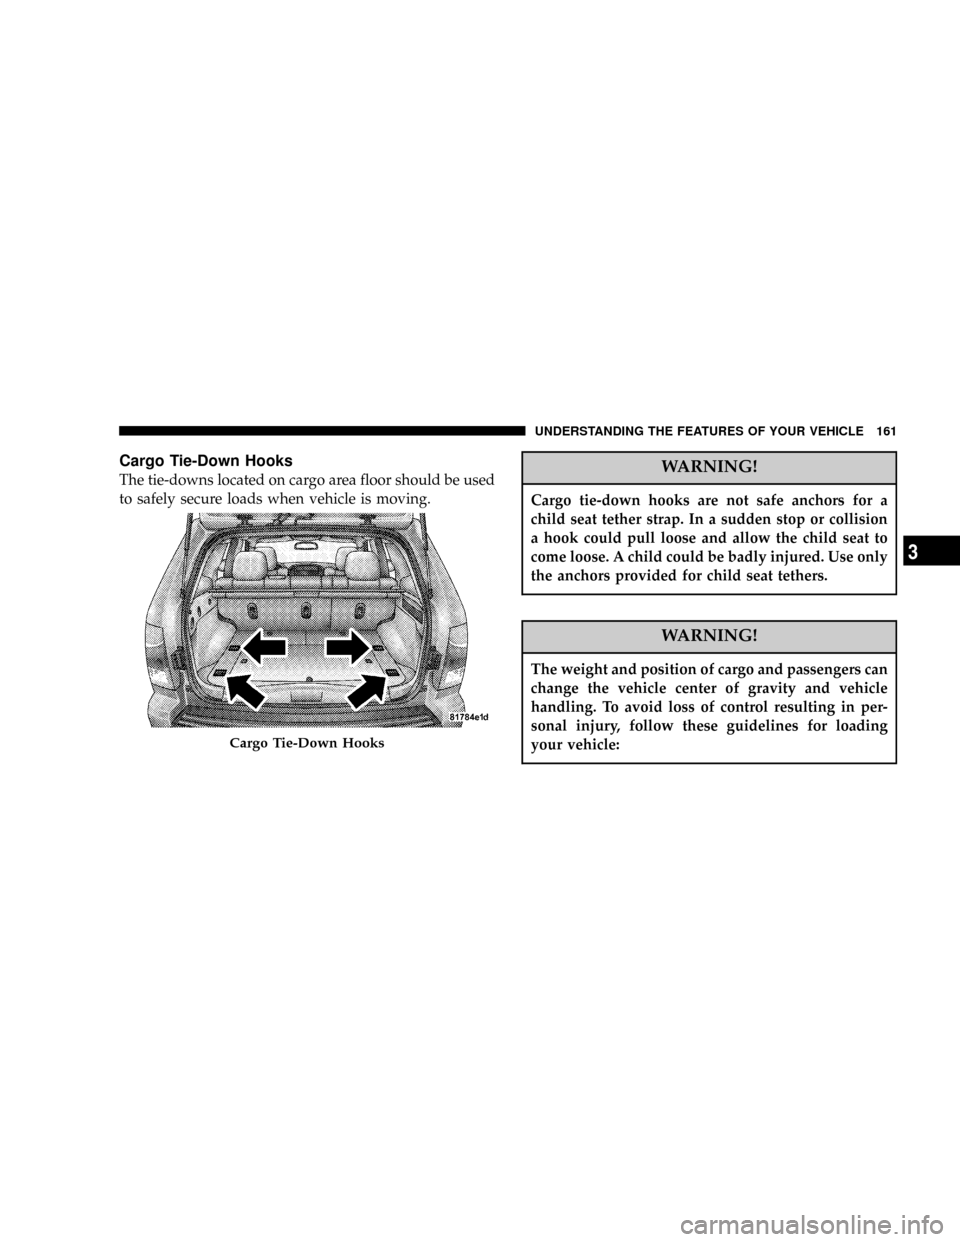
Cargo Tie-Down Hooks
The tie-downs located on cargo area floor should be used
to safely secure loads when vehicle is moving.WARNING!
Cargo tie-down hooks are not safe anchors for a
child seat tether strap. In a sudden stop or collision
a hook could pull loose and allow the child seat to
come loose. A child could be badly injured. Use only
the anchors provided for child seat tethers.
WARNING!
The weight and position of cargo and passengers can
change the vehicle center of gravity and vehicle
handling. To avoid loss of control resulting in per-
sonal injury, follow these guidelines for loading
your vehicle:
Cargo Tie-Down Hooks
UNDERSTANDING THE FEATURES OF YOUR VEHICLE 161
3
Page 162 of 395
²Do not carry loads which exceed the load limits
described on the label attached to the left door or left
door center pillar.
²Always place cargo evenly on the cargo floor. Put
heavier objects as low and as far forward as possible.
²Place as much cargo as possible in front of the rear
axle. Too much weight or improperly placed weight
over or behind the rear axle can cause the rear of the
vehicle to sway.
²Do not pile luggage or cargo higher than the top of the
seatback. This could impair visibility or become a
dangerous projectile in a sudden stop or collision.
WARNING!
To help protect against personal injury, passengers
should not be seated in the rear cargo area. The rear
cargo space is intended for load carrying purposes
only, not for passengers, who should sit in seats and
use seat belts.
162 UNDERSTANDING THE FEATURES OF YOUR VEHICLE
Page 163 of 395
Cargo Load Floor
The panel in the load floor is reversible for added utility.
One side is carpeted and the other side features a plastic
lined tray which holds a variety of items.The cargo load floor is held by spring loaded latches. In
order to use the cargo load floor, use the following
procedure:
NOTE: The cargo load floor latches should not be
used as cargo tie-downs.
1. Flip up pull loop(s) so they are perpendicular (straight
up) to the top surface of the tray.
2. Pull up on loop(s) and twist 90 degrees, so they are
parallel to the slotted hole in tray.
3. Lift tray over loop(s), and reposition tray.
4. Pull up on loop(s) and twist 90 degrees, so they are
perpendicular (straight up) to the slotted hole in tray.
5. Push loop(s) back down, so they are parallel to the top
of the tray.
Cargo Load Floor
UNDERSTANDING THE FEATURES OF YOUR VEHICLE 163
3
Page 164 of 395
REAR WINDOW FEATURES
Rear Window Wiper/Washer Ð If Equipped
A switch on the right side of the steering column controls
operation of the rear wiper/washer function. Rotating
the switch up to the DEL (Delay) position or the ON
position will activate the wiper. Rotating the switch all
the way up or down will turn on the wash function. The
wash pump will continue to operate as long as the button
is pressed. Upon release, the wipers will cycle three times
before returning to the set position.
If the rear wiper is operating when the ignition is turned
OFF, the wiper will automatically return to the ªParkº
position.
Rear Wiper/Washer Switch
164 UNDERSTANDING THE FEATURES OF YOUR VEHICLE
Page 165 of 395

If the liftgate flipper glass is open, connection to the rear
window wiper is interrupted preventing activation of the
rear wiper blade. When the liftgate flipper glass is closed,
the rear wiper switch or the ignition switch needs to be
turned OFF and ON to restart the rear wiper.
Adding Washer Fluid
The fluid reservoir for the windshield washers and the
rear window washer is shared. It is located in the front of
the engine compartment on the passenger side and
should be checked for fluid level at regular intervals. Fill
the reservoir with windshield washer solvent (not radia-
tor antifreeze) and operate the system for a few seconds
to flush out the residual water.
Rear Window Defroster Ð If Equipped
Press this button (located on the Climate Control
panel) to turn on the rear window defroster and
the heated side mirrors (if equipped). An LED in the
button will illuminate to indicate the rear window de-
froster is ON. The defroster automatically turns off after
about 10 minutes of operation.
CAUTION!
To avoid damaging the electrical conductors of the
rear window defroster, do not use scrapers, sharp
instruments, or abrasive window cleaners on the
interior surface of the window.
Labels can be peeled off after soaking with warm
water.
UNDERSTANDING THE FEATURES OF YOUR VEHICLE 165
3
Page 166 of 395
Page 167 of 395
UNDERSTANDING YOUR INSTRUMENT PANEL
CONTENTS
mInstrument Panel And Controls.............170
mInstrument Cluster......................171
mInstrument Cluster Description.............172
mElectronic Vehicle Information Center........179
NCustomer Programmable Features.........181
NCompass/Temperature/Trip Computer......186
NTrip Computer.......................188
mRadio General Information................194
NRadio Broadcast Signals.................194NTwo Types Of Signals..................194
NElectrical Disturbances..................194
NAM Reception.......................194
NFM Reception........................195
mSales Code RAQ ± AM/FM/CD (6-Disc) Radio With
Optional Satellite Radio, Hands Free Phone, And
Vehicle Entertainment Systems (VES)
Capabilities...........................195
NOperating Instructions - Radio Mode.......1954
Page 168 of 395

NOperation Instructions -
(CD Mode For CD Audio Play)...........201
NLoad/Eject Button
(CD Mode For CD Audio Play)...........202
NNotes On Playing MP3 Files.............204
NOperation Instructions -
(CD Mode For MP3 Audio Play)..........207
NLoad/Eject Button (CD Mode For MP3 Play) . . 207
mSales Code REC Ð AM/FM/CD (6±Disc) Radio
With Navigation System..................209
NOperating Instructions Ð Satellite Radio
(If Equipped)........................210
NREC Setting The Clock.................210
NAudio Clock Display...................213mVideo Entertainment System (Sales Code XRV) Ð
If Equipped...........................214
mSatellite Radio Ð If Equipped..............216
NSystem Activation.....................216
NElectronic Serial Number/Sirius Identification
Number (ESN/SID)....................216
NSelecting Satellite Mode In RAQ Radios.....217
NSelecting a Channel....................217
NStoring And Selecting Pre-Set Channels......218
NUsing The PTY (Program Type) Button Ð
If Equipped.........................218
NPTY Button9Scan9.....................218
NPTY Button9Seek9.....................218
NSatellite Antenna......................218
168 UNDERSTANDING YOUR INSTRUMENT PANEL
Page 169 of 395
NReception Quality.....................219
mRemote Sound System Controls.............219
NRadio Operation......................220
NCD Player..........................220
mCD/DVD Disc Maintenance...............221mRadio Operation And Cellular Phones........221
mClimate Controls.......................222
NAutomatic Temperature Control...........222
NOperating Tips.......................228
UNDERSTANDING YOUR INSTRUMENT PANEL 169
4
Page 170 of 395
INSTRUMENT PANEL AND CONTROLS
170 UNDERSTANDING YOUR INSTRUMENT PANEL
Trending: power steering fluid, deactivate airbag, automatic transmission, tow bar, child restraint, mileage, trunk


