oil pressure JEEP GRAND CHEROKEE 2008 WK / 3.G SRT Owners Manual
[x] Cancel search | Manufacturer: JEEP, Model Year: 2008, Model line: GRAND CHEROKEE, Model: JEEP GRAND CHEROKEE 2008 WK / 3.GPages: 405, PDF Size: 2.93 MB
Page 69 of 405
Defrosters
Check operation by selecting the defrost mode and place
the blower control on high speed. You should be able to
feel the air directed against the windshield. See your
authorized dealer for service if your defroster is inoper-
able.
Safety Checks You Should Make Outside The
Vehicle
Tires
Examine tires for excessive tread wear or uneven wear
patterns. Check for stones, nails, glass, or other objects
lodged in the tread. Inspect for tread cuts or sidewall
cracks. Check wheel nuts for tightness and tires (includ-
ing spare) for proper pressure.
Lights
Have someone observe the operation of all exterior lights
while you work the controls. Check turn signal and high
beam indicator lights on the instrument panel.
Fluid Leaks
Check area under vehicle after overnight parking for fuel,
coolant, oil or other fluid leaks. Also, if gasoline fumes
are detected, the cause should be located and corrected
immediately.
68 THINGS TO KNOW BEFORE STARTING YOUR VEHICLE
Page 177 of 405
8. Tachometer
The red segments indicate the maximum permissible
engine revolutions-per-minute (r.p.m. x 1000) for each
gear range. Before reaching the red area, ease up on the
accelerator.
9. Security Alarm System Indicator Light Ð If
Equipped
This light will flash rapidly for approximately 15 seconds
when the vehicle theft alarm is arming. The light will
flash at a slower speed continuously after the alarm is set.
The security light will also come on for about three
seconds when the ignition is first turned on.
10. Oil Pressure Warning Light
This light shows low engine oil pressure. The light
should turn on momentarily when the engine is
started. If the light turns on while driving, stop the
vehicle, and shut off the engine as soon as possible. A
continuous chime will sound when this light turns on.Do not operate the vehicle until the cause is corrected.
This light does not show how much oil is in the engine.
The engine oil level must be checked under the hood.
11. Electronic Stability Program (ESP) Indicator
Light/Traction Control System (TCS) Indicator Light
This indicator light starts to flash as soon as the
tires lose traction and the ESP system becomes
active. The ªESP/TCS Indicator Lightº also
flashes when TCS is active. If the ªESP/TCS
Indicator Lightº begins to flash during acceleration, ease
up on the accelerator and apply as little throttle as
possible. Be sure to adapt your speed and driving to the
prevailing road conditions. The ªESP/TCS Indicator
Lightº will flash any time the ESP or TCS is active and
helping to improve vehicle stability. If the ªESP/TCS
Indicator Lightº is on solid, the ESP system has been
turned off by the driver or a temporary condition exists
that will not allow full ESP function.
176 UNDERSTANDING YOUR INSTRUMENT PANEL
Page 180 of 405
The gauge pointer will likely indicate a higher tempera-
ture when driving in hot weather, up mountain grades,
or when towing a trailer. It should not be allowed to
exceed the upper limits of the normal operating range.
CAUTION!
Driving with a hot engine cooling system could
damage your vehicle. If temperature gauge reads
high, pull over and stop the vehicle. Idle the vehicle
with the air conditioner turned off until the pointer
drops back into the normal range. If the pointer
remains high, and you hear continuous chimes, turn
the engine off immediately, and call for service.
WARNING!
A hot engine cooling system is dangerous. You or
others could be badly burned by steam or boiling
coolant. If you decide to look under the hood your-
self, refer to Section 7 of this manual. Follow the
warnings under ªCooling System Pressure Cap.º
14. Electronic Vehicle Information Center Display
When the appropriate conditions exist, this display
shows the Electronic Vehicle Information Center (EVIC)
messages. Refer to ªElectronic Vehicle Information Cen-
terº later in this section.
UNDERSTANDING YOUR INSTRUMENT PANEL 179
4
Page 187 of 405
²LEFT REAR LOW PRESSURE (Premium TPM System
Only)
²RIGHT REAR LOW PRESSURE (Premium TPM Sys-
tem Only)
Trip Functions
Press and release the MENU button until one of the
following Trip Functions displays in the EVIC:
²Distance To Empty
²Trip A
²Trip B
²Elapsed Time
²Service Distance
²Engine Oil Pressure
²Engine Oil Temperature
²Display Units of Measure in
Press the SCROLL button to cycle through all the Trip
Computer functions.
The Trip Functions mode displays the following informa-
tion:
²Distance To Empty (DTE)
Shows the estimated distance that can be traveled with
the fuel remaining in the tank. This estimated distance is
determined by a weighted average of the instantaneous
and average fuel economy, according to the current fuel
tank level. DTE cannot be reset through the FUNCTION
SELECT button.
NOTE:Significant changes in driving style or vehicle
loading will greatly affect the actual drivable distance of
the vehicle, regardless of the DTE displayed value.
186 UNDERSTANDING YOUR INSTRUMENT PANEL
Page 188 of 405
²When the DTE value is less than 30 miles (48 km)
estimated driving distance, the DTE display will
change to a text display of9LOW FUEL.9This display
will continue until the vehicle runs out of fuel. Adding
a significant amount of fuel to the vehicle will turn off
the9LOW FUEL9text and a new DTE value will
display.
²Trip A
Shows the total distance traveled for trip A since the last
reset.
²Trip B
Shows the total distance traveled for trip B since the last
reset.
²Elapsed Time
Shows the total elapsed time of travel since the last reset
when the ignition switch is in the ACC position. Elapsed
time will increment when the ignition switch is in the ON
or START position.
²Engine Oil Pressure
Shows the current engine oil pressure. The scale will read
from 0±100 psi (0±689 kPa).
²Engine Oil Temperature
Shows the current engine oil temperature. The scale will
read from 140É ± 300ÉF (60É ± 149ÉC).
²Display Units of Measure in:
To make your selection, press and release the FUNC-
TION SELECT button until ªUSº or ªMETRICº appears.
To Reset The Display
Reset will only occur while a resettable function is being
displayed. Press and release the FUNCTION SELECT
button once to clear the resettable function being dis-
played. To reset all resettable functions, press and release
the FUNCTION SELECT button a second time within 3
seconds of resetting the currently displayed function
(>Reset ALL will display during this 3 second window).
UNDERSTANDING YOUR INSTRUMENT PANEL 187
4
Page 274 of 405
WARNING!
All tires should be replaced after six years, regardless
of the remaining tread. Failure to follow this warning
can result in sudden tire failure. You could lose
control and have an accident resulting in serious
injury.
Keep unmounted tires in a cool, dry place with as little
exposure to light as possible. Protect tires from contact
with oil, grease and gasoline.
Replacement Tires
The tires on your new vehicle provide a balance of many
characteristics. They should be inspected regularly for
wear and correct cold tire inflation pressure. The manu-
facturer strongly recommends that you use tires equiva-
lent to the originals in size, quality and performance
when replacement is needed (see the paragraph on tread
wear indicators). Refer to the Tire and Loading Informa-
tion placard for the size designation of your tire. The
service description and load identification will be found
on the original equipment tire. Failure to use equivalent
replacement tires may adversely affect the safety, han-
dling, and ride of your vehicle. We recommend that you
contact your original equipment or an authorized tire
dealer with any questions you may have on tire specifi-
cations or capability.
STARTING AND OPERATING 273
5
Page 313 of 405
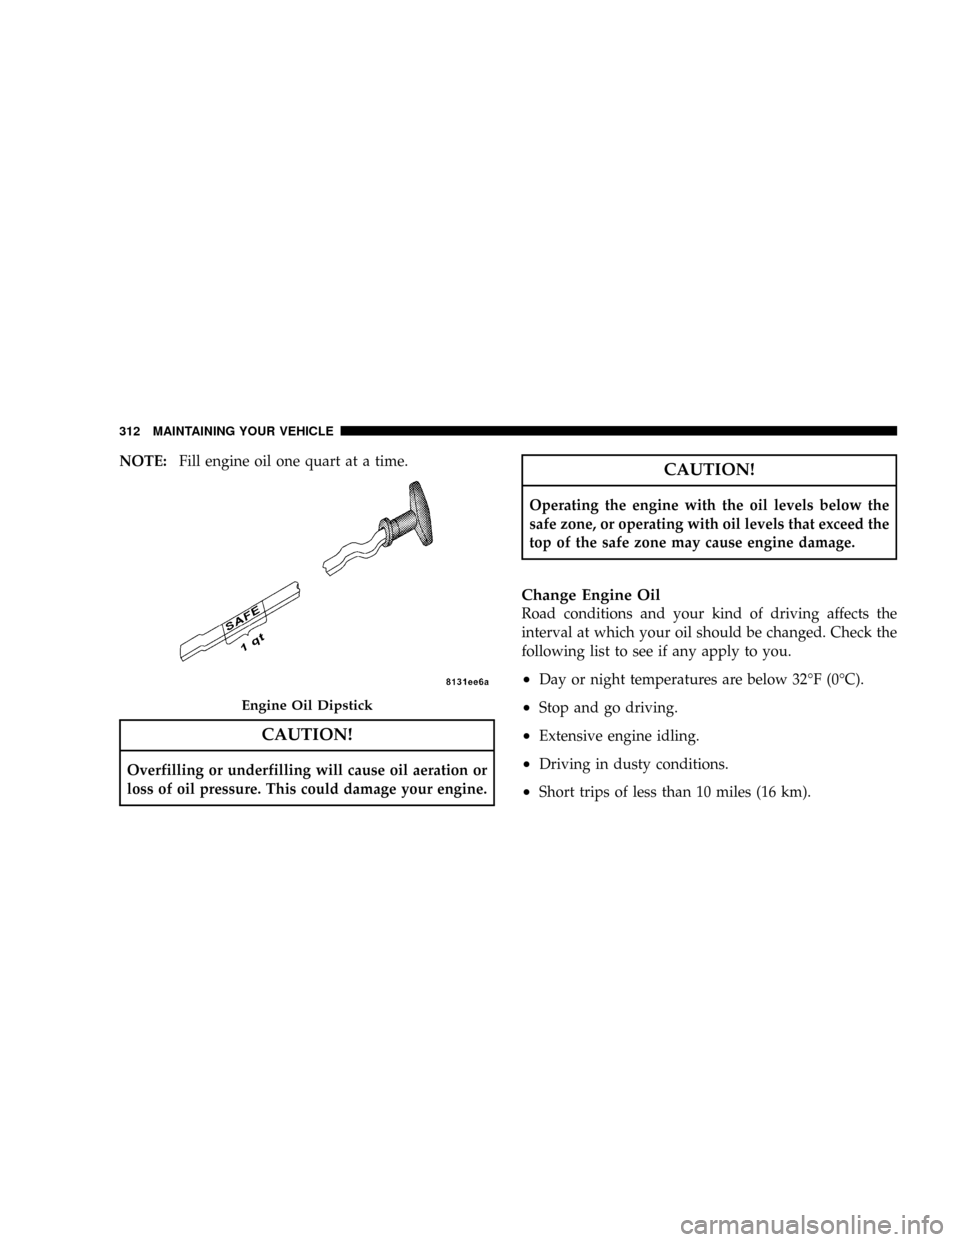
NOTE:Fill engine oil one quart at a time.
CAUTION!
Overfilling or underfilling will cause oil aeration or
loss of oil pressure. This could damage your engine.
CAUTION!
Operating the engine with the oil levels below the
safe zone, or operating with oil levels that exceed the
top of the safe zone may cause engine damage.
Change Engine Oil
Road conditions and your kind of driving affects the
interval at which your oil should be changed. Check the
following list to see if any apply to you.
²Day or night temperatures are below 32ÉF (0ÉC).
²Stop and go driving.
²Extensive engine idling.
²Driving in dusty conditions.
²Short trips of less than 10 miles (16 km).
Engine Oil Dipstick
312 MAINTAINING YOUR VEHICLE
Page 331 of 405
WARNING!
Riding the brakes can lead to brake failure and
possibly an accident. Driving with your foot resting
or riding on the brake pedal can result in abnormally
high brake temperatures, excessive lining wear, and
possible brake damage. You wouldn't have your full
braking capacity in an emergency.
Brake And Power Steering Hoses
When the vehicle is serviced for scheduled maintenance,
inspect surface of hoses and nylon tubing for evidence of
heat and mechanical damage. Hard and brittle rubber,
cracking, tears, cuts, abrasion, and excessive swelling
indicate deterioration of the rubber. Particular attention
should be made to examining those hose surfaces nearest
to high heat sources, such as the exhaust manifold.Insure nylon tubing in these areas has not melted or
collapsed.
Inspect all hose connections such as clamps and cou-
plings to make sure they are secure and no leaks are
present.
NOTE:Often, fluid such as oil, power steering fluid,
and brake fluid are used during assembly plant opera-
tions to facilitate the assembly of hoses to couplings.
Therefore, oil wetness at the hose-coupling area is not
necessarily an indication of leakage. Actual dripping of
hot fluid when systems are under pressure (during
vehicle operation), should be noted before a hose is
replaced based on leakage.
NOTE:Inspection of brake hoses should be performed
whenever the brake system is serviced and at every
engine oil change. Inspect hydraulic brake hoses for
surface cracking, scuffing, or worn spots. If there is any
evidence of cracking, scuffing, or worn spots, the hose
330 MAINTAINING YOUR VEHICLE
Page 333 of 405
WARNING!
²Overfilling the brake fluid reservoir can result in
spilling brake fluid on hot engine parts and the
brake fluid catching fire.
²Use of a brake fluid that has a lower initial boiling
point than the recommended MOPAR DOT 3
product or a brake fluid that is unidentified as to
FMVSS specification may result in sudden brake
failure during hard prolonged braking. You could
have an accident.
Use only brake fluid that has been in a tightly closed
container to avoid contamination from foreign matter or
moisture.
CAUTION!
Do not allow a petroleum base fluid to contaminate
the brake fluid, Seal damage may result.
Fuel System Hoses
Electronic Fuel Injection high pressure fuel systems are
designed with hoses and quick connect fittings which
have unique material characteristics to provide adequate
sealing and resist attack by deteriorated gasoline.
You are urged to use only the manufacturer's specified
hoses with quick connect fittings, or their equivalent in
material and specification, in any fuel system servicing. It
is mandatory to replace any damaged hoses or quick
connect fittings that have been removed during service.
Care should be taken in installing quick connect fittings
to insure they are properly installed and fully connected.
See your authorized dealer for service.
332 MAINTAINING YOUR VEHICLE
Page 341 of 405
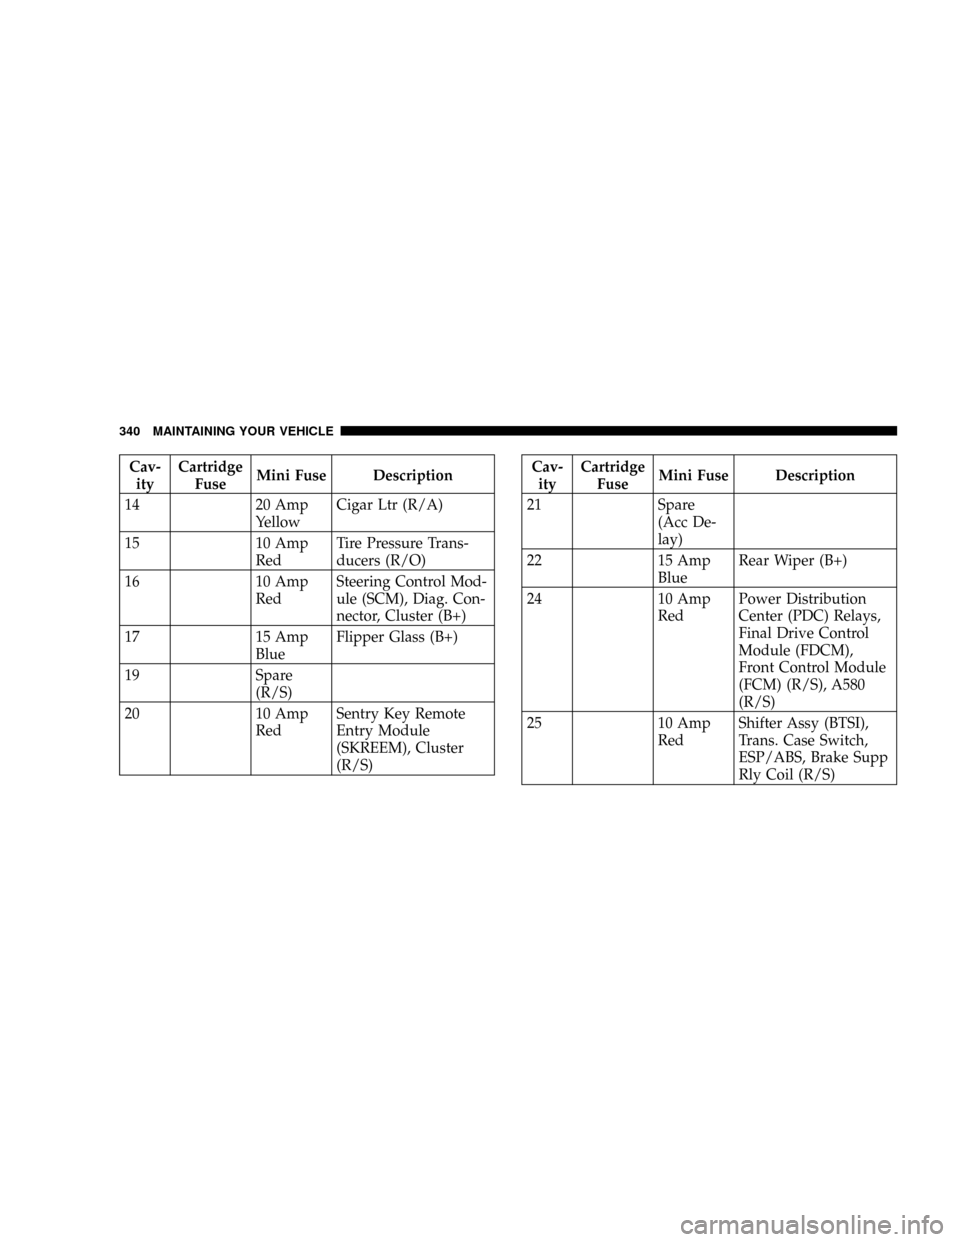
Cav-
ityCartridge
FuseMini Fuse Description
14 20 Amp
YellowCigar Ltr (R/A)
15 10 Amp
RedTire Pressure Trans-
ducers (R/O)
16 10 Amp
RedSteering Control Mod-
ule (SCM), Diag. Con-
nector, Cluster (B+)
17 15 Amp
BlueFlipper Glass (B+)
19 Spare
(R/S)
20 10 Amp
RedSentry Key Remote
Entry Module
(SKREEM), Cluster
(R/S)Cav-
ityCartridge
FuseMini Fuse Description
21 Spare
(Acc De-
lay)
22 15 Amp
BlueRear Wiper (B+)
24 10 Amp
RedPower Distribution
Center (PDC) Relays,
Final Drive Control
Module (FDCM),
Front Control Module
(FCM) (R/S), A580
(R/S)
25 10 Amp
RedShifter Assy (BTSI),
Trans. Case Switch,
ESP/ABS, Brake Supp
Rly Coil (R/S)
340 MAINTAINING YOUR VEHICLE