ignition JEEP GRAND CHEROKEE 2011 WK2 / 4.G Owner's Manual
[x] Cancel search | Manufacturer: JEEP, Model Year: 2011, Model line: GRAND CHEROKEE, Model: JEEP GRAND CHEROKEE 2011 WK2 / 4.GPages: 100, PDF Size: 5.46 MB
Page 63 of 100
TOW/HAUL MODE
• When driving in hilly areas, towing atrailer, carrying a heavy load, etc.,
and frequent transmission shifting
occurs, press the TOW/HAUL switch
to select TOW/HAUL mode. This will
improve performance and reduce the
potential for transmission overheating
or failure due to excessive shifting.
When operating in TOW/HAUL
mode, transmission upshifts are
delayed, and the transmission will
automatically downshift (for engine
braking) during steady braking
maneuvers.
• The “TOW/HAUL Indicator Light” will illuminate in the instrument cluster to
indicate that TOW/HAUL mode has
been activated. Pressing the switch a
second time restores normal
operation. If the TOW/HAUL mode is
desired, the switch must be pressed
each time the engine is started.
RECREATIONAL
TOWING (BEHIND
MOTORHOME, ETC.)
Two-Wheel Drive Models
•Recreational towing is not
allowed.
Quadra-Trac I®(Single-Speed
Transfer Case) Four-Wheel
Drive Models
• Recreational towing is not
allowed. This model does not have
a NEUTRAL position in the transfer
case.
Quadra–Trac II®/Quadra–
Drive®II /Selec- Terrain™
Four-Wheel Drive Models
NOTE: The transfer case must be in the
NEUTRAL position, and the transmission
must be in the PARK position for
recreational towing.
Shifting Into NEUTRAL• Use the following procedure to prepare your vehicle for recreational
towing.
• Bring the vehicle to a complete stop and shift the transmission to PARK.
Turn the engine off.
• For vehicles with Keyless Enter-N-Go, remove the Keyless Enter-N-Go button
and use the Key Fob to complete this
procedure.
• Turn the ignition switch to the ON/RUN position, but do not start the
engine.
• Press and hold the brake pedal and shift the transmission into NEUTRAL.
TOW/HAUL Switch
UTILITY
61
Page 67 of 100
- Electronic Stability Control (ESC) Activation/Malfunction
Indicator Light
• If the “ESC Activation/Malfunction Indicator Light” comes on continuously with the engine running, a malfunction has been detected in the ESC system. If this light
remains on after several ignition cycles, and the vehicle has been driven several miles
(kilometers) at speeds greater than 30 mph (48 km/h), we recommend you drive to
the nearest service center and have the vehicle serviced immediately.
• The “ESC Activation/Malfunction Indicator Light” starts to flash as soon as the tires lose traction and the ESC system becomes active. If the light begins to flash during
acceleration, ease up on the accelerator and apply as little throttle as possible. Be sure
to adapt your speed and driving to the prevailing road conditions. The light also
flashes when TCS is active. To improve the vehicle's traction when starting off in deep
snow, sand or gravel, it may be desirable to switch the ESC system to Partial Off
mode by momentarily pressing the ESC Off
switch located below the climate
controls, on the switch panel.
- Charging System Light
• This light shows the status of the electrical charging system. If the charging system light remains on, it means that the vehicle is experiencing a problem with the charging
system.
• We recommend you do not continue driving if the charging system light is on. Have the vehicle serviced immediately.
- Oil Pressure Warning Light
• This light indicates low engine oil pressure. If the light turns on while driving, stop thevehicle and shut off the engine as soon as possible. A chime will sound for four
minutes when this light turns on.
• We recommend you do not operate the vehicle or engine damage will occur. Have the vehicle serviced immediately.
- Anti-Lock Brake (ABS) Light
• This light monitors the Anti-Lock Brake System (ABS).
• If the light is not on during starting, stays on, or turns on while driving, werecommend you drive to the nearest service center and have the vehicle serviced
immediately.
- Electronic Throttle Control (ETC) Light
• This light informs you of a problem with the Electronic Throttle Control (ETC) system.
• If a problem is detected, the light will come on while the engine is running. Cycle theignition key when the vehicle has completely stopped and the shift lever is placed in
the PARK position; the light should turn off.
• If the light remains lit with the engine running, your vehicle will usually be drivable; however, see an authorized service center immediately. If the light is flashing when the
engine is running, immediate service is required and you may experience reduced
performance, an elevated/rough idle or engine stall and your vehicle may require
towing.
WHAT TO DO IN EMERGENCIES
65
Page 68 of 100
- Airbag Warning Light
• If the light is not on during starting, stays on, or turns on while driving, have thevehicle serviced by an authorized service center immediately.
Fuel Cap/Loose Gas Cap Message
• If a “gas cap” message (shown as Check Gascap) appears, tighten the gas cap until a“clicking” sound is heard.
• If the message continues to appear for more than three days after tightening the gas cap, have the vehicle serviced by an authorized service center immediately.
Oil Change Indicator
Message
• If an “oil change” message (shown as Oil Change Required) appears and a single chime sounds, it is time for your next required oil change.
Vehicles Equipped With Keyless Enter-N-Go
• Without pressing the brake pedal, push the ENGINE START/STOP button and cycle the ignition to the ON/RUN position (Do not start the engine.)
• Fully depress the accelerator pedal, slowly, three times within 10 seconds.
• Without pressing the brake pedal, push the ENGINE START/STOP button once to return the ignition to the OFF/LOCK position.
Vehicles Not Equipped With Keyless Enter-N-Go
• Turn the ignition switch to the ON/RUN position (Do not start the engine.)
• Fully depress the accelerator pedal, slowly, three times within 10 seconds.
• Turn the ignition switch to the OFF/LOCK position.
WHAT TO DO IN EMERGENCIES
66
Page 70 of 100
JACKING AND TIRE CHANGING
Jack Location
• The scissor-type jack and tire changing tools are located in the rear cargo area,below the load floor.
Spare Tire Stowage
• The spare tire is located under the load floor in the rear cargo area.
Preparations For Jacking
• Park on a firm, level surface. Avoid ice or slippery areas.
• Set the parking brake and shift the automatic transmission into PARK.
• Turn the ignition to LOCK and turn on the Hazard Warning flasher.
WHAT TO DO IN EMERGENCIES
68
Page 73 of 100
WARNING!(Continued)
• If it is necessary to retrieve the spare tire from under the vehicle on the side ofthe vehicle close to moving traffic, pull far enough off the road to avoid the
danger of being hit.
• Carefully follow these tire changing procedures to help prevent personal injury or damage to your vehicle: Always park on a firm, level surface as far from the
edge of the roadway as possible before raising the vehicle.
• Raising the vehicle higher than necessary can make the vehicle less stable and could cause it to slip off the jack and hurt someone near it. Raise the vehicle
only enough to remove the tire.
• A loose tire or jack, thrown forward in a collision or hard stop, could endanger the occupants of the vehicle. Always stow the jack parts and the spare tire in the
places provided.
JUMP-STARTING
• If your vehicle has a discharged battery it can be jump-started using a set of jumpercables and a battery in another vehicle or by using a portable battery booster pack.
• Jump-starting can be dangerous if done improperly so please follow the procedures in this section carefully.
NOTE: When using a portable battery booster pack follow the manufacturer’s operating
instructions and precautions.
Preparations for Jump-Start
• The battery in your vehicle is located under the passengers front seat. There
are remote locations under the hood to
assist in jump starting.
• Set the parking brake, shift the automatic transmission into PARK and
turn the ignition to LOCK.
• Turn off the heater, radio, and all unnecessary electrical accessories.
• Remove the protective cover over the remote positive (+) battery post. Pull
upward on the cover to remove it.
• If using another vehicle to jump-start the battery, park the vehicle within the jumper cables reach, set the parking brake and make sure the ignition is OFF.
WHAT TO DO IN EMERGENCIES
71
Page 75 of 100
WARNING!
• When temperatures are below the freezing point, electrolyte in a dischargedbattery may freeze. Do not attempt jump-starting because the battery could
rupture or explode and cause personal injury. Battery temperature must be
brought above freezing point before attempting a jump-start.
• Take care to avoid the radiator cooling fan whenever the hood is raised. It can start anytime the ignition switch is on. You can be injured by moving fan blades.
• Remove any metal jewelry, such as watch bands or bracelets, that might make an inadvertent electrical contact. You could be severely injured.
• Batteries contain sulfuric acid that can burn your skin or eyes and generate hydrogen gas which is flammable and explosive. Keep open flames or sparks
away from the battery.
• Do not allow vehicles to touch each other as this could establish a ground connection and personal injury could result.
• Failure to follow this procedure could result in personal injury or property damage due to battery explosion.
• Do not connect the cable to the negative post (-)of the discharged battery. The
resulting electrical spark could cause the battery to explode and could result in
personal injury.
EMERGENCY TOW HOOKS
• If your vehicle is equipped with tow hooks, they are mounted in the front and the rear.
NOTE: For off-road recovery, it is recommended to use both of the front tow hooks to
minimize the risk of damage to the vehicle.
CAUTION!
Tow hooks are for emergency use only, to rescue a vehicle stranded off-road. Do
not use tow hooks for tow truck hookup or highway towing. You could damage
your vehicle. Tow straps are recommended when towing the vehicle; chains may
cause vehicle damage.
WARNING!
• Chains are not recommended for freeing a stuck vehicle. Chains may break, causing serious injury or death.
• Stand clear of vehicles when pulling with tow hooks. Tow straps may become disengaged, causing serious injury.
WHAT TO DO IN EMERGENCIES
73
Page 76 of 100
SHIFT LEVER OVERRIDE
• If a malfunction occurs and the shiftlever cannot be moved out of the PARK
position, you can use the following
procedure to temporarily move the shift
lever:
• To access the shift lever override, remove the rubber cupholder liner to
the right of the shift lever.
• Firmly set the parking brake.
• Turn the ignition switch to the ACC or ON position without starting the
engine.
• Press and maintain firm pressure on the brake pedal.
• Using a screwdriver or similar tool, press and hold the override tab through the access port on the center console.
• Move the shift lever into the NEUTRAL position.
• The vehicle may then be started in NEUTRAL.
• Reinstall the override cover.
WHAT TO DO IN EMERGENCIES
74
Page 88 of 100
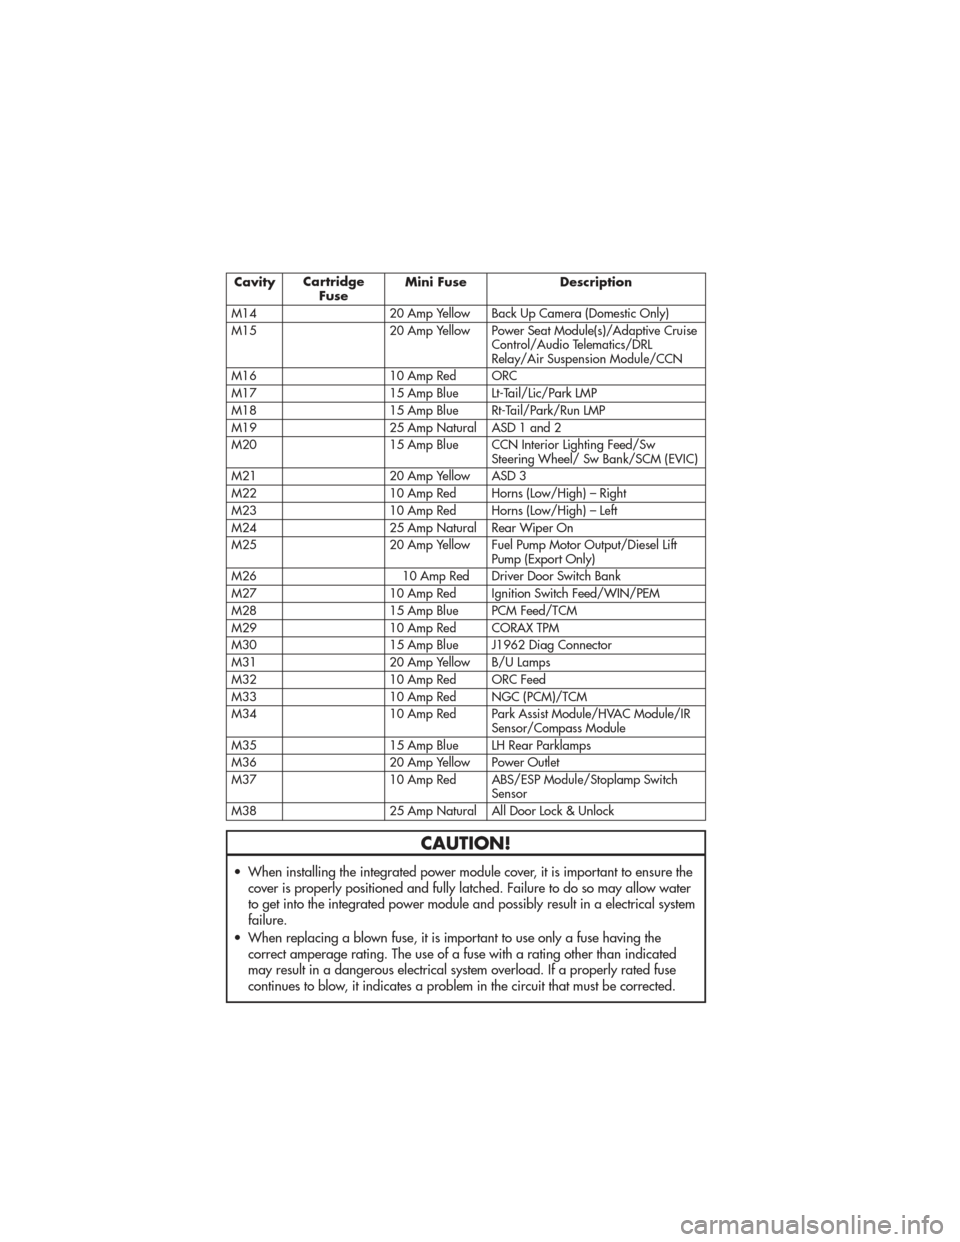
CavityCartridge
Fuse Mini Fuse Description
M14 20 Amp Yellow Back Up Camera (Domestic Only)
M15 20 Amp Yellow Power Seat Module(s)/Adaptive Cruise Control/Audio Telematics/DRL
Relay/Air Suspension Module/CCN
M16 10 Amp Red ORC
M17 15 Amp Blue Lt-Tail/Lic/Park LMP
M18 15 Amp Blue Rt-Tail/Park/Run LMP
M19 25 Amp Natural ASD 1 and 2
M20 15 Amp Blue CCN Interior Lighting Feed/Sw Steering Wheel/ Sw Bank/SCM (EVIC)
M21 20 Amp Yellow ASD 3
M22 10 Amp Red Horns (Low/High) – Right
M23 10 Amp Red Horns (Low/High) – Left
M24 25 Amp Natural Rear Wiper On
M25 20 Amp Yellow Fuel Pump Motor Output/Diesel Lift Pump (Export Only)
M26 10 Amp Red Driver Door Switch Bank
M27 10 Amp Red Ignition Switch Feed/WIN/PEM
M28 15 Amp Blue PCM Feed/TCM
M29 10 Amp Red CORAX TPM
M30 15 Amp Blue J1962 Diag Connector
M31 20 Amp Yellow B/U Lamps
M32 10 Amp Red ORC Feed
M33 10 Amp Red NGC (PCM)/TCM
M34 10 Amp Red Park Assist Module/HVAC Module/IR Sensor/Compass Module
M35 15 Amp Blue LH Rear Parklamps
M36 20 Amp Yellow Power Outlet
M37 10 Amp Red ABS/ESP Module/Stoplamp Switch Sensor
M38 25 Amp Natural All Door Lock & Unlock
CAUTION!
• When installing the integrated power module cover, it is important to ensure the cover is properly positioned and fully latched. Failure to do so may allow water
to get into the integrated power module and possibly result in a electrical system
failure.
• When replacing a blown fuse, it is important to use only a fuse having the correct amperage rating. The use of a fuse with a rating other than indicated
may result in a dangerous electrical system overload. If a properly rated fuse
continues to blow, it indicates a problem in the circuit that must be corrected.
MAINTAINING YOUR VEHICLE
86