ESP JEEP GRAND CHEROKEE 2011 WK2 / 4.G User Guide
[x] Cancel search | Manufacturer: JEEP, Model Year: 2011, Model line: GRAND CHEROKEE, Model: JEEP GRAND CHEROKEE 2011 WK2 / 4.GPages: 100, PDF Size: 5.46 MB
Page 2 of 100
Driving and Alcohol:
The driver’s prima\bry responsibi\fity i\bs the safe operatio\bn of the vehic\fe. \briving whi\b\fe distracted can re\bsu\ft in \foss of vehi\bc\fe contro\f, resu\fting i\bn a co\f\fision and pe\brsona\f injury. Chry\bs\fer
Group LLC strong\fy r\becommends that the \bdriver use extreme\b caution when using \bany device or featu\bre that may take t\bheir
attention off the r\boad. Use of any e\fe\bctrica\f devices such \bas ce\f\f
phones, computers, \bportab\fe radios, ve\bhic\fe navigation or\b other devices by the driv\ber whi\fe the vehic\fe\b is moving is dang\berous
and cou\fd \fead to a serious co\f\fision. Texting whi\fe driving is a\fso dangerous and shou\b\fd never be done wh\bi\fe the vehic\fe is
moving. If you find \byourse\ff unab\fe to d\bevote your fu\f\f atte\bntion
to vehic\fe operation, pu\f\f off the road to a safe \focation and stop your vehic\fe. Some \bStates or Provinces\b prohibit the use o\bf
ce\f\fu\far te\fephones o\br texting whi\fe dri\bving. It is a\fways \bthe driver’s responsibi\b\fity to comp\fy with \ba\f\f \foca\f \faws.
This User Guide is\b intended to fami\fi\barize you with the\b important
features of your vehic\fe. The \bV\b enc\fosed contains your Owner’s Manua\f, Navigation/\bMedia Center Manua\b\fs, Warranty Book\fe\bts, Tire Warranty and \b24-Hour Towing Ass\bistance (new vehic\fe\bs purchased in the U.\bS.) or Roadside As\bsistance (new vehic\b\fes
purchased in Canada\b) in e\fectronic form\bat. We hope you fin\bd it usefu\f. Rep\facement \b\bV\b kits may be purc\bhased by visiting \bwww.techauthority.c\bom. Jeep
® is a registered t\brademark of
Chrys\fer Group LLC. \b© 2011 Chrys\fer Gro\bup LLC.
Important:
WARNING!
Driving after drinking can lead to a collision. Your perceptions are
less sharp, your reflexes are slower, and your judgment is
impaired when you have been drinking. Never drink and then drive.
Drunken driving is one of the most frequent causes of collisions. Your driving ability can be seriously impaired with blood alcohol
levels far below the legal minimum. If you are drinking, don)t drive. Ride with a
designated non-drinking driver, call a cab,
a friend, or use public transportation.
Drunken driving is one of the most frequent causes of collisions. Your driving ability can be seriously impaired with blood alcohol
levels far below the legal minimum. If you are drinking, don)t drive. Ride with a
designated non-drinking driver, call a cab,
a friend, or use public transportation.
Drunken driving is one of the most frequent causes of collisions. Your driving ability can be seriously impaired with blood alcohol
levels far below the legal minimum. If you are drinking, don)t drive. Ride with a
designated non-drinking driver, call a cab,
a friend, or use public transportation.
Drunken driving is one of the most frequent causes of collisions. Your driving ability can be seriously impaired with blood alcohol
levels far below the legal minimum. If you are drinking, don)t drive. Ride with a
designated non-drinking driver, call a cab,
a friend, or use public transportation.
Jep.Thp drpivrp’ds\bipdrmasirdrypTonrd\bpTep.Thdpbrva\ftrfp.Thpc .pT\bi \banp p\fTcgtacrni d.p
gdaniryp\fTg.pTepivrpwonrdusp, nh tfpj bam iaTnC ,rya pGrnirdp, nh \btspTdpL dd ni.pxTTk\btrip\b.p
\f ttanmpUIfiSSIPzVIOMMSpN/W\bBW2pTdpUIfi44IMfiSIUUPMp NG n y 2pTdp\b.p\fTni \fianmp.T\bhdpyr trdWp
Page 4 of 100
WELCOME FROM CHRYSLER GROUP LLC
Congratulations on selecting your new Chrysler Group LLC vehicle. Be assured that it
represents precision workmanship, distinctive styling, and high quality - all essentials that
are traditional to our vehicles.
Your new Chrysler Group LLC vehicle has characteristics to enhance the driver's control
under some driving conditions. These are to assist the driver and are never a substitute for
attentive driving. They can never take the driver's place. Always drive carefully.
Your new vehicle has many features for the comfort and convenience of you and your
passengers. Some of these should not be used when driving because they take your eyes
from the road or your attention from driving. Never text while driving or take your eyes
more than momentarily off the road.
This guide illustrates and describes the operation of features and equipment that are either
standard or optional on this vehicle. This guide may also include a description of features
and equipment that are no longer available or were not ordered on this vehicle. Please
disregard any features and equipment described in this guide that are not available on this
vehicle. Chrysler Group LLC reserves the right to make changes in design and
specifications and/or make additions to or improvements to its products without imposing
any obligation upon itself to install them on products previously manufactured.
This User Guide has been prepared to help you quickly become acquainted with the
important features of your vehicle. It contains most everything you will need to operate and
maintain the vehicle, including emergency information.
The DVD includes a computer application containing detailed owner's information which
can be viewed on a personal computer or MAC computer. The multimedia DVD also
includes videos which can be played on any standard DVD player (including the Media
Center Touch-Screen Radios). Additional DVD operational information is located on the
back of the DVD sleeve.
For complete owner information, refer to your Owner's Manual on the DVD in the owner’s
kit provided at the time of new vehicle purchase. For your convenience, the information
contained on the DVD may also be printed and saved for future reference.
Chrysler Group LLC is committed to protecting our environment and natural resources. By
converting from paper to electronic delivery for the majority of the user information for
your vehicle, together we greatly reduce the demand for tree-based products and lessen
the stress on our environment.
Vehicles Sold In Canada
With respect to any vehicles sold in Canada, the name Chrysler Group LLC shall be
deemed to be deleted and the name Chrysler Canada Inc. used in substitution therefore.
INTRODUCTION/WELCOME
2
Page 22 of 100
Rear Heated Seats
• Second row heated seat switches arelocated on the rear of the center
console.
• Press the switch once to select High-level heating. Press the switch a second time
to select Low-level heating. Press the
switch a third time to shut the heating
elements Off.
• If the High-level setting is selected, the system will automatically switch to Low-level after approximately 55 minutes. The Low-level setting will turn Off automatically after
approximately 45 minutes.
WARNING!
• Persons who are unable to feel pain to the skin because of advanced age,chronic illness, diabetes, spinal cord injury, medication, alcohol use, exhaustion
or other physical conditions must exercise care when using the seat heater. It
may cause burns even at low temperatures, especially if used for long periods of
time.
• Do not place anything on the seat that insulates against heat, such as a blanket or cushion. This may cause the seat heater to overheat. Sitting in a seat that has
been overheated could cause serious burns due to the increased surface
temperature of the seat.
HEATED STEERING WHEEL
• The steering wheel contains a heatingelement that heats the steering wheel to
one temperature setting.
• The heated steering wheel switch is located on the center instrument panel
below the climate controls.
• Press the switch once to turn the heating element On. Press the switch a second
time to turn the heating element Off.
• Once the heated steering wheel has been turned on, it will operate for approximately 58 to 70 minutes before automatically shutting off. The heated steering wheel can shut
off early or may not turn on when the steering wheel is already warm.
GETTING STARTED
20
Page 26 of 100
High Beam Operation
• Push the lever forward to activate the high beams. Pull the lever toward you for flashto pass.
NOTE: For safe driving, turn off high beams when oncoming traffic is present to prevent
headlight glare and as a courtesy to other motorists.
AUTO DIMMING MIRRORS
• The rearview and driver side exterior mirror automatically adjusts for headlight glare from vehicles behind you.
• You can turn the feature on or off by pressing the button at the base of the rearview mirror. A light next to the button will illuminate to indicate when the dimming feature
is activated.
SPEED CONTROL
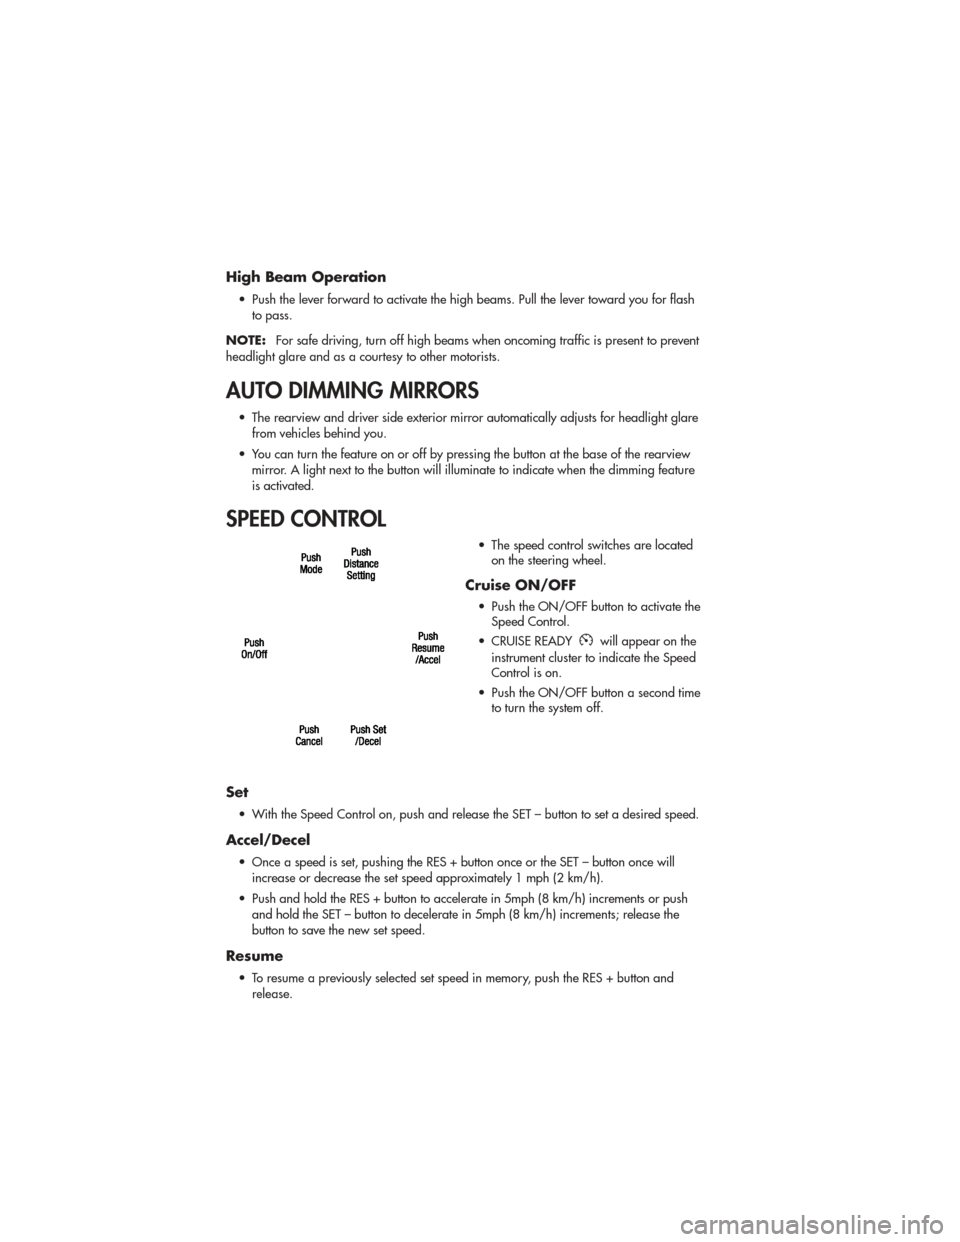
• The speed control switches are locatedon the steering wheel.
Cruise ON/OFF
• Push the ON/OFF button to activate theSpeed Control.
• CRUISE READY
will appear on the
instrument cluster to indicate the Speed
Control is on.
• Push the ON/OFF button a second time to turn the system off.
Set
• With the Speed Control on, push and release the SET – button to set a desired speed.
Accel/Decel
• Once a speed is set, pushing the RES + button once or the SET – button once will
increase or decrease the set speed approximately 1 mph (2 km/h).
• Push and hold the RES + button to accelerate in 5mph (8 km/h) increments or push and hold the SET – button to decelerate in 5mph (8 km/h) increments; release the
button to save the new set speed.
Resume
• To resume a previously selected set speed in memory, push the RES + button andrelease.
OPERATING YOUR VEHICLE
24
Page 28 of 100
WARNING!
• Leaving the Electronic or Adaptive Speed Control system on when not in use isdangerous. You could accidentally set the system or cause it to go faster than
you want. You could lose control and have a collision. Always leave the
Electronic or Adaptive Speed Control system off when you are not using it.
• Electronic Speed Control can be dangerous where the system cannot maintain a constant speed. Your vehicle could go too fast for the conditions, and you could
lose control. A collision could be the result. Do not use Electronic Speed Control
in heavy traffic or on roads that are winding, icy, snow-covered or slippery.
• Adaptive Cruise Control (ACC) is a convenience system. It is not a substitute for active driving involvement. Pay attention to road, traffic, and weather
conditions, vehicle speed, distance to the vehicle ahead; and, brake operation to
ensure safe operation of the vehicle under all road conditions. Your attention is
always required while driving to maintain safe control of your vehicle. Failure to
follow these warnings can result in a collision or serious personal injury.
The ACC system:
• Does not react to pedestrians, oncoming vehicles, and stationary objects (i.e., a stopped vehicle in a traffic jam or a disabled vehicle).
• Cannot take street, traffic, and weather conditions into account, and may be limited upon adverse sight distance conditions.
• Does not predict the lane curvature or the movement of preceding vehicles and will not compensate for such changes.
• Does not always fully recognize complex driving conditions, which can result in wrong or missing distance warnings.
• May not detect a vehicle ahead when strong light (for example, sunrise or sunset) is directly shining on the front of the vehicle.
• Can only apply a maximum of 25% of the vehicle’s braking capability, and will not bring the vehicle to a complete stop.
You should switch off the ACC system:
• When driving in fog, heavy rain, heavy snow, sleet, heavy traffic, and complex driving situations (i.e., in highway construction zones).
• When entering a turn lane or highway off ramp; when driving on roads that are winding, icy, snow-covered, slippery, or have steep uphill or downhill slopes;
and when towing a trailer.
• When circumstances do not allow safe driving at a constant speed.
• Failure to follow these warnings can result in a collision.
• Forward Collision Warning (FCW) is not intended to avoid a collision on its own. The driver has the responsibility to avoid a collision by controlling the
vehicle via braking and steering. Failure to follow this warning could lead to
serious injury or death.
OPERATING YOUR VEHICLE
26
Page 49 of 100
WARNING!
• Any voice commanded system should be used only in safe driving conditionsfollowing local laws and phone use. All attention should be kept on the roadway
ahead. Failure to do so may result in a collision causing you and others to be
severely injured or killed.
• In an emergency, to use Uconnect™ Phone, your mobile phone must be: • turned on,
• paired to Uconnect™ Phone,
• and have network coverage.
Uconnect™ VOICE COMMAND
• The Uconnect™ Voice Command system allows you to control your AM, FM radio,satellite radio, disc player, Uconnect™ Phone, a memo recorder, and supported
portable media devices.
• When you press the Voice Command button
located on the radio faceplate
or steering wheel, you will hear a beep. The beep is your signal to give a command. If
you do not say a command within a few seconds, the system will present you with a
list of options. If you ever wish to interrupt the system while it lists options, press the
Voice Command button
, listen for the BEEP, and say your command.
Voice Command for Text Messaging
• If equipped with Uconnect™ Voice Command, your Media Center 430N radio may be able to play incoming SMS messages through the vehicle sound system.
• It also allows you to respond by selecting from various pre-defined phrases.
• Not all phones are compatible with this feature. Refer to the phone compatibility list at www.jeep.com/uconnect. Connected mobile phones must be bluetooth-compatible,
and paired with your radio.
Changing The Volume
• Start a dialogue by pressing the Voice Command button, then say a
command (for example, “tutorial”).
• Use the radio ON/OFF VOLUME rotary knob to adjust the volume to a comfortable level while the Voice Command system is speaking. The volume setting for Voice
Command is different than the audio system.
• For vehicles equipped with Video Entertainment System (VES)™, refer to the Uconnect™ Voice Command section of the Uconnect™ User's Manual on the DVD for
further details.
• For vehicles not equipped with VES™, refer to your vehicle Owner's Manual on the DVD for Uconnect™ Voice Command information.
NOTE: To access the tutorial, press the Voice Command button
. After the BEEP,
say “tutorial”. Press any hard-key/button or touch the display (Touch-Screen radio) to
cancel the tutorial.
ELECTRONICS
47
Page 52 of 100
VIDEO ENTERTAINMENT SYSTEM (VES)™
System Operation
• The screen is located on the headlinerbehind the front seat. To lower the
screen, press the release button located
in the rear of the overhead console.
• The system may be controlled by the front seat occupants using the
touch-screen radio, or by the rear seat
occupants using the remote control.
•
The video screen displays information in a
split-screen format. The left side of the
screen is referred to as Channel 1 and the
right side of the screen is referred to as
Channel 2. All modes except video modes
are displayed in a split-screen format.
• To use the headphones, press the power button located on the right ear cup. Select the channel on the headphones (1 or 2) that corresponds to the channel selected on the
VES™ screen.
Operation Of The Touch-Screen Radio
• To view a DVD video, press the OPEN/CLOSE or LOAD hard-key and insert the disc.Playback will begin automatically after the DVD is recognized by the disc drive. If
playback does not begin automatically, follow these steps:
• Press the MENU hard-key, then touch the Rear VES™ soft-key. If a chapter list appears on the right side of the screen touch the HIDE LIST soft-key to display the
Rear VES™ Control screen.
• Touch the 1 soft-key to select an audio channel, then touch the DISC soft-key in the MEDIA column.
SIRIUS Backseat TV™ • Press the MENU hard-key, then touch the Rear VES™ soft-key. If a chapter list appears on the right side of the screen, touch the HIDE LIST soft key to display the Rear VES™
Control screen.
• Touch the 1 soft-key to select an audio channel, then touch the TV soft-key in the RADIO column to select SIRIUS Backseat TV™.
• To view SIRIUS Backseat TV™ using the remote, set the remote control channel selector switch to channel 1. Press the MODE button, then using the arrow buttons select TV
and press ENTER.
ELECTRONICS
50
Page 65 of 100
24-HOUR TOWING ASSISTANCE
• Dial toll-free 1-800-521-2779 or 1-800-363-4869 for Canadian residents.
• Provide your name, vehicle identification number and license plate number.
• Provide your location, including telephone number, from which you are calling.
• Briefly describe the nature of the problem and answer a few simple questions.
• You will be given the name of the service provider and an estimated time of arrival. Ifyou feel you are in an “unsafe situation”, please let us know. With your consent, we
will contact local police or safety authorities.
INSTRUMENT CLUSTER WARNING LIGHTS
- Tire Pressure Monitoring System (TPMS) Light
• Each tire, including the spare (if provided), should be checked monthly, when coldand inflated to the inflation pressure recommended by the vehicle manufacturer on the
vehicle placard or tire inflation pressure label. (If your vehicle has tires of a different
size than the size indicated on the vehicle placard or tire inflation pressure label, you
should determine the proper tire inflation pressure for those tires.)
• As an added safety feature, your vehicle has been equipped with a Tire Pressure Monitoring System (TPMS) that illuminates a low tire pressure telltale when one or
more of your tires is significantly under-inflated. Accordingly, when the low tire
pressure telltale illuminates, you should stop and check your tires as soon as possible,
and inflate them to the proper pressure. Driving on a significantly under-inflated tire
causes the tire to overheat and can lead to tire failure. Under-inflation also reduces
fuel efficiency and tire tread life, and may affect the vehicle’s handling and stopping
ability.
• IF THE LIGHT STARTS FLASHING INDICATING A LOW TIRE PRESSURE,
ADJUST THE AIR PRESSURE IN THE LOW TIRE TO THE AIR PRESSURE
SHOWN ON THE VEHICLE PLACARD OR TIRE INFLATION PRESSURE
LABEL LOCATED ON THE DRIVER'S DOOR. NOTE: AFTER INFLATION,
THE VEHICLE MAY NEED TO BE DRIVEN FOR 20 MINUTES BEFORE THE
FLASHING LIGHT WILL TURN OFF.
• Please note that the TPMS is not a substitute for proper tire maintenance, and it is the driver’s responsibility to maintain correct tire pressure, even if under-inflation has not
reached the level to trigger illumination of the TPMS low tire pressure telltale.
• Your vehicle has also been equipped with a TPMS malfunction indicator to indicate when the system is not operating properly. The TPMS malfunction indicator is
combined with the low tire pressure telltale. When the system detects a malfunction,
the telltale will flash for approximately one minute and then remain continuously
illuminated. This sequence will continue each time the vehicle is restarted as long as
the malfunction exists.
WHAT TO DO IN EMERGENCIES
63
Page 87 of 100
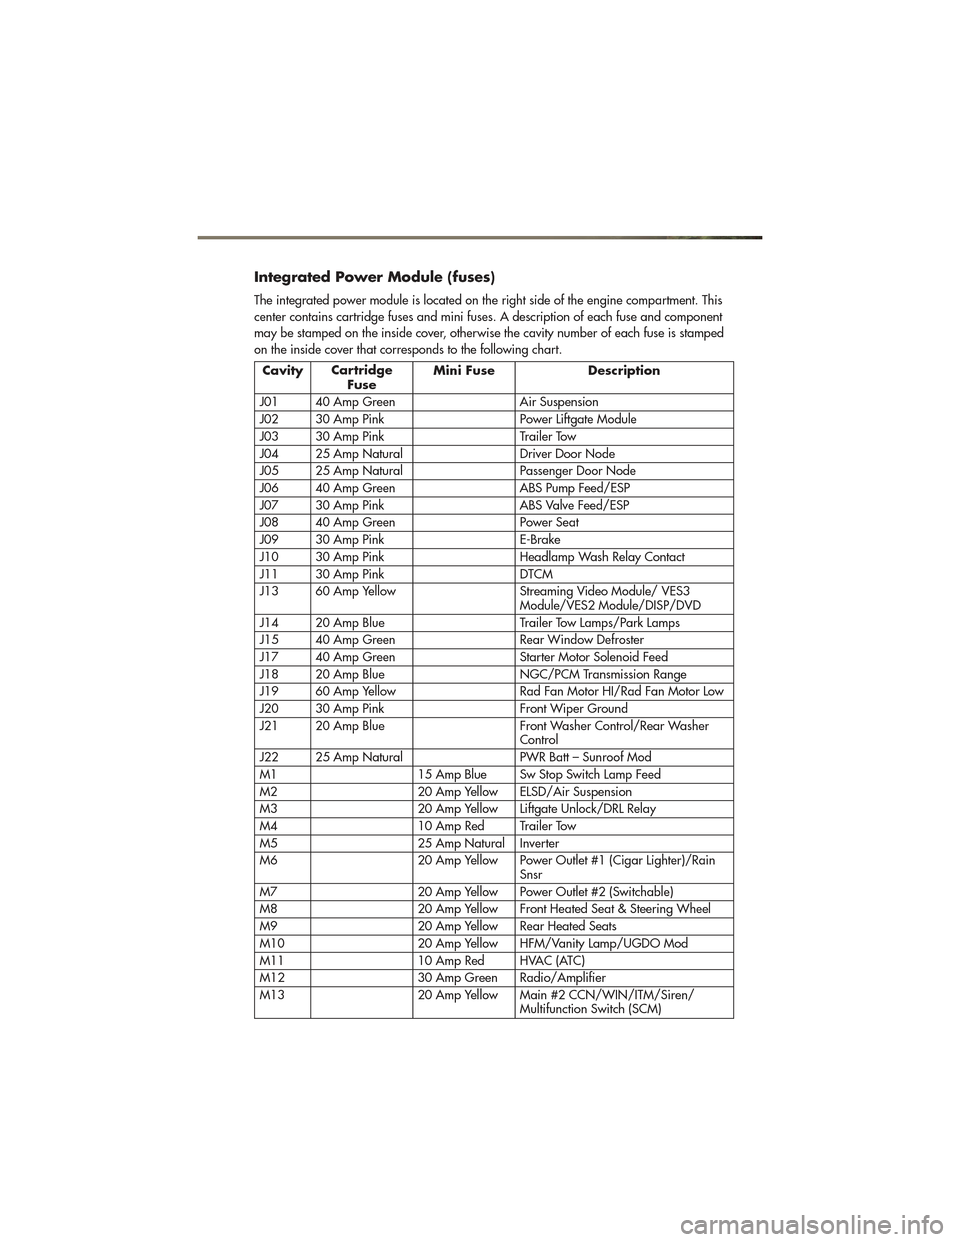
Integrated Power Module (fuses)
The integrated power module is located on the right side of the engine compartment. This
center contains cartridge fuses and mini fuses. A description of each fuse and component
may be stamped on the inside cover, otherwise the cavity number of each fuse is stamped
on the inside cover that corresponds to the following chart.
CavityCartridge
Fuse Mini Fuse Description
J01 40 Amp Green Air Suspension
J02 30 Amp Pink Power Liftgate Module
J03 30 Amp Pink Trailer Tow
J04 25 Amp Natural Driver Door Node
J05 25 Amp Natural Passenger Door Node
J06 40 Amp Green ABS Pump Feed/ESP
J07 30 Amp Pink ABS Valve Feed/ESP
J08 40 Amp Green Power Seat
J09 30 Amp Pink E-Brake
J10 30 Amp Pink Headlamp Wash Relay Contact
J11 30 Amp Pink DTCM
J13 60 Amp Yellow Streaming Video Module/ VES3 Module/VES2 Module/DISP/DVD
J14 20 Amp Blue Trailer Tow Lamps/Park Lamps
J15 40 Amp Green Rear Window Defroster
J17 40 Amp Green Starter Motor Solenoid Feed
J18 20 Amp Blue NGC/PCM Transmission Range
J19 60 Amp Yellow Rad Fan Motor HI/Rad Fan Motor Low
J20 30 Amp Pink Front Wiper Ground
J21 20 Amp Blue Front Washer Control/Rear Washer Control
J22 25 Amp Natural PWR Batt – Sunroof Mod
M1 15 Amp Blue Sw Stop Switch Lamp Feed
M2 20 Amp Yellow ELSD/Air Suspension
M3 20 Amp Yellow Liftgate Unlock/DRL Relay
M4 10 Amp Red Trailer Tow
M5 25 Amp Natural Inverter
M6 20 Amp Yellow Power Outlet #1 (Cigar Lighter)/Rain Snsr
M7 20 Amp Yellow Power Outlet #2 (Switchable)
M8 20 Amp Yellow Front Heated Seat & Steering Wheel
M9 20 Amp Yellow Rear Heated Seats
M10 20 Amp Yellow HFM/Vanity Lamp/UGDO Mod
M11 10 Amp Red HVAC (ATC)
M12 30 Amp Green Radio/Amplifier
M13 20 Amp Yellow Main #2 CCN/WIN/ITM/Siren/ Multifunction Switch (SCM)
MAINTAINING YOUR VEHICLE
85
Page 88 of 100
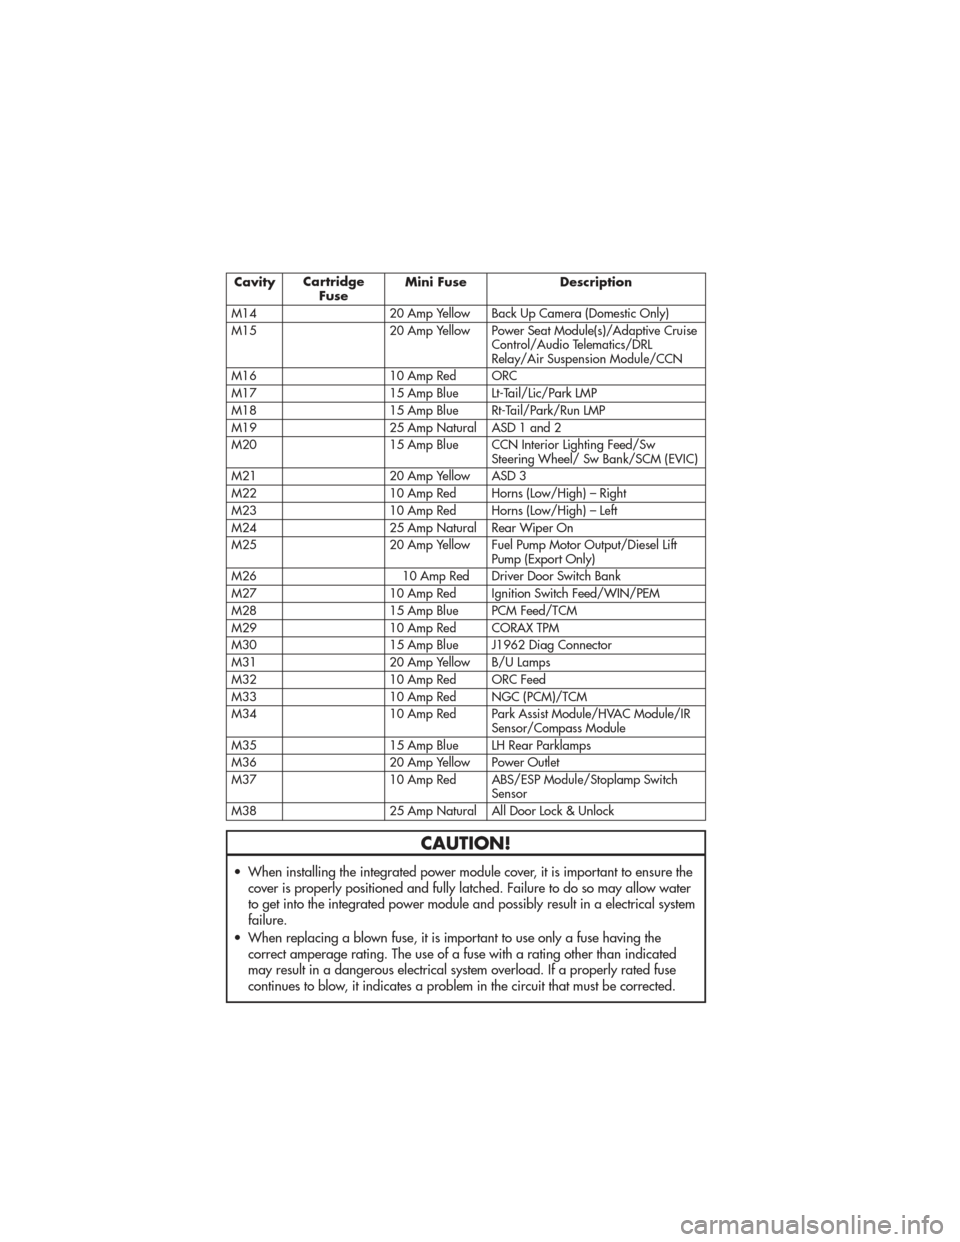
CavityCartridge
Fuse Mini Fuse Description
M14 20 Amp Yellow Back Up Camera (Domestic Only)
M15 20 Amp Yellow Power Seat Module(s)/Adaptive Cruise Control/Audio Telematics/DRL
Relay/Air Suspension Module/CCN
M16 10 Amp Red ORC
M17 15 Amp Blue Lt-Tail/Lic/Park LMP
M18 15 Amp Blue Rt-Tail/Park/Run LMP
M19 25 Amp Natural ASD 1 and 2
M20 15 Amp Blue CCN Interior Lighting Feed/Sw Steering Wheel/ Sw Bank/SCM (EVIC)
M21 20 Amp Yellow ASD 3
M22 10 Amp Red Horns (Low/High) – Right
M23 10 Amp Red Horns (Low/High) – Left
M24 25 Amp Natural Rear Wiper On
M25 20 Amp Yellow Fuel Pump Motor Output/Diesel Lift Pump (Export Only)
M26 10 Amp Red Driver Door Switch Bank
M27 10 Amp Red Ignition Switch Feed/WIN/PEM
M28 15 Amp Blue PCM Feed/TCM
M29 10 Amp Red CORAX TPM
M30 15 Amp Blue J1962 Diag Connector
M31 20 Amp Yellow B/U Lamps
M32 10 Amp Red ORC Feed
M33 10 Amp Red NGC (PCM)/TCM
M34 10 Amp Red Park Assist Module/HVAC Module/IR Sensor/Compass Module
M35 15 Amp Blue LH Rear Parklamps
M36 20 Amp Yellow Power Outlet
M37 10 Amp Red ABS/ESP Module/Stoplamp Switch Sensor
M38 25 Amp Natural All Door Lock & Unlock
CAUTION!
• When installing the integrated power module cover, it is important to ensure the cover is properly positioned and fully latched. Failure to do so may allow water
to get into the integrated power module and possibly result in a electrical system
failure.
• When replacing a blown fuse, it is important to use only a fuse having the correct amperage rating. The use of a fuse with a rating other than indicated
may result in a dangerous electrical system overload. If a properly rated fuse
continues to blow, it indicates a problem in the circuit that must be corrected.
MAINTAINING YOUR VEHICLE
86