JEEP GRAND CHEROKEE 2012 WK2 / 4.G SRT Owners Manual
Manufacturer: JEEP, Model Year: 2012, Model line: GRAND CHEROKEE, Model: JEEP GRAND CHEROKEE 2012 WK2 / 4.GPages: 572, PDF Size: 8.69 MB
Page 361 of 572

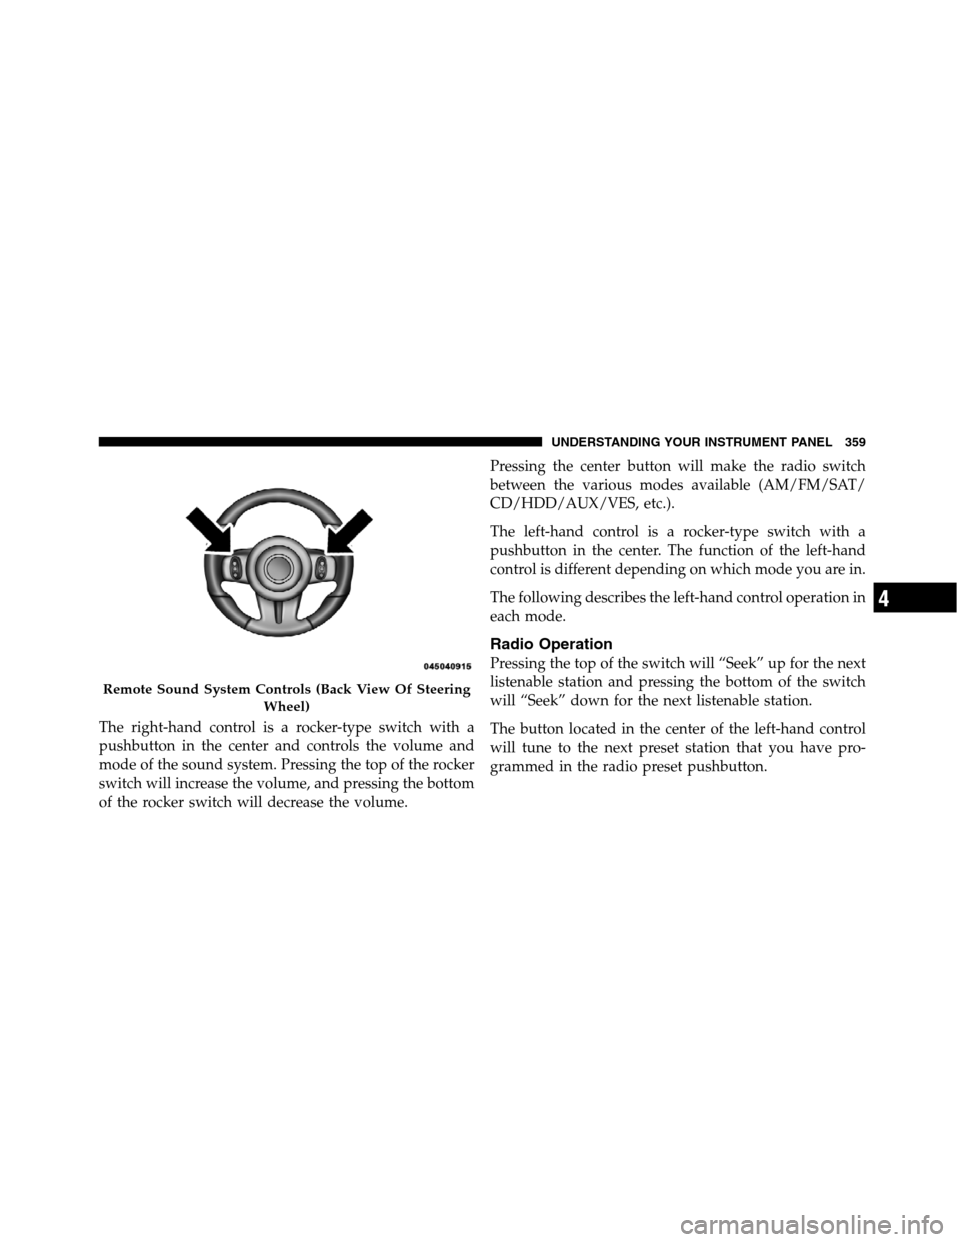
The right-hand control is a rocker-type switch with a
pushbutton in the center and controls the volume and
mode of the sound system. Pressing the top of the rocker
switch will increase the volume, and pressing the bottom
of the rocker switch will decrease the volume.Pressing the center button will make the radio switch
between the various modes available (AM/FM/SAT/
CD/HDD/AUX/VES, etc.).
The left-hand control is a rocker-type switch with a
pushbutton in the center. The function of the left-hand
control is different depending on which mode you are in.
The following describes the left-hand control operation in
each mode.
Radio Operation
Pressing the top of the switch will “Seek” up for the next
listenable station and pressing the bottom of the switch
will “Seek” down for the next listenable station.
The button located in the center of the left-hand control
will tune to the next preset station that you have pro-
grammed in the radio preset pushbutton.
Remote Sound System Controls (Back View Of Steering
Wheel)
4
UNDERSTANDING YOUR INSTRUMENT PANEL 359
Page 362 of 572

CD Player
Pressing the top of the switch once will go to the next
track on the CD. Pressing the bottom of the switch once
will go to the beginning of the current track, or to the
beginning of the previous track if it is within one second
after the current track begins to play.
If you press the switch up or down twice, it plays the
second track; three times, it will play the third, etc.
The center button on the left side rocker switch has no
function for a single-disc CD player. However, when a
multiple-disc CD player is equipped on the vehicle, the
center button will select the next available CD in the
player.
CD/DVD DISC MAINTENANCE
To keep a CD/DVD in good condition, take the following
precautions:
1. Handle the disc by its edge; avoid touching the
surface.2. If the disc is stained, clean the surface with a soft cloth,
wiping from center to edge.
3. Do not apply paper or tape to the disc; avoid scratch-
ing the disc.
4. Do not use solvents such as benzene, thinner, cleaners,
or anti-static sprays.
5. Store the disc in its case after playing.
6. Do not expose the disc to direct sunlight.
7. Do not store the disc where temperatures may become
too high.
NOTE:If you experience difficulty in playing a particu-
lar disc, it may be damaged (i.e., scratched, reflective
coating removed, a hair, moisture or dew on the disc)
oversized, or have protection encoding. Try a known
good disc before considering disc player service.
360 UNDERSTANDING YOUR INSTRUMENT PANEL
Page 363 of 572

RADIO OPERATION AND MOBILE PHONES
Under certain conditions, the mobile phone being on in
your vehicle can cause erratic or noisy performance from
your radio. This condition may be lessened or eliminated
by relocating the mobile phone antenna. This condition is
not harmful to the radio. If your radio performance does
not satisfactorily “clear” by the repositioning of the
antenna, it is recommended that the radio volume be
turned down or off during mobile phone operation when
not using Uconnect™ (if equipped).
CLIMATE CONTROLS
The air conditioning and heating system is designed to
make you comfortable in all types of weather.
Dual-Zone Automatic Temperature Control (ATC)
— If Equipped
•
The Automatic Temperature Control (ATC) allows
both driver and front passenger seat occupants to
select individual comfort settings.
•When occupants in the vehicle select an Auto mode
operation, Auto blower operation is set by using a
push button on the control unit and a comfort tem-
perature setting by using the temperature up and
down buttons.
•The system provides set-and-forget operation for op-
timum comfort and convenience.
•The system can be controlled manually, if desired.
4
UNDERSTANDING YOUR INSTRUMENT PANEL 361
Page 364 of 572

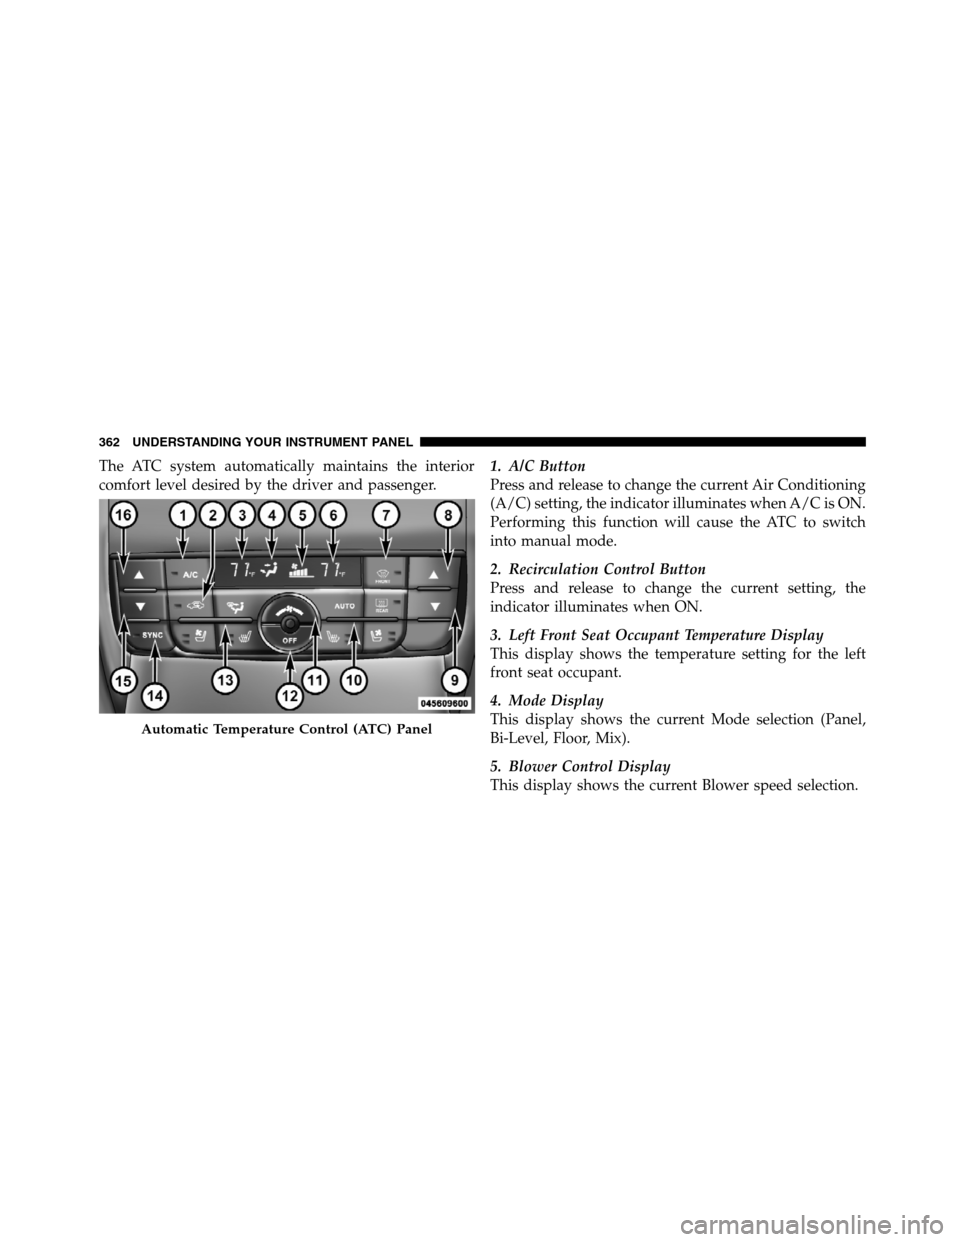
The ATC system automatically maintains the interior
comfort level desired by the driver and passenger.1. A/C Button
Press and release to change the current Air Conditioning
(A/C) setting, the indicator illuminates when A/C is ON.
Performing this function will cause the ATC to switch
into manual mode.
2. Recirculation Control Button
Press and release to change the current setting, the
indicator illuminates when ON.
3. Left Front Seat Occupant Temperature Display
This display shows the temperature setting for the left
front seat occupant.
4. Mode Display
This display shows the current Mode selection (Panel,
Bi-Level, Floor, Mix).
5. Blower Control Display
This display shows the current Blower speed selection.
Automatic Temperature Control (ATC) Panel
362 UNDERSTANDING YOUR INSTRUMENT PANEL
Page 365 of 572

6. Right Front Seat Occupant Temperature Display
This display shows the temperature setting for the right
front seat occupant.
7. Front Defrost Button
Press and release to change the current setting, the
indicator illuminates when ON. Performing this function
will cause the ATC to switch into manual mode. The
blower will engage immediately if the Defrost mode is
selected.
8. Passenger Temperature Control Up Button
Provides the passenger with independent temperature
control. Push the button for warmer temperature set-
tings.
9. Passenger Temperature Control Down Button
Provides the passenger with independent temperature
control. Push the button for cooler temperature settings.10. Auto Temperature Control Button
Controls airflow temperature, distribution, volume, and
the amount of air recirculation automatically. Press and
release to select. Refer to “Automatic Operation” for
more information. Performing this function will cause
the ATC to switch between manual mode and automatic
modes.
11. Blower Control
There are seven blower speeds, the blower speed in-
creases as you move the control to the right from the
lowest blower setting. Performing this function will
cause the ATC to switch into manual mode.
12. Climate Control ON/OFF Button
Press and release this button to turn the Climate Control
OFF
4
UNDERSTANDING YOUR INSTRUMENT PANEL 363
Page 366 of 572

13. Mode Control Button
Press and release to select between Modes (Panel, Bi-
Level, Floor, Mix). Performing this function will cause the
ATC to switch into manual mode.
14. SYNC Button
Press and release to control the temperature setting for
both zones from the driver temperature control.
15. Driver Temperature Control Down Button
Provides the driver with independent temperature con-
trol. Push the button for cooler temperature settings.
16. Driver Temperature Control Up Button
Provides the driver with independent temperature con-
trol. Push the button for warmer temperature settings.
Automatic Operation
1. Press the AUTO button on the Automatic Temperature
Control (ATC) Panel.2. Next, adjust the temperature you would like the
system to maintain by adjusting the driver and front
passenger temperature control buttons. Once the desired
temperature is displayed, the system will achieve and
automatically maintain that comfort level.
3. When the system is set up for your comfort level, it is
not necessary to change the settings. You will experience
the greatest efficiency by simply allowing the system to
function automatically.
NOTE:
•It is not necessary to move the temperature settings for
cold or hot vehicles. The system automatically adjusts
the temperature, mode and fan speed to provide
comfort as quickly as possible.
•The temperature can be displayed in U.S. or Metric
units by selecting the US/M customer-programmable
feature. Refer to the “Electronic Vehicle Information
Center (EVIC) — Customer-Programmable Features
(SETUP)” in this section of the manual.
364 UNDERSTANDING YOUR INSTRUMENT PANEL
Page 367 of 572

To provide you with maximum comfort in the Automatic
mode, during cold start-ups the blower fan will remain
on low until the engine warms up. The blower will
increase in speed and transition into Auto mode.
Manual Operation
This system offers a full complement of manual override
features.
NOTE:Each of these features operate independently
from each other. If any one feature is controlled manually,
temperature control will continue to operate automati-
cally.
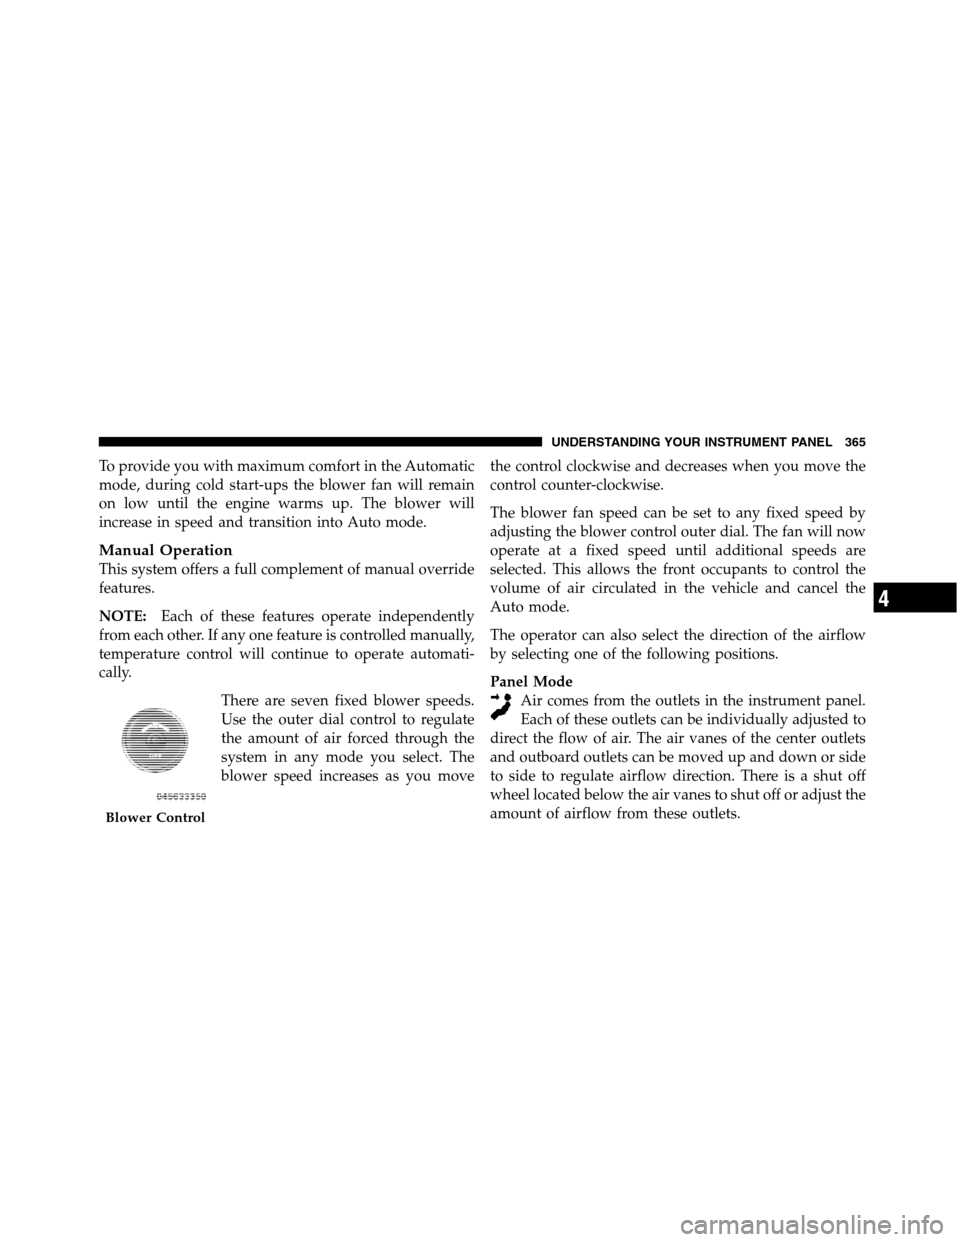
There are seven fixed blower speeds.
Use the outer dial control to regulate
the amount of air forced through the
system in any mode you select. The
blower speed increases as you movethe control clockwise and decreases when you move the
control counter-clockwise.
The blower fan speed can be set to any fixed speed by
adjusting the blower control outer dial. The fan will now
operate at a fixed speed until additional speeds are
selected. This allows the front occupants to control the
volume of air circulated in the vehicle and cancel the
Auto mode.
The operator can also select the direction of the airflow
by selecting one of the following positions.
Panel Mode
Air comes from the outlets in the instrument panel.
Each of these outlets can be individually adjusted to
direct the flow of air. The air vanes of the center outlets
and outboard outlets can be moved up and down or side
to side to regulate airflow direction. There is a shut off
wheel located below the air vanes to shut off or adjust the
amount of airflow from these outlets.
Blower Control
4
UNDERSTANDING YOUR INSTRUMENT PANEL 365
Page 368 of 572

Bi-Level Mode
Air comes from the instrument panel outlets, floor
outlets and defrost outlets.
NOTE:In many temperature positions, the BI-LEVEL
mode is designed to provide cooler air out of the panel
outlets and warmer air from the floor outlets.
Floor Mode
Air comes from the floor outlets. A slight amount of
air is directed through the defrost and side window
demister outlets.
Mix Mode
Air comes from the floor, defrost and side window
demist outlets. This mode works best in cold or
snowy conditions. It allows you to stay comfortable
while keeping the windshield clear.Defrost Mode
Air comes from the windshield and side window
demist outlets. Use Defrost mode with maximum
temperature settings for best windshield and side win-
dow defrosting. When the defrost mode is selected, the
blower will automatically default to medium-high unless
the blower is controlled manually.
NOTE:While operating in the other modes, the system
will not automatically sense the presence of fog, mist or
ice on the windshield. Defrost mode must be manually
selected to clear the windshield and side glass.
Air Conditioning (A/C)
The Air Conditioning (A/C) button allows the operator
to manually activate or deactivate the air conditioning
system. When in A/C mode and the ATC is set to a cool
temperature, dehumidified air flows through the air
366 UNDERSTANDING YOUR INSTRUMENT PANEL
Page 369 of 572

outlets. If Economy mode is desired, press the A/C
button to turn off the A/C mode in the ATC display and
deactivate the A/C system.
NOTE:
•If the system is in Mix, Floor or Defrost Mode, the A/C
can be turned off, but the A/C system shall remain
active to prevent fogging of the windows.
•If fog or mist appears on the windshield or side glass,
select Defrost mode and increase blower speed.
Recirculation Control
When outside air contains smoke, odors, or
high humidity, or if rapid cooling is desired,
you may wish to recirculate interior air by
pressing the RECIRCULATION control button.
Recirculation mode should only be used temporarily. The
recirculation LED will illuminate when this button isselected. Push the button a second time to turn off the
Recirculation mode LED and allow outside air into the
vehicle.
NOTE:In cold weather, use of Recirculation mode may
lead to excessive window fogging. The Recirculation
mode is not allowed in the Floor/Defrost Mix and
Defrost modes to improve window clearing operation.
Recirculation will be disabled automatically if these
modes are selected.
Operating Tips
Window Fogging
Windows will fog on the inside when the humidity inside
the vehicle is high. This often occurs in mild or cool
temperatures when it’s rainy or humid. In most cases,
turning the air conditioning (pressing the A/C button) on
will clear the fog. Adjust the temperature control, air
direction, and blower speed to maintain comfort.
4
UNDERSTANDING YOUR INSTRUMENT PANEL 367
Page 370 of 572

As the temperature gets colder, it may be necessary to
direct air onto the windshield. Adjust the temperature
control and blower speed to maintain comfort. Higher
blower speeds will reduce fogging. Interior fogging on
the windshield can be quickly removed by selecting the
DEFROST mode.
Regular cleaning of the inside of the windows with a
non-filming cleaning solution (vinegar and water works
very well) will help prevent contaminates (cigarette
smoke, perfumes, etc.) from sticking to the windows.
Contaminates increase the rate of window fogging.
Summer Operation
NOTE:In some cases during high temperature trailer
tow operation the Air Conditioning system performance
may be reduced. This is to help protect the engine from
overheating during the high load condition.Your air conditioning system is also equipped with an
automatic recirculation system. When the system senses
a heavy load or high heat conditions, it may use partial
Recirculation A/C mode to provide additional comfort.
Winter Operation
When operating the system during the winter months,
make sure the air intake, located directly in front of the
windshield, is free of ice, slush, snow, or other
obstructions.
Vacation Storage
Anytime you store your vehicle, or keep it out of service
(i.e. vacation) for two weeks or more, run the air condi-
tioning system at idle for about five minutes in the fresh
air and high blower setting. This will ensure adequate
system lubrication to minimize the possibility of com-
pressor damage when the system is started again.
368 UNDERSTANDING YOUR INSTRUMENT PANEL