rear view mirror JEEP GRAND CHEROKEE 2014 WK2 / 4.G Owners Manual
[x] Cancel search | Manufacturer: JEEP, Model Year: 2014, Model line: GRAND CHEROKEE, Model: JEEP GRAND CHEROKEE 2014 WK2 / 4.GPages: 674, PDF Size: 4.38 MB
Page 122 of 674
MIRRORS
Inside Day/Night Mirror — If Equipped
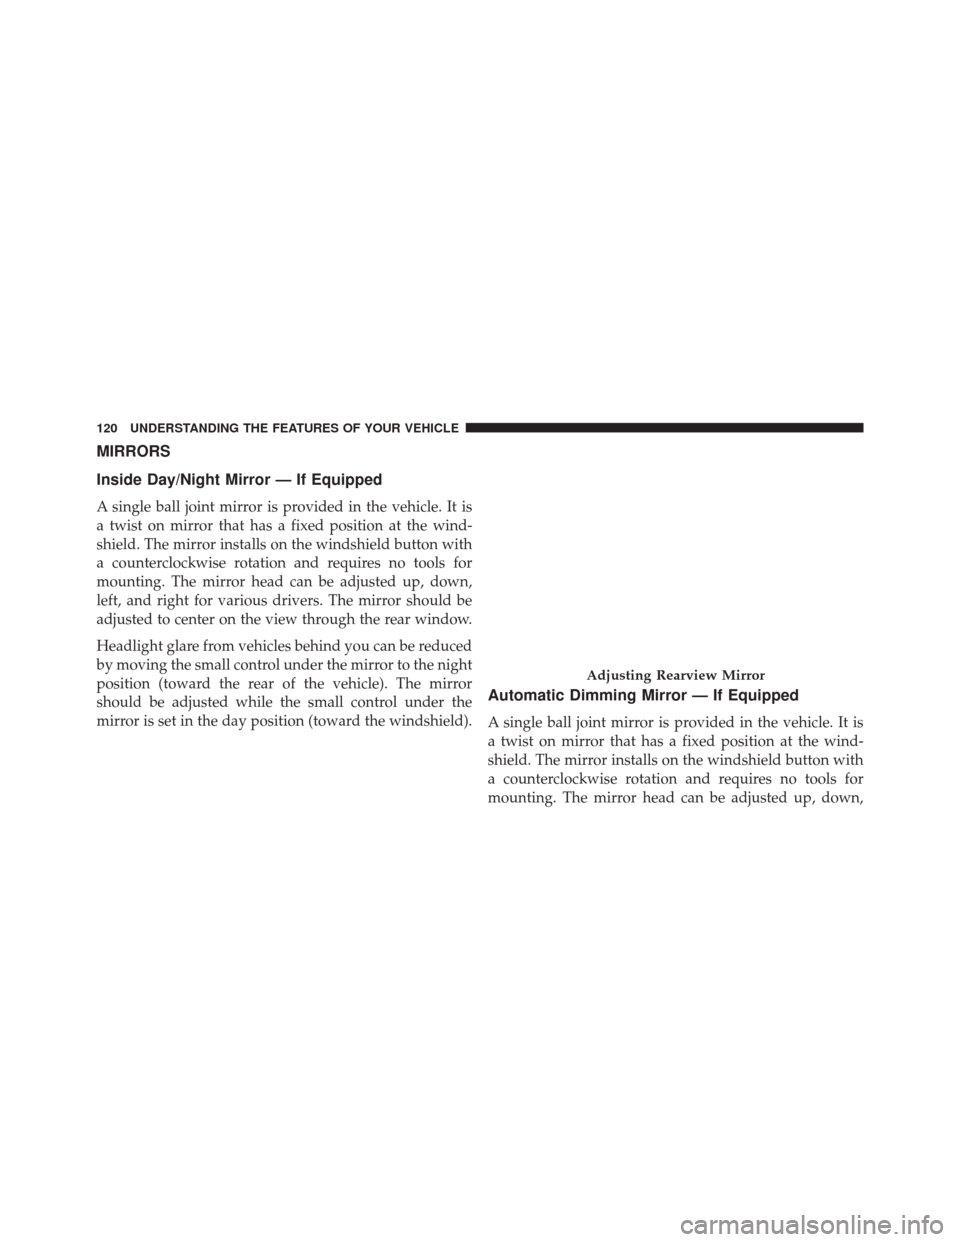
A single ball joint mirror is provided in the vehicle. It is
a twist on mirror that has a fixed position at the wind-
shield. The mirror installs on the windshield button with
a counterclockwise rotation and requires no tools for
mounting. The mirror head can be adjusted up, down,
left, and right for various drivers. The mirror should be
adjusted to center on the view through the rear window.
Headlight glare from vehicles behind you can be reduced
by moving the small control under the mirror to the night
position (toward the rear of the vehicle). The mirror
should be adjusted while the small control under the
mirror is set in the day position (toward the windshield).
Automatic Dimming Mirror — If Equipped
A single ball joint mirror is provided in the vehicle. It is
a twist on mirror that has a fixed position at the wind-
shield. The mirror installs on the windshield button with
a counterclockwise rotation and requires no tools for
mounting. The mirror head can be adjusted up, down,
Adjusting Rearview Mirror
120 UNDERSTANDING THE FEATURES OF YOUR VEHICLE
Page 123 of 674
left, and right for various drivers. The mirror should be
adjusted to center on the view through the rear window.
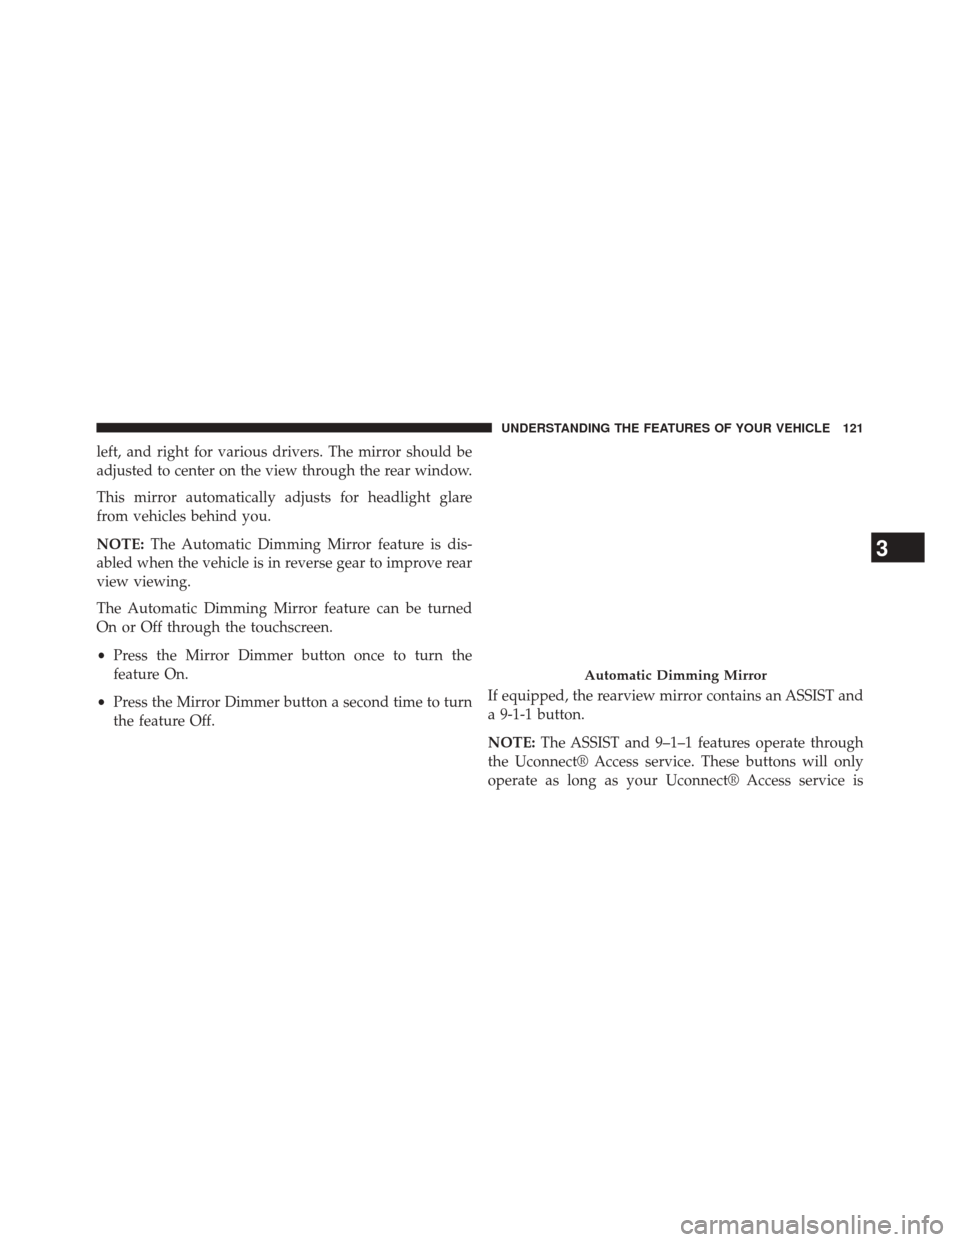
This mirror automatically adjusts for headlight glare
from vehicles behind you.
NOTE:The Automatic Dimming Mirror feature is dis-
abled when the vehicle is in reverse gear to improve rear
view viewing.
The Automatic Dimming Mirror feature can be turned
On or Off through the touchscreen.
• Press the Mirror Dimmer button once to turn the
feature On.
• Press the Mirror Dimmer button a second time to turn
the feature Off. If equipped, the rearview mirror contains an ASSIST and
a 9-1-1 button.
NOTE:
The ASSIST and 9–1–1 features operate through
the Uconnect® Access service. These buttons will only
operate as long as your Uconnect® Access service is
Automatic Dimming Mirror
3
UNDERSTANDING THE FEATURES OF YOUR VEHICLE 121
Page 124 of 674
active. Refer to your “Uconnect® System supplement
manual” for further information.
ASSIST Call
The ASSIST Button is used to automatically connect you
to any one of the following support centers:
•Roadside Assistance – If you get a flat tire, or need a
tow, just press the Assist button and you’ll be con-
nected to someone who can help. Roadside Assistance
will know what vehicle you’re driving and its location.
Additional fees may apply for roadside Assistance.
• Uconnect® Access Customer Care – In-vehicle support
for Uconnect® Access and Uconnect® Access Via
Mobile features.
• Vehicle Customer Care – Total support for all other
vehicle issues. 9-1-1 Call
1. Press the 9-1-1 Call button on the Rearview Mirror.
NOTE:
In case the 9-1-1 Call button is pushed in error,
there will be a 10 second delay before the 9-1-1 Call
system initiates a call to a 9-1-1 operator. To cancel the
9-1-1 Call connection, press the 9-1-1 Call button on the
Rearview Mirror or press the cancellation button on the
Phone Screen. Termination of the 9-1-1 Call will turn the
green LED light on the Rearview Mirror off.
2. The LED light located between the Assist and 9-1-1 buttons on the Rearview Mirror will turn green once a
connection to a 9-1-1 operator has been made.
3. Once a connection between the vehicle and a 9-1-1 operator is made, the 9-1-1 Call system may transmit
the following important vehicle information to a 9-1-1
operator:
• Indication that the occupant placed a 9-1-1 Call.
122 UNDERSTANDING THE FEATURES OF YOUR VEHICLE
Page 126 of 674
WARNING!(Continued)
•The 9-1-1 Call system is embedded into the vehi-
cle’s electrical system. Do not add aftermarket
electrical equipment to the vehicle’s electrical sys-
tem. This may prevent your vehicle from sending a
signal to initiate an emergency call. To avoid inter-
ference that can cause the 9-1-1 Call system to fail,
never add aftermarket equipment (e.g., two-way
mobile radio, CB radio, data recorder, etc.) to your
vehicle’s electrical system or modify the antennas
on your vehicle. IF YOUR VEHICLE LOSES BAT-
TERY POWER FOR ANY REASON (INCLUDING
DURING OR AFTER AN ACCIDENT), THE
UCONNECT FEATURES, APPS AND SERVICES,
AMONG OTHERS, WILL NOT OPERATE.
(Continued)
WARNING! (Continued)
•Modifications to any part of the 9-1-1 Call system
could cause the air bag system to fail when you
need it. You could be injured if the air bag system
is not there to help protect you.
9-1-1 Call System Limitations
Vehicles sold in Canada and Mexico DO NOThave 9-1-1
Call system capabilities.
9-1-1 or other emergency line operators in Canada and
Mexico may not answer or respond to 9-1-1 system calls.
If the 9-1-1 Call system detects a malfunction, any of the
following may occur at the time the malfunction is
detected, and at the beginning of each ignition cycle:
• The Rearview Mirror light located between the Assist
and 9-1-1 buttons will continuously be illuminated
red.
124 UNDERSTANDING THE FEATURES OF YOUR VEHICLE
Page 127 of 674
•The Phone Screen will display the following message
“Vehicle phone requires service. Please contact your
dealer.”
• An In-Vehicle Audio message will state “Vehicle phone
requires service. Please contact your dealer.”
WARNING!
• Ignoring the Rearview Mirror light could mean you
will not have 9-1-1 Call services. If the Rearview
Mirror light is illuminated, have an authorized
dealer service the 9-1-1 Call system immediately.
(Continued)
WARNING! (Continued)
•The Occupant Restraint Control module turns on
the Air Bag Warning Light on the instrument panel
if a malfunction in any part of the system is
detected. If the Air Bag Warning Light is illumi-
nated, the air bag system may not be working
properly and the 9-1-1 system may not be able to
send a signal to a 9-1-1 operator. If the Air Bag
Warning Light is illuminated, have an authorized
dealer service the ORC system immediately.
Even if the 9-1-1 Call system is fully functional, factors
beyond Chrysler Group LLC’s control may prevent or
stop the 9-1-1 Call system operation. These include, but
are not limited to, the following factors:
• The ignition key has been removed from the ignition
and the delayed accessories mode is active.
• The ignition key is in OFF position.
3
UNDERSTANDING THE FEATURES OF YOUR VEHICLE 125
Page 129 of 674
Outside Mirrors
To receive maximum benefit, adjust the outside mirrors
to center on the adjacent lane of traffic with a slight
overlap of the view obtained on the inside mirror.
WARNING!
Vehicles and other objects seen in the passenger side
convex mirror will look smaller and farther away
than they really are. Relying too much on your
passenger side convex mirror could cause you to
collide with another vehicle or other object. Use your
inside mirror when judging the size or distance of a
vehicle seen in the passenger side convex mirror.
Some vehicles will not have a convex passenger side
mirror.
Outside Mirrors Folding Feature
All outside mirrors are hinged and may be moved either
forward or rearward to resist damage. The hinges have
three detent positions:
•Full forward position
• Full rearward position
• Normal position
Power Folding Outside Mirrors — If Equipped
If equipped with power folding mirrors, they can be
electrically folded rearward and unfolded into the drive
position.
The switch for the power folding mirrors is located
between the power mirror switches L (left) and R (right).
Press the switch once and the mirrors will fold in, press
the switch a second time and the mirrors will return to
the normal driving position.
3
UNDERSTANDING THE FEATURES OF YOUR VEHICLE 127
Page 132 of 674
Tilt Mirrors In Reverse (Available With Memory
Seat Only) — If Equipped
Tilt Mirrors in Reverse provides automatic outside mirror
positioning which will aid the drivers view of the ground
rearward of the front doors. Outside mirrors will move
slightly downward from the present position when the
vehicle is shifted into REVERSE. Outside mirrors will
then return to the original position when the vehicle is
shifted out of REVERSE position. Each stored memory
seat setting will have an associated Tilt Mirrors in Re-
verse position.
NOTE:The Tilt Mirrors in Reverse feature is not turned
on when delivered from the factory. The Tilt Mirrors in
Reverse feature can be turned on and off using the
Uconnect® System. Refer to “Uconnect® Settings/
Customer Programmable Features” in “Understanding
Your Instrument Panel” for further information.
Illuminated Vanity Mirrors
To access an illuminated vanity mirror, flip down one of
the visors.
Lift the cover to reveal the mirror. The light will turn on
automatically.
Illuminated Vanity Mirror
130 UNDERSTANDING THE FEATURES OF YOUR VEHICLE
Page 133 of 674
Sun Visor “Slide-On-Rod” Feature — If Equipped
The sun visor “Slide-On-Rod” feature allows for addi-
tional flexibility in positioning the sun visor to block out
the sun.
1. Fold down the sun visor.
2. Unclip the visor from the center clip.
3. Pull the sun visor toward the inside rearview mirror toextend it.
BLIND SPOT MONITORING (BSM) — IF
EQUIPPED
The Blind Spot Monitoring (BSM) system uses two radar-
based sensors, located inside the rear bumper fascia, to
detect highway licensable vehicles (automobiles, trucks,
motorcycles, etc.) that enter the blind spot zones from the
rear/front/side of the vehicle. When the vehicle is started, the BSM warning light will
momentarily illuminate in both outside rear view mirrors
to let the driver know that the system is operational. The
BSM system sensors operate when the vehicle is in any
forward gear or REVERSE and enters stand-by mode
when the vehicle is in PARK.
Rear Detection Zones
3
UNDERSTANDING THE FEATURES OF YOUR VEHICLE 131
Page 134 of 674
The BSM detection zone covers approximately one lane
on both sides of the vehicle (12 ft or 3.8 m). The zone
starts at the outside rear view mirror and extends ap-
proximately 23 ft (7 m) to the rear of the vehicle. The BSM
system monitors the detection zones on both sides of the
vehicle when the vehicle speed has reached approxi-
mately 6 mph (10 km/h) or higher and will alert the
driver of vehicles in these areas.
NOTE:
•The BSM system does NOT alert the driver about
rapidly approaching vehicles that are outside the de-
tection zones.
• The BSM system detection zone DOES NOT change if
your vehicle is towing a trailer. Therefore, visually
verify the adjacent lane is clear for both your vehicle
and trailer before making a lane change. If the trailer or
other object (i.e., bicycle, sports equipment) extends beyond the side of your vehicle, this may result in the
BSM warning light remaining illuminated the entire
time the vehicle is in a forward gear.
The area on the rear fascia where the radar sensors are
located must remain free of snow, ice, and dirt/road
contamination so that the BSM system can function
properly. Do not block the area of the rear fascia where
the radar sensors are located with foreign objects (bum-
per stickers, bicycle racks, etc.).
132 UNDERSTANDING THE FEATURES OF YOUR VEHICLE
Page 139 of 674
The BSM system will not alert you of objects that are
traveling in the opposite direction of the vehicle in
adjacent lanes.WARNING!
The Blind Spot Monitoring system is only an aid to
help detect objects in the blind spot zones. The BSM
system is not designed to detect pedestrians, bicy-
clists, or animals. Even if your vehicle is equipped
with the BSM system, always check your vehicles
mirrors, glance over your shoulder, and use your turn
signal before changing lanes. Failure to do so can
result in serious injury or death.
Rear Cross Path
The Rear Cross Path (RCP) feature is intended to aid the
driver when backing out of parking spaces where their
vision of oncoming vehicles may be blocked. Proceed
slowly and cautiously out of the parking space until the
rear end of the vehicle is exposed. The RCP system will
then have a clear view of the cross traffic and if an
oncoming vehicle is detected, alert the driver.
Opposing Traffic
3
UNDERSTANDING THE FEATURES OF YOUR VEHICLE 137