display JEEP GRAND CHEROKEE 2014 WK2 / 4.G Owner's Manual
[x] Cancel search | Manufacturer: JEEP, Model Year: 2014, Model line: GRAND CHEROKEE, Model: JEEP GRAND CHEROKEE 2014 WK2 / 4.GPages: 220, PDF Size: 6.12 MB
Page 75 of 220
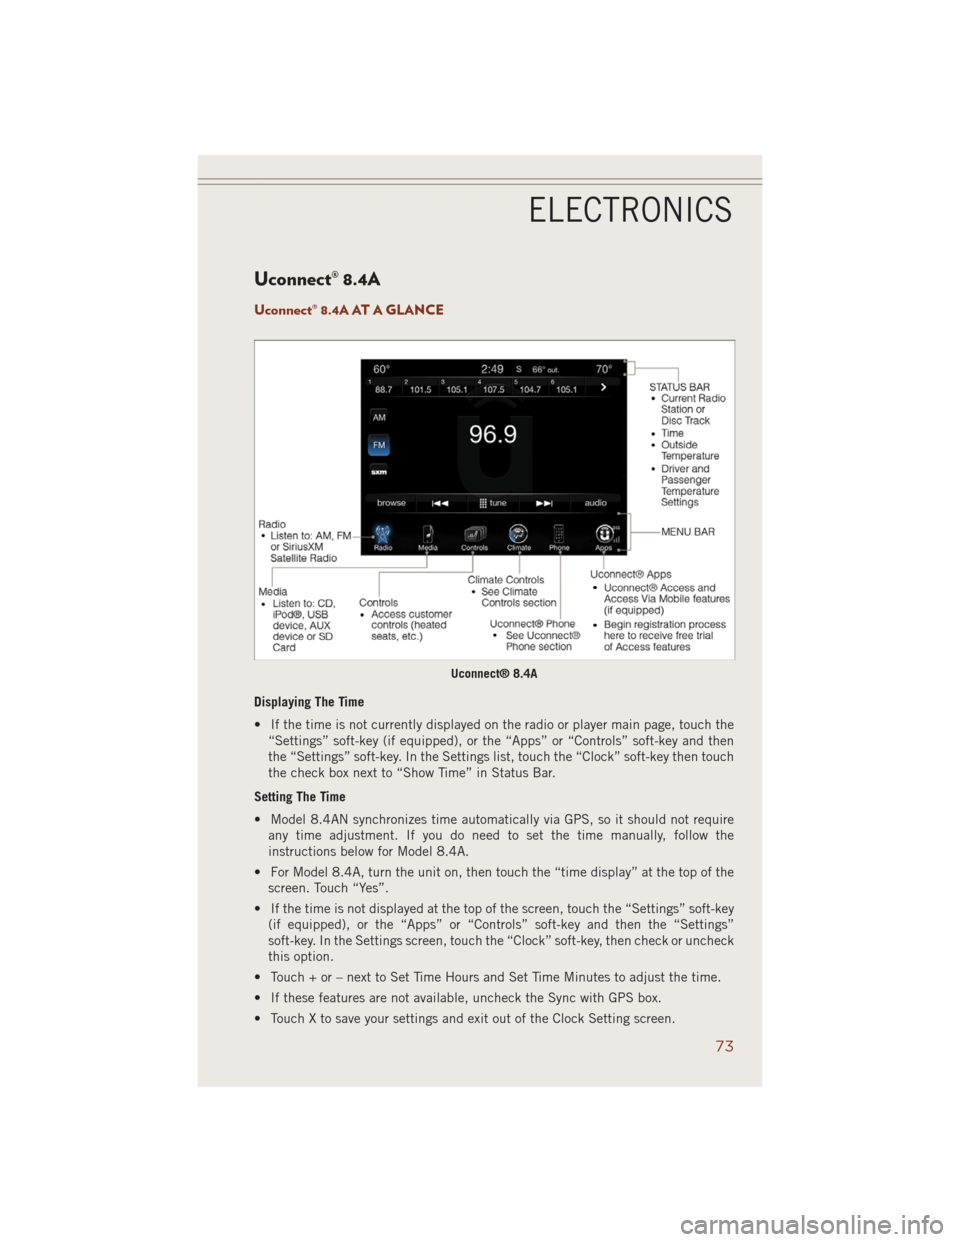
Uconnect® 8.4A
Uconnect® 8.4A AT A GLANCE
Displaying The Time
• If the time is not currently displayed on the radio or player main page, touch the
“Settings” soft-key (if equipped), or the “Apps” or “Controls” soft-key and then
the “Settings” soft-key. In the Settings list, touch the “Clock” soft-key then touch
the check box next to “Show Time” in Status Bar.
Setting The Time
• Model 8.4AN synchronizes time automatically via GPS, so it should not require
any time adjustment. If you do need to set the time manually, follow the
instructions below for Model 8.4A.
• For Model 8.4A, turn the unit on, then touch the “time display” at the top of the
screen. Touch “Yes”.
• If the time is not displayed at the top of the screen, touch the “Settings” soft-key
(if equipped), or the “Apps” or “Controls” soft-key and then the “Settings”
soft-key. In the Settings screen, touch the “Clock” soft-key, then check or uncheck
this option.
• Touch + or – next to Set Time Hours and Set Time Minutes to adjust the time.
• If these features are not available, uncheck the Sync with GPS box.
• Touch X to save your settings and exit out of the Clock Setting screen.
Uconnect® 8.4A
ELECTRONICS
73
Page 76 of 220
Audio Settings
• Touch of the “Audio” soft-key to activate the Audio settings screen to adjust
Balance\Fade, Equalizer, and Speed Adjusted Volume.
• You can return to the Radio screen by touching the X located at the top right.
Balance/Fade
• Touch the “Balance/Fade” soft-key to Balance audio between the front speakers or
fade the audio between the rear and front speakers.
• Touching the “Front, Rear, Left, or Right” soft-keys or touch and drag the Speaker
Icon to adjust the Balance/Fade.
Equalizer
• Touch the “Equalizer” soft-key to activate the Equalizer screen.
• Touch the + or - soft-keys, or by touching and dragging over the level bar for each
of the equalizer bands. The level value, which spans between plus or minus 9, is
displayed at the bottom of each of the Bands.
Speed Adjusted Volume
• Touch the “Speed Adjusted Volume” soft-key to activate the Speed Adjusted
Volume screen. The Speed Adjusted Volume is adjusted by touching the + and -
buttons or by touching and dragging over the level bar. This alters the automatic
adjustment of the audio volume with variation to vehicle speed.
Surround Sound
• Touch the “Surround Sound” soft-key, select On or Off followed by pressing the
“arrow back” soft-key. When this feature is activated, it provides simulated
surround sound mode.
ELECTRONICS
74
Page 80 of 220
Replay
• Lets you replay up to 44 minutes of the content of the current SiriusXM channel.
Replay
OptionOption Description
Play/Pause Touch to Pause content playback. Touch Pause/Play again to resume
playback.
Rewind/RW Rewinds the channel content in steps of five seconds. Touch and hold to
rewind continuously, then release to begin playing content at that point.
Fast
Forward/FWForwards the content, and works similarly to Rewind/RW. However, Fast
Forward/FW can only be used when content has been previously rewound.
Replay Time Displays the amount of time in the upper center of the screen by which
your content lags the Live channel.
Live Resumes playback of Live content at any time while replaying rewound
content.
• SiriusXM services require subscriptions, sold separately after the 12-month trial
included with the new vehicle purchase.If you decide to continue your service at the
end of your trial subscription, the plan you choose will automatically renew and bill at
then-current rates until you call SiriusXM at 1-866-635-2349 for U.S. residents and
1-888-539-7474 for Canadian residents to cancel. See SiriusXM Customer Agreement
for complete terms at www.siriusxm.com for U.S. residents and www.siriusxm.ca for
Canadian residents.All fees and programming subject to change. Our satellite
service is available only to those at least 18 and older in the 48 contiguous USA
and D.C. Our Sirius satellite service is also available in PR (with coverage
limitations). Our Internet radio service is available throughout our satellite service
area and in AK and HI. ©2014 Sirius XM Radio Inc. Sirius, XM and all related
marks and logos are trademarks of Sirius XM Radio Inc.
Disc Operation
• Your vehicle may have a remote CD player located in the lower center console
storage bin.
• CD/Disc Mode is entered by either inserting a CD/Disc or by touching the “Media”
button located on the side of the display. Once in Media Mode, select “Disc”.
• Gently insert one CD into the CD player with the CD label facing as indicated on
the illustration located on the Disc player.
Seek Up/Down Buttons
• Press to seek through Disc tracks.
• Hold either button to bypass tracks without stopping.
Browse
• Touch the “Browse” soft-key to scroll through and select a desired track on the
Disc. Touch the “Exit” soft-key if you wish to cancel the browse function.
ELECTRONICS
78
Page 81 of 220
MEDIA HUB – PLAYING iPod®/USB/MP3 DEVICES
• There are many ways to play music from iPod®/MP3 players or USB devices
through your vehicle's sound system.
Audio Jack (AUX)
• The AUX allows a portable device, such as an MP3 player or an iPod
®,tobe
plugged into the radio and utilize the vehicle’s sound system, using a 3.5 mm
audio cable, to amplify the source and play through the vehicle speakers.
• Touching the Media soft-key then choose AUX source will change the mode to
auxiliary device if the audio jack is connected, allowing the music from your
portable device to be heard through the vehicle's speakers. In order to activate the
AUX, plug in the audio jack.
• The functions of the portable device are controlled using the device buttons. The
volume may be controlled using the radio or portable device.
• To route the audio cable out of the center console, use the access cut out in the
front of the console.
USB Port
• Connect your iPod
®or compatible device using a USB cable into the USB Port.
USB Memory sticks with audio files can also be used. Then, audio from the device
can be played on the vehicle’s sound system while providing metadata (artist, track
title, album, etc.) information on the radio display.
• When connected, the iPod
®/compatible USB device can be controlled using the
radio or Steering Wheel Audio Controls to play, skip to the next or previous track,
browse, and list the contents.
• The iPod
®battery charges when plugged into the USB port (if supported by the
specific device).
• To route the USB/iPod
®cable out of the center console, use the access cut out.
NOTE:
• When connecting your iPod
®device for the first time, the system may take several
minutes to read your music, depending on the number of files. For example, the
system will take approximately five minutes for every 1000 songs loaded on the
device. Also during the reading process, the Shuffle and Browse functions will be
disabled. This process is needed to ensure the full use of your iPod
®features and
only happens the first time it is connected. After the first time, the reading process
of your iPod
®will take considerably less time unless changes are made or new
songs are added to the playlist.
•
The USB port supports certain Mini, Classic, Nano, Touch, and iPhone®devices. The
USB port also supports playing music from compatible external USB Mass Storage
Class memory devices. Some iPod
®software versions may not fully support the USB
port features. Please visit Apple’s website for iPod®software updates.
SD Card
• Play songs stored on an SD card inserted into the SD card slot.
• Song playback can be controlled using the radio or Steering Wheel Audio Controls
to play, skip to the next or previous track, browse, and list the contents.
ELECTRONICS
79
Page 82 of 220
Bluetooth® Streaming Audio
• If equipped with Uconnect
®Voice Command, your Bluetooth®-equipped iPod®
devices, cell phones or other media players, may also be able to stream music to
your vehicle's sound system. Your connected device must be Bluetooth®-
compatible, and paired with your system (see Uconnect®Phone for pairing
instructions). You can access the music from your connected Bluetooth®device by
touching the Bluetooth®soft-key while in Media mode.
Uconnect®
8.4A &
8.4ANMedia Hub
(USB, AUX
Ports)Media Hub
(SD, USB,
AUX Ports)Remote USB
Port (Fully
Functional)Remote USB
Port (Charg-
ing Only)Dual Charg-
ing Ports
-SSOO
S = Standard Equipment
O = Optional Equipment
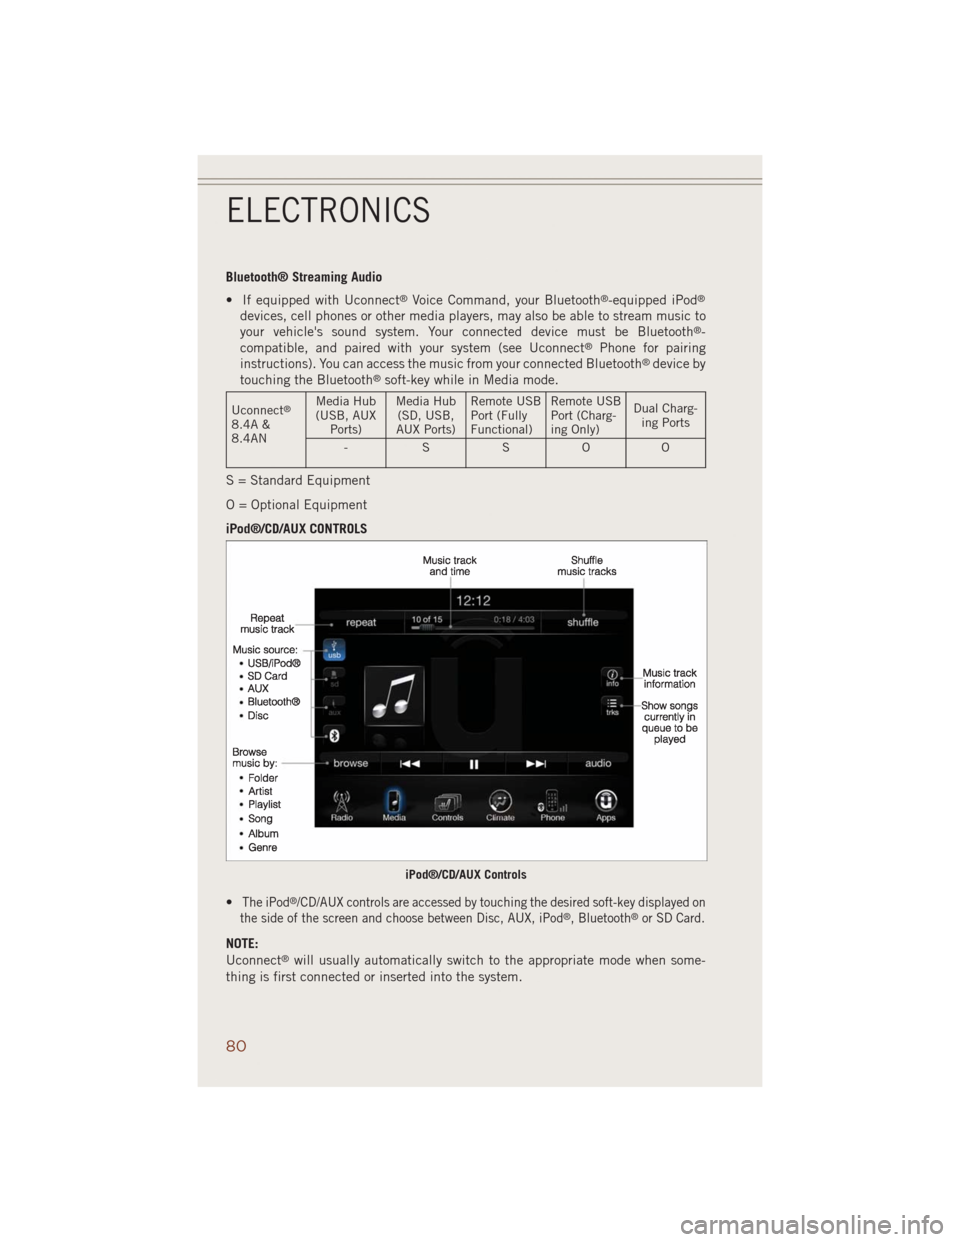
iPod®/CD/AUX CONTROLS
•
The iPod®/CD/AUX controls are accessed by touching the desired soft-key displayed on
the side of the screen and choose between Disc, AUX, iPod®, Bluetooth®or SD Card.
NOTE:
Uconnect®will usually automatically switch to the appropriate mode when some-
thing is first connected or inserted into the system.
iPod®/CD/AUX Controls
ELECTRONICS
80
Page 86 of 220
Uconnect® Phone (Bluetooth® Hands Free Calling)
• If the Uconnect®Phone Buttonexists on your steering wheel, then you have
the Uconnect®Phone features.
• The Uconnect
®Phone is a voice-activated, hands-free, in-vehicle communica-
tions system with Voice Command Capability (see Voice Command section).
• The Uconnect
®Phone allows you to dial a phone number with your mobile phone
using simple voice commands or using button on the touchscreen.
• Refer to the Understand The Features Of Your Vehicle section of your vehicle's
Owner's Manual on the DVD for further details.
NOTE:
The Uconnect
®Phone requires a mobile phone equipped with the Bluetooth®
Hands-Free Profile, Version 1.0 or higher. For Uconnect®Customer Support:
• U.S. residents visit www.UconnectPhone.com or call 1-877-855-8400.
• Canadian Residents visit www.UconnectPhone.com or call, 1-800-465–2001
(English) or 1-800-387-9983 (French).
Pairing A Phone
• To use the Uconnect®Phone feature, you must first pair your Bluetooth®phone
with the Uconnect®system.
Start Pairing Procedure On The Radio
• Touch the “Phone” soft-key and then the “Settings” soft-key. Next, touch “Add
Device”.
• Uconnect
®Phone will display an “In progress” screen while the system is
connecting.
Start Pairing Procedure On Mobile Phone
• Search for available devices on your Bluetooth
®enabled mobile phone. This is
usually within Settings or Options under “Bluetooth”. See your mobile phone’s
manual for details.
• When your phone finds the system, select “Uconnect” as the paired device. You
may be prompted by your phone to download the phonebook. This is so you can
make calls by saying the name of your contact (PBAP-Phone Book Access Profile).
Complete The Pairing Procedure
• When prompted on the phone, verify with radio password shown on the Uconnect
®
Screen.
• If your phone asks you to accept a connection request from Uconnect
®, select
“Yes”. If available, check the box telling it not to ask again – that way your phone
will automatically connect each time you start the vehicle.
ELECTRONICS
84
Page 88 of 220
Phonebook
• Uconnect®radios automatically downloads your phonebook from your paired
phone, if this feature is supported by your phone. Entries are updated each time
that the phone is connected. If your phone book entries do not appear, check the
settings on your phone. Some phones require you to enable this feature manually.
• Your phonebook can be browsed on your radio screen, but editing can only be done
on your phone. To browse, touch the “Phone” soft-key, then the “Phonebook”
soft-key.
• Favorite phonebook entries can be saved as Favorites for quicker access. Favorites
are shown at the top of your main phone screen.
Voice Command Tips
• Using complete names (i.e; Call John Doe vs. Call John) will result in greater
system accuracy.
• You can “chain” commands together for faster results. Say “Call John Doe,
mobile”, for example.
• If you are listening to available voice command options, you do not have to listen
to the entire list. When you hear the command that you need, press the
button on the steering wheel, wait for the beep and say your command.
Changing The Volume
• Start a dialogue by pressing the Phone button, then say a command for
example - "Help".
• Use the radio ON/OFF VOLUME rotary knob to adjust the volume to a comfortable
level while the Uconnect
®system is speaking. Please note the volume setting for
Uconnect®is different than the audio system.
NOTE:
To access help, press the Uconnect
®Phonebutton on the steering wheel and
say "help." Touch the display or push either
orbutton and say "cancel"
to cancel the help session.
Voice Text Reply (Not Compatible With iPhone®)
Once your Uconnect®system is paired with a compatible mobile device, the system
can announce a new incoming text message, and read it to your over the vehicle audio
system. You can reply to the message using Voice Recognition, by selecting, or saying
one of the 18 pre-defined messages.
•Here’s How:Press the Uconnect
®Phone buttonand wait for the beep, then
say “reply.” Uconnect®will give the following prompt: “ Please say the message
you would like to send.” Wait for the beep and say one of the pre-defined
messages. (If you are not sure, you can say “help”). Uconnect
®will then read the
ELECTRONICS
86
Page 90 of 220
Voice Command (VR) User TIPs
• To hear available commands, press the Uconnect
®Voice Command button and
say “Help.” You will hear available commands for the menu displayed.
• At any time, you can say the words “Cancel” or “Help”. These commands are
universal and can be used from virtually any menu. All other specific commands
can be used depending upon the active application.
• You can interrupt the system prompts at any time by pressing the Uconnect
®Voice
Command button while the system is speaking. After the beep, you can say a
command.
• You can chain commands together for faster results. Say “Call Joe Doe mobile,”
for example.
• For best performance, adjust the rearview mirror to provide at least ½ inch (1 cm)
gap between the overhead console (if equipped) and the mirror.
• Always wait for the beep before speaking.
• Speak normally, without pausing, just as you would speak to a person sitting a few
feet/meters away from you.
• Make sure that no one other than you is speaking during a Voice Command period.
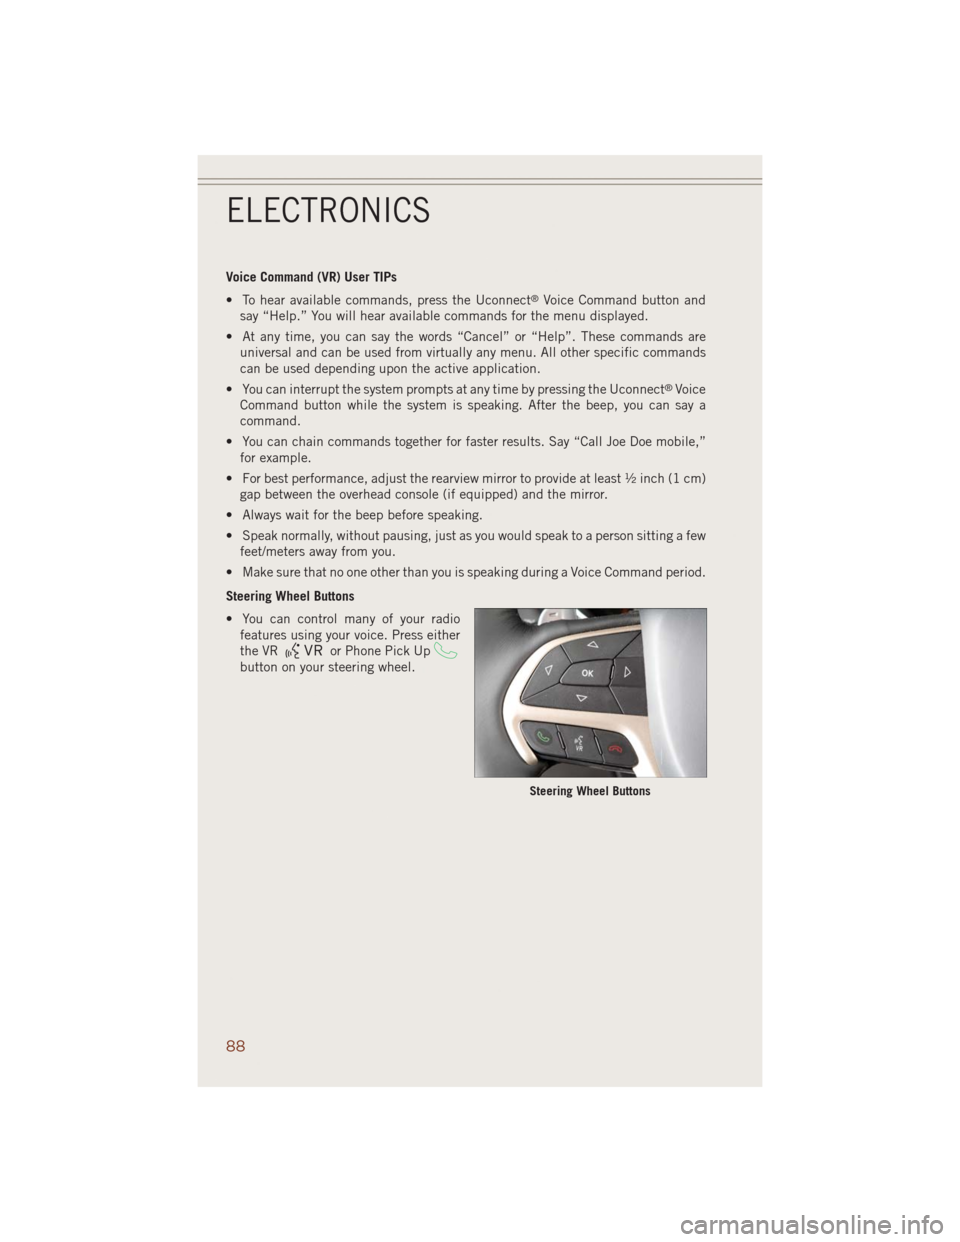
Steering Wheel Buttons
• You can control many of your radio
features using your voice. Press either
the VR
or Phone Pick Up
button on your steering wheel.
Steering Wheel Buttons
ELECTRONICS
88
Page 93 of 220
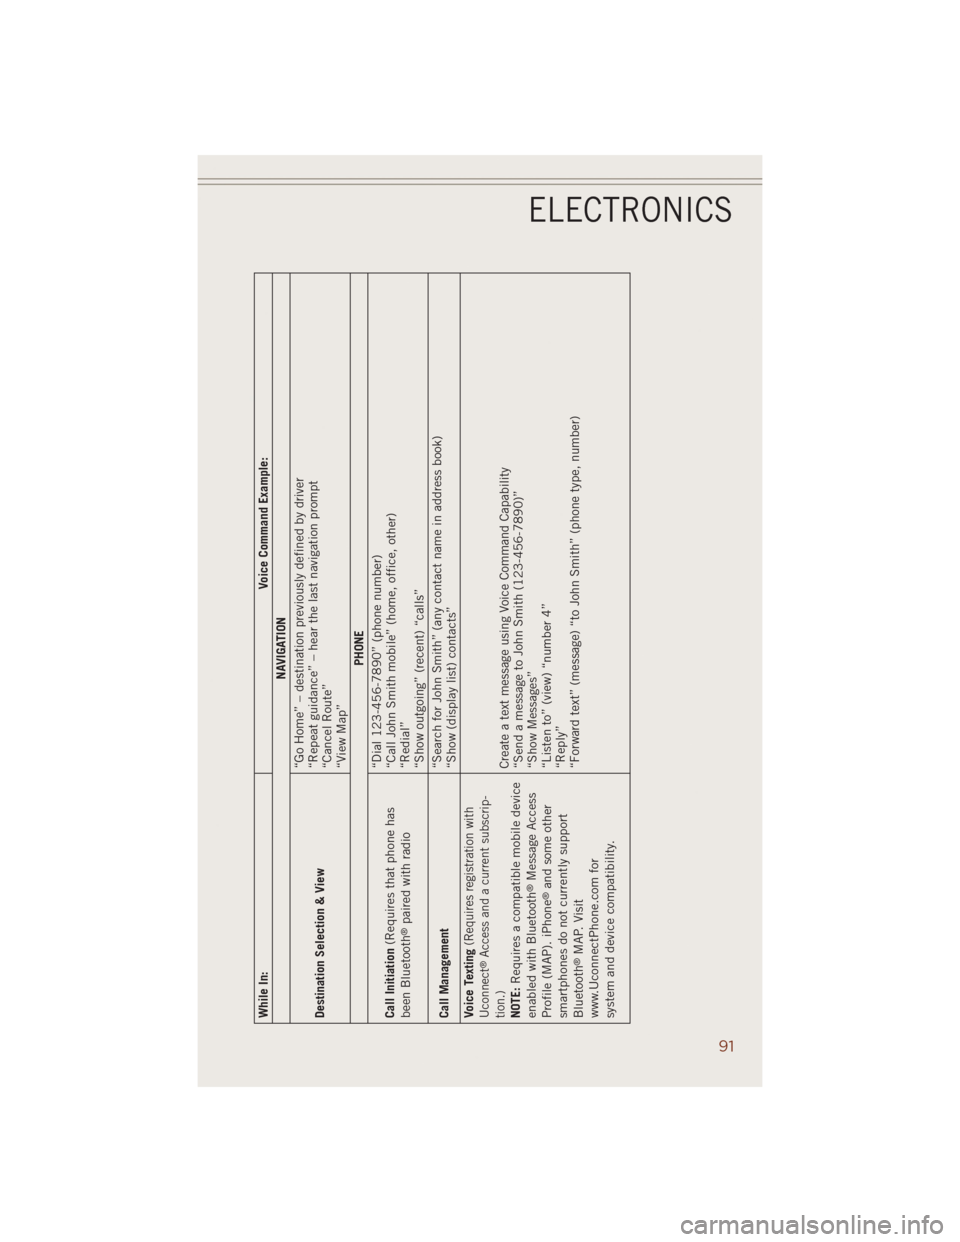
While In: Voice Command Example:
NAVIGATION
Destination Selection & View“Go Home” – destination previously defined by driver
“Repeat guidance” – hear the last navigation prompt
“Cancel Route”
“View Map”
PHONE
Call Initiation(Requires that phone has
been Bluetooth
®paired with radio“Dial 123-456-7890” (phone number)
“Call John Smith mobile” (home, office, other)
“Redial”
“Show outgoing” (recent) “calls”
Call Management“Search for John Smith” (any contact name in address book)
“Show (display list) contacts”
Voice Texting
(Requires registration with
Uconnect
®Access and a current subscrip-
tion.)
NOTE:Requires a compatible mobile device
enabled with Bluetooth
®Message Access
Profile (MAP). iPhone
®and some other
smartphones do not currently support
Bluetooth
®MAP. Visit
www.UconnectPhone.com for
system and device compatibility.Create a text message using Voice Command Capability
“Send a message to John Smith (123-456-7890)”
“Show Messages”
“Listen to” (view) “number 4”
“Reply”
“Forward text” (message) “to John Smith” (phone type, number)
ELECTRONICS
91
Page 95 of 220
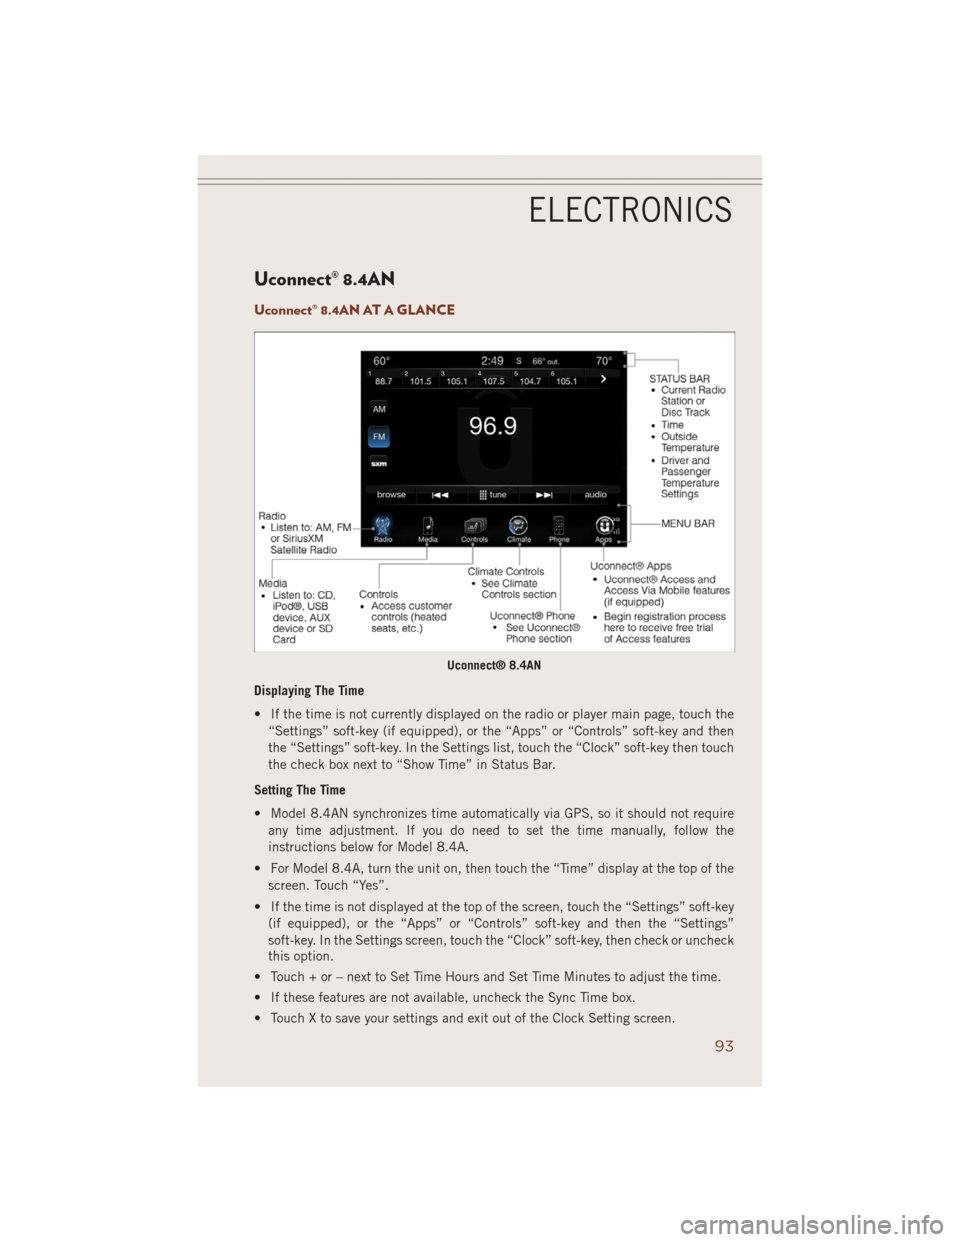
Uconnect® 8.4AN
Uconnect® 8.4AN AT A GLANCE
Displaying The Time
• If the time is not currently displayed on the radio or player main page, touch the
“Settings” soft-key (if equipped), or the “Apps” or “Controls” soft-key and then
the “Settings” soft-key. In the Settings list, touch the “Clock” soft-key then touch
the check box next to “Show Time” in Status Bar.
Setting The Time
• Model 8.4AN synchronizes time automatically via GPS, so it should not require
any time adjustment. If you do need to set the time manually, follow the
instructions below for Model 8.4A.
• For Model 8.4A, turn the unit on, then touch the “Time” display at the top of the
screen. Touch “Yes”.
• If the time is not displayed at the top of the screen, touch the “Settings” soft-key
(if equipped), or the “Apps” or “Controls” soft-key and then the “Settings”
soft-key. In the Settings screen, touch the “Clock” soft-key, then check or uncheck
this option.
• Touch + or – next to Set Time Hours and Set Time Minutes to adjust the time.
• If these features are not available, uncheck the Sync Time box.
• Touch X to save your settings and exit out of the Clock Setting screen.
Uconnect® 8.4AN
ELECTRONICS
93