tow JEEP GRAND CHEROKEE 2014 WK2 / 4.G Owner's Guide
[x] Cancel search | Manufacturer: JEEP, Model Year: 2014, Model line: GRAND CHEROKEE, Model: JEEP GRAND CHEROKEE 2014 WK2 / 4.GPages: 220, PDF Size: 6.12 MB
Page 171 of 220
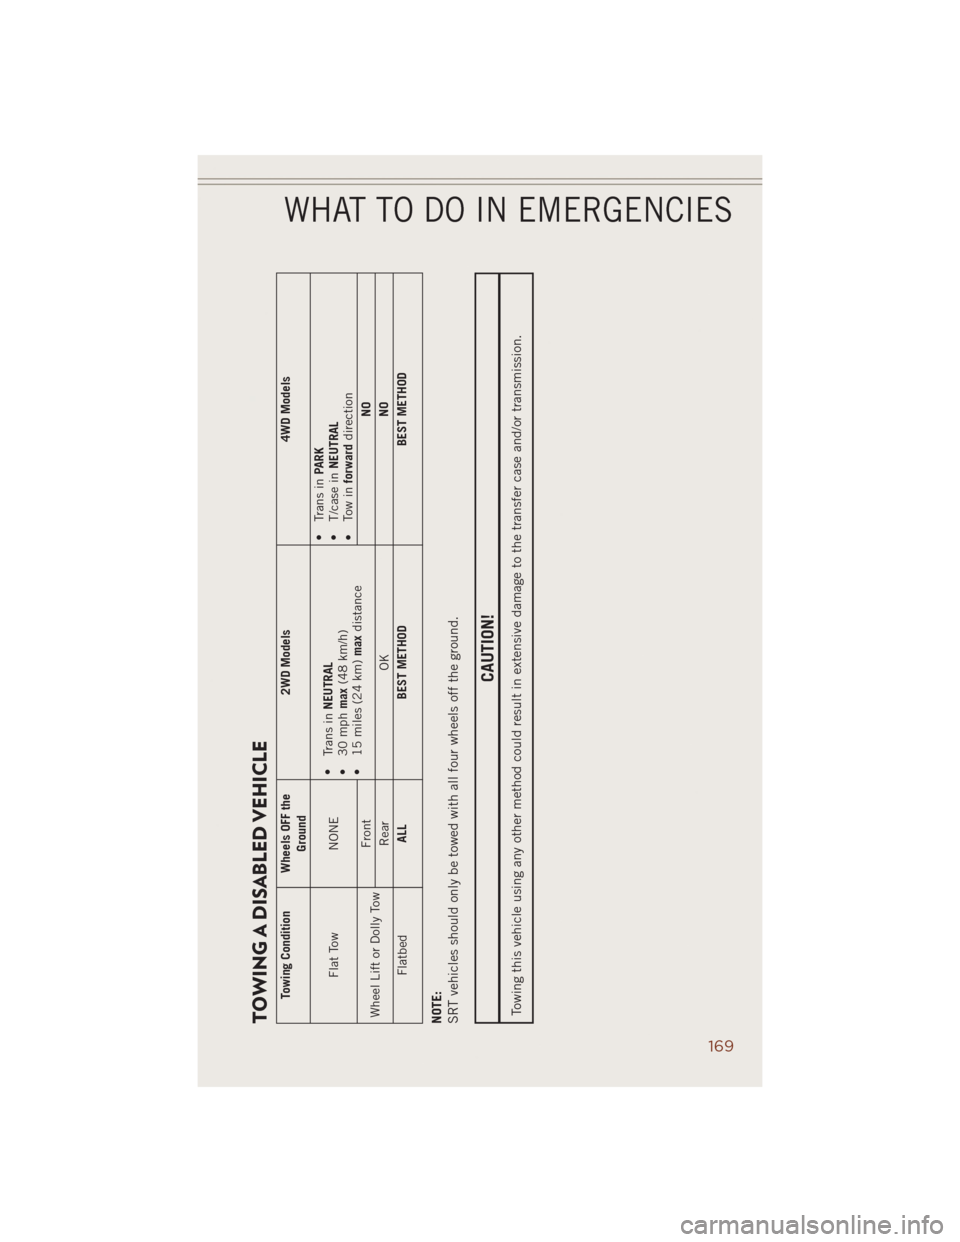
TOWING A DISABLED VEHICLE
Towing Condition Wheels OFF the
Ground2WD Models 4WD Models
Flat Tow NONE•
Trans inNEUTRAL
• 30 mphmax(48 km/h)
• 15 miles (24 km)maxdistance•
Trans inPARK
• T/case inNEUTRAL
• Tow inforwarddirection
Wheel Lift or Dolly TowFrontNO
Rear OKNO
FlatbedALL BEST METHOD BEST METHOD
NOTE:
SRT vehicles should only be towed with all four wheels off the ground.
CAUTION!
Towing this vehicle using any other method could result in extensive damage to the transfer case and/or transmission.
WHAT TO DO IN EMERGENCIES
169
Page 179 of 220
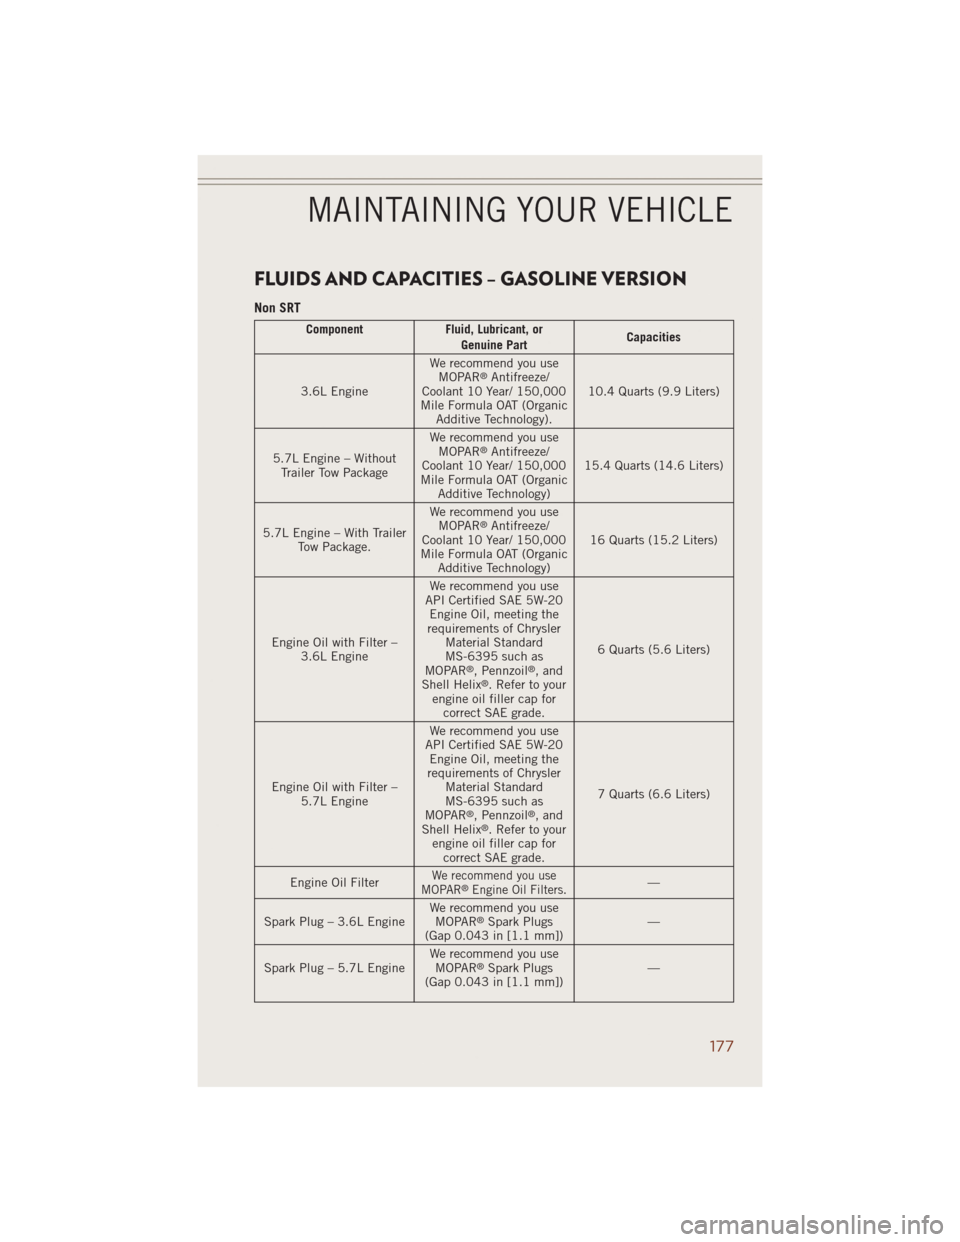
FLUIDS AND CAPACITIES – GASOLINE VERSION
Non SRT
Component Fluid, Lubricant, or
Genuine PartCapacities
3.6L EngineWe recommend you use
MOPAR
®Antifreeze/
Coolant 10 Year/ 150,000
Mile Formula OAT (Organic
Additive Technology).10.4 Quarts (9.9 Liters)
5.7L Engine – Without
Trailer Tow PackageWe recommend you use
MOPAR
®Antifreeze/
Coolant 10 Year/ 150,000
Mile Formula OAT (Organic
Additive Technology)15.4 Quarts (14.6 Liters)
5.7L Engine – With Trailer
Tow Package.We recommend you use
MOPAR
®Antifreeze/
Coolant 10 Year/ 150,000
Mile Formula OAT (Organic
Additive Technology)16 Quarts (15.2 Liters)
Engine Oil with Filter –
3.6L EngineWe recommend you use
API Certified SAE 5W-20
Engine Oil, meeting the
requirements of Chrysler
Material Standard
MS-6395 such as
MOPAR
®, Pennzoil®,and
Shell Helix®. Refer to your
engine oil filler cap for
correct SAE grade.6 Quarts (5.6 Liters)
Engine Oil with Filter –
5.7L EngineWe recommend you use
API Certified SAE 5W-20
Engine Oil, meeting the
requirements of Chrysler
Material Standard
MS-6395 such as
MOPAR
®, Pennzoil®,and
Shell Helix®. Refer to your
engine oil filler cap for
correct SAE grade.7 Quarts (6.6 Liters)
Engine Oil Filter
We recommend you use
MOPAR®Engine Oil Filters.—
Spark Plug – 3.6L EngineWe recommend you use
MOPAR
®Spark Plugs
(Gap 0.043 in [1.1 mm])—
Spark Plug – 5.7L EngineWe recommend you use
MOPAR
®Spark Plugs
(Gap 0.043 in [1.1 mm])—
MAINTAINING YOUR VEHICLE
177
Page 186 of 220
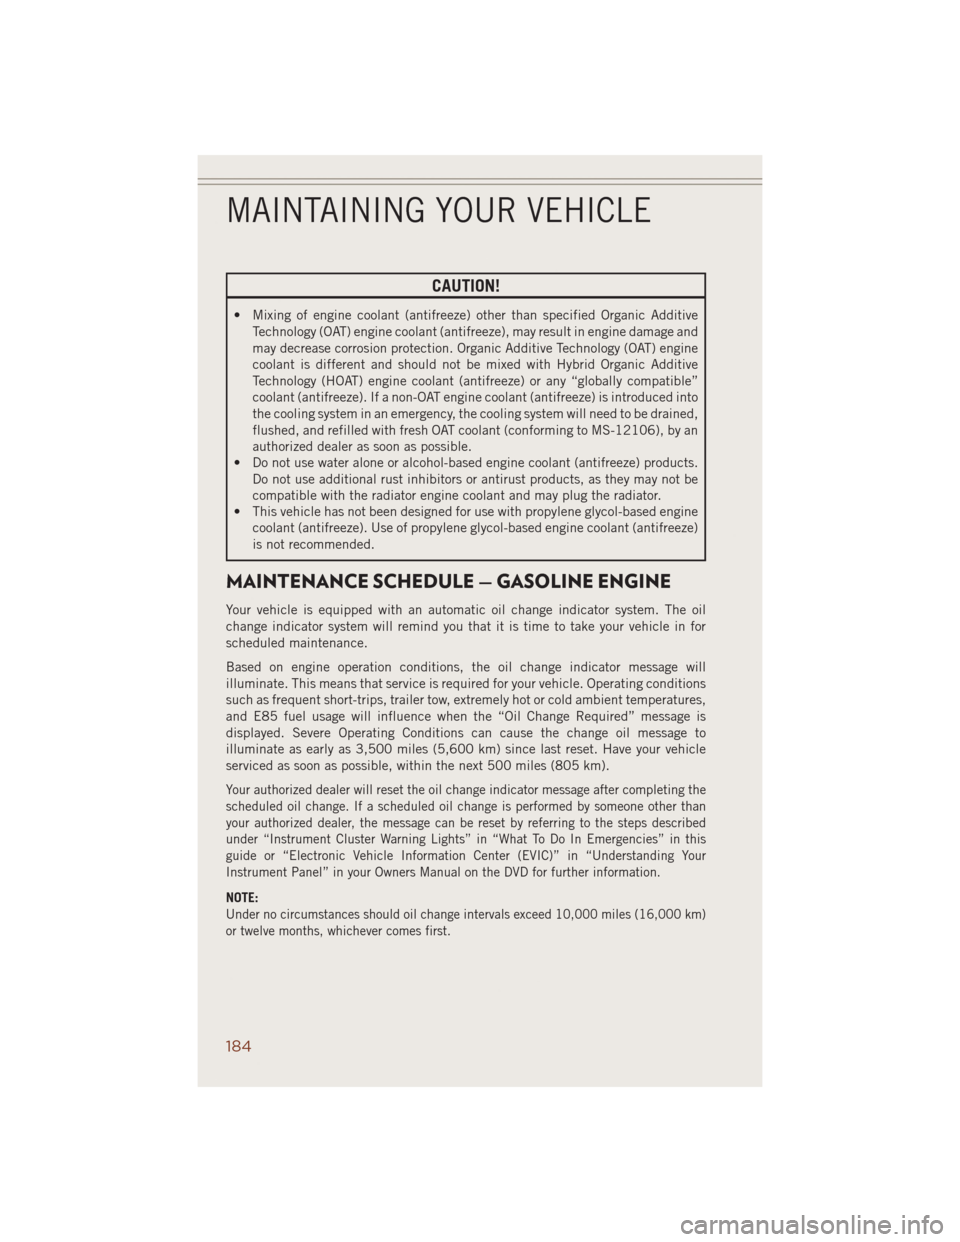
CAUTION!
• Mixing of engine coolant (antifreeze) other than specified Organic Additive
Technology (OAT) engine coolant (antifreeze), may result in engine damage and
may decrease corrosion protection. Organic Additive Technology (OAT) engine
coolant is different and should not be mixed with Hybrid Organic Additive
Technology (HOAT) engine coolant (antifreeze) or any “globally compatible”
coolant (antifreeze). If a non-OAT engine coolant (antifreeze) is introduced into
the cooling system in an emergency, the cooling system will need to be drained,
flushed, and refilled with fresh OAT coolant (conforming to MS-12106), by an
authorized dealer as soon as possible.
• Do not use water alone or alcohol-based engine coolant (antifreeze) products.
Do not use additional rust inhibitors or antirust products, as they may not be
compatible with the radiator engine coolant and may plug the radiator.
• This vehicle has not been designed for use with propylene glycol-based engine
coolant (antifreeze). Use of propylene glycol-based engine coolant (antifreeze)
is not recommended.
MAINTENANCE SCHEDULE — GASOLINE ENGINE
Your vehicle is equipped with an automatic oil change indicator system. The oil
change indicator system will remind you that it is time to take your vehicle in for
scheduled maintenance.
Based on engine operation conditions, the oil change indicator message will
illuminate. This means that service is required for your vehicle. Operating conditions
such as frequent short-trips, trailer tow, extremely hot or cold ambient temperatures,
and E85 fuel usage will influence when the “Oil Change Required” message is
displayed. Severe Operating Conditions can cause the change oil message to
illuminate as early as 3,500 miles (5,600 km) since last reset. Have your vehicle
serviced as soon as possible, within the next 500 miles (805 km).
Your authorized dealer will reset the oil change indicator message after completing the
scheduled oil change. If a scheduled oil change is performed by someone other than
your authorized dealer, the message can be reset by referring to the steps described
under “Instrument Cluster Warning Lights” in “What To Do In Emergencies” in this
guide or “Electronic Vehicle Information Center (EVIC)” in “Understanding Your
Instrument Panel” in your Owners Manual on the DVD for further information.
NOTE:
Under no circumstances should oil change intervals exceed 10,000 miles (16,000 km)
or twelve months, whichever comes first.
MAINTAINING YOUR VEHICLE
184
Page 188 of 220
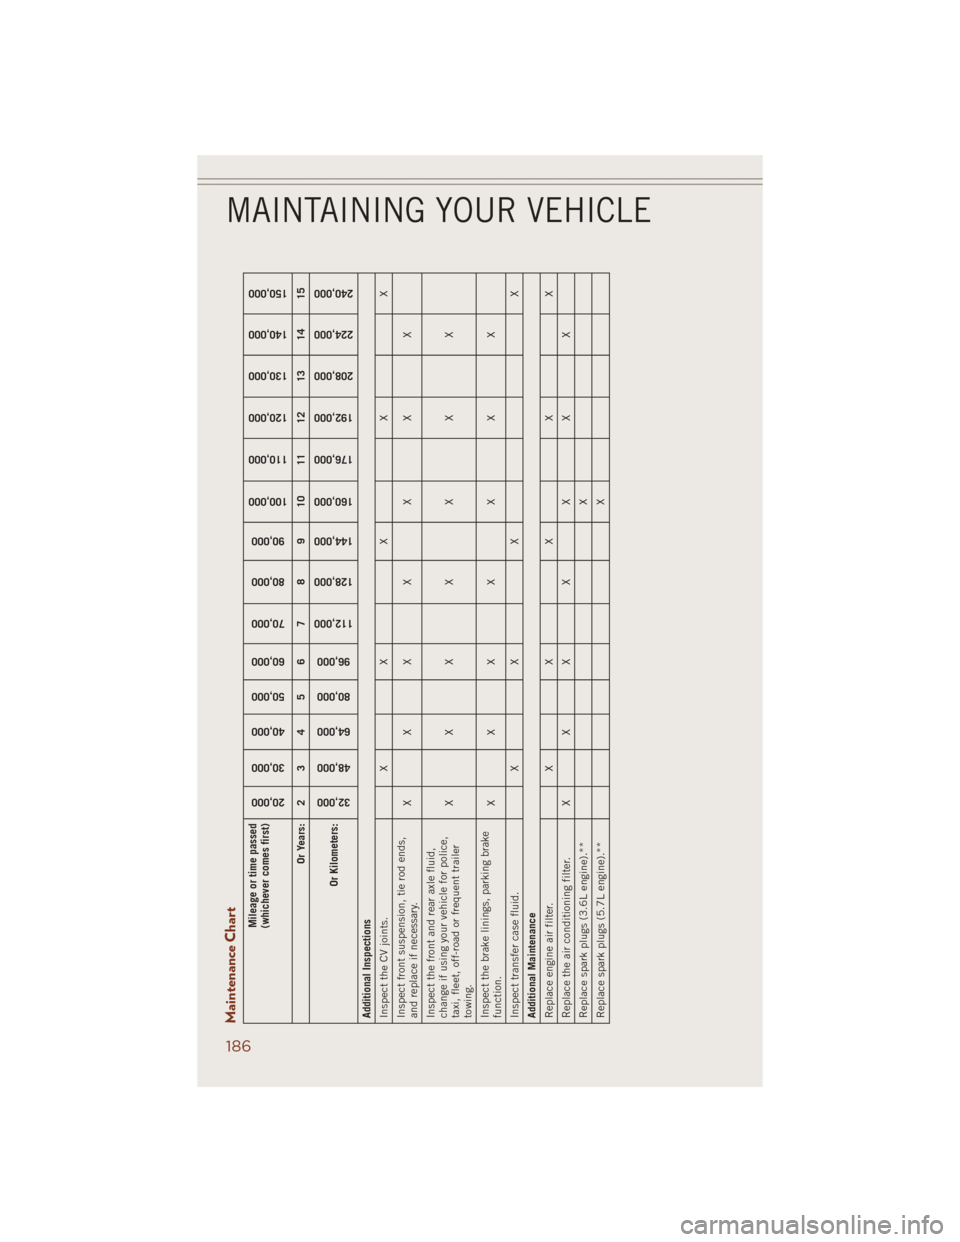
Maintenance Chart
Mileage or time passed
(whichever comes first)
20,000
30,000
40,000
50,000
60,000
70,000
80,000
90,000
100,000
110,000
120,000
130,000
140,000
150,000
Or Years: 2 3 4 5 6 7 8 9 10 11 12 13 14 15
Or Kilometers:
32,000
48,000
64,000
80,000
96,000
112,000
128,000
144,000
160,000
176,000
192,000
208,000
224,000
240,000
Additional Inspections
Inspect the CV joints. X X X X X
Inspect front suspension, tie rod ends,
and replace if necessary.XXX X X X X
Inspect the front and rear axle fluid,
change if using your vehicle for police,
taxi, fleet, off-road or frequent trailer
towing.XXX X X X X
Inspect the brake linings, parking brake
function.XXX X X X X
Inspect transfer case fluid. X X X X
Additional Maintenance
Replace engine air filter. X X X X X
Replace the air conditioning filter. X X X X X X X
Replace spark plugs (3.6L engine).** X
Replace spark plugs (5.7L engine).** X
MAINTAINING YOUR VEHICLE
186
Page 193 of 220
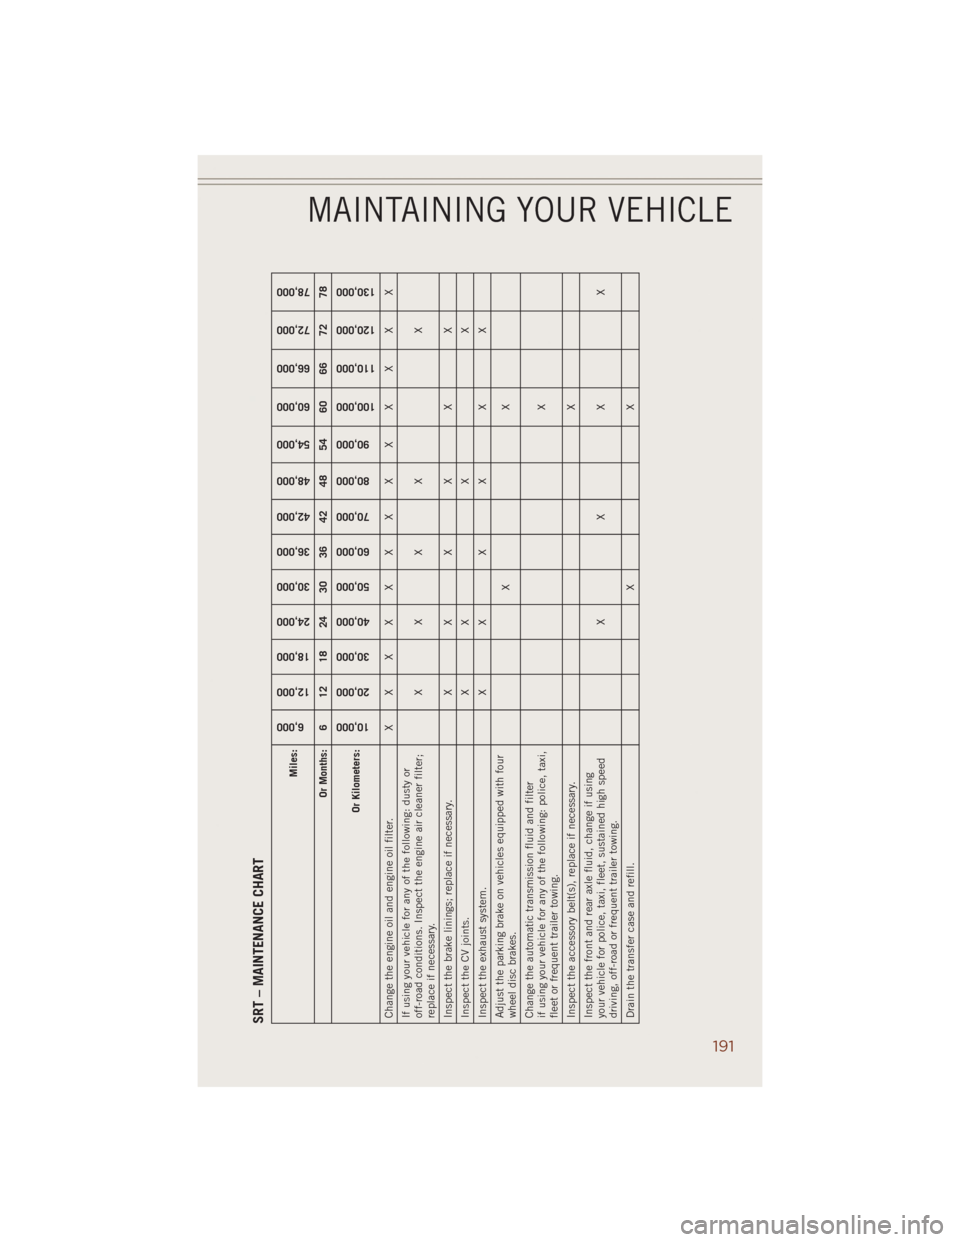
SRT – MAINTENANCE CHART
Miles:
6,000
12,000
18,000
24,000
30,000
36,000
42,000
48,000
54,000
60,000
66,000
72,000
78,000
Or Months: 6 12 18 24 30 36 42 48 54 60 66 72 78
Or Kilometers:
10,000
20,000
30,000
40,000
50,000
60,000
70,000
80,000
90,000
100,000
110,000
120,000
130,000
Change the engine oil and engine oil filter. X X X X X X X X X X X X X
If using your vehicle for any of the following: dusty or
off-road conditions. Inspect the engine air cleaner filter;
replace if necessary.XXX X X
Inspect the brake linings; replace if necessary. X X X X X X
Inspect the CV joints. X X X X
Inspect the exhaust system. X X X X X X
Adjust the parking brake on vehicles equipped with four
wheel disc brakes.XX
Change the automatic transmission fluid and filter
if using your vehicle for any of the following: police, taxi,
fleet or frequent trailer towing.X
Inspect the accessory belt(s), replace if necessary.X
Inspect the front and rear axle fluid, change if using
your vehicle for police, taxi, fleet, sustained high speed
driving, off-road or frequent trailer towing.XX X X
Drain the transfer case and refill. X X
MAINTAINING YOUR VEHICLE
191
Page 196 of 220
MAINTENANCE SCHEDULE — DIESEL ENGINE
Your vehicle is equipped with an automatic oil change indicator system. The oil
change indicator system will remind you that it is time to take your vehicle in for
scheduled maintenance.
Based on engine operation conditions, the oil change indicator message will
illuminate. This means that service is required for your vehicle. Operating conditions
such as frequent short-trips, trailer tow, extremely hot or cold ambient temperatures
will influence when the “Oil Change Required” message is displayed. Severe
Operating Conditions can cause the change oil message to illuminate as early as
3,500 miles (5,600 km) since last reset. Have your vehicle serviced as soon as
possible, within the next 500 miles (805 km).
Your authorized dealer will reset the oil change indicator message after completing
the scheduled oil change. If a scheduled oil change is performed by someone other
than your authorized dealer, the message can be reset by referring to the steps
described under “Electronic Vehicle Information Center (EVIC)/Oil Change Re-
quired” in “Understanding Your Instrument Panel” for further information
NOTE:
Under no circumstances should oil change intervals exceed 10,000 miles (16,000 km)
or twelve months, whichever comes first.
Engine Oil Filter Replacement
Residual oil in the housing may spill from the housing when the new filter is installed if
the residual oil is not either removed from the housing or enough time has not elapsed
to allow the oil to drain back into the engine. When servicing the oil filter on this engine,
carefully remove the filter and use a suction gun to remove any residual oil left in the
housing or wait about 30 minutes for the oil to drain back into the engine.
MAINTAINING YOUR VEHICLE
194
Page 198 of 220
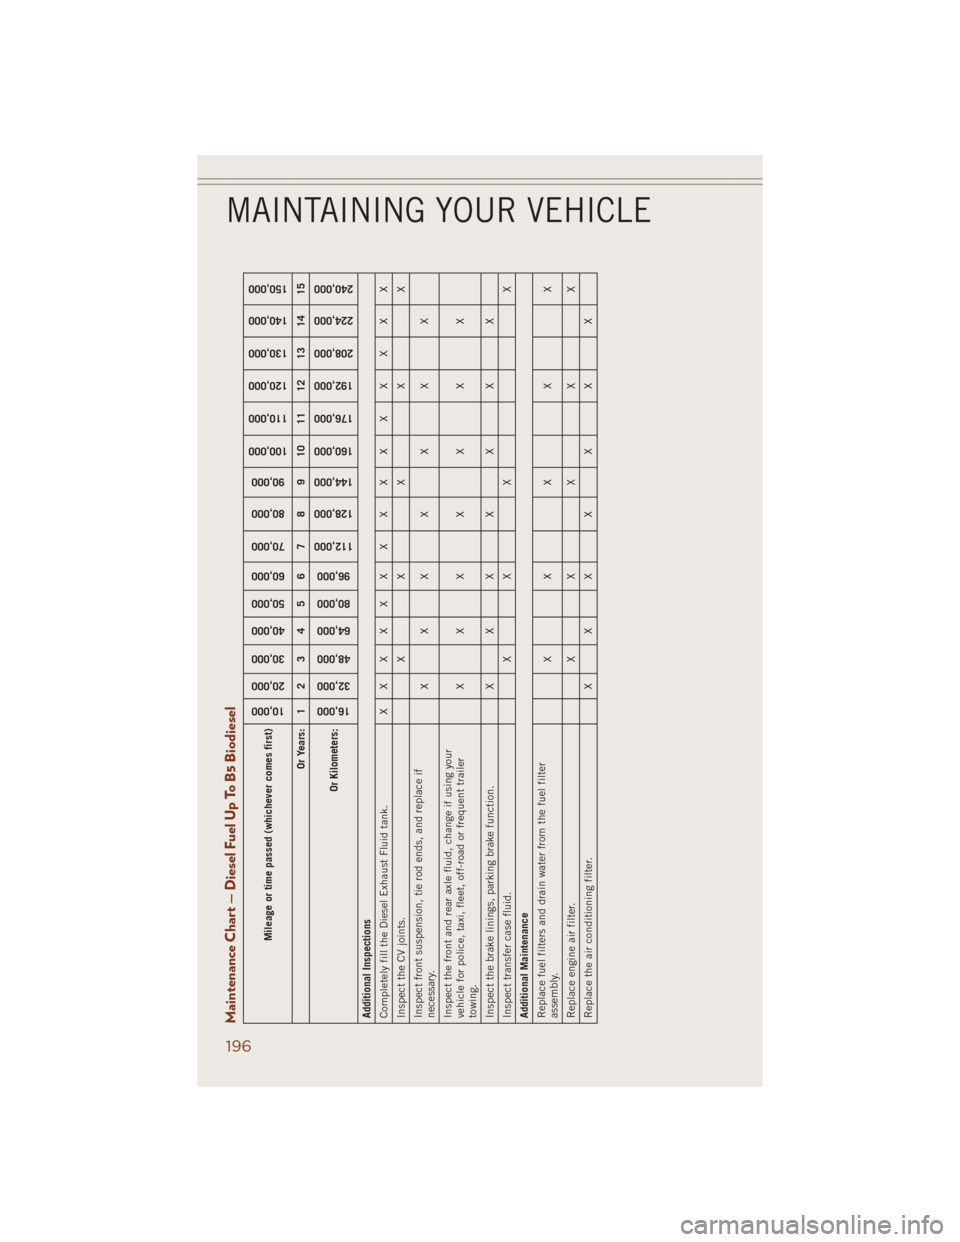
Maintenance Chart — Diesel Fuel Up To B5 Biodiesel
Mileage or time passed (whichever comes first)
10,000
20,000
30,000
40,000
50,000
60,000
70,000
80,000
90,000
100,000
110,000
120,000
130,000
140,000
150,000
Or Years: 1 2 3 4 5 6 7 8 9 10 11 12 13 14 15
Or Kilometers:
16,000
32,000
48,000
64,000
80,000
96,000
112,000
128,000
144,000
160,000
176,000
192,000
208,000
224,000
240,000
Additional Inspections
Completely fill the Diesel Exhaust Fluid tank. X X X X X X X X X X X X X X X
Inspect the CV joints. X X X X X
Inspect front suspension, tie rod ends, and replace if
necessary.XXX X X X X
Inspect the front and rear axle fluid, change if using your
vehicle for police, taxi, fleet, off-road or frequent trailer
towing.XXX X X X X
Inspect the brake linings, parking brake function. X X X X X X X
Inspect transfer case fluid. X X X X
Additional Maintenance
Replace fuel filters and drain water from the fuel filter
assembly.XX X X X
Replace engine air filter. X X X X X
Replace the air conditioning filter. X X X X X X X
MAINTAINING YOUR VEHICLE
196
Page 203 of 220
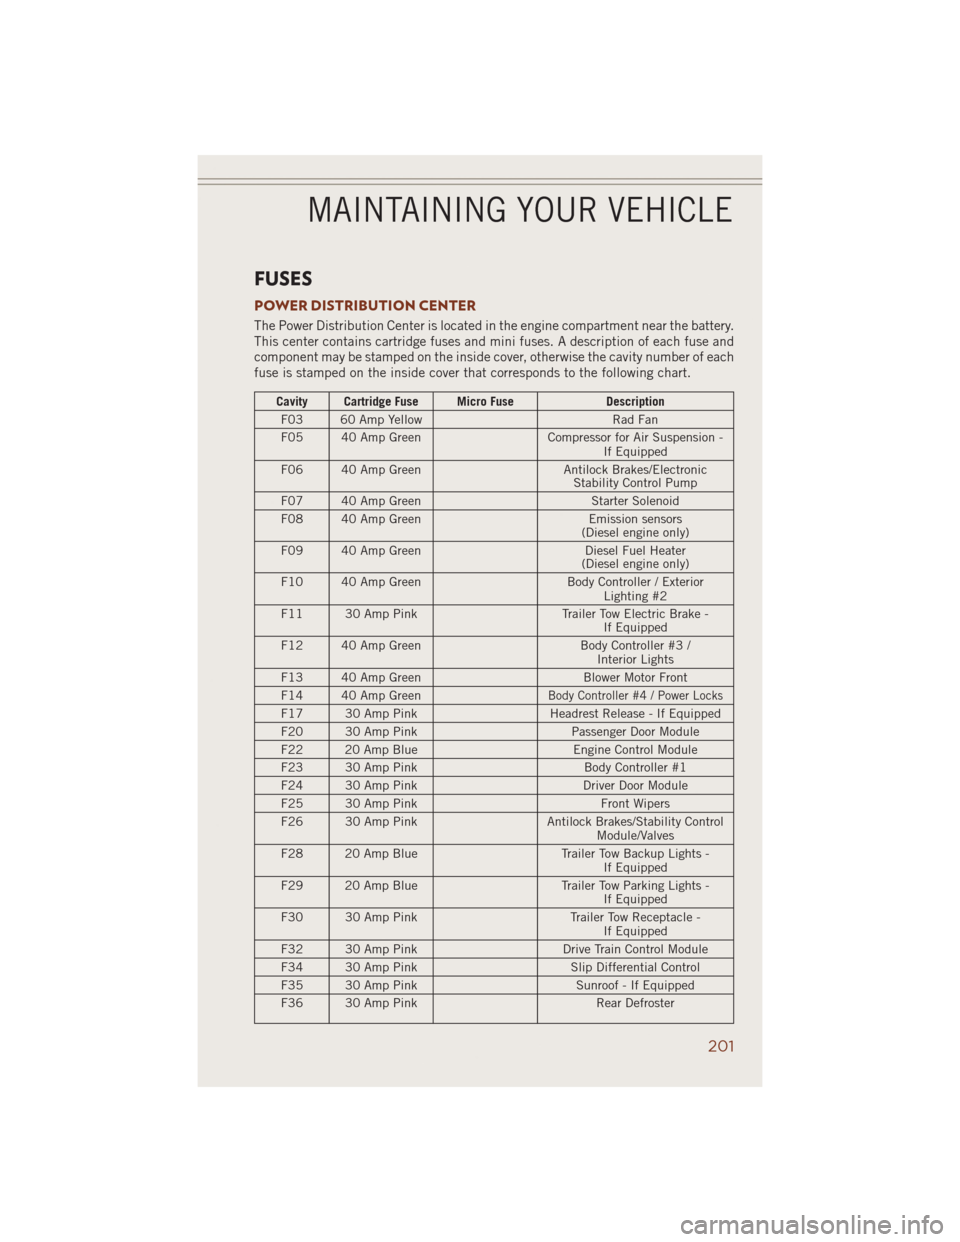
FUSES
POWER DISTRIBUTION CENTER
The Power Distribution Center is located in the engine compartment near the battery.
This center contains cartridge fuses and mini fuses. A description of each fuse and
component may be stamped on the inside cover, otherwise the cavity number of each
fuse is stamped on the inside cover that corresponds to the following chart.
Cavity Cartridge Fuse Micro Fuse Description
F03 60 Amp Yellow Rad Fan
F05 40 Amp Green Compressor for Air Suspension -
If Equipped
F06 40 Amp Green Antilock Brakes/Electronic
Stability Control Pump
F07 40 Amp Green Starter Solenoid
F08 40 Amp Green Emission sensors
(Diesel engine only)
F09 40 Amp Green Diesel Fuel Heater
(Diesel engine only)
F10 40 Amp Green Body Controller / Exterior
Lighting #2
F11 30 Amp Pink Trailer Tow Electric Brake -
If Equipped
F12 40 Amp Green Body Controller #3 /
Interior Lights
F13 40 Amp Green Blower Motor Front
F14 40 Amp Green
Body Controller #4 / Power Locks
F17 30 Amp Pink Headrest Release - If Equipped
F20 30 Amp Pink Passenger Door Module
F22 20 Amp Blue Engine Control Module
F23 30 Amp Pink Body Controller #1
F24 30 Amp Pink Driver Door Module
F25 30 Amp Pink Front Wipers
F26 30 Amp Pink Antilock Brakes/Stability Control
Module/Valves
F28 20 Amp Blue Trailer Tow Backup Lights -
If Equipped
F29 20 Amp Blue Trailer Tow Parking Lights -
If Equipped
F30 30 Amp Pink Trailer Tow Receptacle -
If Equipped
F32 30 Amp Pink Drive Train Control Module
F34 30 Amp Pink Slip Differential Control
F35 30 Amp Pink Sunroof - If Equipped
F36 30 Amp Pink Rear Defroster
MAINTAINING YOUR VEHICLE
201
Page 204 of 220
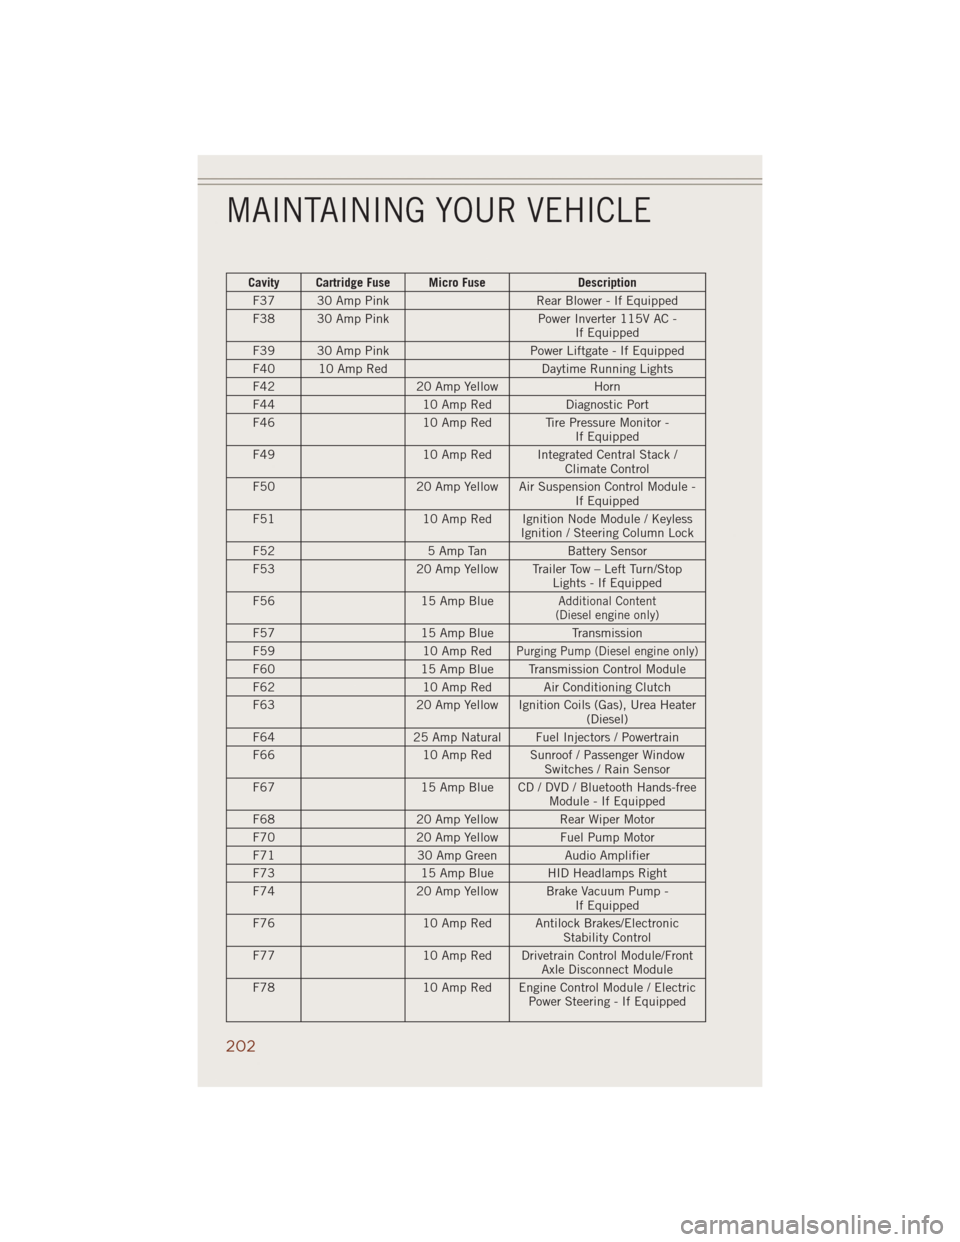
Cavity Cartridge Fuse Micro Fuse Description
F37 30 Amp Pink Rear Blower - If Equipped
F38 30 Amp Pink Power Inverter 115V AC -
If Equipped
F39 30 Amp Pink Power Liftgate - If Equipped
F40 10 Amp Red Daytime Running Lights
F42 20 Amp Yellow Horn
F44 10 Amp Red Diagnostic Port
F46 10 Amp Red Tire Pressure Monitor -
If Equipped
F49 10 Amp Red Integrated Central Stack /
Climate Control
F50 20 Amp Yellow Air Suspension Control Module -
If Equipped
F51 10 Amp Red Ignition Node Module / Keyless
Ignition / Steering Column Lock
F52 5 Amp Tan Battery Sensor
F53 20 Amp Yellow Trailer Tow – Left Turn/Stop
Lights - If Equipped
F56 15 Amp Blue
Additional Content
(Diesel engine only)
F57 15 Amp Blue Transmission
F59 10 Amp Red
Purging Pump (Diesel engine only)
F60 15 Amp Blue Transmission Control Module
F62 10 Amp Red Air Conditioning Clutch
F63 20 Amp Yellow Ignition Coils (Gas), Urea Heater
(Diesel)
F64 25 Amp Natural Fuel Injectors / Powertrain
F66 10 Amp Red Sunroof / Passenger Window
Switches / Rain Sensor
F67 15 Amp Blue CD / DVD / Bluetooth Hands-free
Module - If Equipped
F68 20 Amp Yellow Rear Wiper Motor
F70 20 Amp Yellow Fuel Pump Motor
F71 30 Amp Green Audio Amplifier
F73 15 Amp Blue HID Headlamps Right
F74 20 Amp Yellow Brake Vacuum Pump -
If Equipped
F76 10 Amp Red Antilock Brakes/Electronic
Stability Control
F77 10 Amp Red Drivetrain Control Module/Front
Axle Disconnect Module
F78 10 Amp Red Engine Control Module / Electric
Power Steering - If Equipped
MAINTAINING YOUR VEHICLE
202
Page 205 of 220
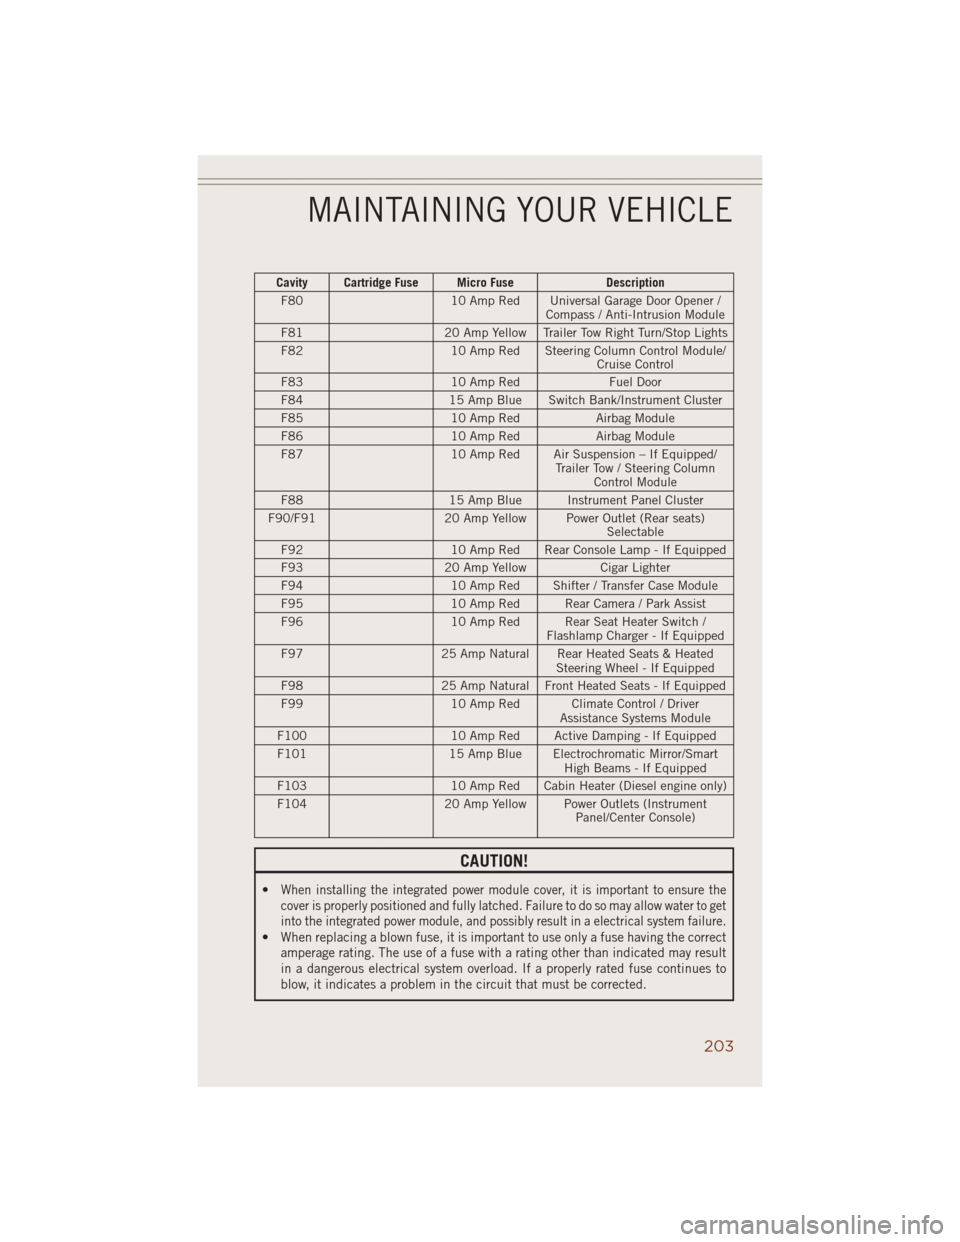
Cavity Cartridge Fuse Micro Fuse Description
F80 10 Amp Red Universal Garage Door Opener /
Compass / Anti-Intrusion Module
F81 20 Amp Yellow Trailer Tow Right Turn/Stop Lights
F82 10 Amp Red Steering Column Control Module/
Cruise Control
F83 10 Amp Red Fuel Door
F84 15 Amp Blue Switch Bank/Instrument Cluster
F85 10 Amp Red Airbag Module
F86 10 Amp Red Airbag Module
F87 10 Amp Red Air Suspension – If Equipped/
Trailer Tow / Steering Column
Control Module
F88 15 Amp Blue Instrument Panel Cluster
F90/F91 20 Amp Yellow Power Outlet (Rear seats)
Selectable
F92 10 Amp Red Rear Console Lamp - If Equipped
F93 20 Amp Yellow Cigar Lighter
F94 10 Amp Red Shifter / Transfer Case Module
F95 10 Amp Red Rear Camera / Park Assist
F96 10 Amp Red Rear Seat Heater Switch /
Flashlamp Charger - If Equipped
F97 25 Amp Natural Rear Heated Seats & Heated
Steering Wheel - If Equipped
F98 25 Amp Natural Front Heated Seats - If Equipped
F99 10 Amp Red Climate Control / Driver
Assistance Systems Module
F100 10 Amp Red Active Damping - If Equipped
F101 15 Amp Blue Electrochromatic Mirror/Smart
High Beams - If Equipped
F103 10 Amp Red Cabin Heater (Diesel engine only)
F104 20 Amp Yellow Power Outlets (Instrument
Panel/Center Console)
CAUTION!
•When installing the integrated power module cover, it is important to ensure the
cover is properly positioned and fully latched. Failure to do so may allow water to get
into the integrated power module, and possibly result in a electrical system failure.
•When replacing a blown fuse, it is important to use only a fuse having the correct
amperage rating. The use of a fuse with a rating other than indicated may result
in a dangerous electrical system overload. If a properly rated fuse continues to
blow, it indicates a problem in the circuit that must be corrected.
MAINTAINING YOUR VEHICLE
203