light JEEP GRAND CHEROKEE 2014 WK2 / 4.G User Guide
[x] Cancel search | Manufacturer: JEEP, Model Year: 2014, Model line: GRAND CHEROKEE, Model: JEEP GRAND CHEROKEE 2014 WK2 / 4.GPages: 220, PDF Size: 6.12 MB
Page 3 of 220
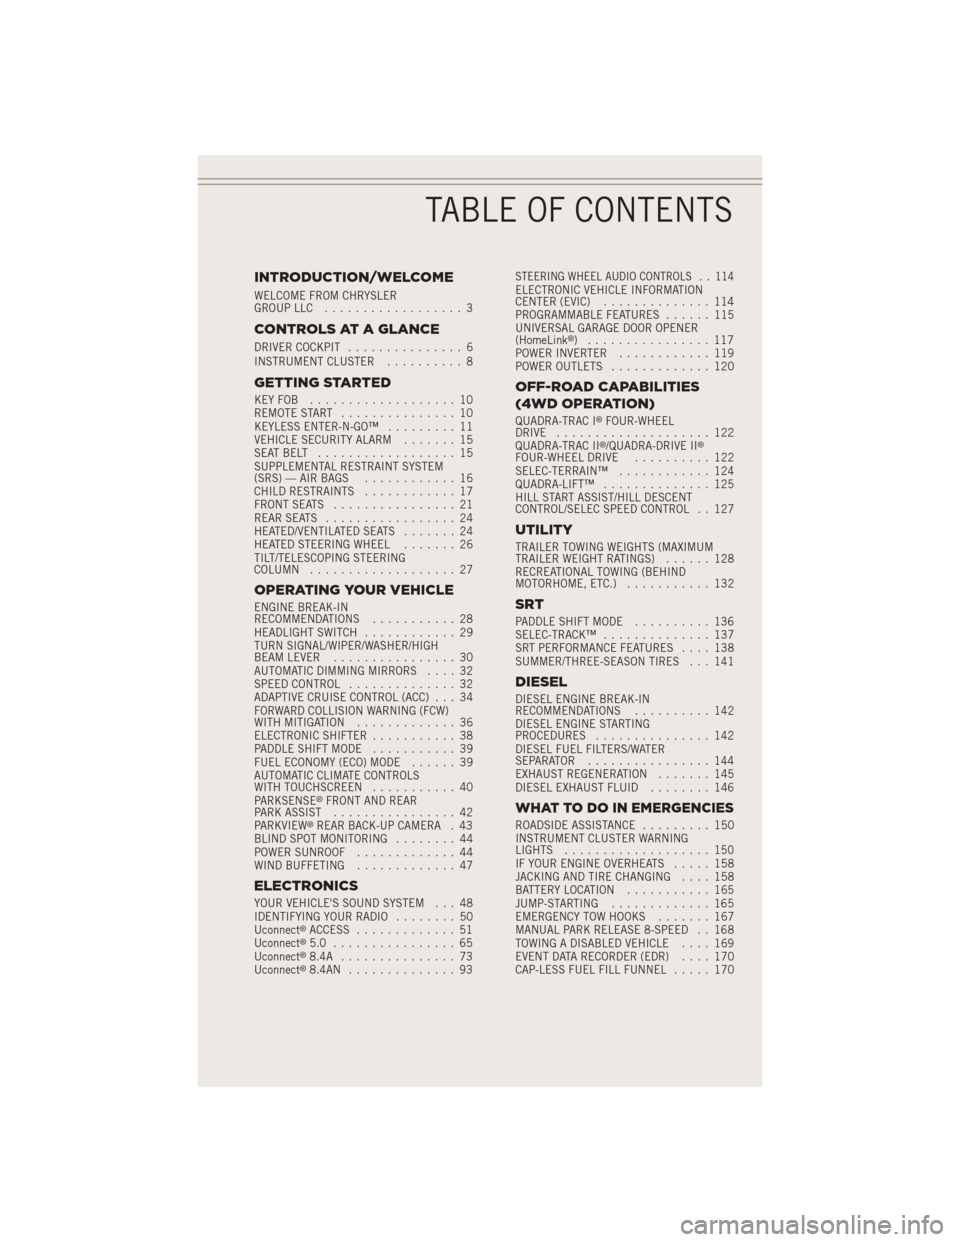
INTRODUCTION/WELCOME
WELCOME FROM CHRYSLER
GROUP LLC.................. 3
CONTROLS AT A GLANCE
DRIVER COCKPIT............... 6
INSTRUMENT CLUSTER.......... 8
GETTING STARTED
KEYFOB ................... 10
REMOTE START............... 10
KEYLESS ENTER-N-GO™......... 11
VEHICLE SECURITY ALARM....... 15
SEATBELT .................. 15
SUPPLEMENTAL RESTRAINT SYSTEM
(SRS) — AIR BAGS............ 16
CHILD RESTRAINTS............ 17
FRONT SEATS................ 21
REAR SEATS................. 24
HEATED/VENTILATED SEATS....... 24
HEATED STEERING WHEEL....... 26
TILT/TELESCOPING STEERING
COLUMN................... 27
OPERATING YOUR VEHICLE
ENGINE BREAK-IN
RECOMMENDATIONS........... 28
HEADLIGHT SWITCH............ 29
TURN SIGNAL/WIPER/WASHER/HIGH
BEAM LEVER................ 30
AUTOMATIC DIMMING MIRRORS.... 32
SPEED CONTROL.............. 32
ADAPTIVE CRUISE CONTROL (ACC) . . . 34
FORWARD COLLISION WARNING (FCW)
WITHMITIGATION ............. 36
ELECTRONIC SHIFTER........... 38
PADDLE SHIFT MODE........... 39
FUEL ECONOMY (ECO) MODE...... 39
AUTOMATIC CLIMATE CONTROLS
WITH TOUCHSCREEN........... 40
PARKSENSE
®FRONT AND REAR
PARK ASSIST................ 42
PARKVIEW
®REAR BACK-UP CAMERA . 43
BLIND SPOT MONITORING........ 44
POWER SUNROOF............. 44
WIND BUFFETING............. 47
ELECTRONICS
YOUR VEHICLE'S SOUND SYSTEM . . . 48
IDENTIFYING YOUR RADIO........ 50
Uconnect
®ACCESS............. 51
Uconnect®5.0 ................ 65
Uconnect®8.4A ............... 73
Uconnect®8.4AN .............. 93
STEERING WHEEL AUDIO CONTROLS . . 114ELECTRONIC VEHICLE INFORMATION
CENTER (EVIC).............. 114
PROGRAMMABLE FEATURES...... 115
UNIVERSAL GARAGE DOOR OPENER
(HomeLink
®) ................ 117
POWER INVERTER............ 119
POWER OUTLETS............. 120
OFF-ROAD CAPABILITIES
(4WD OPERATION)
QUADRA-TRAC I®FOUR-WHEEL
DRIVE .................... 122
QUADRA-TRAC II
®/QUADRA-DRIVE II®FOUR-WHEEL DRIVE.......... 122
SELEC-TERRAIN™............ 124
QUADRA-LIFT™.............. 125
HILL START ASSIST/HILL DESCENT
CONTROL/SELEC SPEED CONTROL . . 127
UTILITY
TRAILER TOWING WEIGHTS (MAXIMUM
TRAILER WEIGHT RATINGS)...... 128
RECREATIONAL TOWING (BEHIND
MOTORHOME, ETC.)........... 132
SRT
PADDLE SHIFT MODE.......... 136
SELEC-TRACK™.............. 137
SRT PERFORMANCE FEATURES.... 138
SUMMER/THREE-SEASON TIRES . . . 141
DIESEL
DIESEL ENGINE BREAK-IN
RECOMMENDATIONS.......... 142
DIESEL ENGINE STARTING
PROCEDURES............... 142
DIESEL FUEL FILTERS/WATER
SEPARATOR ................ 144
EXHAUST REGENERATION....... 145
DIESEL EXHAUST FLUID........ 146
WHAT TO DO IN EMERGENCIES
ROADSIDE ASSISTANCE......... 150
INSTRUMENT CLUSTER WARNING
LIGHTS................... 150
IF YOUR ENGINE OVERHEATS..... 158
JACKING AND TIRE CHANGING.... 158
BATTERY LOCATION........... 165
JUMP-STARTING............. 165
EMERGENCY TOW HOOKS....... 167
MANUAL PARK RELEASE 8-SPEED . . 168
TOWING A DISABLED VEHICLE.... 169
EVENT DATA RECORDER (EDR).... 170
CAP-LESS FUEL FILL FUNNEL..... 170
TABLE OF CONTENTS
Page 8 of 220
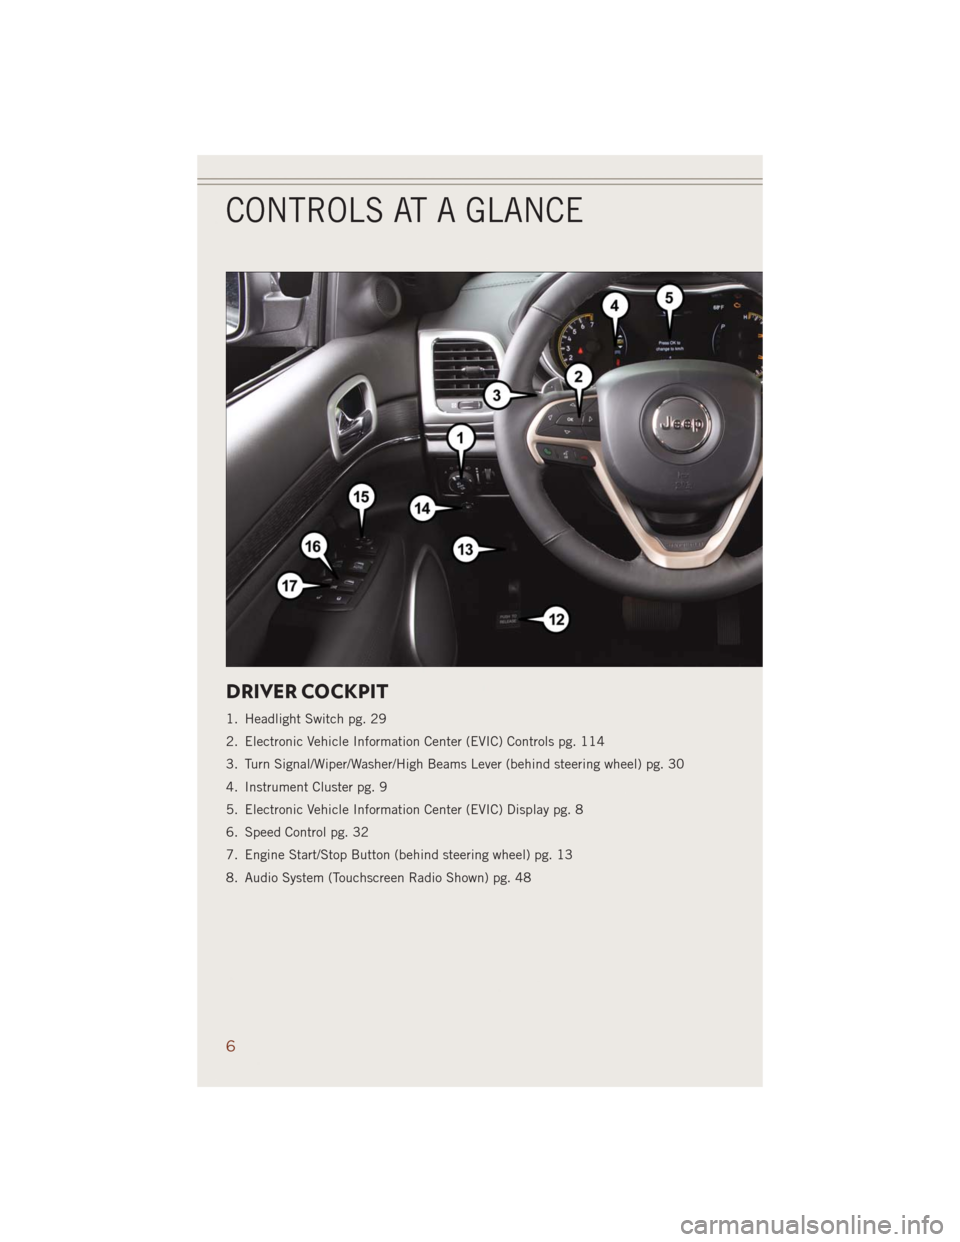
DRIVER COCKPIT
1. Headlight Switch pg. 29
2. Electronic Vehicle Information Center (EVIC) Controls pg. 114
3. Turn Signal/Wiper/Washer/High Beams Lever (behind steering wheel) pg. 30
4. Instrument Cluster pg. 9
5. Electronic Vehicle Information Center (EVIC) Display pg. 8
6. Speed Control pg. 32
7. Engine Start/Stop Button (behind steering wheel) pg. 13
8. Audio System (Touchscreen Radio Shown) pg. 48
CONTROLS AT A GLANCE
6
Page 10 of 220
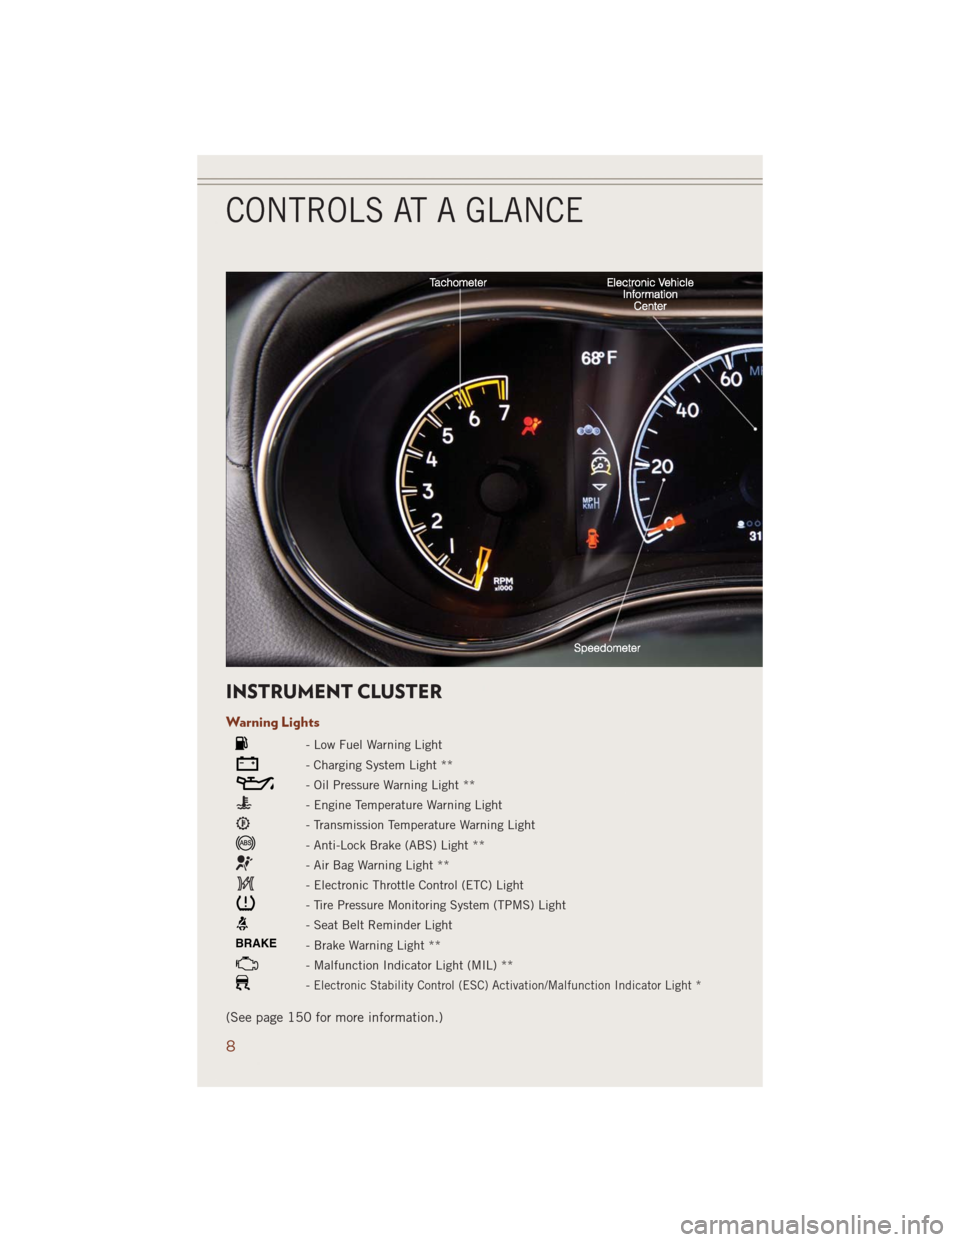
INSTRUMENT CLUSTER
Warning Lights
- Low Fuel Warning Light
- Charging System Light **
- Oil Pressure Warning Light **
- Engine Temperature Warning Light
- Transmission Temperature Warning Light
- Anti-Lock Brake (ABS) Light **
- Air Bag Warning Light **
- Electronic Throttle Control (ETC) Light
- Tire Pressure Monitoring System (TPMS) Light
- Seat Belt Reminder Light
BRAKE- Brake Warning Light **
- Malfunction Indicator Light (MIL) **
-Electronic Stability Control (ESC) Activation/Malfunction Indicator Light *
(See page 150 for more information.)
CONTROLS AT A GLANCE
8
Page 11 of 220
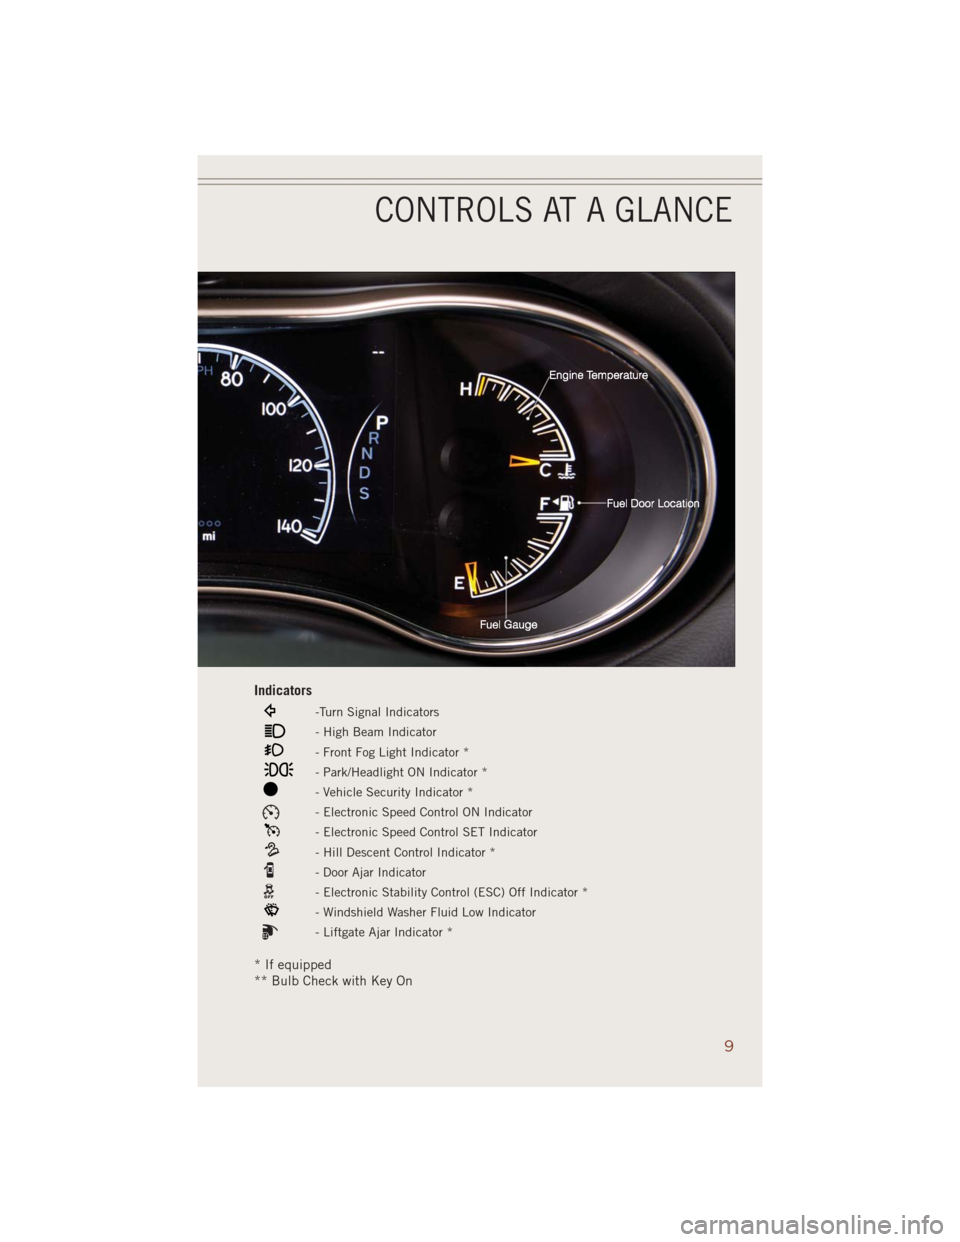
Indicators
-Turn Signal Indicators
- High Beam Indicator
- Front Fog Light Indicator *
- Park/Headlight ON Indicator *
- Vehicle Security Indicator *
- Electronic Speed Control ON Indicator
- Electronic Speed Control SET Indicator
- Hill Descent Control Indicator *
- Door Ajar Indicator
- Electronic Stability Control (ESC) Off Indicator *
- Windshield Washer Fluid Low Indicator
- Liftgate Ajar Indicator *
* If equipped
** Bulb Check with Key On
CONTROLS AT A GLANCE
9
Page 17 of 220
VEHICLE SECURITY ALARM
This Vehicle Security Alarm monitors the doors, liftgate, and ignition switch for
unauthorized operation.
When the alarm is activated, the interior switches for door locks are disabled. The
Vehicle Security Alarm provides both audio and visual signals repeatedly for three
minutes. If the disturbance is still present (driver's door, passenger door, other doors,
ignition) after three minutes, the parking lights and tail lights will flash for an additional
15 minutes.
To A r m
Cycle the Keyless Enter-N-Go™ START/STOP button until the button display indi-
cates that the vehicle ignition is “OFF”. Push the power door lock switch while the
door is open, push the Key Fob LOCK button, or with one of the Key Fobs located
outside the vehicle and within 5 ft (1.5 m) of the driver's and passenger front door
handles, push the Keyless Enter-N-Go™ LOCK button located on the door handle.
NOTE:
After pushing the Keyless Enter-N-Go™ LOCK button, you must wait two seconds
before you can lock or unlock the vehicle via the door handle.
To Disarm
Push the Key Fob UNLOCK button or with one of the Key Fobs located outside the
vehicle and within 5 ft (1.5 m) of the driver's and passenger front door handles, grab
the Keyless Enter-N-Go™ door handle and enter the vehicle, then push the Keyless
Enter-N-Go™ START/STOP button (requires at least one valid Key Fob in the vehicle).
SEAT BELT
Be sure everyone in your vehicle is in a seat and using a seat belt properly.
• Position the lap belt across your thighs, below your abdomen. To remove slack in
the lap portion, pull up a bit on the shoulder belt. To loosen the lap belt if it is too
tight, tilt the latch plate and pull on the lap belt. A snug belt reduces the risk of
sliding under the belt in a collision.
• Position the shoulder belt on your chest so that it is comfortable and not resting
on your neck. The retractor will withdraw any slack in the belt.
A shoulder belt placed behind you will not protect you from injury during a collision.
You are more likely to hit your head in a collision if you do not wear your shoulder belt.
The lap and shoulder belt are meant to be used together.
A belt that is too loose will not protect you properly. In a sudden stop you could move
too far forward, increasing the possibility of injury. Wear your seat belt snugly.
GETTING STARTED
15
Page 18 of 220
A frayed or torn belt could rip apart in a collision and leave you with no protection.
Inspect the belt system periodically, checking for cuts, frays, or loose parts. Damaged
parts must be replaced immediately. Do not disassemble or modify the system. Seat
belt assemblies must be replaced after a collision if they have been damaged (bent
retractor, torn webbing, etc.).
T
he seat belts for both front seating positions are equipped with pretensioning devices
that are designed to remove slack from the seat belt in the event of a collision.
A deployed pretensioner or a deployed air bag must be replaced immediately.
WARNING!
In a collision, you and your passengers can suffer much greater injuries if you are
not properly buckled up. You can strike the interior of your vehicle or other
passengers, or you can be thrown out of the vehicle. Always be sure you and others
in your vehicle are buckled up properly.
SUPPLEMENTAL RESTRAINT SYSTEM (SRS) — AIR
BAGS
This vehicle has Advanced Front Air Bags for both the driver and front passenger as
a supplement to the seat belt restraint systems. The driver's Advanced Front Air Bag
is mounted in the center of the steering wheel. The passenger's Advanced Front Air
Bag is mounted in the instrument panel, above the glove compartment. The words
SRS AIR BAG are embossed on the air bag covers.
Advanced Front Air Bags are designed to provide additional protection by supple-
menting the seat belts in certain frontal collisions depending on several factors,
including the severity and type of collision. Advanced Front Air Bags are not expected
to reduce the risk of injury in rear, side, or rollover collisions.
This vehicle is equipped with Supplemental Side Air Bag Inflatable Curtains to
protect the driver, front and rear passengers sitting next to a window.
This vehicle is equipped with Supplemental Seat-Mounted Side Air Bags to provide
enhanced protection to help protect an occupant during a side impact.
This vehicle is equipped with Supplemental Driver’s Side Knee Air Bag mounted in
the instrument panel below the steering column and a Knee Bolster mounted below
the glove compartment. The Supplemental Driver’s Side Knee Air Bag provides
enhanced protection and works together with the Driver Advanced Front Air Bag
during a frontal impact.
If the Air Bag Warning Light
is not on during starting, stays on, or turns on while
driving, have the vehicle serviced by an authorized service center immediately.
Refer to the Owner's Manual on the DVD for further details regarding the Supple-
mental Restraint System (SRS).
GETTING STARTED
16
Page 31 of 220
100 to 300 miles (161 to 483 km):
• Depress the accelerator pedal slowly and not more than halfway to avoid rapid
acceleration in lower gears (1st to 3rd gears).
• Avoid aggressive braking.
• Drive with the engine speed less than 5,000 RPM.
• Maintain vehicle speed below 70 mph (112 km/h) and observe local speed limits.
300 to 500 miles (483 to 805 km):
• Exercise the full engine rpm range, shifting manually (paddles or gear shift) at
higher rpms when possible.
• Do not perform sustained operation with the accelerator pedal at wide open
throttle.
• Maintain vehicle speed below 85 mph (136 km/h) and observe local speed limits.
For the first 1500 mi (2414 km):
• Do not participate in track events, sport driving schools, or similar activities during
the first 1500 mi (2414 km).
NOTE:
Check engine oil with every refueling and add if necessary. Oil and fuel consumption
may be higher through the first oil change interval.
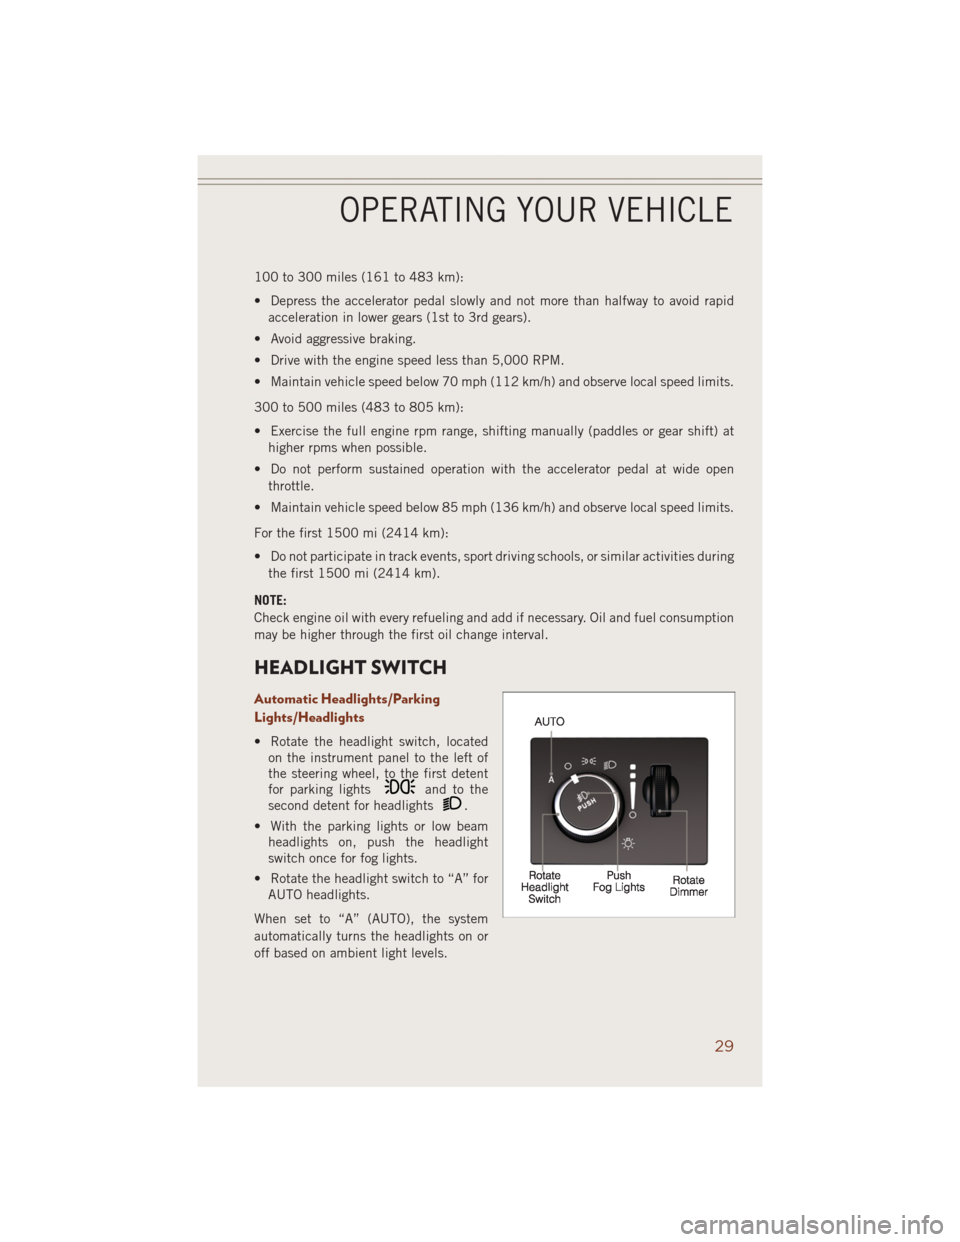
HEADLIGHT SWITCH
Automatic Headlights/Parking
Lights/Headlights
• Rotate the headlight switch, located
on the instrument panel to the left of
the steering wheel, to the first detent
for parking lights
and to the
second detent for headlights
.
• With the parking lights or low beam
headlights on, push the headlight
switch once for fog lights.
• Rotate the headlight switch to “A” for
AUTO headlights.
When set to “A” (AUTO), the system
automatically turns the headlights on or
off based on ambient light levels.
OPERATING YOUR VEHICLE
29
Page 32 of 220
Automatic High Beams
The Automatic High Beams system provides increased forward lighting at night by
automating high beam control through the use of a digital camera mounted on the
inside rearview mirror. This camera detects vehicle specific light and automatically
switches from high beams to low beams until the approaching vehicle is out of view.
This feature is programmable through the Uconnect
®system. Refer to “Uconnect®
Settings ” in “Understanding Your Instrument Panel” in the Owner's Manual on the
DVD for further details.
Instrument Panel Dimmer
• Rotate the dimmer control to the extreme bottom position to fully dim the
instrument panel lights and prevent the interior lights from illuminating when a
door is opened.
• Rotate the dimmer control up to increase the brightness of the instrument panel
when the parking lights or headlights are on.
• Rotate the dimmer control up to the next detent position to fully brighten the
odometer and radio when the parking lights or headlights are on.
• Rotate the dimmer control up to the last detent position to turn on the interior
lighting.
• If your vehicle is equipped with a touchscreen, the dimming is programmable
through the Uconnect
®system. Refer to “Uconnect®Settings ” in “Understanding
Your Instrument Panel” in the Owner's Manual on the DVD for further details.
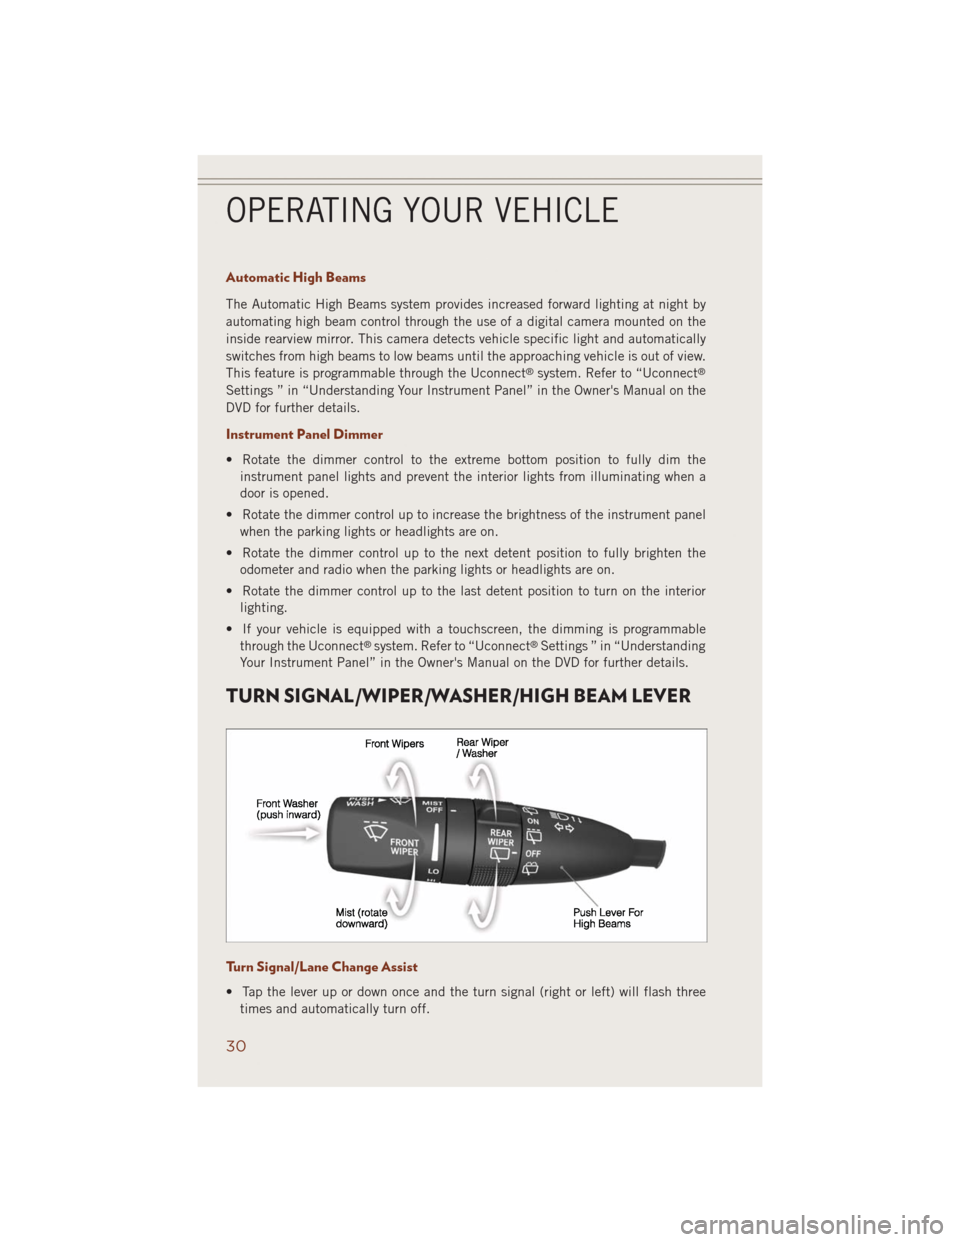
TURN SIGNAL/WIPER/WASHER/HIGH BEAM LEVER
Turn Signal/Lane Change Assist
• Tap the lever up or down once and the turn signal (right or left) will flash three
times and automatically turn off.
OPERATING YOUR VEHICLE
30
Page 33 of 220
High Beam Operation
• Push the lever forward to activate the high beams. Pull the lever toward you for
flash to pass.
NOTE:
For safe driving, turn off high beams when oncoming traffic is present to prevent
headlight glare and as a courtesy to other motorists.
Front Wipers
Intermittent, Low And High Operation
• Rotate the end of the lever to the first detent position for one of four intermittent
settings, the second detent for low wiper operation and the third detent for high
wiper operation.
Washer Operation
• Push inward on the end of the lever and hold for as long as spray is desired.
Mist
• Rotate the end of the lever downward when a single wipe is desired.
NOTE:
The mist feature does not activate the washer pump; therefore, no washer fluid will
be sprayed on the windshield. The wash function must be activated in order to spray
the windshield with washer fluid.
Rain Sensing Wipers
This feature senses moisture on the vehicles windshield and automatically activates
the wipers for the driver when the switch is in the intermittent position.
• Rotate the end of the lever to one of four settings to activate this feature and
adjust sensitivity.
This feature can be activated/deactivated using the Uconnect
®system screen. Refer
to the “Programmable Features” under the “Electronics” section in this guide.
Refer to the Owner's Manual on the DVD for further details.
Rear Wiper
Rear Wiper Operation
• Rotate the center portion of the lever forward to the first detent for intermittent
operation and to the second detent for rear wiper operation.
Rear Washer Operation
• Rotate the center portion of the lever past the second detent to activate the rear
washer.
OPERATING YOUR VEHICLE
31
Page 34 of 220
AUTOMATIC DIMMING MIRRORS
The rearview and driver side exterior mirror automatically adjusts for headlight glare
from vehicles behind you.
SPEED CONTROL
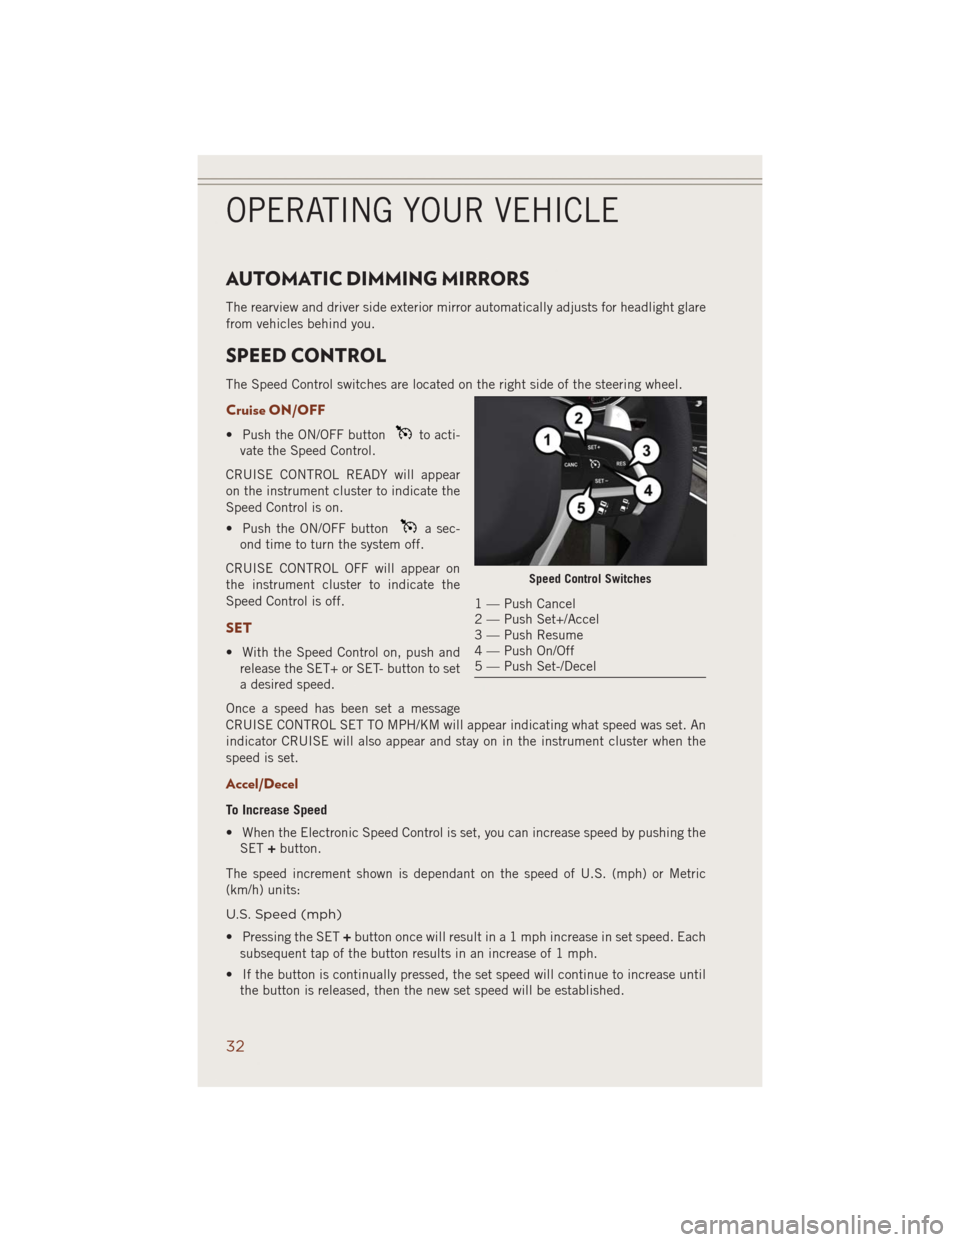
The Speed Control switches are located on the right side of the steering wheel.
Cruise ON/OFF
• Push the ON/OFF buttonto acti-
vate the Speed Control.
CRUISE CONTROL READY will appear
on the instrument cluster to indicate the
Speed Control is on.
• Push the ON/OFF button
a sec-
ond time to turn the system off.
CRUISE CONTROL OFF will appear on
the instrument cluster to indicate the
Speed Control is off.
SET
• With the Speed Control on, push and
release the SET+ or SET- button to set
a desired speed.
Once a speed has been set a message
CRUISE CONTROL SET TO MPH/KM will appear indicating what speed was set. An
indicator CRUISE will also appear and stay on in the instrument cluster when the
speed is set.
Accel/Decel
To Increase Speed
• When the Electronic Speed Control is set, you can increase speed by pushing the
SET+button.
The speed increment shown is dependant on the speed of U.S. (mph) or Metric
(km/h) units:
U.S. Speed (mph)
• Pressing the SET+button once will result in a 1 mph increase in set speed. Each
subsequent tap of the button results in an increase of 1 mph.
• If the button is continually pressed, the set speed will continue to increase until
the button is released, then the new set speed will be established.
Speed Control Switches
1 — Push Cancel
2 — Push Set+/Accel
3 — Push Resume
4 — Push On/Off
5 — Push Set-/Decel
OPERATING YOUR VEHICLE
32