spare wheel JEEP GRAND CHEROKEE 2014 WK2 / 4.G User Guide
[x] Cancel search | Manufacturer: JEEP, Model Year: 2014, Model line: GRAND CHEROKEE, Model: JEEP GRAND CHEROKEE 2014 WK2 / 4.GPages: 220, PDF Size: 6.12 MB
Page 160 of 220
IF YOUR ENGINE OVERHEATS
In any of the following situations, you can reduce the potential for overheating by
taking the appropriate action:
• On the highways — slow down.
• In city traffic — while stopped, shift the transmission to NEUTRAL, but do not
increase engine idle speed.
NOTE:
There are steps that you can take to slow down an impending overheat condition:
• If your air conditioner (A/C) is on, turn it off. The A/C system adds heat to the
engine cooling system and turning the A/C off can help remove this heat.
•
You can also turn the temperature control to maximum heat, the mode control to floor
and the blower control to high. This allows the heater core to act as a supplement to
the radiator and aids in removing heat from the engine cooling system.
CAUTION!
Driving with a hot cooling system could damage your vehicle. If the temperature
gauge reads HOT (H), pull over and stop the vehicle. Idle the vehicle with the air
conditioner turned off until the pointer drops back into the normal range. If the
pointer remains on HOT (H), and you hear continuous chimes, turn the engine off
immediately, and call for service.
WARNING!
You or others can be badly burned by hot engine coolant (antifreeze) or steam from
your radiator. If you see or hear steam coming from under the hood, do not open
the hood until the radiator has had time to cool. Never try to open a cooling system
pressure cap when the radiator or coolant bottle is hot.
JACKING AND TIRE CHANGING
Run Flat Tires — SRT Only
This vehicle is equipped with “run flat” tires. Run flat tires allow the vehicle to be
driven approximately 50 miles (80km) at 55 mph (88km/h). Tire service should be
obtained to avoid prolonged run flat feature usage.
NOTE:
This vehicle may be equipped with a spare tire. The spare tire must be used for the
rear wheel(s) only. For a flat front tire, move the rear tire to the front and use the spare
tire on the rear.
WHAT TO DO IN EMERGENCIES
158
Page 161 of 220
WARNING!
• Do not exceed 50 mph (80 km/h) if the “Tire Pressure Monitoring Telltale
Light” is illuminated. Vehicle handling and braking may be reduced. You could
have a collision and be severely or fatally injured.
• Do not tow a trailer when using the compact spare tire.
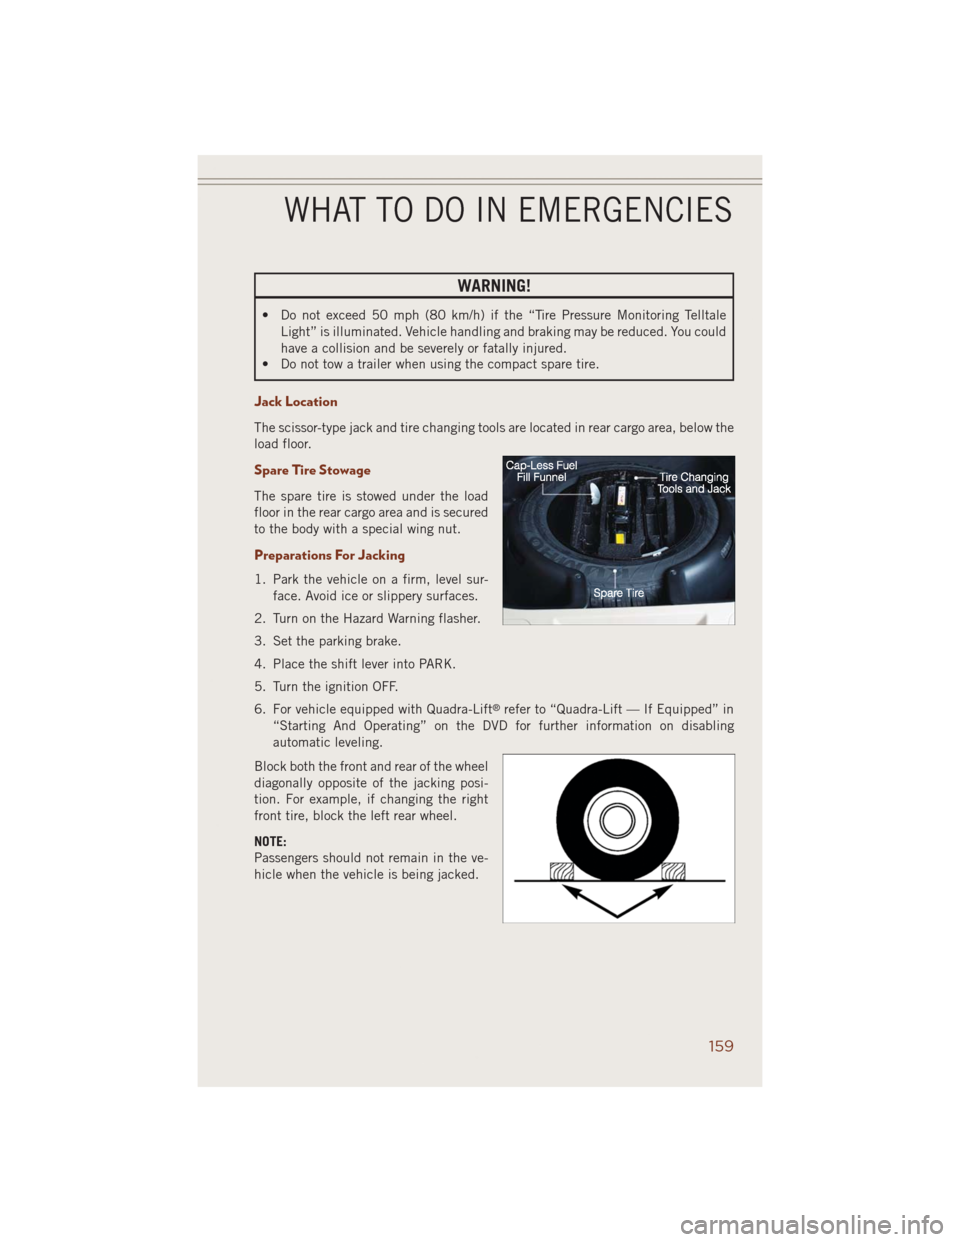
Jack Location
The scissor-type jack and tire changing tools are located in rear cargo area, below the
load floor.
Spare Tire Stowage
The spare tire is stowed under the load
floor in the rear cargo area and is secured
to the body with a special wing nut.
Preparations For Jacking
1. Park the vehicle on a firm, level sur-
face. Avoid ice or slippery surfaces.
2. Turn on the Hazard Warning flasher.
3. Set the parking brake.
4. Place the shift lever into PARK.
5. Turn the ignition OFF.
6. For vehicle equipped with Quadra-Lift
®refer to “Quadra-Lift — If Equipped” in
“Starting And Operating” on the DVD for further information on disabling
automatic leveling.
Block both the front and rear of the wheel
diagonally opposite of the jacking posi-
tion. For example, if changing the right
front tire, block the left rear wheel.
NOTE:
Passengers should not remain in the ve-
hicle when the vehicle is being jacked.
WHAT TO DO IN EMERGENCIES
159
Page 162 of 220
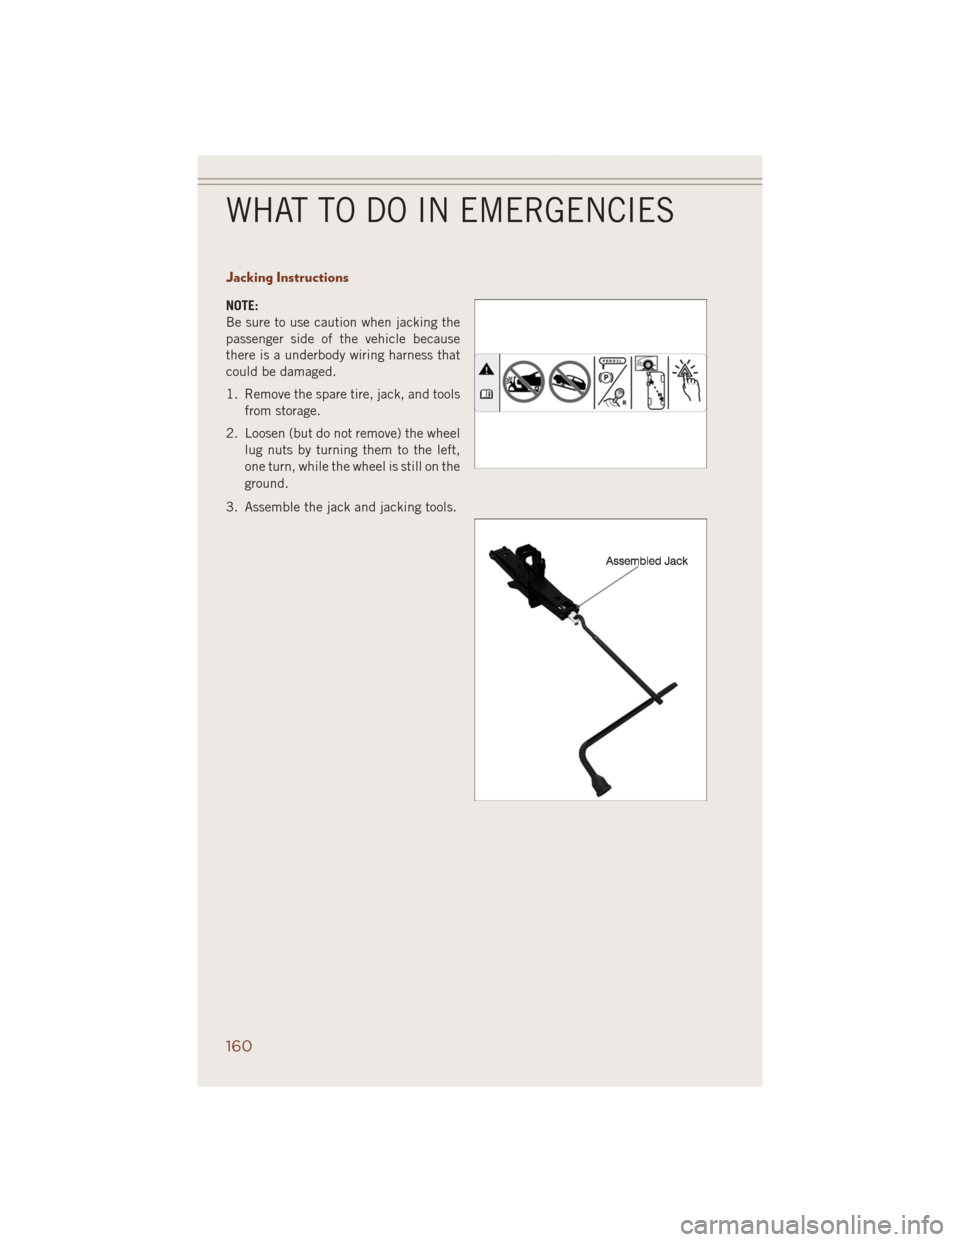
Jacking Instructions
NOTE:
Be sure to use caution when jacking the
passenger side of the vehicle because
there is a underbody wiring harness that
could be damaged.
1. Remove the spare tire, jack, and tools
from storage.
2. Loosen (but do not remove) the wheel
lug nuts by turning them to the left,
one turn, while the wheel is still on the
ground.
3. Assemble the jack and jacking tools.
WHAT TO DO IN EMERGENCIES
160
Page 164 of 220
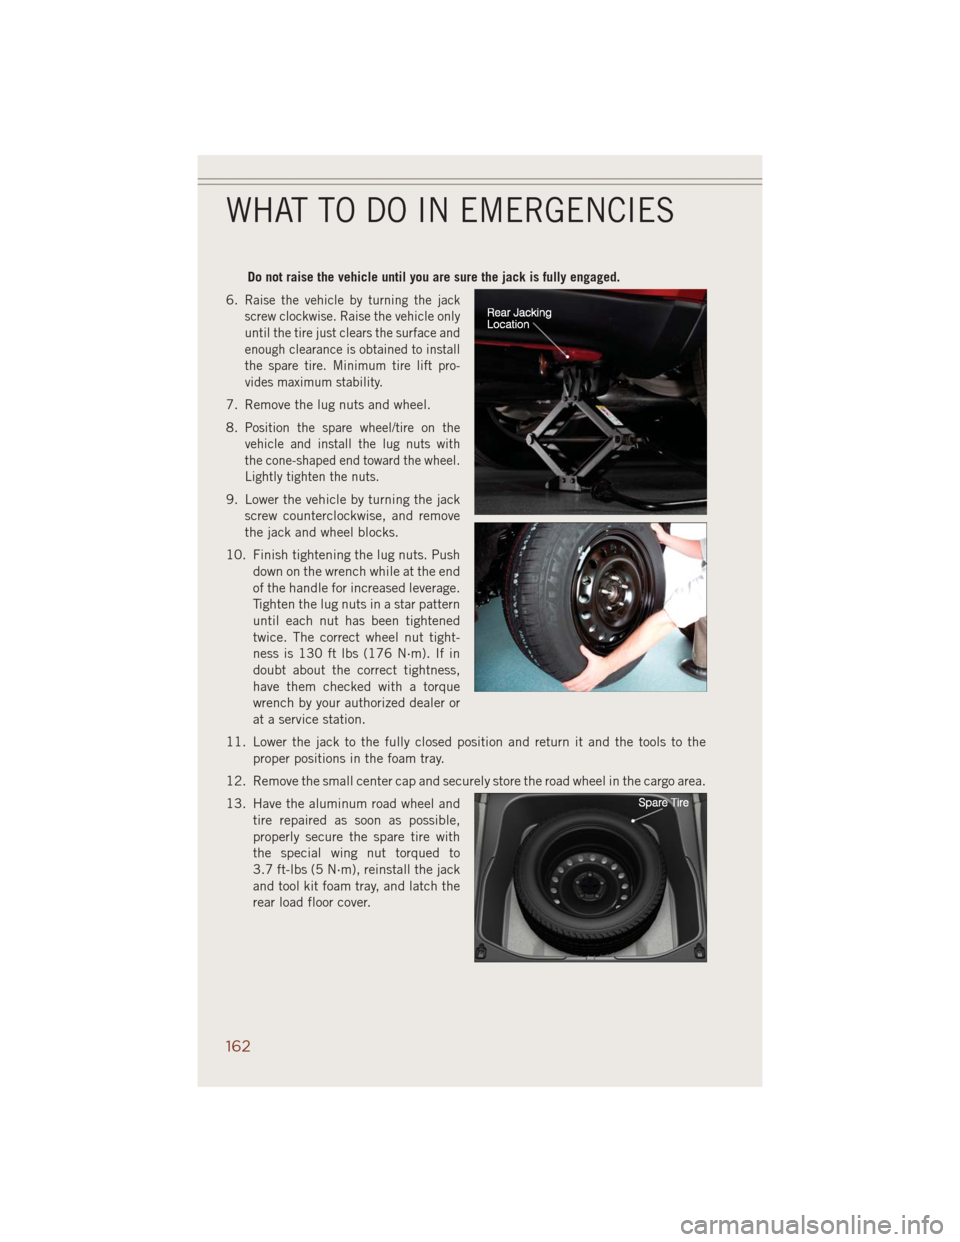
Do not raise the vehicle until you are sure the jack is fully engaged.
6.
Raise the vehicle by turning the jack
screw clockwise. Raise the vehicle only
until the tire just clears the surface and
enough clearance is obtained to install
the spare tire. Minimum tire lift pro-
vides maximum stability.
7. Remove the lug nuts and wheel.
8.
Position the spare wheel/tire on the
vehicle and install the lug nuts with
the cone-shaped end toward the wheel.
Lightly tighten the nuts.
9. Lower the vehicle by turning the jack
screw counterclockwise, and remove
the jack and wheel blocks.
10. Finish tightening the lug nuts. Push
down on the wrench while at the end
of the handle for increased leverage.
Tighten the lug nuts in a star pattern
until each nut has been tightened
twice. The correct wheel nut tight-
ness is 130 ft lbs (176 N·m). If in
doubt about the correct tightness,
have them checked with a torque
wrench by your authorized dealer or
at a service station.
11. Lower the jack to the fully closed position and return it and the tools to the
proper positions in the foam tray.
12. Remove the small center cap and securely store the road wheel in the cargo area.
13. Have the aluminum road wheel and
tire repaired as soon as possible,
properly secure the spare tire with
the special wing nut torqued to
3.7 ft-lbs (5 N·m), reinstall the jack
and tool kit foam tray, and latch the
rear load floor cover.
WHAT TO DO IN EMERGENCIES
162
Page 165 of 220
Road Tire Installation
1. Mount the road tire on the axle.
2. Install the remaining lug nuts with the cone shaped end of the nut toward the
wheel. Lightly tighten the lug nuts.
3. Lower the vehicle to the ground by turning the jack handle counterclockwise.
4. Finish tightening the lug nuts. Push down on the wrench while at the end of the
handle for increased leverage. Tighten the lug nuts in a star pattern until each nut
has been tightened twice. The correct tightness of each lug nut is 130 ft/lbs
(176 N·m). If in doubt about the correct tightness, have them checked with a
torque wrench by your authorized dealer or service station.
5. After 25 miles (40 km) check the lug nut torque with a torque wrench to ensure
that all lug nuts are properly seated against the wheel.
CAUTION!
• Do not attempt to raise vehicle by jacking on locations other than those
indicated in the Jacking Instructions for this vehicle.
• Be sure to mount the spare tire with the valve stem facing outward. The vehicle
could be damaged if the spare tire is mounted incorrectly.
WHAT TO DO IN EMERGENCIES
163
Page 166 of 220
WARNING!
• Do not attempt to change a tire on the side of the vehicle close to moving
traffic. Pull far enough off the road to avoid the danger of being hit when
operating the jack or changing the wheel.
• Being under a jacked-up vehicle is dangerous. The vehicle could slip off the
jack and fall on you. You could be crushed. Never put any part of your body
under a vehicle that is on a jack. If you need to get under a raised vehicle, take
it to a service center where it can be raised on a lift.
• Never start or run the engine while the vehicle is on a jack.
• The jack is designed to be used as a tool for changing tires only. The jack
should not be used to lift the vehicle for service purposes. The vehicle should
be jacked on a firm level surface only. Avoid ice or slippery areas.
• Always park on a firm, level surface as far from the edge of the roadway as
possible before raising the vehicle.
• Turn on the Hazard Warning flasher.
• Block the wheel diagonally opposite the wheel to be raised.
• Set the parking brake firmly and set an automatic transmission in PARK.
• Do not let anyone sit in the vehicle when it is on a jack.
• Do not get under the vehicle when it is on a jack.
• Only use the jack in the positions indicated and for lifting this vehicle during
a tire change.
• If working on or near a roadway, be extremely careful of motor traffic.
• To assure that spare tires, flat or inflated, are securely stowed, spares must be
stowed with the valve stem facing the ground.
• Carefully follow these tire changing warnings to help prevent personal injury or
damage to your vehicle.
• Raising the vehicle higher than necessary can make the vehicle less stable. It
could slip off the jack and hurt someone near it. Raise the vehicle only enough
to remove the tire.
• To avoid the risk of forcing the vehicle off the jack, do not tighten the wheel
nuts fully until the vehicle has been lowered. Failure to follow this warning may
result in personal injury.
• A loose tire or jack, thrown forward in a collision or hard stop could endanger
the occupants of the vehicle. Always stow the jack parts and the spare tire in
the places provided. Have the deflated (flat) tire repaired or replaced imme-
diately.
WHAT TO DO IN EMERGENCIES
164
Page 206 of 220
TIRE PRESSURES
Check the inflation pressure of each tire, including the spare tire, at least monthly
and inflate to the recommended pressure for your vehicle.
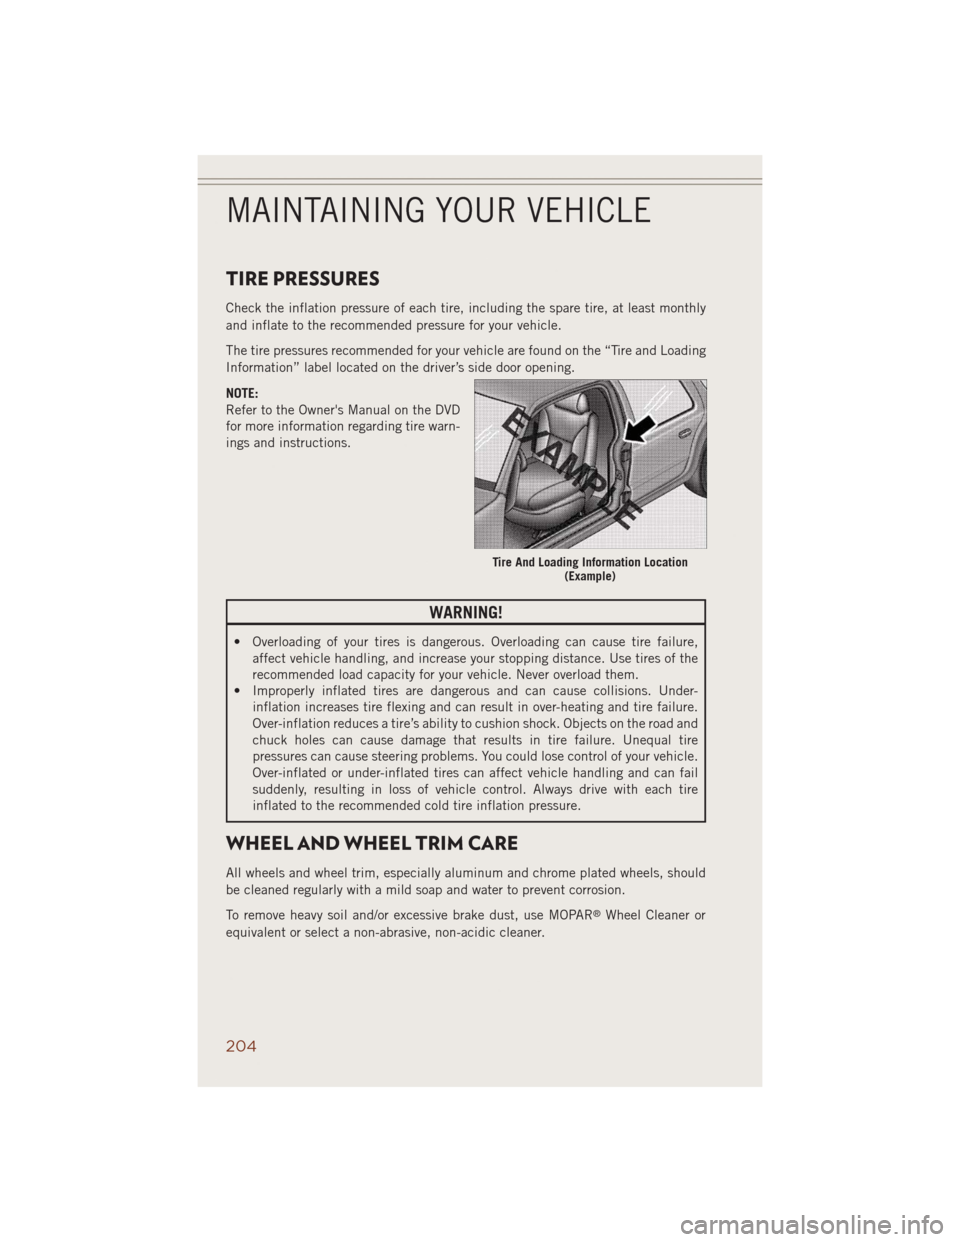
The tire pressures recommended for your vehicle are found on the “Tire and Loading
Information” label located on the driver’s side door opening.
NOTE:
Refer to the Owner's Manual on the DVD
for more information regarding tire warn-
ings and instructions.
WARNING!
• Overloading of your tires is dangerous. Overloading can cause tire failure,
affect vehicle handling, and increase your stopping distance. Use tires of the
recommended load capacity for your vehicle. Never overload them.
• Improperly inflated tires are dangerous and can cause collisions. Under-
inflation increases tire flexing and can result in over-heating and tire failure.
Over-inflation reduces a tire’s ability to cushion shock. Objects on the road and
chuck holes can cause damage that results in tire failure. Unequal tire
pressures can cause steering problems. You could lose control of your vehicle.
Over-inflated or under-inflated tires can affect vehicle handling and can fail
suddenly, resulting in loss of vehicle control. Always drive with each tire
inflated to the recommended cold tire inflation pressure.
WHEEL AND WHEEL TRIM CARE
All wheels and wheel trim, especially aluminum and chrome plated wheels, should
be cleaned regularly with a mild soap and water to prevent corrosion.
To remove heavy soil and/or excessive brake dust, use MOPAR
®Wheel Cleaner or
equivalent or select a non-abrasive, non-acidic cleaner.
Tire And Loading Information Location
(Example)
MAINTAINING YOUR VEHICLE
204
Page 216 of 220
Tilt/Telescoping Steering Column..27
Preparation for Jacking........159
Programmable Electronic Features. .115
Purchase Apps
Uconnect
®Access .........54
Quadra-Lift ..............125
Quadra-Trac..............122
Rain Sensitive Wiper System.....31
RearCamera ..............43
RearCrossPath.............44
Rear Heated Seats...........25
Rear Park Assist System........42
Rear ParkSense System......42,43
RearSeat,Folding...........24
Reclining Front Seats.........23
RecreationalTowing .........132
Shifting into Transfer Case
Neutral (N)............133
Shifting out of Transfer Case
Neutral (N)............135
Remote Keyless Entry (RKE)
Arm The Alarm...........15
Disarm The Alarm.........15
Lock The Doors...........10
Unlock The Doors.........10
Remote Starting
EnterRemoteStartMode .....10
How To Use Remote Start.....10
KeyFob ...............10
Remote Starting System.....10
Remote Starting System........10
ReplacementBulbs..........205
Reporting Safety Defects.......207
RollOverWarning ............4
Schedule, Mainte-
nance .........184, 189, 194
Seat Belt
Automatic Locking Retractor
(ALR)................15
Child Restraints........15,17
Energy Management Feature . . .15
Engage The Automatic Locking
Mode................19
Lap/Shoulder Belts.........15
Seat Belt Pretensioner......15SeatBeltReminder ........15
Seat Belts
Reminder.............151
Seats................21,23
Adjustment .............23
Folding Front Passenger.....23
Heated...............24
Lumbar Support..........22
Manual ...............23
Power ................21
RearFolding ............24
RearFolding(Sedan) .......24
Reclining..............24
Ventilated.............25
Security Alarm............156
Arm The System..........15
Disarm The System........15
Security Alarm...........15
Selec-Terrain.............124
Set Up Your Via Mobile Profile
Uconnect
®.............53
Signals, Turn...........30,156
SIRIUS Travel Link..........104
SpareTire...............159
SparkPlugs...........177, 181
Speed Control
Accel/Decel............32
Distance Setting (ACC Only) . . .33
Mode Setting (ACC Only).....35
Speed Control (Cruise Control)....32
Starting
Cold Weather...........143
Remote ...............10
Starting Procedures (Diesel
Engines) ..............142
Steering
TiltColumn .............27
Wheel, Heated...........26
Storage Bin..............172
SunRoof ................44
Supplemental Restraint System -
Airbag ................16
Temperature Control, Automatic
(ATC).................40
Text Messaging.......68,86,108
Tilt Steering Column..........27
INDEX
214
Page 217 of 220
Tires
Air Pressure...........204
Changing .............158
Jacking..............158
Pressure Warning Light.....150
SpareTire .............159
Tow Hooks, Emergency........167
Towing.................128
Disabled Vehicle.........169
Recreational...........132
Towing Vehicle Behind a
Motorhome.............132
Trailer Towing
Trailer and Tongue Weight . . .128
Trailer Weight.............128
Transfer Case
Fluid .........177, 178, 181
Transmission
Fluid ......177, 178, 179, 181
WarningLight ..........156
TurnSignals ...........30,156
Uconnect
®
Access................51
Access Registration........52
Set Up Your Via Mobile Profile . .53Via Mobile Apps..........64
Uconnect
®5.0.............65
Uconnect®8.4A ............73
Uconnect®8.4AN ...........93
Uconnect®Access...........51
PurchaseApps ...........54
Via Mobile Apps
Uconnect
®.............64
Warning, Roll Over............4
Washer
Rear .................31
Washers, Headlight...........30
Washers, Windshield..........31
Water in Fuel..........143, 144
Water Separator, Diesel Fuel....144
Water Separator Draining......144
WheelandWheelTrimCare.....204
Wind Buffeting.............47
Windshield Washers
Fluid ................157
Windshield Wipers...........31
Wiper,Rear...............31
Wipers, Intermittent..........31
Wipers, Rain Sensitive.........31
INDEX
215