lights JEEP GRAND CHEROKEE 2015 WK2 / 4.G User Guide
[x] Cancel search | Manufacturer: JEEP, Model Year: 2015, Model line: GRAND CHEROKEE, Model: JEEP GRAND CHEROKEE 2015 WK2 / 4.GPages: 717, PDF Size: 18.54 MB
Page 118 of 717
!SEATS . . . . . . . . . . . . . . . . . . . . . . . . . . . . ..143
▫Power Seats — If Equipped..............144
▫Power Lumbar — If Equipped............146
▫Manual Front Seats Forward/Rearward
Adjustment.........................147
▫Manual Front Passenger Seatback Adjustment —
Recline............................148
▫Front Passenger Seat Fold-Flat Feature — If
Equipped...........................148
▫Heated Seats — If Equipped..............149
▫Front Ventilated Seats — If Equipped.......152
▫Head Restraints.......................153
▫60/40 Split Rear Seat..................157
▫Reclining Rear Seat....................159
!DRIVER MEMORY SEAT — IF EQUIPPED . . . .160
▫Programming The Memory Feature.........161
▫Linking And Unlinking The Remote Keyless Entry
Transmitter To Memory.................162
▫Memory Position Recall.................163
▫Easy Entry/Exit Seat...................164
!TO OPEN AND CLOSE THE HOOD.........165
!LIGHTS.............................166
▫Headlight Switch.....................166
▫Automatic Headlights — If Equipped.......168
▫Headlights On Automatically With Wipers . . .168
▫Automatic High Beam — If Equipped......168
▫Daytime Running Lights — If Equipped.....170
11 6 U N D E R S TA N D I N G T H E F E AT U R E S O F Y O U R V E H I C L E
Page 119 of 717
▫Automatic Headlight Leveling — HID Headlights
Only...............................170
▫Adaptive Bi-Xenon High Intensity Discharge
Headlights — If Equipped...............170
▫Headlight Delay......................171
▫Parking Lights And Panel Lights...........171
▫Fog Lights — If Equipped...............171
▫Interior Lights........................172
▫Lights-On Reminder...................173
▫Battery Saver.........................174
▫Front Map/Reading Lights — If Equipped . . .174
▫Courtesy Lights.......................175
▫Ambient Light — If Equipped............176
▫Multifunction Lever....................176
▫Turn Signals.........................177
▫Lane Change Assist...................177
▫Flash-To-Pass........................177
▫High/Low Beam Switch.................177
!WINDSHIELD WIPERS AND WASHERS......178
▫Windshield Wiper Operation.............179
▫Intermittent Wiper System...............180
▫Windshield Washer Operation.............181
▫Mist...............................182
▫Rain Sensing Wipers — If Equipped........182
!TILT/TELESCOPING STEERING COLUMN . . .184
!POWER TILT/TELESCOPING STEERING
COLUMN — IF EQUIPPED...............185
3
UNDERSTANDING THE FEATURES OF YOUR VEHICLE 117
Page 122 of 717
▫ParkSense® System Usage Precautions.......240
!PARKVIEW® REAR BACK UP CAMERA — IF
EQUIPPED...........................243
!OVERHEAD CONSOLE..................245
▫Front Map/Reading Lights — If Equipped . . .246
▫Courtesy Lights.......................247
▫Sunglasses Bin Door...................247
!GARAGE DOOR OPENER — IF EQUIPPED . . .248
▫Before You Begin Programming HomeLink® . .249
▫Programming A Rolling Code.............249
▫Programming A Non-Rolling Code.........251
▫Canadian/Gate Operator Programming......253
▫Using HomeLink®....................254
▫Security............................254
▫Troubleshooting Tips...................255
▫General Information....................256
!POWER SUNROOF — IF EQUIPPED........257
▫Opening Sunroof — Express..............258
▫Opening Sunroof — Manual Mode.........258
▫Closing Sunroof — Express...............258
▫Closing Sunroof — Manual Mode..........258
▫Pinch Protect Feature...................259
▫Venting Sunroof — Express..............259
▫Sunshade Operation....................259
▫Wind Buffeting.......................259
▫Sunroof Maintenance...................260
120 UNDERSTANDING THE FEATURES OF YOUR VEHICLE
Page 144 of 717
Modes Of Operation
Three selectable modes of operation are available in the
Uconnect® System. Refer to “Uconnect® Settings/
Customer Programmable Features” in “Understanding
Your Instrument Panel” for further information.
Blind Spot Alert Lights Only
When operating in Blind Spot Alert mode, the BSM
system will provide a visual alert in the appropriate side
view mirror based on a detected object. However, when
the system is operating in Rear Cross Path (RCP) mode,
the system will respond with both visual and audible
alerts when a detected object is present. Whenever an
audible alert is requested, the radio is muted.
Blind Spot Alert Lights/Chime
When operating in Blind Spot Alert Lights/Chime mode,
the BSM system will provide a visual alert in the appro-
priate side view mirror based on a detected object. If the
turn signal is then activated, and it corresponds to an
alert present on that side of the vehicle, an audible chime
will also be sounded. Whenever a turn signal and de-
tected object are present on the same side at the same
time, both the visual and audible alerts will be issued. In
addition to the audible alert the radio (if on) will also be
muted.
NOTE:Whenever an audible alert is requested by the
BSM system, the radio is also muted.
When the system is in RCP, the system shall respond with
both visual and audible alerts when a detected object is
present. Whenever an audible alert is requested, the radio
is also muted. Turn/hazard signal status is ignored; the
RCP state always requests the chime.
Blind Spot Alert Off
When the BSM system is turned off there will be no
visual or audible alerts from either the BSM or RCP
systems.
142 UNDERSTANDING THE FEATURES OF YOUR VEHICLE
Page 153 of 717
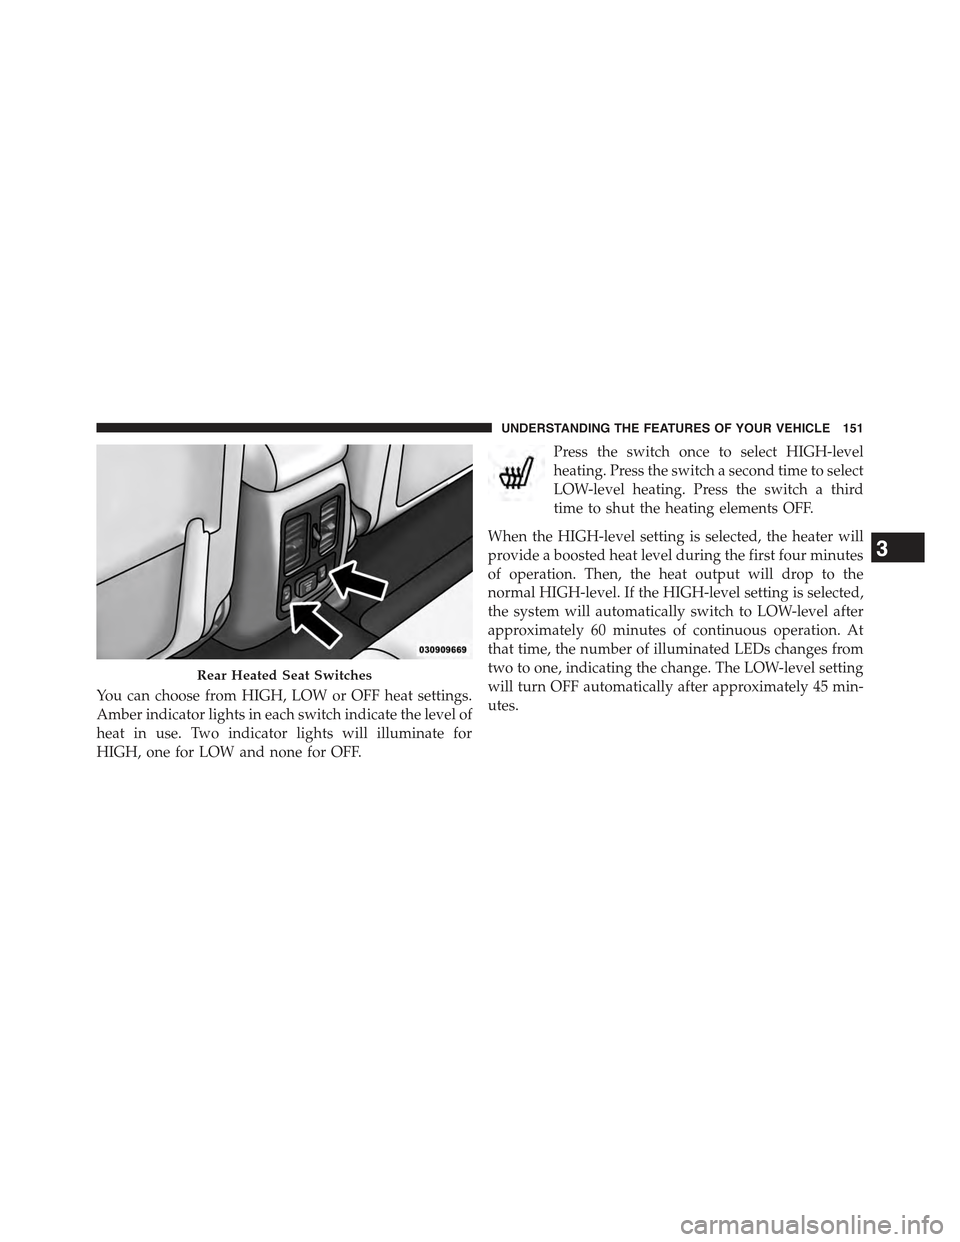
You can choose from HIGH, LOW or OFF heat settings.
Amber indicator lights in each switch indicate the level of
heat in use. Two indicator lights will illuminate for
HIGH, one for LOW and none for OFF.
Press the switch once to select HIGH-level
heating. Press the switch a second time to select
LOW-level heating. Press the switch a third
time to shut the heating elements OFF.
When the HIGH-level setting is selected, the heater will
provide a boosted heat level during the first four minutes
of operation. Then, the heat output will drop to the
normal HIGH-level. If the HIGH-level setting is selected,
the system will automatically switch to LOW-level after
approximately 60 minutes of continuous operation. At
that time, the number of illuminated LEDs changes from
two to one, indicating the change. The LOW-level setting
will turn OFF automatically after approximately 45 min-
utes.
Rear Heated Seat Switches
3
UNDERSTANDING THE FEATURES OF YOUR VEHICLE 151
Page 168 of 717
CAUTION!
To prevent possible damage, do not slam the hood to
close it. Use a firm downward push at the front center
of the hood to ensure that both latches engage.
WARNING!
Be sure the hood is fully latched before driving your
vehicle. If the hood is not fully latched, it could open
when the vehicle is in motion and block your vision.
Failure to follow this warning could result in serious
injury or death.
LIGHTS
Headlight Switch
The headlight switch is located on the left side of the
instrument panel, next to the steering wheel. The head-
light switch controls the operation of the headlights,
parking lights, instrument panel lights, cargo lights and
fog lights (if equipped).
166 UNDERSTANDING THE FEATURES OF YOUR VEHICLE
Page 169 of 717
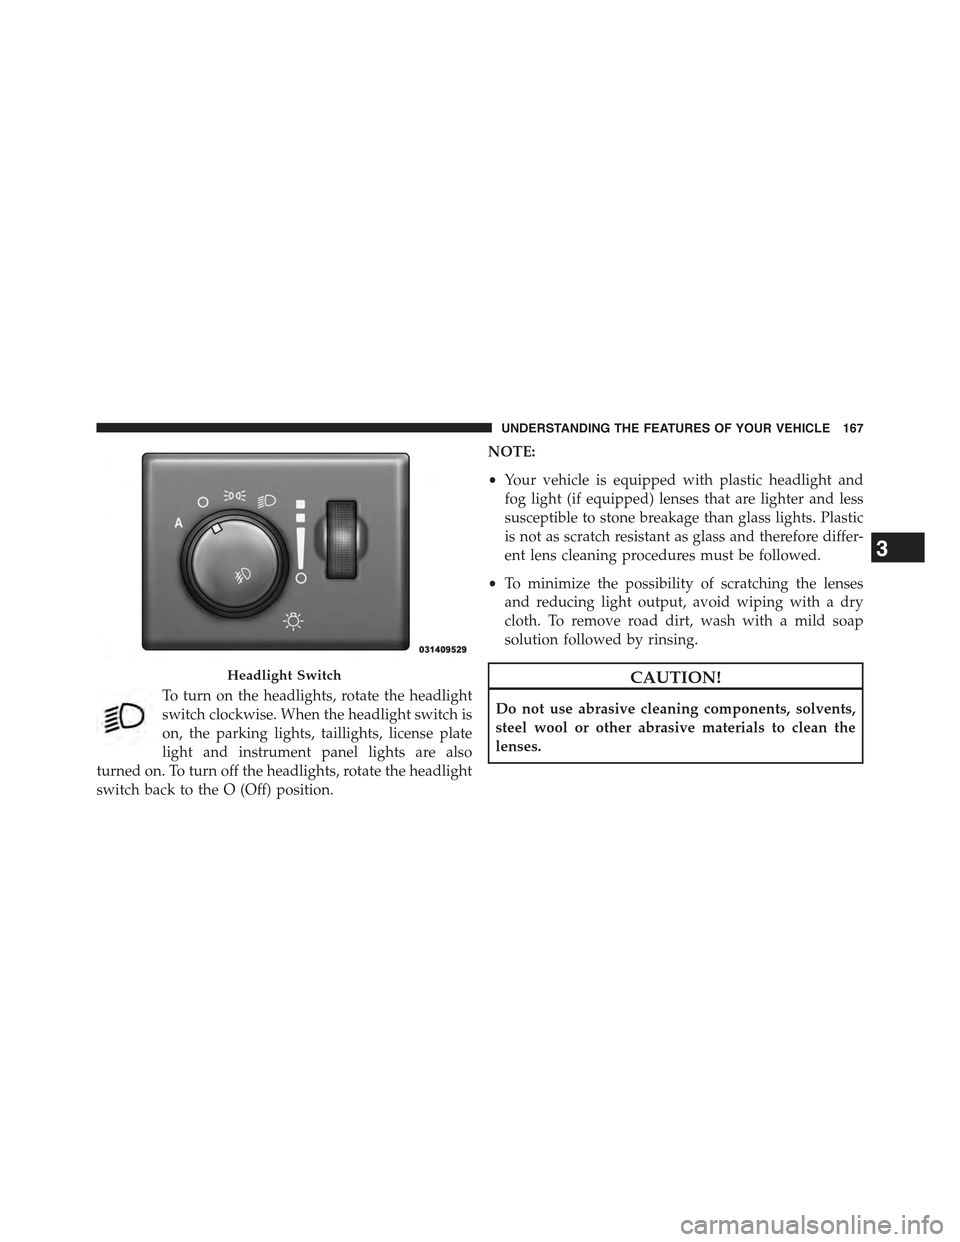
To turn on the headlights, rotate the headlight
switch clockwise. When the headlight switch is
on, the parking lights, taillights, license plate
light and instrument panel lights are also
turned on. To turn off the headlights, rotate the headlight
switch back to the O (Off) position.
NOTE:
•Your vehicle is equipped with plastic headlight and
fog light (if equipped) lenses that are lighter and less
susceptible to stone breakage than glass lights. Plastic
is not as scratch resistant as glass and therefore differ-
ent lens cleaning procedures must be followed.
•To minimize the possibility of scratching the lenses
and reducing light output, avoid wiping with a dry
cloth. To remove road dirt, wash with a mild soap
solution followed by rinsing.
CAUTION!
Do not use abrasive cleaning components, solvents,
steel wool or other abrasive materials to clean the
lenses.
Headlight Switch
3
UNDERSTANDING THE FEATURES OF YOUR VEHICLE 167
Page 170 of 717
Automatic Headlights — If Equipped
This system automatically turns the headlights on or off
according to ambient light levels. To turn the system on,
rotate the headlight switch to the A (AUTO) position.
When the system is on, the Headlight Delay feature is
also on. This means the headlights will stay on for up to
90 seconds after you turn the ignition switch to the OFF
position. To turn the automatic headlights off, turn the
headlight switch out of the AUTO position.
NOTE:The engine must be running before the head-
lights will turn on in the Automatic Mode.
Headlights On Automatically With Wipers
If your vehicle is equipped with Automatic Headlights, it
also has this customer-programmable feature. When
your headlights are in the automatic mode and the
engine is running, they will automatically turn on when
the wiper system is on. This feature is programmable
through the Uconnect® system screen. Refer to
“Uconnect® Settings” in “Understanding Your Instru-
ment Panel” for further information.
If your vehicle is equipped with a “Rain Sensitive Wiper
System” and it is activated, the headlights will automati-
cally turn on after the wipers complete five wipe cycles
within approximately one minute, and they will turn off
approximately four minutes after the wipers completely
stop. Refer to “Windshield Wipers And Washers” in this
section for further information.
NOTE:When your headlights come on during the day-
time, the instrument panel lights will automatically dim
to the lower nighttime intensity.
Automatic High Beam — If Equipped
The automatic high beam system provides increased
forward lighting at night by automating high beam
control through the use of a digital camera mounted on
the inside rearview mirror. This camera detects vehicle
168 UNDERSTANDING THE FEATURES OF YOUR VEHICLE
Page 171 of 717
specific light and automatically switches from high
beams to low beams until the approaching vehicle is out
of view.
NOTE:
•If the windshield or automatic high beam mirror is
replaced, the automatic high beam mirror must be
re-aimed to ensure proper performance. See your local
authorized dealer.
•Broken, muddy, or obstructed headlights and taillights
of vehicles in the field of view will cause headlights to
remain on longer (closer to the vehicle). Also, dirt, film,
and other obstructions (sticker, toll box, etc.) on the
windshield or camera lens will cause the system to
function improperly.
To Activate
1. Enable the Automatic High Beams through the
Uconnect® system screen. Refer to “Uconnect® Set-
tings” in “Understanding Your Instrument Panel” for
further information.
2. Turn the headlight switch to the AUTO headlight
position.
3. Push the multifunction lever away from you (toward
front of vehicle) to engage the high beam mode.
NOTE:This system will not activate until the vehicle is
at or above 20 mph (32 km/h).
3
UNDERSTANDING THE FEATURES OF YOUR VEHICLE 169
Page 172 of 717
To Deactivate
1. Pull the multifunction lever toward you (or rearward
in car) to manually deactivate the system (normal
operation of low beams).
2. Push back on the multifunction lever once again to
reactivate the system.
Daytime Running Lights — If Equipped
The Daytime Running Lights (low intensity) come on
whenever the engine is running, and the transmission is
not in the PARK position. The lights will remain on until
the ignition is switched to the OFF or ACC position or the
parking brake is engaged.
NOTE:If a turn signal is activated, the DRL lamp on the
same side of the vehicle will turn off for the duration of
the turn signal activation. Once the turn signal is no
longer active, the DRL lamp will illuminate.
The headlight switch must be used for normal nighttime
driving.
Automatic Headlight Leveling — HID Headlights
Only
This feature prevents the headlights from interfering
with the vision of oncoming drivers. Headlight leveling
automatically adjusts the height of the headlight beam in
reaction to changes in vehicle pitch.
Adaptive Bi-Xenon High Intensity Discharge
Headlights — If Equipped
This system automatically swivels the headlight beam
pattern horizontally to provide increased illumination in
the direction the vehicle is steering.
170 UNDERSTANDING THE FEATURES OF YOUR VEHICLE