radio controls JEEP GRAND CHEROKEE 2015 WK2 / 4.G Owners Manual
[x] Cancel search | Manufacturer: JEEP, Model Year: 2015, Model line: GRAND CHEROKEE, Model: JEEP GRAND CHEROKEE 2015 WK2 / 4.GPages: 717, PDF Size: 18.54 MB
Page 17 of 717
Ignition Or Accessory On Message
Opening the driver’s door when the ignition is in ACC or
ON (engine not running), a chime will sound to remind
you to cycle the ignition to OFF. In addition to the chime,
the ignition or accessory on message will display in the
cluster.
NOTE:With the Uconnect® system, the power window
switches, radio, power sunroof (if equipped), and power
outlets will remain active for up to 10 minutes after the
ignition is cycled to the OFF position. Opening either
front door will cancel this feature. The time for this
feature is programmable. Refer to “Uconnect® Settings”
in “Understanding Your Instrument Panel” for further
information.
WARNING!
•When leaving the vehicle, always remove the Key
Fob from the vehicle and lock your vehicle.
•Never leave children alone in a vehicle, or with
access to an unlocked vehicle.
•Allowing children to be in a vehicle unattended is
dangerous for a number of reasons. A child or others
could be seriously or fatally injured. Children
should be warned not to touch the parking brake,
brake pedal or the transmission gear selector.
•Do not leave the Key Fob in or near the vehicle, or
in a location accessible to children, and do not
leave the ignition of a vehicle equipped with
Keyless Enter-N-Go™ in the ACC or ON/RUN
mode. A child could operate power windows, other
controls, or move the vehicle.
(Continued)
2
THINGS TO KNOW BEFORE STARTING YOUR VEHICLE 15
Page 290 of 717
!Uconnect® RADIOS — IF EQUIPPED........359
!iPod®/USB/MP3 CONTROL — IF EQUIPPED . . .359
!Uconnect® REAR SEAT ENTERTAINMENT
SYSTEM — IF EQUIPPED.................360
▫Getting Started.......................360
▫Dual Video Screen.....................362
▫Blu-ray™ Disc Player...................362
▫Play Video Games.....................365
▫Play A DVD/Blu-ray™ Disc Using The
Touchscreen Radio.....................366
▫Important Notes For Dual Video Screen
System.............................368
▫Blu-ray™ Disc Player Remote Control — If
Equipped...........................369
▫Replacing The Remote Control Batteries......370
▫Headphones Operation.................371
▫Controls............................372
▫Replacing The Headphone Batteries.........373
▫Unwired® Stereo Headphone Lifetime Limited
Warranty...........................373
!STEERING WHEEL AUDIO CONTROLS — IF
EQUIPPED...........................381
▫Radio Operation......................381
▫CD Player...........................382
!CD/DVD/Blu-ray™ Disc MAINTENANCE . . . .382
!RADIO OPERATION AND MOBILE PHONES . .383
▫Regulatory And Safety Information.........383
288 UNDERSTANDING YOUR INSTRUMENT PANEL
Page 291 of 717
!CLIMATE CONTROLS...................385
▫General Overview.....................385
▫Climate Control Functions...............391
▫Automatic Temperature Control (ATC)......392
▫Operating Tips.......................394
!Uconnect® VOICE RECOGNITION QUICK
TIPS................................397
▫Introducing Uconnect®.................397
▫Get Started..........................398
▫Basic Voice Commands..................399
▫Radio..............................401
▫Media..............................402
▫Phone..............................404
▫Voice Text Reply......................405
▫Climate (8.4A/8.4AN)..................406
▫Navigation (8.4A/8.4AN)................407
▫Uconnect® Access* (8.4A/8.4AN)..........407
▫Register (8.4A/8.4AN)..................408
▫Mobile App (8.4A/8.4AN)...............409
▫Voice Texting (8.4A/8.4AN)..............410
▫Yelp® (8.4A/8.4AN)....................411
▫SiriusXM Travel Link™ (8.4A/8.4AN).......412
▫Additional Information.................413
4
UNDERSTANDING YOUR INSTRUMENT PANEL 289
Page 292 of 717
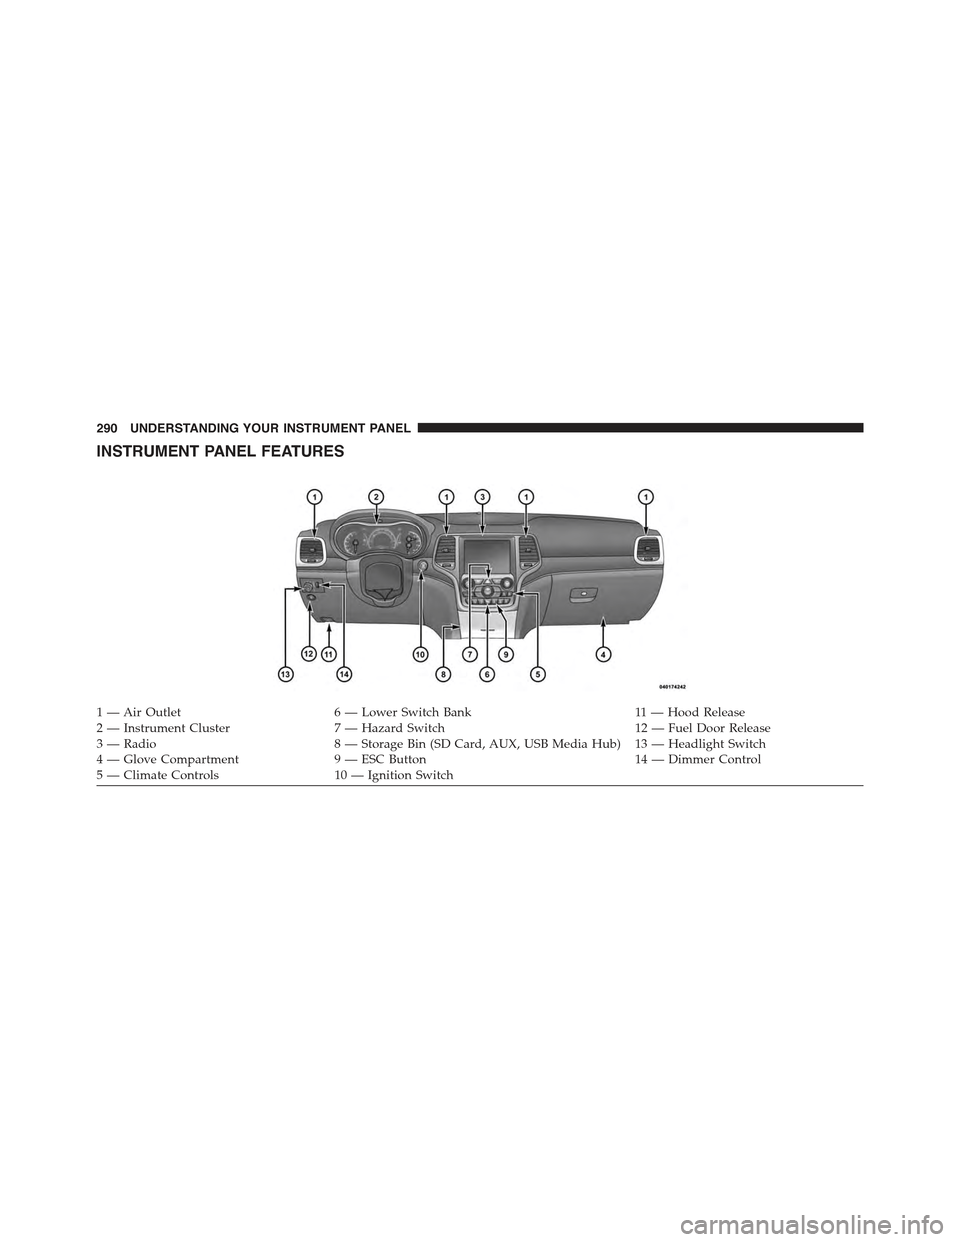
INSTRUMENT PANEL FEATURES
1 — Air Outlet6 — Lower Switch Bank11 — Hood Release2 — Instrument Cluster7 — Hazard Switch12 — Fuel Door Release3—Radio8—StorageBin(SDCard,AUX,USBMediaHub) 13—HeadlightSwitch4—GloveCompartment9—ESCButton14 — Dimmer Control5 — Climate Controls10 — Ignition Switch
290 UNDERSTANDING YOUR INSTRUMENT PANEL
Page 349 of 717
•ParkView® Backup Camera Active Guidelines
Your vehicle may be equipped with the ParkView® Rear
Back Up Camera Active Guidelines that allows you to see
active guidelines over the ParkView Back up camera
display whenever the shift lever is put into REVERSE.
The image will be displayed on the radio touchscreen
display along with a caution note to “check entire sur-
roundings” across the top of the screen. After five sec-
onds, this note will disappear. To change the mode status,
press the “ParkView Backup Camera Active Guidelines”
button on the touchscreen, until a check-mark appears
next to setting, indicating that the setting had been
selected. Press the back arrow button on the touchscreen
to return to the previous menu.
•ParkView® Backup Camera Delay
When the vehicle is shifted out of REVERSE (with camera
delay turned OFF), the rear camera mode is exited and
the navigation or audio screen appears again. When the
vehicle is shifted out of REVERSE (with camera delay
turned ON), the rear view image with dynamic grid lines
will be displayed for up to 10 seconds after shifting out of
“REVERSE” unless the forward vehicle speed exceeds
8 mph (12 km/h), the transmission is shifted into
“PARK” or the ignition is switched to the OFF position.
To set the ParkView® Backup Camera Delay press the
“Controls” button on the touchscreen, the “settings”
button on the touchscreen, then the “Safety & Driving
Assistance” button on the touchscreen. Press the
“Parkview Backup camera Delay” button on the touch-
screen to turn the ParkView® Delay ON or OFF.
•Rain Sensing Auto Wipers
When this feature is selected, the system will automati-
cally activate the windshield wipers if it senses moisture
on the windshield. To make your selection, press the
“Rain Sensing” button on the touchscreen, until a check-
mark appears next to setting, indicating that the setting
4
UNDERSTANDING YOUR INSTRUMENT PANEL 347
Page 366 of 717
is not highlighted select button to access controls for
Screen 1/Channel 1 source.
2.RSE Power
Press to turn RSE On/Off.
3.RSE Mute
Mute rear headphones for the current ignition cycle.
Pressing mute again will unmute rear headphones.
4.RSE Remote Control Lock Out
Press to enable/disable Remote Control functions.
5.RSE Channel 2 Mode
Indicates the current source for Screen 2/Channel 2; This
button will be highlighted when it is the active Screen/
Channel being controlled by the front user. If this button
is not highlighted select button to access controls for
Screen 2/Channel 2 source.
6.Radio Full Screen Mode
Select this button to change to Full Screen Mode.
7.Cabin Audio Mode
Select this button to change the cabin audio to the rear
entertainment source currently shown on the rear media
control screen.
8.RSE Mode
Select this button to change source for the active (high-
lighted) rear Screen/Channel on the rear media control
screen.
•Press the Media button on the touchscreen, then press
the Rear Media button on the touchscreen.
•Press the OK button on the touchscreen to begin
playing the Blu-ray™ Disc on the touchscreen radio.
364 UNDERSTANDING YOUR INSTRUMENT PANEL
Page 369 of 717
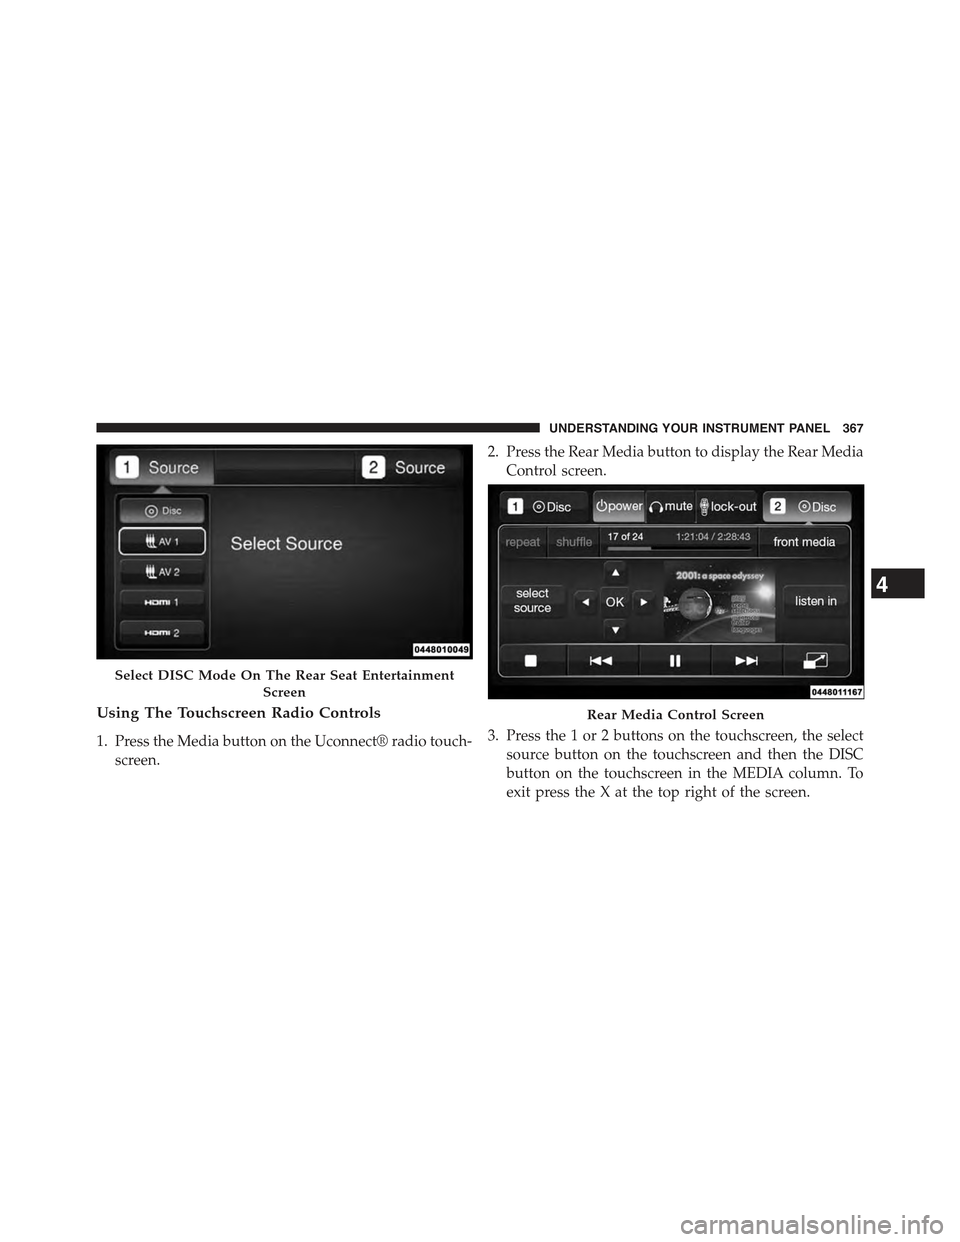
Using The Touchscreen Radio Controls
1. Press the Media button on the Uconnect® radio touch-
screen.
2. Press the Rear Media button to display the Rear Media
Control screen.
3. Press the 1 or 2 buttons on the touchscreen, the select
source button on the touchscreen and then the DISC
button on the touchscreen in the MEDIA column. To
exit press the X at the top right of the screen.
Select DISC Mode On The Rear Seat Entertainment
Screen
Rear Media Control Screen
4
UNDERSTANDING YOUR INSTRUMENT PANEL 367
Page 383 of 717
STEERING WHEEL AUDIO CONTROLS — IF
EQUIPPED
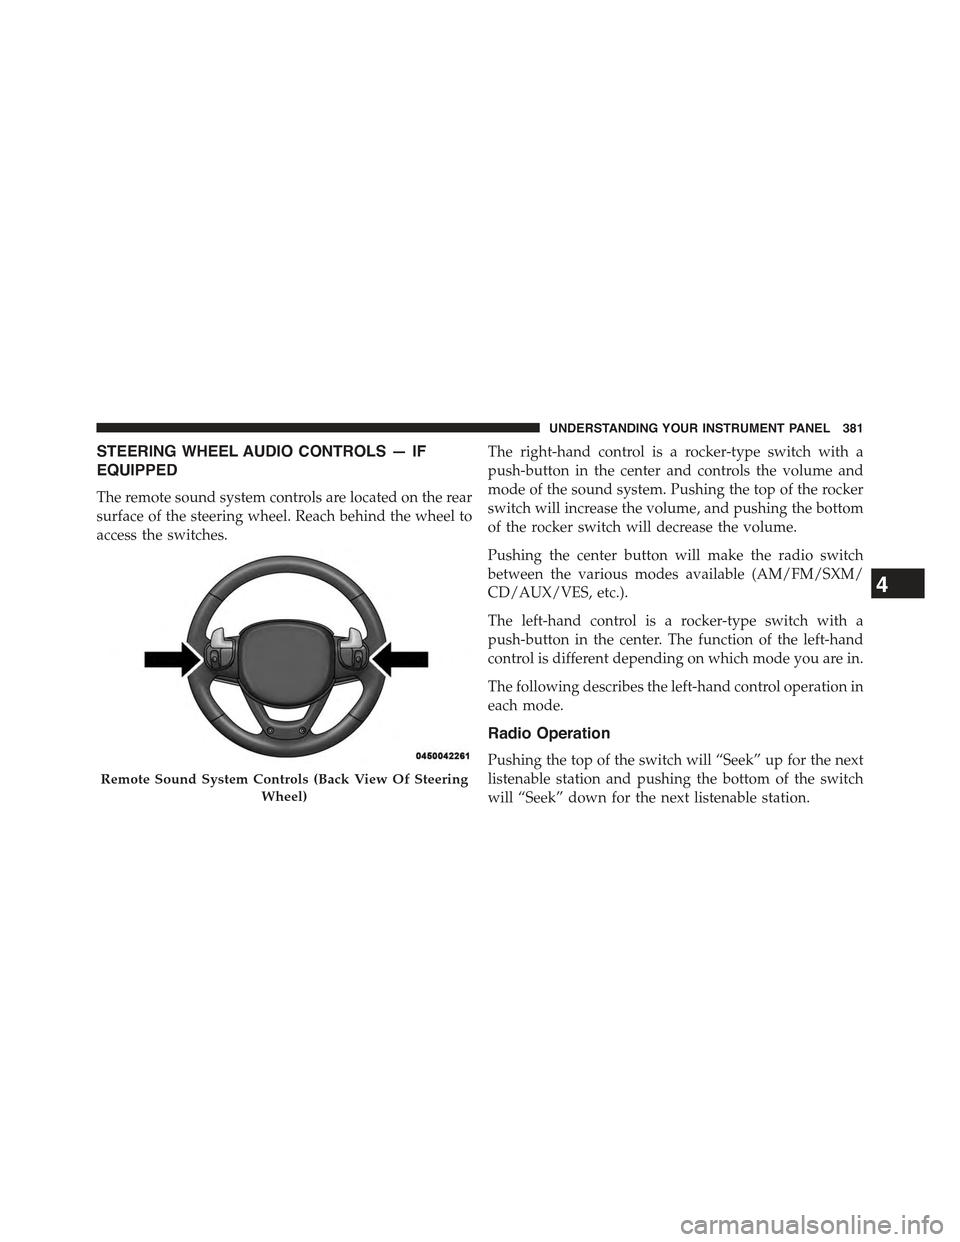
The remote sound system controls are located on the rear
surface of the steering wheel. Reach behind the wheel to
access the switches.
The right-hand control is a rocker-type switch with a
push-button in the center and controls the volume and
mode of the sound system. Pushing the top of the rocker
switch will increase the volume, and pushing the bottom
of the rocker switch will decrease the volume.
Pushing the center button will make the radio switch
between the various modes available (AM/FM/SXM/
CD/AUX/VES, etc.).
The left-hand control is a rocker-type switch with a
push-button in the center. The function of the left-hand
control is different depending on which mode you are in.
The following describes the left-hand control operation in
each mode.
Radio Operation
Pushing the top of the switch will “Seek” up for the next
listenable station and pushing the bottom of the switch
will “Seek” down for the next listenable station.
Remote Sound System Controls (Back View Of Steering
Wheel)
4
UNDERSTANDING YOUR INSTRUMENT PANEL 381
Page 387 of 717
•Consult the dealer or an experienced radio technician
for help.
CLIMATE CONTROLS
The air conditioning and heating system is designed to
make you comfortable in all types of weather. This
system can be operated through either the controls on the
instrument panel or through the Uconnect® system dis-
play.
When the Uconnect® system is in different modes (Ra-
dio, Player, Settings, More, etc.) the driver and passenger
temperature settings will be indicated at the top of the
display.
General Overview
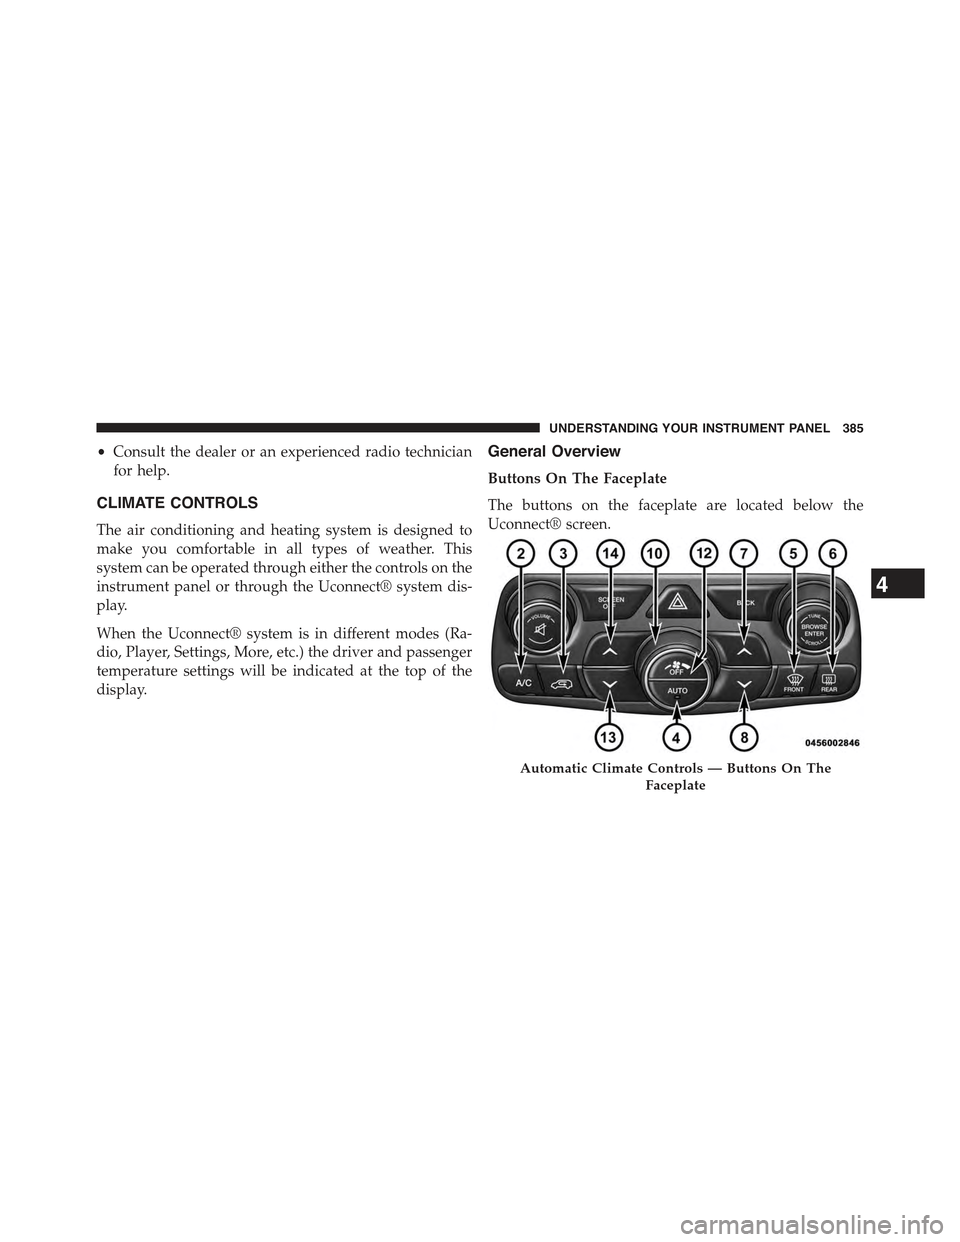
Buttons On The Faceplate
The buttons on the faceplate are located below the
Uconnect® screen.
Automatic Climate Controls — Buttons On The
Faceplate
4
UNDERSTANDING YOUR INSTRUMENT PANEL 385
Page 477 of 717
CAUTION!
The Anti-Lock Brake System is subject to possible
detrimental effects of electronic interference caused
by improperly installed aftermarket radios or tele-
phones.
NOTE:During severe braking conditions, a pulsing sen-
sation may occur and a clicking noise will be heard. This
is normal, indicating that the Anti-Lock Brake System is
functioning.
Traction Control System (TCS)
This system monitors the amount of wheel spin of each of
the driven wheels. If wheel spin is detected, brake
pressure is applied to the slipping wheel(s) and engine
power is reduced to provide enhanced acceleration and
stability.
A feature of the TCS system, Brake Limited Differential
(BLD), functions similar to a limited-slip differential and
controls the wheel spin across a driven axle. If one wheel
on a driven axle is spinning faster than the other, the
system will apply the brake of the spinning wheel. This
will allow more engine torque to be applied to the wheel
that is not spinning. This feature remains active even if
ESC system is in the “Partial Off” mode. Refer to “Elec-
tronic Stability Control (ESC)” in this section for further
information.
Brake Assist System (BAS)
The BAS is designed to optimize the vehicle’s braking
capability during emergency braking maneuvers. The
system detects an emergency braking situation by sens-
ing the rate and amount of brake application and then
applies optimum pressure to the brakes. This can help
reduce braking distances. The BAS complements the
anti-lock brake system (ABS). Applying the brakes very
5
STARTING AND OPERATING 475