engine JEEP GRAND CHEROKEE 2016 WK2 / 4.G User Guide
[x] Cancel search | Manufacturer: JEEP, Model Year: 2016, Model line: GRAND CHEROKEE, Model: JEEP GRAND CHEROKEE 2016 WK2 / 4.GPages: 276, PDF Size: 10.84 MB
Page 3 of 276
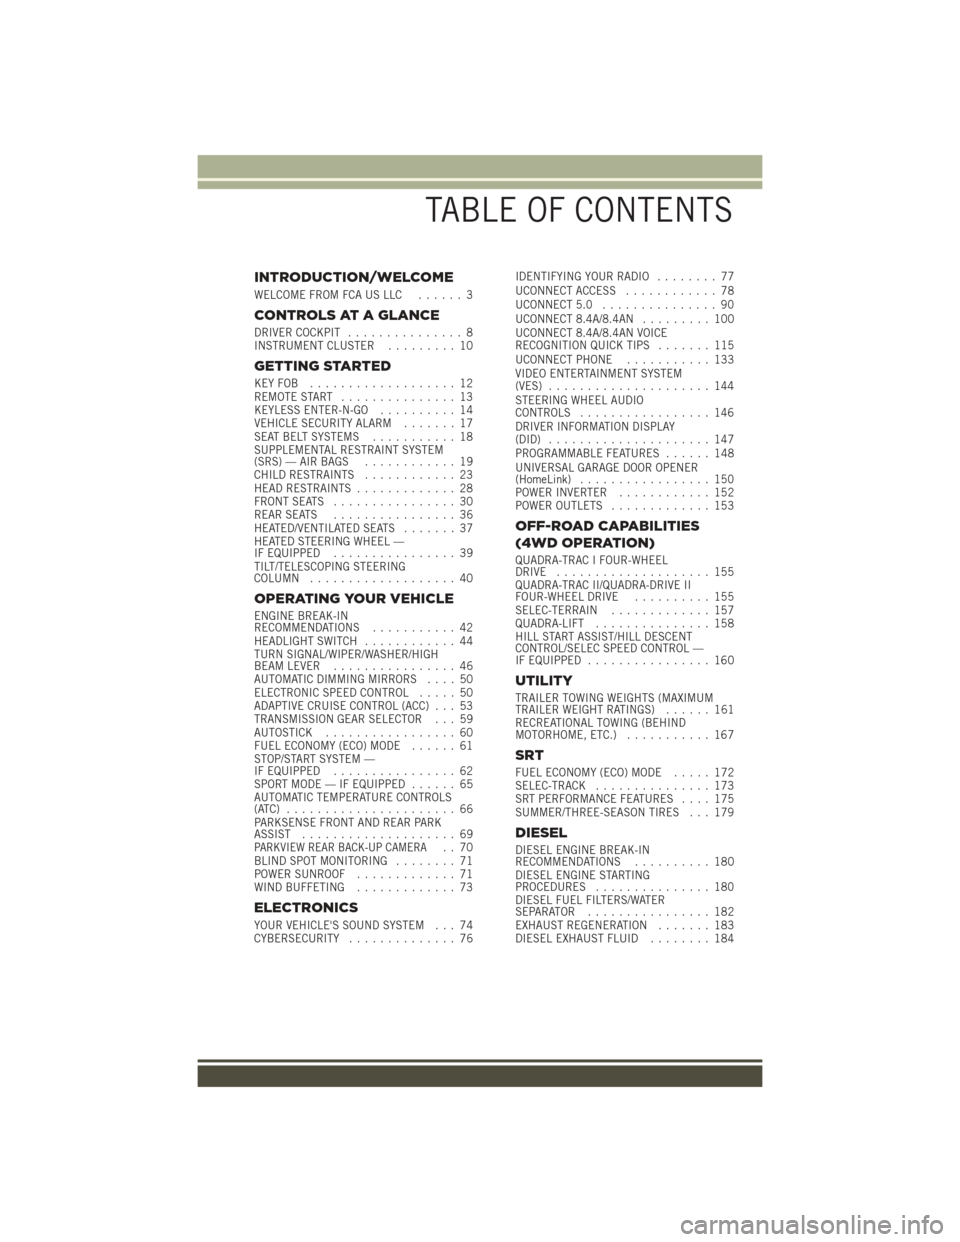
INTRODUCTION/WELCOME
WELCOME FROM FCA US LLC...... 3
CONTROLS AT A GLANCE
DRIVER COCKPIT............... 8
INSTRUMENT CLUSTER ......... 10
GETTING STARTED
KEYFOB ................... 12
REMOTE START............... 13
KEYLESS ENTER-N-GO .......... 14
VEHICLE SECURITY ALARM ....... 17
SEAT BELT SYSTEMS ........... 18
SUPPLEMENTAL RESTRAINT SYSTEM
(SRS) — AIR BAGS ............ 19
CHILD RESTRAINTS ............ 23
HEAD RESTRAINTS ............. 28
FRONT SEATS ................ 30
REAR SEATS ................ 36
HEATED/VENTILATED SEATS ....... 37
HEATED STEERING WHEEL —
IF EQUIPPED ................ 39
TILT/TELESCOPING STEERING
COLUMN ................... 40
OPERATING YOUR VEHICLE
ENGINE BREAK-IN
RECOMMENDATIONS ........... 42
HEADLIGHT SWITCH ............ 44
TURN SIGNAL/WIPER/WASHER/HIGH
BEAM LEVER ................ 46
AUTOMATIC DIMMING MIRRORS .... 50
ELECTRONIC SPEED CONTROL ..... 50
ADAPTIVE CRUISE CONTROL (ACC) . . . 53
TRANSMISSION GEAR SELECTOR . . . 59
AUTOSTICK ................. 60
FUEL ECONOMY (ECO) MODE ...... 61
STOP/START SYSTEM —
IF EQUIPPED ................ 62
SPORT MODE — IF EQUIPPED ...... 65
AUTOMATIC TEMPERATURE CONTROLS
(ATC) ...................... 66
PARKSENSE FRONT AND REAR PARK
ASSIST .................... 69
PARKVIEW REAR BACK-UP CAMERA.. 70
BLIND SPOT MONITORING ........ 71
POWER SUNROOF ............. 71
WIND BUFFETING ............. 73
ELECTRONICS
YOUR VEHICLE'S SOUND SYSTEM . . . 74
CYBERSECURITY.............. 76 IDENTIFYING YOUR RADIO
........ 77
UCONNECT ACCESS ............ 78
UCONNECT 5.0 ............... 90
UCONNECT 8.4A/8.4AN ......... 100
UCONNECT 8.4A/8.4AN VOICE
RECOGNITION QUICK TIPS ....... 115
UCONNECT PHONE ........... 133
VIDEO ENTERTAINMENT SYSTEM
(VES) ..................... 144
STEERING WHEEL AUDIO
CONTROLS ................. 146
DRIVER INFORMATION DISPLAY
(DID) ..................... 147
PROGRAMMABLE FEATURES ...... 148
UNIVERSAL GARAGE DOOR OPENER
(HomeLink) ................. 150
POWER INVERTER ............ 152
POWER OUTLETS ............. 153
OFF-ROAD CAPABILITIES
(4WD OPERATION)
QUADRA-TRAC I FOUR-WHEEL
DRIVE .................... 155
QUADRA-TRAC II/QUADRA-DRIVE II
FOUR-WHEEL DRIVE .......... 155
SELEC-TERRAIN ............. 157
QUADRA-LIFT ............... 158
HILL START ASSIST/HILL DESCENT
CONTROL/SELEC SPEED CONTROL —
IF EQUIPPED ................ 160
UTILITY
TRAILER TOWING WEIGHTS (MAXIMUM
TRAILER WEIGHT RATINGS) ...... 161
RECREATIONAL TOWING (BEHIND
MOTORHOME, ETC.) ........... 167
SRT
FUEL ECONOMY (ECO) MODE ..... 172
SELEC-TRACK ............... 173
SRT PERFORMANCE FEATURES .... 175
SUMMER/THREE-SEASON TIRES . . . 179
DIESEL
DIESEL ENGINE BREAK-IN
RECOMMENDATIONS .......... 180
DIESEL ENGINE STARTING
PROCEDURES ............... 180
DIESEL FUEL FILTERS/WATER
SEPARATOR ................ 182
EXHAUST REGENERATION ....... 183
DIESEL EXHAUST FLUID ........ 184
TABLE OF CONTENTS
Page 4 of 276
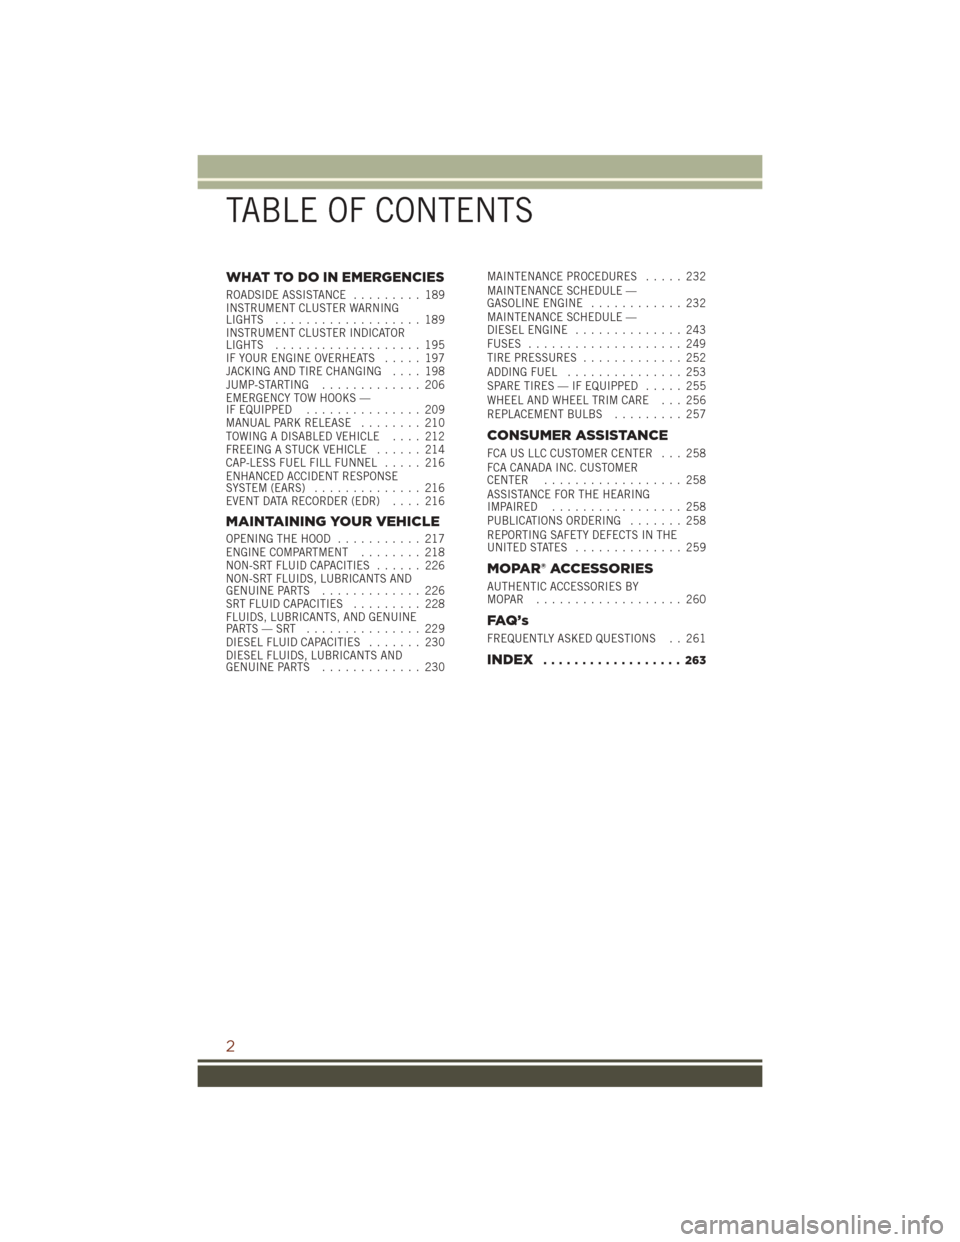
WHAT TO DO IN EMERGENCIES
ROADSIDE ASSISTANCE......... 189
INSTRUMENT CLUSTER WARNING
LIGHTS ................... 189
INSTRUMENT CLUSTER INDICATOR
LIGHTS ................... 195
IF YOUR ENGINE OVERHEATS ..... 197
JACKING AND TIRE CHANGING .... 198
JUMP-STARTING ............. 206
EMERGENCY TOW HOOKS —
IF EQUIPPED ............... 209
MANUAL PARK RELEASE ........ 210
TOWING A DISABLED VEHICLE .... 212
FREEING A STUCK VEHICLE ...... 214
CAP-LESS FUEL FILL FUNNEL ..... 216
ENHANCED ACCIDENT RESPONSE
SYSTEM (EARS) .............. 216
EVENT DATA RECORDER (EDR) .... 216
MAINTAINING YOUR VEHICLE
OPENING THE HOOD........... 217
ENGINE COMPARTMENT ........ 218
NON-SRT FLUID CAPACITIES ...... 226
NON-SRT FLUIDS, LUBRICANTS AND
GENUINE PARTS ............. 226
SRT FLUID CAPACITIES ......... 228
FLUIDS, LUBRICANTS, AND GENUINE
PARTS—SRT ............... 229
DIESEL FLUID CAPACITIES ....... 230
DIESEL FLUIDS, LUBRICANTS AND
GENUINE PARTS ............. 230 MAINTENANCE PROCEDURES
..... 232
MAINTENANCE SCHEDULE —
GASOLINE ENGINE ............ 232
MAINTENANCE SCHEDULE —
DIESEL ENGINE .............. 243
FUSES .................... 249
TIRE PRESSURES ............. 252
ADDING FUEL ............... 253
SPARE TIRES — IF EQUIPPED ..... 255
WHEEL AND WHEEL TRIM CARE . . . 256
REPLACEMENT BULBS ......... 257
CONSUMER ASSISTANCE
FCA US LLC CUSTOMER CENTER . . . 258
FCA CANADA INC. CUSTOMER
CENTER.................. 258
ASSISTANCE FOR THE HEARING
IMPAIRED ................. 258
PUBLICATIONS ORDERING ....... 258
REPORTING SAFETY DEFECTS IN THE
UNITEDSTATES .............. 259
MOPAR® ACCESSORIES
AUTHENTIC ACCESSORIES BY
MOPAR ................... 260
FAQ ’ s
FREQUENTLY ASKED QUESTIONS . . 261
INDEX.................. 263
TABLE OF CONTENTS
2
Page 10 of 276
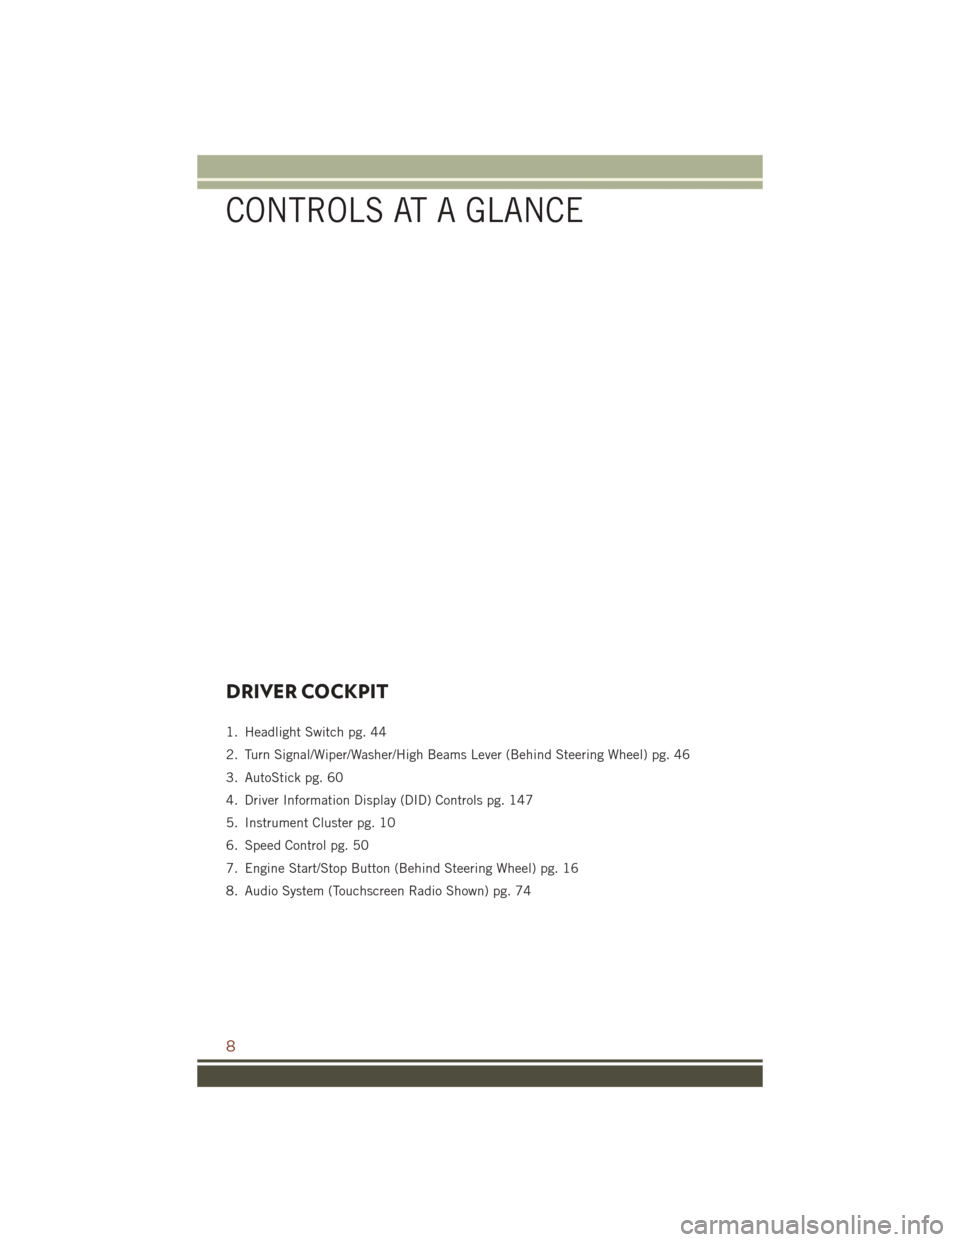
DRIVER COCKPIT
1. Headlight Switch pg. 44
2. Turn Signal/Wiper/Washer/High Beams Lever (Behind Steering Wheel) pg. 46
3. AutoStick pg. 60
4. Driver Information Display (DID) Controls pg. 147
5. Instrument Cluster pg. 10
6. Speed Control pg. 50
7. Engine Start/Stop Button (Behind Steering Wheel) pg. 16
8. Audio System (Touchscreen Radio Shown) pg. 74
CONTROLS AT A GLANCE
8
Page 13 of 276
4. Engine Temperature Gauge pg. 189
5. Fuel Door Location
6. Fuel Gauge pg. 195
(See page 195 for Instrument Cluster Indicator Lights.)
CONTROLS AT A GLANCE
11
Page 15 of 276
REMOTE START
Push the REMOTE START buttonon the Key Fob twice within five seconds.
Pushing the REMOTE START button a third time shuts the engine off.
To drive the vehicle, with a valid Keyless Enter-N-Go Key Fob within 5 ft (1.5m) of the
driver's side of the vehicle, grab the front driver door handle to unlock the driver's
door automatically, then push the START/STOP button.
With Remote Start, the engine will only run for 15 minutes (timeout) unless the
ignition is placed in the ON/RUN position.
The vehicle must be started with the ENGINE START/STOP button after two
consecutive timeouts.
NOTE:
For 3.0L Diesel Engine, please refer to “Things To Know Before Starting Your
Vehicle” located in your Diesel Supplement.
WARNING!
• Do not start or run an engine in a closed garage or confined area. Exhaust gas contains Carbon Monoxide (CO) which is odorless and colorless. Carbon
Monoxide is poisonous and can cause you or others to be severely injured or
killed when inhaled.
• Keep Key Fob transmitters away from children. Operation of the Remote Start
System, windows, door locks or other controls could cause you and others to be
severely injured or killed.
GETTING STARTED
13
Page 18 of 276
Engine Starting/Stopping
Starting
Perform the following starting procedure
with a Remote Keyless Entry (RKE) trans-
mitter inside the vehicle:
1. Place the gear selector in PARK orNEUTRAL.
2. While depressing the brake pedal, push the ENGINE START/STOP but-
ton once. If the engine fails to start,
the starter will disengage automati-
cally after 10 seconds.
3. To stop the cranking of the engine prior to the engine starting, push the
button again.
Stopping
1. Bring the vehicle to a complete stop.
2. Shift the transmission to PARK (P).
3. Push the ENGINE START/STOP button once. The ignition switch will return to theOFF position.
NOTE:
If the transmission is not in PARK and the vehicle is in motion, the ENGINE
START/STOP button must be held for two seconds with the vehicle speed above
5 mph (8 km/h) before the engine will shut off.
Accessory Positions With Engine Off
NOTE:
The following functions are with the driver’s foot off of the Brake Pedal (transmission
in PARK).
Beginning With The Ignition Switch In The OFF Position:
1. Push the ENGINE START/STOP button once to cycle the ignition to the ACC position.
2. Push the ENGINE START/STOP button a second time to cycle the ignition to the ON/RUN position.
Start/Stop Button
GETTING STARTED
16
Page 19 of 276
3. Push the ENGINE START/STOP button a third time to return the ignition to theOFF position.
NOTE:
If the ignition is left in the ACC or ON/
RUN (engine not running) position and
the transmission is in PARK, the system
will automatically time out after 30 min-
utes of inactivity, and the ignition is re-
turned to the OFF position.
VEHICLE SECURITY ALARM
The Vehicle Security Alarm monitors the vehicle doors for unauthorized entry and the
ignition for unauthorized operation. While the Vehicle Security Alarm is armed,
interior switches for door locks and decklid release are disabled. If something triggers
the alarm, the Vehicle Security Alarm will provide the following audible and visible
signals: the horn will pulse, the park lamps and/or turn signals will flash, and the
Vehicle Security Light in the instrument cluster will flash.
To A r m
Cycle the Keyless Enter-N-Go START/STOP button until the button display indicates
that the vehicle ignition is “OFF.” Push the power door lock switch while the door is
open, push the Key Fob LOCK button, or with one of the Key Fobs located outside the
vehicle and within 5 ft (1.5 m) of the driver's and passenger front door handles, push
the Keyless Enter-N-Go LOCK button located on the door handle.
NOTE:
After pushing the Keyless Enter-N-Go LOCK button, you must wait two seconds
before you can lock or unlock the vehicle via the door handle.
To Disarm
Push the Key Fob UNLOCK button or with one of the Key Fobs located outside the
vehicle and within 5 ft (1.5 m) of the driver's and passenger front door handles. Grab
the Keyless Enter-N-Go door handle and enter the vehicle, then push the Keyless
Enter-N-Go START/STOP button (requires at least one valid Key Fob in the vehicle).
Ignition Positions
GETTING STARTED
17
Page 23 of 276
WARNING!
• Side Air Bags need room to inflate. Do not lean against the door or window. Situpright in the center of the seat.
• Being too close to the Side Air Bags during deployment could cause you to be
severely injured or killed.
• Relying on the Side Air Bags alone could lead to more severe injuries in a
collision. The Side Air Bags work with your seat belt to restrain you properly. In
some collisions, Side Air Bags won’t deploy at all. Always wear your seat belt
even though you have Side Air Bags.
• This vehicle is equipped with left and right Supplemental Side Air Bag
Inflatable Curtains (SABICs). Do not stack luggage or other cargo up high
enough to block the deployment of the SABICs. The trim covering above the
side windows where the SABIC and its deployment path are located should
remain free from any obstructions.
• This vehicle is equipped with SABICs. In order for the SABICs to work as
intended, do not install any accessory items in your vehicle which could alter
the roof. Do not add an aftermarket sunroof to your vehicle. Do not add roof
racks that require permanent attachments (bolts or screws) for installation on
the vehicle roof. Do not drill into the roof of the vehicle for any reason.
• Do not use accessory seat covers or place objects between you and the Side Air
Bags; the performance could be adversely affected and/or objects could be
pushed into you, causing serious injury.
Enhanced Accident Response System
In the event of an impact, if the communication network remains intact, and the
power remains intact, depending on the nature of the event, the ORC will determine
whether to have the Enhanced Accident Response System perform the following
functions:
• Cut off fuel to the engine.
• Flash hazard lights as long as the battery has power or until the hazard light button
is pushed. The hazard lights can be deactivated by pushing the hazard light
button.
• Turn on the interior lights, which remain on as long as the battery has power.
• Unlock the power door locks.
Enhanced Accident Response System Reset Procedure
In order to reset the Enhanced Accident Response System functions after an event,
the ignition switch must be changed from ignition START or ON/RUN to ignition OFF.
Carefully check the vehicle for fuel leaks in the engine compartment and on the
ground near the engine compartment and fuel tank before resetting the system and
starting the engine.
GETTING STARTED
21
Page 24 of 276
Air Bag Warning Light
The air bags must be ready to inflate for your protection in a collision. The Occupant
Restraint Controller (ORC) monitors the internal circuits and interconnecting wiring
associated with air bag system electrical components.
The ORC monitors the readiness of the electronic parts of the air bag system
whenever the ignition switch is in the START or ON/RUN position. If the ignition
switch is in the OFF position or in the ACC position, the air bag system is not on and
the air bags will not inflate.
The ORC turns on the Air Bag Warning Light in the instrument panel for approxi-
mately four to eight seconds for a self-check when the ignition switch is first turned
to the ON/RUN position. After the self-check, the Air Bag Warning Light will turn off.
If the ORC detects a malfunction in any part of the system, it turns on the Air Bag
Warning Light, either momentarily or continuously. A single chime will sound to alert
you if the light comes on again after initial startup.
If the Air Bag Warning Light in the instrument panel is not on during the four to eight
seconds when the ignition switch is first turned to the ON/RUN position, stays on, or
turns on while driving, have the vehicle serviced by an authorized service center
immediately.
NOTE:
If the speedometer, tachometer, or any engine related gauges are not working, the
Occupant Restraint Controller (ORC) may also be disabled. In this condition the air
bags may not be ready to inflate for your protection. Have an authorized dealer
service the air bag system immediately.
Event Data Recorder (EDR)
This vehicle is equipped with an event data recorder (EDR). The main purpose of an
EDR is to record, in certain crash or near crash-like situations, such as an air bag
deployment or hitting a road obstacle, data that will assist in understanding how a
vehicle’s systems performed. The EDR is designed to record data related to vehicle
dynamics and safety systems for a short period of time, typically 30 seconds or less.
The EDR in this vehicle is designed to record such data as:
• How various systems in your vehicle were operating;
• Whether or not the driver and passenger safety belts were buckled/fastened;
• How far (if at all) the driver was depressing the accelerator and/or brake pedal;and,
• How fast the vehicle was traveling.
GETTING STARTED
22
Page 39 of 276
WARNING!
• Be certain that the seatback is securely locked into position. If the seatback isnot securely locked into position the seat will not provide the proper stability
for child seats and/or passengers. An improperly latched seat could cause
serious injury.
• The cargo area in the rear of the vehicle (with the rear seatbacks in the
locked-up or folded down position) should not be used as a play area by
children when the vehicle is in motion. They could be seriously injured in a
collision. Children should be seated and using the proper restraint system.
Reclining Rear Seat
To recline the seatback, lift the lever located on the outboard side of the seat, lean
back and release the lever at the desired position. To return the seatback, lift the
lever, lean forward and release the lever.
WARNING!
Do not ride with the seatback reclined so that the shoulder belt is no longer resting
against your chest. In a collision you could slide under the seat belt, which could
result in serious injury or death.
HEATED/VENTILATED SEATS
Front Heated Seats
The front heated seats control buttons are located within the climate or controls
screen of the touchscreen.
You can choose from HI, LO or OFF heat settings. The indicator arrows in touchscreen
buttons indicate the level of heat in use. Two indicator arrows will illuminate for HI,
one for LO and none for OFF.
• Press the heated seat button
once to turn the HI setting ON.
• Press the heated seat button
a second time to turn the LO setting ON.
• Press the heated seat button
a third time to turn the heating elements OFF.
If the HI-level setting is selected, the system will automatically switch to LO-level
after approximately 60 minutes of continuous operation. At that time, the display will
change from HI to LO, indicating the change. The LO-level setting will turn OFF
automatically after approximately 45 minutes.
NOTE:
• Once a heat setting is selected, heat will be felt within two to five minutes.
• The engine must be running for the heated seats to operate.
GETTING STARTED
37