brake fluid JEEP GRAND CHEROKEE 2017 WK2 / 4.G Owner's Manual
[x] Cancel search | Manufacturer: JEEP, Model Year: 2017, Model line: GRAND CHEROKEE, Model: JEEP GRAND CHEROKEE 2017 WK2 / 4.GPages: 372
Page 241 of 372
SCHEDULED SERVICING —
DIESEL ENGINE
Your vehicle is equipped with an automatic
oil change indicator system. The oil change
indicator system will remind you that it is
time to take your vehicle in for scheduled
maintenance.
Based on engine operation conditions, the oil
change indicator message will illuminate.
This means that service is required for your
vehicle. Operating conditions such as fre-
quent short-trips, trailer tow, extremely hot or
cold ambient temperatures will influence
when the “Oil Change Required” message is
displayed. Severe Operating Conditions can
cause the change oil message to illuminate
as early as 3,500 miles (5,600 km) since last
reset. Have your vehicle serviced as soon as
possible, within the next 500 miles
(805 km).Your authorized dealer will reset the oil
change indicator message after completing
the scheduled oil change. If a scheduled oil
change is performed by someone other than
your authorized dealer, the message can be
reset by referring to the steps described un-
der “Instrument Cluster Display” in “Getting
To Know Your Instrument Panel” in this
guide.
NOTE:
Under no circumstances should oil change
intervals exceed 10,000 miles (16,000 km)
or twelve months, whichever comes first.
Engine Oil Filter Replacement
Residual oil in the housing may spill from the
housing when the new filter is installed if the
residual oil is not either removed from the
housing or enough time has not elapsed to
allow the oil to drain back into the engine.
When servicing the oil filter on this engine,carefully remove the filter and use a suction
gun to remove any residual oil left in the
housing or wait about 30 minutes for the oil
to drain back into the engine.
Once A Month Or Before A Long Trip:
• Check engine oil level
• Check windshield washer fluid level
• Check the tire inflation pressures and look
for unusual wear or damage
• Check the fluid levels of the coolant reser- voir, brake master cylinder, and fill as
needed
• Check function of all interior and exterior lights
239
Page 242 of 372
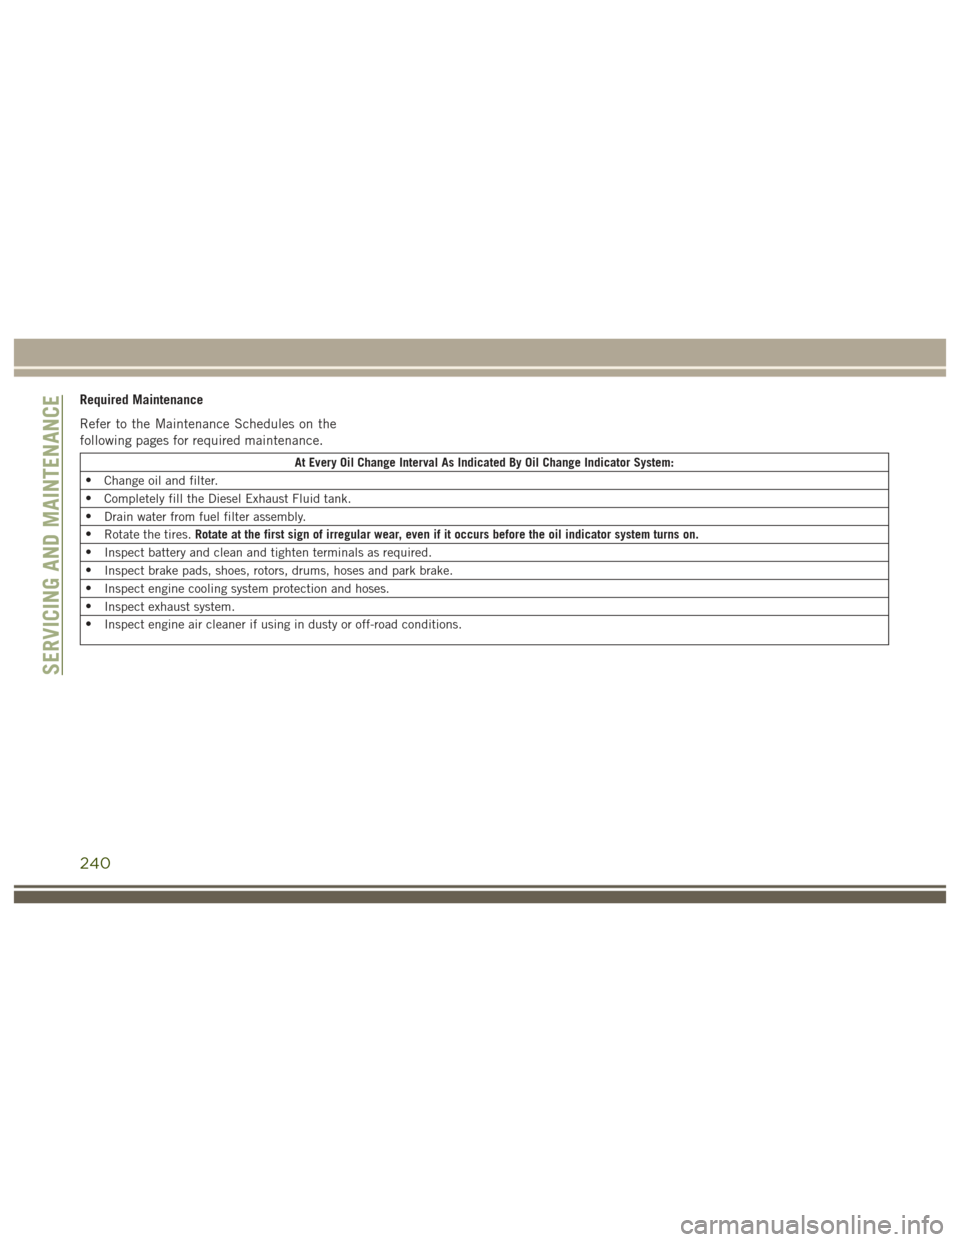
Required Maintenance
Refer to the Maintenance Schedules on the
following pages for required maintenance.
At Every Oil Change Interval As Indicated By Oil Change Indicator System:
• Change oil and filter.
• Completely fill the Diesel Exhaust Fluid tank.
• Drain water from fuel filter assembly.
• Rotate the tires. Rotate at the first sign of irregular wear, even if it occurs before the oil indicator system turns on.
• Inspect battery and clean and tighten terminals as required.
• Inspect brake pads, shoes, rotors, drums, hoses and park brake.
• Inspect engine cooling system protection and hoses.
• Inspect exhaust system.
• Inspect engine air cleaner if using in dusty or off-road conditions.
SERVICING AND MAINTENANCE
240
Page 243 of 372
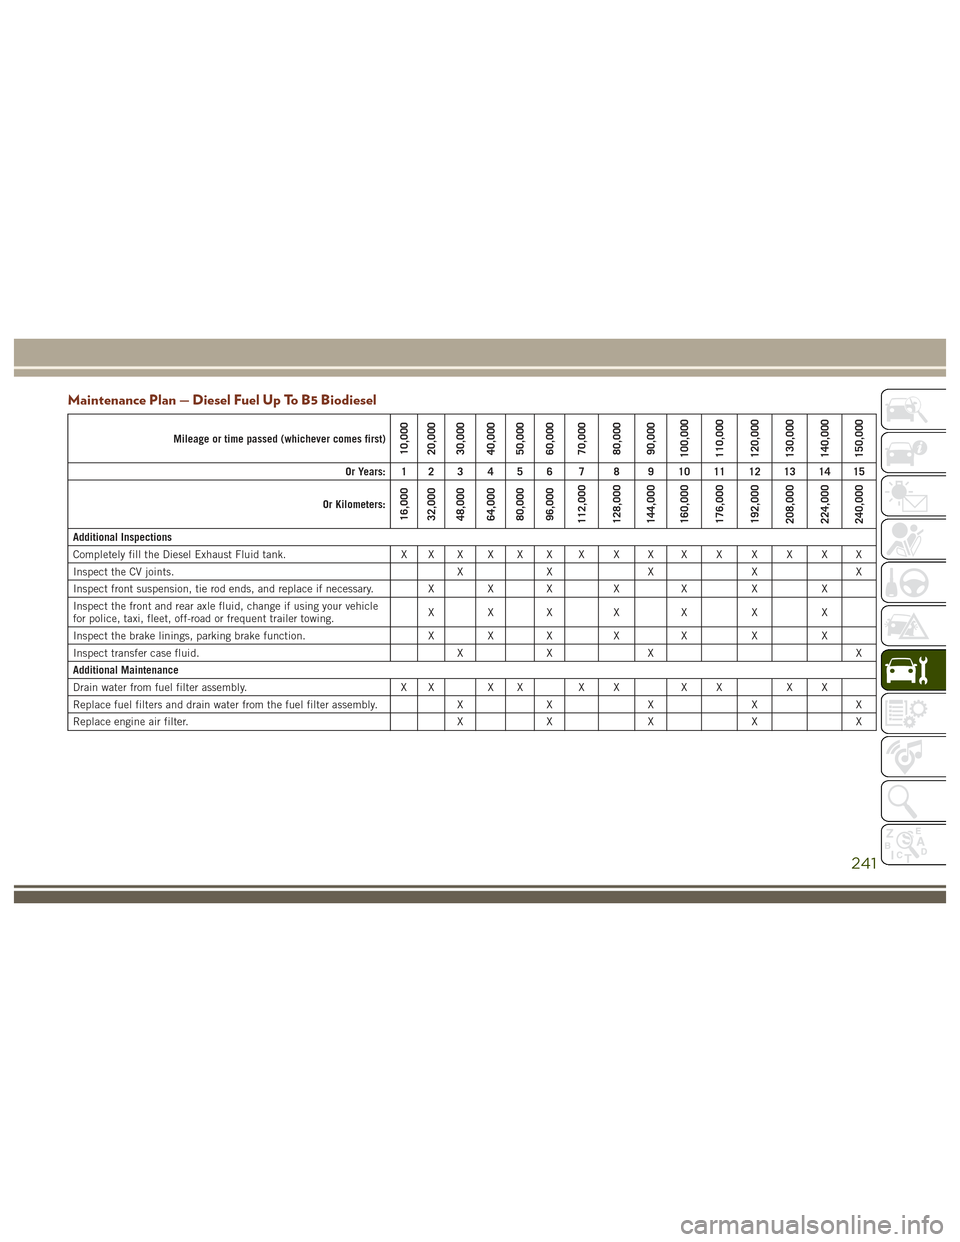
Maintenance Plan — Diesel Fuel Up To B5 Biodiesel
Mileage or time passed (whichever comes first)10,000
20,000
30,000
40,000
50,000
60,000
70,000
80,000
90,000
100,000
110,000
120,000
130,000
140,000
150,000
Or Years: 1 2 3 4 5 6 7 8 9 10 11 12 13 14 15
Or Kilometers:
16,000
32,000
48,000
64,000
80,000
96,000
112,000
128,000
144,000
160,000
176,000
192,000
208,000
224,000
240,000
Additional Inspections
Completely fill the Diesel Exhaust Fluid tank. X X X X X X X X X X X X X X X
Inspect the CV joints. X X X X X
Inspect front suspension, tie rod ends, and replace if necessary. X X X X X X X
Inspect the front and rear axle fluid, change if using your vehicle
for police, taxi, fleet, off-road or frequent trailer towing. XXX X X X X
Inspect the brake linings, parking brake function. X X X X X X X
Inspect transfer case fluid. X X X X
Additional Maintenance
Drain water from fuel filter assembly. X X X X X X X X X X
Replace fuel filters and drain water from the fuel filter assembly. X X X X X
Replace engine air filter. X X X X X
241
Page 246 of 372
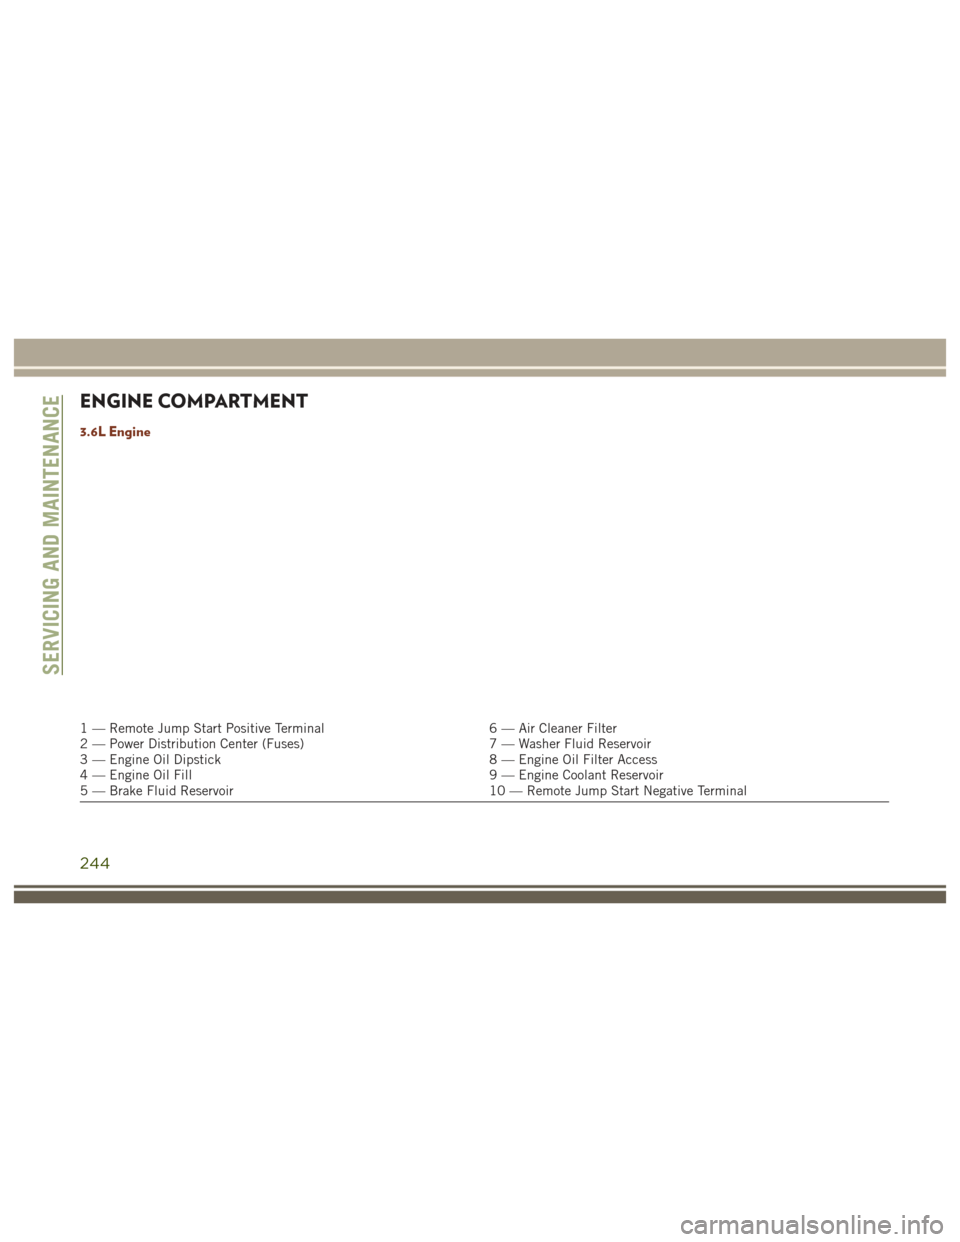
ENGINE COMPARTMENT
3.6L Engine
1 — Remote Jump Start Positive Terminal6 — Air Cleaner Filter
2 — Power Distribution Center (Fuses) 7 — Washer Fluid Reservoir
3 — Engine Oil Dipstick 8 — Engine Oil Filter Access
4 — Engine Oil Fill 9 — Engine Coolant Reservoir
5 — Brake Fluid Reservoir 10 — Remote Jump Start Negative Terminal
SERVICING AND MAINTENANCE
244
Page 247 of 372
5.7L Engine
1 — Remote Jump Start Positive Terminal6 — Air Cleaner Filter
2 — Power Distribution Center (Fuses) 7 — Washer Fluid Reservoir
3 — Engine Oil Dipstick 8 — Coolant Pressure Cap (Radiator)
4 — Engine Oil Fill 9 — Engine Coolant Reservoir
5 — Brake Fluid Reservoir 10— Remote Jump Start Negative Terminal
245
Page 248 of 372
6.4L Engine
1 — Remote Jump Start Positive Terminal6 — Air Cleaner Filter
2 — Power Distribution Center (Fuses) 7 — Washer Fluid Reservoir
3 — Engine Oil Dipstick 8 — Coolant Pressure Cap (Radiator)
4 — Engine Oil Fill 9 — Engine Coolant Reservoir
5 — Brake Fluid Reservoir 10 — Remote Jump Start Negative Terminal
SERVICING AND MAINTENANCE
246
Page 249 of 372
3.0L Diesel Engine
1 — Remote Jump Start Positive Terminal6 — Air Cleaner Filter
2 — Power Distribution Center (Fuses) 7 — Washer Fluid Reservoir
3 — Engine Oil Dipstick 8 — Coolant Pressure Reservoir
4 — Engine Oil Fill 9 — Remote Jump Start Negative Terminal
5 — Brake Fluid Reservoir
247
Page 251 of 372
voir, take some washer fluid and apply it to a
cloth or towel and wipe clean the wiper
blades, this will help blade performance. To
prevent freeze-up of your windshield washer
system in cold weather, select a solution or
mixture that meets or exceeds the tempera-
ture range of your climate. This rating infor-
mation can be found on most washer fluid
containers.
WARNING!
Commercially available windshield washer
solvents are flammable. They could ignite
and burn you. Care must be exercised
when filling or working around the washer
solution.
Brake System
In order to assure brake system performance,
all brake system components should be in-
spected periodically. Refer to the “Mainte-
nance Plan” in this section for the proper
maintenance intervals.
WARNING!
Riding the brakes can lead to brake failure
and possibly a collision. Driving with your
foot resting or riding on the brake pedal
can result in abnormally high brake tem-
peratures, excessive lining wear, and pos-
sible brake damage. You would not have
your full braking capacity in an emergency.
Fluid Level Check — Brake Master Cylinder
The fluid level of the master cylinder should
be checked whenever the vehicle is serviced,
or immediately if the brake system warning
light is on. If necessary, add fluid to bring
level to the full mark on the side of the
reservoir of the brake master cylinder. Be sure
to clean the top of the master cylinder area
before removing cap. With disc brakes, fluid
level can be expected to fall as the brake pads
wear. Brake fluid level should be checked
when pads are replaced. If the brake fluid is
abnormally low, check system for leaks.
Refer to “Fluids And Lubricants” in “Techni-
cal Specifications” for further information.
WARNING!
• Use only manufacturer's recommendedbrake fluid. Refer to “Fluids And Lubri-
cants” in “Technical Specifications” for
further information. Using the wrong
type of brake fluid can severely damage
your brake system and/or impair its per-
formance. The proper type of brake fluid
for your vehicle is also identified on the
original factory installed hydraulic mas-
ter cylinder reservoir.
• To avoid contamination from foreign
matter or moisture, use only new brake
fluid or fluid that has been in a tightly
closed container. Keep the master cylin-
der reservoir cap secured at all times.
Brake fluid in a open container absorbs
moisture from the air resulting in a lower
boiling point. This may cause it to boil
unexpectedly during hard or prolonged
braking, resulting in sudden brake fail-
ure. This could result in a collision.
• Overfilling the brake fluid reservoir can
result in spilling brake fluid on hot en-
gine parts, causing the brake fluid to
249
Page 252 of 372
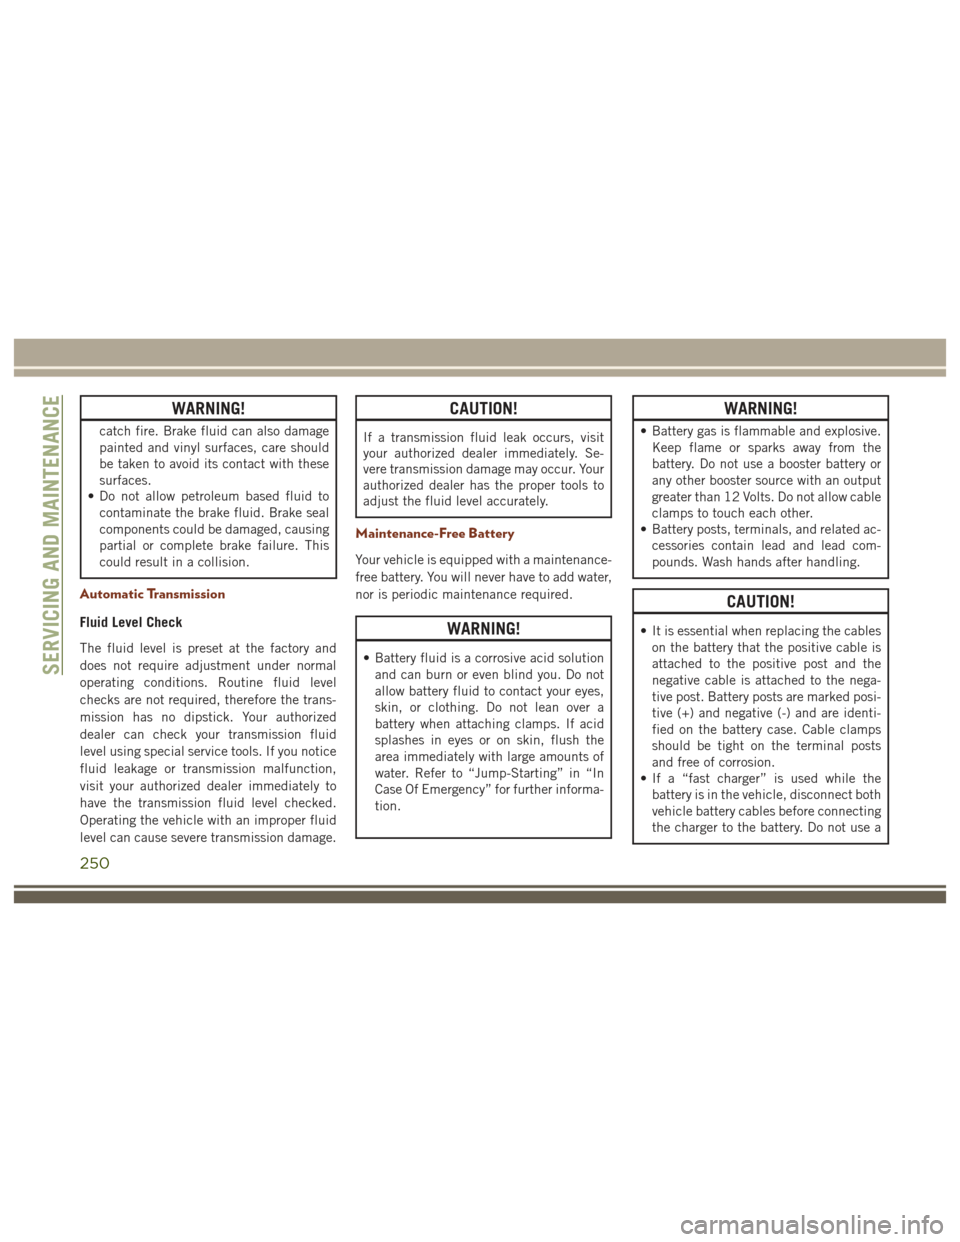
WARNING!
catch fire. Brake fluid can also damage
painted and vinyl surfaces, care should
be taken to avoid its contact with these
surfaces.
• Do not allow petroleum based fluid to
contaminate the brake fluid. Brake seal
components could be damaged, causing
partial or complete brake failure. This
could result in a collision.
Automatic Transmission
Fluid Level Check
The fluid level is preset at the factory and
does not require adjustment under normal
operating conditions. Routine fluid level
checks are not required, therefore the trans-
mission has no dipstick. Your authorized
dealer can check your transmission fluid
level using special service tools. If you notice
fluid leakage or transmission malfunction,
visit your authorized dealer immediately to
have the transmission fluid level checked.
Operating the vehicle with an improper fluid
level can cause severe transmission damage.
CAUTION!
If a transmission fluid leak occurs, visit
your authorized dealer immediately. Se-
vere transmission damage may occur. Your
authorized dealer has the proper tools to
adjust the fluid level accurately.
Maintenance-Free Battery
Your vehicle is equipped with a maintenance-
free battery. You will never have to add water,
nor is periodic maintenance required.
WARNING!
• Battery fluid is a corrosive acid solutionand can burn or even blind you. Do not
allow battery fluid to contact your eyes,
skin, or clothing. Do not lean over a
battery when attaching clamps. If acid
splashes in eyes or on skin, flush the
area immediately with large amounts of
water. Refer to “Jump-Starting” in “In
Case Of Emergency” for further informa-
tion.
WARNING!
• Battery gas is flammable and explosive.Keep flame or sparks away from the
battery. Do not use a booster battery or
any other booster source with an output
greater than 12 Volts. Do not allow cable
clamps to touch each other.
• Battery posts, terminals, and related ac-
cessories contain lead and lead com-
pounds. Wash hands after handling.
CAUTION!
• It is essential when replacing the cableson the battery that the positive cable is
attached to the positive post and the
negative cable is attached to the nega-
tive post. Battery posts are marked posi-
tive (+) and negative (-) and are identi-
fied on the battery case. Cable clamps
should be tight on the terminal posts
and free of corrosion.
• If a “fast charger” is used while the
battery is in the vehicle, disconnect both
vehicle battery cables before connecting
the charger to the battery. Do not use a
SERVICING AND MAINTENANCE
250
Page 281 of 372
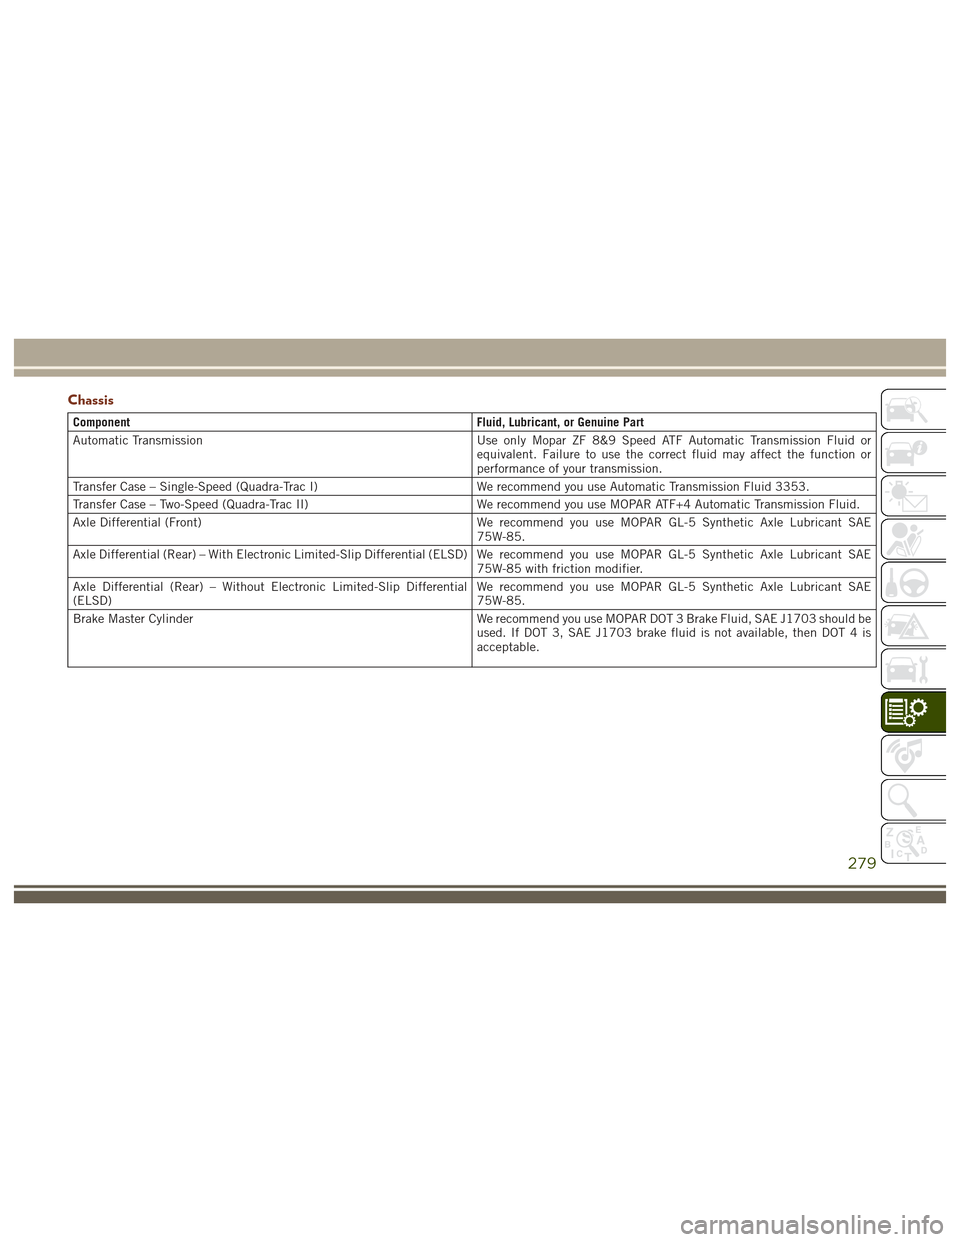
Chassis
ComponentFluid, Lubricant, or Genuine Part
Automatic Transmission Use only Mopar ZF 8&9 Speed ATF Automatic Transmission Fluid or
equivalent. Failure to use the correct fluid may affect the function or
performance of your transmission.
Transfer Case – Single-Speed (Quadra-Trac I) We recommend you use Automatic Transmission Fluid 3353.
Transfer Case – Two-Speed (Quadra-Trac II) We recommend you use MOPAR ATF+4 Automatic Transmission Fluid.
Axle Differential (Front) We recommend you use MOPAR GL-5 Synthetic Axle Lubricant SAE
75W-85.
Axle Differential (Rear) – With Electronic Limited-Slip Differential (ELSD) We recommend you use MOPAR GL-5 Synthetic Axle Lubricant SAE 75W-85 with friction modifier.
Axle Differential (Rear) – Without Electronic Limited-Slip Differential
(ELSD) We recommend you use MOPAR GL-5 Synthetic Axle Lubricant SAE
75W-85.
Brake Master Cylinder We recommend you use MOPAR DOT 3 Brake Fluid, SAE J1703 should be
used. If DOT 3, SAE J1703 brake fluid is not available, then DOT 4 is
acceptable.
279