run flat JEEP GRAND CHEROKEE 2017 WK2 / 4.G Owner's Manual
[x] Cancel search | Manufacturer: JEEP, Model Year: 2017, Model line: GRAND CHEROKEE, Model: JEEP GRAND CHEROKEE 2017 WK2 / 4.GPages: 372
Page 200 of 372
To reinstall the hitch receiver cover after
towing repeat the procedure in reverse order.NOTE:
Be sure to engage all tabs of the hitch re-
ceiver cover in the bumper fascia prior to
installation.
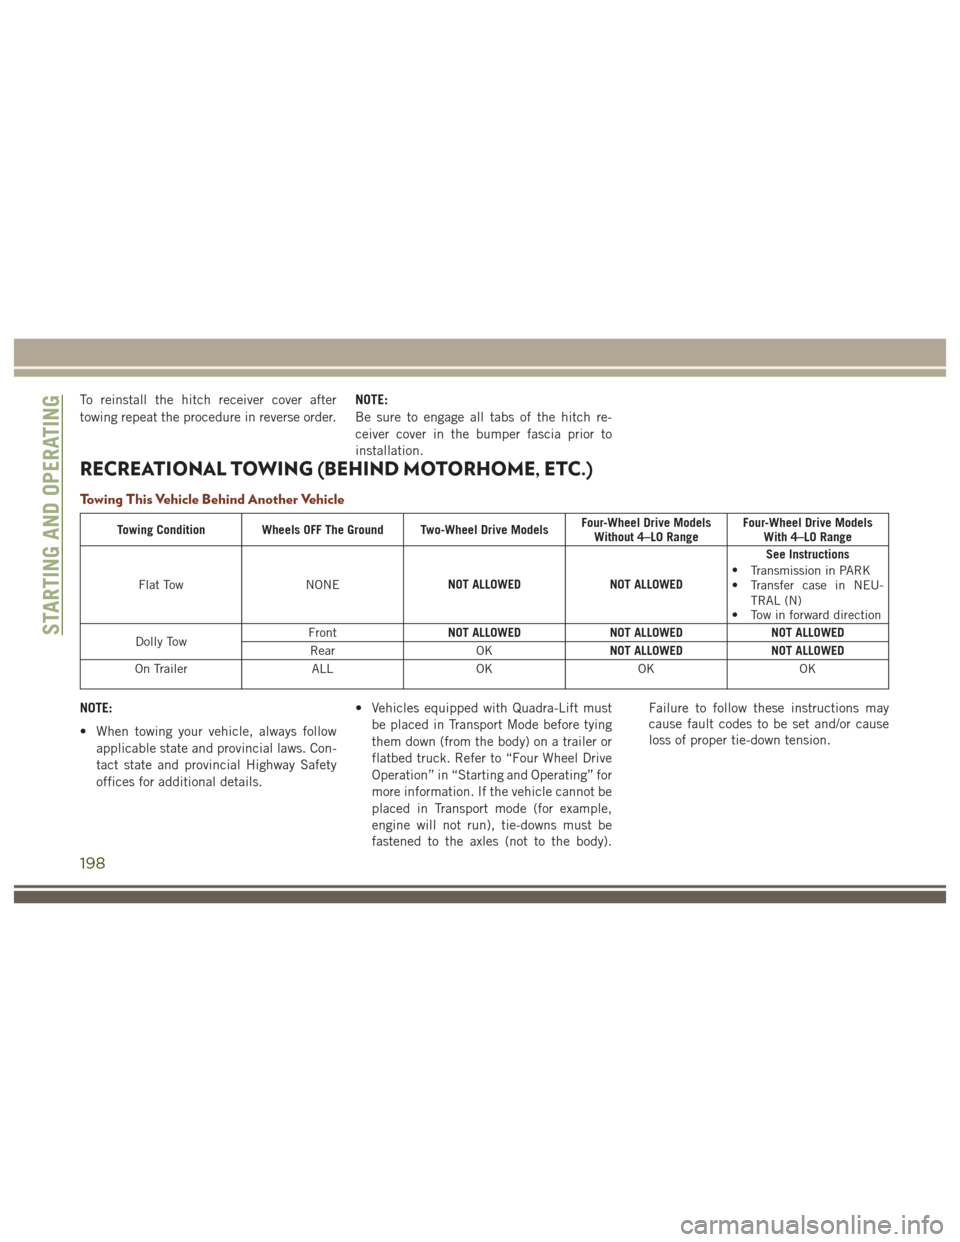
RECREATIONAL TOWING (BEHIND MOTORHOME, ETC.)
Towing This Vehicle Behind Another Vehicle
Towing Condition Wheels OFF The Ground Two-Wheel Drive Models
Four-Wheel Drive Models
Without 4–LO Range Four-Wheel Drive Models
With 4–LO Range
Flat Tow NONENOT ALLOWED
NOT ALLOWEDSee Instructions
• Transmission in PARK
• Transfer case in NEU-
TRAL (N)
• Tow in forward direction
Dolly Tow Front
NOT ALLOWED
NOT ALLOWEDNOT ALLOWED
Rear OKNOT ALLOWED
NOT ALLOWED
On Trailer ALLOKOKOK
NOTE:
• When towing your vehicle, always follow
applicable state and provincial laws. Con-
tact state and provincial Highway Safety
offices for additional details. • Vehicles equipped with Quadra-Lift must
be placed in Transport Mode before tying
them down (from the body) on a trailer or
flatbed truck. Refer to “Four Wheel Drive
Operation” in “Starting and Operating” for
more information. If the vehicle cannot be
placed in Transport mode (for example,
engine will not run), tie-downs must be
fastened to the axles (not to the body). Failure to follow these instructions may
cause fault codes to be set and/or cause
loss of proper tie-down tension.
STARTING AND OPERATING
198
Page 205 of 372
IN CASE OF EMERGENCY
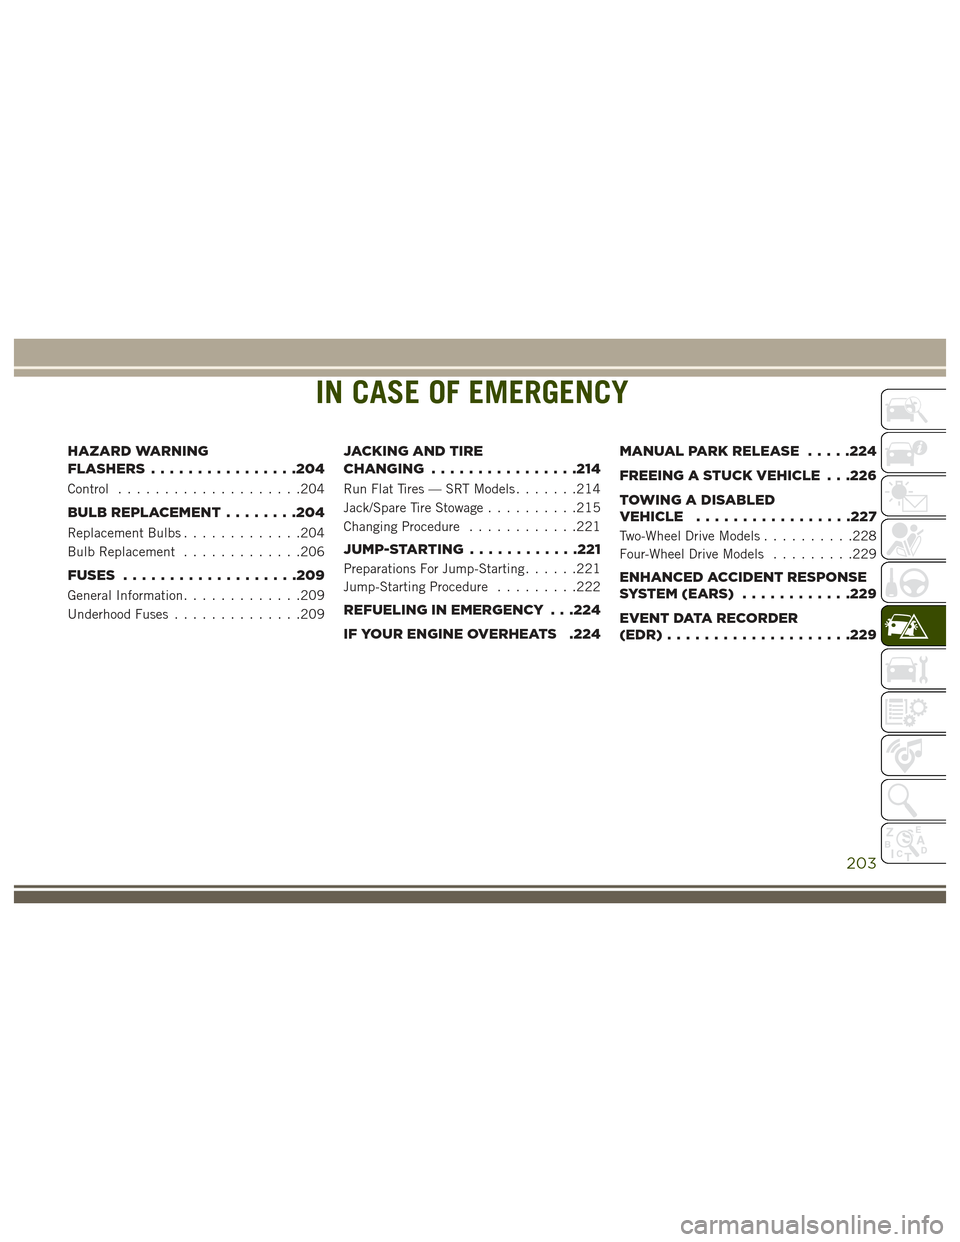
HAZARD WARNING
FLASHERS................204
Control....................204
BULB REPLACEMENT ........204
Replacement Bulbs.............204
Bulb Replacement .............206
FUSES ...................209
General Information.............209
Underhood Fuses ..............209
JACKING AND TIRE
CHANGING............... .214
Run Flat Tires — SRT Models .......214
Jack/Spare Tire Stowage ..........215
Changing Procedure ............221
JUMP-STARTING............221
Preparations For Jump-Starting ......221
Jump-Starting Procedure .........222
REFUELING IN EMERGENCY . . .224
IF YOUR ENGINE OVERHEATS .224 MANUAL PARK RELEASE
.....224
FREEING A STUCK VEHICLE . . .226
TOWING A DISABLED
VEHICLE ................ .227
Two-Wheel Drive Models..........228
Four-Wheel Drive Models .........229
ENHANCED ACCIDENT RESPONSE
SYSTEM(EARS) ........... .229
EVENT DATA RECORDER
(EDR)................... .229
IN CASE OF EMERGENCY
203
Page 216 of 372
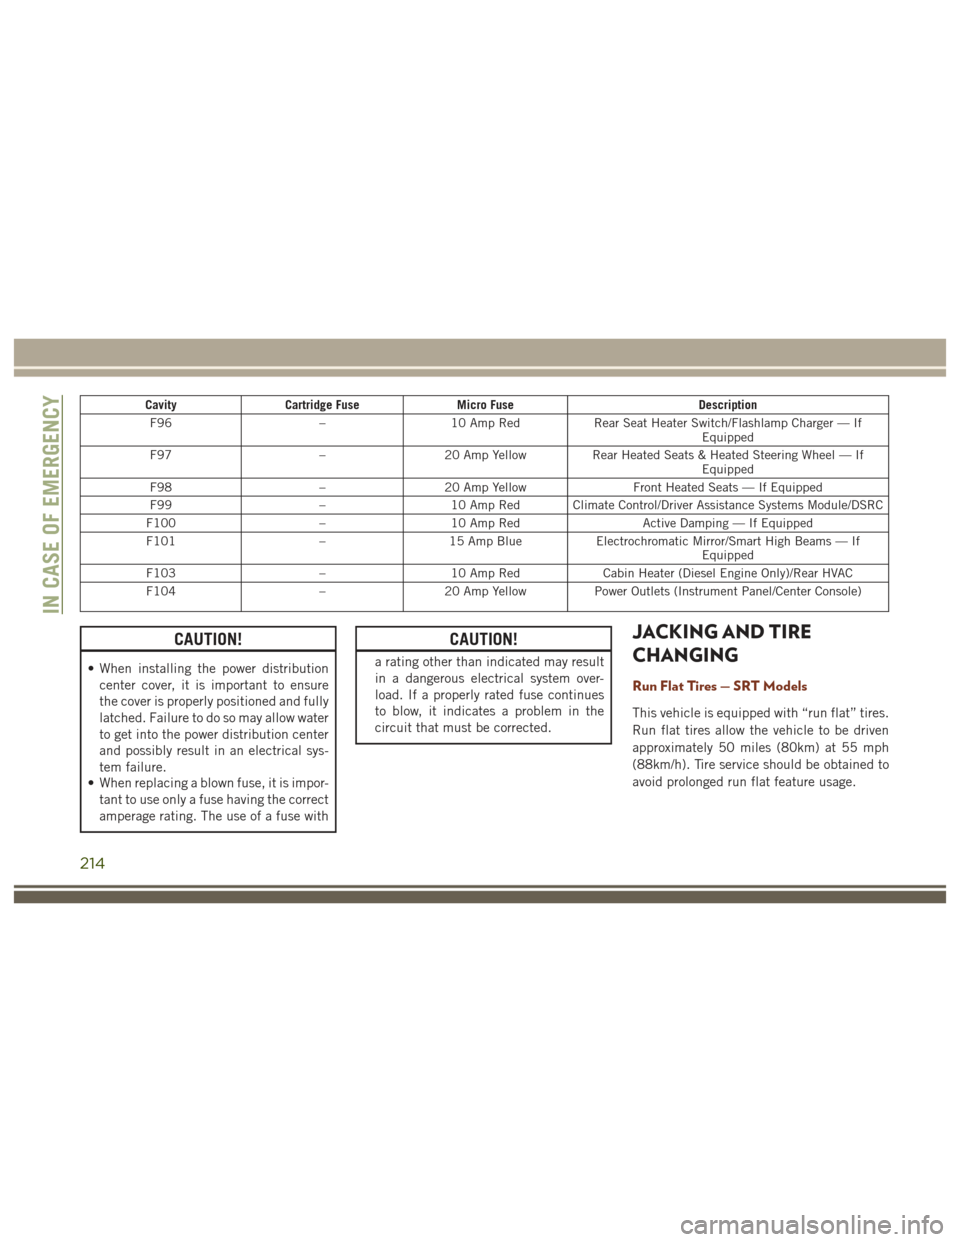
CavityCartridge Fuse Micro Fuse Description
F96 –10 Amp Red Rear Seat Heater Switch/Flashlamp Charger — If
Equipped
F97 –20 Amp Yellow Rear Heated Seats & Heated Steering Wheel — If
Equipped
F98 –20 Amp Yellow Front Heated Seats — If Equipped
F99 –10 Amp Red Climate Control/Driver Assistance Systems Module/DSRC
F100 –10 Amp Red Active Damping — If Equipped
F101 –15 Amp Blue Electrochromatic Mirror/Smart High Beams — If
Equipped
F103 –10 Amp Red Cabin Heater (Diesel Engine Only)/Rear HVAC
F104 –20 Amp Yellow Power Outlets (Instrument Panel/Center Console)
CAUTION!
• When installing the power distribution
center cover, it is important to ensure
the cover is properly positioned and fully
latched. Failure to do so may allow water
to get into the power distribution center
and possibly result in an electrical sys-
tem failure.
• When replacing a blown fuse, it is impor-
tant to use only a fuse having the correct
amperage rating. The use of a fuse with
CAUTION!
a rating other than indicated may result
in a dangerous electrical system over-
load. If a properly rated fuse continues
to blow, it indicates a problem in the
circuit that must be corrected.
JACKING AND TIRE
CHANGING
Run Flat Tires — SRT Models
This vehicle is equipped with “run flat” tires.
Run flat tires allow the vehicle to be driven
approximately 50 miles (80km) at 55 mph
(88km/h). Tire service should be obtained to
avoid prolonged run flat feature usage.
IN CASE OF EMERGENCY
214
Page 219 of 372
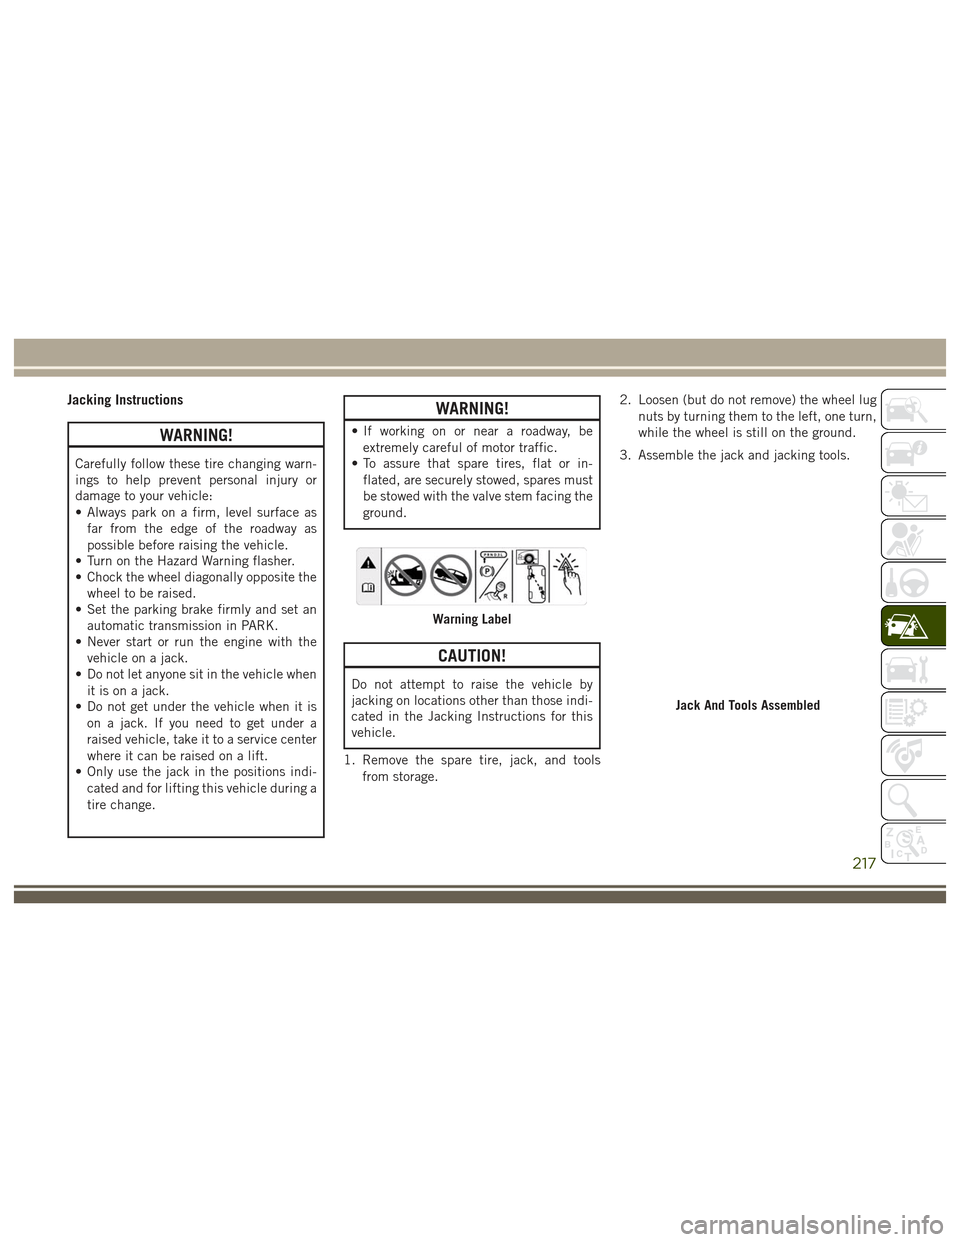
Jacking Instructions
WARNING!
Carefully follow these tire changing warn-
ings to help prevent personal injury or
damage to your vehicle:
• Always park on a firm, level surface asfar from the edge of the roadway as
possible before raising the vehicle.
• Turn on the Hazard Warning flasher.
• Chock the wheel diagonally opposite the
wheel to be raised.
• Set the parking brake firmly and set an
automatic transmission in PARK.
• Never start or run the engine with the
vehicle on a jack.
• Do not let anyone sit in the vehicle when
it is on a jack.
• Do not get under the vehicle when it is
on a jack. If you need to get under a
raised vehicle, take it to a service center
where it can be raised on a lift.
• Only use the jack in the positions indi-
cated and for lifting this vehicle during a
tire change.
WARNING!
• If working on or near a roadway, beextremely careful of motor traffic.
• To assure that spare tires, flat or in-
flated, are securely stowed, spares must
be stowed with the valve stem facing the
ground.
CAUTION!
Do not attempt to raise the vehicle by
jacking on locations other than those indi-
cated in the Jacking Instructions for this
vehicle.
1. Remove the spare tire, jack, and tools from storage. 2. Loosen (but do not remove) the wheel lug
nuts by turning them to the left, one turn,
while the wheel is still on the ground.
3. Assemble the jack and jacking tools.
Warning Label
Jack And Tools Assembled
217
Page 229 of 372
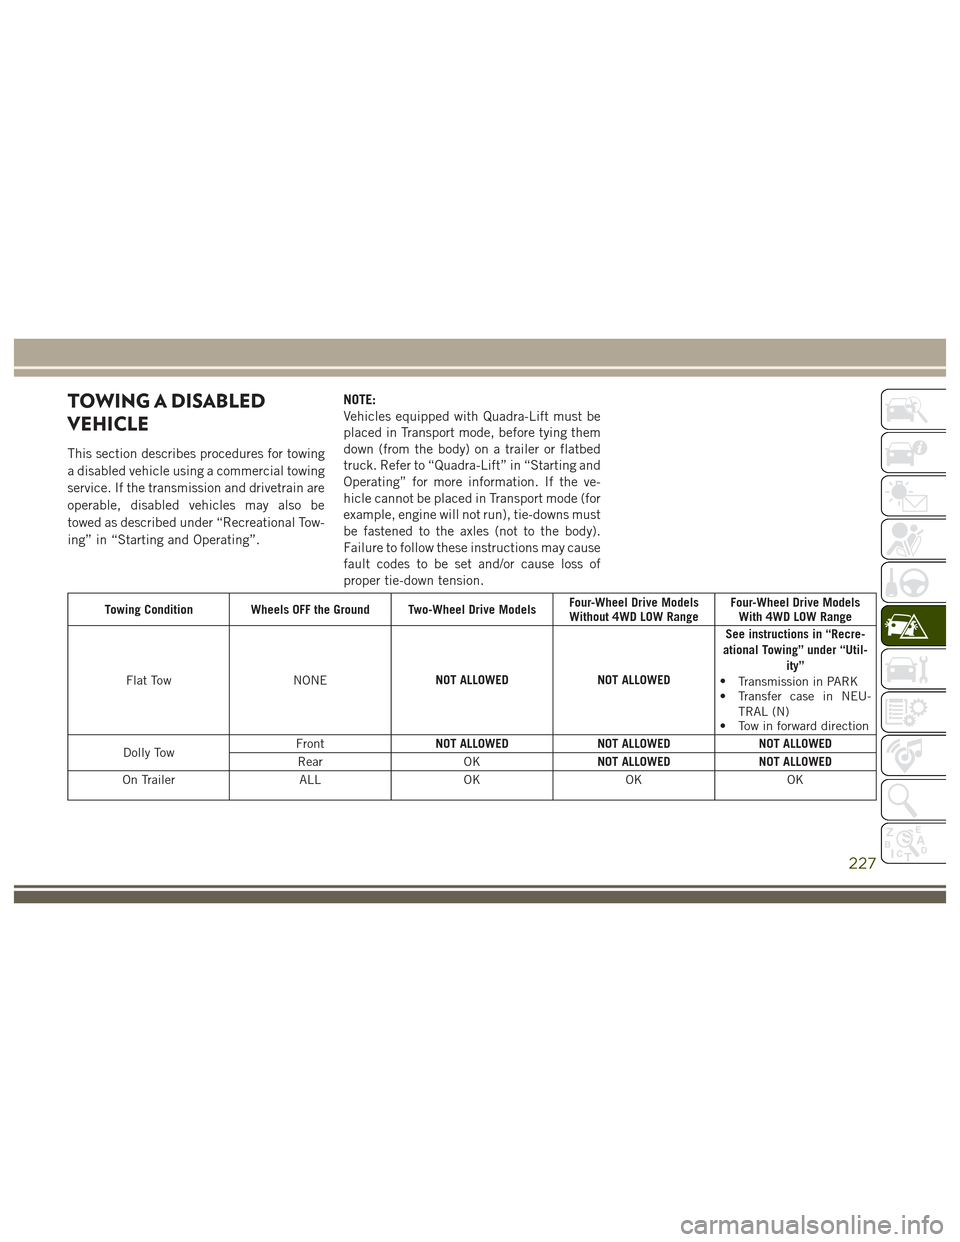
TOWING A DISABLED
VEHICLE
This section describes procedures for towing
a disabled vehicle using a commercial towing
service. If the transmission and drivetrain are
operable, disabled vehicles may also be
towed as described under “Recreational Tow-
ing” in “Starting and Operating”.NOTE:
Vehicles equipped with Quadra-Lift must be
placed in Transport mode, before tying them
down (from the body) on a trailer or flatbed
truck. Refer to “Quadra-Lift” in “Starting and
Operating” for more information. If the ve-
hicle cannot be placed in Transport mode (for
example, engine will not run), tie-downs must
be fastened to the axles (not to the body).
Failure to follow these instructions may cause
fault codes to be set and/or cause loss of
proper tie-down tension.
Towing Condition Wheels OFF the Ground Two-Wheel Drive Models
Four-Wheel Drive Models
Without 4WD LOW Range Four-Wheel Drive Models
With 4WD LOW Range
Flat Tow NONENOT ALLOWED
NOT ALLOWEDSee instructions in “Recre-
ational Towing” under “Util- ity”
• Transmission in PARK
• Transfer case in NEU-
TRAL (N)
• Tow in forward direction
Dolly Tow Front
NOT ALLOWED
NOT ALLOWEDNOT ALLOWED
Rear OKNOT ALLOWED
NOT ALLOWED
On Trailer ALLOKOKOK
227
Page 230 of 372
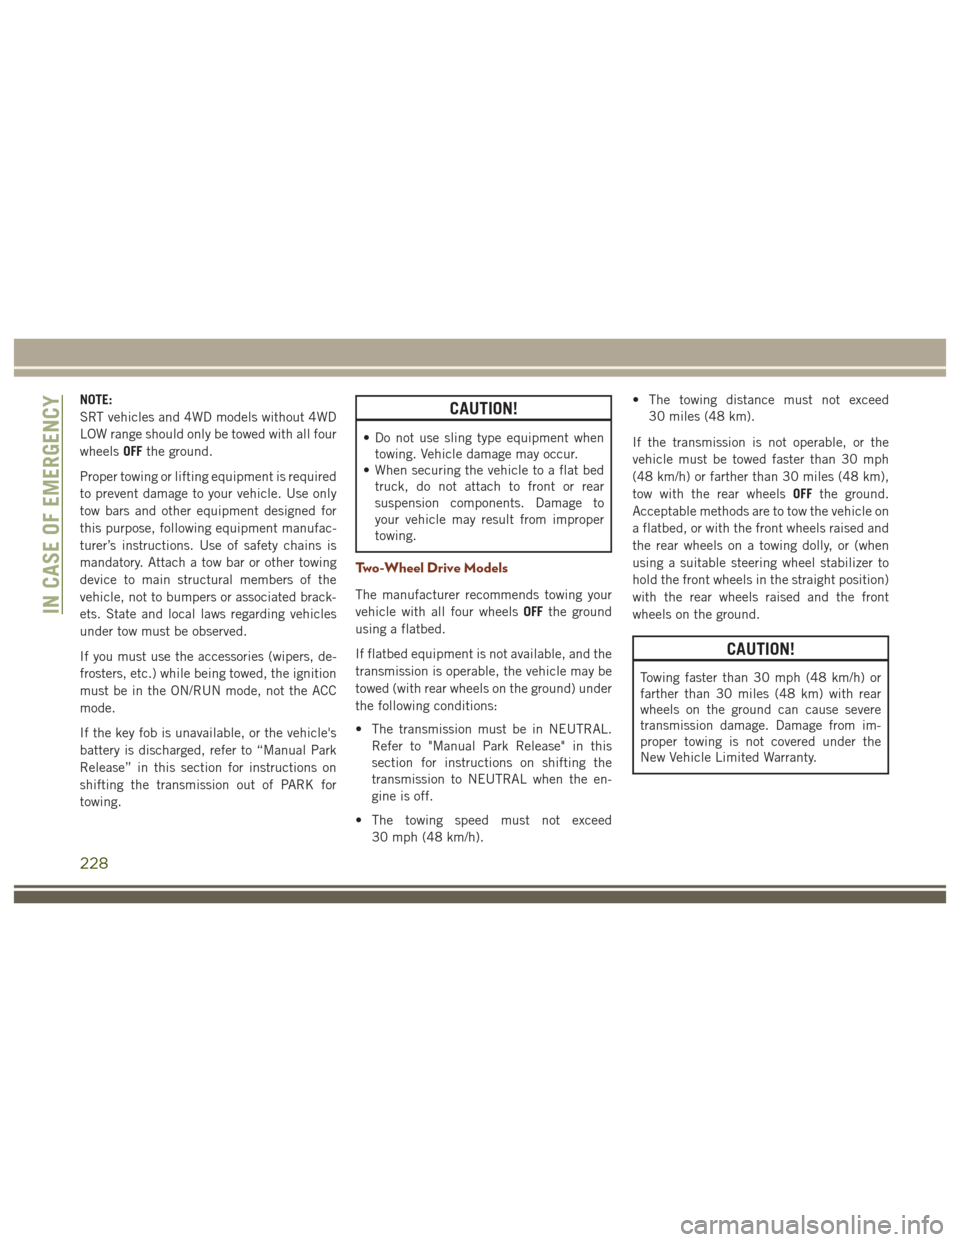
NOTE:
SRT vehicles and 4WD models without 4WD
LOW range should only be towed with all four
wheelsOFFthe ground.
Proper towing or lifting equipment is required
to prevent damage to your vehicle. Use only
tow bars and other equipment designed for
this purpose, following equipment manufac-
turer’s instructions. Use of safety chains is
mandatory. Attach a tow bar or other towing
device to main structural members of the
vehicle, not to bumpers or associated brack-
ets. State and local laws regarding vehicles
under tow must be observed.
If you must use the accessories (wipers, de-
frosters, etc.) while being towed, the ignition
must be in the ON/RUN mode, not the ACC
mode.
If the key fob is unavailable, or the vehicle's
battery is discharged, refer to “Manual Park
Release” in this section for instructions on
shifting the transmission out of PARK for
towing.CAUTION!
• Do not use sling type equipment when towing. Vehicle damage may occur.
• When securing the vehicle to a flat bed
truck, do not attach to front or rear
suspension components. Damage to
your vehicle may result from improper
towing.
Two-Wheel Drive Models
The manufacturer recommends towing your
vehicle with all four wheels OFFthe ground
using a flatbed.
If flatbed equipment is not available, and the
transmission is operable, the vehicle may be
towed (with rear wheels on the ground) under
the following conditions:
• The transmission must be in NEUTRAL. Refer to "Manual Park Release" in this
section for instructions on shifting the
transmission to NEUTRAL when the en-
gine is off.
• The towing speed must not exceed 30 mph (48 km/h). • The towing distance must not exceed
30 miles (48 km).
If the transmission is not operable, or the
vehicle must be towed faster than 30 mph
(48 km/h) or farther than 30 miles (48 km),
tow with the rear wheels OFFthe ground.
Acceptable methods are to tow the vehicle on
a flatbed, or with the front wheels raised and
the rear wheels on a towing dolly, or (when
using a suitable steering wheel stabilizer to
hold the front wheels in the straight position)
with the rear wheels raised and the front
wheels on the ground.
CAUTION!
Towing faster than 30 mph (48 km/h) or
farther than 30 miles (48 km) with rear
wheels on the ground can cause severe
transmission damage. Damage from im-
proper towing is not covered under the
New Vehicle Limited Warranty.
IN CASE OF EMERGENCY
228
Page 234 of 372
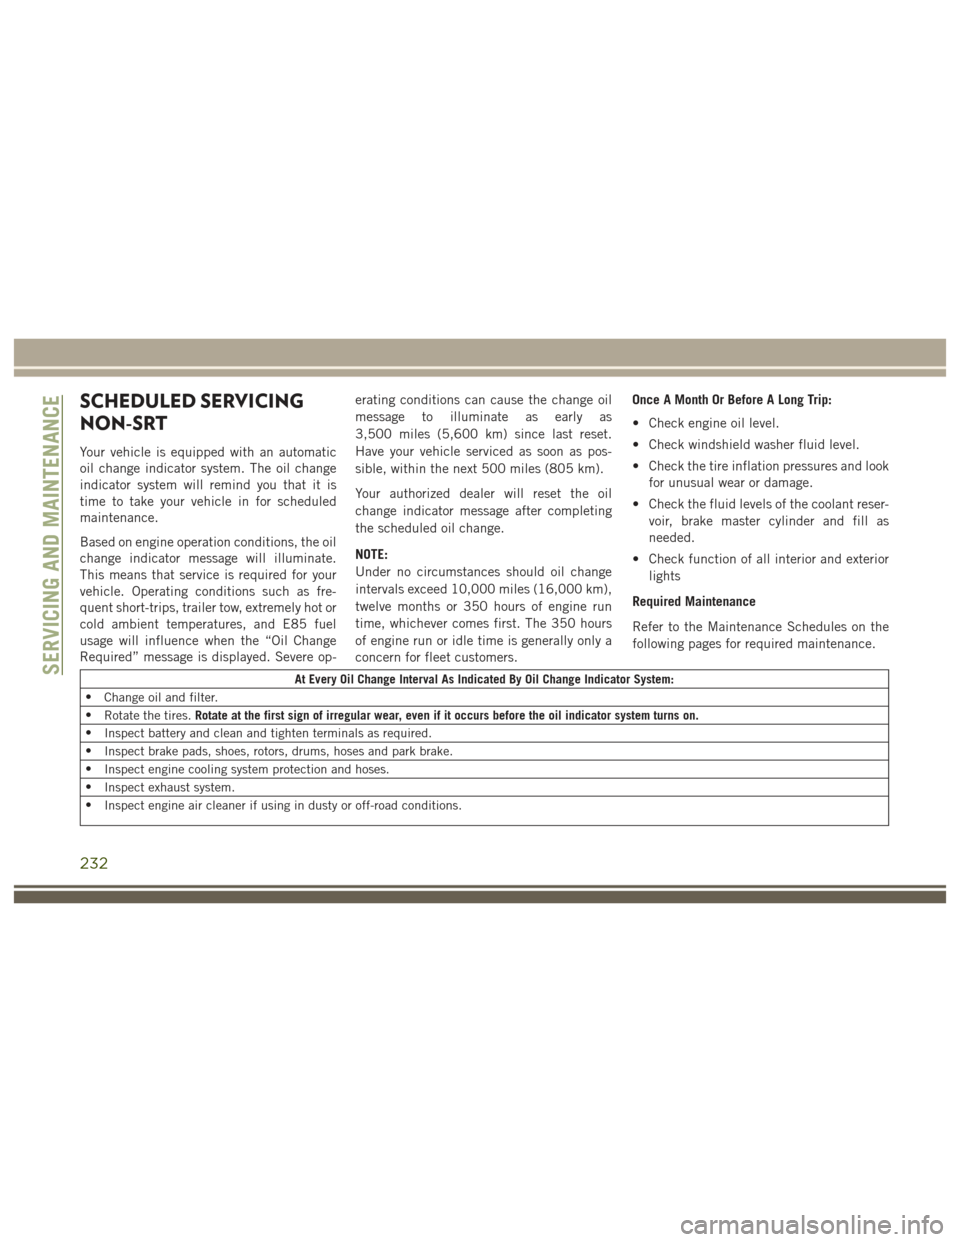
SCHEDULED SERVICING
NON-SRT
Your vehicle is equipped with an automatic
oil change indicator system. The oil change
indicator system will remind you that it is
time to take your vehicle in for scheduled
maintenance.
Based on engine operation conditions, the oil
change indicator message will illuminate.
This means that service is required for your
vehicle. Operating conditions such as fre-
quent short-trips, trailer tow, extremely hot or
cold ambient temperatures, and E85 fuel
usage will influence when the “Oil Change
Required” message is displayed. Severe op-erating conditions can cause the change oil
message to illuminate as early as
3,500 miles (5,600 km) since last reset.
Have your vehicle serviced as soon as pos-
sible, within the next 500 miles (805 km).
Your authorized dealer will reset the oil
change indicator message after completing
the scheduled oil change.
NOTE:
Under no circumstances should oil change
intervals exceed 10,000 miles (16,000 km),
twelve months or 350 hours of engine run
time, whichever comes first. The 350 hours
of engine run or idle time is generally only a
concern for fleet customers. Once A Month Or Before A Long Trip:
• Check engine oil level.
• Check windshield washer fluid level.
• Check the tire inflation pressures and look
for unusual wear or damage.
• Check the fluid levels of the coolant reser- voir, brake master cylinder and fill as
needed.
• Check function of all interior and exterior lights
Required Maintenance
Refer to the Maintenance Schedules on the
following pages for required maintenance.
At Every Oil Change Interval As Indicated By Oil Change Indicator System:
• Change oil and filter.
• Rotate the tires. Rotate at the first sign of irregular wear, even if it occurs before the oil indicator system turns on.
• Inspect battery and clean and tighten terminals as required.
• Inspect brake pads, shoes, rotors, drums, hoses and park brake.
• Inspect engine cooling system protection and hoses.
• Inspect exhaust system.
• Inspect engine air cleaner if using in dusty or off-road conditions.SERVICING AND MAINTENANCE
232
Page 269 of 372
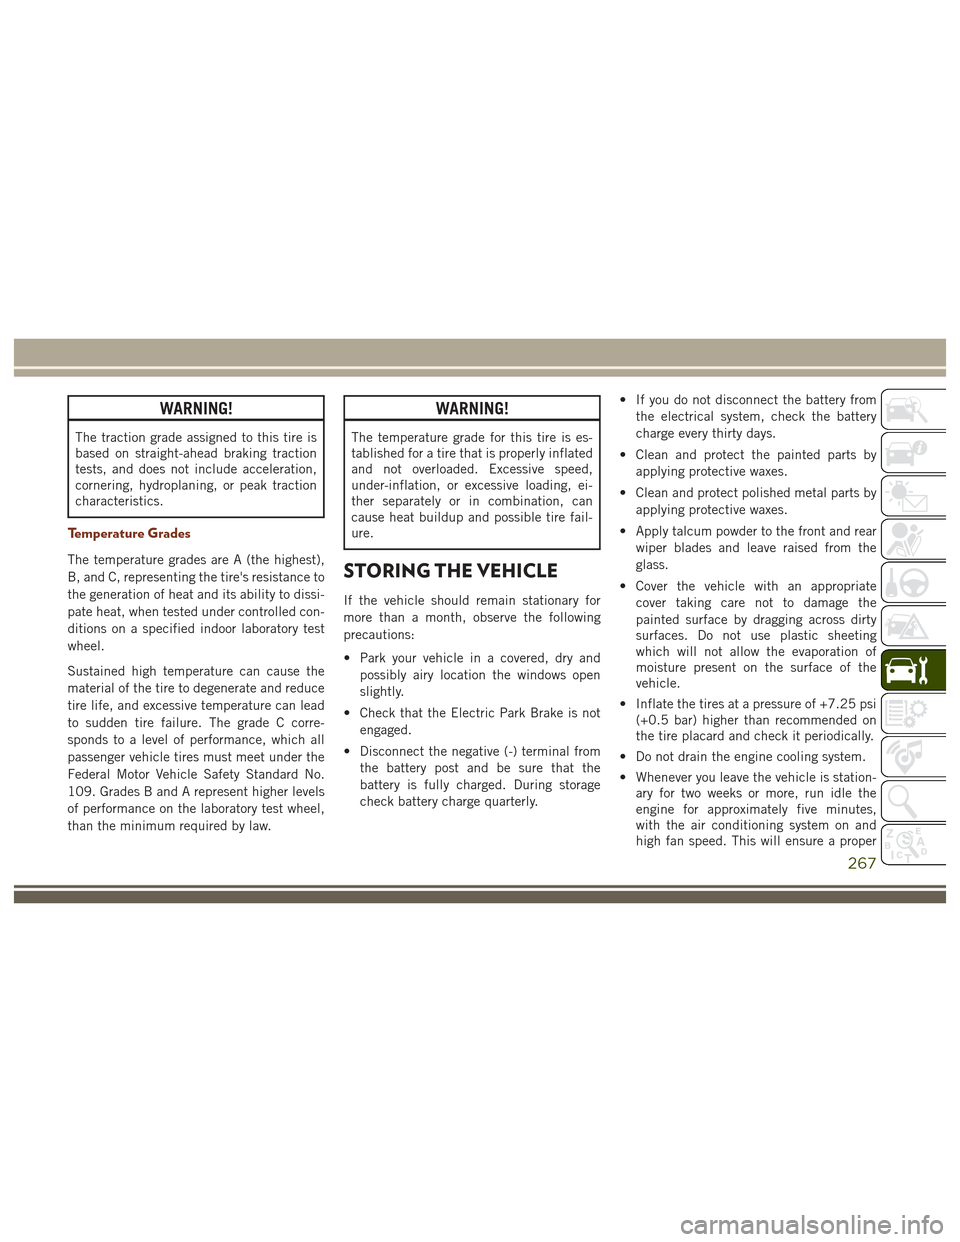
WARNING!
The traction grade assigned to this tire is
based on straight-ahead braking traction
tests, and does not include acceleration,
cornering, hydroplaning, or peak traction
characteristics.
Temperature Grades
The temperature grades are A (the highest),
B, and C, representing the tire's resistance to
the generation of heat and its ability to dissi-
pate heat, when tested under controlled con-
ditions on a specified indoor laboratory test
wheel.
Sustained high temperature can cause the
material of the tire to degenerate and reduce
tire life, and excessive temperature can lead
to sudden tire failure. The grade C corre-
sponds to a level of performance, which all
passenger vehicle tires must meet under the
Federal Motor Vehicle Safety Standard No.
109. Grades B and A represent higher levels
of performance on the laboratory test wheel,
than the minimum required by law.
WARNING!
The temperature grade for this tire is es-
tablished for a tire that is properly inflated
and not overloaded. Excessive speed,
under-inflation, or excessive loading, ei-
ther separately or in combination, can
cause heat buildup and possible tire fail-
ure.
STORING THE VEHICLE
If the vehicle should remain stationary for
more than a month, observe the following
precautions:
• Park your vehicle in a covered, dry andpossibly airy location the windows open
slightly.
• Check that the Electric Park Brake is not engaged.
• Disconnect the negative (-) terminal from the battery post and be sure that the
battery is fully charged. During storage
check battery charge quarterly. • If you do not disconnect the battery from
the electrical system, check the battery
charge every thirty days.
• Clean and protect the painted parts by applying protective waxes.
• Clean and protect polished metal parts by applying protective waxes.
• Apply talcum powder to the front and rear wiper blades and leave raised from the
glass.
• Cover the vehicle with an appropriate cover taking care not to damage the
painted surface by dragging across dirty
surfaces. Do not use plastic sheeting
which will not allow the evaporation of
moisture present on the surface of the
vehicle.
• Inflate the tires at a pressure of +7.25 psi (+0.5 bar) higher than recommended on
the tire placard and check it periodically.
• Do not drain the engine cooling system.
• Whenever you leave the vehicle is station- ary for two weeks or more, run idle the
engine for approximately five minutes,
with the air conditioning system on and
high fan speed. This will ensure a proper
267
Page 362 of 372
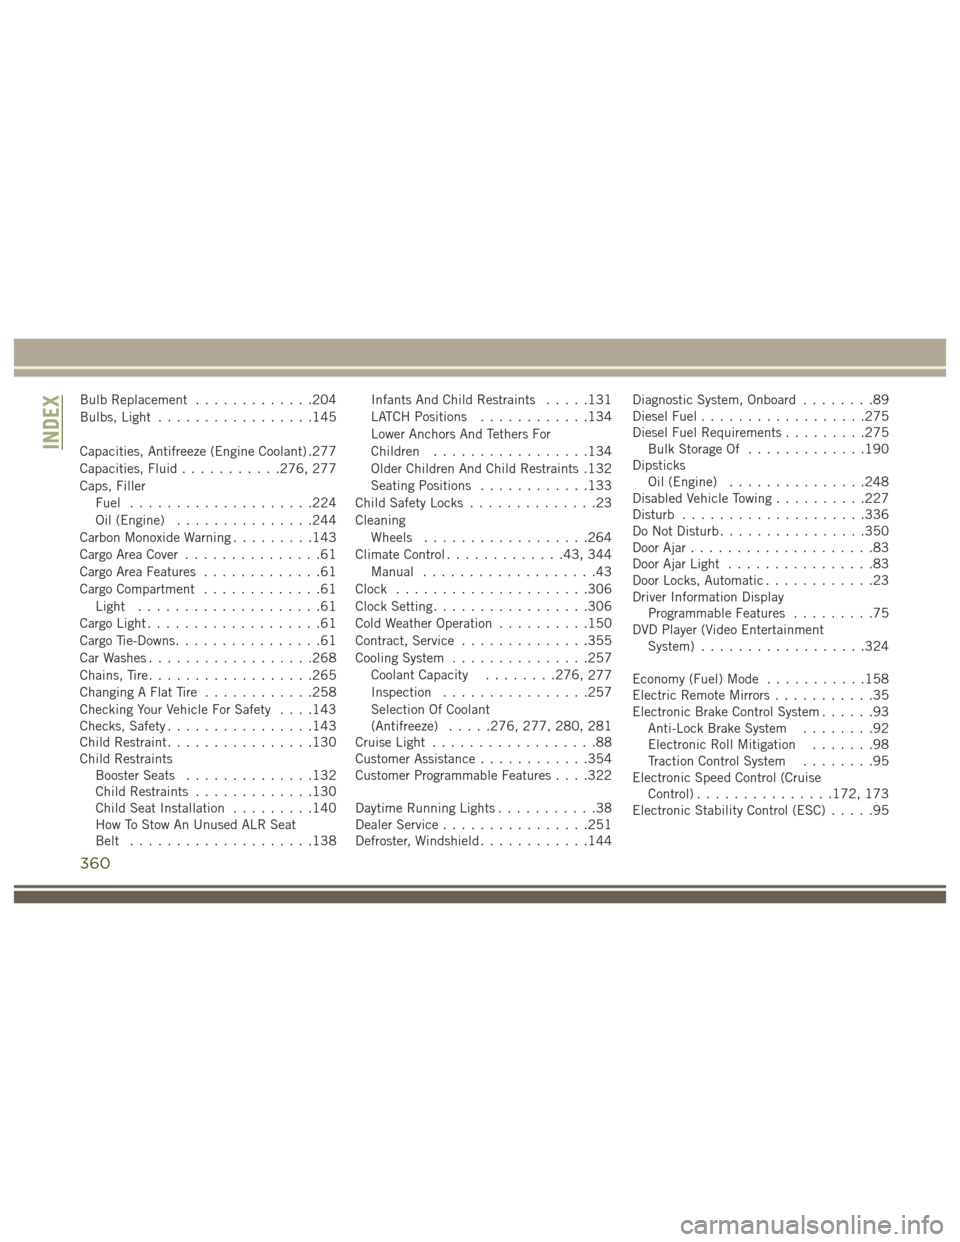
Bulb Replacement.............204
Bulbs, Light .................145
Capacities, Antifreeze (Engine Coolant) .277
Capacities, Fluid ...........276, 277
Caps, Filler Fuel ....................224
Oil (Engine) ...............244
Carbon Monoxide Warning .........143
Cargo Area Cover ...............61
Cargo Area Features .............61
Cargo Compartment .............61
Light ....................61
Cargo Light ...................61
Cargo Tie-Downs ................61
Car Washes ..................268
Chains, Tire ..................265
Changing A Flat Tire ............258
Checking Your Vehicle For Safety . . . .143
Checks, Safety ................143
Child Restraint ................130
Child Restraints Booster Seats ..............132
Child Restraints .............130
Child Seat Installation .........140
How To Stow An Unused ALR Seat
Belt ....................138 Infants And Child Restraints
.....131
LATCH Positions ............134
Lower Anchors And Tethers For
Children .................134
Older Children And Child Restraints .132
Seating Positions ............133
Child Safety Locks ..............23
Cleaning Wheels ..................264
Climate Control .............43, 344
Manual ...................43
Clock .....................306
Clock Setting .................306
Cold Weather Operation ..........150
Contract, Service ..............355
Cooling System ...............257
Coolant Capacity ........276,
277
Inspection ................257
Selection Of Coolant
(Antifreeze) .....276, 277, 280, 281
Cruise Light ..................88
Customer Assistance ............354
Customer Programmable Features . . . .322
Daytime Running Lights ...........38
Dealer Service ................251
Defroster, Windshield ............144 Diagnostic System, Onboard
........89
Diesel Fuel ..................275
Diesel Fuel Requirements .........275
Bulk Storage Of .............190
Dipsticks Oil (Engine) ...............248
Disabled Vehicle Towing ..........227
Disturb ....................336
Do Not Disturb ................350
Door Ajar ....................83
Door Ajar Light ................83
Door Locks, Automatic ............23
Driver Information Display Programmable Features .........75
DVD Player (Video Entertainment System) ..................324
Economy (Fuel) Mode ...........158
Electric Remote Mirrors ...........35
Electronic Brake Control System ......93
Anti-Lock Brake System ........92
Electronic Roll Mitigation .......98
Traction Control System ........95
Electronic Speed Control (Cruise Control) ...............172, 173
Electronic Stability Control (ESC) .....95
INDEX
360