service JEEP GRAND CHEROKEE 2017 WK2 / 4.G Owner's Guide
[x] Cancel search | Manufacturer: JEEP, Model Year: 2017, Model line: GRAND CHEROKEE, Model: JEEP GRAND CHEROKEE 2017 WK2 / 4.GPages: 372
Page 182 of 372
• Clean the ParkSense sensors regularly,taking care not to scratch or damage them.
The sensors must not be covered with ice,
snow, slush, mud, dirt or debris. Failure to
do so can result in the system not working
properly. The ParkSense system might not
detect an obstacle behind the fascia/
bumper, or it could provide a false indica-
tion that an obstacle is behind the fascia/
bumper.
• Use the ParkSense switch to turn the ParkSense system OFF if objects such as
bicycle carriers, trailer hitches, etc. are
placed within 12 in (30 cm) from the rear
fascia/bumper. Failure to do so can result
in the system misinterpreting a close ob-
ject as a sensor problem, causing the
“PARKSENSE UNAVAILABLE SERVICE
REQUIRED” message to appear in the
instrument cluster display.
• ParkSense should be disabled when the liftgate is in the open position and the
vehicle is in REVERSE. An open liftgate
could provide a false indication that an
obstacle is behind the vehicle.WARNING!
• Drivers must be careful when backing upeven when using ParkSense. Always
check carefully behind your vehicle,
look behind you, and be sure to check
for pedestrians, animals, other vehicles,
obstructions, and blind spots before
backing up. You are responsible for
safety and must continue to pay atten-
tion to your surroundings. Failure to do
so can result in serious injury or death.
• Before using ParkSense, it is strongly
recommended that the ball mount and
hitch ball assembly is disconnected
from the vehicle when the vehicle is not
used for towing. Failure to do so can
result in injury or damage to vehicles or
obstacles because the hitch ball will be
much closer to the obstacle than the
rear fascia when the loudspeaker sounds
the continuous tone. Also, the sensors
could detect the ball mount and hitch
ball assembly, depending on its size and
shape, giving a false indication that an
obstacle is behind the vehicle.
CAUTION!
• ParkSense is only a parking aid and it isunable to recognize every obstacle, in-
cluding small obstacles. Parking curbs
might be temporarily detected or not
detected at all. Obstacles located above
or below the sensors will not be detected
when they are in close proximity.
• The vehicle must be driven slowly when
using ParkSense in order to be able to
stop in time when an obstacle is de-
tected. It is recommended that the
driver looks over his/her shoulder when
using ParkSense.
PARKSENSE FRONT AND
REAR PARK ASSIST
Sensors
The four ParkSense sensors, located in the
rear fascia/bumper, monitor the area behind
the vehicle that is within the sensors field of
view. The sensors can detect obstacles from
approximately 12 inches (30 cm) up to
STARTING AND OPERATING
180
Page 192 of 372
WARNING!
• Never have any smoking materials lit inor near the vehicle when the fuel door is
open or the tank is being filled.
• Never add fuel when the engine is run-
ning. This is in violation of most state
and federal fire regulations and may
cause the “Malfunction Indicator Light”
to turn on.
• A fire may result if fuel is pumped into a
portable container that is inside of a
vehicle. You could be burned. Always
place fuel containers on the ground
while filling.
CAUTION!
To avoid fuel spillage and overfilling, do
not “top off” the fuel tank after filling.
Avoid Using Contaminated Fuel
Fuel that is contaminated by water or dirt can
cause severe damage to the engine fuel sys-
tem. Proper maintenance of the engine fuel filter and fuel tank is essential. Refer to
“Dealer Service” in “Servicing And Mainte-
nance” for further information.
Bulk Fuel Storage — Diesel Fuel
If you store quantities of fuel, good mainte-
nance of the stored fuel is also essential. Fuel
contaminated with water will promote the
growth of “microbes.” These microbes form
“slime” that will clog the fuel filtration sys-
tem and lines. Drain condensation from the
supply tank and change the line filter on a
regular basis.
NOTE:
When a diesel engine is allowed to run out of
fuel, air is pulled into the fuel system.
If the vehicle will not start, refer to “Dealer
Service / Priming If The Engine Has Run Out
Of Fuel” in “Servicing And Maintenance” for
further information.
WARNING!
Do not open the high pressure fuel system
with the engine running. Engine operation
causes high fuel pressure. High pressure
WARNING!
fuel spray can cause serious injury or
death.
Diesel Exhaust Fluid
Your vehicle is equipped with a Selective
Catalytic Reduction system to meet the very
stringent diesel emissions standards re-
quired by the Environmental Protection
Agency.
The purpose of the SCR system is to reduce
levels of NOx (oxides of nitrogen emitted from
engines) that are harmful to our health and
the environment to a near-zero level. Small
quantities of Diesel Exhaust Fluid (DEF) is
injected into the exhaust upstream of a cata-
lyst where, when vaporized, it converts smog-
forming nitrogen oxides (NOx) into harmless
nitrogen (N2) and water vapor (H2O), two
natural components of the air we breathe.
You can operate with the comfort that your
vehicle is contributing to a cleaner, healthier
world environment for this and generations to
come.
STARTING AND OPERATING
190
Page 194 of 372
DEF Fill Procedure
NOTE:
Refer to “Fluids And Lubricants” in the
“Technical Specifications” section for the
correct fluid type.
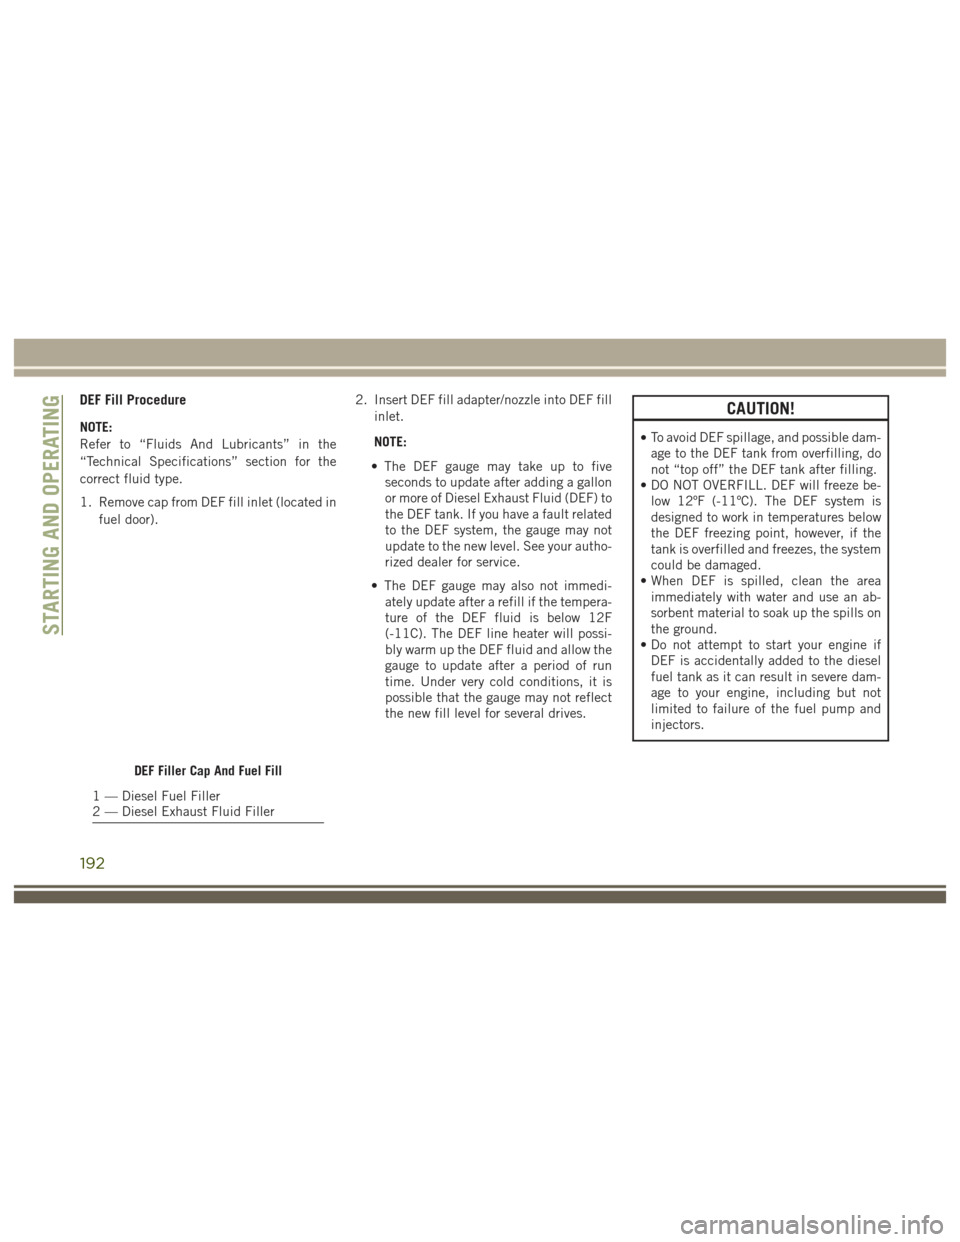
1. Remove cap from DEF fill inlet (located infuel door). 2. Insert DEF fill adapter/nozzle into DEF fill
inlet.
NOTE:
• The DEF gauge may take up to five seconds to update after adding a gallon
or more of Diesel Exhaust Fluid (DEF) to
the DEF tank. If you have a fault related
to the DEF system, the gauge may not
update to the new level. See your autho-
rized dealer for service.
• The DEF gauge may also not immedi- ately update after a refill if the tempera-
ture of the DEF fluid is below 12F
(-11C). The DEF line heater will possi-
bly warm up the DEF fluid and allow the
gauge to update after a period of run
time. Under very cold conditions, it is
possible that the gauge may not reflect
the new fill level for several drives.
CAUTION!
•To avoid DEF spillage, and possible dam-
age to the DEF tank from overfilling, do
not “top off” the DEF tank after filling.
• DO NOT OVERFILL. DEF will freeze be- low 12ºF (-11ºC). The DEF system is
designed to work in temperatures below
the DEF freezing point, however, if the
tank is overfilled and freezes, the system
could be damaged.
• When DEF is spilled, clean the area immediately with water and use an ab-
sorbent material to soak up the spills on
the ground.
• Do not attempt to start your engine if DEF is accidentally added to the diesel
fuel tank as it can result in severe dam-
age to your engine, including but not
limited to failure of the fuel pump and
injectors.
DEF Filler Cap And Fuel Fill
1 — Diesel Fuel Filler
2 — Diesel Exhaust Fluid Filler
STARTING AND OPERATING
192
Page 207 of 372
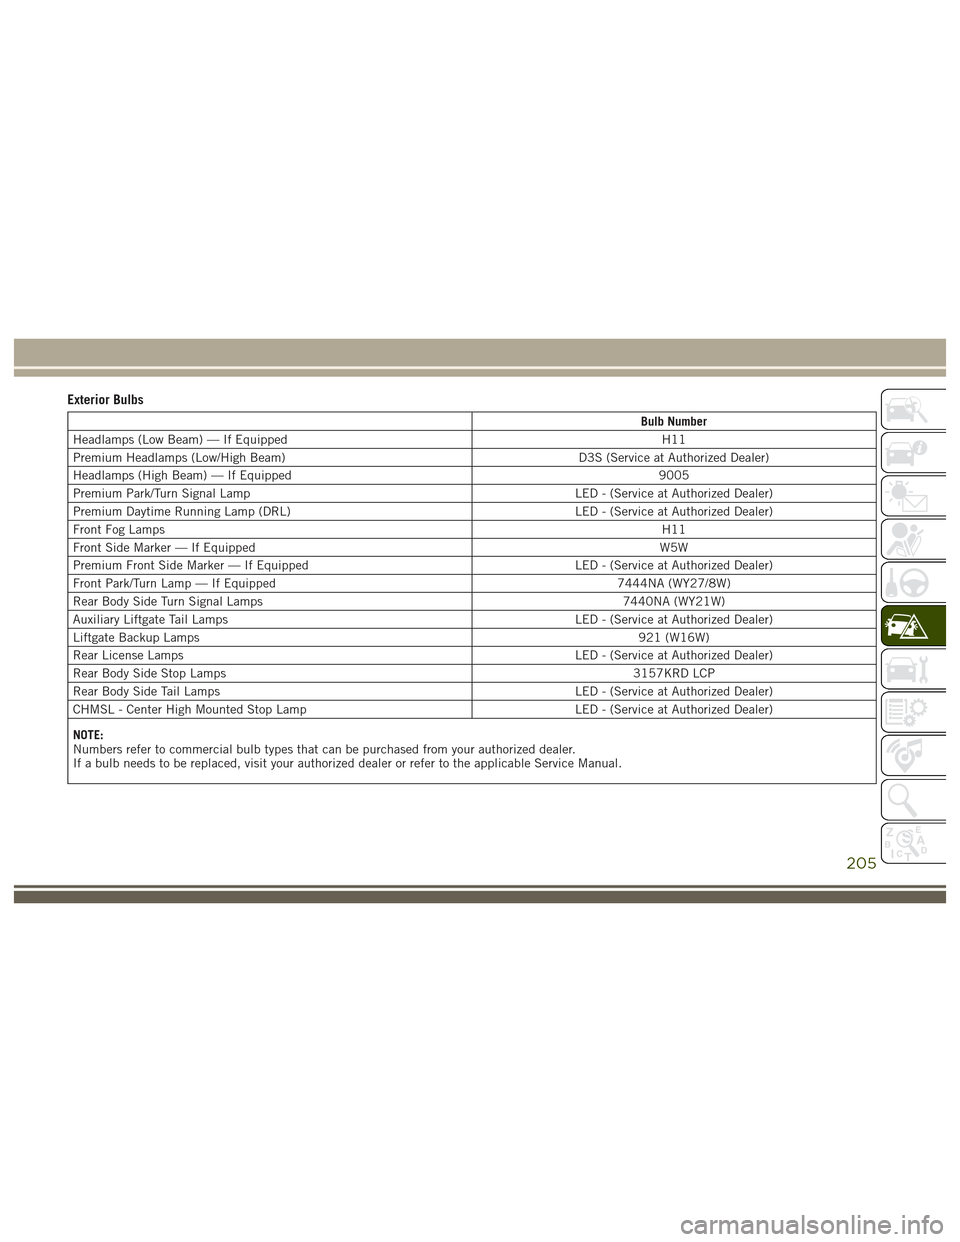
Exterior Bulbs
Bulb Number
Headlamps (Low Beam) — If Equipped H11
Premium Headlamps (Low/High Beam) D3S (Service at Authorized Dealer)
Headlamps (High Beam) — If Equipped 9005
Premium Park/Turn Signal Lamp LED - (Service at Authorized Dealer)
Premium Daytime Running Lamp (DRL) LED - (Service at Authorized Dealer)
Front Fog Lamps H11
Front Side Marker — If Equipped W5W
Premium Front Side Marker — If Equipped LED - (Service at Authorized Dealer)
Front Park/Turn Lamp — If Equipped 7444NA (WY27/8W)
Rear Body Side Turn Signal Lamps 7440NA (WY21W)
Auxiliary Liftgate Tail Lamps LED - (Service at Authorized Dealer)
Liftgate Backup Lamps 921 (W16W)
Rear License Lamps LED - (Service at Authorized Dealer)
Rear Body Side Stop Lamps 3157KRD LCP
Rear Body Side Tail Lamps LED - (Service at Authorized Dealer)
CHMSL - Center High Mounted Stop Lamp LED - (Service at Authorized Dealer)
NOTE:
Numbers refer to commercial bulb types that can be purchased from your authorized dealer.
If a bulb needs to be replaced, visit your authorized dealer or refer to the applicable Service Manual.
205
Page 208 of 372
Bulb Replacement
High Intensity Discharge Headlamps (HID)
—
If Equipped
The headlamps are a type of high voltage
discharge tube. High voltage can remain in
the circuit even with the headlamp switch off
and the key removed. Because of this, you
should not attempt to service a headlamp bulb
yourself. If a headlamp bulb fails, take your
vehicle to an authorized dealer for service.
WARNING!
A transient high voltage occurs at the bulb
sockets of High Intensity Discharge (HID)
headlamps when the headlamp switch is
turned ON. It may cause serious electrical
shock or electrocution if not serviced prop-
erly. See your authorized dealer for ser-
vice. NOTE:
On vehicles equipped with High Intensity
Discharge (HID) headlamps, when the head-
lamps are turned on, there is a blue hue to
the lamps. This diminishes and becomes
more white after approximately 10 seconds,
as the system charges.
Halogen Headlamps — If Equipped
1. Open the hood.
2. Turn the low or high beam bulb one–
quarter turn counterclockwise to remove
from housing.
3. Disconnect the electrical connector and replace the bulb.
CAUTION!
Do not touch the new bulb with your fin-
gers. Oil contamination will severely
shorten bulb life. If the bulb comes in
contact with any oily surface, clean the
bulb with rubbing alcohol.
Front Turn Signal Lamp
1. Open the hood.
2. Turn the turn signal bulb one–quarter turncounterclockwise to remove from
housing.
3. Disconnect the electrical connector and replace the bulb.
CAUTION!
Do not touch the new bulb with your fin-
gers. Oil contamination will severely
shorten bulb life. If the bulb comes in
contact with any oily surface, clean the
bulb with rubbing alcohol.
Front Fog Lamps
1. Reach through the cutout in the splashshield and disconnect the wiring harness
from the fog lamp connector.
2. Firmly grasp the bulb by the two latches and squeeze them together to unlock the
bulb from the back of the front fog lamp
housing.
IN CASE OF EMERGENCY
206
Page 211 of 372
Center High-Mounted Stop Lamp (CHMSL)
The center high mounted stop lamp is an
LED. Service at an authorized dealer.
Rear License Lamp
The rear license lamps are LEDs. See your
authorized dealer for service.
FUSES
WARNING!
• When replacing a blown fuse, always usean appropriate replacement fuse with
the same amp rating as the original fuse.
Never replace a fuse with another fuse of
higher amp rating. Never replace a
blown fuse with metal wires or any other
material. Failure to use proper fuses may
result in serious personal injury, fire
and/or property damage.
• Before replacing a fuse, make sure that
the ignition is off and that all the other
services are switched off and/or disen-
gaged.
• If the replaced fuse blows again, contact
an authorized dealer.
• If a general protection fuse for safety
systems (air bag system, braking sys-
tem), power unit systems (engine sys-
tem, gearbox system) or steering system
blows, contact an authorized dealer.
General Information
The fuses protect electrical systems against
excessive current.
When a device does not work you must check
the electrical circuit inside the fuse for a
break/melt.
Also please be aware that when using power
outlets for extended periods of time with the
engine off may result in vehicle battery dis-
charge.
Underhood Fuses
The Power Distribution Center is located in
the engine compartment near the battery.
This center contains cartridge fuses, micro
fuses, relays, and circuit breakers. A descrip-
tion of each fuse and component may be
stamped on the inside cover, otherwise the
cavity number of each fuse is stamped on the
inside cover that corresponds to the following
chart.
Center High-Mounted Stop Lamp
209
Page 216 of 372
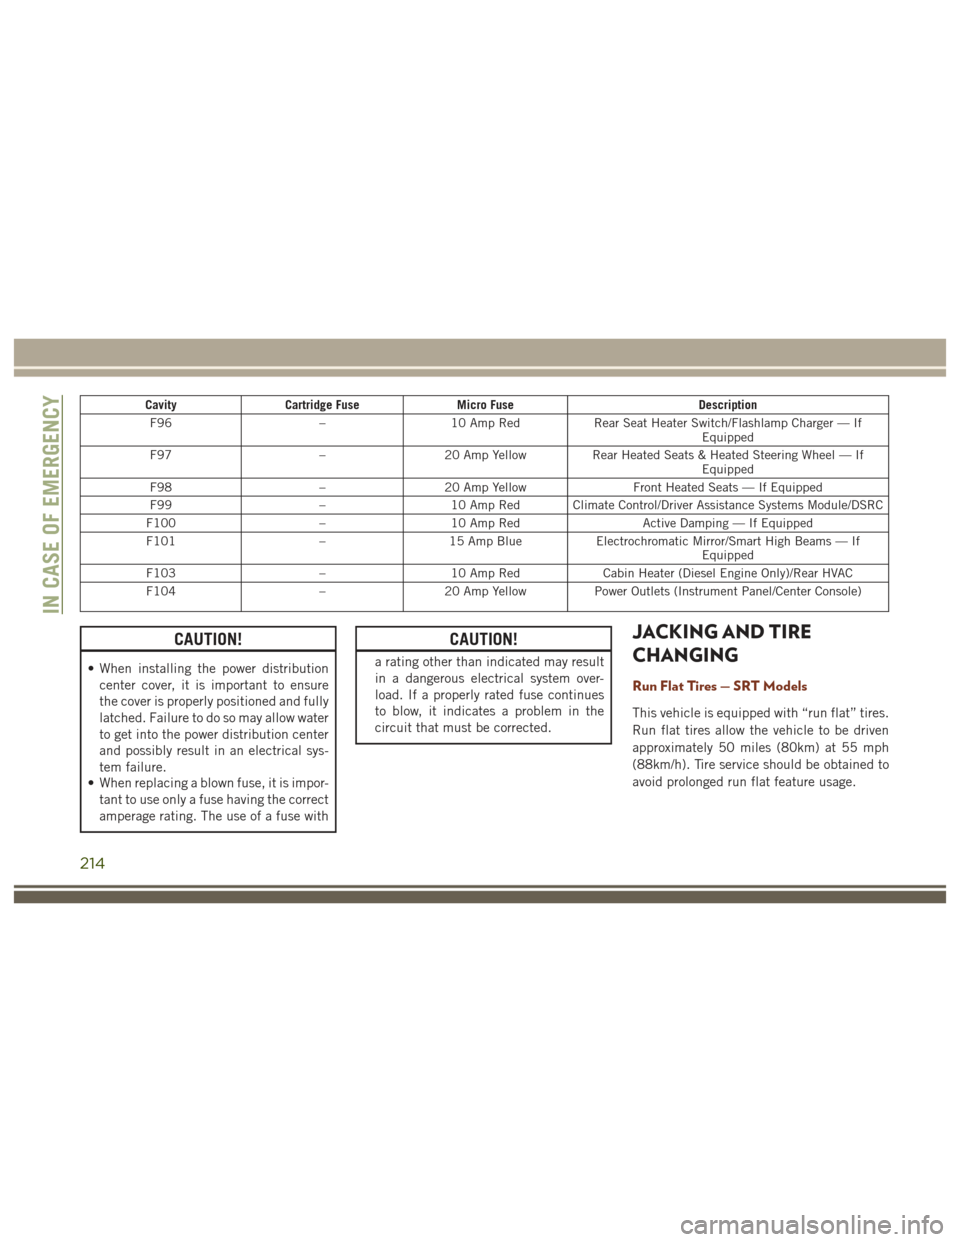
CavityCartridge Fuse Micro Fuse Description
F96 –10 Amp Red Rear Seat Heater Switch/Flashlamp Charger — If
Equipped
F97 –20 Amp Yellow Rear Heated Seats & Heated Steering Wheel — If
Equipped
F98 –20 Amp Yellow Front Heated Seats — If Equipped
F99 –10 Amp Red Climate Control/Driver Assistance Systems Module/DSRC
F100 –10 Amp Red Active Damping — If Equipped
F101 –15 Amp Blue Electrochromatic Mirror/Smart High Beams — If
Equipped
F103 –10 Amp Red Cabin Heater (Diesel Engine Only)/Rear HVAC
F104 –20 Amp Yellow Power Outlets (Instrument Panel/Center Console)
CAUTION!
• When installing the power distribution
center cover, it is important to ensure
the cover is properly positioned and fully
latched. Failure to do so may allow water
to get into the power distribution center
and possibly result in an electrical sys-
tem failure.
• When replacing a blown fuse, it is impor-
tant to use only a fuse having the correct
amperage rating. The use of a fuse with
CAUTION!
a rating other than indicated may result
in a dangerous electrical system over-
load. If a properly rated fuse continues
to blow, it indicates a problem in the
circuit that must be corrected.
JACKING AND TIRE
CHANGING
Run Flat Tires — SRT Models
This vehicle is equipped with “run flat” tires.
Run flat tires allow the vehicle to be driven
approximately 50 miles (80km) at 55 mph
(88km/h). Tire service should be obtained to
avoid prolonged run flat feature usage.
IN CASE OF EMERGENCY
214
Page 219 of 372
Jacking Instructions
WARNING!
Carefully follow these tire changing warn-
ings to help prevent personal injury or
damage to your vehicle:
• Always park on a firm, level surface asfar from the edge of the roadway as
possible before raising the vehicle.
• Turn on the Hazard Warning flasher.
• Chock the wheel diagonally opposite the
wheel to be raised.
• Set the parking brake firmly and set an
automatic transmission in PARK.
• Never start or run the engine with the
vehicle on a jack.
• Do not let anyone sit in the vehicle when
it is on a jack.
• Do not get under the vehicle when it is
on a jack. If you need to get under a
raised vehicle, take it to a service center
where it can be raised on a lift.
• Only use the jack in the positions indi-
cated and for lifting this vehicle during a
tire change.
WARNING!
• If working on or near a roadway, beextremely careful of motor traffic.
• To assure that spare tires, flat or in-
flated, are securely stowed, spares must
be stowed with the valve stem facing the
ground.
CAUTION!
Do not attempt to raise the vehicle by
jacking on locations other than those indi-
cated in the Jacking Instructions for this
vehicle.
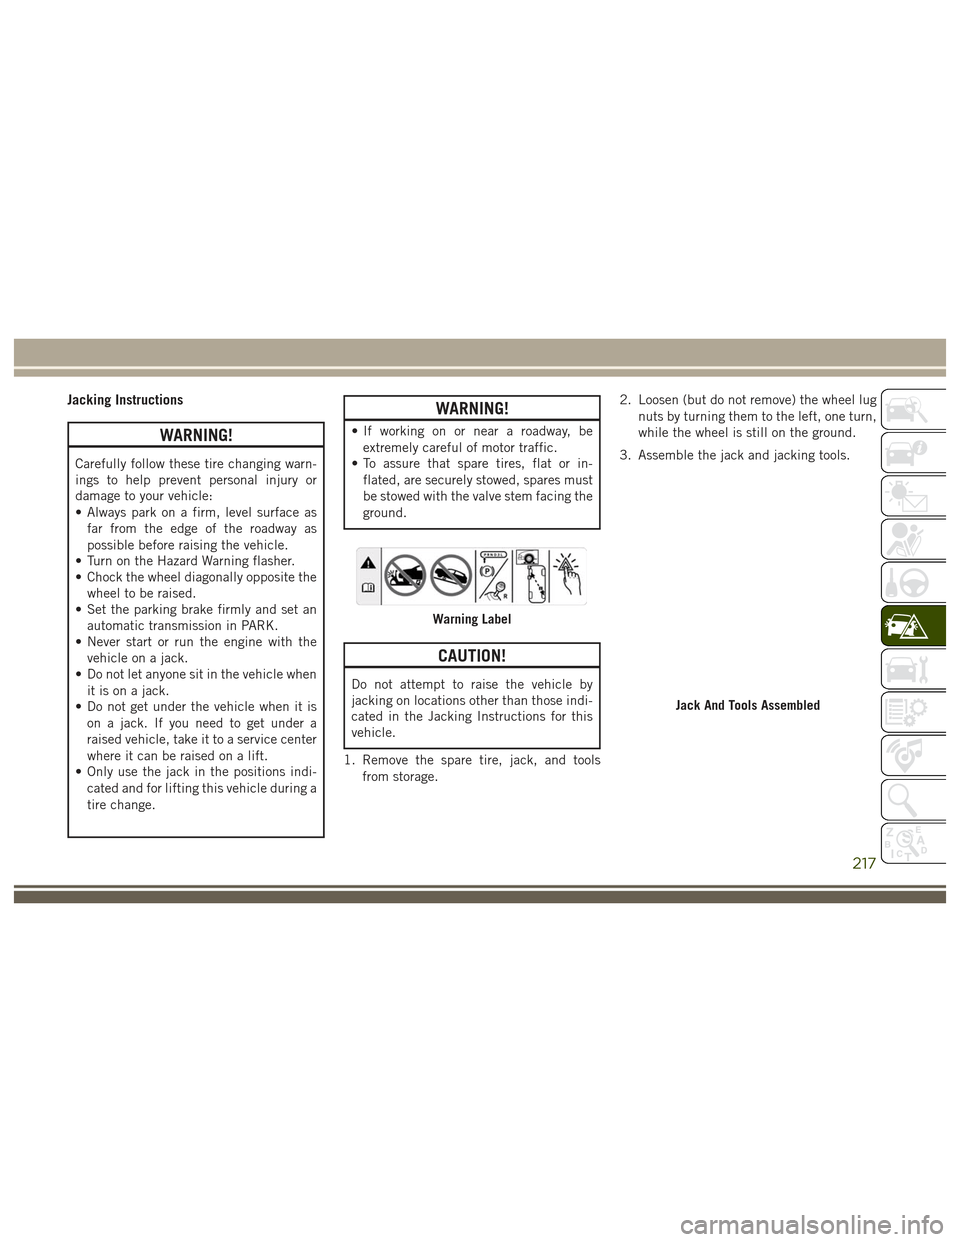
1. Remove the spare tire, jack, and tools from storage. 2. Loosen (but do not remove) the wheel lug
nuts by turning them to the left, one turn,
while the wheel is still on the ground.
3. Assemble the jack and jacking tools.
Warning Label
Jack And Tools Assembled
217
Page 222 of 372
CAUTION!
Be sure to mount the spare tire with the
valve stem facing outward. The vehicle
could be damaged if the spare tire is
mounted incorrectly.
9. Lower the vehicle by turning the jack screw counterclockwise, and remove the
jack and wheel blocks. 10. Finish tightening the lug nuts. Push
down on the wrench while at the end of
the handle for increased leverage.
Tighten the lug nuts in a star pattern
until each nut has been tightened twice.
The correct tightness of each lug nut is
130 ft-lbs (176 N·m). If in doubt about
the correct tightness, have them
checked with a torque wrench by your
authorized dealer or service station.
NOTE:
For the SRT model the correct wheel nut
tightness is 110 ft lbs (149 N·m).
11. Lower the jack to the fully closed posi- tion and return it and the tools to the
proper positions in the foam tray.
12. Remove the small center cap and se- curely store the road wheel in the cargo
area. 13. Have the aluminum road wheel and tire
repaired as soon as possible, properly
secure the spare tire with the special
wing nut torqued to 3.7 ft-lbs (5 N·m),
reinstall the jack and tool kit foam tray,
and latch the rear load floor cover.
NOTE:
Do not drive with the spare tire installed for
more than 50 miles (80 km) at a max speed
of 50 mph (80 km/h).
Installing Spare Wheel/Tire
Spare Tire
IN CASE OF EMERGENCY
220
Page 223 of 372
WARNING!
A loose tire or jack thrown forward in a
collision or hard stop could endanger the
occupants of the vehicle. Always stow the
jack parts and the spare tire in the places
provided. Have the deflated (flat) tire re-
paired or replaced immediately.
Changing Procedure
1. Mount the road tire on the axle.
2. Install the remaining lug nuts with thecone shaped end of the nut toward the
wheel. Lightly tighten the lug nuts.
WARNING!
To avoid the risk of forcing the vehicle off
the jack, do not tighten the lug nuts fully
until the vehicle has been lowered. Failure
to follow this warning may result in per-
sonal injury.
3. Lower the vehicle to the ground by turning the jack handle counterclockwise.
4. Finish tightening the lug nuts. Push down on the wrench while at the end of the handle for increased leverage. Tighten the
lug nuts in a star pattern until each nut
has been tightened twice. The correct
tightness of each lug nut is 130 ft-lbs
(176 N·m). If in doubt about the correct
tightness, have them checked with a
torque wrench by your authorized dealer
or service station.
NOTE:
For the SRT model the correct wheel nut
tightness is 110 ft lbs (149 N·m).
5. After 25 miles (40 km) check the lug nut torque with a torque wrench to ensure that
all lug nuts are properly seated against the
wheel.JUMP-STARTING
If your vehicle has a discharged battery it can
be jump-started using a set of jumper cables
and a battery in another vehicle or by using a
portable battery booster pack. Jump-starting
can be dangerous if done improperly so
please follow the procedures in this section
carefully.
WARNING!
Do not attempt jump-starting if the battery
is frozen. It could rupture or explode and
cause personal injury.
CAUTION!
Do not use a portable battery booster pack
or any other booster source with a system
voltage greater than 12 Volts or damage to
the battery, starter motor, alternator or
electrical system may occur.
NOTE:
When using a portable battery booster pack
follow the manufacturer's operating instruc-
tions and precautions.
Preparations For Jump-Starting
The battery in your vehicle is located under
the passenger's front seat. There are remote
locations located under the hood to assist in
jump-starting.
221