fuel cap JEEP GRAND CHEROKEE 2017 WK2 / 4.G User Guide
[x] Cancel search | Manufacturer: JEEP, Model Year: 2017, Model line: GRAND CHEROKEE, Model: JEEP GRAND CHEROKEE 2017 WK2 / 4.GPages: 372
Page 85 of 372
NOTE:
• If the power steering assistance is no lon-ger operational, it is still possible to steer
the vehicle. Under these conditions there
will be a substantial increase in steering
effort, especially at low speeds and during
parking maneuvers.
• See your authorized dealer for service.
– Door Open Warning Light
This indicator will illuminate when a door is
ajar/open and not fully closed.
If the vehicle is moving, there will also be a
single chime.
– Liftgate Open Warning Light
This indicator will turn when the liftgate is
open.
If the vehicle is moving there will also be a
single chime.
– Transmission Temperature Warning
Light
This light indicates that there is excessive
transmission fluid temperature that might
occur with severe usage such as trailer tow- ing. If this light turns on, stop the vehicle and
run the engine at idle, with the transmission
in NEUTRAL, until the light turns off. Once
the light turns off, you may continue to drive
normally.
WARNING!
If you continue operating the vehicle when
the Transmission Temperature Warning
Light is illuminated you could cause the
fluid to boil over, come in contact with hot
engine or exhaust components and cause a
fire.
CAUTION!
Continuous driving with the Transmission
Temperature Warning Light illuminated
will eventually cause severe transmission
damage or transmission failure.
– Hood Open Warning Light
This indicator will illuminate when the hood
is left open and not fully closed.
Yellow Telltale Lights
– Engine Malfunction Warning Light
The Engine Check/Malfunction Indicator
Light (MIL) is a part of an Onboard Diagnostic
System called OBD II that monitors engine
and automatic transmission control systems.
The light will illuminate when the ignition is
in the ON position before engine start. If the
bulb does not come on when turning the key
from OFF to ON/RUN, have the condition
checked promptly.
Certain conditions, such as a loose or missing
gas cap, poor quality fuel, etc., may illumi-
nate the light after engine start. The vehicle
should be serviced if the light stays on
through several typical driving styles. In most
situations, the vehicle will drive normally and
will not require towing.
When the engine is running, the MIL may
flash to alert serious conditions that could
lead to immediate loss of power or severe
catalytic converter damage. The vehicle
should be serviced as soon as possible if this
occurs.
83
Page 110 of 372
Monitoring Telltale Light will turn OFF only
after the tires have been inflated to the vehi-
cle’s recommended cold tire pressure value.
CAUTION!
• The TPMS has been optimized for theoriginal equipment tires and wheels.
TPMS pressures and warnings have
been established for the tire size
equipped on your vehicle. Undesirable
system operation or sensor damage may
result when using replacement equip-
ment that is not of the same size, type,
and/or style. Aftermarket wheels can
cause sensor damage. Using aftermar-
ket tire sealants may cause the Tire Pres-
sure Monitoring System (TPMS) sensor
to become inoperable. After using an
aftermarket tire sealant it is recom-
mended that you take your vehicle to an
authorized dealership to have your sen-
sor function checked.
• After inspecting or adjusting the tire
pressure, always reinstall the valve stem
cap. This will prevent moisture and dirt
from entering the valve stem, which
CAUTION!
could damage the Tire Pressure Monitor-
ing Sensor.
NOTE:
• The TPMS is not intended to replace nor- mal tire care and maintenance, or to pro-
vide warning of a tire failure or condition.
• The TPMS should not be used as a tire pressure gauge while adjusting your tire
pressure.
• Driving on a significantly under-inflated tire causes the tire to overheat and can
lead to tire failure. Under-inflation also
reduces fuel efficiency and tire tread life,
and may affect the vehicle’s handling and
stopping ability.
• The TPMS is not a substitute for proper tire maintenance, and it is the driver’s
responsibility to maintain correct tire pres-
sure using an accurate tire gauge, even if
under-inflation has not reached the level
to trigger illumination of the Tire Pressure
Monitoring Telltale Light. • Seasonal temperature changes will affect
tire pressure, and the TPMS will monitor
the actual tire pressure in the tire.
Premium System
The Tire Pressure Monitor System (TPMS)
uses wireless technology with wheel rim-
mounted electronic sensors to monitor tire
pressure levels. Sensors, mounted to each
wheel as part of the valve stem, transmit tire
pressure readings to the Receiver Module.
Tire Pressure Monitor Display
SAFETY
108
Page 188 of 372
REFUELING THE VEHICLE
1. Push the fuel filler door release switch(located under the headlamp switch).
2. Open the fuel filler door. NOTE:
In certain cold conditions, ice may pre-
vent the fuel door from opening. If this
occurs, lightly push on the fuel door to
break the ice buildup and re-release the
fuel door using the inside release button.
Do not pry on the door.
3. There is no fuel filler cap. A flapper door inside the pipe seals the system. 4. Insert the fuel nozzle fully into the filler
pipe, the nozzle opens and holds the flap-
per door while refueling.
5. Fill the vehicle with fuel, when the fuel nozzle “clicks” or shuts off the fuel tank is
full.
6. Wait 5 seconds before removing the fuel nozzle to allow fuel to drain from nozzle.
7. Remove the fuel nozzle and close the fuel door.
Emergency Gas Can Refueling
• Most gas cans will not open the flapper door.
• A funnel is provided to open the flapper door to allow emergency refueling with a
gas can.
• Retrieve funnel from the spare tire storage area.
• Insert funnel into same filler pipe opening as the fuel nozzle.
Fuel Filler Door Release
Fuel Filler Door LatchSTARTING AND OPERATING
186
Page 190 of 372
NOTE:
If the fuel door does not latch after the
manual release cable has been activated, the
actuator latch should be manually returned
to the closed position.
REFUELING THE VEHICLE —
DIESEL ENGINE
1. Press the fuel filler door release switch(located under the headlamp switch).
2. Open the fuel filler door.
1 — Fuel Fill Location
2 — Diesel Exhaust Fluid Fill Location
NOTE:
There is no fuel filler cap. A flapper door
inside the filler pipe seals the system.
Release Cable
Fuel Filler Door Release Switch
Fuel and Diesel Exhaust Fluid Fill LocationSTARTING AND OPERATING
188
Page 191 of 372
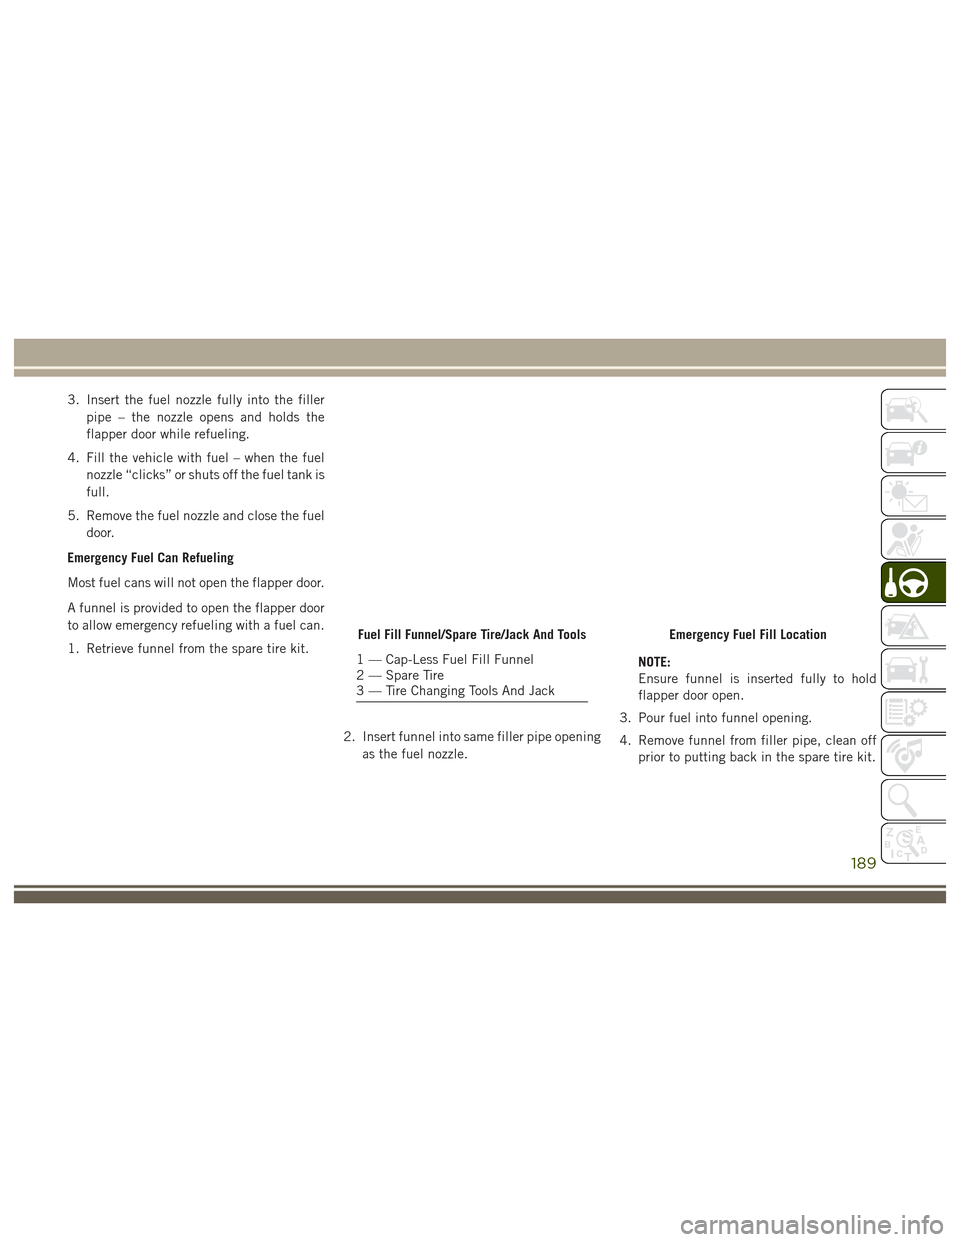
3. Insert the fuel nozzle fully into the fillerpipe – the nozzle opens and holds the
flapper door while refueling.
4. Fill the vehicle with fuel – when the fuel nozzle “clicks” or shuts off the fuel tank is
full.
5. Remove the fuel nozzle and close the fuel door.
Emergency Fuel Can Refueling
Most fuel cans will not open the flapper door.
A funnel is provided to open the flapper door
to allow emergency refueling with a fuel can.
1. Retrieve funnel from the spare tire kit.
2. Insert funnel into same filler pipe openingas the fuel nozzle. NOTE:
Ensure funnel is inserted fully to hold
flapper door open.
3. Pour fuel into funnel opening.
4. Remove funnel from filler pipe, clean off prior to putting back in the spare tire kit.
Fuel Fill Funnel/Spare Tire/Jack And Tools
1 — Cap-Less Fuel Fill Funnel
2 — Spare Tire
3 — Tire Changing Tools And Jack
Emergency Fuel Fill Location
189
Page 194 of 372
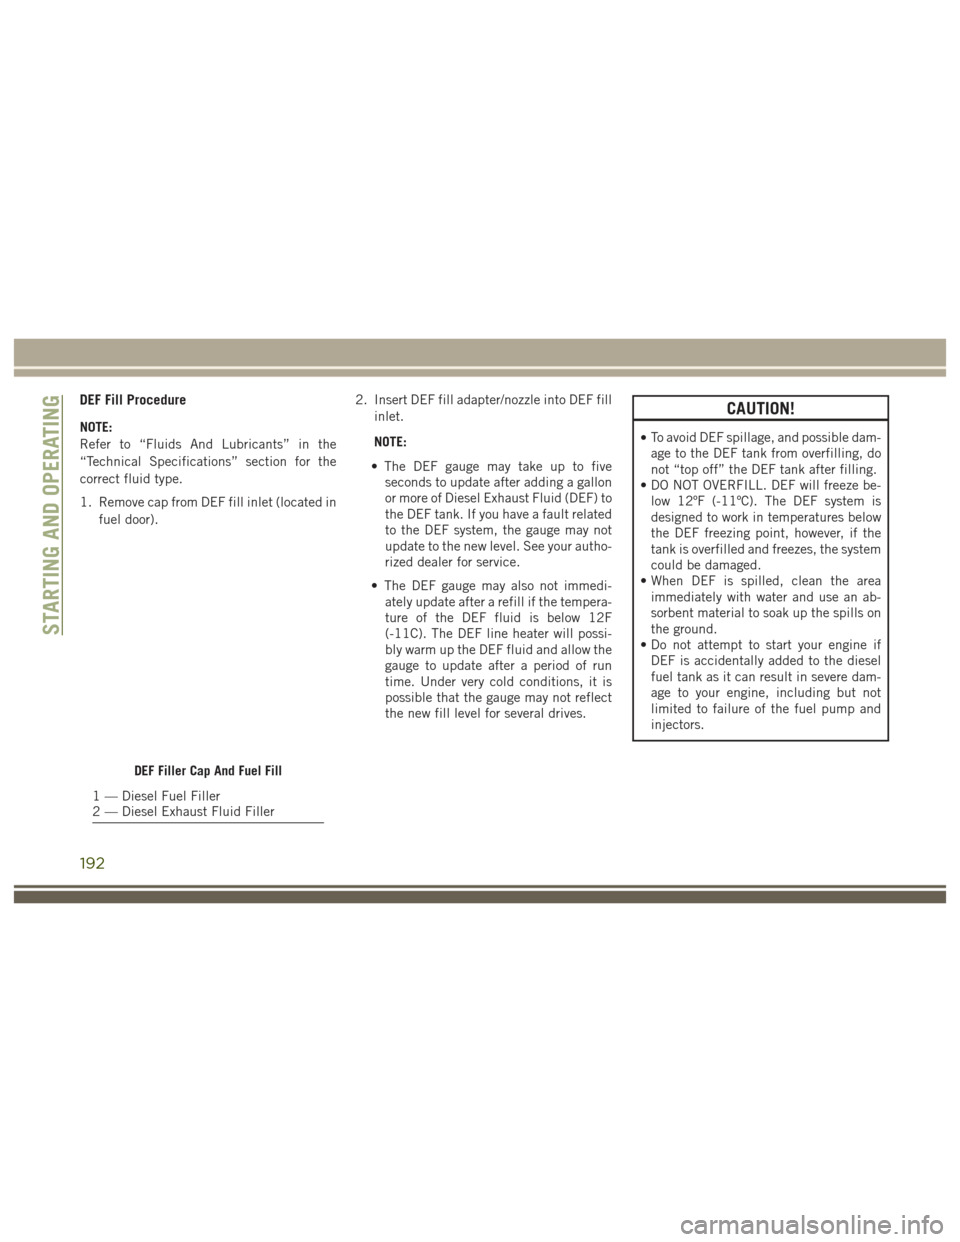
DEF Fill Procedure
NOTE:
Refer to “Fluids And Lubricants” in the
“Technical Specifications” section for the
correct fluid type.
1. Remove cap from DEF fill inlet (located infuel door). 2. Insert DEF fill adapter/nozzle into DEF fill
inlet.
NOTE:
• The DEF gauge may take up to five seconds to update after adding a gallon
or more of Diesel Exhaust Fluid (DEF) to
the DEF tank. If you have a fault related
to the DEF system, the gauge may not
update to the new level. See your autho-
rized dealer for service.
• The DEF gauge may also not immedi- ately update after a refill if the tempera-
ture of the DEF fluid is below 12F
(-11C). The DEF line heater will possi-
bly warm up the DEF fluid and allow the
gauge to update after a period of run
time. Under very cold conditions, it is
possible that the gauge may not reflect
the new fill level for several drives.
CAUTION!
•To avoid DEF spillage, and possible dam-
age to the DEF tank from overfilling, do
not “top off” the DEF tank after filling.
• DO NOT OVERFILL. DEF will freeze be- low 12ºF (-11ºC). The DEF system is
designed to work in temperatures below
the DEF freezing point, however, if the
tank is overfilled and freezes, the system
could be damaged.
• When DEF is spilled, clean the area immediately with water and use an ab-
sorbent material to soak up the spills on
the ground.
• Do not attempt to start your engine if DEF is accidentally added to the diesel
fuel tank as it can result in severe dam-
age to your engine, including but not
limited to failure of the fuel pump and
injectors.
DEF Filler Cap And Fuel Fill
1 — Diesel Fuel Filler
2 — Diesel Exhaust Fluid Filler
STARTING AND OPERATING
192
Page 195 of 372
CAUTION!
• Never add anything other than DEF tothe tank – especially any form of hydro-
carbon such as diesel fuel, fuel system
additives, gasoline, or any other
petroleum-based product. Even a very
small amount of these, less than
100 parts per million or less than 1 oz.
per 78 gallons (295 liters) will contami-
nate the entire DEF system and will
require replacement. If owners use a
container, funnel or nozzle when refilling
the tank, it should either be new or one
that is has only been used for adding
DEF. MOPAR provides an attachable
nozzle with its DEF for this purpose. 3. Stop filling the DEF tank immediately
when any of the following happen: DEF
stops flowing from the fill bottle into the
DEF fill inlet, DEF splashes out the fill
inlet, or a DEF pump nozzle automatically
shuts off.
4. Reinstall cap onto DEF fill inlet.
TRAILER TOWING
Trailer Towing Weights (Maximum Trailer
Weight Ratings) — Non SRT
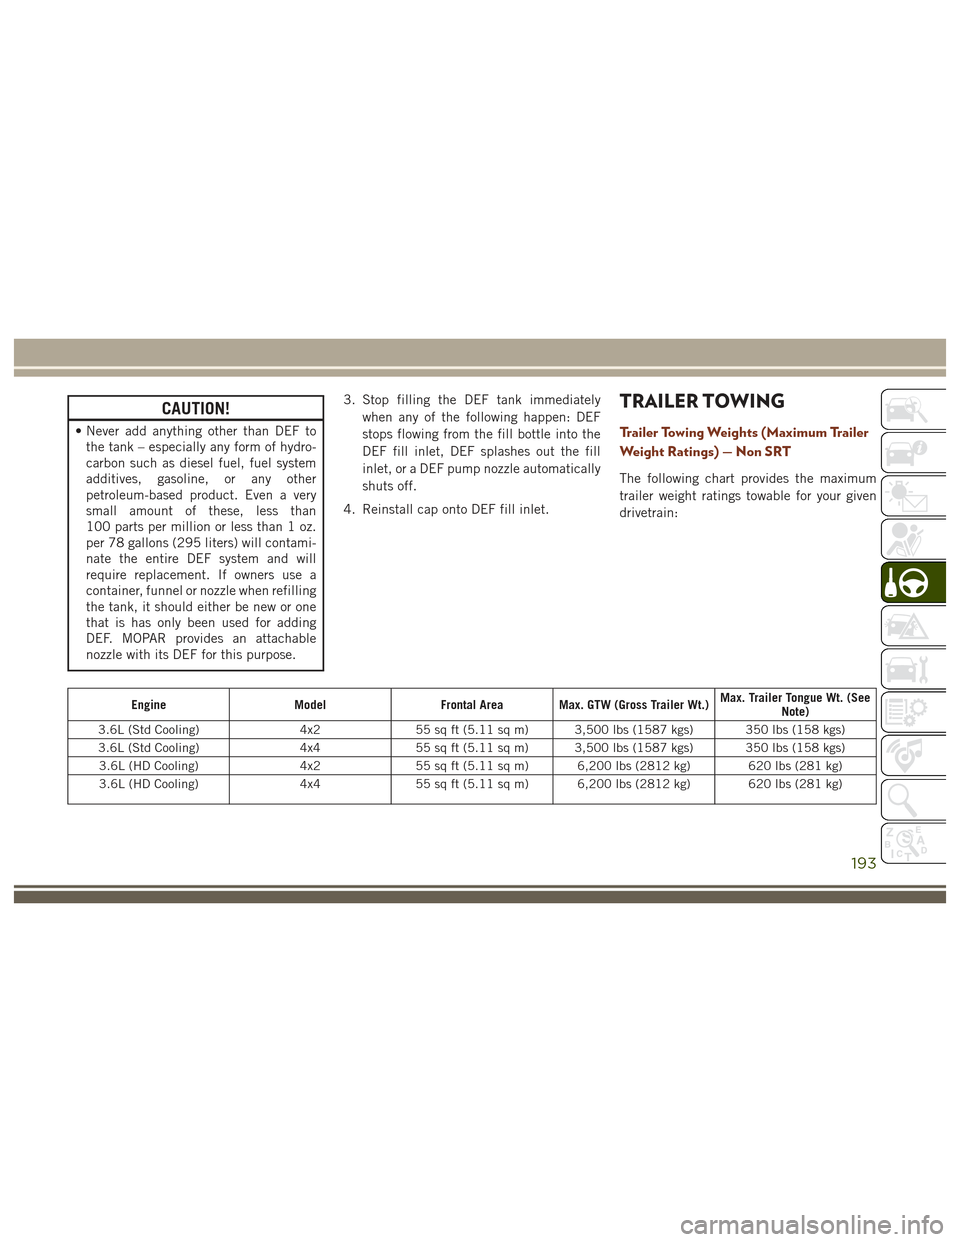
The following chart provides the maximum
trailer weight ratings towable for your given
drivetrain:
Engine ModelFrontal Area Max. GTW (Gross Trailer Wt.) Max. Trailer Tongue Wt. (See
Note)
3.6L (Std Cooling) 4x255 sq ft (5.11 sq m) 3,500 lbs (1587 kgs) 350 lbs (158 kgs)
3.6L (Std Cooling) 4x455 sq ft (5.11 sq m) 3,500 lbs (1587 kgs) 350 lbs (158 kgs)
3.6L (HD Cooling) 4x255 sq ft (5.11 sq m) 6,200 lbs (2812 kg) 620 lbs (281 kg)
3.6L (HD Cooling) 4x455 sq ft (5.11 sq m) 6,200 lbs (2812 kg) 620 lbs (281 kg)
193
Page 217 of 372

WARNING!
Do not exceed 50 mph (80 km/h) if the
“Tire Pressure Monitoring Telltale Light” is
illuminated. Vehicle handling and braking
may be reduced. You could have a collision
and be severely or fatally injured.
Jack/Spare Tire Stowage
Jack Location
The scissor-type jack and tire changing tools
are located in rear cargo area, below the load
floor.Spare Tire Stowage
The spare tire is stowed under the load floor
in the rear cargo area and is secured to the
body with a special wing nut.
Preparations For Jacking
CAUTION!
Always lift or jack the vehicle from the
correct jacking points. Failure to follow
this information could cause damage to
the vehicle or underbody components.
NOTE:
To assist with changing a spare tire, the air
suspension system (if equipped) has a fea-
ture which allows the automatic leveling to be
disabled.
1. Park the vehicle on a firm, level surface. Avoid ice or slippery surfaces.
Spare Tire/Jack And Tools
1 — Cap-Less Fuel Fill Funnel
2 — Spare Tire
3 — Tire Changing Tools And Jack
215
Page 226 of 372
REFUELING IN EMERGENCY
The funnel for the Cap-Less Fuel System is
located in the spare tire storage area. If your
vehicle is out of fuel and an auxiliary fuel can
is needed, insert the funnel into the filler
neck and proceed to fill the vehicle.
For more information on the Cap-Less Fuel
System refer to “Refueling The Vehicle” in
“Starting And Operating ” in this manual.
IF YOUR ENGINE
OVERHEATS
In any of the following situations, you can
reduce the potential for overheating by taking
the appropriate action.
• On the highways — slow down.
• In city traffic — while stopped, place thetransmission in NEUTRAL, but do not in-
crease the engine idle speed while prevent-
ing vehicle motion with the brakes. NOTE:
There are steps that you can take to slow
down an impending overheat condition:
• If your air conditioner (A/C) is on, turn it
off. The A/C system adds heat to the en-
gine cooling system and turning the A/C
off can help remove this heat.
• You can also turn the temperature control to maximum heat, the mode control to
floor and the blower control to high. This
allows the heater core to act as a supple-
ment to the radiator and aids in removing
heat from the engine cooling system.WARNING!
You or others can be badly burned by hot
engine coolant (antifreeze) or steam from
your radiator. If you see or hear steam
coming from under the hood, do not open
the hood until the radiator has had time to
cool. Never try to open a cooling system
pressure cap when the radiator or coolant
bottle is hot.
CAUTION!
Driving with a hot cooling system could
damage your vehicle. If the temperature
gauge reads HOT (H), pull over and stop
the vehicle. Idle the vehicle with the air
conditioner turned off until the pointer
drops back into the normal range. If the
pointer remains on HOT (H), and you hear
continuous chimes, turn the engine off
immediately and call for service.
MANUAL PARK RELEASE
WARNING!
Always secure your vehicle by fully apply-
ing the parking brake, before activating
the Manual Park Release. Activating the
Manual Park Release will allow your ve-
hicle to roll away if it is not secured by the
parking brake or by proper connection to a
tow vehicle. Activating the Manual Park
Release on an unsecured vehicle could
lead to serious injury or death for those in
or around the vehicle.
IN CASE OF EMERGENCY
224
Page 250 of 372
Checking Oil Level — Gasoline Engine
To assure proper lubrication of your vehicle’s
engine, the engine oil must be maintained at
the correct level. Check the oil level at regular
intervals, such as every fuel stop. The best
time to check the engine oil level is about five
minutes after a fully warmed up engine is
shut off.
Checking the oil while the vehicle is on level
ground will improve the accuracy of the oil
level readings. Always maintain the oil level
within the SAFE zone on the dipstick. Adding
one quart of oil when the reading is at the
bottom of the SAFE zone will result in a
reading at the top of the safe zone on these
engines.
CAUTION!
Overfilling or underfilling the crankcase
will cause aeration or loss of oil pressure.
This could damage your engine.
Checking Oil Level — Diesel Engine
To assure proper lubrication of your vehicle's
engine, the engine oil must be maintained at
the correct level. Check the oil level at regular
intervals. The best time to check the oil level
is before starting the engine after it has been
parked overnight. When checking oil after
operating the engine, first ensure the engine
is at full operating temperature, then wait for
five minutes after engine shutdown to check
the oil.
Checking the oil while the vehicle is on level
ground will improve the accuracy of the oil
level readings. Add oil only when the level on
the dipstick is below the “MIN” mark. The
total capacity from the MIN mark to the MAX
mark is 1.7 qts (1.6L).
CAUTION!
Overfilling or underfilling the crankcase
will cause oil aeration or loss of oil pres-
sure. This could damage your engine.NOTE:
It is possible for your oil level to be slightly
higher than a previous check. This would be
due to diesel fuel that may temporarily be in
the crankcase due to operation of the diesel
particulate filter regeneration strategy. This
fuel will evaporate out under normal opera-
tion.
Never operate the engine with oil level below
the “MIN” mark or above the upper “MAX”
mark.
Adding Washer Fluid
The instrument cluster display will indicate
when the washer fluid level is low. When the
sensor detects a low fluid level, the wind-
shield will light on the vehicle graphic outline
and the “WASHER FLUID LOW” message
will be displayed.
The fluid reservoir for the windshield washers
and the rear window washer is shared. The
fluid reservoir is located in the engine com-
partment, be sure to check the fluid level at
regular intervals. Fill the reservoir with wind-
shield washer solvent only (not radiator anti-
freeze). When refilling the washer fluid reser-
SERVICING AND MAINTENANCE
248