JEEP GRAND CHEROKEE 2018 Owner handbook (in English)
Manufacturer: JEEP, Model Year: 2018, Model line: GRAND CHEROKEE, Model: JEEP GRAND CHEROKEE 2018Pages: 368, PDF Size: 5.72 MB
Page 181 of 368
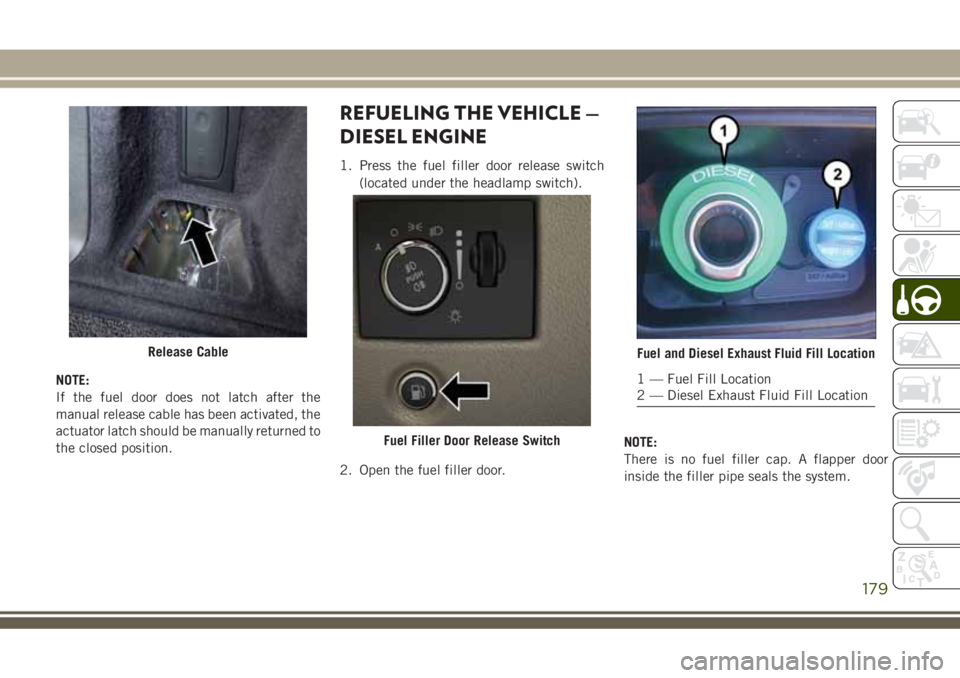
NOTE:
If the fuel door does not latch after the
manual release cable has been activated, the
actuator latch should be manually returned to
the closed position.
REFUELING THE VEHICLE —
DIESEL ENGINE
1. Press the fuel filler door release switch
(located under the headlamp switch).
2. Open the fuel filler door.NOTE:
There is no fuel filler cap. A flapper door
inside the filler pipe seals the system.
Release Cable
Fuel Filler Door Release Switch
Fuel and Diesel Exhaust Fluid Fill Location
1 — Fuel Fill Location
2 — Diesel Exhaust Fluid Fill Location
179
Page 182 of 368
3. Insert the fuel nozzle fully into the filler
pipe – the nozzle opens and holds the
flapper door while refueling.
4. Fill the vehicle with fuel – when the fuel
nozzle “clicks” or shuts off the fuel tank is
full.
5. Wait five seconds before removing the
nozzle to allow fuel to drain from the
nozzle.
6. Remove the fuel nozzle and close the fuel
door.
Emergency Fuel Can Refueling
Most fuel cans will not open the flapper door.
A funnel is provided to open the flapper door
to allow emergency refueling with a fuel can.
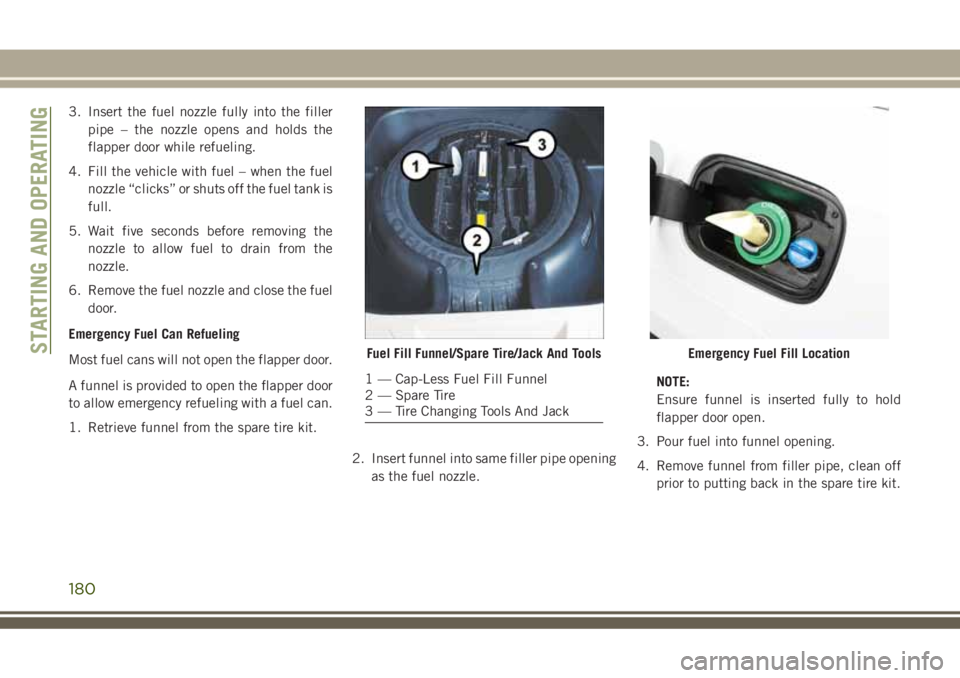
1. Retrieve funnel from the spare tire kit.
2. Insert funnel into same filler pipe opening
as the fuel nozzle.NOTE:
Ensure funnel is inserted fully to hold
flapper door open.
3. Pour fuel into funnel opening.
4. Remove funnel from filler pipe, clean off
prior to putting back in the spare tire kit.
Fuel Fill Funnel/Spare Tire/Jack And Tools
1 — Cap-Less Fuel Fill Funnel
2 — Spare Tire
3 — Tire Changing Tools And Jack
Emergency Fuel Fill LocationSTARTING AND OPERATING
180
Page 183 of 368
WARNING!
• Never have any smoking materials lit in
or near the vehicle when the fuel door is
open or the tank is being filled.
• Never add fuel when the engine is run-
ning. This is in violation of most coun-
tries regulations and may cause the
“Malfunction Indicator Light” to turn
on.
• A fire may result if fuel is pumped into a
portable container that is inside of a
vehicle. You could be burned. Always
place fuel containers on the ground
while filling.
CAUTION!
To avoid fuel spillage and overfilling, do
not “top off” the fuel tank after filling.
Avoid Using Contaminated Fuel
Fuel that is contaminated by water or dirt can
cause severe damage to the engine fuel sys-
tem. Proper maintenance of the engine fuelfilter and fuel tank is essential. Refer to
“Dealer Service” in “Servicing And Mainte-
nance” in your Owner’s Manual for further
information.
Bulk Fuel Storage — Diesel Fuel
If you store quantities of fuel, good mainte-
nance of the stored fuel is also essential. Fuel
contaminated with water will promote the
growth of “microbes.” These microbes form
“slime” that will clog the fuel filtration sys-
tem and lines. Drain condensation from the
supply tank and change the line filter on a
regular basis.
NOTE:
When a diesel engine is allowed to run out of
fuel, air is pulled into the fuel system.
If the vehicle will not start, refer to “Dealer
Service / Priming If The Engine Has Run Out
Of Fuel” in “Servicing And Maintenance” in
your Owner’s Manual for further information.
WARNING!
Do not open the high pressure fuel system
with the engine running. Engine operation
WARNING!
causes high fuel pressure. High pressure
fuel spray can cause serious injury or
death.
Diesel Exhaust Fluid
Your vehicle is equipped with a Selective
Catalytic Reduction system to meet the very
stringent diesel emissions standards required
by the Environmental Protection Agency.
The purpose of the SCR system is to reduce
levels of NOx (oxides of nitrogen emitted from
engines) that are harmful to our health and
the environment to a near-zero level. A small
quantity of Diesel Exhaust Fluid (DEF) is
injected into the exhaust upstream of a cata-
lyst where, when vaporized, it converts smog-
forming nitrogen oxides (NOx) into harmless
nitrogen (N2) and water vapor (H2O), two
natural components of the air we breathe.
You can operate with the comfort that your
vehicle is contributing to a cleaner, healthier
world environment for this and generations to
come.
181
Page 184 of 368
System Overview
This vehicle is equipped with a Diesel Ex-
haust Fluid (DEF) injection system and a
Selective Catalytic Reduction (SCR) catalyst
to meet the emission requirements.
The DEF injection system consists of the
following components:
• DEF tank
• DEF pump
• DEF injector
• Electronically-heated DEF lines
• NOx sensors
• Temperature sensors
• SCR catalyst
The DEF injection system and SCR catalyst
enable the achievement of diesel emissions
requirements; while maintaining outstanding
fuel economy, drivability, torque and power
ratings.Refer to “Instrument Cluster Display” in
“Getting To Know Your Instrument Panel” for
system messages and warnings.
NOTE:
• Your vehicle is equipped with a DEF injec-
tion system. You may occasionally hear an
audible clicking noise from under the ve-
hicle at a stop. This is normal operation.
• The DEF pump will run for a period of time
after engine shutdown to purge the DEF
system. This is normal operation and may
be audible from the rear of the vehicle.
Diesel Exhaust Fluid Storage
Diesel Exhaust Fluid (DEF) is considered a
very stable product with a long shelf life. If
DEF is kept in temperatures between 10° and
90°F (-12° and 32°C), it will last a minimum
of one year.
DEF is subject to freezing at the lowest tem-
peratures. For example, DEF may freeze at
temperatures at or below 12° F (-11° C). The
system has been designed to operate in this
environment.
NOTE:
When working with DEF, it is important to
know that:
• Any containers or parts that come into con-
tact with DEF must be DEF compatible
(plastic or stainless steel). Copper, brass,
aluminum, iron or non-stainless steel
should be avoided as they are subject to
corrosion by DEF.
• If DEF is spilled, it should be wiped up
completely.
STARTING AND OPERATING
182
Page 185 of 368
Adding Diesel Exhaust Fluid
The DEF gauge (located on the instrument
cluster display) will display the level of DEF
remaining in the tank. Refer to “Instrument
Cluster Display” in “Getting To Know Your
Instrument Panel” for further information.
NOTE:
Driving conditions (altitude, vehicle speed,
load, etc.) will effect the amount of DEF that
is used in your vehicle.
DEF Fill Procedure
NOTE:
Refer to “Fluids And Lubricants” in the
“Technical Specifications” section for the
correct fluid type.
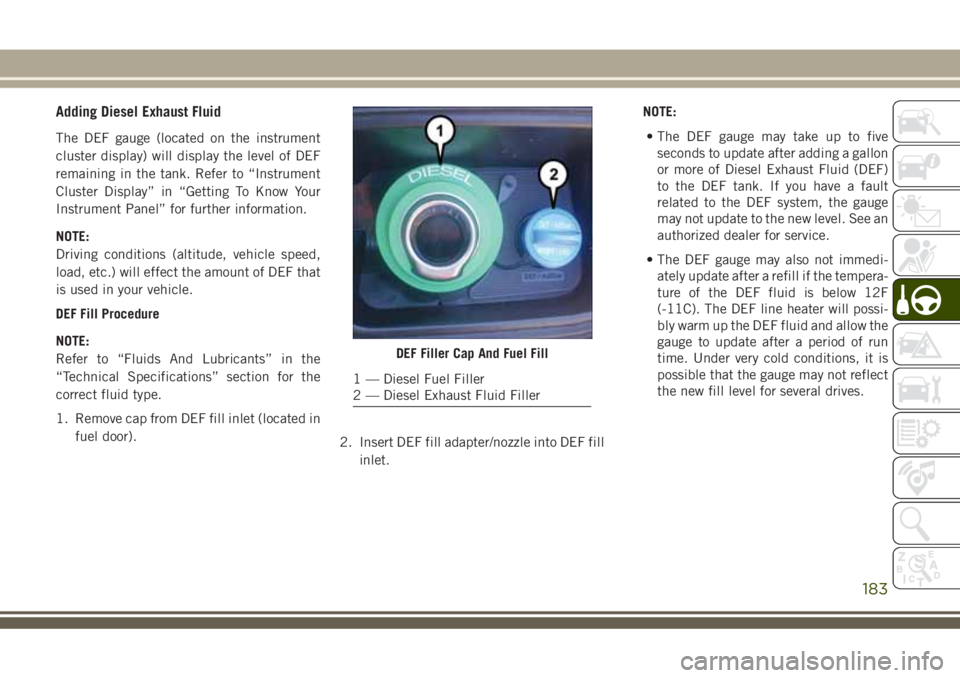
1. Remove cap from DEF fill inlet (located in
fuel door).
2. Insert DEF fill adapter/nozzle into DEF fill
inlet.NOTE:
• The DEF gauge may take up to five
seconds to update after adding a gallon
or more of Diesel Exhaust Fluid (DEF)
to the DEF tank. If you have a fault
related to the DEF system, the gauge
may not update to the new level. See an
authorized dealer for service.
• The DEF gauge may also not immedi-
ately update after a refill if the tempera-
ture of the DEF fluid is below 12F
(-11C). The DEF line heater will possi-
bly warm up the DEF fluid and allow the
gauge to update after a period of run
time. Under very cold conditions, it is
possible that the gauge may not reflect
the new fill level for several drives.
DEF Filler Cap And Fuel Fill
1 — Diesel Fuel Filler
2 — Diesel Exhaust Fluid Filler
183
Page 186 of 368
CAUTION!
•To avoid DEF spillage, and possible dam-
age to the DEF tank from overfilling, do
not “top off” the DEF tank after filling.
• DO NOT OVERFILL. DEF will freeze be-
low 12ºF (-11ºC). The DEF system is
designed to work in temperatures below
the DEF freezing point, however, if the
tank is overfilled and freezes, the system
could be damaged.
• When DEF is spilled, clean the area
immediately with water and use an ab-
sorbent material to soak up the spills on
the ground.
• Do not attempt to start your engine if
DEF is accidentally added to the diesel
fuel tank as it can result in severe dam-
age to your engine, including but not
limited to failure of the fuel pump and
injectors.
CAUTION!
• Never add anything other than DEF to
the tank – especially any form of hydro-
carbon such as diesel fuel, fuel system
additives, gasoline, or any other
petroleum-based product. Even a very
small amount of these, less than
100 parts per million or less than 1 oz.
(30 ml) per 78 gallons (295 liters) will
contaminate the entire DEF system and
will require replacement. If owners use a
container, funnel or nozzle when refilling
the tank, it should either be new or one
that is has only been used for adding
DEF. Mopar provides an attachable
nozzle with its DEF for this purpose.3. Stop filling the DEF tank immediately
when any of the following happen: DEF
stops flowing from the fill bottle into the
DEF fill inlet, DEF splashes out the fill
inlet, or a DEF pump nozzle automatically
shuts off.
4. Reinstall cap onto DEF fill inlet.
STARTING AND OPERATING
184
Page 187 of 368
TRAILER TOWING
Trailer Towing Weights (Maximum Trailer
Weight Ratings) — Non SRT
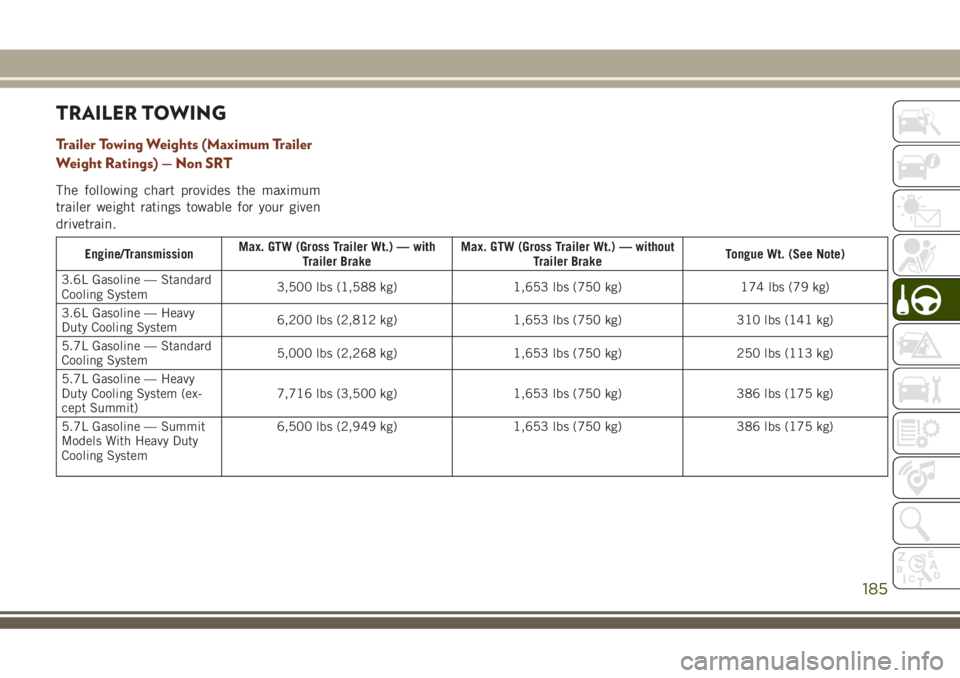
The following chart provides the maximum
trailer weight ratings towable for your given
drivetrain.
Engine/TransmissionMax. GTW (Gross Trailer Wt.) — with
Trailer BrakeMax. GTW (Gross Trailer Wt.) — without
Trailer BrakeTongue Wt. (See Note)
3.6L Gasoline — Standard
Cooling System3,500 lbs (1,588 kg) 1,653 lbs (750 kg) 174 lbs (79 kg)
3.6L Gasoline — Heavy
Duty Cooling System6,200 lbs (2,812 kg) 1,653 lbs (750 kg) 310 lbs (141 kg)
5.7L Gasoline — Standard
Cooling System5,000 lbs (2,268 kg) 1,653 lbs (750 kg) 250 lbs (113 kg)
5.7L Gasoline — Heavy
Duty Cooling System (ex-
cept Summit)7,716 lbs (3,500 kg) 1,653 lbs (750 kg) 386 lbs (175 kg)
5.7L Gasoline — Summit
Models With Heavy Duty
Cooling System6,500 lbs (2,949 kg) 1,653 lbs (750 kg) 386 lbs (175 kg)
185
Page 188 of 368
Engine/TransmissionMax. GTW (Gross Trailer Wt.) — with
Trailer BrakeMax. GTW (Gross Trailer Wt.) — without
Trailer BrakeTongue Wt. (See Note)
3.0L Diesel All Wheel Drive ModelswithoutEngine Start Stop and Diesel Emission Fluid
All models except Summit 7,716 lbs (3,500 kg) 1,653 lbs (750 kg) 386 lbs (175 kg)
Summit Model 6,500 lbs (2,949 kg) 1,653 lbs (750 kg) 324 lbs (147 kg)
3.0L Diesel All Wheel Drive ModelswithEngine Start Stop and Diesel Emission Fluid
All models except Summit
and Trailhawk without skid
plate group7,716 lbs (3,500 kg) 1,653 lbs (750 kg) 386 lbs (175 kg)
All models except Summit
and Trailhawk with skid
plate group6,500 lbs (2,949 kg) 1,653 lbs (750 kg) 324 lbs (147 kg)
Summit and Trailhawk
models6,500 lbs (2,949 kg) 1,653 lbs (750 kg) 324 lbs (147 kg)
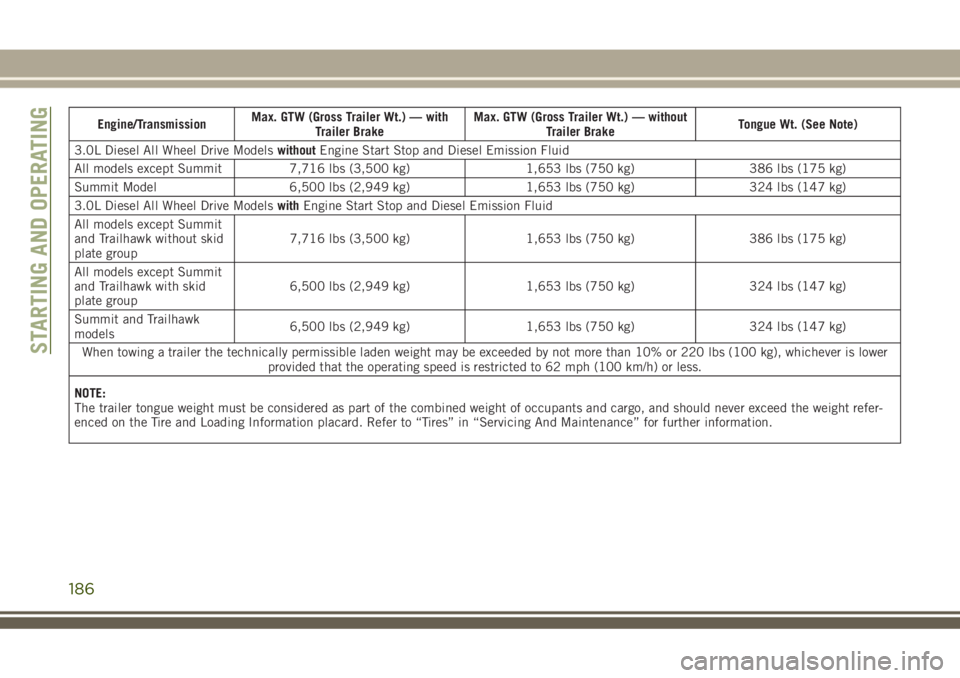
When towing a trailer the technically permissible laden weight may be exceeded by not more than 10% or 220 lbs (100 kg), whichever is lower
provided that the operating speed is restricted to 62 mph (100 km/h) or less.
NOTE:
The trailer tongue weight must be considered as part of the combined weight of occupants and cargo, and should never exceed the weight refer-
enced on the Tire and Loading Information placard. Refer to “Tires” in “Servicing And Maintenance” for further information.
STARTING AND OPERATING
186
Page 189 of 368
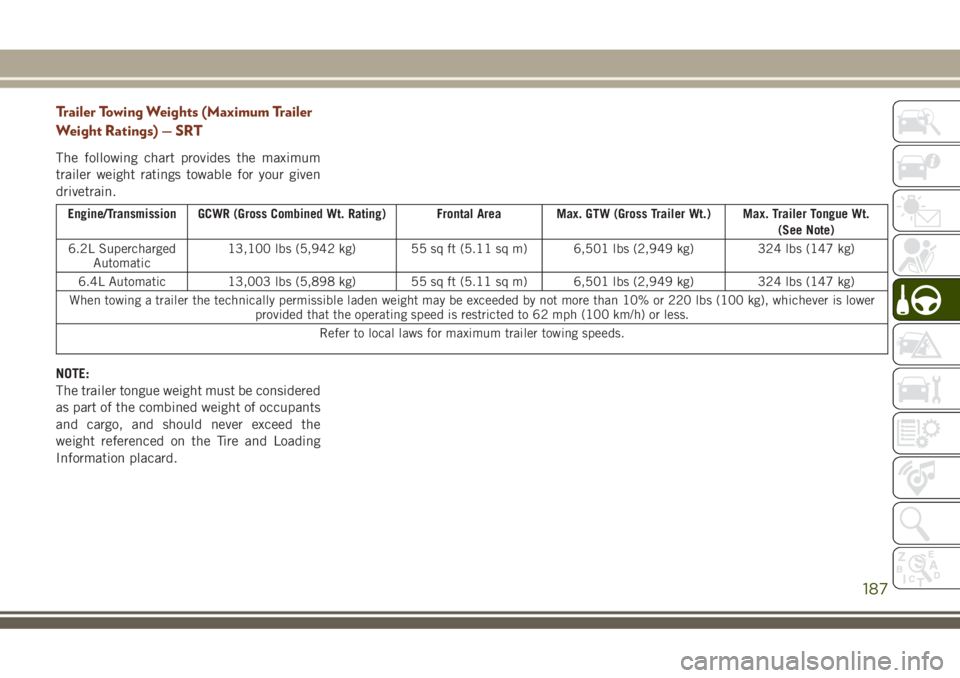
Trailer Towing Weights (Maximum Trailer
Weight Ratings) — SRT
The following chart provides the maximum
trailer weight ratings towable for your given
drivetrain.
Engine/Transmission GCWR (Gross Combined Wt. Rating) Frontal Area Max. GTW (Gross Trailer Wt.) Max. Trailer Tongue Wt.
(See Note)
6.2L Supercharged
Automatic13,100 lbs (5,942 kg) 55 sq ft (5.11 sq m) 6,501 lbs (2,949 kg) 324 lbs (147 kg)
6.4L Automatic 13,003 lbs (5,898 kg) 55 sq ft (5.11 sq m) 6,501 lbs (2,949 kg) 324 lbs (147 kg)
When towing a trailer the technically permissible laden weight may be exceeded by not more than 10% or 220 lbs (100 kg), whichever is lower
provided that the operating speed is restricted to 62 mph (100 km/h) or less.
Refer to local laws for maximum trailer towing speeds.
NOTE:
The trailer tongue weight must be considered
as part of the combined weight of occupants
and cargo, and should never exceed the
weight referenced on the Tire and Loading
Information placard.
187
Page 190 of 368
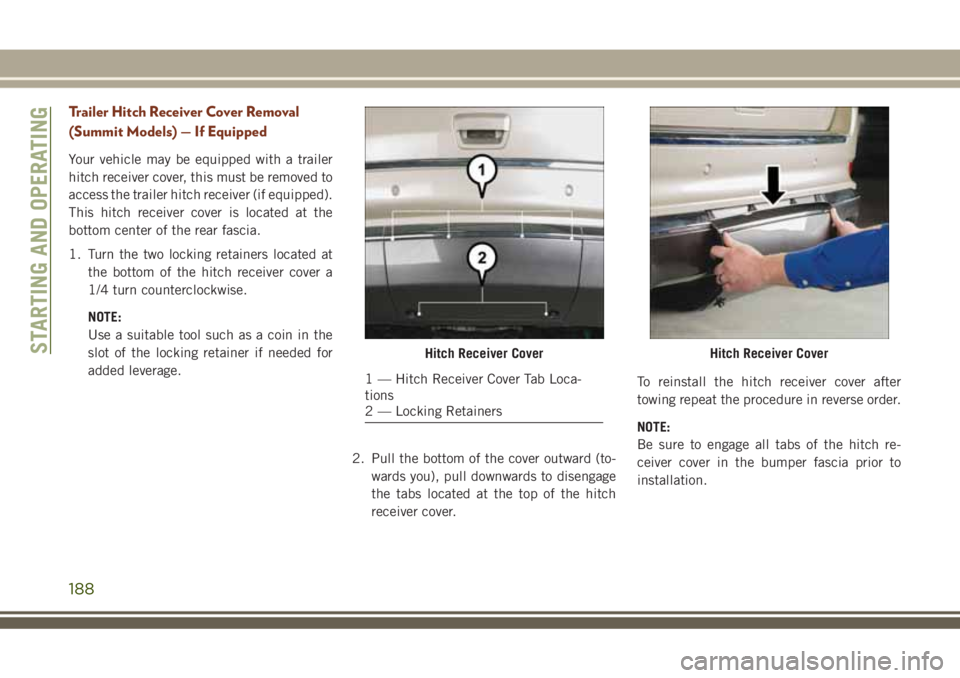
Trailer Hitch Receiver Cover Removal
(Summit Models) — If Equipped
Your vehicle may be equipped with a trailer
hitch receiver cover, this must be removed to
access the trailer hitch receiver (if equipped).
This hitch receiver cover is located at the
bottom center of the rear fascia.
1. Turn the two locking retainers located at
the bottom of the hitch receiver cover a
1/4 turn counterclockwise.
NOTE:
Use a suitable tool such as a coin in the
slot of the locking retainer if needed for
added leverage.
2. Pull the bottom of the cover outward (to-
wards you), pull downwards to disengage
the tabs located at the top of the hitch
receiver cover.To reinstall the hitch receiver cover after
towing repeat the procedure in reverse order.
NOTE:
Be sure to engage all tabs of the hitch re-
ceiver cover in the bumper fascia prior to
installation.
Hitch Receiver Cover
1 — Hitch Receiver Cover Tab Loca-
tions
2 — Locking Retainers
Hitch Receiver CoverSTARTING AND OPERATING
188