display JEEP GRAND CHEROKEE 2018 Owner handbook (in English)
[x] Cancel search | Manufacturer: JEEP, Model Year: 2018, Model line: GRAND CHEROKEE, Model: JEEP GRAND CHEROKEE 2018Pages: 368, PDF Size: 5.72 MB
Page 317 of 368
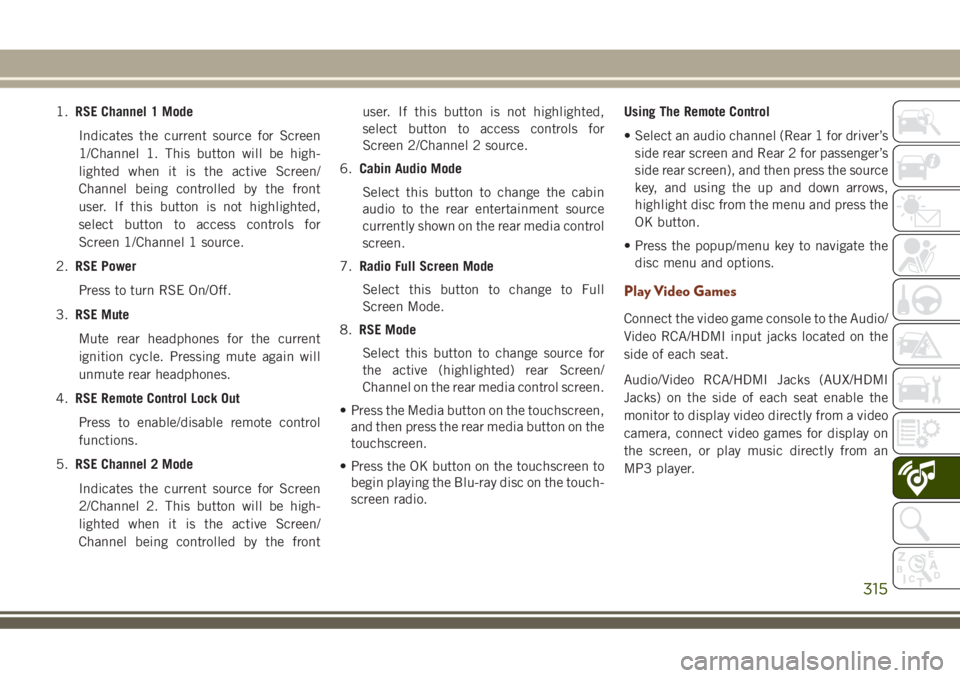
1.RSE Channel 1 Mode
Indicates the current source for Screen
1/Channel 1. This button will be high-
lighted when it is the active Screen/
Channel being controlled by the front
user. If this button is not highlighted,
select button to access controls for
Screen 1/Channel 1 source.
2.RSE Power
Press to turn RSE On/Off.
3.RSE Mute
Mute rear headphones for the current
ignition cycle. Pressing mute again will
unmute rear headphones.
4.RSE Remote Control Lock Out
Press to enable/disable remote control
functions.
5.RSE Channel 2 Mode
Indicates the current source for Screen
2/Channel 2. This button will be high-
lighted when it is the active Screen/
Channel being controlled by the frontuser. If this button is not highlighted,
select button to access controls for
Screen 2/Channel 2 source.
6.Cabin Audio Mode
Select this button to change the cabin
audio to the rear entertainment source
currently shown on the rear media control
screen.
7.Radio Full Screen Mode
Select this button to change to Full
Screen Mode.
8.RSE Mode
Select this button to change source for
the active (highlighted) rear Screen/
Channel on the rear media control screen.
• Press the Media button on the touchscreen,
and then press the rear media button on the
touchscreen.
• Press the OK button on the touchscreen to
begin playing the Blu-ray disc on the touch-
screen radio.Using The Remote Control
• Select an audio channel (Rear 1 for driver’s
side rear screen and Rear 2 for passenger’s
side rear screen), and then press the source
key, and using the up and down arrows,
highlight disc from the menu and press the
OK button.
• Press the popup/menu key to navigate the
disc menu and options.
Play Video Games
Connect the video game console to the Audio/
Video RCA/HDMI input jacks located on the
side of each seat.
Audio/Video RCA/HDMI Jacks (AUX/HDMI
Jacks) on the side of each seat enable the
monitor to display video directly from a video
camera, connect video games for display on
the screen, or play music directly from an
MP3 player.
315
Page 318 of 368
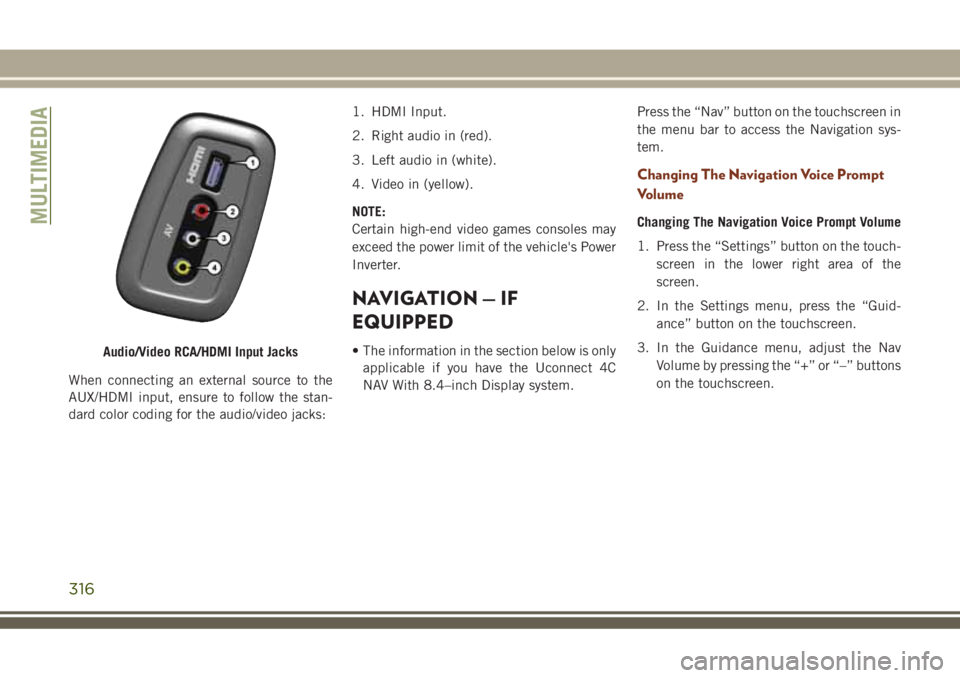
When connecting an external source to the
AUX/HDMI input, ensure to follow the stan-
dard color coding for the audio/video jacks:1. HDMI Input.
2. Right audio in (red).
3. Left audio in (white).
4. Video in (yellow).
NOTE:
Certain high-end video games consoles may
exceed the power limit of the vehicle's Power
Inverter.
NAVIGATION — IF
EQUIPPED
• The information in the section below is only
applicable if you have the Uconnect 4C
NAV With 8.4–inch Display system.Press the “Nav” button on the touchscreen in
the menu bar to access the Navigation sys-
tem.
Changing The Navigation Voice Prompt
Volume
Changing The Navigation Voice Prompt Volume
1. Press the “Settings” button on the touch-
screen in the lower right area of the
screen.
2. In the Settings menu, press the “Guid-
ance” button on the touchscreen.
3. In the Guidance menu, adjust the Nav
Volume by pressing the “+” or “–” buttons
on the touchscreen.
Audio/Video RCA/HDMI Input Jacks
MULTIMEDIA
316
Page 319 of 368
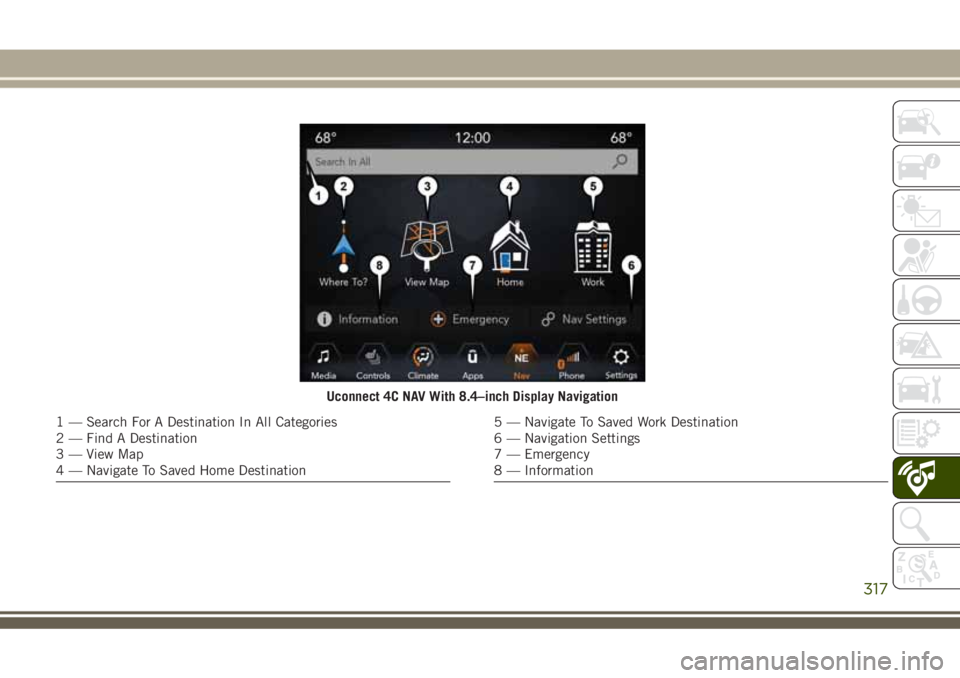
Uconnect 4C NAV With 8.4–inch Display Navigation
1 — Search For A Destination In All Categories
2 — Find A Destination
3 — View Map
4 — Navigate To Saved Home Destination5 — Navigate To Saved Work Destination
6 — Navigation Settings
7 — Emergency
8 — Information
317
Page 321 of 368
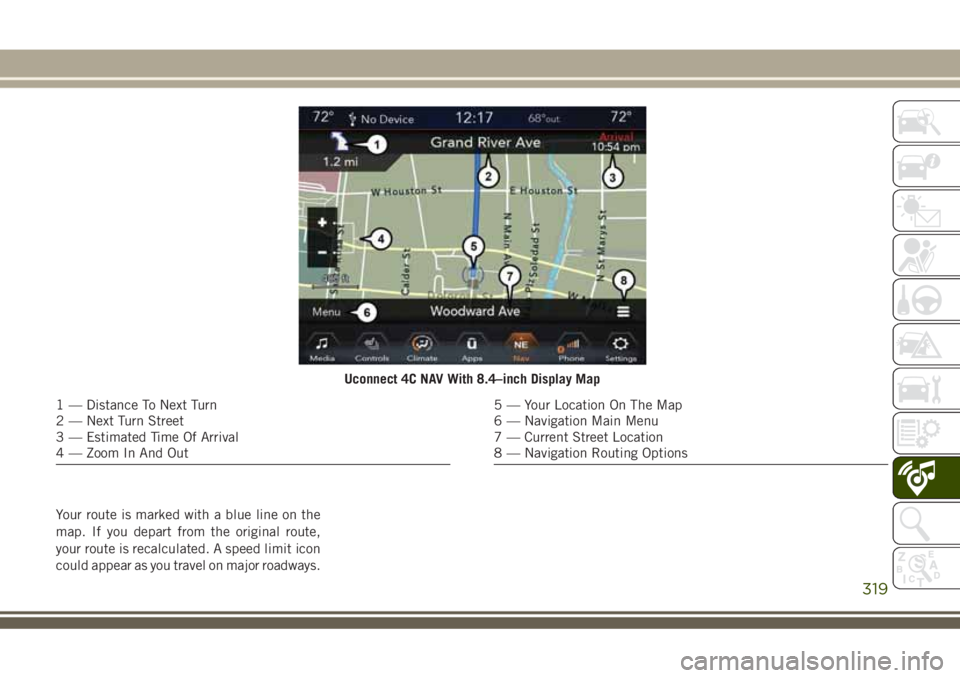
Your route is marked with a blue line on the
map. If you depart from the original route,
your route is recalculated. A speed limit icon
could appear as you travel on major roadways.
Uconnect 4C NAV With 8.4–inch Display Map
1 — Distance To Next Turn
2 — Next Turn Street
3 — Estimated Time Of Arrival
4 — Zoom In And Out5 — Your Location On The Map
6 — Navigation Main Menu
7 — Current Street Location
8 — Navigation Routing Options
319
Page 323 of 368
UCONNECT PHONE
Uconnect Phone (Bluetooth Hands Free Calling)
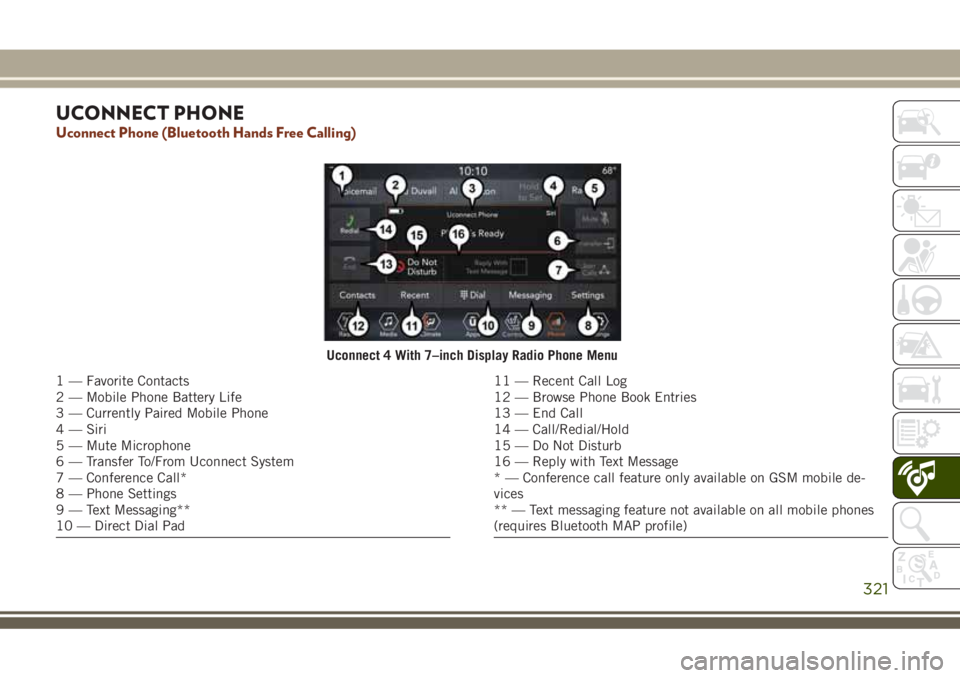
Uconnect 4 With 7–inch Display Radio Phone Menu
1 — Favorite Contacts
2 — Mobile Phone Battery Life
3 — Currently Paired Mobile Phone
4 — Siri
5 — Mute Microphone
6 — Transfer To/From Uconnect System
7 — Conference Call*
8 — Phone Settings
9 — Text Messaging**
10 — Direct Dial Pad11 — Recent Call Log
12 — Browse Phone Book Entries
13 — End Call
14 — Call/Redial/Hold
15 — Do Not Disturb
16 — Reply with Text Message
* — Conference call feature only available on GSM mobile de-
vices
** — Text messaging feature not available on all mobile phones
(requires Bluetooth MAP profile)
321
Page 325 of 368
The Uconnect Phone feature enables you to
place and receive hands-free mobile phone
calls. Drivers can also place mobile phone
calls using their voice or by using the buttons
on the touchscreen (see Voice Command sec-
tion).
The hands-free calling feature is made pos-
sible through Bluetooth technology — the
global standard that enables different elec-
tronic devices to connect to each other wire-
lessly.
If the Uconnect Phone Button
exists on
your steering wheel, you then have the
Uconnect Phone features.
NOTE:
• The Uconnect Phone requires a mobile
phone equipped with the Bluetooth Hands-
Free Profile, Version 1.0 or higher.
• Most mobile phones/devices are compat-
ible with the Uconnect system, however
some mobile phones/devices may not be
equipped with all of the required features to
utilize all of the Uconnect system features.For Uconnect Customer Care:
• Visit UconnectPhone.com or call
1-877-855-8400.
Pairing (Wirelessly Connecting) Your
Mobile Phone To The Uconnect System
Mobile phone pairing is the process of estab-
lishing a wireless connection between a cel-
lular phone and the Uconnect system.
NOTE:
• To use the Uconnect Phone feature, you
first must determine if your mobile phone
and software are compatible with the
Uconnect system. Please visit
UconnectPhone.com for complete mobile
phone compatibility information.
• Mobile phone pairing is not available while
the vehicle is in motion.
• A maximum of ten mobile phones can be
paired to the Uconnect system.Start Pairing Procedure On The Radio
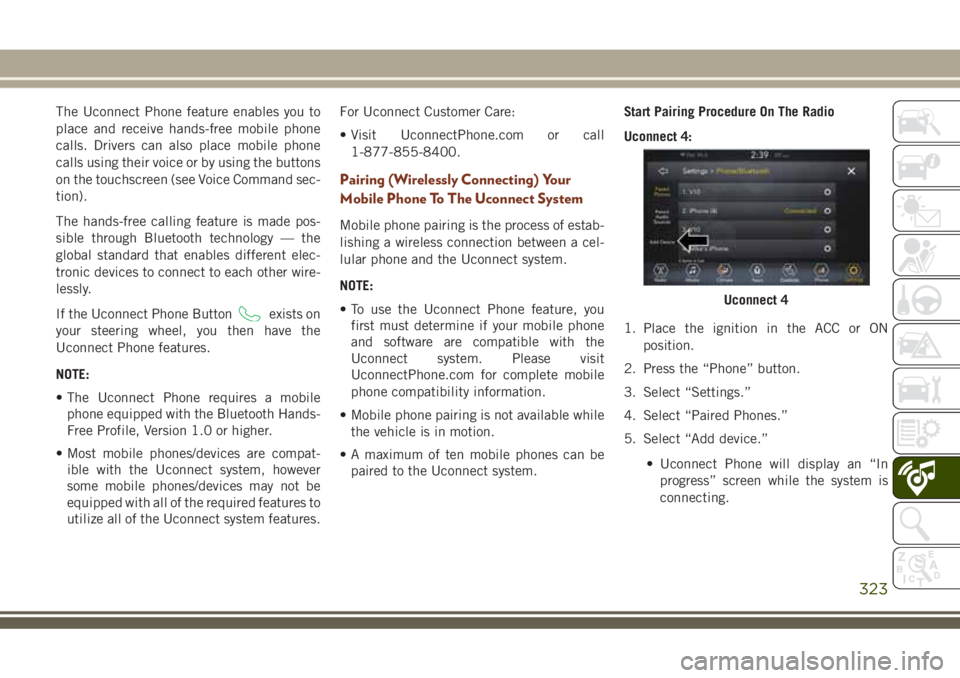
Uconnect 4:
1. Place the ignition in the ACC or ON
position.
2. Press the “Phone” button.
3. Select “Settings.”
4. Select “Paired Phones.”
5. Select “Add device.”
• Uconnect Phone will display an “In
progress” screen while the system is
connecting.
Uconnect 4
323
Page 326 of 368
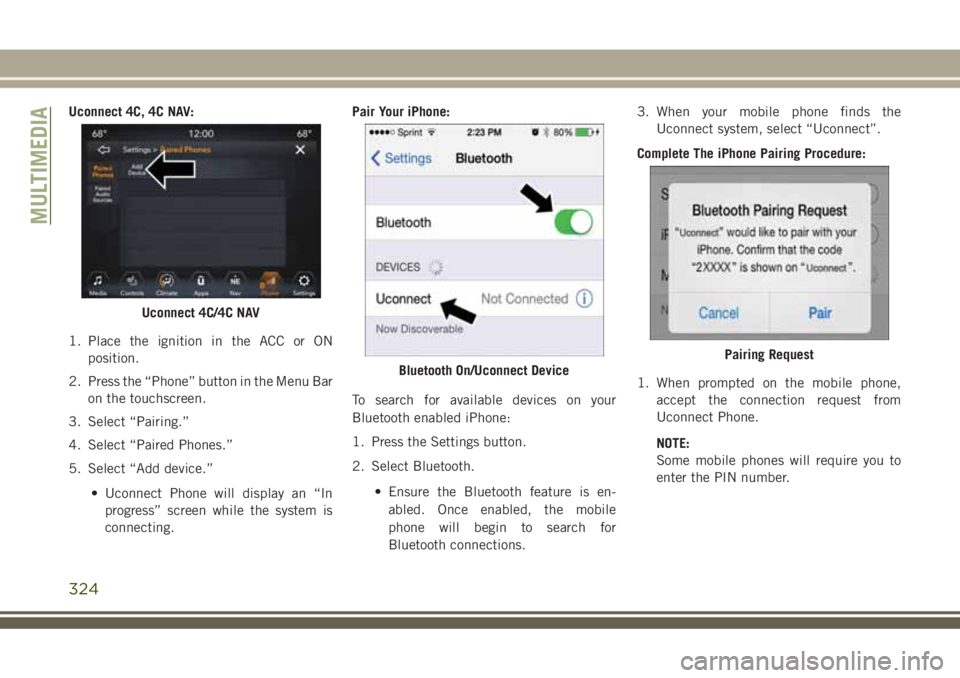
Uconnect 4C, 4C NAV:
1. Place the ignition in the ACC or ON
position.
2. Press the “Phone” button in the Menu Bar
on the touchscreen.
3. Select “Pairing.”
4. Select “Paired Phones.”
5. Select “Add device.”
• Uconnect Phone will display an “In
progress” screen while the system is
connecting.Pair Your iPhone:
To search for available devices on your
Bluetooth enabled iPhone:
1. Press the Settings button.
2. Select Bluetooth.
• Ensure the Bluetooth feature is en-
abled. Once enabled, the mobile
phone will begin to search for
Bluetooth connections.3. When your mobile phone finds the
Uconnect system, select “Uconnect”.
Complete The iPhone Pairing Procedure:
1. When prompted on the mobile phone,
accept the connection request from
Uconnect Phone.
NOTE:
Some mobile phones will require you to
enter the PIN number.
Uconnect 4C/4C NAV
Bluetooth On/Uconnect DevicePairing Request
MULTIMEDIA
324
Page 329 of 368
• Your phonebook can be browsed on the
Uconnect system touchscreen, but editing
can only be done on your phone. To browse,
press the “Phone” button on the touch-
screen, then the “Phonebook” button on
the touchscreen.
Favorite phonebook entries can be saved as
Favorites for quicker access. Favorites are
shown at the top of the main phone screen.
Voice Command Tips
• Speaking complete names (i.e; Call John
Doe vs. Call John) will result in greater
system accuracy.
• You can “link” commands together for
faster results. Say “Call John Doe, mobile,”
for example.
• If you are listening to available voice com-
mand options, you do not have to listen to
the entire list. When you hear the command
that you need, push the
button on the
steering wheel, wait for the beep and say
your command.
Changing The Volume
• Start a dialogue by pushing the VR button
, then say a command. For example,
"Help".
• Use the radio VOLUME rotary knob to ad-
just the volume to a comfortable level while
the Uconnect system is speaking.
NOTE:
The volume setting for Uconnect is different
than the audio system.
NOTE:
To access help, push the Uconnect VR button
(if active) on the steering wheel and say
"help." Push the Uconnect VR Pickup button
(if active) or the VR button(if
active) and say "cancel" to cancel the help
session.
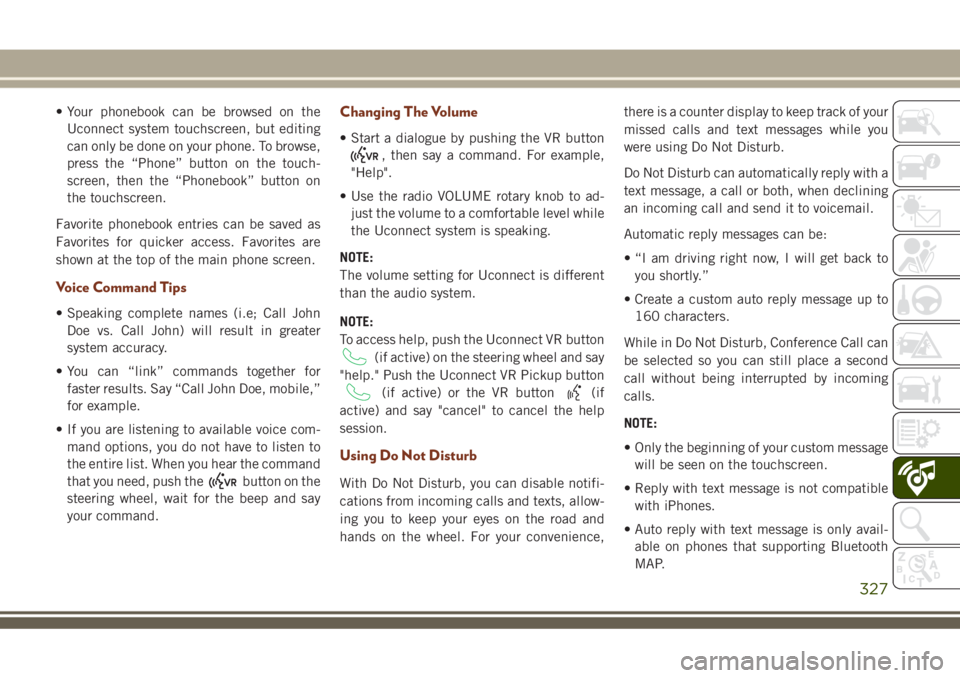
Using Do Not Disturb
With Do Not Disturb, you can disable notifi-
cations from incoming calls and texts, allow-
ing you to keep your eyes on the road and
hands on the wheel. For your convenience,there is a counter display to keep track of your
missed calls and text messages while you
were using Do Not Disturb.
Do Not Disturb can automatically reply with a
text message, a call or both, when declining
an incoming call and send it to voicemail.
Automatic reply messages can be:
• “I am driving right now, I will get back to
you shortly.”
• Create a custom auto reply message up to
160 characters.
While in Do Not Disturb, Conference Call can
be selected so you can still place a second
call without being interrupted by incoming
calls.
NOTE:
• Only the beginning of your custom message
will be seen on the touchscreen.
• Reply with text message is not compatible
with iPhones.
• Auto reply with text message is only avail-
able on phones that supporting Bluetooth
MAP.
327
Page 332 of 368
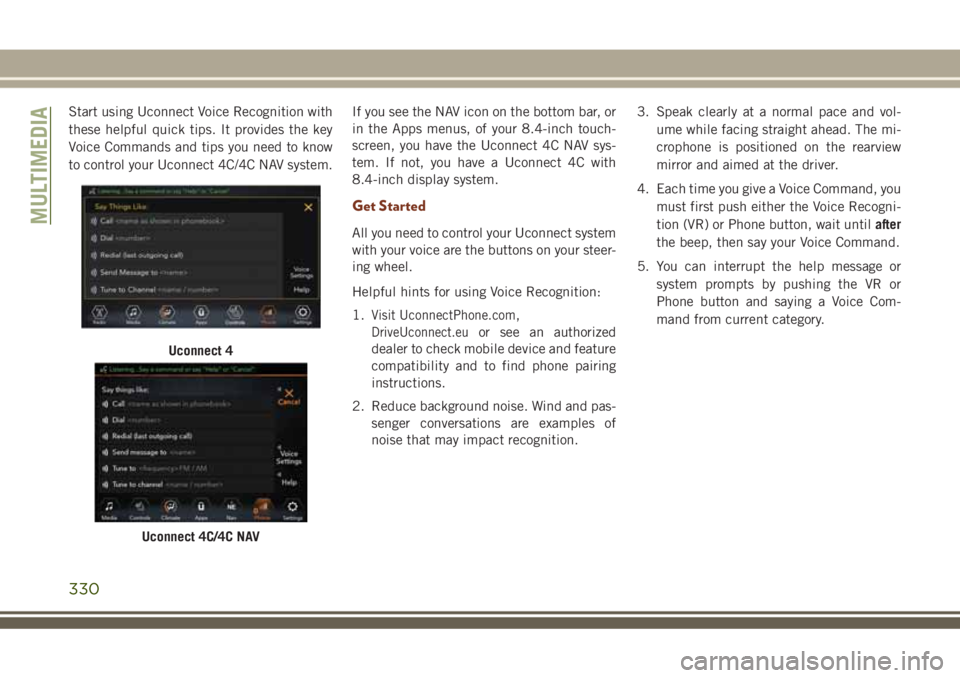
Start using Uconnect Voice Recognition with
these helpful quick tips. It provides the key
Voice Commands and tips you need to know
to control your Uconnect 4C/4C NAV system.If you see the NAV icon on the bottom bar, or
in the Apps menus, of your 8.4-inch touch-
screen, you have the Uconnect 4C NAV sys-
tem. If not, you have a Uconnect 4C with
8.4-inch display system.
Get Started
All you need to control your Uconnect system
with your voice are the buttons on your steer-
ing wheel.
Helpful hints for using Voice Recognition:
1.
Visit UconnectPhone.com,
DriveUconnect.euor see an authorized
dealer to check mobile device and feature
compatibility and to find phone pairing
instructions.
2. Reduce background noise. Wind and pas-
senger conversations are examples of
noise that may impact recognition.3. Speak clearly at a normal pace and vol-
ume while facing straight ahead. The mi-
crophone is positioned on the rearview
mirror and aimed at the driver.
4. Each time you give a Voice Command, you
must first push either the Voice Recogni-
tion (VR) or Phone button, wait untilafter
the beep, then say your Voice Command.
5. You can interrupt the help message or
system prompts by pushing the VR or
Phone button and saying a Voice Com-
mand from current category.
Uconnect 4
Uconnect 4C/4C NAV
MULTIMEDIA
330
Page 334 of 368
Media
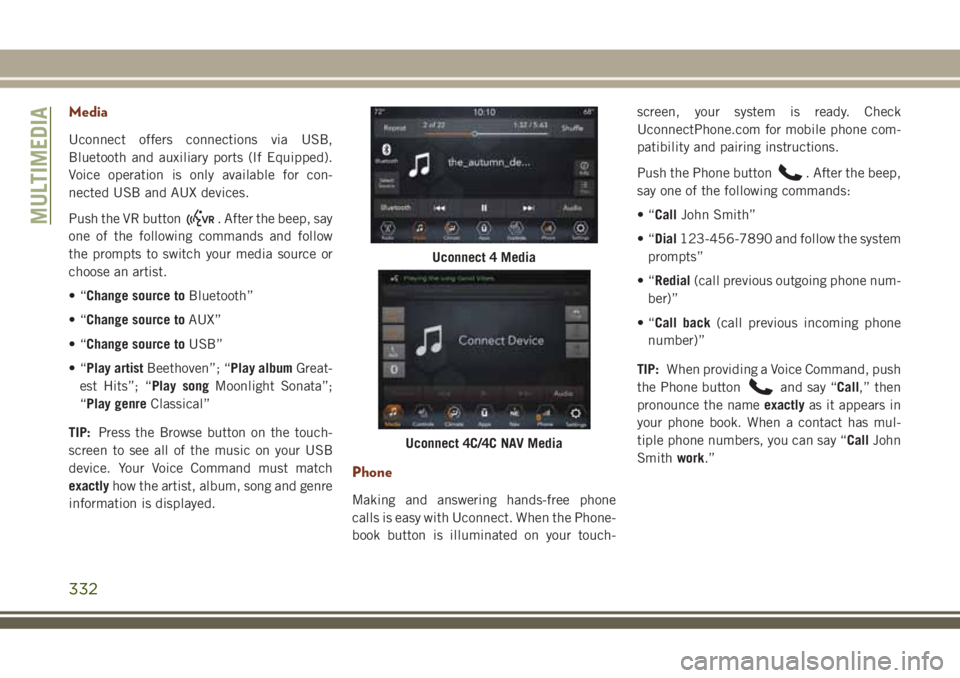
Uconnect offers connections via USB,
Bluetooth and auxiliary ports (If Equipped).
Voice operation is only available for con-
nected USB and AUX devices.
Push the VR button
. After the beep, say
one of the following commands and follow
the prompts to switch your media source or
choose an artist.
•“Change source toBluetooth”
•“Change source toAUX”
•“Change source toUSB”
•“Play artistBeethoven”; “Play albumGreat-
est Hits”; “Play songMoonlight Sonata”;
“Play genreClassical”
TIP:Press the Browse button on the touch-
screen to see all of the music on your USB
device. Your Voice Command must match
exactlyhow the artist, album, song and genre
information is displayed.
Phone
Making and answering hands-free phone
calls is easy with Uconnect. When the Phone-
book button is illuminated on your touch-screen, your system is ready. Check
UconnectPhone.com for mobile phone com-
patibility and pairing instructions.
Push the Phone button
. After the beep,
say one of the following commands:
•“CallJohn Smith”
•“Dial123-456-7890 and follow the system
prompts”
•“Redial(call previous outgoing phone num-
ber)”
•“Call back(call previous incoming phone
number)”
TIP:When providing a Voice Command, push
the Phone button
and say “Call,” then
pronounce the nameexactlyas it appears in
your phone book. When a contact has mul-
tiple phone numbers, you can say “CallJohn
Smithwork.”
Uconnect 4 Media
Uconnect 4C/4C NAV Media
MULTIMEDIA
332