remote start JEEP GRAND CHEROKEE 2019 Owner handbook (in English)
[x] Cancel search | Manufacturer: JEEP, Model Year: 2019, Model line: GRAND CHEROKEE, Model: JEEP GRAND CHEROKEE 2019Pages: 378, PDF Size: 6.88 MB
Page 229 of 378
4. If using another vehicle to jump start the
battery, park the vehicle within the jumper
cables reach, apply the parking brake and
make sure the ignition is OFF.
WARNING!
Do not allow vehicles to touch each other
as this could establish a ground connec-
tion and personal injury could result.
Jump Starting Procedure
WARNING!
Failure to follow this jump starting proce-
dure could result in personal injury or
property damage due to battery explosion.
CAUTION!
Failure to follow these procedures could
result in damage to the charging system of
the booster vehicle or the discharged ve-
hicle.NOTE:
Make sure at all times that unused ends of
jumper cables are not contacting each other
or either vehicle while making connections.
Connecting The Jumper Cables
1. Connect the positive(+)end of the jumper
cable to the remote positive(+)post of the
discharged vehicle.
2. Connect the opposite end of the positive
(+)jumper cable to the positive(+)post of
the booster battery.
3. Connect the negative end(-)of the jumper
cable to the negative(-)post of the
booster battery.
4. Connect the opposite end of the negative
(-)jumper cable to the remote negative(-)
post of the vehicle with the discharged
battery.WARNING!
Do not connect the jumper cable to the
negative (-) post of the discharged battery.
The resulting electrical spark could cause
the battery to explode and could result in
WARNING!
personal injury. Only use the specific
ground point, do not use any other exposed
metal parts.
5. Start the engine in the vehicle that has the
booster battery, let the engine idle a few
minutes, and then start the engine in the
vehicle with the discharged battery.
CAUTION!
Do not run the booster vehicle engine
above 2,000 rpm since it provides no
charging benefit, wastes fuel, and can
damage booster vehicle engine.
6. Once the engine is started, remove the
jumper cables in the reverse sequence:
Disconnecting The Jumper Cables
1. Disconnect the negative(-)end of the
jumper cable from the remote negative(-)
post of the discharged vehicle.
2. Disconnect the opposite end of the nega-
tive(-)jumper cable from the negative(-)
post of the booster battery.
227
Page 230 of 378
3. Disconnect the positive(+)end of the
jumper cable from the positive(+)post of
the booster battery.
4. Disconnect the opposite end of the posi-
tive(+)jumper cable from the remote
positive(+)post of the discharged
vehicle.
5. Reinstall the protective cover over the
remote positive(+)post of the discharged
vehicle.
If frequent jump starting is required to start
your vehicle you should have the battery and
charging system tested at an authorized
dealer.
CAUTION!
Accessories plugged into the vehicle
power outlets draw power from the vehi-
cle’s battery, even when not in use (i.e.,
cellular devices, etc.). Eventually, if
plugged in long enough without engine
operation, the vehicle’s battery will dis-
charge sufficiently to degrade battery life
and/or prevent the engine from starting.
REFUELING IN EMERGENCY
The funnel for the Cap-Less Fuel System is
located in the spare tire storage area. If your
vehicle is out of fuel and an auxiliary fuel can
is needed, insert the funnel into the filler
neck and proceed to fill the vehicle.
For more information on the Cap-Less Fuel
System refer to “Refueling The Vehicle” in
“Starting And Operating”.
IF YOUR ENGINE
OVERHEATS
In any of the following situations, you can
reduce the potential for overheating by taking
the appropriate action.
• On the highways — slow down.
• In city traffic — while stopped, place the
transmission in NEUTRAL, but do not in-
crease the engine idle speed while prevent-
ing vehicle motion with the brakes.NOTE:
There are steps that you can take to slow
down an impending overheat condition:
• If your air conditioner (A/C) is on, turn it off.
The A/C system adds heat to the engine
cooling system and turning the A/C off can
help remove this heat.
• You can also turn the temperature control
to maximum heat, the mode control to floor
and the blower control to high. This allows
the heater core to act as a supplement to
the radiator and aids in removing heat from
the engine cooling system.WARNING!
You or others can be badly burned by hot
engine coolant (antifreeze) or steam from
your radiator. If you see or hear steam
coming from under the hood, do not open
the hood until the radiator has had time to
cool. Never try to open a cooling system
pressure cap when the radiator or coolant
bottle is hot.
IN CASE OF EMERGENCY
228
Page 250 of 378
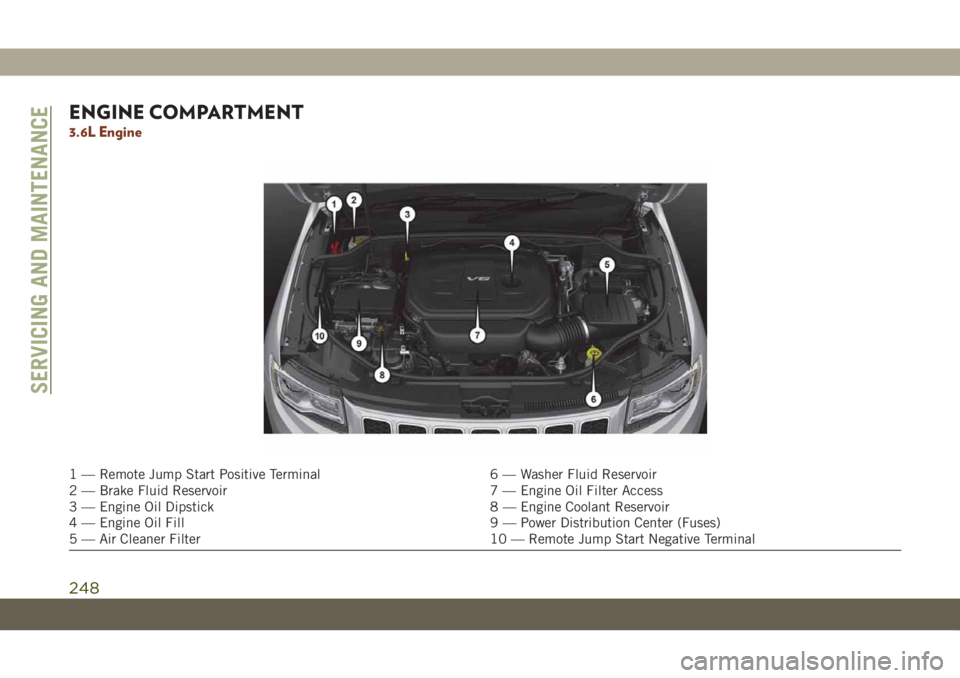
ENGINE COMPARTMENT
3.6L Engine
1 — Remote Jump Start Positive Terminal 6 — Washer Fluid Reservoir
2 — Brake Fluid Reservoir 7 — Engine Oil Filter Access
3 — Engine Oil Dipstick 8 — Engine Coolant Reservoir
4 — Engine Oil Fill 9 — Power Distribution Center (Fuses)
5 — Air Cleaner Filter 10 — Remote Jump Start Negative Terminal
SERVICING AND MAINTENANCE
248
Page 251 of 378
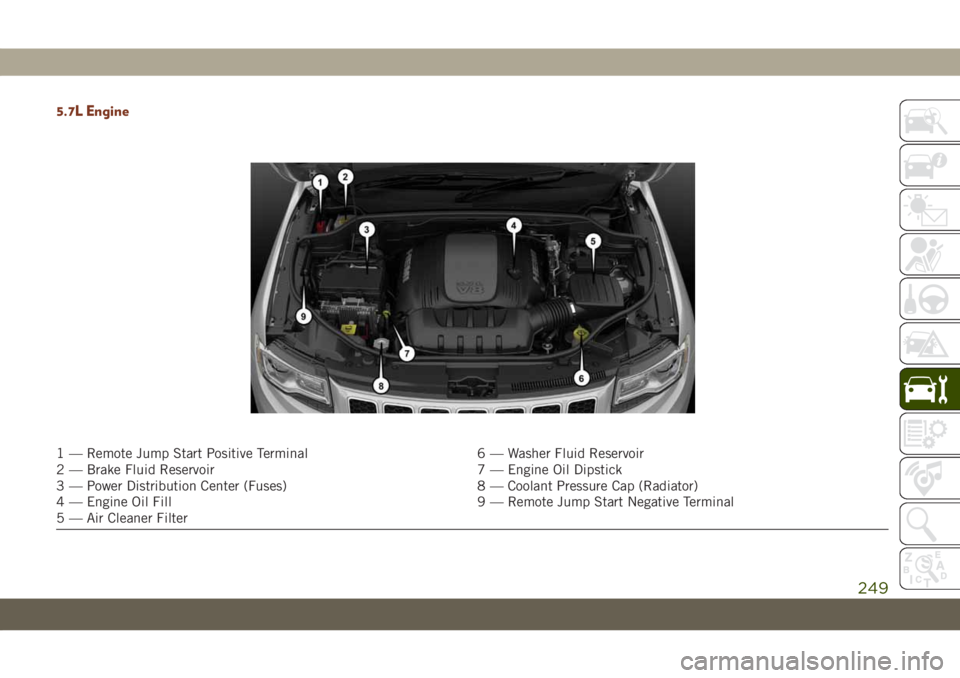
5.7L Engine
1 — Remote Jump Start Positive Terminal 6 — Washer Fluid Reservoir
2 — Brake Fluid Reservoir 7 — Engine Oil Dipstick
3 — Power Distribution Center (Fuses) 8 — Coolant Pressure Cap (Radiator)
4 — Engine Oil Fill 9 — Remote Jump Start Negative Terminal
5 — Air Cleaner Filter
249
Page 252 of 378
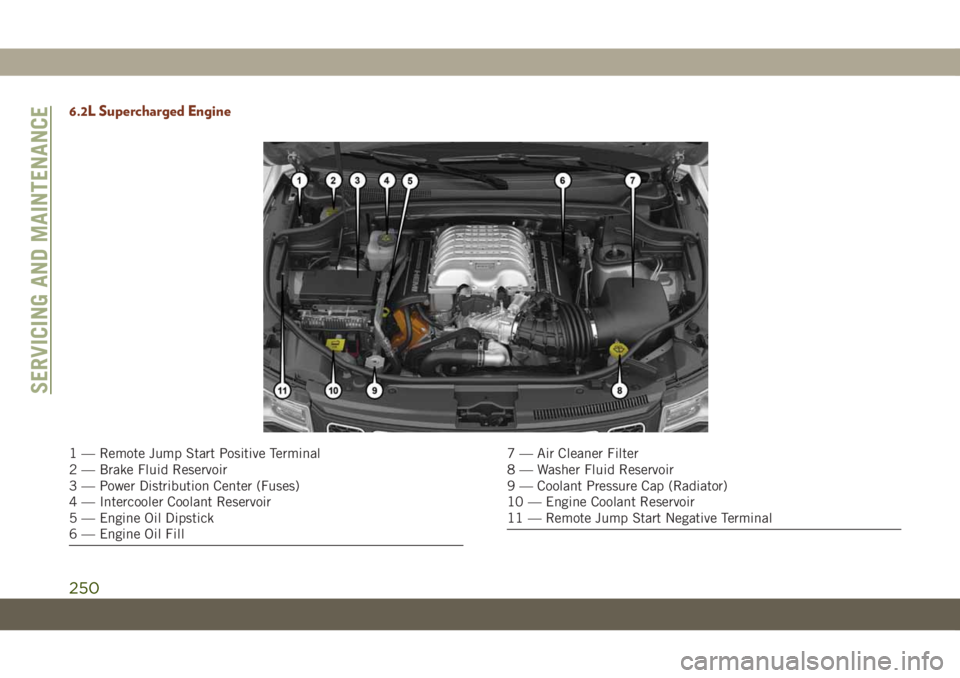
6.2L Supercharged Engine
1 — Remote Jump Start Positive Terminal
2 — Brake Fluid Reservoir
3 — Power Distribution Center (Fuses)
4 — Intercooler Coolant Reservoir
5 — Engine Oil Dipstick
6 — Engine Oil Fill7 — Air Cleaner Filter
8 — Washer Fluid Reservoir
9 — Coolant Pressure Cap (Radiator)
10 — Engine Coolant Reservoir
11 — Remote Jump Start Negative Terminal
SERVICING AND MAINTENANCE
250
Page 253 of 378
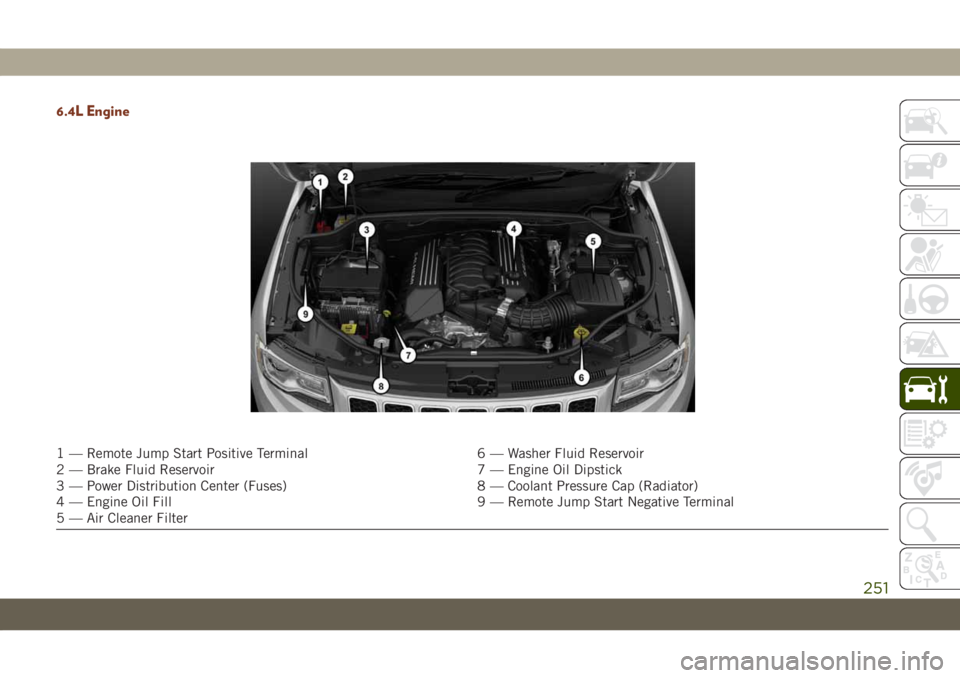
6.4L Engine
1 — Remote Jump Start Positive Terminal 6 — Washer Fluid Reservoir
2 — Brake Fluid Reservoir 7 — Engine Oil Dipstick
3 — Power Distribution Center (Fuses) 8 — Coolant Pressure Cap (Radiator)
4 — Engine Oil Fill 9 — Remote Jump Start Negative Terminal
5 — Air Cleaner Filter
251
Page 254 of 378
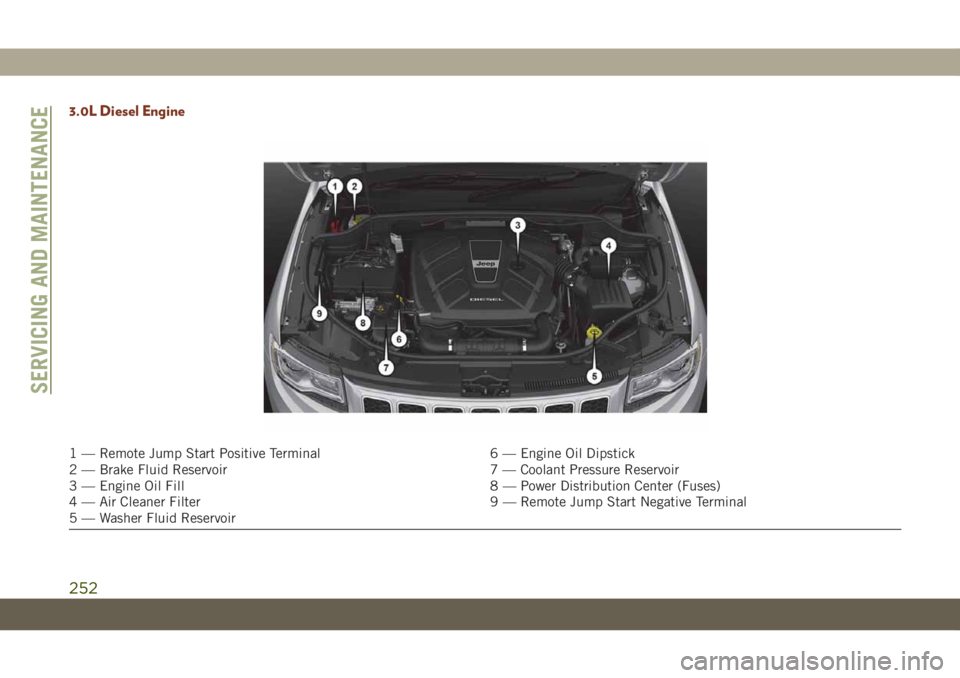
3.0L Diesel Engine
1 — Remote Jump Start Positive Terminal 6 — Engine Oil Dipstick
2 — Brake Fluid Reservoir 7 — Coolant Pressure Reservoir
3 — Engine Oil Fill 8 — Power Distribution Center (Fuses)
4 — Air Cleaner Filter 9 — Remote Jump Start Negative Terminal
5 — Washer Fluid Reservoir
SERVICING AND MAINTENANCE
252
Page 301 of 378
EXTERIOR:
• Front End Cover • Window Air Deflectors • Molded Splash Guards
• Wheels • Skid Plates • Tow Hooks
• Tubular Side Steps • Hitch Receiver • Front Air Deflector
INTERIOR:
• Carpet Floor Mats • Katzkin Leather Interiors • Cargo Net
• All-weather Floor Mats • Footwell Lighting • Bright Pedal Kit
• Cargo Barrier • Molded Cargo Tray • Door Sill Guards
ELECTRONICS:
• Remote Start • Mopar Connect • Rear View Camera
• Park Distance Sensors
CARRIERS:
• Sport Utility Bars • Roof Box Cargo Carrier • Roof Mount Bike Carrier
• Roof Mount Ski and Snowboard Carrier • Roof Mount Water Sports Carrier • Roof Mount Cargo Basket and Cargo Net
For the full line of Authentic Jeep Accesso-
ries by Mopar, visit your local dealership.NOTE:
All parts are subject to availability.
299
Page 319 of 378
• Safety & Driving
Assistance• Phone/Bluetooth
• Mirrors & Wipers • Accessibility
• Lights • Radio Setup
• Doors & Locks • Restore Settings
• Auto-On Comfort &
Remote Start• Clear Personal Data
• Compass –
If Equipped• System Information
NOTE:
Depending on the vehicles options, feature
settings may vary.
Refer to “Uconnect Settings” in “Multime-
dia” in the Owner’s Manual for further infor-
mation.
OFF ROAD PAGES — IF
EQUIPPED
Your vehicle is equipped with Off Road
Pages, which provides the vehicle status
while operating on off road conditions. It
supplies information relating to the vehicle
ride height, the status of the transfer case,
the pitch and roll of the vehicle (if equipped),
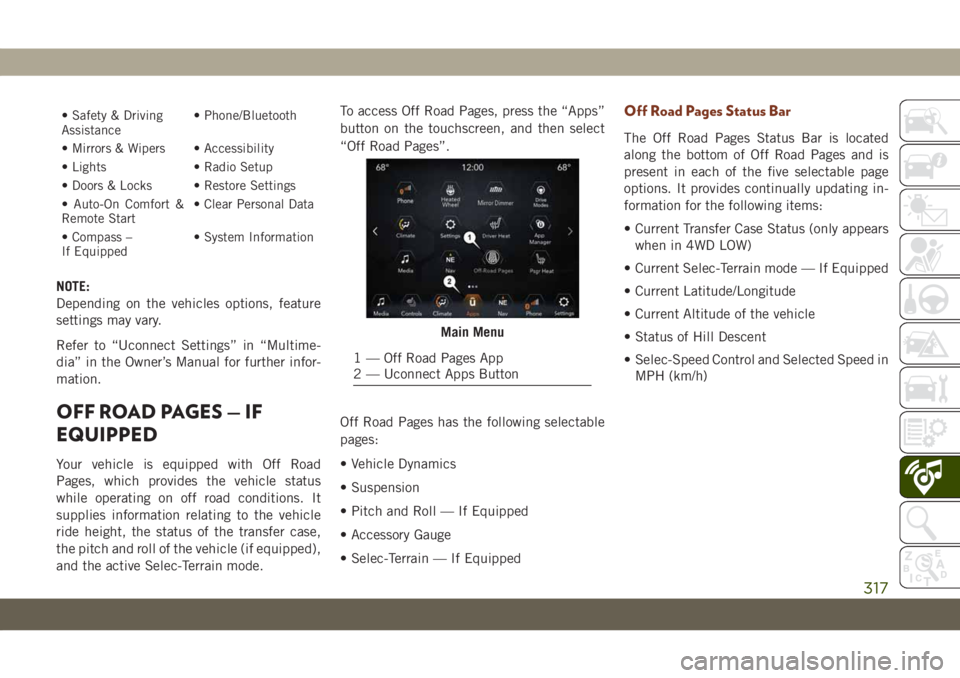
and the active Selec-Terrain mode.To access Off Road Pages, press the “Apps”
button on the touchscreen, and then select
“Off Road Pages”.
Off Road Pages has the following selectable
pages:
• Vehicle Dynamics
• Suspension
• Pitch and Roll — If Equipped
• Accessory Gauge
• Selec-Terrain — If Equipped
Off Road Pages Status Bar
The Off Road Pages Status Bar is located
along the bottom of Off Road Pages and is
present in each of the five selectable page
options. It provides continually updating in-
formation for the following items:
• Current Transfer Case Status (only appears
when in 4WD LOW)
• Current Selec-Terrain mode — If Equipped
• Current Latitude/Longitude
• Current Altitude of the vehicle
• Status of Hill Descent
• Selec-Speed Control and Selected Speed in
MPH (km/h)
Main Menu
1 — Off Road Pages App
2 — Uconnect Apps Button
317
Page 326 of 378
• The system can be controlled either by the
front seat occupants utilizing the touch-
screen radio or by the rear seat occupants
using the remote control.
Dual Video Screen
NOTE:
Typically there are two different ways to op-
erate the features of the Rear Seat Entertain-
ment System.
• The Remote Control
• The Touchscreen Radio (If Equipped)
Blu-ray Disc Player
Play A Blu-ray Disc
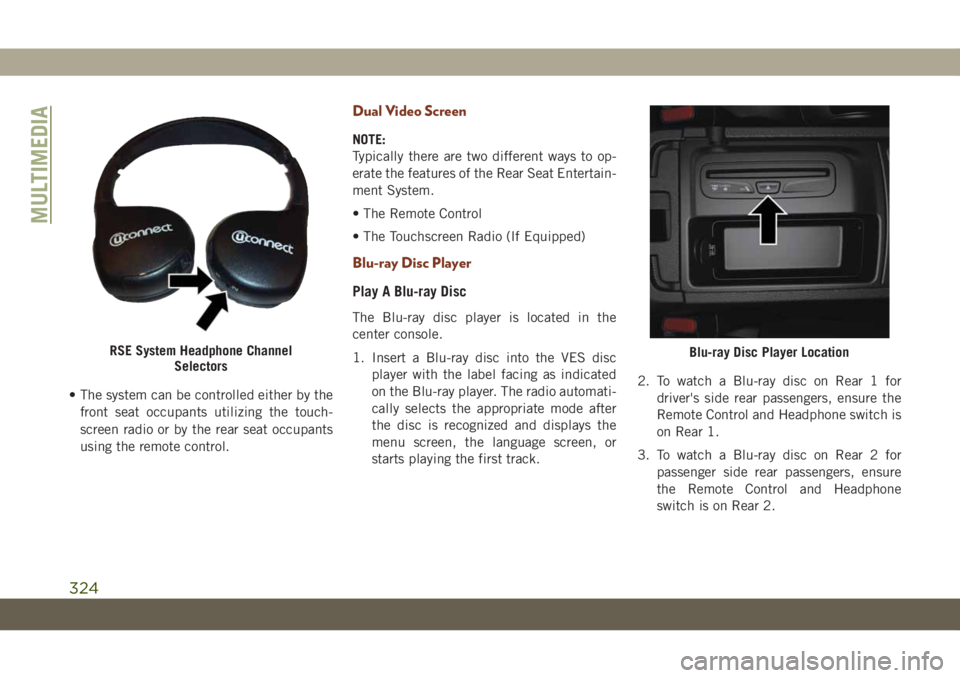
The Blu-ray disc player is located in the
center console.
1. Insert a Blu-ray disc into the VES disc
player with the label facing as indicated
on the Blu-ray player. The radio automati-
cally selects the appropriate mode after
the disc is recognized and displays the
menu screen, the language screen, or
starts playing the first track.2. To watch a Blu-ray disc on Rear 1 for
driver's side rear passengers, ensure the
Remote Control and Headphone switch is
on Rear 1.
3. To watch a Blu-ray disc on Rear 2 for
passenger side rear passengers, ensure
the Remote Control and Headphone
switch is on Rear 2.
RSE System Headphone Channel
SelectorsBlu-ray Disc Player Location
MULTIMEDIA
324