turn signal bulb JEEP GRAND CHEROKEE 2020 Owner handbook (in English)
[x] Cancel search | Manufacturer: JEEP, Model Year: 2020, Model line: GRAND CHEROKEE, Model: JEEP GRAND CHEROKEE 2020Pages: 378, PDF Size: 6.88 MB
Page 42 of 378
NOTE:
• This feature can be programmed through
the Uconnect system. Refer to “Uconnect
Settings” in “Multimedia” in the Owner’s
Manual for further information.
• The headlight delay feature is automati-
cally activated if the headlight switch is left
in the A (auto) position when the ignition is
placed in the OFF position.
Lights-On Reminder
If the headlights, parking lights, or cargo
lights are left on after the ignition is turned
OFF, a chime will sound when the driver’s
door is opened.
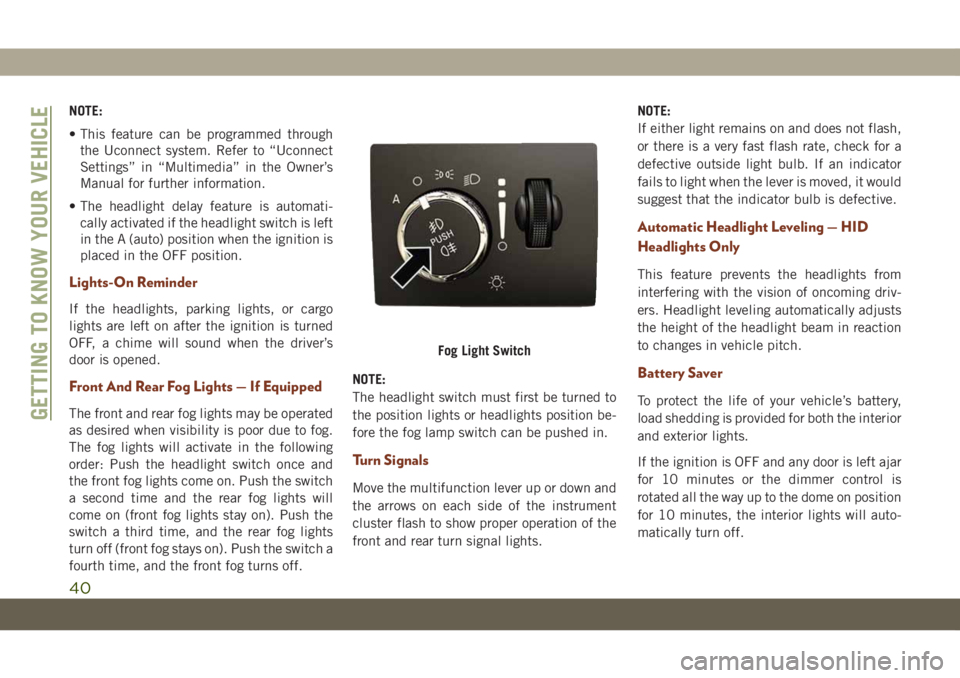
Front And Rear Fog Lights — If Equipped
The front and rear fog lights may be operated
as desired when visibility is poor due to fog.
The fog lights will activate in the following
order: Push the headlight switch once and
the front fog lights come on. Push the switch
a second time and the rear fog lights will
come on (front fog lights stay on). Push the
switch a third time, and the rear fog lights
turn off (front fog stays on). Push the switch a
fourth time, and the front fog turns off.NOTE:
The headlight switch must first be turned to
the position lights or headlights position be-
fore the fog lamp switch can be pushed in.
Turn Signals
Move the multifunction lever up or down and
the arrows on each side of the instrument
cluster flash to show proper operation of the
front and rear turn signal lights.NOTE:
If either light remains on and does not flash,
or there is a very fast flash rate, check for a
defective outside light bulb. If an indicator
fails to light when the lever is moved, it would
suggest that the indicator bulb is defective.
Automatic Headlight Leveling — HID
Headlights Only
This feature prevents the headlights from
interfering with the vision of oncoming driv-
ers. Headlight leveling automatically adjusts
the height of the headlight beam in reaction
to changes in vehicle pitch.
Battery Saver
To protect the life of your vehicle’s battery,
load shedding is provided for both the interior
and exterior lights.
If the ignition is OFF and any door is left ajar
for 10 minutes or the dimmer control is
rotated all the way up to the dome on position
for 10 minutes, the interior lights will auto-
matically turn off.
Fog Light Switch
GETTING TO KNOW YOUR VEHICLE
40
Page 75 of 378
TRIP COMPUTER
Push and release the up or down arrow button
until the Trip A or Trip B icon is highlighted in
the instrument cluster display (Toggle left or
right to select Trip A or Trip B). Push and
release the OK button to display the Trip
information.
WARNING LIGHTS AND
MESSAGES
The warning/indicator lights will illuminate in
the instrument panel together with a dedi-
cated message and/or acoustic signal when
applicable. These indications are indicative
and precautionary and as such must not be
considered as exhaustive and/or alternative
to the information contained in the Owner’s
Manual, which you are advised to read care-
fully in all cases. Always refer to the informa-
tion in this chapter in the event of a failure
indication. All active telltales will display first
if applicable. The system check menu may
appear different based upon equipment op-
tions and current vehicle status. Some tell-
tales are optional and may not appear.
Red Warning Lights
— Air Bag Warning Light
This warning light will illuminate to indicate a
fault with the air bag, and will turn on for four
to eight seconds as a bulb check when the
ignition is placed in the ON/RUN or ACC/ON/
RUN position. This light will illuminate with a
single chime when a fault with the air bag has
been detected, it will stay on until the fault is
cleared. If the light is either not on during
startup, stays on, or turns on while driving,
have the system inspected at an authorized
dealer as soon as possible.
— Brake Warning Light
This warning light monitors various brake
functions, including brake fluid level and
parking brake application. If the brake light
turns on it may indicate that the parking
brake is applied, that the brake fluid level is
low, or that there is a problem with the
anti-lock brake system.
If the light remains on when the parking
brake has been disengaged, and the fluid
level is at the full mark on the master cylinder
reservoir, it indicates a possible brake hy-draulic system malfunction or that a problem
with the Brake Booster has been detected by
the Anti-Lock Brake System (ABS) / Elec-
tronic Stability Control (ESC) system. In this
case, the light will remain on until the condi-
tion has been corrected. If the problem is
related to the brake booster, the ABS pump
will run when applying the brake, and a brake
pedal pulsation may be felt during each stop.
The dual brake system provides a reserve
braking capacity in the event of a failure to a
portion of the hydraulic system. A leak in
either half of the dual brake system is indi-
cated by the Brake Warning Light, which will
turn on when the brake fluid level in the
master cylinder has dropped below a speci-
fied level.
The light will remain on until the cause is
corrected.
NOTE:
The light may flash momentarily during sharp
cornering maneuvers, which change fluid
level conditions. The vehicle should have
service performed, and the brake fluid level
checked.
73
Page 80 of 378
— Low Washer Fluid Warning Light —
If Equipped
This warning light will illuminate when the
windshield washer fluid is low.
— Engine Check/Malfunction Indica-
tor Warning Light (MIL)
The Engine Check/Malfunction Indicator
Light (MIL) is a part of an Onboard Diagnostic
System called OBD II that monitors engine
and automatic transmission control systems.
This warning light will illuminate when the
ignition is in the ON/RUN position before
engine start. If the bulb does not come on
when turning the ignition switch from OFF to
ON/RUN, have the condition checked
promptly.
Certain conditions, such as a loose or missing
gas cap, poor quality fuel, etc., may illumi-
nate the light after engine start. The vehicle
should be serviced if the light stays on
through several typical driving styles. In most
situations, the vehicle will drive normally and
will not require towing.When the engine is running, the MIL may
flash to alert serious conditions that could
lead to immediate loss of power or severe
catalytic converter damage. The vehicle
should be serviced by an authorized dealer as
soon as possible if this occurs.WARNING!
A malfunctioning catalytic converter, as
referenced above, can reach higher tem-
peratures than in normal operating condi-
tions. This can cause a fire if you drive
slowly or park over flammable substances
such as dry plants, wood, cardboard, etc.
This could result in death or serious injury
to the driver, occupants or others.
CAUTION!
Prolonged driving with the Malfunction
Indicator Light (MIL) on could cause dam-
age to the vehicle control system. It also
could affect fuel economy and driveability.
If the MIL is flashing, severe catalytic
converter damage and power loss will soon
occur. Immediate service is required.
— AdBlue® (UREA) Injection System
Failure Warning Light — If Equipped
This warning light will illuminate along with a
dedicated message on the display (If
Equipped) if an unknown fluid not conform-
ing with acceptable characteristics is in-
serted, or if an average consumption of
AdBlue
®(UREA) over 50% is detected. Con-
tact an authorized dealer as soon as possible.
If the problem is not solved, a specific mes-
sage will appear on the Instrument Cluster
Display whenever a certain threshold is
reached until it will no longer be possible to
start the engine.
When about 125 mi (200 km) are remaining
before the AdBlue
®tank is empty, a continu-
ous dedicated message will appear on the
instrument panel, accompanied by a buzzer
sound (If Equipped).
SERV4WD— Service 4WD Warning Light — If
Equipped
This warning light will illuminate to signal a
fault with the 4WD system. If the light stays
on or comes on during driving, it means that
the 4WD system is not functioning properlyGETTING TO KNOW YOUR INSTRUMENT PANEL
78
Page 85 of 378
Refer to “Selec-Track” in “Starting And Op-
erating” for further information.
— Turn Signal Indicator Lights
When the left or right turn signal is activated,
the turn signal indicator will flash indepen-
dently and the corresponding exterior turn
signal lamps will flash. Turn signals can be
activated when the multifunction lever is
moved down (left) or up (right).
NOTE:
• A continuous chime will sound if the ve-
hicle is driven more than 1 mile (1.6 km)
with either turn signal on.
• Check for an inoperative outside light bulb
if either indicator flashes at a rapid rate.
White Indicator Lights
— Adaptive Cruise Control (ACC) Ready
Light — If Equipped
This light will turn on when the vehicle
equipped with Adaptive Cruise Control (ACC)
has been turned on, but not set. Refer to
“Adaptive Cruise Control (ACC) — If
Equipped” in “Starting And Operating” for
further information.
— Custom Mode SRT Indicator Light
This light will turn on when Custom Mode
SRT is active.
Refer to “Selec-Track” in “Starting And Op-
erating” for further information.
— Hill Descent Control (HDC) Indicator
Light — If Equipped
This indicator shows when the Hill Descent
Control (HDC) feature is turned on. The lamp
will be on solid when HDC is armed. HDC can
only be armed when the transfer case is in the
“4WD LOW” position and the vehicle speedis less then 30 mph (48 km/h). If these
conditions are not met while attempting to
use the HDC feature, the HDC indicator light
will flash on/off.
— LaneSense Indicator Light — If
Equipped
When the LaneSense system is ON, but not
armed, the LaneSense indicator light illumi-
nates solid white. This occurs when only left,
right, or neither lane line has been detected.
If a single lane line is detected, the system is
ready to provide only visual warnings if an
unintentional lane departure occurs on the
detected lane line.
Refer to “LaneSense — If Equipped" in
“Starting And Operating” for further informa-
tion.
— SRT Speed Warning Indicator Light
— If Equipped
When Set Speed Warning is turned on, the
speed warning telltale will illuminate in the
instrument cluster with a number matching
the set speed. When the set speed is ex-
ceeded, the indication will light up yellow
83
Page 207 of 378
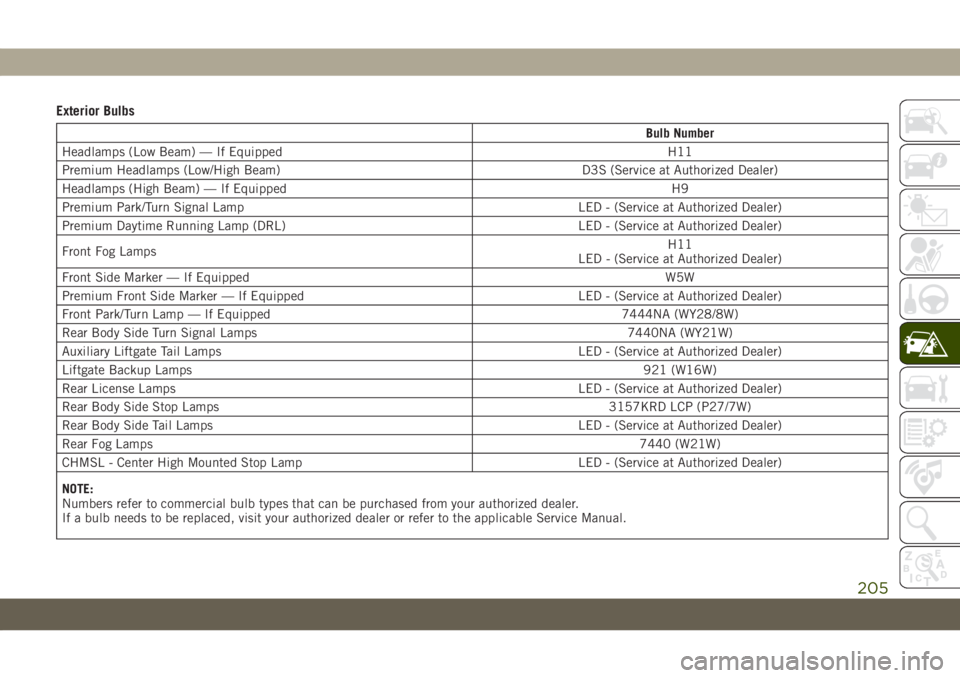
Exterior Bulbs
Bulb Number
Headlamps (Low Beam) — If Equipped H11
Premium Headlamps (Low/High Beam) D3S (Service at Authorized Dealer)
Headlamps (High Beam) — If Equipped H9
Premium Park/Turn Signal Lamp LED - (Service at Authorized Dealer)
Premium Daytime Running Lamp (DRL) LED - (Service at Authorized Dealer)
Front Fog LampsH11
LED - (Service at Authorized Dealer)
Front Side Marker — If EquippedW5W
Premium Front Side Marker — If Equipped LED - (Service at Authorized Dealer)
Front Park/Turn Lamp — If Equipped 7444NA (WY28/8W)
Rear Body Side Turn Signal Lamps 7440NA (WY21W)
Auxiliary Liftgate Tail Lamps LED - (Service at Authorized Dealer)
Liftgate Backup Lamps921 (W16W)
Rear License Lamps LED - (Service at Authorized Dealer)
Rear Body Side Stop Lamps 3157KRD LCP (P27/7W)
Rear Body Side Tail Lamps LED - (Service at Authorized Dealer)
Rear Fog Lamps7440 (W21W)
CHMSL - Center High Mounted Stop Lamp LED - (Service at Authorized Dealer)
NOTE:
Numbers refer to commercial bulb types that can be purchased from your authorized dealer.
If a bulb needs to be replaced, visit your authorized dealer or refer to the applicable Service Manual.
205
Page 209 of 378
CAUTION!
• Always use the correct bulb size and type
for replacement. An incorrect bulb size
or type may overheat and cause damage
to the lamp, the bulb socket, or the lamp
wiring.
4. Turn the low or high beam bulb one–
quarter turn counterclockwise to remove
from housing.
5. Disconnect the electrical connector and
replace the bulb.
Front Turn Signal Lamp
SRT vehicles are equipped with front turn
signal lamps are LEDs. See your authorized
dealer for service.
NOTE:
We advise referring to an authorized dealer.
1. Open the hood.
2. Access the back of the headlamp.NOTE:
• The air filter housing must be removed.
• The windshield washer reservoir may
need to be rotated out of the way by
removing the fastener.
• Coolant reservoir (if equipped) will
need to be repositioned by removing the
fasteners, and moving the unit out of
the way.
3. Turn the turn signal bulb one–quarter turn
counterclockwise to remove from housing.
4. Disconnect the electrical connector and
replace the bulb.
CAUTION!
Do not touch the new bulb with your fin-
gers. Oil contamination will severely
shorten bulb life. If the bulb comes in
contact with any oily surface, clean the
bulb with rubbing alcohol.
Front Fog Lamps
Please see your authorized dealer for service.
Rear Tail, Stop, and Turn Signal Lamps
1. Raise the liftgate.
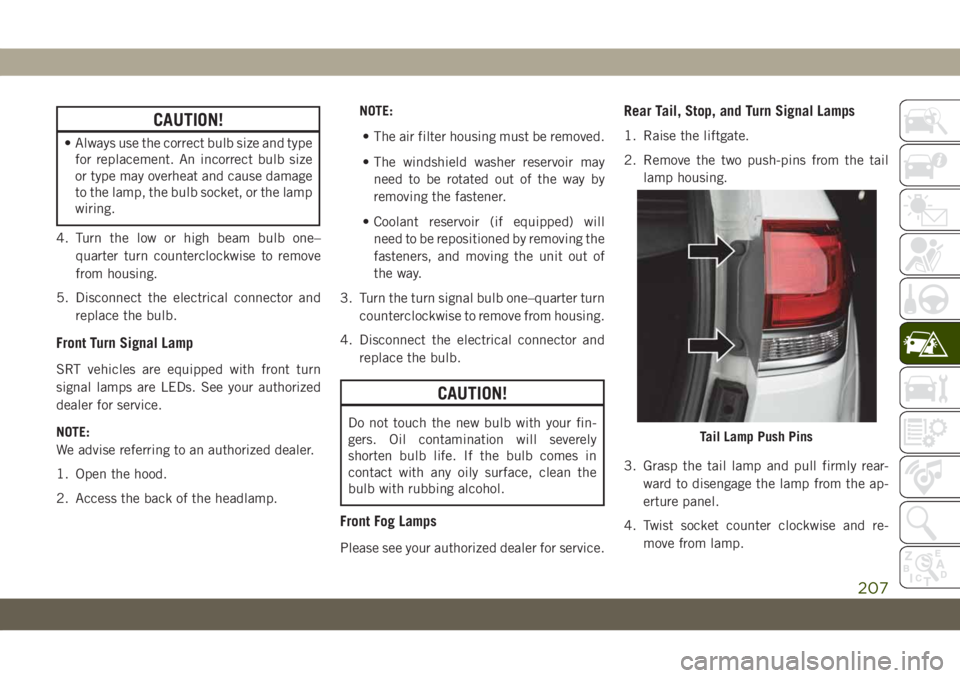
2. Remove the two push-pins from the tail
lamp housing.
3. Grasp the tail lamp and pull firmly rear-
ward to disengage the lamp from the ap-
erture panel.
4. Twist socket counter clockwise and re-
move from lamp.
Tail Lamp Push Pins
207
Page 210 of 378
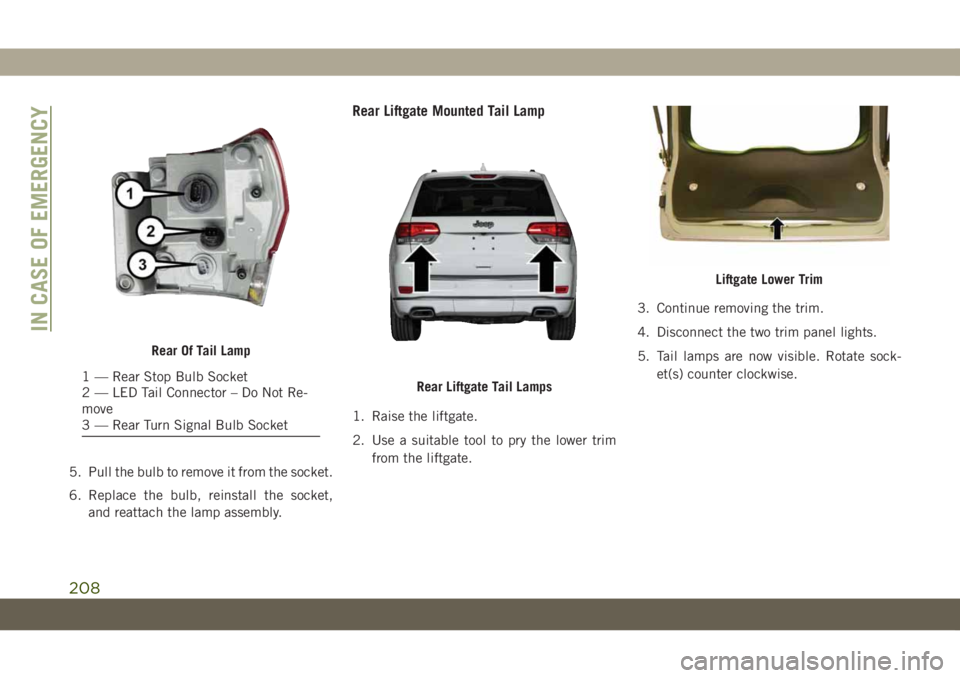
5. Pull the bulb to remove it from the socket.
6. Replace the bulb, reinstall the socket,
and reattach the lamp assembly.
Rear Liftgate Mounted Tail Lamp
1. Raise the liftgate.
2. Use a suitable tool to pry the lower trim
from the liftgate.3. Continue removing the trim.
4. Disconnect the two trim panel lights.
5. Tail lamps are now visible. Rotate sock-
et(s) counter clockwise.
Rear Of Tail Lamp
1 — Rear Stop Bulb Socket
2 — LED Tail Connector – Do Not Re-
move
3 — Rear Turn Signal Bulb SocketRear Liftgate Tail Lamps
Liftgate Lower Trim
IN CASE OF EMERGENCY
208
Page 372 of 378
Ignition.....................15
Switch...................15
Instrument Cluster..............67
Descriptions................83
Display...................66
Instrument Panel Lens Cleaning.....276
Interior Appearance Care.........275
Intermittent Wipers (Delay Wipers)....41
Introduction...................1
Jacking Instructions............218
Jack Location................217
Jack Operation.........217, 218, 262
Jump Starting................225
Key Fob
Arm The System.............18
Disarm The System............18
Keyless Enter-N-Go..............21
Passive Entry...............21
Keys.......................14
Replacement...............15
LaneSense..................181
Lap/Shoulder Belts.............110
Latches....................143
Hood....................59Lead Free Gasoline.............282
Leaks, Fluid.................143
Life Of Tires.................266
Liftgate.....................59
Closing...................60
Opening..................59
Power....................61
Liftgate Window Wiper/Washer.......43
Light Bulbs..................143
Lights.....................143
AirBag ............73, 117, 141
Automatic Headlights..........38
Brake Assist Warning...........92
Brake Warning...............73
Bulb Replacement...........204
Cruise.................82, 84
Daytime Running.............37
Electronic Stability Program(ESP)
Indicator..................75
Exterior..............
.36, 143
F
og ...................40, 81
Hazard Warning Flasher........203
Headlights On With Wipers.......39
High Beam/Low Beam Select . . .37, 38
Hill Descent Control Indicator.....94
Lights On Reminder...........40
Low Fuel..................77Malfunction Indicator
(Check Engine)..............78
Park..................39, 82
Passing...................38
Seat Belt Reminder...........75
Security Alarm..............76
Service..................204
Side Marker...............207
Traction Control..............92
Turn Signals......40, 83, 143, 207
Warning Instrument Cluster
Descriptions.............75, 83
Locks
Child Protection..............24
Luggage Carrier................64
Lug Nuts/Bolts................278
Maintenance...............55, 58
Maintenance Free Battery.........256
Maintenance Schedule. . . .236, 240, 244
Malfunction Indicator Light
(Check Engine)...............78
Memory Feature (Memory Seats)......25
Memory Seat..................25
Methanol...................283
Methanol Fuel................283
Mirrors.....................35
INDEX
370