remote start JEEP GRAND CHEROKEE 2021 Owner handbook (in English)
[x] Cancel search | Manufacturer: JEEP, Model Year: 2021, Model line: GRAND CHEROKEE, Model: JEEP GRAND CHEROKEE 2021Pages: 378, PDF Size: 6.88 MB
Page 8 of 378
WELCOME FROM FCA
HOW TO FIND YOUR OWNER’S MANUAL ONLINE.... 1
HOW TO USE THIS MANUAL
HOW TO USE THIS MANUAL............... 2Essential Information................ 2
Symbols........................ 2
ROLLOVER WARNING................... 2
WARNINGS AND CAUTIONS............... 3
VEHICLE CHANGES/ALTERATIONS............ 3
GRAPHICAL TABLE OF CONTENTS
INSTRUMENT PANEL.................. 12
INTERIOR......................... 13
GETTING TO KNOW YOUR VEHICLE
KEYS........................... 14KeyFob ....................... 14
IGNITION SWITCH.................... 15Keyless Enter-N-Go — Ignition......... 15
REMOTE STARTING SYSTEM — IF EQUIPPED.... 17How To Use Remote Start............ 17
To Enter Remote Start Mode........... 18
VEHICLE SECURITY ALARM — IF EQUIPPED..... 18To Arm The System................ 18
To Disarm The System.............. 18
Tamper Alert.................... 19
PREMIUM VEHICLE SECURITY ALARM
— IF EQUIPPED..................... 19
To Arm The System................ 19
To Disarm The System.............. 20
Security System Manual Override........ 21
DOORS.......................... 21Keyless Enter-N-Go — Passive Entry...... 21
Child-Protection Door Lock System
— Rear Doors................... 24
SEATS .......................... 25Driver Memory Seat — If Equipped....... 25
Heated Seats.................... 28
Front Ventilated Seats.............. 29
HEAD RESTRAINTS................... 30Supplemental Active Head Restraints
— Front Seats................... 30
Adjustment — Rear Seats............ 32
Head Restraint Removal — Rear Seats.... 32
STEERING WHEEL.................... 33Manual Tilt/Telescoping Steering Column
— If Equipped................... 33
Power Tilt/Telescoping Steering Column
— If Equipped................... 34
Heated Steering Wheel — If Equipped..... 34
MIRRORS........................ 35Power Folding Outside Mirrors
— If Equipped................... 35
Tilt Side Mirrors In Reverse (Available With
Memory Seat Only) — If Equipped....... 36
EXTERIOR LIGHTS................... 36Headlight Switch.................. 36
Multifunction Lever................ 37
Daytime Running Lights — If Equipped.... 37
High/Low Beam Switch.............. 38
Automatic High Beam — If Equipped..... 38
Flash-To-Pass................... 38
Automatic Headlights — If Equipped..... 38
Parking Lights And Panel Lights........ 39
Headlights On Automatically With Wipers . . . 39Adaptive Bi-Xenon High Intensity Discharge
Headlights — If Equipped............ 39
Headlight Delay.................. 39
Lights-On Reminder................ 40
Front And Rear Fog Lights — If Equipped . . . 40
Turn Signals.................... 40
Automatic Headlight Leveling — HID Headlights
Only......................... 40
Battery Saver.................... 40
WINDSHIELD WIPERS AND WASHERS......... 41Windshield Wiper Operation........... 41
Rain Sensing Wipers — If Equipped...... 42
Rear Window Wiper/Washer........... 43
CLIMATE CONTROLS.................. 43Automatic Climate Controls Overview..... 44
Climate Control Functions............ 50
Automatic Temperature Control (ATC)..... 50
Operating Tips................... 51
WINDOWS........................ 52Power Window Controls.............. 52
Auto-Down Feature................ 52
Auto-Up Feature With Anti-Pinch Protection . 53
Window Lockout Switch............. 53
Wind Buffeting.................. 53
POWER SUNROOF — IF EQUIPPED........... 54Opening Sunroof.................. 54
Closing Sunroof.................. 54
Sunshade Operation................ 55
Pinch Protect Feature............... 55
Venting Sunroof — Express........... 55
Sunroof Maintenance............... 55
Relearn Procedure................. 55
TABLE OF CONTENTS
6
Page 16 of 378
KEYS
Key Fob
Your vehicle uses a keyless ignition system.
The ignition system consists of a key fob with
Remote Keyless Entry (RKE) and a START/
STOP push button ignition system. The Re-
mote Keyless Entry system consists of a key
fob and Keyless Enter-N-Go feature if
equipped.
NOTE:
The key fob may not be found if it is located
next to a mobile phone, laptop or other elec-
tronic device; these devices may block the
key fob’s wireless signal.
The key fob allows you to lock or unlock the
doors and liftgate from distances up to ap-
proximately 66 ft (20 m) using a handheld
key fob. The key fob does not need to be
pointed at the vehicle to activate the system.NOTE:
• With ignition on/start and the vehicle mov-
ing at 5 mph (8 km/h), all RKE commands
are disabled.
CAUTION!
The electrical components inside of the
key fob may be damaged if the key fob is
subjected to strong electrical shocks. In
order to ensure complete efficiency of the
electronic devices inside of the key fob,
avoid exposing the key fob to direct sun-
light.
In case the ignition switch does not change
with the push of a button, the key fob may
have a low or fully depleted battery. A low key
fob battery can be verified by referring to the
instrument cluster, which will display direc-
tions to follow.
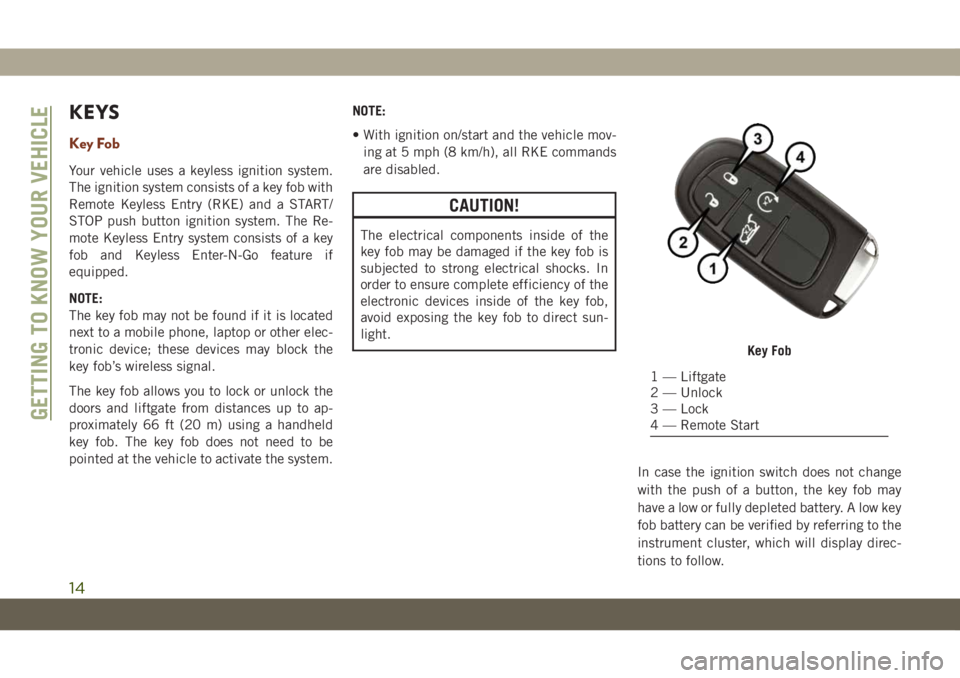
Key Fob
1 — Liftgate
2 — Unlock
3 — Lock
4 — Remote Start
GETTING TO KNOW YOUR VEHICLE
14
Page 19 of 378
NOTE:
Refer to "Starting The Engine," in "Starting
And Operating" in the Owners Manual for
further information.
REMOTE STARTING
SYSTEM — IF EQUIPPED
• Push the remote start button on the key fob
twice within five seconds. Pushing the re-
mote start button a third time shuts the
engine off.
• With remote start, the engine will only run
for 15 minutes (time out) unless the igni-
tion is placed in the ON/RUN position.
• The vehicle must be manually started with
a push of the ignition START/STOP button
after two consecutive time outs.
WARNING!
• Do not start or run an engine in a closed
garage or confined area. Exhaust gas
contains Carbon Monoxide (CO) which
is odorless and colorless. Carbon Mon-
WARNING!
oxide is poisonous and can cause seri-
ous injury or death when inhaled.
• Keep key fobs away from children. Op-
eration of the Remote Start System,
windows, door locks or other controls
could cause serious injury or death.
How To Use Remote Start
• Push Remote Start button on the key fob
twice within five seconds. Pushing the Re-
mote Start button a third time shuts the
engine off.
• With remote start, the engine will only run
for 15 minutes (time out) unless the igni-
tion is placed in the ON/RUN position.
• The vehicle must be manually started with
a push of the ignition START/STOP button
after two consecutive time outs.
All of the following conditions must be met
before the engine will remote start:
• Gear Selector in PARK
• Doors closed
• Hood closed• Liftgate closed
• Hazard switch off
• Brake switch inactive (brake pedal not
pushed)
• Battery at an acceptable charge level
• System not disabled from previous remote
start event
• Vehicle alarm system indicator flashing
• Ignition in STOP/OFF position
• Fuel level meets minimum requirement
WARNING!
• Do not start or run an engine in a closed
garage or confined area. Exhaust gas
contains Carbon Monoxide (CO) which
is odorless and colorless. Carbon Mon-
oxide is poisonous and can cause seri-
ous injury or death when inhaled.
• Keep key fobs away from children. Op-
eration of the Remote Start System,
windows, door locks or other controls
could cause serious injury or death.
17
Page 20 of 378
To Enter Remote Start Mode
Push and release the Remote Start button on
the key fob twice within five seconds. The
vehicle doors will lock, the turn signals will
flash twice, and the horn will chirp twice.
Then the engine will start, and the vehicle
will remain in the Remote Start mode for a
15-minute cycle.
NOTE:
• If an engine fault is present or fuel level is
low, the vehicle will start and then shut
down in 10 seconds.
• The park lamps will turn on and remain on
during Remote Start mode.
• For security, power window operation is
disabled when the vehicle is in the Remote
Start mode.
• The engine can be started two consecutive
times (two 15-minute cycles) with the key
fob. However, the ignition must be placed
in the ON/RUN position before you can
repeat the start sequence for a third cycle.
VEHICLE SECURITY ALARM
— IF EQUIPPED
The vehicle security alarm monitors the ve-
hicle doors, hood, liftgate, and the Keyless
Enter-N-Go — Ignition for unauthorized op-
eration. While the vehicle security alarm is
armed, interior switches for door locks and
liftgate release are disabled. If something
triggers the alarm, the vehicle security alarm
will provide the following audible and visible
signals:
• The horn will pulse.
• The turn signals will flash.
• The vehicle security light in the instrument
cluster will flash.
To Arm The System
Follow these steps to arm the vehicle security
alarm:
1. Make sure the vehicle’s ignition is placed
in the “OFF” mode.
• For vehicles equipped with Keyless En-
try, make sure the vehicle’s keyless
ignition system is OFF.2. Perform one of the following methods to
lock the vehicle:
• Push the lock button on the interior
power door lock switch with the driver
and/or passenger door open.
• Push the lock button on the exterior
Passive Entry Door Handle with a valid
key fob available in the same exterior
zone. Refer to "Doors" in "Getting To
Know Your Vehicle" in your Owner’s
Manual for further information.
• Push the lock button on the key fob.
3. If any doors are open, close them.
To Disarm The System
The vehicle security alarm can be disarmed
using any of the following methods:
• Push the unlock button on the key fob.
• Grasp the passive entry door handle to
unlock the door, refer to "Doors" in "Getting
To Know Your Vehicle" in your Owner’s
Manual for further information.
• Cycle the ignition out of the off mode to
disarm the system.GETTING TO KNOW YOUR VEHICLE
18
Page 24 of 378
NOTE:
If “Unlock All Doors 1st Press” is pro-
grammed all doors will unlock when you grab
hold of the front driver’s door handle. To
select between “Unlock Driver Door 1st
Push” and “Unlock All Doors 1st Press,”
refer to “Uconnect Settings” in “Multime-
dia” in the Owner’s Manual for further infor-
mation.
To Unlock From The Passenger Side
With a valid Passive Entry key fob within 5 ft
(1.5 m) of the passenger door handle, grab
the front passenger door handle to unlock all
four doors and the liftgate automatically.
NOTE:
All doors will unlock when the front passen-
ger door handle is grabbed regardless of the
driver’s door unlock preference setting (“Un-
lock Driver Door 1st Press” or “Unlock All
Doors 1st Press”).Preventing Inadvertent Locking Of Passive Entry
Key Fob In Vehicle (FOBIK-Safe)
To minimize the possibility of unintentionally
locking a Passive Entry key fob inside your
vehicle, the Passive Entry system is equipped
with an automatic door unlock feature which
will function if the ignition switch is in the
OFF position.
FOBIK-Safe only executes in vehicles with
passive entry. There are five situations that
trigger a FOBIK-Safe search in any passive
entry vehicle:
• A lock request is made by a valid Passive
Entry key fob while a door is open.
• A lock request is made by the Passive Entry
door handle while a door is open.
• A lock request is made by the door panel
switch while the door is open.
• When the vehicle security alarm is in pre-
arm or armed status and the liftgate transi-
tions from open to closed.
• When the liftgate transitions from opened
to closed and remote start is active.When any of these situations occur, after all
open doors are shut, the FOBIK-Safe search
will be executed. If it finds a Passive Entry
key fob inside the car, the car will unlock and
alert the customer.
NOTE:
The vehicle will only unlock the doors when a
valid Passive Entry key fob is detected inside
the vehicle. The vehicle will not unlock the
doors when any of the following conditions
are true:
• The doors are manually locked using the
door lock knobs.
• Three attempts are made to lock the doors
using the door panel switch and then close
the doors.
• There is a valid Passive Entry key fob out-
side the vehicle within 5 ft. (1.5 m) of a
Passive Entry door handle.
To Lock The Vehicle’s Doors And Liftgate
With one of the vehicle’s Passive Entry key
fob within 5 ft (1.5 m) of the driver or
passenger front door handles, pushing the
passive entry lock button will lock the
vehicle.
GETTING TO KNOW YOUR VEHICLE
22
Page 28 of 378
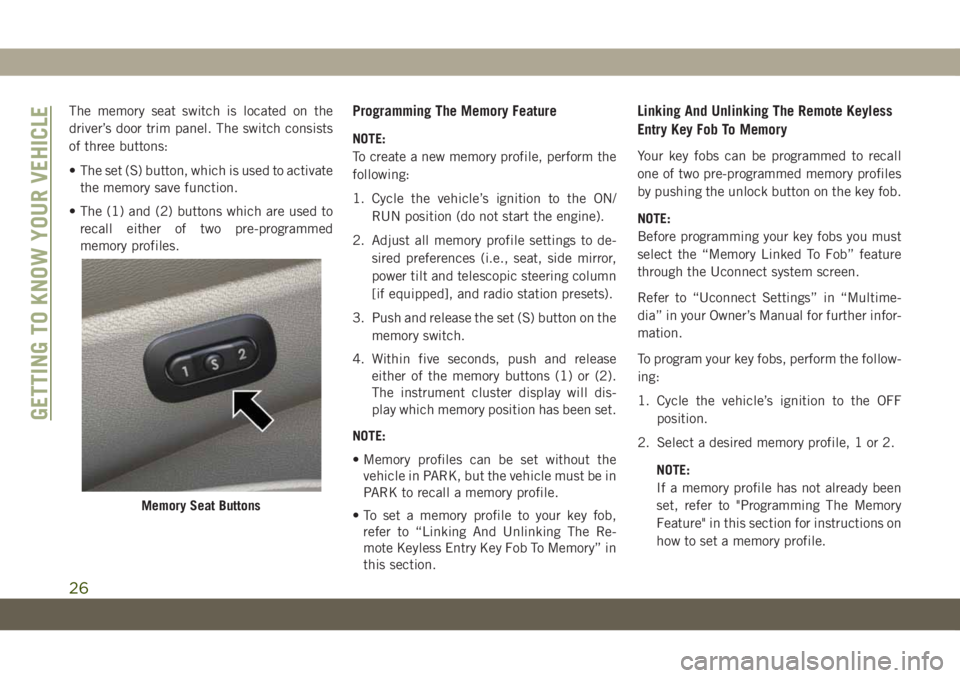
The memory seat switch is located on the
driver’s door trim panel. The switch consists
of three buttons:
• The set (S) button, which is used to activate
the memory save function.
• The (1) and (2) buttons which are used to
recall either of two pre-programmed
memory profiles.Programming The Memory Feature
NOTE:
To create a new memory profile, perform the
following:
1. Cycle the vehicle’s ignition to the ON/
RUN position (do not start the engine).
2. Adjust all memory profile settings to de-
sired preferences (i.e., seat, side mirror,
power tilt and telescopic steering column
[if equipped], and radio station presets).
3. Push and release the set (S) button on the
memory switch.
4. Within five seconds, push and release
either of the memory buttons (1) or (2).
The instrument cluster display will dis-
play which memory position has been set.
NOTE:
• Memory profiles can be set without the
vehicle in PARK, but the vehicle must be in
PARK to recall a memory profile.
• To set a memory profile to your key fob,
refer to “Linking And Unlinking The Re-
mote Keyless Entry Key Fob To Memory” in
this section.
Linking And Unlinking The Remote Keyless
Entry Key Fob To Memory
Your key fobs can be programmed to recall
one of two pre-programmed memory profiles
by pushing the unlock button on the key fob.
NOTE:
Before programming your key fobs you must
select the “Memory Linked To Fob” feature
through the Uconnect system screen.
Refer to “Uconnect Settings” in “Multime-
dia” in your Owner’s Manual for further infor-
mation.
To program your key fobs, perform the follow-
ing:
1. Cycle the vehicle’s ignition to the OFF
position.
2. Select a desired memory profile, 1 or 2.
NOTE:
If a memory profile has not already been
set, refer to "Programming The Memory
Feature" in this section for instructions on
how to set a memory profile.
Memory Seat Buttons
GETTING TO KNOW YOUR VEHICLE
26
Page 30 of 378
NOTE:
The Easy Entry/Exit feature is not enabled
when the vehicle is delivered from the fac-
tory. The Easy Entry/Exit feature is enabled
(or later disabled) through the programmable
features in the Uconnect system. Refer to
“Uconnect Settings” in “Multimedia” in your
Owner’s Manual for further details.
Heated Seats
On some models, the front and rear seats may
be equipped with heaters located in the seat
cushions and seat backs.
WARNING!
• Persons who are unable to feel pain to
the skin because of advanced age,
chronic illness, diabetes, spinal cord in-
jury, medication, alcohol use, exhaus-
tion or other physical condition must
exercise care when using the seat
heater. It may cause burns even at low
temperatures, especially if used for long
periods of time.
• Do not place anything on the seat or
seatback that insulates against heat,
WARNING!
such as a blanket or cushion. This may
cause the seat heater to overheat. Sit-
ting in a seat that has been overheated
could cause serious burns due to the
increased surface temperature of the
seat.
Front Heated Seats
The front heated seat control buttons are
located within the climate or controls screen
of the touchscreen.
You can choose from HI, LO, or OFF heat
settings. The indicator arrows in touchscreen
buttons indicate the level of heat in use. Two
indicator arrows will illuminate for HI, and
one for LO. Turning the heating elements off
will return the user to the radio screen.
• Press the heated seat button
once to
turn the HI setting on.
• Press the heated seat button
a second
time to turn the LO setting on.
• Press the heated seat button
a third
time to turn the heating elements off.NOTE:
• Once a heat setting is selected, heat will be
felt within two to five minutes.
• The engine must be running for the heated
seats to operate.
• The level of heat selected will stay on until
the operator changes it.
Vehicles Equipped With Remote Start
On models that are equipped with remote
start, the heated seats can be programmed to
come on during a remote start.
This feature can be programmed through the
Uconnect system. Refer to “Uconnect Set-
tings” in “Multimedia” in your Owner’s
Manual for further details.
WARNING!
• Persons who are unable to feel pain to
the skin because of advanced age,
chronic illness, diabetes, spinal cord in-
jury, medication, alcohol use, exhaus-
tion or other physical condition must
exercise care when using the seat
GETTING TO KNOW YOUR VEHICLE
28
Page 32 of 378
Vehicles Equipped With Remote Start
On models that are equipped with remote
start, the ventilated seats can be pro-
grammed to come on during a remote start.
This feature can be programmed through the
Uconnect system. Refer to “Uconnect Set-
tings” in “Multimedia” in the Owner's
Manual for further information.
HEAD RESTRAINTS
Head restraints are designed to reduce the
risk of injury by restricting head movement in
the event of a rear-impact. Head restraints
should be adjusted so that the top of the head
restraint is located above the top of your ear.
WARNING!
• All occupants, including the driver,
should not operate a vehicle or sit in a
vehicle’s seat until the head restraints
are placed in their proper positions in
order to minimize the risk of neck injury
in the event of a crash.
WARNING!
• Head restraints should never be ad-
justed while the vehicle is in motion.
Driving a vehicle with the head restraints
improperly adjusted or removed could
cause serious injury or death in the
event of a collision.
Supplemental Active Head Restraints —
Front Seats
Active Head Restraints are passive, deploy-
able components, and vehicles with this
equipment cannot be readily identified by
any markings, only through visual inspection
of the head restraint. The Active Head Re-
straints (AHR) will be split in two halves, with
the front half being soft foam and trim, the
back half being decorative plastic.
When AHRs deploy during a rear impact, the
front half of the head restraint extends for-
ward to reduce the gap between the back of
the occupant’s head and the AHR. This sys-
tem is design to reduce the risk of injury tothe driver or front passenger in certain types
of rear impacts. Refer to “Occupant Re-
straints” in “Safety” for further information.
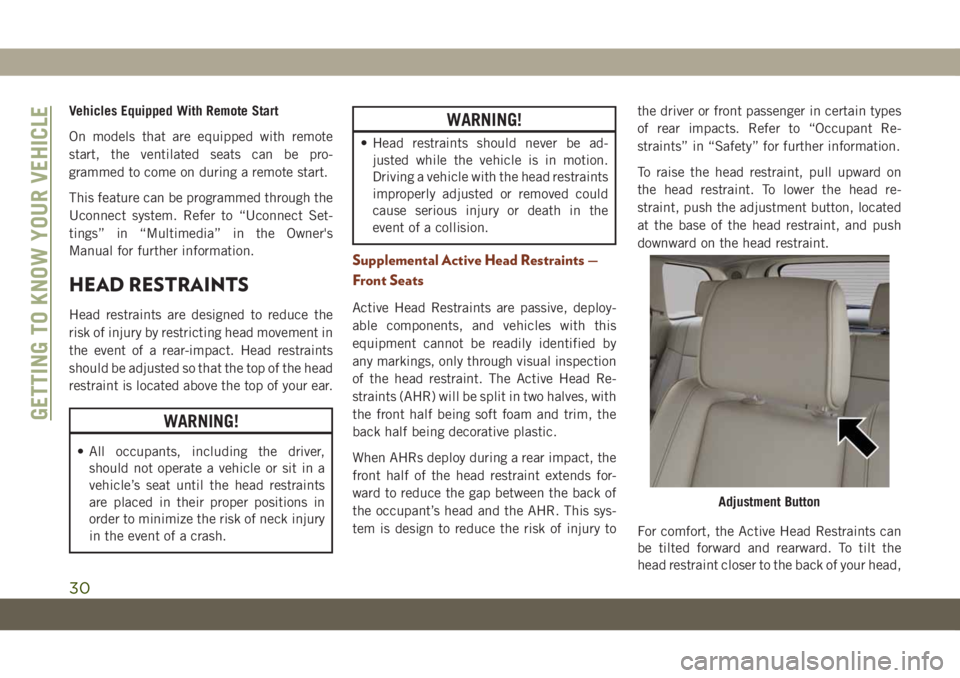
To raise the head restraint, pull upward on
the head restraint. To lower the head re-
straint, push the adjustment button, located
at the base of the head restraint, and push
downward on the head restraint.
For comfort, the Active Head Restraints can
be tilted forward and rearward. To tilt the
head restraint closer to the back of your head,
Adjustment Button
GETTING TO KNOW YOUR VEHICLE
30
Page 37 of 378
NOTE:
The engine must be running for the heated
steering wheel to operate.
Vehicles Equipped With Remote Start
On models that are equipped with remote
start, the heated steering wheel can be pro-
grammed to come on during a remote start.
This feature can be programmed through the
Uconnect system. Refer to “Uconnect Set-
tings” in “Multimedia” in your Owner’s
Manual for further information.
WARNING!
• Persons who are unable to feel pain to
the skin because of advanced age,
chronic illness, diabetes, spinal cord in-
jury, medication, alcohol use, exhaus-
tion, or other physical conditions must
exercise care when using the steering
wheel heater. It may cause burns even at
low temperatures, especially if used for
long periods.
WARNING!
• Do not place anything on the steering
wheel that insulates against heat, such
as a blanket or steering wheel covers of
any type and material. This may cause
the steering wheel heater to overheat.
MIRRORS
Power Folding Outside Mirrors — If
Equipped
If equipped with power folding mirrors, they
can be electrically folded rearward and un-
folded into the drive position.
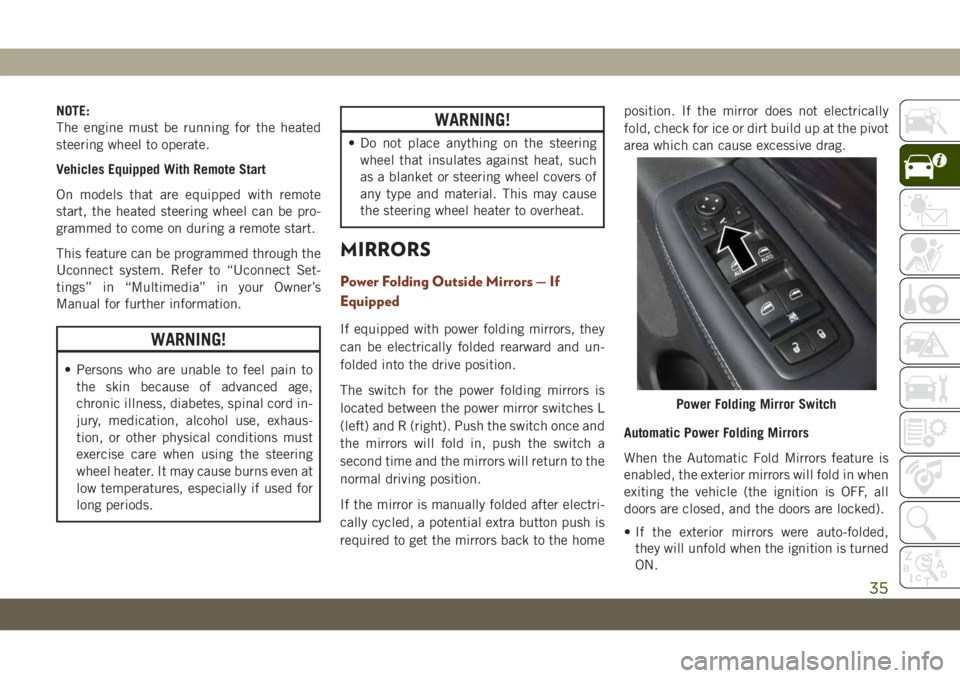
The switch for the power folding mirrors is
located between the power mirror switches L
(left) and R (right). Push the switch once and
the mirrors will fold in, push the switch a
second time and the mirrors will return to the
normal driving position.
If the mirror is manually folded after electri-
cally cycled, a potential extra button push is
required to get the mirrors back to the homeposition. If the mirror does not electrically
fold, check for ice or dirt build up at the pivot
area which can cause excessive drag.
Automatic Power Folding Mirrors
When the Automatic Fold Mirrors feature is
enabled, the exterior mirrors will fold in when
exiting the vehicle (the ignition is OFF, all
doors are closed, and the doors are locked).
• If the exterior mirrors were auto-folded,
they will unfold when the ignition is turned
ON.
Power Folding Mirror Switch
35
Page 228 of 378
WARNING!
Do not attempt jump starting if the battery
is frozen. It could rupture or explode and
cause personal injury.
CAUTION!
Do not use a portable battery booster pack
or any other booster source with a system
voltage greater than 12 Volts or damage to
the battery, starter motor, alternator or
electrical system may occur.
NOTE:
When using a portable battery booster pack,
follow the manufacturer's operating instruc-
tions and precautions.
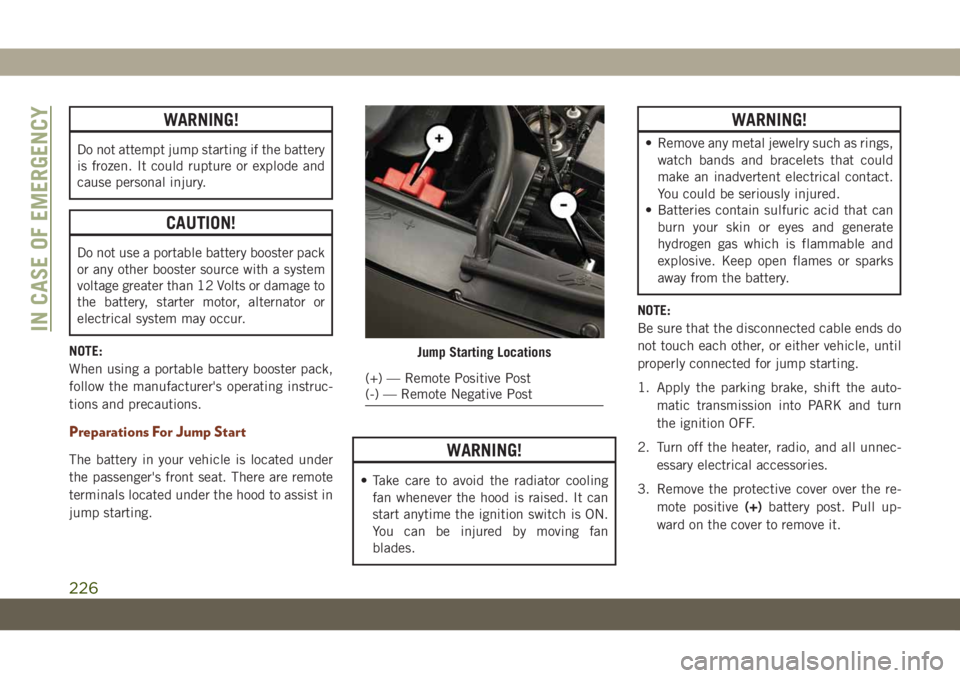
Preparations For Jump Start
The battery in your vehicle is located under
the passenger's front seat. There are remote
terminals located under the hood to assist in
jump starting.WARNING!
• Take care to avoid the radiator cooling
fan whenever the hood is raised. It can
start anytime the ignition switch is ON.
You can be injured by moving fan
blades.
WARNING!
• Remove any metal jewelry such as rings,
watch bands and bracelets that could
make an inadvertent electrical contact.
You could be seriously injured.
• Batteries contain sulfuric acid that can
burn your skin or eyes and generate
hydrogen gas which is flammable and
explosive. Keep open flames or sparks
away from the battery.
NOTE:
Be sure that the disconnected cable ends do
not touch each other, or either vehicle, until
properly connected for jump starting.
1. Apply the parking brake, shift the auto-
matic transmission into PARK and turn
the ignition OFF.
2. Turn off the heater, radio, and all unnec-
essary electrical accessories.
3. Remove the protective cover over the re-
mote positive(+)battery post. Pull up-
ward on the cover to remove it.
Jump Starting Locations
(+) — Remote Positive Post
(-) — Remote Negative Post
IN CASE OF EMERGENCY
226