start stop button JEEP GRAND CHEROKEE 2023 User Guide
[x] Cancel search | Manufacturer: JEEP, Model Year: 2023, Model line: GRAND CHEROKEE, Model: JEEP GRAND CHEROKEE 2023Pages: 424, PDF Size: 15.48 MB
Page 127 of 424
STARTING AND OPERATING125
AUTO PARK BRAKE
The EPB can be programmed to be applied
automatically whenever the vehicle is at a
standstill and the transmission is placed in PARK.
Auto Park Brake is enabled and disabled by
customer selection through the customer
programmable features section of the Uconnect
Settings Úpage 218.
Any single Auto Park Brake application can be
bypassed by pushing the EPB switch to the release
position while the transmission is placed in PARK.
SAFEHOLD
SafeHold is a safety feature of the EPB system that
will place the transmission in PARK, and engage
the parking brake automatically if the vehicle is left
unsecured while the ignition is in ON/RUN.
The parking brake will automatically engage if all of
the following conditions are met:
The vehicle is at a standstill.
There is no attempt to press the brake pedal or
accelerator pedal.
The seat belt is unbuckled.
The driver door is open. SafeHold can be temporarily bypassed by pushing
the EPB switch while the driver door is open. Once
manually bypassed, SafeHold will be enabled
again once the vehicle reaches 12 mph (20 km/h)
or the ignition is turned to the OFF position and
back to ON again.
HOLD ‘N GO — IF EQUIPPED
Hold ‘N Go is a comfort feature that allows the
driver to remove their foot from the brake pedal
once the vehicle has come to a stop. The vehicle
must be held at a standstill for a predetermined
amount of time by hydraulic braking. The EPB will
then engage and continue to hold the vehicle at a
stop until the driver applies the accelerator pedal.
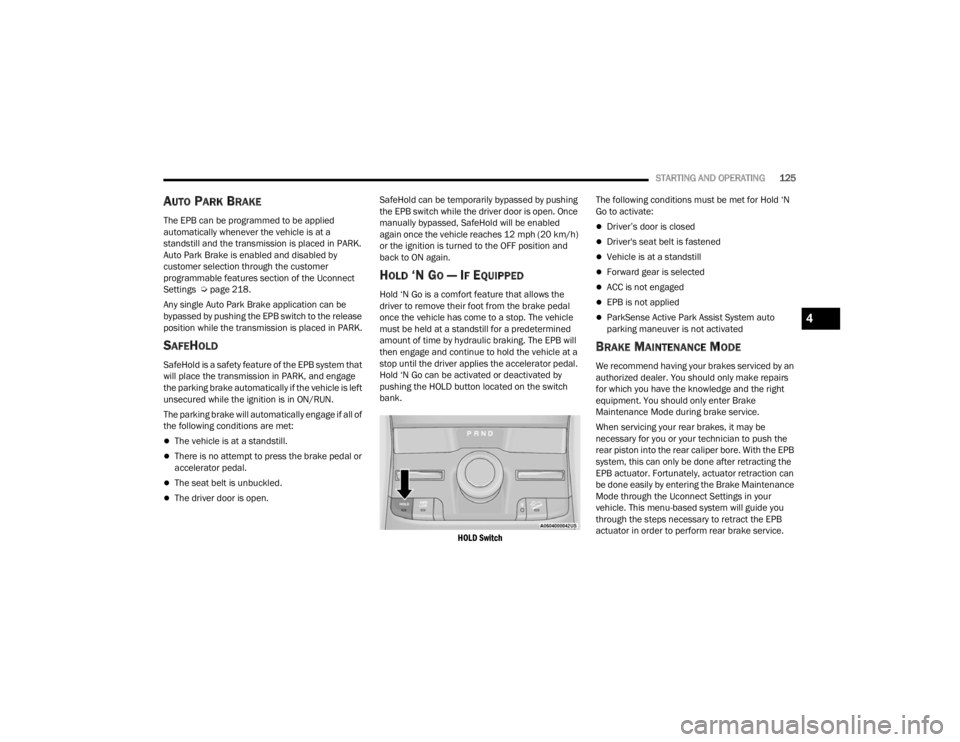
Hold ‘N Go can be activated or deactivated by
pushing the HOLD button located on the switch
bank.
HOLD Switch
The following conditions must be met for Hold ‘N
Go to activate:
Driver’s door is closed
Driver's seat belt is fastened
Vehicle is at a standstill
Forward gear is selected
ACC is not engaged
EPB is not applied
ParkSense Active Park Assist System auto
parking maneuver is not activated
BRAKE MAINTENANCE MODE
We recommend having your brakes serviced by an
authorized dealer. You should only make repairs
for which you have the knowledge and the right
equipment. You should only enter Brake
Maintenance Mode during brake service.
When servicing your rear brakes, it may be
necessary for you or your technician to push the
rear piston into the rear caliper bore. With the EPB
system, this can only be done after retracting the
EPB actuator. Fortunately, actuator retraction can
be done easily by entering the Brake Maintenance
Mode through the Uconnect Settings in your
vehicle. This menu-based system will guide you
through the steps necessary to retract the EPB
actuator in order to perform rear brake service.
4
23_WL_OM_EN_USC_t.book Page 125
Page 134 of 424
132STARTING AND OPERATING
Proper operation of four-wheel drive vehicles
depends on tires of equal size, type, and
circumference on each wheel. Any difference will
adversely affect performance and function of the
transfer case.
Because four-wheel drive provides improved
traction, there is a tendency to exceed safe turning
and stopping speeds. Do not go faster than road
conditions permit.
SHIFT POSITIONS
For additional information on the appropriate use
of each four-wheel drive system mode position,
see the following:
4WD HI
This is the default operating range for daily use.
N (NEUTRAL)
This range disengages the driveline from the
powertrain. It is used for towing your vehicle
behind another vehicle Ú page 195.
4WD LOW
This range is for low speed four-wheel drive. It
provides an additional gear reduction which allows
for increased torque to be delivered to both the
front and rear wheels while providing maximum
pulling power for loose, slippery road surfaces only.
Do not exceed 25 mph (40 km/h).
SHIFTING PROCEDURES
4WD HI To 4WD LOW
With the vehicle at speeds of 0 to 3 mph (0 to
5 km/h), the ignition switch in the ON/RUN
position and the engine running, shift the
transmission into NEUTRAL (N), push and hold the
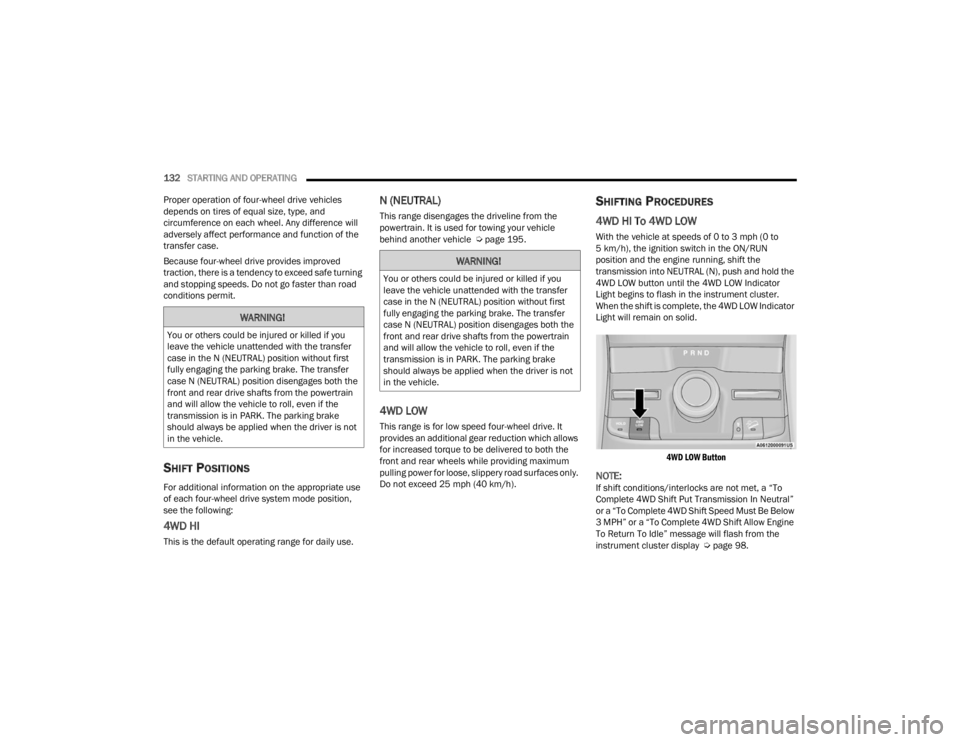
4WD LOW button until the 4WD LOW Indicator
Light begins to flash in the instrument cluster.
When the shift is complete, the 4WD LOW Indicator
Light will remain on solid.
4WD LOW Button
NOTE:If shift conditions/interlocks are not met, a “To
Complete 4WD Shift Put Transmission In Neutral”
or a “To Complete 4WD Shift Speed Must Be Below
3 MPH” or a “To Complete 4WD Shift Allow Engine
To Return To Idle” message will flash from the
instrument cluster display Ú page 98.
WARNING!
You or others could be injured or killed if you
leave the vehicle unattended with the transfer
case in the N (NEUTRAL) position without first
fully engaging the parking brake. The transfer
case N (NEUTRAL) position disengages both the
front and rear drive shafts from the powertrain
and will allow the vehicle to roll, even if the
transmission is in PARK. The parking brake
should always be applied when the driver is not
in the vehicle.
23_WL_OM_EN_USC_t.book Page 132
Page 135 of 424
STARTING AND OPERATING133
4WD LOW To 4WD HI
With the vehicle at speeds of 0 to 3 mph (0 to
5 km/h), the ignition switch in the ON position or
the engine running, shift the transmission into
NEUTRAL (N), push and hold the 4WD LOW button
until the 4WD LOW Indicator Light begins to flash
in the instrument cluster. When the shift is
complete, the 4WD LOW Indicator Light will
remain off.
NOTE:
If shift conditions/interlocks are not met —
“4WD Shift Cancelled” or “4WD Shift Aborted/
Retry Shift” message will be displayed on the
instrument cluster. To reattempt shift, put the
transmission in NEUTRAL (N) and push and hold
the 4WD LOW button.
If shift conditions/interlocks are not met, a “To
Complete 4WD Shift Put Transmission In
Neutral” or a “To Complete 4WD Shift Speed
Must Be Below 3 MPH” or a “To Complete 4WD
Shift Allow Engine To Return To Idle” message
will flash from the instrument cluster display
Úpage 98.
Shifting into or out of 4WD LOW is possible with
the vehicle completely stopped; however, diffi -
culty may occur due to the mating clutch teeth
not being properly aligned. Several attempts
may be required for clutch teeth alignment and shift completion to occur. The preferred
method is with the vehicle rolling 0 to 3 mph
(0 to 5 km/h). If the vehicle is moving faster
than 3 mph (5 km/h), the transfer case will not
allow the shift.
QUADRA-TRAC II SYSTEM —
I
F EQUIPPED
The Quadra-Trac II System features two torque
transfer couplings. The couplings include an
Electronic Limited-Slip Differential (ELSD) rear axle
and the Quadra-Trac II transfer case. The ELSD
axle is fully automatic and requires no driver input
to operate. Under normal driving conditions, the
unit functions as a standard axle, balancing torque
evenly between left and right wheels. With a
traction difference between left and right wheels,
the coupling will sense a speed difference. As one
wheel begins to spin faster than the other, torque
will automatically transfer from the wheel that has
less traction, to the wheel that has traction. While
the transfer case and axle coupling differ in design,
their operation is similar. Follow the Quadra-Trac II
transfer case shifting information, preceding this
section, for shifting this system.
ELECTRONIC SWAY BAR DISCONNECT —
I
F EQUIPPED
Your vehicle may be equipped with an electronic
disconnecting stabilizer/sway bar. This system
allows greater front suspension travel in off-road
situations.
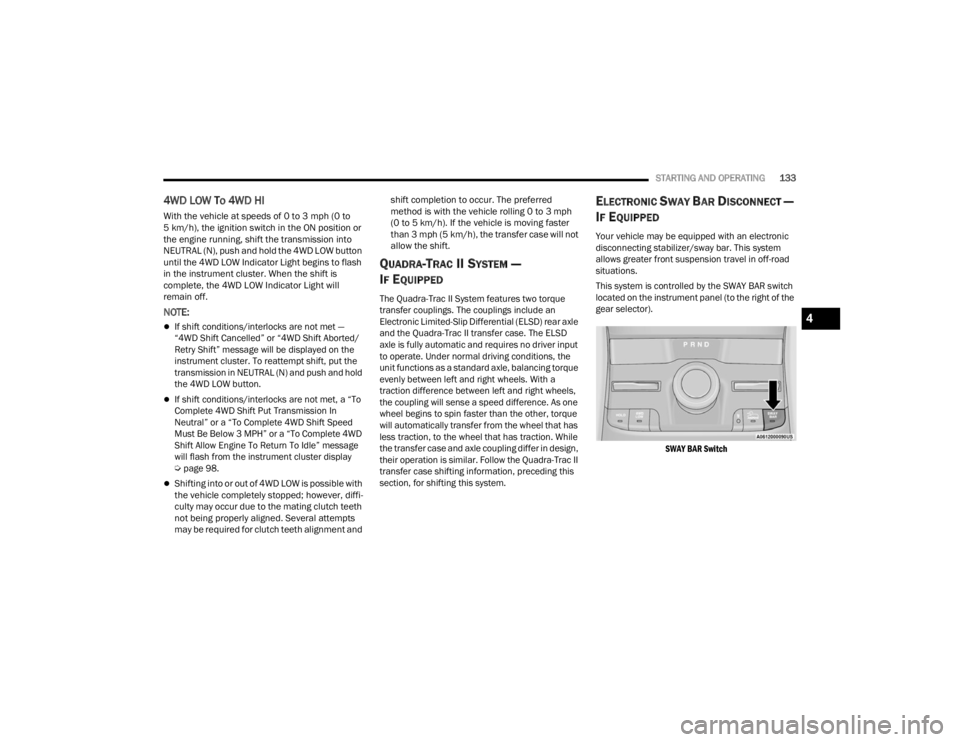
This system is controlled by the SWAY BAR switch
located on the instrument panel (to the right of the
gear selector).
SWAY BAR Switch
4
23_WL_OM_EN_USC_t.book Page 133
Page 145 of 424
STARTING AND OPERATING143
Adaptive Cruise Control (ACC) Operation
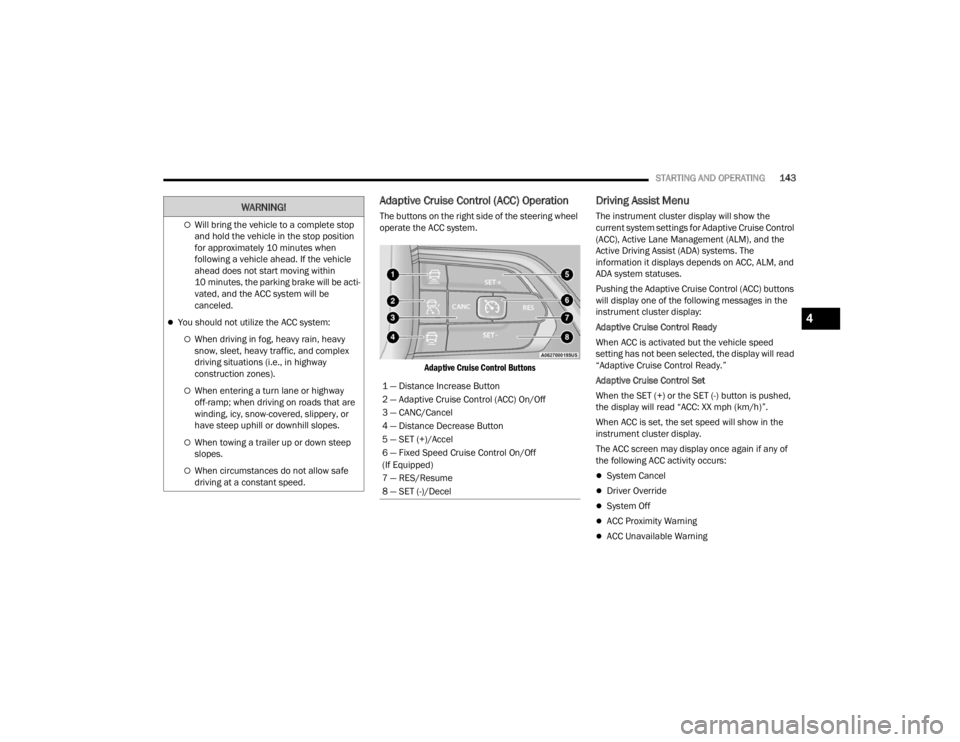
The buttons on the right side of the steering wheel
operate the ACC system.
Adaptive Cruise Control Buttons
Driving Assist Menu
The instrument cluster display will show the
current system settings for Adaptive Cruise Control
(ACC), Active Lane Management (ALM), and the
Active Driving Assist (ADA) systems. The
information it displays depends on ACC, ALM, and
ADA system statuses.
Pushing the Adaptive Cruise Control (ACC) buttons
will display one of the following messages in the
instrument cluster display:
Adaptive Cruise Control Ready
When ACC is activated but the vehicle speed
setting has not been selected, the display will read
“Adaptive Cruise Control Ready.”
Adaptive Cruise Control Set
When the SET (+) or the SET (-) button is pushed,
the display will read “ACC: XX mph (km/h)”.
When ACC is set, the set speed will show in the
instrument cluster display.
The ACC screen may display once again if any of
the following ACC activity occurs:
System Cancel
Driver Override
System Off
ACC Proximity Warning
ACC Unavailable Warning
Will bring the vehicle to a complete stop
and hold the vehicle in the stop position
for approximately 10 minutes when
following a vehicle ahead. If the vehicle
ahead does not start moving within
10 minutes, the parking brake will be acti -
vated, and the ACC system will be
canceled.
You should not utilize the ACC system:
When driving in fog, heavy rain, heavy
snow, sleet, heavy traffic, and complex
driving situations (i.e., in highway
construction zones).
When entering a turn lane or highway
off-ramp; when driving on roads that are
winding, icy, snow-covered, slippery, or
have steep uphill or downhill slopes.
When towing a trailer up or down steep
slopes.
When circumstances do not allow safe
driving at a constant speed.
WARNING!
1 — Distance Increase Button
2 — Adaptive Cruise Control (ACC) On/Off
3 — CANC/Cancel
4 — Distance Decrease Button
5 — SET (+)/Accel
6 — Fixed Speed Cruise Control On/Off
(If Equipped)
7 — RES/Resume
8 — SET (-)/Decel
4
23_WL_OM_EN_USC_t.book Page 143
Page 147 of 424

STARTING AND OPERATING145
NOTE:
Keeping your foot on the accelerator pedal can
cause the vehicle to continue to accelerate
beyond the set speed. If this occurs, the
message “DRIVER OVERRIDE” will display in the
instrument cluster display.
If you continue to accelerate beyond the set
speed while ACC is enabled, the system will not
be controlling the distance between your vehicle
and the vehicle ahead. The vehicle speed will
only be determined by the position of the accel-
erator pedal.
To Cancel
The following conditions cancel the ACC or Fixed
Speed Cruise Control systems:
The brake pedal is applied
The CANC (cancel) button is pushed
The gear selector is removed from the DRIVE
position
The Electronic Stability Control/Traction Control
System (ESC/TCS) activates
The vehicle parking brake is applied
The Trailer Sway Control (TSC) activates
The braking temperature exceeds normal range
(overheated) The following conditions will only cancel the ACC
system:
Driver seat belt is unbuckled at low speeds
Driver door is opened at low speeds
To Turn Off
The system will turn off and erase the set speed in
memory if:
The Adaptive Cruise Control (ACC) on/off button
is pushed
Fixed Speed Cruise Control on/off button is
pushed
The ignition is placed in the OFF position
4WD Low is engaged
The Active Driving Assist (ADA) system (if
equipped) is enabled/engaged and the ADA
button is pressed
NOTE:If ADA is not enabled/engaged and the ADA button
is pressed, the ACC system will remain on or turn
on, depending on the state of ACC at the time of
the ADA button press.
To Resume
If there is a set speed in memory, push the RES
(resume) button and remove your foot from the
accelerator pedal. The instrument cluster display
will show the last set speed. Resume can be used at any speed above 20 mph
(32 km/h) when only Fixed Speed Cruise Control is
being used.
Resume can be used at any speed above 0 mph
(0 km/h) when ACC is active.
NOTE:
While in ACC mode, when the vehicle comes to
a complete stop longer than two seconds, the
driver will either have to push the RES (resume)
button or press the accelerator pedal to reen
-
gage the ACC system.
ACC cannot be resumed if there is a stationary
vehicle in front of your vehicle in close proximity.
WARNING!
The Resume function should only be used if
traffic and road conditions permit. Resuming a
set speed that is too high or too low for
prevailing traffic and road conditions could
cause the vehicle to accelerate or decelerate too
sharply for safe operation. Failure to follow these
warnings can result in a collision and death or
serious personal injury.
4
23_WL_OM_EN_USC_t.book Page 145
Page 148 of 424
146STARTING AND OPERATING
To Vary The Speed Setting
To Increase Or Decrease The Set Speed
After setting a speed, you can increase the set
speed by pushing the SET (+) button, or decrease
speed by pushing the SET (-) button.
U.S. Speed (mph)
Pushing the SET (+) , or SET (-) button once will
result in a 1 mph speed adjustment. Each
subsequent tap of the button results in an
adjustment of 1 mph.
If the button is continually pushed, the set
speed will continue to adjust in 5 mph incre -
ments until the button is released. The new set
speed is reflected in the instrument cluster
display.
Metric Speed (km/h)
Pushing the SET (+) , or SET (-) button once will
result in a 1 km/h speed adjustment. Each
subsequent tap of the button results in an
adjustment of 1 km/h.
If the button is continually pushed, the set
speed will continue to adjust in 10 km/h incre -
ments until the button is released. The new set
speed is reflected in the instrument cluster
display.
NOTE:When you override and push the SET (+) button or
SET (-) button, the new set speed will be the current
speed of the vehicle.
When ACC Is Active
When you use the SET (-) button to decelerate, if
the engine’s braking power does not slow the
vehicle sufficiently to reach the set speed, the
brake system will automatically slow the
vehicle.
The ACC system decelerates the vehicle to a full
stop when following the vehicle in front. If your
vehicle follows the vehicle in front to a standstill,
after two seconds the driver will either have to
push the RES (resume) button, or apply the
accelerator pedal to reengage the ACC to the
existing set speed.
The ACC system maintains set speed when
driving uphill and downhill. However, a slight
speed change on moderate hills is normal. In
addition, downshifting may occur while climbing
uphill or descending downhill. This is normal
operation and necessary to maintain set speed.
When driving uphill and downhill, the ACC
system will cancel if the braking temperature
exceeds normal range (overheated).
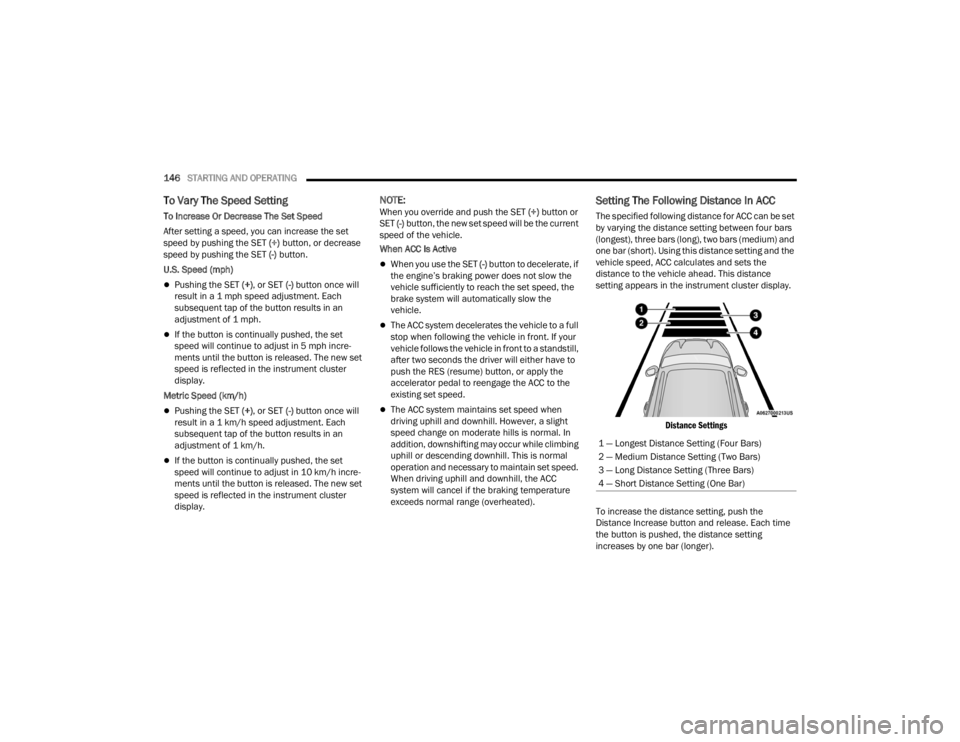
Setting The Following Distance In ACC
The specified following distance for ACC can be set
by varying the distance setting between four bars
(longest), three bars (long), two bars (medium) and
one bar (short). Using this distance setting and the
vehicle speed, ACC calculates and sets the
distance to the vehicle ahead. This distance
setting appears in the instrument cluster display.
Distance Settings
To increase the distance setting, push the
Distance Increase button and release. Each time
the button is pushed, the distance setting
increases by one bar (longer). 1 — Longest Distance Setting (Four Bars)
2 — Medium Distance Setting (Two Bars)
3 — Long Distance Setting (Three Bars)
4 — Short Distance Setting (One Bar)
23_WL_OM_EN_USC_t.book Page 146
Page 149 of 424

STARTING AND OPERATING147
To decrease the distance setting, push the
Distance Decrease button and release. Each time
the button is pushed, the distance setting
decreases by one bar (shorter).
If there is no vehicle ahead, the vehicle will
maintain the set speed. If a slower moving vehicle
is detected in the same lane, the instrument
cluster display will show the ACC Set With Target
Detected Indicator Light, and the system will adjust
the vehicle speed automatically to maintain the
distance setting, regardless of the set speed.
The vehicle will then maintain the set distance
until:
The vehicle ahead accelerates to a speed above
the set speed.
The vehicle ahead moves out of your lane or
view of the sensor.
The distance setting is changed.
The system disengages Ú page 144.
The maximum braking applied by ACC is limited;
however, the driver can always apply the brakes
manually, if necessary.
NOTE:The brake lights will illuminate whenever the ACC
system applies the brakes. A Proximity Warning will alert the driver if ACC
predicts that its maximum braking level is not
sufficient to maintain the set distance. If this
occurs, a visual alert “BRAKE!” will flash in the
instrument cluster display and a chime will sound
while ACC continues to apply its maximum braking
capacity.
NOTE:The “BRAKE!” screen in the instrument cluster
display is a warning for the driver to take action
and does not necessarily mean that the Forward
Collision Warning system is applying the brakes
autonomously.
Overtake Aid
When driving with Adaptive Cruise Control (ACC)
engaged and following a vehicle, the system will
provide an additional acceleration up to the ACC
set speed to assist in passing the vehicle. This
additional acceleration is triggered when the driver
utilizes the left turn signal and will only be active
when passing on the left hand side.
ACC Operation At Stop
If the ACC system brings your vehicle to a standstill
while following a vehicle ahead, your vehicle will
resume motion, without any driver interaction, if
the vehicle ahead starts moving within two
seconds of your vehicle coming to a standstill.If the vehicle in front does not start moving within
two seconds of your vehicle coming to a standstill,
the driver will either have to push the RES (resume)
button, or apply the accelerator pedal to reengage
the ACC to the existing set speed.
NOTE:
If your vehicle is at a standstill for longer than
two seconds, the system will hold brake pres
-
sure for up to 10 minutes. If no driver action is
taken after the 10 minutes, the Electric Park
Brake will be applied and the ACC system will
cancel.
While ACC is holding your vehicle at a standstill
(or the vehicle is traveling below 3 mph
(5 km/h), and the driver seat belt is unbuckled
or the driver door is opened, the Electric Park
Brake will be applied and the ACC system will
cancel.
WARNING!
When the ACC system is resumed, the driver
must ensure that there are no pedestrians,
vehicles or objects in the path of the vehicle.
Failure to follow these warnings can result in a
collision and death or serious personal injury.
4
23_WL_OM_EN_USC_t.book Page 147
Page 158 of 424
156STARTING AND OPERATING
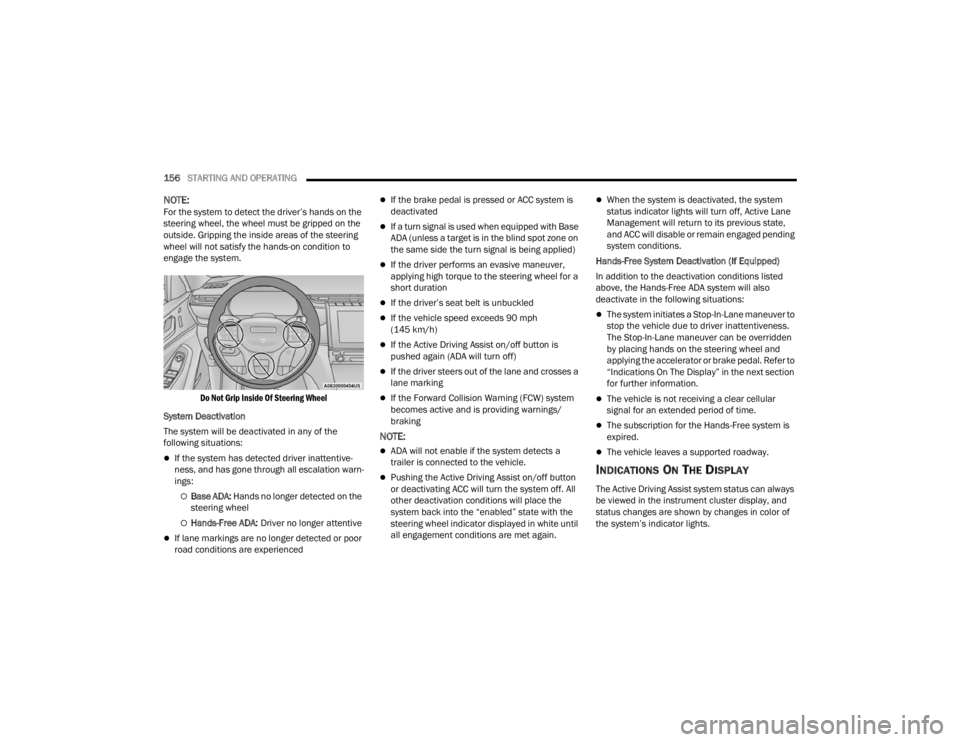
NOTE:For the system to detect the driver’s hands on the
steering wheel, the wheel must be gripped on the
outside. Gripping the inside areas of the steering
wheel will not satisfy the hands-on condition to
engage the system.
Do Not Grip Inside Of Steering Wheel
System Deactivation
The system will be deactivated in any of the
following situations:
If the system has detected driver inattentive -
ness, and has gone through all escalation warn -
ings:
Base ADA: Hands no longer detected on the
steering wheel
Hands-Free ADA: Driver no longer attentive
If lane markings are no longer detected or poor
road conditions are experienced
If the brake pedal is pressed or ACC system is
deactivated
If a turn signal is used when equipped with Base
ADA (unless a target is in the blind spot zone on
the same side the turn signal is being applied)
If the driver performs an evasive maneuver,
applying high torque to the steering wheel for a
short duration
If the driver’s seat belt is unbuckled
If the vehicle speed exceeds 90 mph
(145 km/h)
If the Active Driving Assist on/off button is
pushed again (ADA will turn off)
If the driver steers out of the lane and crosses a
lane marking
If the Forward Collision Warning (FCW) system
becomes active and is providing warnings/
braking
NOTE:
ADA will not enable if the system detects a
trailer is connected to the vehicle.
Pushing the Active Driving Assist on/off button
or deactivating ACC will turn the system off. All
other deactivation conditions will place the
system back into the “enabled” state with the
steering wheel indicator displayed in white until
all engagement conditions are met again.
When the system is deactivated, the system
status indicator lights will turn off, Active Lane
Management will return to its previous state,
and ACC will disable or remain engaged pending
system conditions.
Hands-Free System Deactivation (If Equipped)
In addition to the deactivation conditions listed
above, the Hands-Free ADA system will also
deactivate in the following situations:
The system initiates a Stop-In-Lane maneuver to
stop the vehicle due to driver inattentiveness.
The Stop-In-Lane maneuver can be overridden
by placing hands on the steering wheel and
applying the accelerator or brake pedal. Refer to
“Indications On The Display” in the next section
for further information.
The vehicle is not receiving a clear cellular
signal for an extended period of time.
The subscription for the Hands-Free system is
expired.
The vehicle leaves a supported roadway.
INDICATIONS ON THE DISPLAY
The Active Driving Assist system status can always
be viewed in the instrument cluster display, and
status changes are shown by changes in color of
the system’s indicator lights.
23_WL_OM_EN_USC_t.book Page 156
Page 179 of 424
STARTING AND OPERATING177
Cleaning The TrailCam
Press and hold the Clean Camera button located
on the TrailCam view to wash the TrailCam. Washer
fluid will stop when the button is released. The
camera can be washed up to 20 seconds at a time
while holding the button.
NOTE:
Pressing the Clean Camera button will also
wash the Night Vision camera (if equipped).
If the front window washer feature is activated,
all of the front cameras on the vehicle will be
washed as well. The front camera washers will
not operate when the low washer fluid warning
is displayed.
When enabled, active dynamic tire lines are
projected on the ground plane of the TrailCam view
based on the steering wheel position.
FAMCAM SYSTEM — IF EQUIPPED
The FamCam system consists of an interior
monitoring camera mounted on the headliner that
allows the driver to view cargo/passengers in the
rear interior of the vehicle through the Uconnect
screen. To activate the feature, press the
FamCam button in the Controls tab of the
Vehicle menu. The FamCam feature can
also be accessed from the App Drawer, or
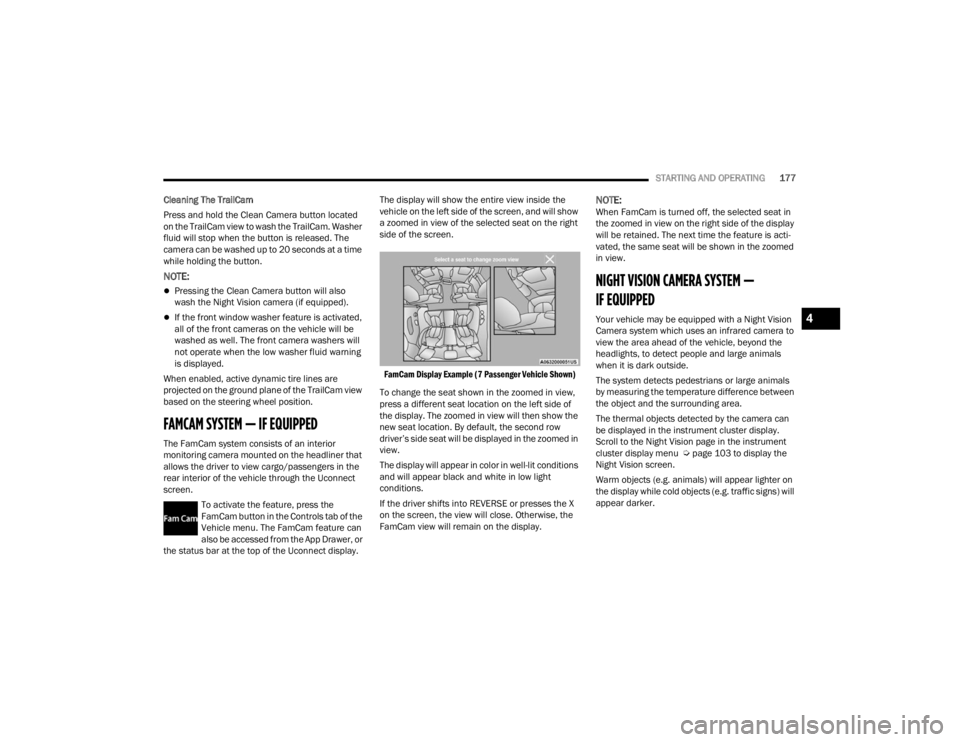
the status bar at the top of the Uconnect display. The display will show the entire view inside the
vehicle on the left side of the screen, and will show
a zoomed in view of the selected seat on the right
side of the screen.
FamCam Display Example (7 Passenger Vehicle Shown)
To change the seat shown in the zoomed in view,
press a different seat location on the left side of
the display. The zoomed in view will then show the
new seat location. By default, the second row
driver’s side seat will be displayed in the zoomed in
view.
The display will appear in color in well-lit conditions
and will appear black and white in low light
conditions.
If the driver shifts into REVERSE or presses the X
on the screen, the view will close. Otherwise, the
FamCam view will remain on the display.
NOTE:When FamCam is turned off, the selected seat in
the zoomed in view on the right side of the display
will be retained. The next time the feature is acti -
vated, the same seat will be shown in the zoomed
in view.
NIGHT VISION CAMERA SYSTEM —
IF EQUIPPED
Your vehicle may be equipped with a Night Vision
Camera system which uses an infrared camera to
view the area ahead of the vehicle, beyond the
headlights, to detect people and large animals
when it is dark outside.
The system detects pedestrians or large animals
by measuring the temperature difference between
the object and the surrounding area.
The thermal objects detected by the camera can
be displayed in the instrument cluster display.
Scroll to the Night Vision page in the instrument
cluster display menu Ú page 103 to display the
Night Vision screen.
Warm objects (e.g. animals) will appear lighter on
the display while cold objects (e.g. traffic signs) will
appear darker.4
23_WL_OM_EN_USC_t.book Page 177
Page 199 of 424
STARTING AND OPERATING197
Shifting Into Transfer Case N (NEUTRAL)
Use the following procedure to prepare your
vehicle for recreational towing:
1. Bring the vehicle to a complete stop on level
ground, with the engine running.
2. Press and hold the brake pedal.
3. Shift the transmission into NEUTRAL. 4. If vehicle is equipped with Quadra-Lift air
suspension, ensure the vehicle is set to
Normal Ride Height with the Auto Entry/Exit
setting deselected.
NOTE:
Steps 1 through 4 are requirements that
must be met before pushing the N
(NEUTRAL) button, and must continue to be
met until the shift has been completed. If
any of these requirements are not met
before pushing the N (NEUTRAL) button or
are no longer met during the shift, then the
N (NEUTRAL) indicator light will flash contin -
uously until all requirements are met or until
the N (NEUTRAL) button is released.
The ignition must be in the ON/RUN position
for a shift to take place and for the position
indicator lights to be operable. If the ignition
is not in the ON/RUN position, the shift will
not take place and no position indicator
lights will be on or flashing.
A flashing N (NEUTRAL) position indicator
light indicates that shift requirements have
not been met.
CAUTION!
DO NOT dolly tow any 4WD vehicle. Towing
with only one set of wheels on the ground
(front or rear) will cause severe transmission
and/or transfer case damage. Tow with all
four wheels either ON the ground, or OFF the
ground (using a vehicle trailer).
Tow only in a forward direction. Towing this
vehicle backwards can cause severe damage
to the transfer case.
The transmission must be in PARK for recre -
ational towing.
Before recreational towing, perform the proce -
dure outlined under “Shifting into N
(NEUTRAL)” to be certain that the transfer
case is fully in N (NEUTRAL). Otherwise,
internal damage will result.
Towing this vehicle in violation of the above
requirements can cause severe transmission
and/or transfer case damage. Damage from
improper towing is not covered under the New
Vehicle Limited Warranty.
Do not use a bumper-mounted clamp-on tow
bar on your vehicle. The bumper face bar will
be damaged.
WARNING!
You or others could be injured or killed if you
leave the vehicle unattended with the transfer
case in the N (NEUTRAL) position without first
fully engaging the Electric Park Brake. The
transfer case N (NEUTRAL) position disengages
both the front and rear driveshafts from the
powertrain and will allow the vehicle to roll, even
if the transmission is in PARK. The Electric Park
Brake should always be applied when the driver
is not in the vehicle.
CAUTION!
It is necessary to follow these steps to be certain
that the transfer case is fully in N (NEUTRAL)
before recreational towing to prevent damage to
internal parts.
4
23_WL_OM_EN_USC_t.book Page 197